GN-BR33V-RH - Router GIGABYTE - Free user manual and instructions
Find the device manual for free GN-BR33V-RH GIGABYTE in PDF.

| Product Type | Wireless Router |
| Wireless Standard | IEEE 802.11b/g |
| Frequency Band | 2.4 GHz |
| Data Transfer Rate | Up to 54 Mbps |
| WAN Port | 1 x 10/100 Mbps Ethernet (RJ-45) |
| LAN Ports | 4 x 10/100 Mbps Ethernet (RJ-45) |
| Antenna | 1 x External detachable antenna |
| Security | WEP 64/128-bit, WPA, WPA2 |
| Firewall | NAT, SPI, MAC address filtering |
| Management | Web-based GUI (HTTP) |
| LED Indicators | Power, WAN, LAN (4), Wireless |
| Power Supply | 5V DC, 1A |
| Dimensions (W x D x H) | 150 x 100 x 30 mm |
| Weight | 200 g |
| Operating Temperature | 0°C to 40°C |
| Storage Temperature | -20°C to 70°C |
| Humidity | 10% to 90% non-condensing |
| Certifications | FCC, CE |
| Maintenance | Clean with dry cloth; avoid liquids and direct sunlight |
| Spare Parts | Power adapter, antenna (compatible with RP-SMA) |
| Repairability | Not user-serviceable; contact support for repair |
Frequently Asked Questions - GN-BR33V-RH GIGABYTE
User questions about GN-BR33V-RH GIGABYTE
0 question about this device. Answer the ones you know or ask your own.
Ask a new question about this device
Download the instructions for your Router in PDF format for free! Find your manual GN-BR33V-RH - GIGABYTE and take your electronic device back in hand. On this page are published all the documents necessary for the use of your device. GN-BR33V-RH by GIGABYTE.
USER MANUAL GN-BR33V-RH GIGABYTE
Please read the entire instruction manual before using the product and save it for future reference. We reserve the right for any errors in text or images and any necessary changes made to technical data. If you have any questions regarding technical problems please contact Customer Services.
1. Product description
- Wireless Router, 300 Mbps. Pre-N-technology. Backwards compatibility with IEEE802.11b/g.
• Supports IEEE 802.11n specifications.
• High-speed wireless transfer rate, up to 300 Mbps - 64/128-bit WEP encryption, 802.1x, WPA and WPA2.
- Supports dynamic and static routing. Up to 252 users can share the same ADSL/cable modem connection.
- DHCP server for assigning IP addresses.
• Built-in firewall. Packet and protocol filtering. NAT and DHCP. - Auto MDI/MDI-X (detects and automatically adjusts for straight or crossover cables).
- Integrated 4-port 10/100 Mbit switch for TP computer connections.
- Supports redirection (virtual server with port mapping) and DMZ.
- Comes with mains adaptor, cables and comprehensive instruction manual.
1.1 Contents
• GN-BR33V-RH wireless router
- Mains adaptor (5 V DC, 2 A)
- Instruction manual
- Mains lead
• CD with complete instruction manual
2. Buttons and functions
2.1 Buttons and connections
The connections are located on the back of the router. From left to right:
| -+ | Mains adaptor socket (5 V, centre pin positive). |
| WAN | Socket for DSL/cable modem or Internet connection. |
| LAN (1-4) | Sockets for network cables for 1-4 networked computers. |
| USB | USB 2.0 port for connecting a USB device such as external hard drive or USB memory (with FAT32 or EXT3 formatting). |
| RF/WPS | Enable/disable WPS (Wi-Fi Protected Setup).A). Press once briefly to enable/disable WPS (Wi-Fi Protected Setup).B). Press and hold in for 4 seconds to turn on/off the wireless network (WLAN). |
| INIT | Reset button (on bottom of router).Use a paper clip or similar to push in and restart and reset the router's default factory settings.See section 5.3 Resetting. |
2.2 LED Indicators

natural_image
Simple line drawing of a rectangular object with vertical lines and a shaded base (no text or symbols)The LEDs on the front of the router indicate the status of various features. From left to right:
| LAN 1-4 Constant green light:Router is in contact with a network10/100 Mbps.Flashing green light:Data is being transferred via the LAN port. |
| WAN Constant green light:Router is in contact with a DSL or cable modem.Flashing green light:Data is being transferred via the WAN port. |
| WLAN/WPS Constant green light:Network is active but no data is being transferred.Flashing green light:Wireless data transfer.Flashing red:WPS function enabled.N.B.When the red light is flashing the green light is also illuminated, which might be difficult to see. (If you hold in the RF/WPS button for more than 4 seconds, the router will disable the WPS function.) |
| PWR Lights when the adaptor is connected and is functioning.Not lit when the mains adaptor is disconnected. |
3. Installation
N.B.
• Using 300 Mbps products from the same manufacturer gives the best results.
- The first time the router is used it is simplest to connect it to a computer via a network cable, thus avoiding possible configuration problems associated with wireless connections.
3.1 Modem and computer connections
- Turn off all devices (including the router) to be connected before beginning installation.
- Connect a network cable between the xDSL/cable modem and the WAN port (WAN) on the router.
- Connect a network cable between the computer network card and one of the LAN ports on the router.
- Plug the DC connector on the mains adaptor into the router's DC socket (5 V DC) and then plug the adaptor into an available wall socket.
- Turn on the xDSL/cable modem.
- When starting up, the router will conduct a power-on self-test which lasts about 5 seconds.
- The green LEDs for PWR, LAN and WAN should all come on.
- Restart all computers connected to the router via network cable. Angle the aerial on the router so it is pointing straight up if you wish to use a wireless connection.
4. Configuration
These are only brief instructions to help you get started. A complete user manual can be found on the supplied CD.
N.B.
- The configuration instructions in this section require the computer to be connected to the router via network cable.
• These instructions only apply to Windows XP/Vista.
4.1 Checking the broadband connection
Check with your broadband provider regarding your type of Internet connection. Different Internet providers use different connection methods for connecting to the Internet. The most common connection methods are:
A. PPPoE
PPPoE
Automatically assigns IP addresses via PPPoE. Enter the username and password received from your ISP.
B. Dynamic IP Internet Connection
Automatically assigns IP addresses from a DHCP server. No user information is required.
C. Static IP Internet Connection
Enter the details you have from your ISP.
Select “Internet Connection Type” or “WAN Type Select” (depending on configuration method) in the router menu.
4.2 Checking possible firewalls
Ensure that all computers connected to the router do not have a firewall programme enabled, e.g. Internet Security or Zone Alarm.
4.3 Checking the computer's settings
Check that the computer is set to automatically receive an IP address and that the computer has received a correct IP address from the router.
1a) In Windows XP: Click on Start and select Run....
1b) In Windows Vista and Windows 7: Click on the Windows icon, enter Cmd in the search window and press [Enter].
2. Type Cmd and then click on OK.
3. Type ipconfig and check that the computer has received the correct IP address (in this case 192.168.1.4) and gateway (in this case 192.168.1.254).
If the computer is not assigned an IP address, refer to the Troubleshooting guide.

4.4 Opening the router configuration menu
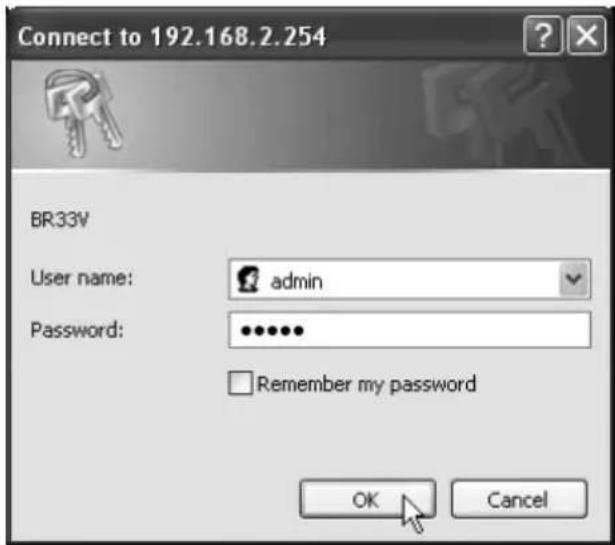
Enter the router's IP address (192.168.1.254) in the address field of your web browser (e.g. Internet Explorer) and press [Enter] to connect to the wireless router.
N.B. If you are using a modem with a built-in router, GN-BR33V-RH will change IP address automatically to avoid conflicts on the network (e.g. 192.168.2.254).
- When the login box appears, enter your User name and Password.
The default user name is "admin" and the default password is "admin".
The password and username can be changed by clicking on the "Management Tool" tab in the router's menu.
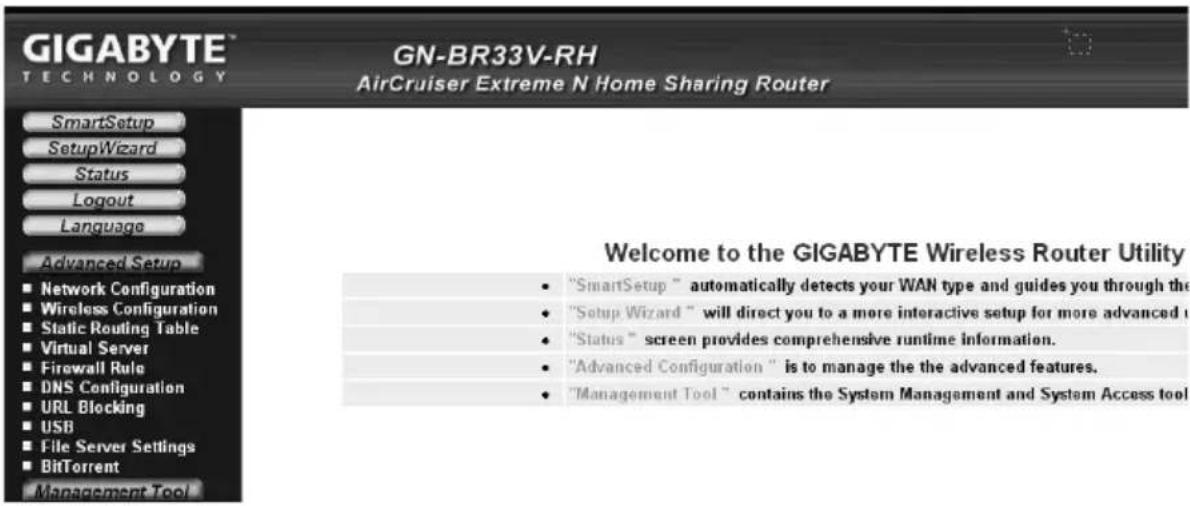
- The router menu opens. Select desired submenu.
| Smart Setup Automatic configuration (only with an Internet connection via a WAN-port). | |
| Setup Wizard Manual configuration. | |
| Status Shows current status of LAN and WAN. | |
| Advanced configuration | Manual setup for network, wireless connection, firewall, etc. |
| Management Tool Setup and programs for the router such as password changing, router firmware upgrades, etc. | |
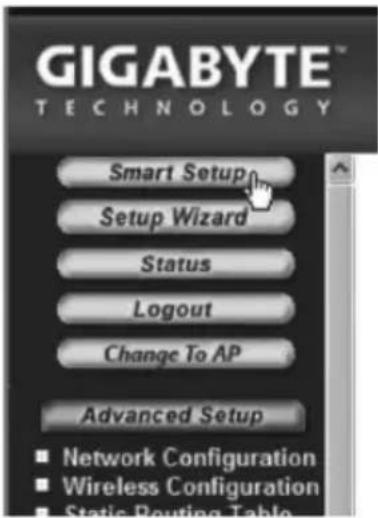
4.5 Smart Setup (automatic configuration) (recommended)
This type of configuration is recommended if the Internet connection is via a WAN port. "Smart Setup" identifies which type of connection you have.
- Click on Smart Setup for automatic configuration.
- The router will attempt to identify and configure your Internet connection.
- When the router has configured your connection the router will restart.
- Select if/how you wish to configure the router manually:
- Click on Logout when you wish to finish and exit the router menu.
4.6 Manual configuration
Setup Wizard
Check with your Internet provider regarding your type of Internet connection. Different Internet providers use different connection methods for connecting to the Internet.
The most common connection methods are:
A) PPPoE
Automatically assigns IP addresses via PPPoE. Use the username and password received from your Internet provider.
B) Dynamic
Automatically assigns IP addresses from a DHCP server. No user information is required.
C) Static
Enter the details you have from your ISP.
- Click on Network Configuration and then WAN Configuration.
- Click on Edit on the top row.
- Select type of connection according to the information received from your Internet provider and click on Next.
- Enter the desired name for the connection under "ISP Name". If the gateway and DNS addresses need to be changed enter them at this stage. Click on Finish.
- Select the connection created in step 4 as the primary connection (Main Session).
- If you have created more than one connection you can select a secondary connection at this stage if you are unable to connect with your primary connection.
- Click on Submit to save settings and finish.
N.B.
- Some Internet providers require the modem to be turned off for 30–60 minutes after inputting the router settings for the connection to work.
- Check that no firewall program is installed on your computer. If there is one, disable it or reconfigure it for the internal network. GN-BR33V-RH has its own built-in firewall.
4.7 Checking the router's connection
The router's status and settings can be changed at any time by clicking on Status in the menu.

| LAN IP 1 Address | Display's the router's internal IP address. |
| WAN IP Address | Display's the router's external IP address. If “Unavailable” is displayed the router has failed to make an Internet connection.Refer to “Troubleshooting”. |
4.8 Activating/deactivating the wireless network
- Press and hold in the WPS button on the back of the router for approx. 5 seconds to turn the wireless network on/off.
- The "WLAN" indicator displays the status of the wireless network:
Lit (green) – wireless network is enabled
Off – wireless network is turned off
Flashing red – WPS is enabled
N.B. You can turn off/disable or activate/enable the WPS by going to the "Wireless Configuration/WPS" tab in the menu and confirming by clicking on Save Setting.
4.9 Wireless network security
The router supports the following types of wireless network encryption (Authentication Type):
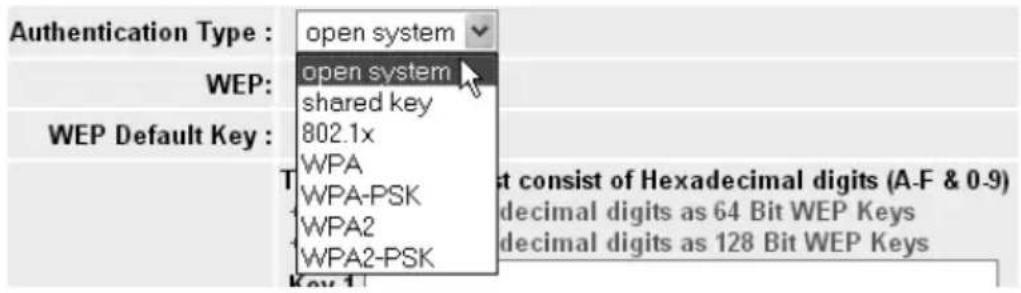
| Open system No encryption, the network is “open”. | |
| Shared key (WEP)(Wired Equivalent Privacy) | Consists of a security key that needs to be Entered into both router and connected computers. When “Shared key” is enabled WEP cannot be disabled. |
| WPA (WiFi Protected Access) | Enables the user to authenticate himself/herself using a RADIUS server. |
| WPA-PSK (WiFi Protected Access & Pre-shared key) | Consists of a password chosen by the user that needs to be entered into both router and connected computers. |
| WPA2-PSK A development of WPA-PSK (at present only compatible with Vista/Windows 7). | |
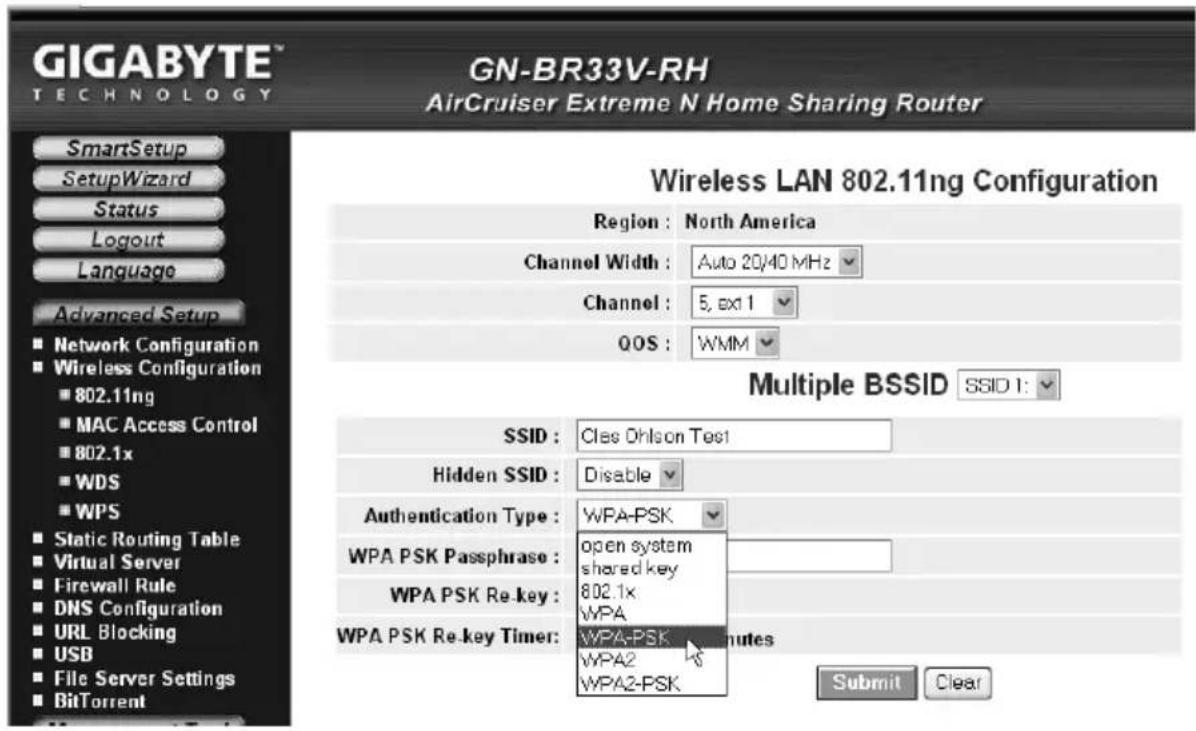
4.9.1 Configuring WPA-PSK encryption
Recommended for home networks.
- Click on Wireless Configuration in the menu and then on 802.11ng.
- Enter the desired name for the wireless network under "SSID". SSID is the name the network transmits to computers searching for a connection to the wireless network.

- Select WPA-PSK encryption (Authentication Type) ^* .
(WEP is an older, less secure form of encryption that is not recommended).
-
Enter a passphrase of between 8 and 63 characters long under WPA PSK Passphrase. Use only accepted symbols. Longer pass phrases give a higher degree of safety. GIGABYTE is the default passphrase, this can be changed.
-
Configure optional settings:
| WPA-PSK Re-key Enable or disable this function which requires that the passphrase must be re-entered. This function is normally disabled. | |
| WPA-PSK Re-key Timer | This specifies a time window (in minutes) in which a WPA passphrase needs to be Re-keyed. |
-
Click on Submit to save your settings.
-
The router will restart with the new settings.
N.B.
When you have configured network encryption and saved your settings all connected users will be disconnected. They must reconnect to the wireless network and enter the same passphrase entered for the router.
* If you want to use use WPA2-PSK this must be entered at step 3.
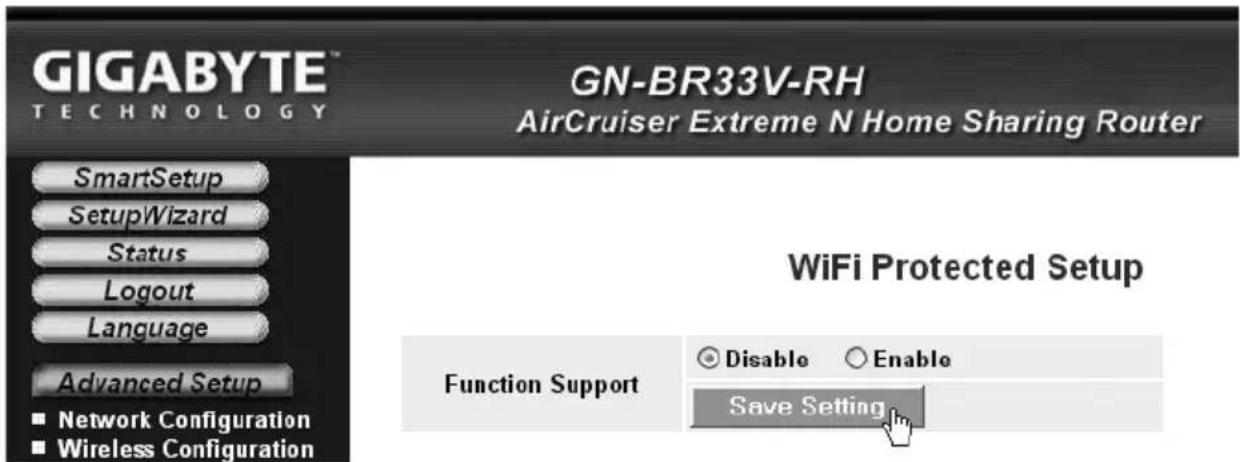
4.10. WPS (Wi-Fi Protected Setup)
WPS (Wi-Fi Protected Setup) is used mostly to connect other wireless devices which support WPS.
When connecting with WPS the router automatically configures the security settings in the network for the router and the connected wireless devices. See the complete instruction manual for further information.
N.B. You can disable or enable the WPS by going to the "Wireless Configuration/WPS" tab in the menu and confirming by clicking on Save Setting (it can also be disabled/enabled using the RF/WPS button).
WiFi Protected Setup

5. Troubleshooting
| Fel Possible | causes Possible solution | |
| I am having trouble con necting to the router. | The router is not connected to the adaptor. | Check that the “PWR” lamp is lit, if not check the adaptor and wall socket. |
| No network connection. | Check that you have a physical or wireless connection between the PC and router; one or several LAN indicators should be lit. The network card's LED will also indicate if the connection is working. | |
| The computer used lies in a dif-ferent IP address series than the router. | The IPCONFIG tool used in the command prompt displays your settings: Type ipconfig and press [Enter]. The computer's network settings e.g. IP address and net mask will be shown. | |
| Other firewalls or anti-virus programs with firewalls are blocking the con- nection. | Standard-gateway is the router's IP address. The three first groups in the IP address (192.168.1.x) should be the same for the router and connected devices. The last group (x) is a network serial number and should be different on all devices. | |
| Check that no firewall programme is installed. If present, deactivate or configure it for the internal network. This router has a built-in firewall. | ||
| I cannot connect to other devices on the network: | The computer's IP settings are incorrectly configured. | Every computer should have a unique IP address, check e.g. with the command IPCONFIG. See the Checking the configuration section about how to check and update the configuration.Normally, Obtain an IP address automatically should be chosen (if you want to use the router's DHCP function).Note! Any changes may require a restart for them to take effect. |
| The network cables are incorrectly connected. | Try connecting using another network cable. | |
| I can connect to the router but not to the Internet: | The modem or ADSL unit does not work. | Some Internet providers require the modem to be turned off for 30–60 minutes after inputting the router settings for the connection to work.Check that no firewall programme is installed. If present, deactivate or configure it for the internal network.This router has a built-in firewall. |
| Cable error between the WAN port on the router and the modem or ADSL unit. | Check the cable connections. | |
| Wrong type of connection is used during Setup (PPPoE, Dynamic or Static). | Check the settings for your type of connection. | |
| Username and password for the Internet provider is possibly wrong. | Enter the correct username and password. Differentiate between capital letters and lower-case letters. | |
| Always read through the instructions and rules received from your Internet provider. There may be certain restrictions regarding the sharing of a connection. |
5.1 Troubleshooting for Windows XP
TCP/IP
- Go to Start/Control panel and select Network connections. Right-click on the network card connection you wish to configure and select Properties.
- Select the TCP/IP protocol associated with the network card and choose Properties.
- Check that Obtain an IP address automatically and Obtain DNS server address automatically are chosen.
- Click on OK.
Disable http-proxy
Make sure that the computer is not configured for a proxy server.
- Open Internet Explorer and click on Tools and then select Internet options.
- Select Connections and then LAN settings. Then remove all selections.
- Press OK to close the windows.
Checking the configuration
You can check that the computer has a correct IP address by:
Checking that the computer is set to automatically receive an IP address and that the computer has received a correct IP address from the router.
- Windows XP: Click on Start and select Run....
Windows Vista: Click on the Windows icon, enter Cmd in the search window and press [Enter]. - Type Cmd and then click on OK.
- Type ipconfig and check that the computer receives a correct IP address (in this case 192.168.1.4) and gateway (192.168.1.254).
- If the computer has received a correct IP address according to the figure below, no further settings will be required. Type exit and press [Enter] to return to Windows.
Updating the configuration
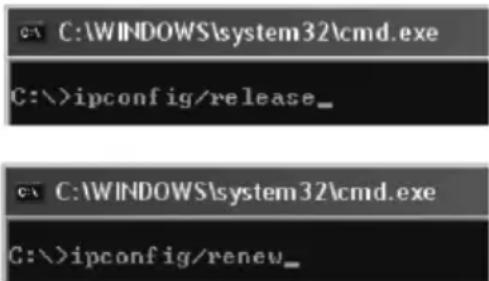
If the computer still has an old or incorrect IP address it can be renewed to receive a correct IP address. Proceed as follows:
-
Open Programs/Accessories/Command Prompt type ipconfig/release and press [Enter].
-
Type ipconfig/renew and press [Enter]. You should now be assigned a new IP address.
-
Type exit and press [Enter] to return to Windows.
5.2 The PING function
The PING function controls which devices/computers are connected to the network. The PING command is used at the command prompt*.
- Type ping at the prompt, press [space] and enter the IP address or the computer you want to "ping" and press [Enter].
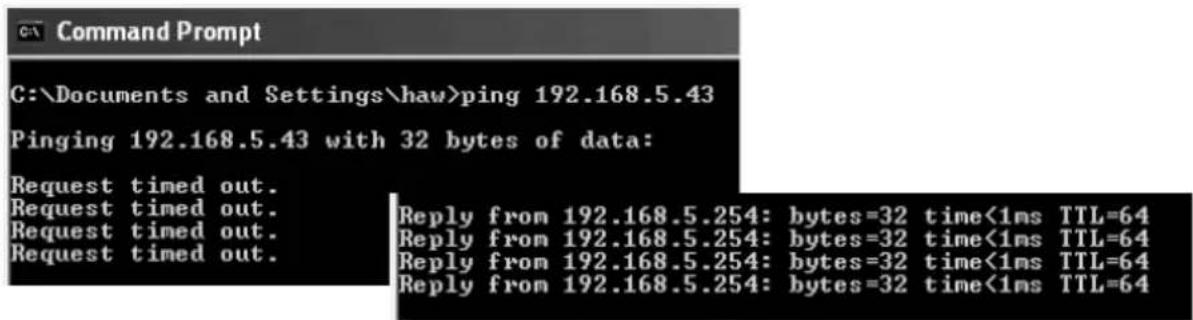
- "Request timed out" appears when the connection does not work (either because the pinged computer is not turned on or correctly connected).
"Reply from..." appears when the connection works and the pinged computer is on.
A working connection should look like this: In this case the computer is connected to a device with an IP address: 192.168.5.254.
* The PING tool can also be found in the router menu under the "Ping" tab.

5.3 Resetting
If you wish to start over from the beginning and return to default settings:
Alt. 1:
The reset button (INIT) on the bottom of the router resets it to the default factory settings. Procedure:
- Switch the router on. Use a paper clip or similar and press [INIT] for 5–6 seconds until the orange "PWR" light comes on. The router should now restart with default settings.
Alt. 2:
- Click on Initialization in the menu and then on Initialize Router. The router should now restart with default settings.
N.B. All personal settings will be erased when doing a reset!
6. Care and maintenance
Always unplug the adaptor from the wall socket before cleaning. Wipe with a soft, lightly moistened cloth. Do not use cleaning solutions or solvents.
7. Disposal
Follow local ordinances when disposing of this product.
If you are unsure of how to dispose of this product, please contact your local authority.
8. Specifications
General Specifications
| Complies with the following standards | IEEE802.3 (10Base-T), IEEE802.3u (100Base-TX) IEEE802.11b/g/n (Wireless) |
| Ports LAN: 10/100 Ethernet (auto-MDIX), RJ45 (4x) WAN: 10/100 Ethernet, RJ45 (1x). | |
| Routing protocol Dynamic, Static Routing with TCP/IP, NAT, PPTP, PPPoE, VPN Pass-Through (IPSec, L2TP) DHCP (Client & Server). | |
| Security WPA, WPA2 (at present only compatible with Vista och Windows 7) Built-in firewall with SPI (Stateful Packet Inspection) 64/128-bit WEP encryption. 802.1x access control | |
| Pre-programmed IP address | 192.168.1.254 |
| Pre-programmed username | admin |
| Pre-programmed password | admin |
| Power supply 5 V DC, 2 A via included adaptor | |
| Size 216 x 136 x 26 mm | |
| Weight 238 g | |
Wireless specifications
| Frequency response | 2412–2484 MHz (according to local regulations) |
| Modulation type DSSS | (DBPSK, DQPSK, CCK) OFDM (BPSK, QPSK, 16-QAM, 64-QAM). |
| Bit rate(auto-fallback) | 802.11b – 1, 2, 5, 11 Mbps802.11g – 6, 9, 12, 18, 24, 36, 48, 54 Mbps802.11n – 81, 108, 121, 135, 162, 216, 243, 270, 300 Mbps |
| Output power Legacy-mode | - 20 dBm @11b, 17 dBm @11g;HT20-mode – 17 dBm @MCS7/15;HT40-mode – 17 dBm @MCS7/15; |
| Sensitivity Legacy-mode | - 90 dBm @11b, 74 dBm @11g;HT20-mode – 73 dBm @MCS7/15;HT40-mode – 68 dBm @MCS7/15; |
| Range Up to 100 metres (indoors) | |
| Aerials 2 x (not detachable) | |
| Certifications CE (Europe), FCC part 15 (USA) |
Operating environment
| Temperature range 0–55 °C (operating temperature) | |
| Humidity 10–85 % (non-condensing) |
Points worth bearing in mind!
- Other wireless equipment operating on the same frequency band may reduce the range of the product.
- The range of all wireless equipment is affected by obstacles between the transmitter and the receiver (a concrete wall reduces the signal far more than a plasterboard partition, for example).
If you are having problems with the operation of the system, try the following solutions
- Switch off any other wireless equipment to check whether it could be causing the problem.
- Move the wireless equipment and/or reduce the distance, and reduce the number of obstacles (walls, furniture, etc.) between the transmitter and the receiver.
Trådlös router
Art. nr 18-8143 Modell GN-BR33V-RH-UK
38-3727 GN-BR33V-RH
natural_image
Simple line drawing of a rectangular object with vertical black lines on top and bottom, no text or symbols present.C. Static IP Internet Connection (fast IP-adress)
4.5 Smart Setup (Automatisk konfiguration) (rekommenderas)
C) Static (fast IP-adress)
4.10. WPS (Wi-Fi Protected Setup)
WiFi Protected Setup

5. Felsökning
natural_image
Simple line drawing of a rectangular object with vertical black lines on its surface (no text or symbols)4.10. WPS (Wi-Fi Protected Setup)
WiFi Protected Setup

5. Feilsøking
| Feil Mulig årsak Mulig løsning | |
| Jeg har problemer med å koble til Routeren. | Produktet er ikke koblet til strømadapteren. |
| Ingen nettverks-tilkobling. | |
| Datamaskinen som du bruker har en IP-adres-se i en annen serie enn routeren. | |
| Andre brannmurer eller antivirusprogram med brannmurer blokkerer tilkoblingen. | |
5.3 Tilbakestilling (reset)
natural_image
Simple line drawing of a rectangular object with vertical black lines on its surface (no text or symbols)4.10. WPS (Wi-Fi Protected Setup)
WiFi Protected Setup

5. Vianetsintä
5.3 Tehdasasetusten palautus (Reset)
Declaration of Conformity
CE
Hereby, Clas Ohlson AB, declares this wireless Router,
18-8143 / 38-3727
GN-BR33V-RH
is in compliance with the essential requirements and other relevant provisions of Directive 1999/5/EC.
Article 3.1a (Safety): EN 60950-1
EMF/SAR 99/519/EC
Council Recommendation
Article 3.1b (EMC): EN 301489–1
EN 301489-17
Article 3.2 (Radio): EN 300328
CE 0984 ⚠
Insjön, Sweden, January 2011

Klas Balkow
President
Clas Ohlson, 793 85 Insjön, Sweden
Sverige
For consumer contact, please visit
www.clasohlson.co.uk and click on
customer service.
Internet www.clasohlson.co.uk