
GN-BR30N-RH - Router GIGABYTE - Free user manual and instructions
Find the device manual for free GN-BR30N-RH GIGABYTE in PDF.


| Product Type | Wireless Router |
| Model | GN-BR30N-RH |
| Brand | Gigabyte |
| Wireless Standard | IEEE 802.11b/g/n |
| Maximum Wireless Speed | 300 Mbps (2.4 GHz) |
| Frequency Band | 2.4 GHz |
| Number of Antennas | 2 external antennas |
| Ports | 1 x WAN (10/100 Mbps), 4 x LAN (10/100 Mbps) |
| Dimensions (W x D x H) | Approx. 17.0 x 11.5 x 3.5 cm |
| Weight | Approx. 220 g |
| Power Supply | DC 5V 1A (adapter included) |
| Security | WEP, WPA/WPA2-PSK, WPA2-Enterprise, MAC address filtering, SPI firewall |
| Main Functions | Wireless access point, router, DHCP server, NAT, QoS, port forwarding, VPN pass-through |
| LED Indicators | Power, WAN, LAN (1-4), WLAN, WPS |
| WPS Button | Yes |
| Reset Button | Yes (hold for 10 seconds to factory reset) |
| Configuration | Web-based interface (http://192.168.1.1) |
| Compliance | CE, FCC |
| Operating Temperature | 0°C to 40°C |
| Storage Temperature | -20°C to 70°C |
| Humidity | 10% to 90% (non-condensing) |
| Maintenance | Keep in ventilated area, clean with dry cloth, avoid liquids |
Frequently Asked Questions - GN-BR30N-RH GIGABYTE
User questions about GN-BR30N-RH GIGABYTE
0 question about this device. Answer the ones you know or ask your own.
Ask a new question about this device
Download the instructions for your Router in PDF format for free! Find your manual GN-BR30N-RH - GIGABYTE and take your electronic device back in hand. On this page are published all the documents necessary for the use of your device. GN-BR30N-RH by GIGABYTE.
USER MANUAL GN-BR30N-RH GIGABYTE
natural_image
White Gigabyte wireless router with two antennas and ventilation slots (no visible text or symbols on body)Art.no Model
18-8004 GN-BR30N-RH
38-2772 GN-BR30N-RH
Wireless Router
Art.no: 18-8004 Model: GN-BR30N-RH
38-2772 GN-BR30N-RH
Please read the entire instruction manual before using the product and save it for future reference. We apologise for any text or photographic errors and any changes of technical data.
If you have any questions concerning technical problems please contact our Customer Service Department (see address on reverse.)
1. Product Description
- High transfer rate: Up to 300 Mbps.
- Supports dynamic and static routing. Several users can share the same connection for ADSL/cable/modem, up to 252 users.
- Automatic DHCP – server shares on IP number.
- Built-in firewall.
1.1 The package contains
- GN-BR30N-RH Wireless router
- AC/DC adaptor
- Instruction Manual
- Network cable (Cat 5, length 1.8 m)
- Antennas (3x)
- CD
- Screws and plugs (wall attachment)
2. Buttons and Functions
2.1 Connectors

natural_image
Front view of a white wireless router with network ports and a WiFi antenna (no visible text or symbols)The connectors are placed on the back of the router. From left to right:
- Antenna attachment 3x for included antennas.
- LAN (1-4) – Connection for network cable to 1 – 4 computers in the network.
- WAN – Connection to ADSL-modem or network.
- INIT – Reset button. Use a paper clip or similar to push in and restart and reset the router's factory settings.
- 5V DC – Connection for AC/DC adaptor.
2.2 LED Display
PWR Lights up when the AC/DC adaptor is connected and works.
WLAN Blinks: Data is being transferred wirelessly.
WAN Lights up: The router is in contact with a xDSL modem. Blinks: Data is being transferred via the WAN port.
LAN 1-4 Lights up: The router is in contact with a network 10/100 Mbps Blinks: Data is being transferred via the LAN port.
3. Installation
- Turn off all devices (including the router) to be connected before starting the installation.
- Attach the included antennas on the three antenna connectors. Then point the antennas straight up.
- Connect a network cable between the xDSL/cable modem and the WAN port (WAN) on the router.
- Turn on the xDSL/cable modem.
- Connect the AC/DC adaptor to the router: First connect the DC plug to the outlet (DC) and then the AC/DC adaptor to a vacant wall socket, the green LED "PWR" lights up when the router is on.
- At the start the router will make a self-test which takes 5 seconds.
- Note! If any or several of the computers will be connected via network cable (and not use wireless transfer) a network cable is needed between one of the LAN ports (LAN 1, 2, 3, or 4) and the network card in the computer. Restart the computers that are connected to the router with the network cable.
- Configure the computer.
4. Configuration of GN-BR30N-RH
This is only a brief operator's manual to help you get started. A complete operator's manual in English is found on the supplied CD.
- Type in the router's IP number (192.168.1.254) in the address field of your web browser (e.g. Internet Explorer) and press ENTER to connect to the wireless router.
Note! If you are using an xDSL modem with a built-in router it can give GN-BR30N-RH a different IP number (e.g. 192.168.2.254).
-
When the login page appears you enter username and password. Log in using the user name admin and the password admin. This can eventually be changed in the router's menu.
-
Choose "Smart Setup" for automatic configuration (if you have an Internet connection via the WAN port) or "Setup Wizard" for manual configuration (if you create a network without Internet connection).

- Smart Setup identifies which type of connection you have. The computer will now restart.

- Click Status to show the current settings made under Smart Setup.

4.1 Manual configuration
Setup Wizard
Check with your Internet distributor regarding your type of connection to the Internet. Different Internet distributors use different connection types for connecting to the Internet. The most common connection types are:
- PPPoE
Automatically assignte IP address via PPPoE. You need to give the username and password you got from your Internet distributor.
- Dynamic
Automatically assigned IP address from a DHCP server. Nu user information is needed.
- Static (constant IP-address)
You need to give the information you received from your Internet distributor.
- Click on Network Configuration and then WAN Configuration.
- Click on Edit on the top row.

- Choose the type of connection you have according to the information from your Internet distributor and click on Next.

- If gateway and DNS addresses are changed this is given in the following steps. Type in possible information and then click on Finish.

5. Press OK to confirm to save the settings.

Note!
- Remember to turn off firewalls and anti virus programs with firewalls.
- Some Internet distributors require the modem to be unplugged for 30-60 minutes after the settings in the router have been made, otherwise the connection does not work.
5. Troubleshooting
Which information should be given in the router's settings?
Carefully read the information given by your Internet distributor.
I am having trouble connecting to the router.
Possible cause:
- The product is not connected to the AC/DC adaptor.
- No network connection.
- The computer you are using does not have a valid IP address.
- Other firewalls or anti-virus programs with firewalls are blocking the connection.
Possible solution:
- Check that the lamp POWER is lit, if not check the AC/DC adaptor and wall socket.
- Check that you have a physical or wireless connection between the PC and router; one or several LAN lights shall be lit. The LED on the network card also indicates if the connection works.
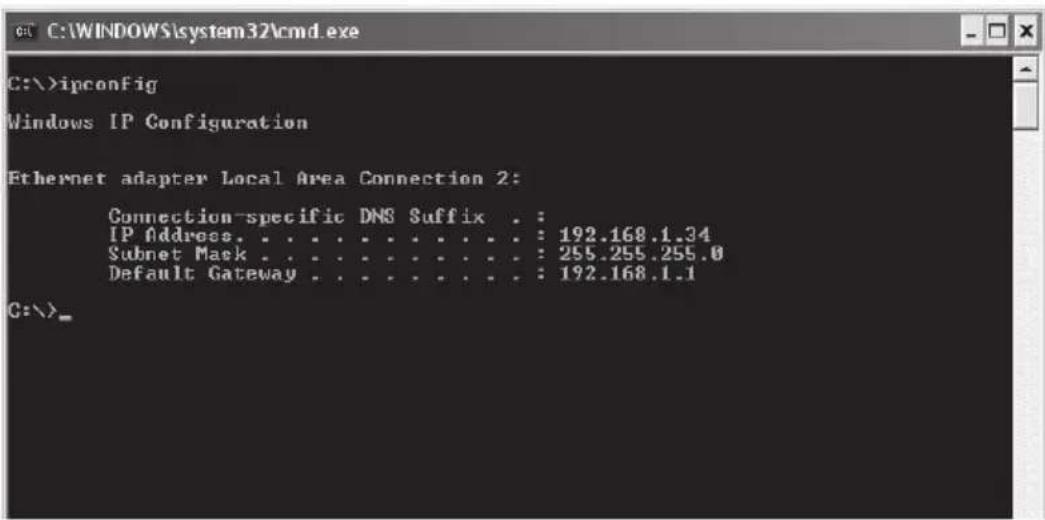
- The tool ipconfig which is used in the command prompt shows your settings. Type ipconfig and press ENTER, the computer's network settings e.g. IP address and net mask will be shown.
- Standard-gateway is the IP address to the router. The three first groups of the IP address (192.168.1.x) shall be the same for the router and other connected devices. The last group (x) is a serial number within the same net and should be different on all devices.
- Check that no software firewall is installed. Activate it or configure it for the internal network. This router has a built-in firewall.
I cannot connect to other devices on the network.
Possible cause:
- The computers' IP addresses are incorrectly set.
- The network cables are incorrectly connected.
- The network settings in Windows are wrong.
Possible solution:
- Every computer should have a unique IP address, check e.g. with the command ipconfig. See the chapter Check configuration about how you check and update the configuration.
- Normally should Obtain an IP address automatically be marked (if you want to use the router's DHCP function). Note! A change can require a restart to work.
I can connect to the router but not to the Internet connection.
Possible cause:
- The modem or ADSL unit does not work.
- Cable error between the WAN port on the router and the modem or ADSL unit.
- Wrong type of connection is used in Setup (PPPoE, Dynamic or Static).
- Possible username and password to the Internet distributor is wrong.
Possible solution:
- Check function and connections.
- Check the settings for your type of connection.
- Write the correct username and password. Differentiate between CAPITAL LETTERS and lower-case letters.
- Always read through instructions and rules from your Internet distributor, there may be rules regarding sharing the same connection.
5.1 Troubleshooting under Windows XP
TCP/IP
- Go to Start/Settings/Control panel and choose Network connections. Right-click on the connection to the network card you wish to configure and select Properties.
- Mark the TCP/IP protocol that is connected to the network card and choose Properties.
- Check that Obtain an IP address automatically and Obtain address to the DNS server automatically are marked.
- Click OK.
Deactivate http-proxy
Check that the computer is not configured for a proxy server.
- Open Internet Explorer and then click on Tools and the option Internet options.
- Choose Connections and then LAN settings. Then deselect all markings.
- Press OK to close the windows.
Check configuration
You can check that the computer has the correct IP address by:
-
Open Program/Accessories/Command prompt. Write ipconfig and press ENTER to show IP-address, net mask and Gateway.
-
If the computer has received the correct IP address according the figure below you don't have to do any more settings. Write exit and press ENTER to return to Windows.
Update configuration
If the computer still has an old or incorrect IP address it can be renewed to receive the correct IP address. Do the following:
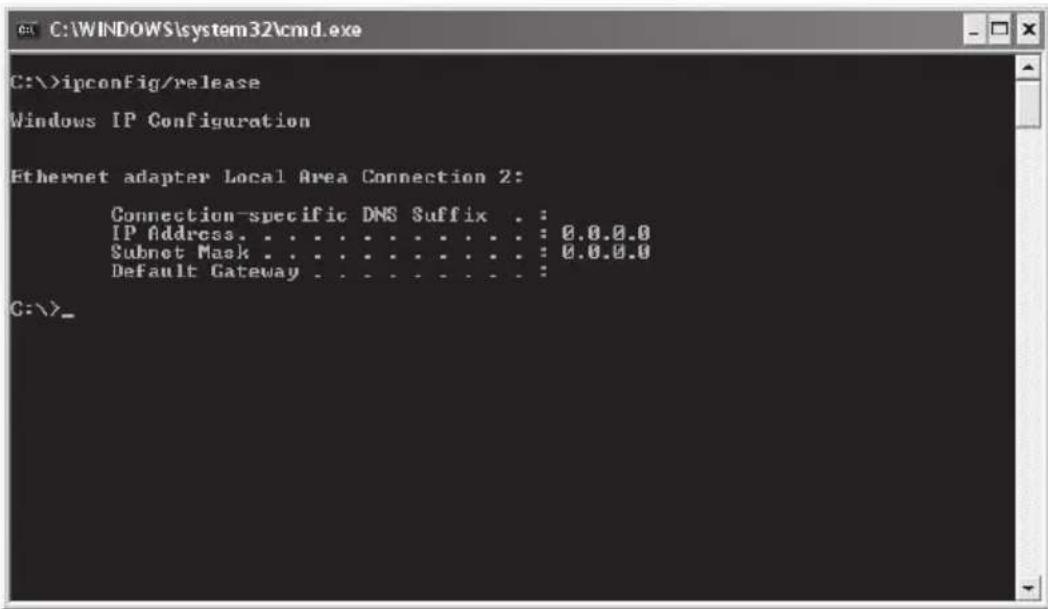
- Open Program/Accessories/Command prompt. Write ipconfig/release and press ENTER.
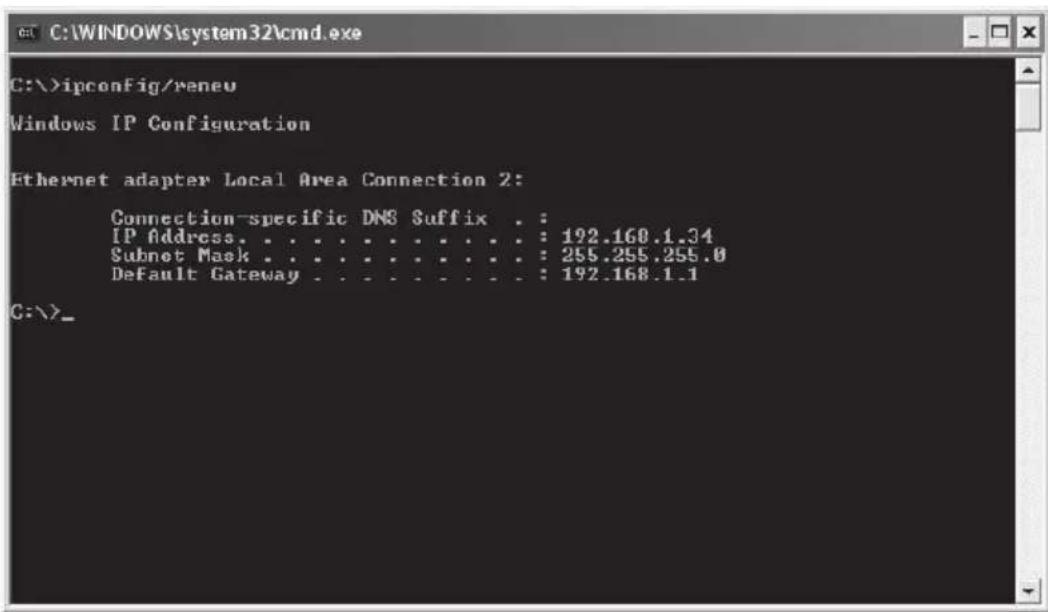
- Write ipconfig/renew and press ENTER.
Your IP address is displayed e.g. 192.168.1.2, Standard-gateway: 192.168.1.254 and Net mask: 255.255.255.0.
- Write exit and press ENTER to return to Windows.
5.2 The PING function
With the PING function you can control which devices/computers are connected to the network. The command PING is used in the command prompt.
-
Write the command ping at the prompt, press SPACE and enter the IP address or the computer name you want to ping and press ENTER.
-
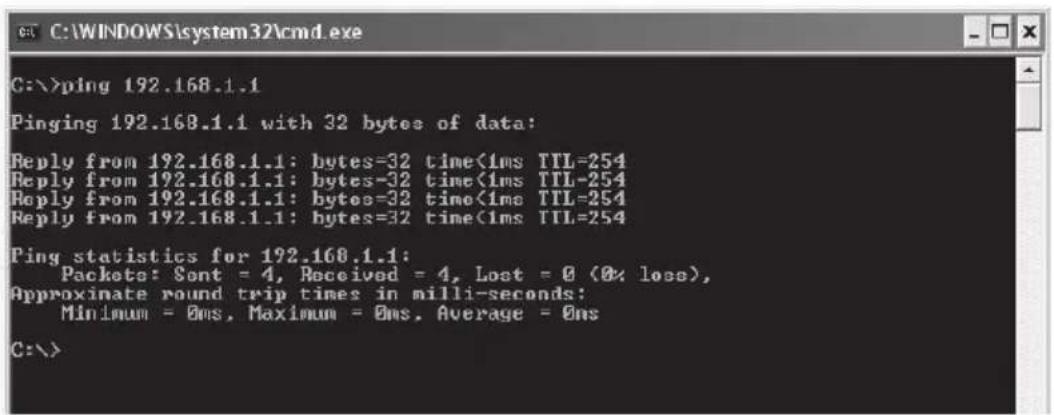
Reply from... shows that the connection works and the searched computer is turned on.
-
Request did timeout shows that the connection does not work (that the computer is not turned on or correctly connected).

- A working connection should look like this: Here is contact with the IP-address 192.168.1.1.
5.3 Reset
If you want to start over:
On the back there is a reset button (INIT) which resets the router to factory settings. Do as follows:
- The router should be on. Use a paper clip or similar and press INIT for 5-6 seconds until the POWER light is orange and then remove the paper clip. The router should now restart with the factory settings.
6. Care and Maintenance
Always unplug from the wall socket before cleaning. Wipe with a soft, lightly moistened cloth. Do not use cleaning solutions or solvents.
7. Disposal
Follow local ordinances when disposing this product. If you are unsure about the disposal of this product contact your municipality.
8. Specifications
General Specifications
Compatible with the
following standards: IEEE802.3 (10Base-T), IEEE802.3u (100Base-TX), IEEE802.11b/g/n (Wireless)
Ports: LAN: 10/100 Ethernet (auto-MDIX), RJ45 (4x)
WAN: 10/100 Ethernet, RJ45 (1x)
Routing protocol: Dynamic, Static Routing med TCP/IP, NAT, PPTP, PPPoE, VPN Pass-Through (IPSec, L2TP) DHCP (Client & Server)
Safety: WPA/WPA2
Integrated firewall with SPI (Stateful Packet Inspection)
64/128-bit WEP-encryption
802.1x access control
Reset: Yes, (INIT on the back side)
Power Supply: 5 V DC, 2 A via included AC/DC adaptor
Size: 140 x 178 x 43 mm
Weight: 320 g
Wireless specifications
Frequency range: 2412 \~ 2483 MHz (according to local regulations)
802.11g - 6, 9, 12, 18, 24, 36, 48, 54 Mbps
802.11n - 81, 108, 121, 135, 162, 216, 243, 270, 300 Mbps
Power Output: 18 dBm (within nominal temperature range)
Antenna: External (x 3)
Certifications: CE (Europe), FCC part (USA)
Operating environment
Temperature Range: 0 to 55 °C (use temperature)
Humidity: 10 \~ 85 % (non condensation)
Trådlös router
Art.nr: 18-8004 Modell: GN-BR30N-RH
38-2772 GN-BR30N-RH
natural_image
Front view of a white wireless router with network ports and a wireless antenna (no visible text or symbols)4.1 Manuell konfigurering
Setup Wizard
5. Felsökning
802.11g - 6, 9, 12, 18, 24, 36, 48, 54 Mbps
802.11n - 81, 108, 121, 135, 162, 216, 243, 270, 300 Mbps
natural_image
Front view of a white wireless router with antenna and ports (no visible text or symbols)802.11g - 6, 9, 12, 18, 24, 36, 48, 54 Mbps
802.11n - 81, 108, 121, 135, 162, 216, 243, 270, 300 Mbps
Uteffekt: 18 dBm innen nominelt temperaturområde
Antenne: Ekstern (x 3)
Godkjennelser: CE (Europa), FCC part (USA)
Bruksmiljø:
natural_image
Front view of a white wireless router with network ports and a WiFi antenna (no visible text or symbols on the device body)5. Vianetsintä
802.11g - 6, 9, 12, 18, 24, 36, 48, 54 Mbps
802.11n-81,108,121,135,162,216,243,270,300 Mbps
Declaration of Conformity
CE
Hereby, Clas Ohlson AB, declares that following product(s):
Wireless Router
38-2772 & 18-8004
GN-BR30N-RH
is in compliance with the essential requirements and other relevant provisions of Directive 1999/5/EC.
Article 3.1a (Safety): EN 60950-1
EMF/SAR 99/519/EC
Council Recommendation
Article 3.1b (EMC): EN 301489-1
EN 301489-17
Article 3.2 (Radio): EN 300328
CE 0678 Ⓞ
Insjön, Sweden, February 2008

Klas Balkow
President
Clas Ohlson, 793 85 Insjön, Sweden
SVERIGE
KUNDTJÄNST Tel: 0247/445 00
Fax: 0247/445 09
E-post: kundtjanst@clasohlson.se
INTERNET www.clasohlson.se
BREV Clas Ohlson AB, 793 85 INSJÖN
NORGE
KUNDESENTER Tlf.: 23 21 40 00
Faks: 23 21 40 80
E-post: kundesenter@clasohlson.no
INTERNETT www.clasohlson.no
POST Clas Ohlson AS, Postboks 485 Sentrum, 0105 OSLO
SUOMI
ASIAKASPALVELU Puh: 020 111 2222
Faksi: 020 111 2221
For consumer contact, please visit
www.clasohlson.co.uk and click on
customer service.
INTERNET www.clasohlson.co.uk

- Wireless Router
- Product Description
- The package contains
- Buttons and Functions
- Connectors
- LED Display
- Installation
- Configuration of GN-BR30N-RH
- Manual configuration
- Setup Wizard
- - PPPoE
- - Dynamic
- - Static (constant IP-address)
- Press OK to confirm to save the settings.
- Note!
- Troubleshooting
- I am having trouble connecting to the router.
- Possible cause:
- Possible solution:
- I cannot connect to other devices on the network.
- I can connect to the router but not to the Internet connection.
- Troubleshooting under Windows XP
- TCP/IP
- Deactivate http-proxy
- Check configuration
- Update configuration
- The PING function
- Reset
- Care and Maintenance
- Disposal
- Specifications
- General Specifications
- Compatible with the
- Wireless specifications
- Operating environment
- Trådlös router
- Art.nr: 18-8004 Modell: GN-BR30N-RH
- 38-2772 GN-BR30N-RH
- Manuell konfigurering
- Felsökning
- Bruksmiljø:
- Vianetsintä
- Declaration of Conformity
- CE
- SVERIGE
- NORGE
- SUOMI
Brand : GIGABYTE
Model : GN-BR30N-RH
Category : Router