NLT04 - Rangefinder Cocraft - Free user manual and instructions
Find the device manual for free NLT04 Cocraft in PDF.

| Product Type | Laser Rangefinder |
| Model | NLT04 |
| Brand | Cocraft |
| Measuring Range | 0.05 - 100 m |
| Measurement Accuracy | ± 2.0 mm |
| Laser Class | Class 2, < 1 mW, 635 nm |
| Measurement Units | Meters, feet, inches, feet + inches |
| Functions | Distance, area, volume, continuous measurement, addition/subtraction |
| Memory | Last 10 measurements |
| Backlit Display | Yes, automatic |
| Battery Type | 2 x AAA (1.5V) |
| Battery Life | Approx. 5,000 measurements |
| Auto Power Off | After 3 minutes of inactivity |
| Dimensions (H x W x D) | 11.0 x 5.0 x 2.5 cm |
| Weight | 105 g (including batteries) |
| IP Rating | IP54 (dust and splash proof) |
| Operating Temperature | 0°C to 40°C |
| Storage Temperature | -20°C to 60°C |
| Material | ABS plastic with rubber grip |
| Included Accessories | Carrying case, wrist strap, 2 x AAA batteries, manual |
| Cleaning | Wipe with a dry, soft cloth; do not use solvents |
| Maintenance | Clean lens with lens cloth; store in dry place |
| Safety | Do not stare into beam; avoid eye exposure |
| Spare Parts / Repairability | Contact Cocraft service center for battery replacement or repairs |
Frequently Asked Questions - NLT04 Cocraft
User questions about NLT04 Cocraft
0 question about this device. Answer the ones you know or ask your own.
Ask a new question about this device
Download the instructions for your Rangefinder in PDF format for free! Find your manual NLT04 - Cocraft and take your electronic device back in hand. On this page are published all the documents necessary for the use of your device. NLT04 by Cocraft.
USER MANUAL NLT04 Cocraft
Art.no Model
41-1106
NLT04

Important!
Read the entire instruction manual carefully and make sure that you fully understand it before you use the equipment. Keep the manual for future reference.
Viktig information:
Original instructions
Bruksanvisning i original
Originalbruksanvisning
Please read the entire instruction manual before using the product and then save it for future reference. We reserve the right for any errors in text or images and any necessary changes made to technical data. In the event of technical problems or other queries, please contact our Customer Services (see address details on the back).
Safety
The person responsible for the instrument must ensure that all users understand these directions and adhere to them.
Areas of responsibility
Responsibilities of the manufacturer
The manufacturer is responsible for supplying the product, including the Instruction Manual in a completely safe condition.
The manufacturer is not responsible for third party accessories.
Responsibilities of the person in charge of the instrument
- To understand the safety instructions on the product and the instructions in the Instruction Manual.
- To be familiar with local safety regulations relating to accident prevention.
• Always prevent access to the product by unauthorised personnel.
Permitted use
- Measuring distances.
Prohibited use
• Using the product without instruction.
• Using outside the stated limits.
- Deactivation of safety systems and removal of explanatory and hazard labels.
- Opening of the equipment by using tools (screwdrivers, etc.).
- Carrying out modification or conversion of the product.
- Use of accessories from other manufacturers without express approval.
- Deliberate dazzling of third parties; also in the dark.
- Inadequate safeguards at the surveying site (e.g. when measuring on roads, construction sites, etc.).
- Deliberate or irresponsible behaviour on scaffolding, when using ladders, when measuring near machines which are running or near parts of machines or installations which are unprotected.
- Aiming directly in the sun.
Hazards in use
⚠ WARNING! Watch out for erroneous measurements if the instrument is defective or if it has been dropped or has been misused or modified. Carry out periodic test measurements. Particularly after the instrument has been subject to abnormal use, and before, during and after important measurements.
⚠️ CAUTION! Never attempt to repair the product yourself. In case of damage, contact a local dealer.
WARNING! Changes or modifications not expressly approved could void the user's authority to operate the equipment.
Limits of use
Refer to section Specifications in the Instruction manual. The device is designed for use in areas permanently habitable by humans. Do not use the product in explosion hazardous areas or in aggressive environments.
Electromagnetic Compatibility (EMC)
⚠ WARNING! The device conforms to the most stringent requirements of the relevant standards and regulations. Yet, the possibility of causing interference in other devices cannot be totally excluded. FCC statement (applicable in U.S.): This equipment has been tested and found to comply with the limits for a Class B digital device, pursuant to part 15 of the FCC Rules. These limits are designed to provide reasonable protection against harmful interference in a residential installation.
This equipment generates, uses and can radiate radio frequency energy and, if not installed and used in accordance with the instructions, may cause harmful interference to radio communications. However, there is no guarantee that interference will not occur in a particular installation. If this equipment does cause harmful interference to radio or television reception, which can be determined by turning the equipment off and on, the user is encouraged to try to correct the interference by one or more of the following measures:
- Reorient or relocate the receiving antenna. Increase the separation between the equipment and receiver.
- Connect the equipment into an outlet on a circuit different from that to which the receiver is connected.
- Consult the dealer or an experienced radio/TV technician for help.
Laser classification
This meter produces a visible laser beam from the front of the instrument: it is a Class 2 laser in accordance with: IEC60825-1: 2014 Safety of laser products.
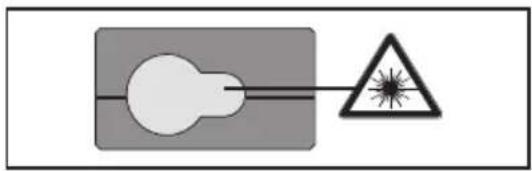
natural_image
Simple diagram showing a light bulb connected to a triangular warning symbol (no text or labels)Laser class 2 products

Do not stare into the laser beam or direct it towards other people or animals. Risk of serious damage to eyes.

Warning! Do not look directly into the beam with optical aids such as binoculars or telescopes. Risk of serious damage to eyes.
Product safety symbols

Read the entire instruction manual.
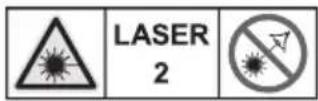
Laser class 2
- Make sure not to remove or damage the safety symbols and warnings found on the distance meter.
- Never try to open the housing, repair or modify the distance meter in any way.
- Only use accessories that are recommended by the manufacturer or retailer.
- Never use the distance meter where flammable or explosive substances are used or stored.
- Do not use the distance meter on or near highly reflective surfaces since the laser beam can be reflected back into your own or someone else's eyes.
- Keep the laser distance meter out of children's reach.
- Labelling: Subject to change (drawings, descriptions and technical data) without prior notice.
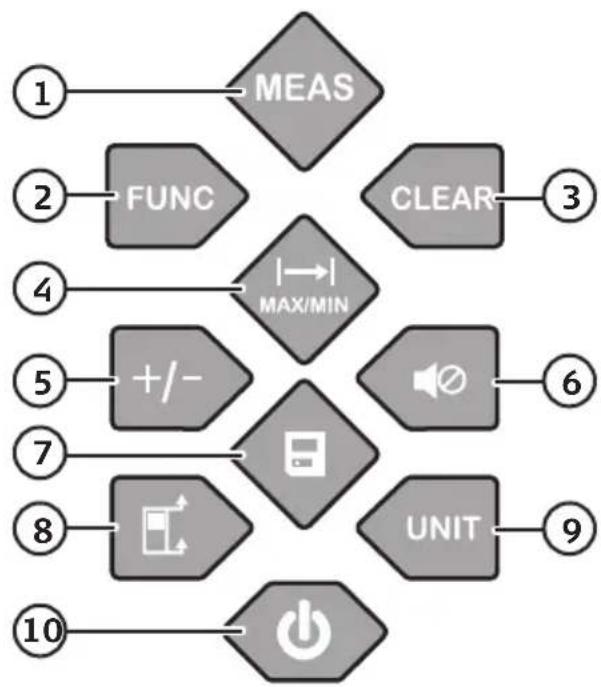
Buttons and functions
- [MEAS] Take a measurement
- [FUNC] Change measuring function: Area, volume or Pythagoras' theorem
- [CLEAR] Delete
- [I-MAX/MIN] Single or continuous distance measurement
- [ +/- ] Add to or subtract from the current measurement
- [Sound on/off]
- [History
- [ ] Reference point selector
- [UNIT] Unit of measurement selection button
- [On/off]
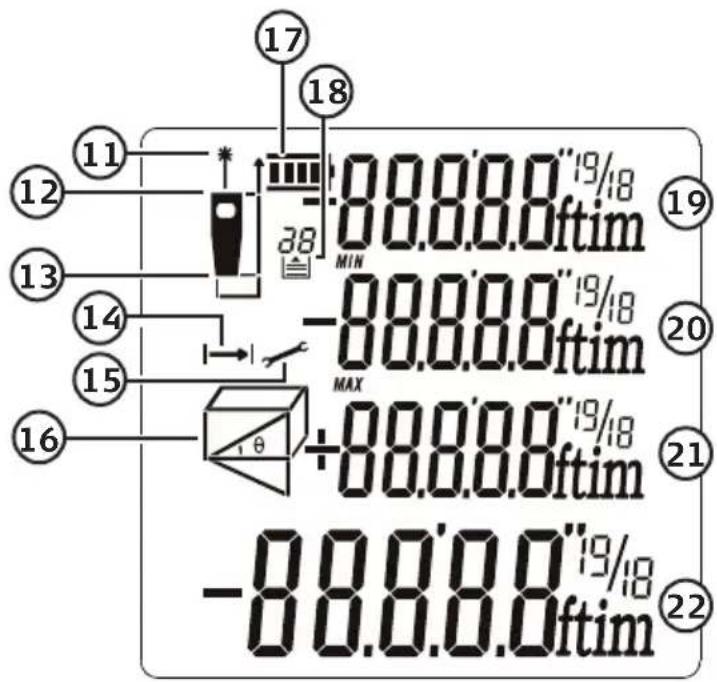
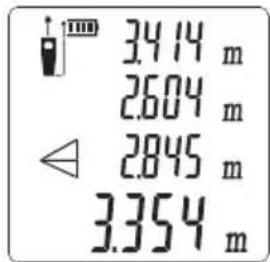
LCD display
- Laser on
- Front reference point
- Rear reference point
- Continuous distance measurement
- Settings
- Measuring functions
- Battery charge status
- Saved measurements
- Measurement 1
- Measurement 2/shortest distance
- Measurement 3/longest distance
- Total measurement/latest measurement/calculation result
flowchart
graph TD
    A["1 MEAS"] --> B["2 FUNC"]
    B --> C["3 CLEAR"]
    C --> D["4 MAX/MIN"]
    D --> E["5 +/-"]
    E --> F["6"]
    F --> G["7"]
    G --> H["8 UNIT"]
    H --> I["9"]
    I --> J["10 POWER"]
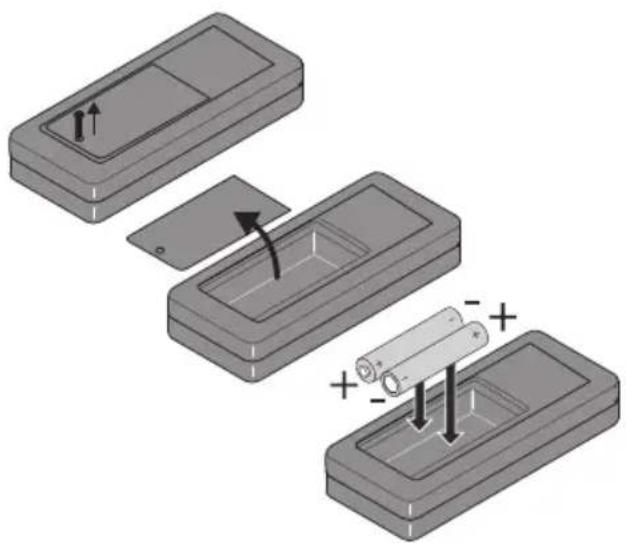
Operating instructions Batteries
-
Remove the battery cover and insert 2 × AAA/LR03 batteries. Refer to the markings in the battery compartment to ensure correct polarity.
-
Refit the battery cover.
natural_image
Diagram showing three steps of battery installation: moving, adding, and adding (+) (no text or symbols present)Switching on/off
Switch the distance meter on by holding in [☐] (10) until the display illuminates. Hold in [☐] again to turn the meter off.
Note: The laser switches off after 30 seconds and the meter switches off after 3 minutes of inactivity.
Clear/Undo
Press [ CLEAR ] to clear measurement results or backstep out of the selected function.
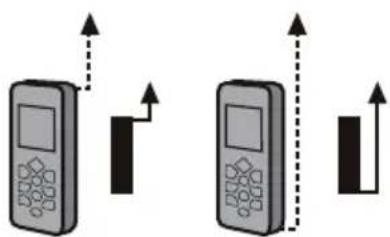
Selecting the measurement reference
Press [☐] (8) to switch the reference point between the front (top edge) and rear (bottom edge) of the instrument.
The default reference setting is the rear of the instrument. Each time the meter is switched off the reference point will be reset to the default setting (i.e. rear).
natural_image
Two identical mobile phone icons with upward arrows indicating signal or movement (no text or symbols)Selecting the unit for measuring distance
Press [UNIT] the required number of times to toggle between m, ft, in and ft+in.
Beep on/off
Press [◀(6) to switch the beep signal on or off.
Single distance measurement
- Switch the distance meter on by holding in [⏻ until the display illuminates.
- Aim the laser dot at the desired surface.
- Press [ MEAS ] to perform a measurement.
- The measurement will show on the display.
Continuous distance measurement

- Switch the distance meter on by holding in [⏻ until the display illuminates.
- Aim the laser dot at the desired surface.
- Press [I-MAX/MIN]. Distance measurement takes place continuously and the display shows the current distance plus the minimum and maximum distances that have been measured during the ongoing measurement session.
- Press [MEAS] or [CLEAR] to finish taking measurements.
Functions
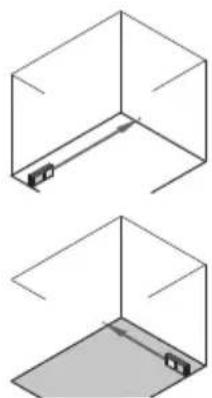
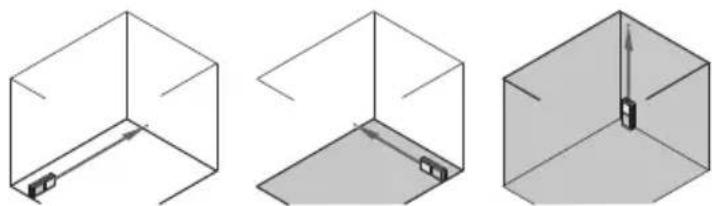
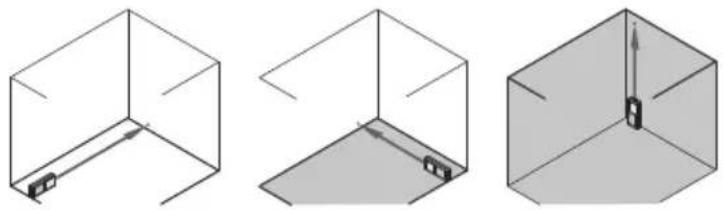
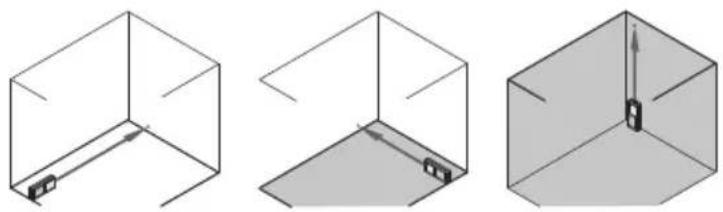
Measuring an area
- Switch the distance meter on by holding in [⏻] until the display illuminates.
- Press [FUNC] until is displayed.
- Aim the laser at the target surface and press [MEAS] to perform the first measurement, the distance will be shown on the top row of the display.
- Aim the laser at the target surface and press [MEAS] to perform the second measurement, the distance will be shown on the second row of the display. The perimeter of the measured area is shown on the third row of the display and the area is shown at the bottom of the display.
natural_image
Two isometric diagrams of a 3D cube with internal and exterior views, no text or symbols present.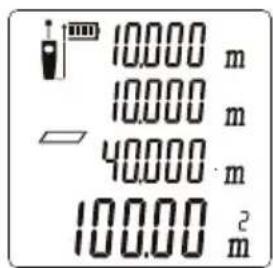
The first measurement
The second measurement
The perimeter
The area
Measuring a volume
- Switch the distance meter on by holding in [⏻ until the display illuminates.
- Press [FUNC] until is displayed.
- Aim the laser at the target surface and press [ MEAS ] to perform the first measurement, the distance will be shown on the top row of the display.
- Press [MEAS] again to perform the two remaining measurements.
- The volume will be shown on the bottom row of the display.
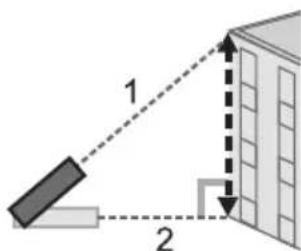
Pythagoras 2-point measurement
- Switch the distance meter on by holding in [∅] until the display illuminates.
- Press [FUNC] until is displayed.
- Press [ MEAS ] to perform the first and second measurements as shown in the picture.
- The calculation result will be shown on the bottom row of the display.
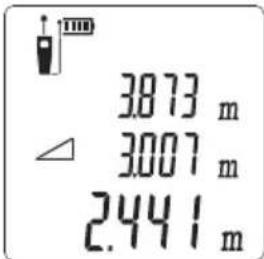
1
2
Calculation result
Pythagoras 3-point measurement
- Switch the distance meter on by holding in [∅until the display illuminates.
- Press [FUNC] until is displayed.
- Press [ MEAS ] to perform the three measurements as shown in the picture below. You can press [ CLEAR ] to delete a measured distance and then press [ MEAS ] again to repeat the same measurement.
- The calculation result will be shown on the bottom row of the display.
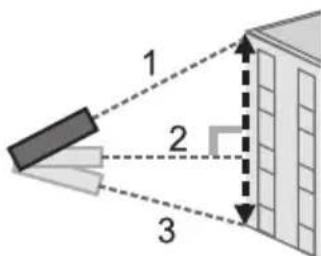
1
2
3
Calculation result
Adding distance measurements
- Switch the distance meter on by holding in [⏻ until the display illuminates.
- Take a measurement. The measurement will show on the display.
- Short press [ +/- ], the measurement will move up a row on the display and a new row will be created as the meter waits to add the next measurement.
- Take a new measurement; the sum of the two added measurements will now appear on the bottom row of the display.
Subtracting distance measurements
- Switch the distance meter on by holding in [⏻ until the display illuminates.
- Take a measurement. The measurement will show on the display.
- Hold in [ +/- ] until the displayed measurement moves up a row on the display and a new row is created as the meter waits to subtract the next measurement.
- Take a new measurement, the resulting distance after the subtraction will now appear on the bottom row of the display.
You can add or subtract several measurements in sussession by short pressing [+/-] to add or holding in [ +/- ] to subtract respectively.
Memory
Press [8] (7) repeatedly to display the 20 latest measurements.
Care and maintenance
- Clean the exterior of the distance meter by wiping it with a damp cloth. Use only mild cleaning agents, never solvents or corrosive chemicals.
- Never immerse the distance meter in water or other liquid.
- Whenever the distance meter is not to be used for an extended period, the batteries should be removed and it should be stored in a dry, dust-free environment, out of children's reach.
Troubleshooting guide
The following table shows the meaning of error codes that might appear on the display.
| Code Cause Correction | |
| 204 Measuring error. Refer to the instruction | manual and repeat the measurement procedure. |
| 208 Hardware error. Contact the place of purchase. | |
| 220 The batteries are flat. Change the batteries. | |
| 252 The meter is too hot. Let the meter cool down and repeat the measurement. | |
| 253 The meter is too cold. Let the meter warm up and repeat the measurement. | |
| 255 Signal too weak, measuring time too long. | Change the target surface for the laser beam (e.g. put up a piece of white paper). |
| 256 Background lighting too strong. Ensure that the surface where the laser beam strikes is shaded. | |
| 261 The measurement is outside the max./min. measurement range. | Measuring range: 0.2–40 m. |
| 500 Hardware error. Try switching the meter on and off a few times. If this doesn't solve the problem, contact the place of purchase. | |
Responsible disposal
This symbol indicates that this product should not be disposed of with general household waste. This applies throughout the entire EU. In order to prevent any harm to the environment or health hazards caused by incorrect waste disposal, the product must be handed in for recycling so that the material can be disposed of in a responsible manner. When recycling your product, take it to your local collection facility or contact the place of purchase. They will ensure that the product is disposed of in an environmentally sound manner.
natural_image
Symbol of a trash bin crossed with no text or labels, accompanied by a black rectangular block below (no text or symbols present)Specifications
Batteries 2 × AAA/LR03 (sold separately)
Measuring range 0.2–40 m
Accuracy ±1.5 mm
Laser class II
Laser type 630–670 nm, < 1 mW
Operating temperature 0–40 °C
Storage temperature -10 to 60 °C
Size 120 × 29 × 50 mm
Weight 130 g (with batteries)
Note: The range of the meter could be negatively affected by prevailing circumstances such as sunlight, surfaces which reflect the laser beam poorly or large temperature changes.
Avständsmätare
Art.nr 41-1106 Modell NLT04
natural_image
Simple diagram showing a light bulb connected to a triangular warning symbol (no text or labels)Laserklass 2-produkter

natural_image
Diagram showing three steps of battery installation: moving, adding, and adding (+) (no text or symbols present)På/av
natural_image
Two identical mobile phone icons with upward arrows indicating signal or movement (no text or symbols)natural_image
Two isometric diagrams of a 3D rectangular prism with internal and external views, no text or symbols present.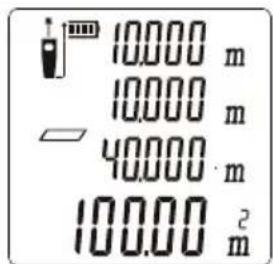
första mätningen
andra mätningen
omkrets
area
Mätning av volym

natural_image
Three technical diagrams showing 3D wireframe views of a cube with internal components, no text or symbols present.natural_image
Symbol of a trash bin crossed with a diagonal line and a horizontal bar below (no text or labels)Specifikationer
Batterier 2 × AAA/LR03 (säljs separat)
Mätområde 0,2–40 m
Noggrannhet ±1,5 mm
Laserklass Klass 2
Lasertyp 630–670 nm, < 1 mW
natural_image
Simple diagram showing a light bulb connected to a triangular warning symbol (no text or labels)Laserklasse 2-produkter

natural_image
Diagram showing three steps of battery installation: opening, inserting into a tray, and adding a battery into a final tray (no text or symbols present)På/Av
natural_image
Two mobile phones with upward arrows indicating movement or signal, no text or symbols presentVelg enhet enhet for avstandsmålingen
natural_image
Two isometric diagrams of a 3D cube with internal and exterior views, no text or symbols present.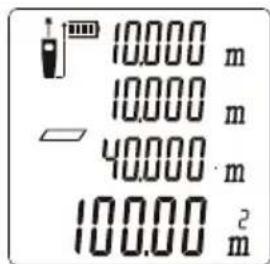
förste måling
andre måling
omkrets
areal
Måling av volum
Lasertype 630–670 nm, < 1 mW
Brukstemperatur 0–40 °C
natural_image
Simple diagram showing a light bulb connected to a triangular warning symbol (no text or labels)natural_image
Diagram showing three steps of battery installation: opening, adding a resistor, and adding an output (no text or symbols)natural_image
Two isometric diagrams of a 3D cube with internal and exterior views, no text or symbols present.
ensimmäinen mittaus
toinen mittaus
ympärysmitta
pinta-ala
Tilavuuden mittaus

1
2
Mittaustulos
Pythagoras 3-pistemittaus
natural_image
Simple diagram showing a light bulb inside a rectangle connected to a triangular warning symbol (no text or labels)natural_image
Diagram showing three steps of battery installation: opening, inserting into a tray, and adding a battery into a final tray (no text or symbols present)Ein/Aus
natural_image
Two identical mobile phone icons with vertical arrows indicating direction (no text or symbols)natural_image
Two isometric diagrams of a 3D cube with internal and exterior views, no text or symbols present.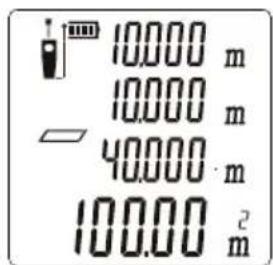
Erste Messung
Zweite Messung
Umfang
Flächeninhalt
Volumenmessung

natural_image
Symbol of a trash bin with crossed lines and a blank rectangular block below (no text or labels)Technische Daten
Declaration of Conformity
Declares that this product complies with the requirements of the following directives and standards
Machinery directive 2006/42/EC
EN 60745-1:2009
EN 60745-2-3:2007
+A11:2009
EMC directive 2014/30/EU
IEC 60825-1: 2013
CONFIRMS WITH THE
STANDARD
EN 61326-1: 2013
Low voltage directive

Henrik Alfredsson
Manager Technique & Quality
Insjön, Sweden, 2016-12-02
Sverige
Postal 10 - 13 Market Place
Kingston Upon Thames
Surrey
KT1 1JZ
Deutschland
Kundenservice Hotline: 040 2999 78111
E-Mail: kundenservice@clasohlson.de
Homepage
www.clasohlson.de