
HD 400 - Rangefinder Cocraft - Free user manual and instructions
Find the device manual for free HD 400 Cocraft in PDF.


| Product Type | Laser Distance Meter (Rangefinder) |
| Brand | Cocraft |
| Model | HD 400 |
| Measuring Range | 0.05–40 m (0.16–131 ft) |
| Accuracy (Favorable Conditions) | ±2 mm (0.08") |
| Accuracy (Unfavorable Conditions) | ±3 mm (0.12") |
| Laser Type | 635 nm, Class 2, <1 mW |
| Laser Dot Diameter | 6 mm at 10 m; 24 mm at 40 m |
| Power Supply | 2 × AAA/LR03 batteries |
| Dimensions (H×W×D) | 116 × 45 × 29 mm |
| Weight | 0.1 kg (including batteries) |
| Protection Class | IP40 |
| Operating Temperature | 0 °C to 40 °C |
| Storage Temperature | -25 °C to 70 °C |
| Measurement Functions | Distance, Area, Volume, Pythagoras (2-point & 3-point), Continuous, Add/Subtract, Max/Min |
| Display | LCD with backlight |
| Reference Point Selection | Front or rear edge of device |
| Unit Selection | mm or inches |
| Auto Power Off | Laser after 90 s, device after 180 s |
| Safety Features | Class 2 laser, do not stare into beam, avoid reflective surfaces |
| Care | Clean with damp soft cloth; do not immerse; no solvents |
| Disposal | Do not dispose with household waste; recycle according to local regulations |
Frequently Asked Questions - HD 400 Cocraft
User questions about HD 400 Cocraft
0 question about this device. Answer the ones you know or ask your own.
Ask a new question about this device
Download the instructions for your Rangefinder in PDF format for free! Find your manual HD 400 - Cocraft and take your electronic device back in hand. On this page are published all the documents necessary for the use of your device. HD 400 by Cocraft.
USER MANUAL HD 400 Cocraft
Read the entire instruction manual carefully and make sure that you fully understand it before you use the equipment. Keep the manual for future reference.
Viktig information:
Art.no Model
40-8786
HD400
Ver. 20160510
Original instructions
Bruksanvisning i original
Originalbruksanvisning
Please read the entire instruction manual before use and save it for future reference. We reserve the right for any errors in text or images and for making any necessary technical changes to this document. If you should have any questions concerning technical problems please contact our Customer Services.
Safety
The person responsible for the instrument must ensure that all users understand these directions and adhere to them.
Areas of responsibility
Responsibilities of the manufacturer
The manufacturer is responsible for supplying the product, including the Instruction Manual in a completely safe condition.
The manufacturer is not responsible for third party accessories.
Responsibilities of the person in charge of the instrument
- To understand the safety instructions on the product and the instructions in the Instruction Manual.
- To be familiar with local safety regulations relating to accident prevention.
• Always prevent access to the product by unauthorised personnel.
Permitted use
- Measuring distances.
Prohibited use
• Using the product without instruction.
• Using outside the stated limits.
- Deactivation of safety systems and removal of explanatory and hazard labels.
- Opening of the equipment by using tools (screwdrivers, etc.).
- Carrying out modification or conversion of the product.
- Use of accessories from other manufacturers without express approval.
- Deliberate dazzling of third parties; also in the dark.
- Inadequate safeguards at the surveying site (e.g. when measuring on roads, construction sites, etc.).
- Deliberate or irresponsible behaviour on scaffolding, when using ladders, when measuring near machines which are running or near parts of machines or installations which are unprotected.
- Aiming directly in the sun.
Hazards in use
⚠ WARNING! Watch out for erroneous measurements if the instrument is defective or if it has been dropped or has been misused or modified. Carry out periodic test measurements. Particularly after the instrument has been subject to abnormal use, and before, during and after important measurements.
⚠️ CAUTION! Never attempt to repair the product yourself. In case of damage, contact a local dealer.
WARNING! Changes or modifications not expressly approved could void the user's authority to operate the equipment.
Limits of use
Refer to section Specifications in the Instruction manual. The device is designed for use in areas permanently habitable by humans. Do not use the product in explosion hazardous areas or in aggressive environments.
Disposal
CAUTION! Flat batteries must not be disposed of with household waste. Care for the environment and take them to the collection points provided in accordance with national or local regulations.
The product must not be disposed with household waste.
Dispose of the product appropriately in accordance with the national regulations in force in your country.
Adhere to the national and country specific regulations.
Product specific treatment and waste management can be downloaded from our homepage.
Electromagnetic Compatibility (EMC)
WARNING! The device conforms to the most stringent requirements of the relevant standards and regulations. Yet, the possibility of causing interference in other devices cannot be totally excluded. FCC statement (applicable in U.S.): This equipment has been tested and found to comply with the limits for a Class B digital device, pursuant to part 15 of the FCC Rules. These limits are designed to provide reasonable protection against harmful interference in a residential installation.
This equipment generates, uses and can radiate radio frequency energy and, if not installed and used in accordance with the instructions, may cause harmful interference to radio communications. However, there is no guarantee that interference will not occur in a particular installation. If this equipment does cause harmful interference to radio or television reception, which can be determined by turning the equipment off and on, the user is encouraged to try to correct the interference by one or more of the following measures:
- Reorient or relocate the receiving antenna. Increase the separation between the equipment and receiver.
- Connect the equipment into an outlet on a circuit different from that to which the receiver is connected.
- Consult the dealer or an experienced radio/TV technician for help.
Laser classification
The device produces visible laser beams, which are emitted from the instrument: It is a Class 2 laser product in accordance with:
- IEC60825-1 : 2014 "Radiation safety of laser products"
Laser Class 2 products
Do not stare into the laser beam or direct it towards other people unnecessarily. Eye protection is normally afforded by aversion responses including the blink reflex.

WARNING! Looking directly into the beam with optical aids (e.g. binoculars, scopes) can be hazardous.

CAUTION! Looking into the laser beam may be hazardous to the eyes.
For technical information for laser and labelling please check the user manual.
Care
- Clean the device with a damp, soft cloth.
- Never immerse the device in water.
- Never use aggressive cleaning agents or solvents.
Laser classification
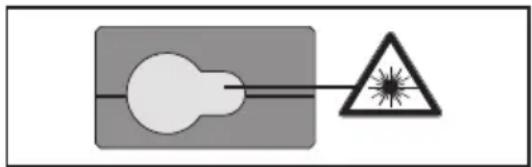
This meter produces a visible laser beam from the front of the instrument: it is a Class 2 laser in accordance with: IEC60825-1: 2014 Safety of laser products.
natural_image
Simple diagram showing a light bulb connected to a triangular warning symbol (no text or labels)Laser class 2 products

Do not stare into the laser beam or direct it towards other people or animals. Risk of serious damage to eyes.

Warning! Do not look directly into the beam with optical aids such as binoculars or telescopes. Risk of serious damage to eyes.
Product safety symbols

Read the entire instruction manual.
LASER 2

Laser class 2
| Description Value | |
| Maximum peak radiant output power 0.95 mW | |
| Wavelength 635 nm | |
| Pulse duration >400 ps | |
| Pulse repetition frequency 320 MHz | |
| Beam divergence 0.16 × 0.6 mrad | |
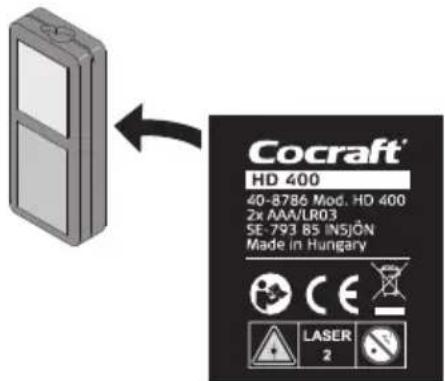
- Make sure not to remove or damage the safety symbols and warnings found on the distance meter.
- Never try to open the housing, repair or modify the distance meter in any way.
- Only use accessories that are recommended by the manufacturer or retailer.
- Never use the distance meter where flammable or explosive substances are used or stored.
- Do not use the distance meter on or near highly reflective surfaces since the laser beam can be reflected back into your own or someone else's eyes.
- Keep the laser distance meter out of children's reach.
- Labelling: Subject to change (drawings, descriptions and technical data) without prior notice.
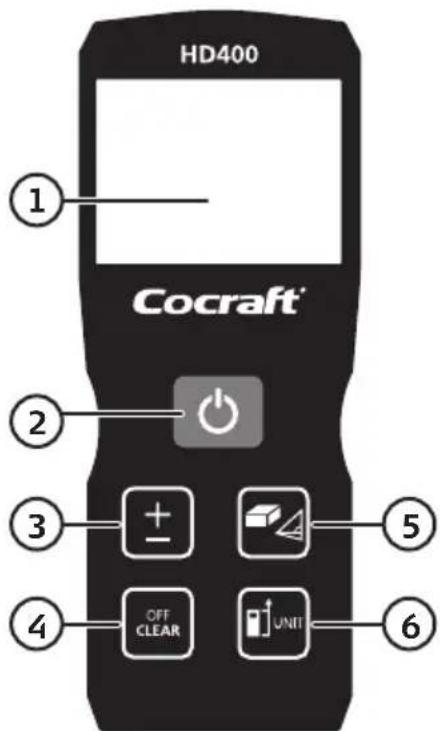
Buttons and functions
Laser Distance Meter
- LCD display
- [⏻] Turn on the laser distance meter, perform measurement
- [±] Add to or subtract from measured value
- [OFF, CLEAR] Switch off, Delete
- [ ] Change measuring function: Area, volume or Pythagoras' theorem
- [ ] Change measuring reference, change unit (mm/inches)
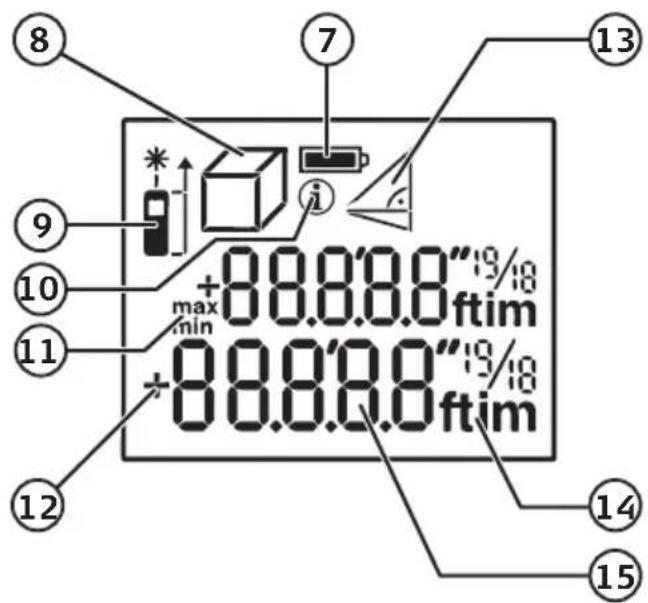
LCD display
- Battery status
- Surface and volume measurement
- Selected laser distance meter reference point
- Info
- Shows the highest and lowest values during continuous measurement
- Addition/Subtraction
- Indicates measurement according to Pythagoras' theorem
- Displays chosen unit
- Current measurement
Operation
Batteries
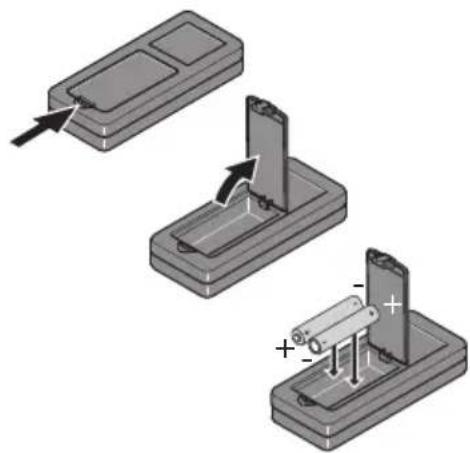
Open the battery compartment and insert 2 × AAA/LR03 batteries. Note the polarity markings at the bottom of the battery holder to ensure correct insertion.
natural_image
Three-step diagram showing battery installation process: adding a resistor to a component, then adding a battery to an electrolytic cell (no text or symbols present)Turning the device on
Press [⏻].

Turning the device off
Hold down [ OFF, CLEAR ] for two seconds.
Note: Following a period of inactivity the laser beam will automatically switch off after 90 seconds and the laser distance meter after 180 seconds.
Deleting the last measurement
Press [OFF, CLEAR].
Info icon
If "InFo" and a number appear together on the display, see the table below:
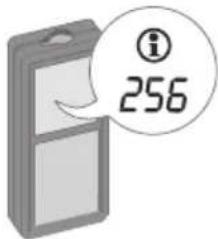
| 204 Measuring error. Repeat the measurement. | ||
| 252 The laser distance meter is too hot. Allow the laser distance meter to cool before use. | ||
| 253 The laser distance meter is too cold. Allow the laser distance meter to warm up before use. | ||
| 255 Signal too weak, measuring time too long. | Change the surface for the laser beam (e.g. by setting up a piece of white paper). | |
| 256 Signal too strong. Change the surface for the laser beam (e.g. by setting up a piece of white paper). | ||
| 257 Background lighting too strong. Ensure that the surface where the laser beam strikes is shaded. | ||
| 258 The measurement is outside the max./min. measuring range. | Measuring range: 0.05–40 m. | |
| 260 Something prevented the laser beam from taking a measurement. | Repeat the measurement. | |
Selecting the reference point on the laser distance meter
- Measuring can be done using the front or rear edge of the laser distance meter as a reference point.
- Press [ ] to change the reference point. The current selection is shown on the display.
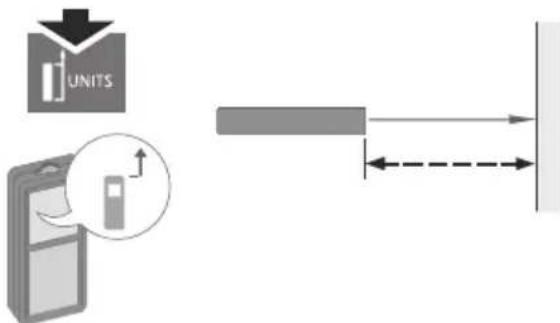
The measurement is performed from the front edge of the laser distance meter.
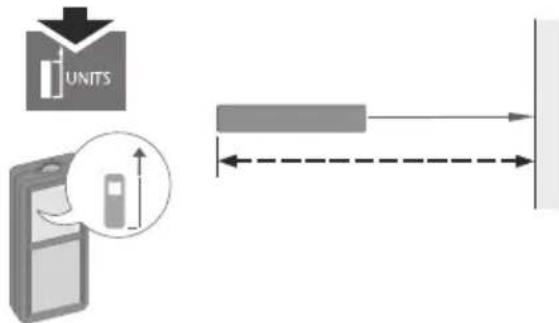
The measurement is performed from the rear edge of the laser distance meter.
Selecting the unit for measuring distance
Hold down [1] for two seconds to display the measurement in millimetres or inches.
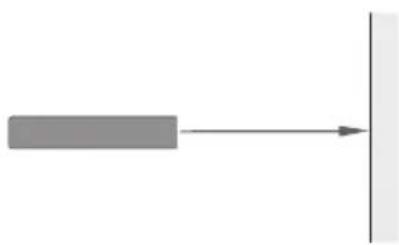
Instantaneous distance measurement
Note: Measuring errors may occur when measuring against colourless liquids, glass, soft plastic, or semi-transparent or high-gloss surfaces. Against very dark surfaces the time taken to display the measurement may increase.
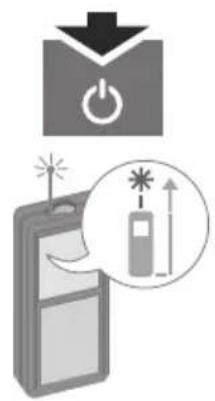
- Press [ ⏻ to turn on the laser distance meter.
natural_image
Simple diagram showing a gray rectangle pointing right toward a vertical line (no text or symbols)- Aim the laser dot at the desired surface.
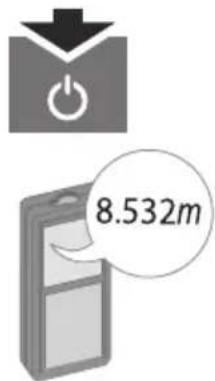
- Press [⏻] to display the measurement.
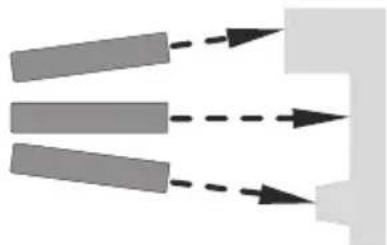
Continuous distance measurement
- Press [↓] to turn on the laser distance meter.
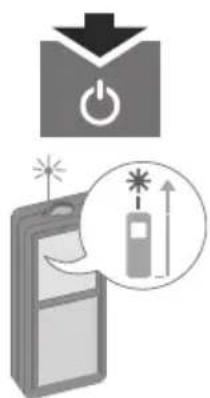
- Hold down [⏻] for two seconds.
natural_image
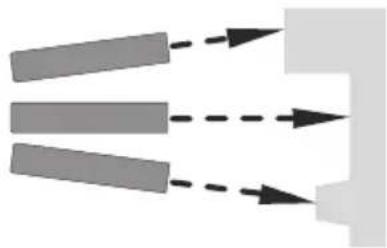
Diagram showing three parallel gray bars with dashed arrows pointing outward from a central object (no text or symbols)-
Aim the laser dot at the desired surface.
-
Continuous distance measurement will be performed and the display will show the current distance.
-
Press [⏻] to end continuous distance measurement.
Measuring an area
Note: For area, volume, Pythagoras 2-point and Pythagoras 3-point measurements, a flashing symbol on the display indicates the measurement that is being performed at the time.
- Press [↓] to turn on the laser distance meter.
- Press once on [ ] and aim the laser dot at the first measuring point.
- Press [⏻].
- Aim the laser dot at the second measuring point.
- Press [⏻]. The area is shown on the bottom line of the display and the last distance measurement is shown on the top line.
Measuring a volume
- Press [d] to turn on the laser distance meter.
- Press twice on [图标] and aim the laser dot at the first measuring point.
- Press [⏻].
- Aim the laser dot at the second measuring point.
- Press [⏻].
- Aim the laser dot at the third measuring point.
- Press [⏻].
- The volume is shown on the bottom line of the display and the last distance measurement is shown on the top line.
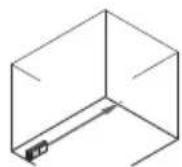
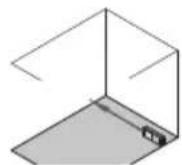
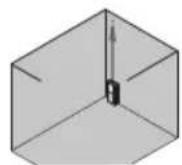
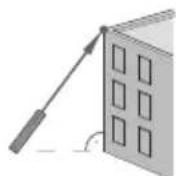
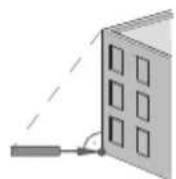
Pythagoras 2-point measurement
- Press [d] to turn on the laser distance meter.
- Press three times on [☐] and aim the laser dot at the top measuring point.
- Press [⏻].
- Aim the laser dot at the bottom measuring point, which must be at the level (horizontal) of the distance meter as otherwise an incorrect measurement will be given.
- Press [⏻].
- The measurement is shown on the bottom line of the display and the last distance measurement is shown on the top line.
Pythagoras 3-point measurement
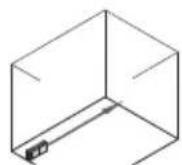
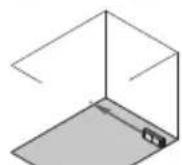
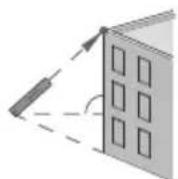
- Press [↓] to turn on the laser distance meter.
- Press four times on [☐] and aim the laser dot at the top measuring point.
- Press [⏻].
- Aim the laser dot at the horizontal measuring point.
- Press [⏻].
- Aim the laser dot at the bottom measuring point.
- Press [⏻].
- The measurement is shown on the bottom line of the display and the last distance measurement is shown on the top line.
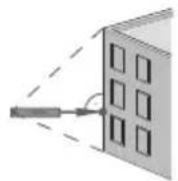
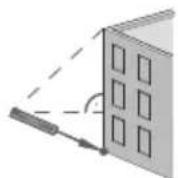
Max/min function with Pythagoras 2-point and 3-point measurement
The max/min function is useful when taking interim measurements in corners (e.g. ceiling/wall) and ensures that the horizontal measurement is also performed correctly. To activate the max/min function hold down [⏻] for two seconds before each interim measurement.
Example of a Pythagoras 3-point measurement using the max/min function:
- Press [⏻] to turn on the laser distance meter.
- Press four times on [☐].
- Aim the laser dot at the corner (ceiling/wall) and hold down [⏻] for two seconds. The display shows "max", and by sweeping the laser dot a little between the ceiling and wall the maximum measurement will be obtained, which is in the corner (the top measuring point).
- Press [⏻].
- Aim the laser dot at the estimated horizontal measuring point and hold down [⏻] for two seconds. The display shows "min", and by sweeping the laser dot up and down a little over the estimated horizontal measuring point the minimum measurement will be obtained, which is the correct horizontal measuring point.
- Press [⏻].
- Aim the laser dot at the corner (floor/wall) and hold down [⏻] for two seconds. The display shows "max", and by sweeping the laser dot a little between the floor and wall the maximum measurement will be obtained, which is in the corner (the bottom measuring point).
- Press [⏻].
- The measurement is shown on the bottom line of the display and the last distance measurement is shown on the top line.
Adding/subtracting distance measurements
- Switch on the laser distance meter and perform a distance measurement as shown above.
- Press [±] once or twice to select addition or subtraction (a plus or minus sign will flash on the display to indicate the selected function) and aim the laser dot at the next measuring point.
- Press [⏻] for the second measurement, which is then added to or subtracted from the first measurement (depending on the selected function) and shown at the bottom of the display.
- Press [±] once or twice to select addition or subtraction (a plus or minus sign will flash on the display to indicate the selected function) and aim the laser dot at the next measuring point.
- Press [⏻] for the third measurement, which is then added or subtracted from the earlier result. The display shows the latest measurement on the top display line and the sum of the measurements on the bottom line.
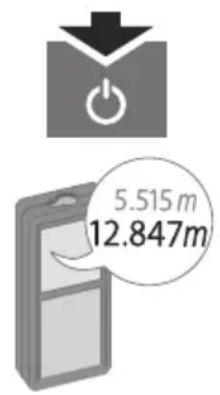
Addition/subtraction of measurements can also be used when measuring areas or volumes or performing Pythagoras measurements:
- Complete the first area, volume or Pythagoras measurement.
- Press [±] once or twice to select addition or subtraction.
- Complete the second measurement.
- Press [⏻] to obtain the sum of the measurements.
- Repeat steps 2–4 to add/subtract further measurements.
Care and maintenance
- Clean the laser distance meter using a lightly moistened cloth. Use only mild cleaning agents, never solvents or corrosive chemicals.
- Never immerse the distance meter in water or other liquid.
- Whenever the distance meter is not to be used for an extended period, the batteries should be removed and it should be stored in a dry, dust-free environment, out of children's reach.
- If “Error” appears on the display, switch the laser distance meter off and on a number of times. If this does not solve the problem, contact a qualified service centre.
Responsible disposal
This symbol indicates that this product should not be disposed of with general household waste. This applies throughout the entire EU. In order to prevent any harm to the environment or health hazards caused by incorrect waste disposal, the product must be handed in for recycling so that the material can be disposed of in a responsible manner. When recycling your product, take it to your local collection facility or contact the place of purchase. They will ensure that the product is disposed of in an environmentally sound manner.
natural_image
Symbol of a trash bin crossed with no text or labels, accompanied by a blank rectangular block below (no text or symbols present)Specifications
Measuring range 0.05–40 m
Diameter of laser dot At 10 m: 6 mm; at 40 m: 24 mm
Accuracy in
favourable conditions ±2 mm (0.08")
Accuracy in
unfavourable conditions ±3 mm (0.12")
Range in favourable conditions 40 m (131 ft). Favourable conditions mean targets that are white and diffuse reflecting (white painted wall), low background illumination and moderate temperatures.
Range in unfavourable conditions 35 m (115 ft). Unfavourable conditions mean targets with lower or higher reflectivity, high background illumination or temperatures at the upper or lower end of the specified temperature range.
Laser type 635 nm, Class 2, < 1 mW
Protection class IP40
Operating temperature 0–40 °C
Storage temperature -25 to 70 °C
Size
116 × 45 × 29 mm
Weight
0.1 kg (incl. batteries)
Laseravständsmätare
natural_image
Simple diagram showing a light bulb connected to a triangular warning symbol (no text or labels)Laserklass 2-produkter

LCD-display
natural_image
Three-step diagram showing battery charging process: first with plug, second with switch, third with battery plug and negative charge (no text or symbols)Slå på
Tryck [💡].

Slå av
natural_image
Simple diagram showing a gray rectangle pointing right toward a vertical line (no text or symbols)natural_image
Diagram showing three parallel gray bars with dashed arrows pointing outward from a central object (no text or symbols)natural_image
Symbol of a trash bin crossed with no text or numbers, representing waste sorting or disposal (no text present)Specifikationer
Mätområde 0,05–40 m
Laserpunktens diameter Vid 10 m: 6 mm, vid 40 m: 24 mm
Noggrannhet vid
natural_image
Simple diagram showing a light bulb connected to a triangular warning symbol (no text or labels)Laserklasse 2-produkter

LCD-display
natural_image
Three-step diagram showing battery charging process: first with arrow indicating direction, second with arrow indicating direction, third with plus signs (no text or symbols)Slå på
Trykk [⏻].

Skru av
Hold [OFF, CLEAR] inne i to sekunder.
natural_image
Simple diagram showing a gray rectangle pointing right toward a vertical line (no text or symbols)- Vend laserpunktet mot ønsket flate.
- Hold [⏻ inne i to sekunder.
natural_image
Diagram showing three parallel gray bars with dashed arrows pointing outward from a vertical structure (no text or symbols)natural_image
Symbol of a trash bin crossed with no text or numbers, representing waste sorting or disposal (no text present)Spesifikasjoner
natural_image
Simple diagram showing a light bulb connected to a triangular warning symbol (no text or labels)LCD-näyttö
natural_image
Three-step diagram showing a battery mounting process with arrows indicating direction (no text or symbols)Käynnistäminen
Paina [💡].

Sammuttaminen
Paina [ OFF, CLEAR ] kahden sekunnin ajan.
natural_image
Simple diagram showing a gray rectangle pointing right toward a vertical line (no text or symbols)natural_image
Diagram showing three parallel gray bars with dashed arrows pointing toward a vertical gray bar (no text or symbols)natural_image
Two isometric diagrams of a 3D cube with internal and external edges, no text or symbols present.natural_image
Three technical diagrams showing 3D wireframe views of a rectangular box with internal components, no text or symbols present.2-pistepythagoras-mittaus
natural_image
Diagram showing two scenarios of a building interior with a lever and angle measurement (no text or symbols)3-pistepythagoras-mittaus
natural_image
Symbol of a trash bin crossed with a diagonal line, no text or numbers presentTekniset tiedot
Mittausalue 0,05–40 m
natural_image
Simple diagram showing a light bulb connected to a triangular warning symbol (no text or labels)LCD-Display
natural_image
Three-step diagram showing a battery mounting mechanism with arrows indicating process (no text or symbols)Gerät einschalten
Auf [💡] drücken.

Gerät ausschalten
natural_image
Illustration of a device with a power button and a warning symbol (no text or labels)natural_image
Simple diagram showing a gray rectangle pointing right toward a vertical line (no text or symbols)natural_image
Abstract diagram with three parallel gray bars and two arrows pointing toward a vertical gray bar (no text or symbols)natural_image
Two isometric diagrams of 3D rectangular prisms with internal alignment, no text or symbols present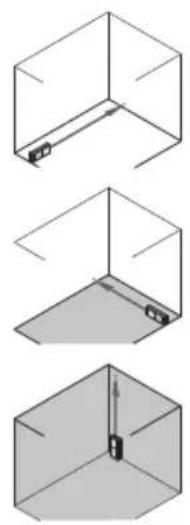
natural_image
Three technical diagrams showing 3D views of a rectangular enclosure with internal components, no text or symbols present.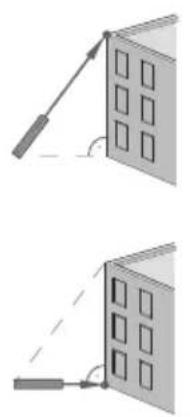
natural_image
Two diagrams showing a lever mechanism interacting with a building panel, no text or symbols presentnatural_image
Symbol of a trash bin crossed with no visible text or labelsTechnische Daten
Postal 10 - 13 Market Place
Kingston Upon Thames
Surrey
KT1 1JZ
Deutschland
Kundenservice

- Viktig information:
- Safety
- Areas of responsibility
- Responsibilities of the manufacturer
- Responsibilities of the person in charge of the instrument
- Permitted use
- Prohibited use
- Hazards in use
- Limits of use
- Disposal
- Electromagnetic Compatibility (EMC)
- Laser classification
- Laser Class 2 products
- Care
- Product safety symbols
- Buttons and functions
- Laser Distance Meter
- LCD display
- Operation
- Batteries
- Turning the device on
- Turning the device off
- Deleting the last measurement
- Info icon
- Selecting the reference point on the laser distance meter
- Selecting the unit for measuring distance
- Instantaneous distance measurement
- Continuous distance measurement
- Measuring an area
- Measuring a volume
- Pythagoras 2-point measurement
- Pythagoras 3-point measurement
- Max/min function with Pythagoras 2-point and 3-point measurement
- Adding/subtracting distance measurements
- Care and maintenance
- Responsible disposal
- Specifications
- Laseravständsmätare
- Laserklass 2-produkter
- LCD-display
- Slå på
- Slå av
- Specifikationer
- Laserklasse 2-produkter
- Skru av
- Spesifikasjoner
- LCD-näyttö
- Käynnistäminen
- Sammuttaminen
- 2-pistepythagoras-mittaus
- 3-pistepythagoras-mittaus
- Tekniset tiedot
- Gerät einschalten
- Gerät ausschalten
- Technische Daten
- Deutschland
Brand : Cocraft
Model : HD 400
Category : Rangefinder