Freedom Zoom 105i - Camera KONICA MINOLTA - Free user manual and instructions
Find the device manual for free Freedom Zoom 105i KONICA MINOLTA in PDF.

| Product Type | 35mm film autofocus compact camera |
| Model | Freedom Zoom 105i |
| Lens | Konica Zoom 35-105mm f/4.2-8.6 |
| Focus System | Active infrared autofocus with focus lock |
| Viewfinder | Real-image zoom viewfinder with autofocus frame |
| Exposure Control | Programmed AE (auto exposure) with DX code film speed |
| Flash | Built-in, red-eye reduction, auto and fill-flash modes |
| Self-Timer | 10-second delay with indicator |
| Film Loading | Automatic load and rewind |
| Power Source | 2× CR123A lithium batteries |
| Dimensions | 130 × 75 × 58 mm (5.1 × 3.0 × 2.3 in) |
| Weight | 310 g (10.9 oz) without batteries |
| Cleaning | Use a soft, dry cloth; avoid solvents; clean lens with lens tissue |
| Battery Life | Approximately 15 rolls of 24-exp. film (with flash usage) |
| Flash Range | 0.6 – 5.0 m (wide) / 0.6 – 2.8 m (tele) |
| Film Speed | DX coded ISO 50-3200 |
| Safety | Do not point at sun; keep away from water; store in dry place |
| Reparability | Not user-serviceable; contact authorized repair center |
| General Info | Konica Minolta Freedom Zoom 105i, produced in 1990s |
Frequently Asked Questions - Freedom Zoom 105i KONICA MINOLTA
User questions about Freedom Zoom 105i KONICA MINOLTA
0 question about this device. Answer the ones you know or ask your own.
Ask a new question about this device
Download the instructions for your Camera in PDF format for free! Find your manual Freedom Zoom 105i - KONICA MINOLTA and take your electronic device back in hand. On this page are published all the documents necessary for the use of your device. Freedom Zoom 105i by KONICA MINOLTA.
USER MANUAL Freedom Zoom 105i KONICA MINOLTA
E INSTRUCTION MANUAL

natural_image
Line drawing of a camera with lens and buttons (no text or symbols)Thank you for purchasing this camera. Integrating state-of-the autofocus and autoexposure systems with a 3X zoom lens, it provides both simple operation and outstanding image quality. We hope it will bring you many years of satisfying results.
Among the camera's most innovative features is Advanced Program Zoom (APZ), which automatically selects a suitable zoom setting based on subject distance. As described in section 7, APZ's auto zoom control is activated by a unique sensing system: simply looking through the viewfinder switches it on. For situations where you want to control the focal-length setting directly, APZ is easily overridden with zoom buttons.
Before using the camera, please take the time to read through this manual; doing so will enable you to take full advantage of its features, right from the start.
TABLE OF CONTENTS
Names of Parts....2
Viewfinder 4
Data Panel 5
Attaching the Neckstrap....6
Getting Started
- Power 7
Battery Installation 7
Battery-condition Indicator 8
Auto Power Off 9
- Film 10
Automatic Film-speed Setting .....10
Loading Film 11
- Holding the Camera .....14
4.Shutter-release Button....15
-
Taking a Picture .....16
-
Film Rewind ..... 19
Automatic Film Rewind .....19
Manual Start of Film Rewind .....20
Operation in Detail
- Advanced Program Zoom (APZ) .....21
Eye Start Operation .....21
Automatic Zoom Control .....22
-
Manual Zoom Control....24
-
Focus Hold....26
Off-center Subjects .....26
Focusing in Special Situations .....27
-
Flash....28
-
Self-timer 32
Troubleshooting 34
Care and Storage 36
Technical Details 38
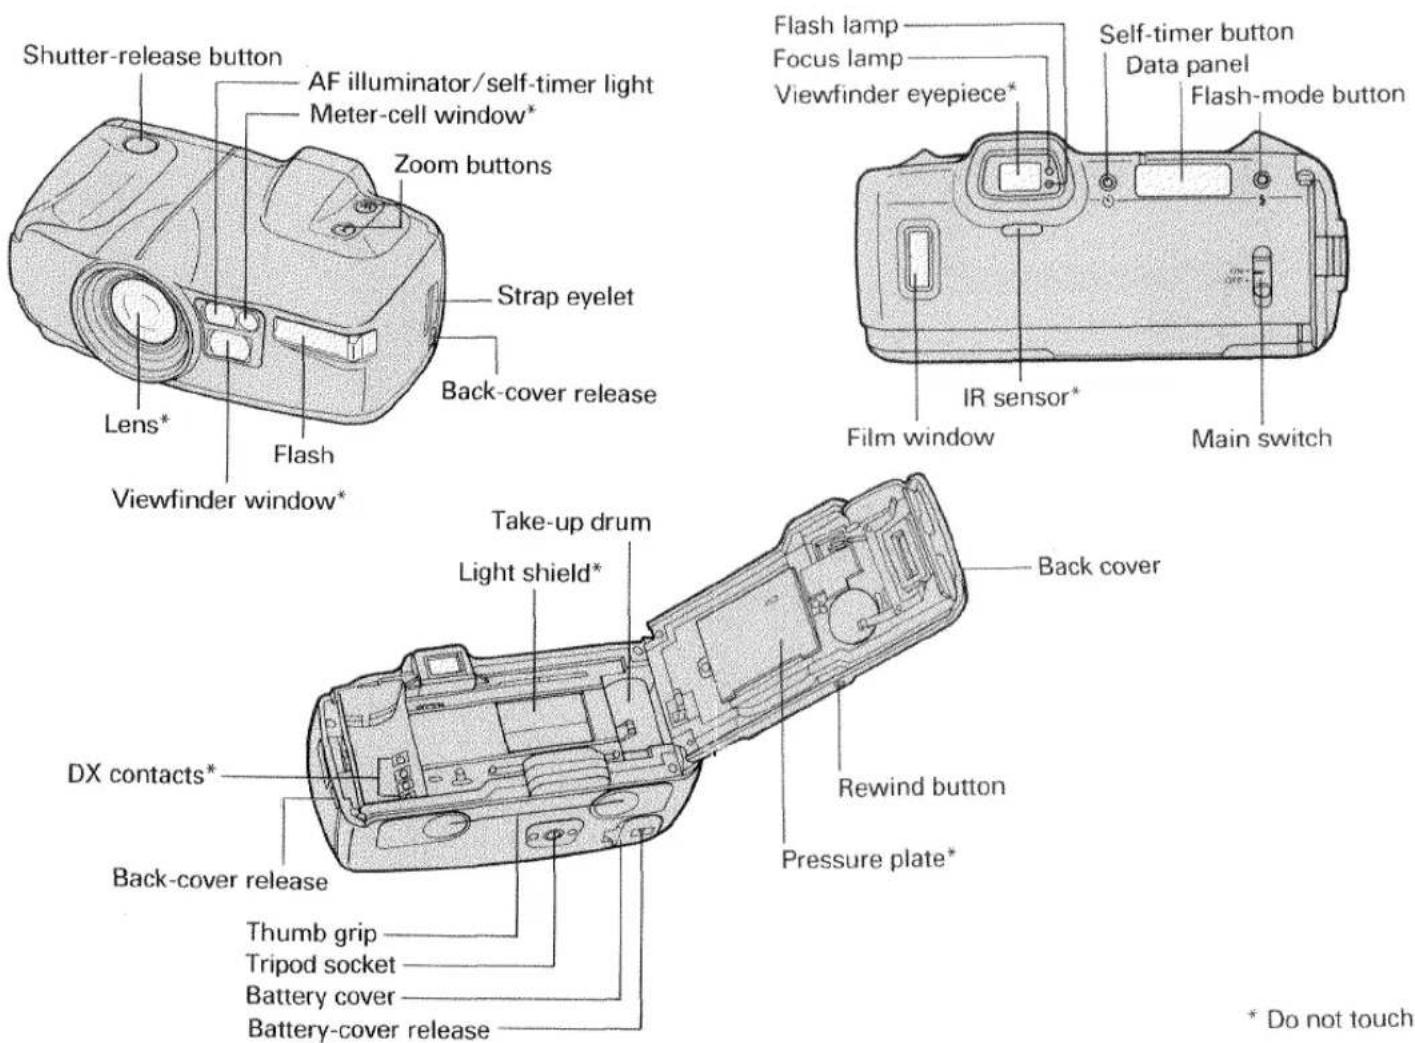
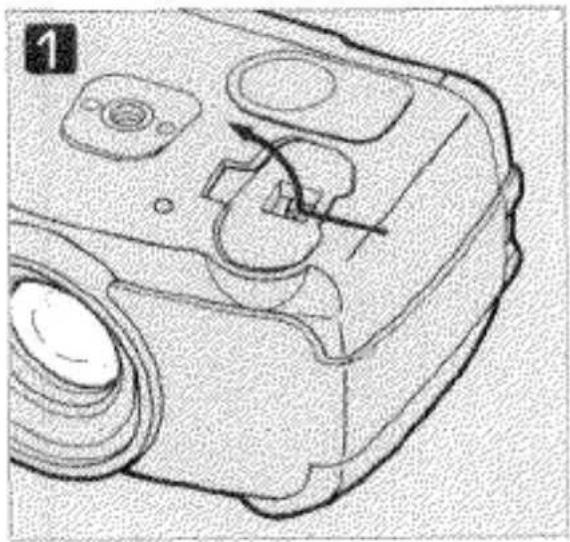
NAMES OF PARTS
text_image
Shutter-release button AF illuminator/self-timer light Meter-cell window* Zoom buttons Lens* Flash Viewfinder window* Strap eyelet Back-cover release Flash lamp Focus lamp Viewfinder eyepiece* Self-timer button Data panel Flash-mode button IR sensor* Film window Main switch Take-up drum Light shield* DX contacts* Back-cover release Thumb grip Tripod socket Battery cover Battery-cover release Rewind button Pressure plate* Back cover * Do not touchVIEWFINDER

text_image
① ② ③① Focus mark: when focusing, should be centered on your main subject
② Focus lamp (green): when the viewfinder is brought to eye level, blinks if focus cannot be confirmed; glows when shutter-release button is pressed partway down to indicate focus, exposure and zoom settings are locked
③ Flash lamp (orange): operates when the viewfinder is brought to eye level according to the mode setting and lighting conditions; while flash is charging, blinks at 8Hz (8 times per second); auto pre-flash mode ( ^5 ): glows when flash will fire; blinks at varying intervals when a pre exposure burst will be used; autoflash mode ( ^5 ): glows when flash will fire; manual fill-flash mode ( ^4 ): glows each time the camera is brought to eye level; flash-off mode ( ^3 ): blinks at 2Hz (twice per second) to recommend use of flash
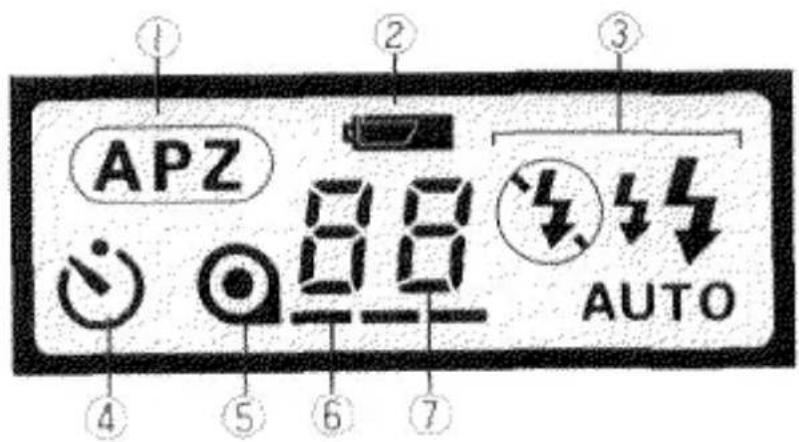
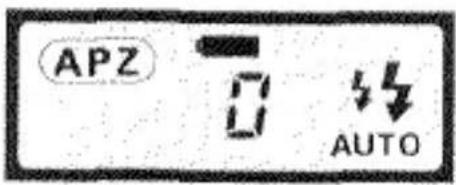
DATA PANEL
text_image
① APZ 88 AUTO ② ③ ④ ⑤ ⑥ ⑦① APZ indicator: displayed continuously, except when self-timer operation or fixed-override manual zoom control is selected
② Battery-condition indicator: when the camera is switched on, shows an appropriate battery display
③ Flash-mode indicator: displays current flash-mode setting
④ Self-timer indicator: displayed when the self-timer function is set (APZ is automatically canceled when self-timer operation is selected.)
⑤ Film-cartridge mark: displayed when film is loaded; blinks when rewind is complete
⑥ Film-transport signals: displayed while film is extended from the film cartridge
⑦ Frame counter: displays the current frame number
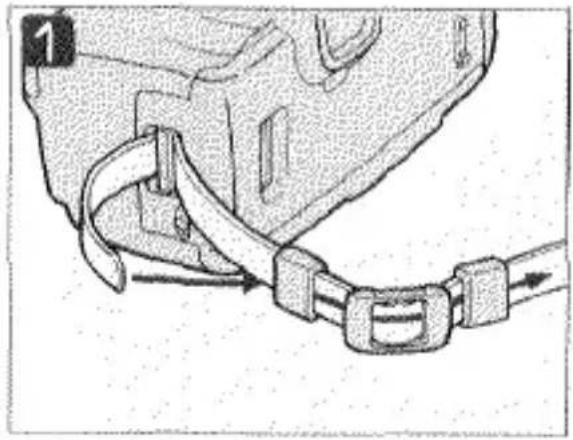
ATTACHING THE STRAP
Attach the strap as shown.
natural_image
Diagram of a car seatbelt buckle securing a vehicle (no text or symbols)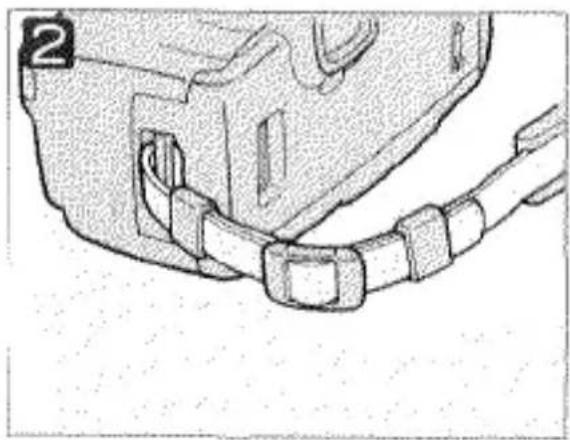
natural_image
Technical line drawing of a mechanical component with no visible text or symbols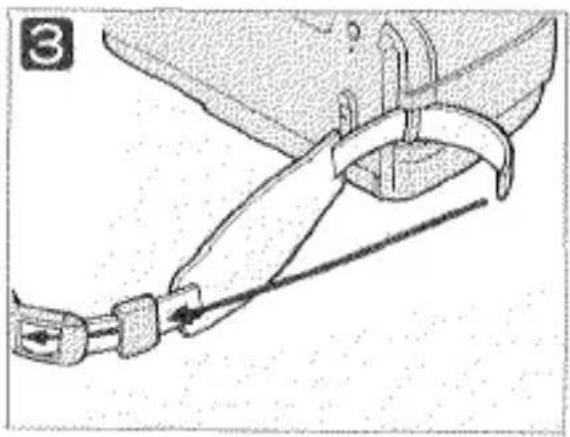
natural_image
Line drawing of a mechanical clamp or tool with a chain, no text or symbols present
natural_image
Technical line drawing of a mechanical clamp or bracket assembly (no text or symbols)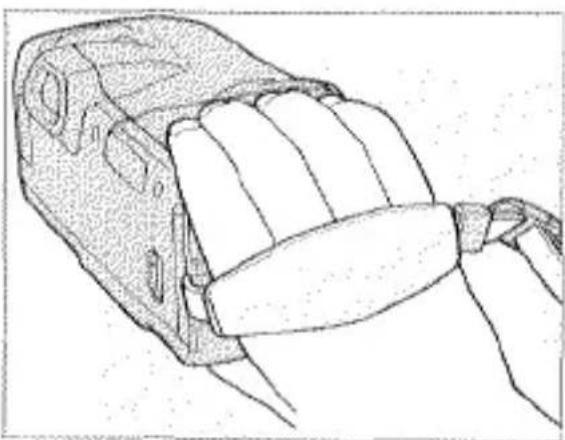
natural_image
Line drawing of a hand gripping a mechanical component (no text or symbols)For added convenience, the right end of the neckstrap is fitted with a handstrap that can be used to hold the camera, as shown at left.
GETTING STARTED
1. POWER
Your Riva Zoom 105i/Freedom Zoom 105i uses a six-volt 2CR5 lithium battery that supplies power for all camera operations.
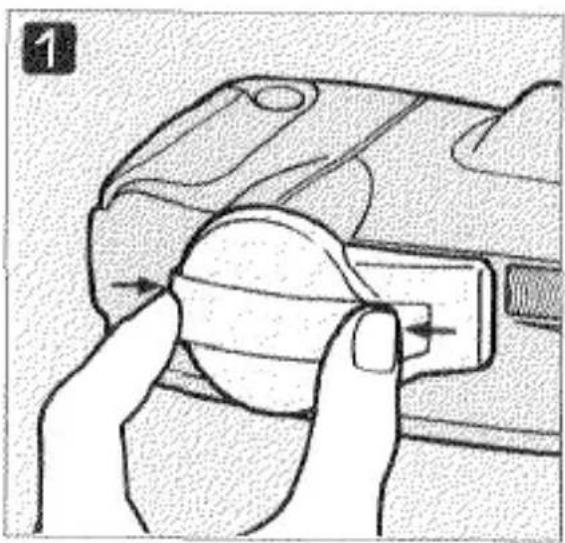
Battery Installation
natural_image
Technical line drawing of a mechanical device with no visible text or symbols
natural_image
Technical line drawing of a mechanical component with no visible text or symbols1 With the main switch at OFF, slide the battery-cover release in the direction shown to open the battery cover.
If necessary, wipe the battery terminals with a dry cloth to ensure proper contact.
② Insert the battery as shown, then snap battery cover closed.
Battery-Condition Indicator
Each time you slide the main switch to ON the camera automatically checks the battery and, provided there is adequate power, displays an appropriate indicator in the data panel:
text_image
APZ 0 AUTOFull-battery symbol appears in the data panel for five seconds: Power is sufficient for camera operation.
text_image
APZ AUTOBlinking low-battery symbol appears with other indicators: Camera can be operated, but the battery will need to be changed soon.

natural_image
Simple line drawing of a light bulb with rays, no text or symbols presentBlinking low-battery symbol alone appears, or the data panel remains completely blank: Power is too low for normal operation, and the shutter remains locked-replace the battery.
Auto Power Off
To conserve power, the camera automatically shuts itself off if it is not operated for more than one hour. To restore the data panel display and resume operation, press the shutter-release button lightly.
Battery Cautions
- Read and follow all warnings and instructions supplied by the battery manufacturer.
- Keep batteries away from children.
- Do not attempt to disassemble, recharge, or short out the battery, or subject it to high temperatures or fire.
The battery may explode and cause burns.
2. FILM
Automatic Film Speed Setting
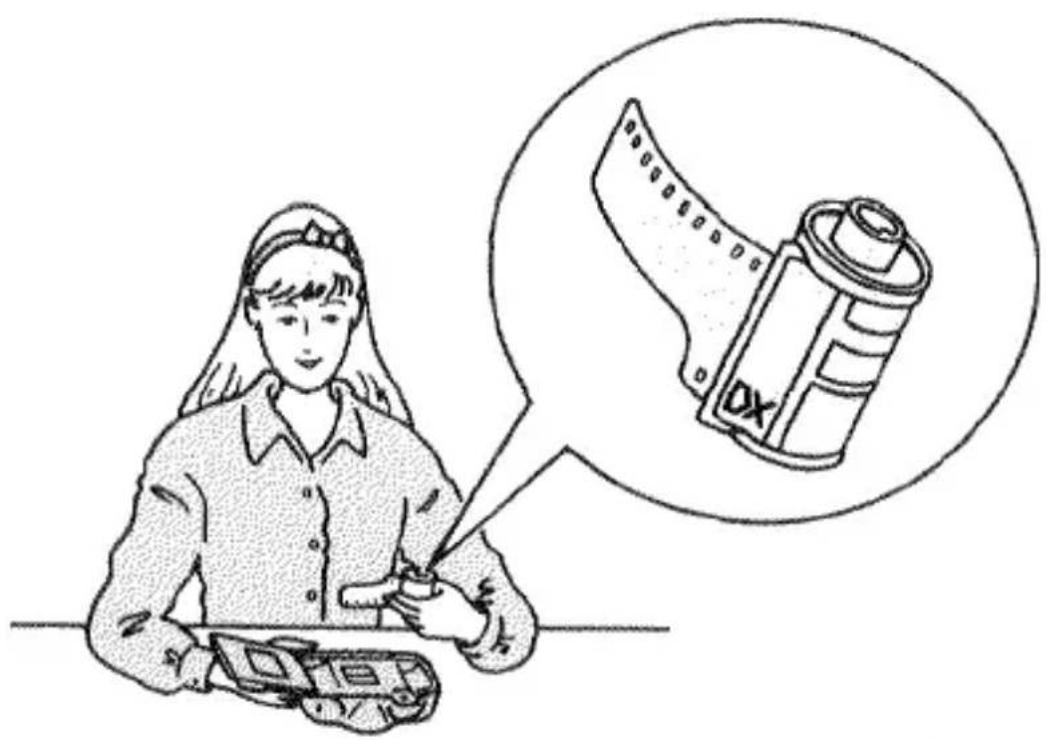
Only 35mm film can be used in this camera. We recommend using only DX-coded (DX is printed on the film cartridge) ISO 25 to 3200 films, for which the correct ISO speed will be automatically set. The camera will set the film speed to ISO 25 when cartridges without DX coding are loaded.
72 exposure cartridges and Polaroid instant 35mm films cannot be used.
natural_image
Illustration of a medical professional examining a device with a thought bubble showing a cylindrical device (no text or symbols present)Use of DX-coded, ISO 25 to 3200 films is recommended.
Loading Film

text_image
1 OR- OFF-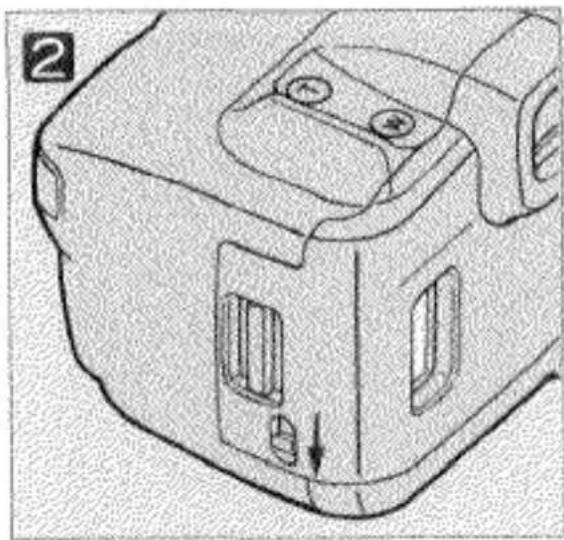
natural_image
Technical line drawing of a mechanical component with no visible text or symbolsSet the main switch to ON.
② Use the back-cover release to open the back cover, as shown.
- Before opening the back cover, check that 0 is displayed in the frame counter; if not, film is already loaded and the camera should not be opened. The type of film loaded can be verified by checking the film window. (Refer to p. 20 for instructions to rewind an unifinished roll of film.)
- Load film in subdued light, or at least shaded from direct sunlight.
natural_image
Cross-sectional diagram of a camera module showing internal components and a downward arrow indicating motion (no text or symbols)
natural_image
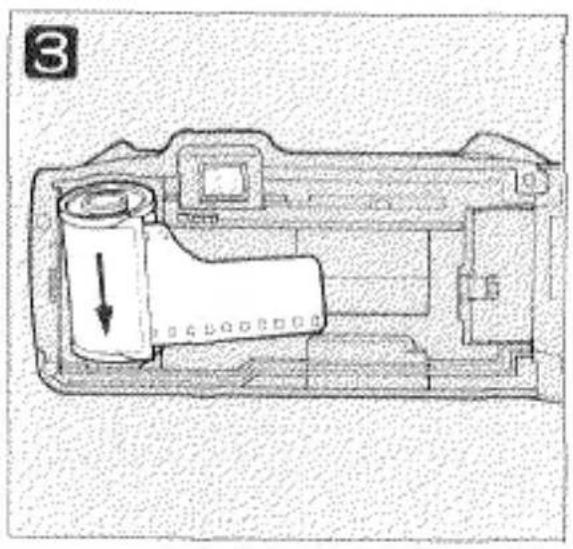
Technical line drawing of a mechanical device interior (no text or symbols)3 Place the film cartridge into the film chamber as shown.

text_image
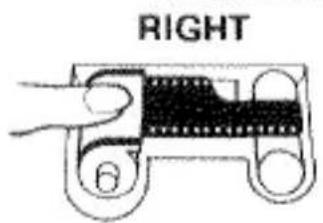
RIGHT
text_image
WRONGMake sure the tip of the film is shaped correctly; otherwise, the film may not wind properly.
4 Lay the film flat between the guide rails and extend the tip of the film over the take-up drum to the orange film mark.
text_image
RIGHT 6
text_image
WRONGIf the film extends too far, gently push the excess back into the cartridge.
text_image
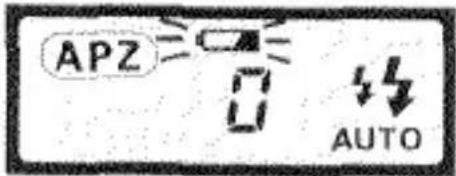
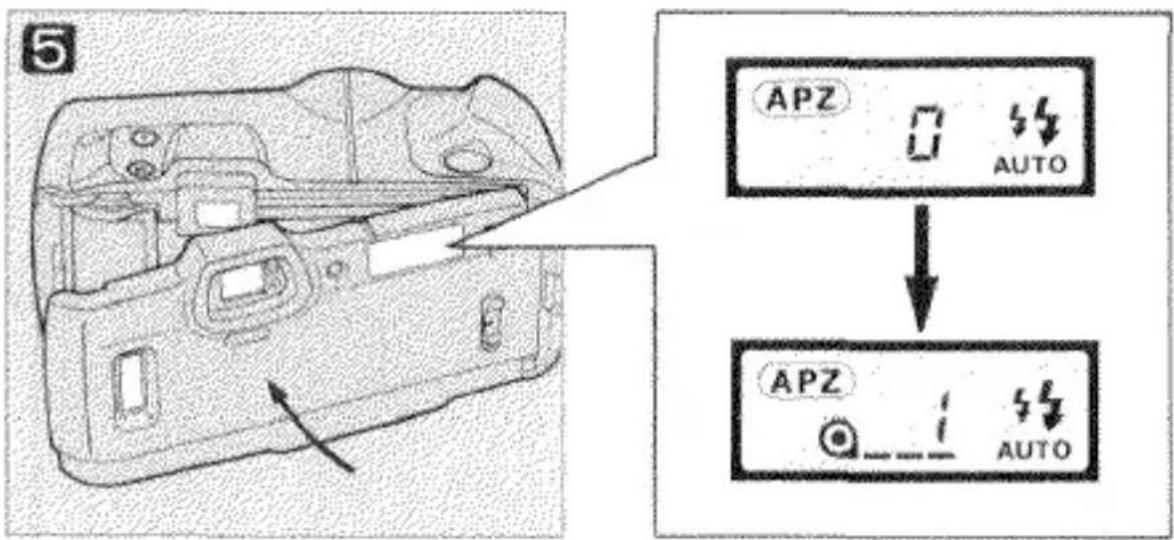
5 APZ AUTO APZ AUTO5 Close the back cover.
The film will advance automatically to the first frame. When 1 appears in the frame counter, the camera is ready for taking pictures.

text_image
APZ 江If 0 blinks in the data panel, the film is loaded incorrectly. Open the back cover and repeat steps 2 through 5.
When loading film, avoid touching the parts of the camera indicated with blue shading.
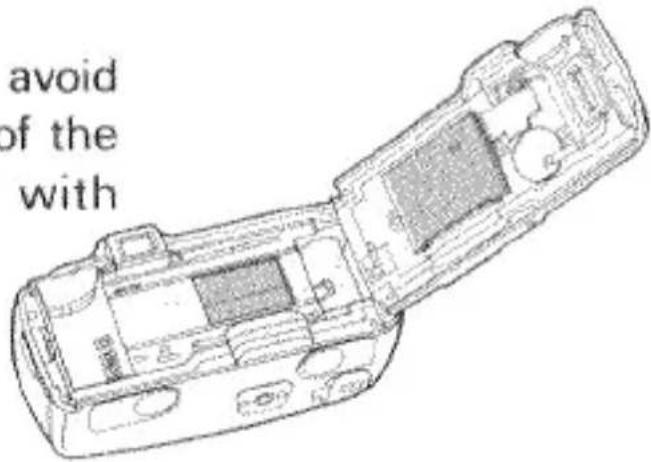
text_image
avoid of the with3. HOLDING THE CAMERA
natural_image
Line drawing of a person holding a camera, no text or symbols present
natural_image
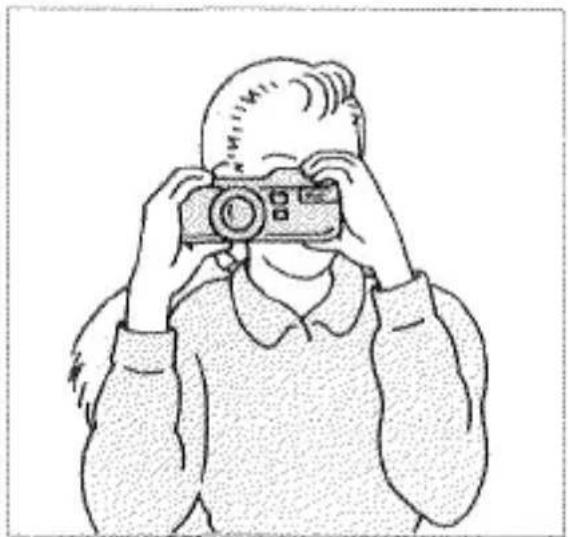
Line drawing of a person holding a camera, no text or symbols presentTo obtain sharp, blur-free photos, hold the camera as still as possible and steady it against your face or body. To take pictures, press the shutter-release button gently with a slow, steady squeeze — never a quick jab.
Two recommended ways of holding the camera are shown here. When taking pictures with the camera held horizontally, use the thumb grips on the bottom of the camera for secure handling. For vertically framed pictures, make sure to hold the camera so that the flash is on top.
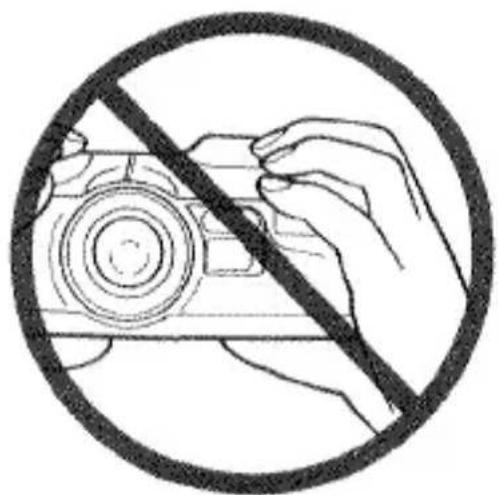
natural_image
Symbol of a hand holding a camera with a diagonal line crossing through, enclosed in a circle (no text or symbols)When taking pictures, be sure to keep your fingers clear of the flash.
4. SHUTTER-RELEASE BUTTON
natural_image
Technical line drawing of a mechanical component with no visible text or symbolsRest
Partway down: Focus, exposure and zoom settings fixed
All-the way down: Shutter released

natural_image
Three-step illustration showing hand pressing down on a rectangular block, with no text or symbols present.In describing camera operation, this manual refers to two shutter-release button operating positions: a pre-release, "partway-down" position, used to memorize current focus, exposure and zoom settings (see Focus Hold, p. 26), and an "all-the-way" down position that triggers the shutter-release sequence. Both operating positions, as well as the rest positions, are illustrated above.
5. TAKING A PICTURE
natural_image
Illustration of a hand pressing a button on a device (no text or symbols visible)
text_image
2 ON: OFF:This section provides a brief description of camera operation, enough to get you started taking pictures. A more complete explanation, as well as information on optional features, can be found in Operation in Detail.
1 Remove the lens cap by pressing in on its side tabs.
2 Set the main switch to ON.
natural_image
Technical line drawing of a mechanical assembly with two intersecting components (no text or symbols)The lens cap can be clipped onto the neckstrap for easy storage when the camera is in use.
3

natural_image
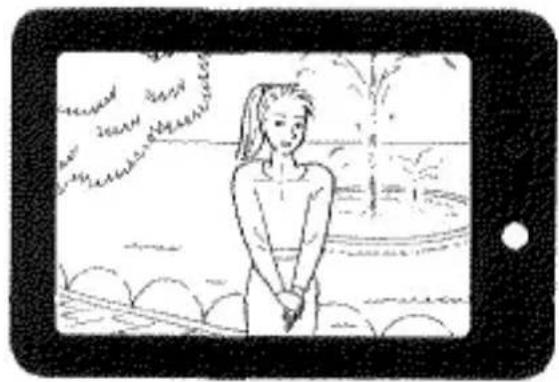
Black-and-white line drawing of a woman standing by the seaside under a tablet (no text or symbols)③ Looking through the viewfinder, center the focus mark on your subject, then press the shutter-release button down to take the picture.
- When you look through the viewfinder the lens zooms automatically, based on your subject's distance from the camera. Refer to p.21 for details on APZ operation.
- As the shutter-release button is pressed down the focus lamp glows, indicating that focus, exposure and zoom settings are fixed.
- The minimum focusing distance is 0.7 meters (2.3ft). If you try to photograph a subject whose distance from the camera is less than 0.7 meters, or in other situations where the camera is unable to confirm focus (p.27), the focus lamp will blink and the shutter will remain locked.
- In low light conditions, the camera's AF illuminator is automatically switched on to facilitate subject detection by the autofocus system.

text_image
APZ AUTO → APZ AUTOAfter you take a picture, the film is automatically advanced and the frame counter increases by one.
- If ambient lighting conditions require the use of flash, the orange flash lamp will glow when you look through the viewfinder, and the flash, will fire when the picture is made. Refer to p.28 for details on flash operation. - To photograph moving subjects, follow the procedure described above: center the focus mark on your subject, then press the shutter-release button down in single, continuous motion. Predictive focus control is an automatic function, activated whenever the camera detects an approaching subject moving at sufficient speed; by compensating for shutter-release time lag, it enables you to get sharply focused pictures even with moving subjects.
- When you are done taking pictures, be sure to switch the camera off to conserve battery power, and attach the lens cap.
6. FILM REWIND
Automatic Film Rewind

text_image
APZ 36 → APZ ≡○≤0After the last frame on the roll is exposed, the camera automatically starts rewinding the film. While rewind is in progress, the frame counter counts down to 0.
When film rewind is complete, the frame counter displays 0 and the data panel's film-cartridge mark blinks to indicate that the film cartridge can be removed. Open the back cover and remove the film. The shutter remains locked if a rewound film cartridge is left in the film chamber.
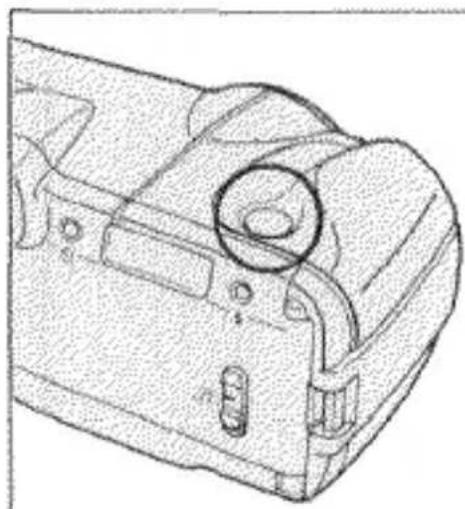
Manual Start of Film Rewind

natural_image
Technical line drawing of a mechanical component with a tool inserted, showing no text or symbols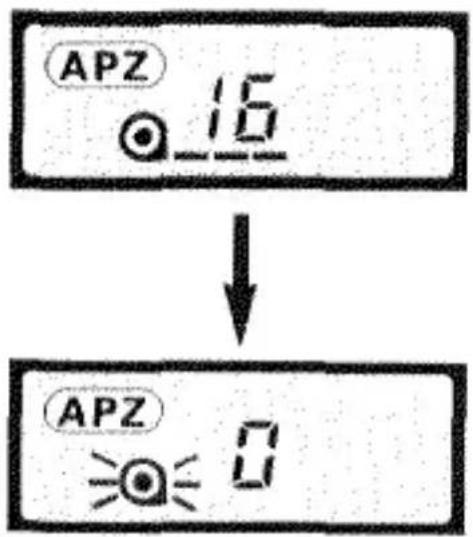
text_image
APZ 16 ↓ APZ 0You can also rewind a roll of film before the last picture is taken. To start film rewind manually, use a ball-point pen or similar object to press the rewind button located on the bottom of the camera. As with automatic rewind, wait until the blinking film-cartridge mark is displayed in the data panel before opening the back cover to remove the film.
OPERATION IN DETAIL
7. ADVANCED PROGRAM ZOOM (APZ)
When you look through the viewfinder, the camera automatically measures the distance to your subject and sets a lens zoom position based on the distance measured. APZ is the system that integrates these automated functions.
Eye Start Operation
Automatic zoom control is switched on and off by an IR sensor located just below the viewfinder eyepiece. Whenever the sensor detects an object closer than approximately 6 to 8cm (2-3/8 to 3-1/8 in.), automatic zoom control is activated; when the detected object moves out of sensor's sensitivity range, zoom control is switched off.

natural_image
Line drawing of a person's face facing away with a device emitting sound waves (no text or symbols)APZ's automatic zoom control is switched on by an IR sensor that detects when you look through the viewfinder.
- When the camera is rested (i.e., detection by the IR sensor is interrupted) following an APZ exposure, the zoom position will be automatically reset to 35mm.
- To conserve power, automatic zoom control is switched off whenever detection by the IR sensor occurs continuously for about three minutes without further camera operation. It can be easily restored either by pressing lightly on the shutter-release button, or by momentarily interrupting detection by the IR sensor.
Automatic Zoom Control
By automatically adjusting the zoom position when you look through the viewfinder, APZ saves time in setting up a picture; with moving subjects, it continues to adjust the zoom setting as the subject's position changes. In general, APZ's distance-based control of the zoom setting, illustrated below, produces framing similar to what might be set using manual zoom control.

natural_image
Black-and-white photo of a person in a white coat standing on steps, holding a phone to their ear (no visible text or symbols)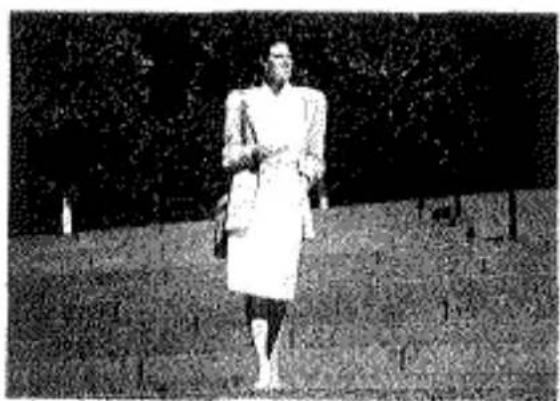
natural_image
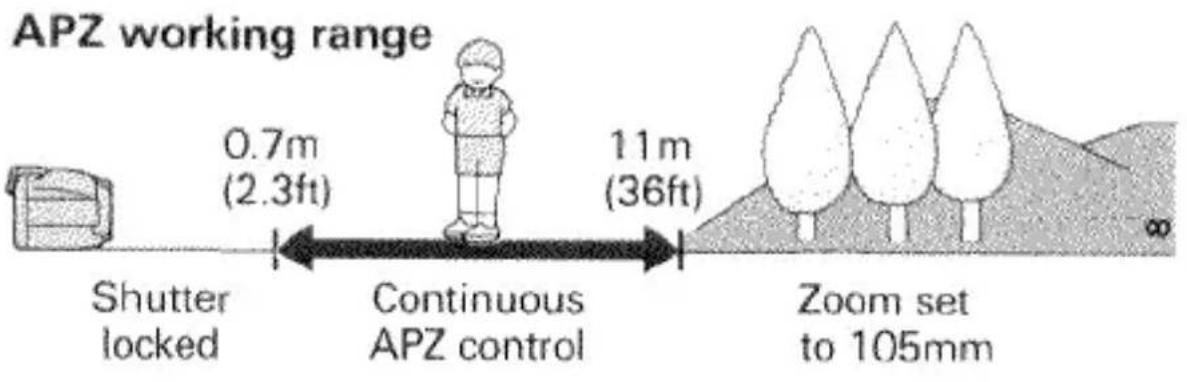
Black-and-white photo of a person walking outdoors on grass, wearing a white coat and boots (no visible text or symbols)APZ's working range is approximately 0.7-11m (2.3-36ft); for subjects within this range, the focal-length setting will be continuously adjusted to match your subject's position. When the camera-subject distance is greater than 11m(36ft), the lens focal length will be set to 105mm.
text_image
APZ working range 0.7m (2.3ft) 11m (36ft) Shutter locked Continuous APZ control Zoom set to 105mm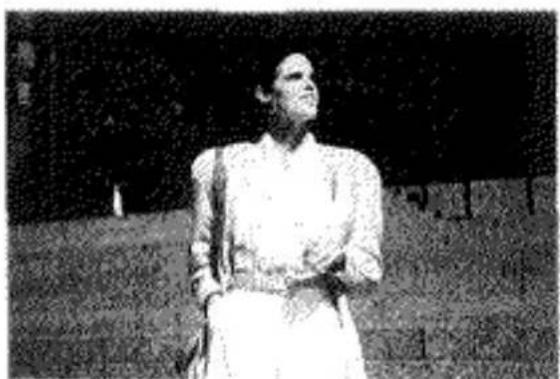
natural_image
Black-and-white photo of a person in traditional attire standing outdoors (no visible text or symbols)When your subject approaches the camera, APZ zooms the lens towards the wide position, increasing image magnification.
8. MANUAL ZOOM CONTROL
Should you want to control the zoom setting yourself, two options for power-assisted manual zoom control are available: one-shot override, which is convenient for overriding APZ for a single exposure, and fixed override, which cancels APZ for the duration of the current operating cycle—i.e., until the camera is switched off. The camera's minimum focusing distance depends on the zoom setting; it ranges from 0.7 meters (2.3ft) at the wide position (35mm), to 1.2 meters (3.9ft) at the tele position (105mm).
One-Shot Override

natural_image
Technical line drawing of a mechanical component with two circular features and arrows indicating direction (no text or symbols)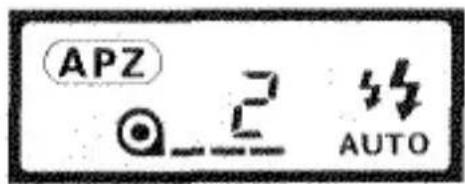
text_image
APZ AUTOOperating manual zoom control is easy. Press the W (wide) button to zoom the lens towards the 35mm position, or the T (tele) button to zoom towards 105mm. When the scene is framed as you like, press the shutter-release button down to take the picture as you would otherwise.

text_image
35mm 70mm 105mmThe cancellation of APZ obtained with one-shot override lasts only as long as detection by the IR sensor is sustained; once the camera is rested so that detection by the IR sensor is interrupted, APZ is reset and automatic zoom control resumes when you next look through the viewfinder.
Fixed Override

text_image
2 AUTOFixed-override mode, which provides you with open-ended manual zoom control, is set by pressing down the T and W buttons at the same time; when you do so, the APZ indicator disappears from the data panel, indicating that manual zoom control is set.
With manual control set, the lens can be zoomed by pressing the T and W buttons as described above for one-shot mode, the difference being that the zoom position you select will remain set from frame to frame until you decide to change it. Once selected, fixed override remains set until the camera is switched off; when you turn the camera on again, APZ operation resumes.
9. FOCUS HOLD
Focus hold enables you to adapt autofocus for situations where your main subject is positioned outside the center of the viewfinder frame. It is also useful for photographing subjects that cannot be autofocused directly.
1
natural_image
Illustration of a person standing outdoors near trees and water, no text or symbols present2

natural_image
Illustration of two women standing outdoors near a tree, one gesturing while the other holds hands (no text or symbols)Off-center Subjects
1 Center the focus mark on your subject, then press the shutter-release button partway down so that the focus lamp glows.
Keeping the shutter-release button held partway down, so that the focus lamp continues to glow, recompose the frame as desired, then press all-the-way down to take the picture.
- When the focus lamp glows, current focus, exposure, and zoom settings are fixed.
- Focus hold is easily canceled by removing your finger from the shutter-release button.
- In general, focus hold is not recommended for photographing moving subjects; predictive focus control does not operate when focus hold is used.
Focusing in Special Situations
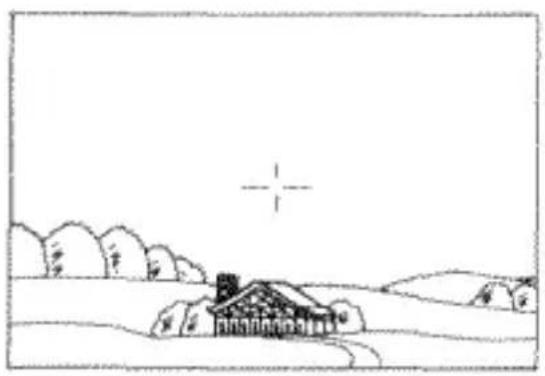
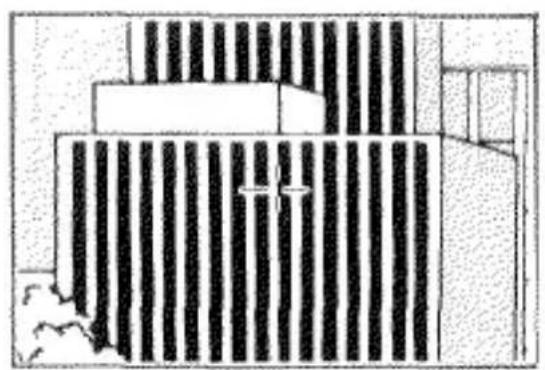
Focus hold is also useful for obtaining accurate focus on subjects difficult for autofocusing, such as those listed below. In cases like these, use focus hold to set focus on another object at the same distance from the camera as your subject, then recompose the viewfinder image as required and release the shutter.
natural_image
Simple line drawing of a rural landscape with a house, trees, and a cross symbol (no text or symbols)Subjects low in contrast, especially horizontal contrast

natural_image
Illustration of a lion resting in vertical bars, no text or symbols presentScenes in which objects at different distances from the camera are covered by the focus mark
natural_image
Architectural cross-section diagram showing building facade with vertical stripes and structural elements (no text or labels)Subjects composed of alternating light and dark lines
10. FLASH
natural_image
Technical line drawing of a camera body panel with adjustment knobs and a dial indicator (no text or symbols)
flowchart
graph TD
    A["START"] --> B["AUTO"]
    B --> C["AUTO"]
    C --> D["Feedback Loop"]
    D --> E["Auto"]
    E --> F["Auto"]
    F --> G["Feedback Loop"]
    G --> H["Auto"]
Your Riva Zoom 105i/Freedom Zoom 105i offers a choice of four flash modes, including auto pre-flash, autoflash, manual fill-flash, and flash-off. Auto pre-flash is the standard position, set each time you turn the camera on; the other modes can be selected in sequence by pressing the flash-mode button, as shown above.
In situations where flash will be used, the shutter remains locked until the flash has finished charging, and the flash lamp will blink at 8Hz (8 times per second) while charging is in progress. If when you press the shutter-release button down charging is not complete, briefly remove your finger from the shutter-release button to allow the flash to finish charging, then resume operation.
Auto Pre-Flash Mode ( ^55 )
Auto pre-flash mode automatically fires the flash when required and, in low light situations, provides a pre-exposure flash burst to reduce red-eye.
When you bring the viewfinder to eye level, the camera's metering system evaluates the ambient lighting. In cases where it determines that flash is required, the flash lamp glows to indicate that the flash will fire when you take the picture; when a pre-exposure flash burst will be given as well, the flash lamp blinks at varying intervals to indicate this.
Autoflash Mode ( ^4 )
Autoflash differs from auto pre-flash mode by the absence of a pre-exposure flash in low-light situations. As in auto pre-flash mode, whenever the metering system determines that flash is required, the flash lamp glows when you bring the camera to eye level, and the flash fires automatically when you take the picture.
Manual Fill-Flash Mode (‡)
In most situations, the autoflash modes described above provide reliable operation, including firing the flash under bright conditions to fill in subject shadows when sufficiently strong backlight is detected.
In certain cases, however, selecting manual fill-flash mode, where the flash fires each time a picture is taken, may give improved results. One such case might include situations where small or light shadows, not sufficient to activate auto fill-flash, obscure your subject's features. Another example would be situations where your subject is illuminated by a fluorescent light source that might otherwise produce a greenish picture cast.
Flash-off Mode (3)
In certain situations non-flash photography may be preferred, for instance when photographing fireworks, or taking pictures inside a museum.
When flash-off mode is selected, the flash will not fire, regardless of the ambient lighting. However, in cases where the metering system judges that flash should be used, the flash lamp will blink at 2Hz (twice per second) when you frame the subject in the viewfinder.
Flash Range
Flash range will vary with both the lens zoom setting and the speed of the film in use. The table below shows the flash range for ISO 100, 200, and 400 speed films with the lens at wide and tele positions.
| ISO 100 | ISO 200 | ISO 400 | |
| 35mm | 0.7-5.5m(2.3-18ft) | 0.8-7.8m(2.6-26ft) | 1.1-11.0m(3.6-36ft) |
| 105mm | 1.2-3.3m(3.9-11ft) | 1.2-4.7m(3.9-15ft) | 1.2-6.6m(3.9-22ft) |
Flash Range (ISO 100 film)
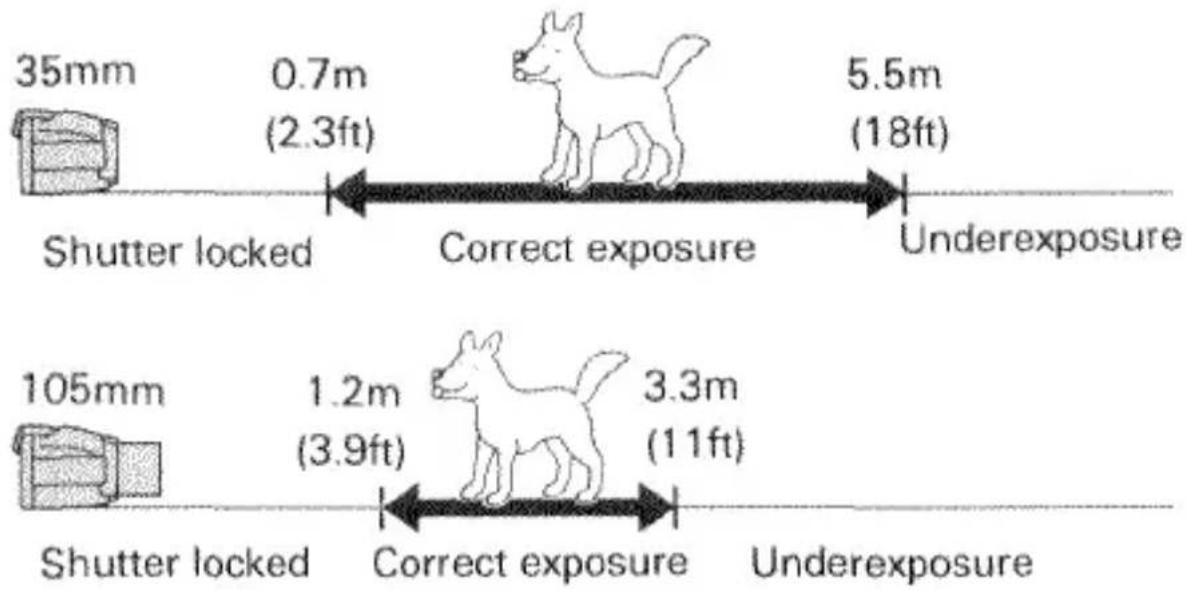
text_image
35mm 0.7m (2.3ft) Correct exposure 5.5m (18ft) Shutter locked Underexposure 105mm 1.2m (3.9ft) Correct exposure 3.3m (11ft) Shutter locked UnderexposureWhen taking flash pictures, be sure to check that your subject is within range of the flash.
11. SELF-TIMER

text_image
Technical diagram of a camera or scanner component with numbered parts and directional arrows indicating parts of the dial.
text_image
AUTOTo set a ten second delay in shutter release, press the self-timer button. The self-timer indicator (☐) will appear in the data panel, indicating that self-timer operation is set. When the scene is composed as you wish, press the shutter-release button down in the usual way to take the picture. Both the self-timer light on the front of the camera and the data panel indicator will begin blinking to indicate operation, and the picture will be taken about ten seconds later.
The self-timer can also be used in combination with focus hold. In this case, set the self-timer and focus the camera on your main subject; then, after pressing down the shutter-release button to start the self-timer, recompose the picture as required. Focus will remain set to the distance focused on when the self-timer was started.
- Selecting self-timer operation sets a temporary cancellation of APZ, indicated by the disappearance of the APZ indicator from the data panel. Once self-timer operation is set, use the zoom buttons to frame the scene as desired. After the picture is taken, APZ is automatically restored.
- To cancel the self-timer prior to pressing the shutter-release button, press the self-timer button a second time. To cancel the self-timer once the shutter-release button has been pressed, but before the picture has been taken, move the main switch to OFF.

natural_image
Black-and-white photo of a family group outdoors on grass, no visible text or symbolsTROUBLE SHOOTING
| Problem | Cause | Solution | Page |
| Entire picture blurred | Camera Movement | Hold camera steady and release shutter gently. | 14 |
| Subject out of focus | Focus mark not on main subject | Use focus hold. | 26 |
| Picture too dark, or partial picture | Lens or flash obstructed | Keep hands, camera strap, and other objects clear. | 14 |
| Subject beyond flash range | Make sure subject is within flash range. | 30 | |
| Shutter cannot be released | Main switch on OFF | Switch to ON. | 16 |
| Subject too close to camera (focus lamp blinks) | Make sure subject is at least 0.7m/2.3ft away.(1.2m/3.9ft with lens at 105mm) | 24 | |
| Special focusing situation (focus lamp blinks) | Use focus hold. | 26 | |
| Flash charging (flash lamp blinks) | Wait a moment for the flash to charge. | 28 | |
| Battery is exhausted | Replace battery. | 7 | |
| Battery inserted incorrectly | Remove and insert correctly. | 7 | |
| Rewind is complete but film cartridge remains in camera | Remove film. | 19 | |
| Circuit fault | Remove and reinstall the battery. | 7 | |
| Frame counter blinks during operation and the shutter cannot be released | Winding malfunction | Rewind the film by pressing the rewind button. | 20 |
| APZ does not function | Self-timer set | Exit self-timer mode. | 32 |
| Override set | Restore APZ operation as explained in section 8. | 25 | |
| Data panel indicators not displayed when the main switch is at ON | Auto power off | Press the shutter-release button lightly. | 9 |
| Battery exhausted | Replace the battery. | 7 |
CARE AND STORAGE
- If the lens becomes dirty, clean it gently with a lens brush. If necessary, moisten a sheet of lens tissue with one drop of lens-cleaning fluid and gently wipe the lens. Never touch the lens surface with your fingers.
- Never use alcohol or chemical solvents on the camera body. If it is dirty, wipe it gently with a soft, clean, dry cloth.
- Never subject the camera to shock, high heat, or humidity. Be particularly careful not to leave it in the glove compartment or other places in motor vehicles where it may be subjected to high temperatures.
- This camera is designed for use between -10^ and 40^ (14°F to 104°F).
- Using the camera at very low temperatures impairs its performance. In cold weather, carry the camera inside your coat to keep it warm. Do not transfer the camera directly from an extremely cold to warm area, since condensation may form inside and prevent normal operation.
- Do not let the camera get wet. Water seepage could result in costly or irreparable damage to internal parts.
- Entry of sand, salt, or other grit may cause costly or irreparable damage to the camera. Use extra care when taking pictures at the beach.
- When not in use, keep the camera in a cool, dry place away from dust and chemicals. For extended storage we recommend that you place the camera in an airtight container with a drying agent such as silica gel.
- If you have questions about your camera, contact your local camera dealer. For more information write to the Minolta distributor or subsidiary in your area (addresses listed at the end of this manual.)
- This camera contains high-voltage circuits. Do not attempt to disassemble or repair it yourself.
- To assure prompt service, please contact an authorized Minolta Service Center before shipping your camera for repairs.
TECHNICAL DETAILS
Type: 35mm autofocus lens-shutter camera
Lens: 35-105mm f/4-6.7 power zoom lens
Autofocus System: Minolta's through-the-lens (TTL) phase-detection type with wide charge-coupled device (CCD) sensor; range: 0.7m (2.3ft.)-infinity (35-60mm), 1.2m (3.9ft.)-infinity (105mm); maximum magnification (105mm, 1.2m): 1/12X; sensitivity range (ISO 100): EV 0 to 18; predictive focus control; cancelable AE-coupled focus hold; automatically activated AF illuminator (range: 0.7 to 5 meters/2.3 to 16ft); shutter lock when focus cannot be confirmed
Zoom Control: APZ (sensor activated) provides programmed selection of focal-length setting based on subject distance; zoom buttons for manual zoom control Metering System: External type; two-segment silicon photocell for separate illuminance readings of center and background picture areas; variable segment weighting based on AF-system input; acceptance angle automatically adjusted to match focal length position
Autoexposure: Programmed autoexposure; range (ISO 100): EV 5 to EV 17 (1/2 sec. at f/4 to 1/500 sec. at f/16) at 35mm setting, EV 6.5 to EV 18.5 (1/2 sec. at f/6.7 to 1/500 sec. f/27) at 105mm setting
Flash System: Four selectable modes: auto pre-flash: flash fires automatically when required, with an initial burst approx. 0.75 sec before exposure to reduce red-eye in low light situations; autoflash: flash fires automatically when required; manual fill-flash: flash fires each time a picture is taken; flash-off: cancels flash for non-flash photography; range (ISO 100): 0.7-5.5m (2.3-18.0ft.) at 35mm, 1.2-3.3m (3.9-10.8ft.) at 105mm; recycling time: 3.5 sec.
Film Speed Range: Automatic setting for DX-coded ISO 25-3200 film; ISO 25 set for films without DX coding
Viewfinder: Image area: 85% coverage; focus mark; LED lamps show focus and flash status
Controls: Main switch with ON and OFF positions; zoom buttons for user-selected focal-length settings; flash-mode button; self-timer button; manual rewind button; focus, exposure and zoom settings fixed when shutter-release button is held partway down
Film Transport: Automatic threading, auto advance to first frame, auto winding, auto rewind and auto rewind stop; rewind button for manual start of rewind
Data Panel: LCD with indications for APZ operation, battery condition, flash mode, frame number, film transport, film loaded, and self-timer operation
Self-Timer: 10-sec. shutter-release delay; operation indicated by blinking LED on front of camera and self-timer indicator in data panel
Power: 6V lithium battery pack (2CR5) powers camera operation; data-panel indicator shows battery condition when camera is switched on; shutter remains locked when battery is exhausted; auto power shut-off when camera is not operated for one hour
Battery Performance: Approximately 25 rolls (Based on Minolta's standard test method, using 24-exposure film with flash on 50% of the exposures.)
Dimensions: 153(W) X 64.5(H) X 84.5(D)mm
(6×2-9/16×3-5/16 in.)
Weight: 560g (19-3/4 oz.) without battery
Specifications subject to change without notice.
STATEMENT OF FCC COMPLIANCE
This device complies with Part 15 of the FCC Rules. Operation is subject to the following two conditions: (1) This device may not cause harmful interference, and (2) this device must accept any interference received, including interference that may cause undesired operation. Changes or modifications not approved by the party responsible for compliance could void the user's authority to operate the equipment. This equipment has been tested and found to comply with the limits for a Class B digital device, pursuant to Part 15 of the FCC Rules. These limits are designed to provide reasonable protection against harmful interference in a residential installation. This equipment generates, uses and can radiate radio frequency energy and, if not installed and used in accordance with the instructions, may cause harmful interference to radio communications. However, there is no guarantee that interference will not occur in a particular installation. If this equipment does cause harmful interference to radio or television reception, which can be determined by turning the equipment off and on, the user is encouraged to try to correct the interference by one or more of the following measures:
Reorient or relocate the receiving antenna.
Increase the separation between the equipment and receiver.
Connect the equipment into an outlet on a circuit different from that to which the receiver is connected. Consult the dealer or an experienced radio/TV technician for help.
STATEMENT OF DOC COMPLIANCE
This digital apparatus does not exceed the Class B limits for radio noise emissions from digital apparatus as set out in the Radio Interference Regulations of the Canadian Department of Communications.
Minolta Camera Co., Ltd.
3-13, 2-Chome, Azuchi-Machi, Chuo-Ku, Osaka 541, Japan
| Minolta GmbH | Kurf-Fischer-Strasse 50, D-2070 |
| Ahrensburg, Germany | |
| Minolta France S.A. | 365-367 Route de Saint-Germain, 78420 Carrieres-Sur-Seine, France |
| Minolta (UK) Limited | 1-3 Tanners Drive, Blakelands North, Milton Keynes, MK14 5BU, England |
| Minolta Austria Gesellschaft m.b.H. | Amalienstrasse 59-61, 1131 Wien, Austria |
| Minolta Camera Benelux B.V. | Zonnebaan 39, 3606 CH Maarssenbroek, P.B. 264, 3600 AG Maarssen, The Netherlands |
| Belgium Branch | Kontichsesteenweg 38, B-2630 Aartselaar, Belgium |
| Minolta (Schweiz) AG | Riedhof V, Riedstrasse 6 8953 Dietikon-Zürich, Switzerland |
| Minolta Svenska AB | Brännkyrkagatan 64, Box 17074, S-10462 Stockholm 17, Sweden |
| Finland Branch | Niltykatu 6 PL 37 SF-02201 ESPOO, Finland |
| Minolta Portugal Limitada | Av. do Brasil 33 a, 1700 Lisbon, Portugal |
| Minolta Corporation | |
| Head Office | 101 Williams Drive, Ramsey, New Jersey 07446, U.S.A. |
| Los Angeles Branch | 11150 Hope Street Cypress, CA 90630, U.S.A. |
| Chicago Branch | 3000 Tollview Drive, Rolling Meadows, IL 60008, U.S.A. |
| Minolta Canada Inc. | |
| Head Office | 369 Britannia Road East, Mississauga, Ontario L4Z 2H5, Canada |
| Vancouver Branch | 106-3850 Jacombs Road, Richmond, B.C. V6V 1Y6, Canada |
| Minolta Hong Kong Limited | Room 208, 2/F, Eastern Center, 1065 King's Road, Quarry Bay, Hong Kong |
| Minolta Singapore (Pte) Ltd. | 10, Teban Gardens Crescent, Singapore 2260 |
