
CVP-79A-CVP-69-CVP-69A-CVP-59S - Numeric keypad YAMAHA - Free user manual and instructions
Find the device manual for free CVP-79A-CVP-69-CVP-69A-CVP-59S YAMAHA in PDF.
| Product type | Digital keyboard (Clavinova) |
| Brand | YAMAHA |
| Models | CVP-79A, CVP-69, CVP-69A, CVP-59S |
| Keyboard | 88 keys (A-1 to C7), touch-sensitive |
| Sound generation | AWM (Advanced Wave Memory) |
| Polyphony | 192 notes (CVP-79A) / 172 notes (other models) |
| Voices | 192 (CVP-79A) / 172 (others) including Piano, E.Piano, Organ, Strings, etc. |
| Styles | 100 styles in Pop, Rock, Jazz, Latin, etc. categories |
| Effects | Reverb (Hall, Room, Stage, Plate, etc.), Chorus, Variation (Delay, Flanger, etc.) |
| Automatic accompaniment | ABC (Auto Bass Chord) with intro, fill, ending |
| Display | LCD 240 × 64 pixels, adjustable contrast |
| Registration memory | 25 or 15 slots, depending on model |
| Floppy disk drive | 3.5″ 2DD/2HD |
| MIDI connectivity | MIDI IN, OUT, THRU (depending on model) |
| Pedals | Right (Damper), Center (Sostenuto), Left (Soft or multi-function) |
| Dimensions (music rest down) | CVP-79A/69/69A: 1417 × 590 × 840 mm; CVP-59S: 1396 × 566 × 830 mm |
| Weight | CVP-79A: 68 kg; CVP-69: 71.5 kg; CVP-69A: 69 kg; CVP-59S: 65.5 kg |
| Power supply | 110–240 V selectable, 50/60 Hz |
| Power consumption | 120 W max (amplifiers 60 W × 2 for CVP-79A/69/69A; 30 W × 2 for CVP-59S) |
| Speakers | 2 × (16 cm + 5 cm) + 2 × 5 cm (CVP-79A/69/69A); 2 × 16 cm + 2 × 5 cm (CVP-59S) |
| Maintenance and cleaning | Clean with a soft, dry cloth. Do not use solvents. |
| Safety | Do not open the device. Use only the supplied power cord. Disconnect during thunderstorms. |
| Spare parts and repairability | Mounting screws and cables are included. For any repair, contact a Yamaha authorized technician. |
Frequently Asked Questions - CVP-79A-CVP-69-CVP-69A-CVP-59S YAMAHA
User questions about CVP-79A-CVP-69-CVP-69A-CVP-59S YAMAHA
0 question about this device. Answer the ones you know or ask your own.
Ask a new question about this device
Download the instructions for your Numeric keypad in PDF format for free! Find your manual CVP-79A-CVP-69-CVP-69A-CVP-59S - YAMAHA and take your electronic device back in hand. On this page are published all the documents necessary for the use of your device. CVP-79A-CVP-69-CVP-69A-CVP-59S by YAMAHA.
USER MANUAL CVP-79A-CVP-69-CVP-69A-CVP-59S YAMAHA
Check Your Power Supply
Make sure that your local AC mains voltage matches the voltage specified on the name plate on the bottom panel. In some areas a voltage selector may be provided on the bottom panel of the main keyboard unit near the power cord. Make sure that the voltage selector is set for the voltage in your area. The voltage selector is set at 240V when the unit is initially shipped. To change the setting use a "minus" screwdriver to rotate the selector dial so that the correct voltage appears next to the pointer on the panel.
WICHTIG
PRODUCT SAFETY MARKINGS: Yamaha electronic products may have either labels similar to the graphics shown below or molded/stamped facsimiles of these graphics on the enclosure. The explanation of these graphics appears on this page. Please observe all cautions indicated on this page and those indicated in the safety instruction section.

See bottom of Keyboard enclosure for graphic symbol markings

The exclamation point with the equilateral triangle is intended to alert the user to the presence of important operating and maintenance (servicing) instructions in the literature accompanying the product.

The lightning flash with arrowhead symbol within the equilateral triangle is intended to alert the user to the presence of uninsulated “dangerous voltage” within the product’s enclosure that may be of sufficient magnitude to constitute a risk of electrical shock.
IMPORTANT NOTICE: All Yamaha electronic products are tested and approved by an independent safety testing laboratory in order that you may be sure that when it is properly installed and used in its normal and customary manner, all foreseeable risks have been eliminated. DO NOT modify this unit or commission others to do so unless specifically authorized by Yamaha. Product performance and/or safety standards may be diminished. Claims filed under the expressed warranty may be denied if the unit is/has been modified. Implied warranties may also be affected.
SPECIFICATIONS SUBJECT TO CHANGE: The information contained in this manual is believed to be correct at the time of printing. However, Yamaha reserves the right to change or modify any of the specifications without notice or obligation to update existing units.
ENVIRONMENTAL ISSUES: Yamaha strives to produce products that are both user safe and environmentally friendly. We sincerely believe that our products and the production methods used to produce them, meet these goals. In keeping with both the letter and the spirit of the law, we want you to be aware of the following:
Battery Notice: This product MAY contain a small non-rechargeable battery which (if applicable) is soldered in place. The average life span of this type of battery is approximately five years. When replacement becomes necessary, contact a qualified service representative to perform the replacement.
Warning: Do not attempt to recharge, disassemble, or incinerate this type of battery. Keep all batteries away from children. Dispose of used batteries promptly and as regulated by applicable laws. Note: In some areas, the servicer is required by law to return the defective parts. However, you do have the option of having the servicer dispose of these parts for you.
Disposal Notice: Should this product become damaged beyond repair, or for some reason its useful life is considered to be at an end, please observe all local, state, and federal regulations that relate to the disposal of products that contain lead, batteries, plastics, etc.
NOTICE: Service charges incurred due to lack of knowledge relating to how a function or effect works (when the unit is operating as designed) are not covered by the manufacturer's warranty, and are therefore the owners responsibility. Please study this manual carefully and consult your dealer before requesting service.
NAME PLATE LOCATION: The graphic below indicates the location of the name plate. The model number, serial number, power requirements, etc., are located on this plate. You should record the model number, serial number, and the date of purchase in the spaces provided below and retain this manual as a permanent record of your purchase.
Model
Serial No. ____
Purchase Date ____
Thank you for choosing a Yamaha Clavinova. Your Clavinova is a fine musical instrument that employs advanced Yamaha music technology. With the proper care, your Clavinova will give you many years of musical pleasure.
● Large LCD (Liquid Crystal Display) panel and a consistent control interface make operation easy and efficient.
● AWM (Advanced Wave Memory) tone generator system offers an extensive range of rich, realistic voices.
● A maximum of 32-note polyphony (64-note polyphony on the CVP-79A) permits use of sophisticated playing techniques.
- Piano-like touch response provides extensive expressive control and outstanding playability.
- Dual and split play modes allow 2 voices to be played simultaneously or individually with the left and right hands.
- 100 exciting accompaniment styles can be used to provide rhythm-only accompaniment or fully-orchestrated rhythm, bass, and chord accompaniment. Optional Style File disks provide additional accompaniment styles.
- Custom Style lets you create original accompaniment patterns that can be recalled and played in the same way as the presets.
● Full-keyboard ABC (Auto Bass Chord) provides accompaniment as you play across the entire keyboard.
● 16 Harmony variations make it simple to produce rich, complex harmonies.
● One-touch Setting Feature automatically sets the ideal voices and other parameters for the selected accompaniment style.
● 16-track built-in sequencer records and plays back your keyboard performances.
● Digital reverb and effects add extra ambiance and depth to your sound.
● Registration Memory memorizes 25 (15 in the case of the CVP-59S) complete control-panel setups that you can recall whenever needed.
- Internal 3.5" floppy disk drive provides extended Song Record capacity and Disk Orchestra Collection disk playback capability.
Disk Orchestra Collection playback capability lets you practice complete songs with full accompaniment — while keyboard guide lamps help beginners find the right keys.
- MIDI compatibility, GM voices, and a range of MIDI functions make the Clavinova useful in a range of advanced MIDI music systems.
In order to make the most of your Clavinova's performance potential and features, we urge you to read this Owner's Manual thoroughly, and keep it in a safe place for later reference.
Contents
Taking Care of Your Clavinova ...... 2
Preparation 3
The Music Stand 3
The Key Cover (CVP-79A/69/69A) ...... 3
The Power Switch 3
Headphones 3
The Panel Controls 4
The Volume Controls 6
Master Volume 6
ABC/Song Volume 6
Other Volume Controls .... 7
Expression Control (CVP-79A only) ..... 7
General Operation: The Display & Related Controls 8
The Display & LCD Buttons 8
The [DISPLAY HOLD] Button ...... 9
The PAGE [<] and [>] Buttons ...... 10
The [MIXER] Button 10
The [EXIT] Button 10
The [CONTRAST] Button 11
The Help Function ...... 11
Memory Backup 12
Demonstration Playback 13
Voice Selection 15
Keyboard Percussion ...... 16
The Keyboard & Polyphony ...... 16
Dual Mode 17
Engaging the Dual Mode & Selecting the 2nd Voice .... 17
Dual-mode Voice Balance 18
Detune Depth 18
Split Mode 19
Engaging the Split Mode 19
Changing the Split Voices .... 19
Split-mode Voice Balance 20
Changing the Split Point 21
Digital Reverb 22
Selecting a Reverb Type 22
Total Depth Control 23
Individual Part Depth Control 23
Voice Effects 24
Selecting a Voice Effect 24
Effect Depth Control 25
One-touch Preset Recall 25
The Pedals 26
Right Pedal (Damper Pedal) 26
Center Pedal (Sostenuto Pedal — CVP-79A/69/69A only) 26
Left Pedal (Multi-function) 27
Accompaniment 28
Style Selection 28
Tempo Control 29
Starting the Accompaniment ...... 30
Fill-ins 32
Left-pedal Break 32
Stopping the Accompaniment .... 32
Metronome 33
Auto Bass Chord (ABC) 34
Single-Finger, Fingered Chord, and Full Keyboard Accompaniment .... 34
Overall Accompaniment Volume Control 37
Individual Part Volume Control ...... 38
Small ABC 39
Changing the ABC Split Point ...... 39
Chord Assist 40
Harmony 41
One Touch Setting 44
Custom Style 45
Other Custom Style Functions .... 50
Playing Back Your Custom Styles ...... 52
Custom Style Alert & Error Displays .... 53
Style File Load 55
Loading Disk Styles 55
Using Loaded Style Files 57
Registration Memory 58
Recall the Registered Panel Settings 60
The ABC Freeze Function 60
Disk Orchestra Collection & Song Playback 61
Straight Playback 61
Playing Back Specific Parts 63
Part Assignment for Original Song Playback....65
Overall Song Playback Volume Control 65
Individual Part Volume Control & Voice Selection 66
Guided Right- and Left-hand Practice 67
Repeat Functions 69
Other Playback Controls .... 70
Playing Other Types of Music Data ..... 71
Song Recording 72
Quick Recording 72
Multi-track Recording & Playback ..... 75
Adding New Tracks 77
Punch-in/out Recording 78
The Chord Sequence Function ..... 80
Chord Sequence Page 2 & 3 Functions 81
Other Song Recording Functions ..... 83
Track Mix 83
Track Delete 84
Track Quantize 84
Initial Edit 85
Renaming Song Files 87
Recording Without a Disk 89
Playback 89
The Utility Functions 90
Keyboard 91
Sound 92
Pedal 92
MIDI 1 94
MIDI 2....95
MIDI 3....97
Format 98
Registration 99
Transform 101
Song Copy 102
Song Delete 104
Micro Tuning 104
Backup 107
Recall 108
Popup Time 109
Song List Priority 109
Alert Sound 109
Messages 110
The Connectors 113
Troubleshooting 114
Options 114
Index 115
Voice List 116
Style List 120
Drum/key Assignment List 121
Backed Up Parameters ...... 122
Fingering Chart 123
MIDI Data Format 124
Specifications 135
CVP-79A: Assembly 136
CVP-69/69A: Assembly 142
CVP-59S: Assembly 150
MIDI Implementation Chart ...... 156
Taking Care of Your Clavinova
Your Clavinova will give you years of playing pleasure if you observe the simple rules given below:
1. Avoid Humidity & Heat
Avoid placing the Clavinova in areas that are subject to excessive humidity or heat. Do not leave the instrument near heaters or in a car exposed to direct sunlight, for example.
2. Avoid Dust & Moisture
Avoid locations in which the instrument is likely to be exposed to excessive dust or moisture.
3. Power-off Before Connecting
Connections between the Clavinova and any other device must be made with both pieces of equipment turned off.
4. Handle With Care
Never apply excessive force to the controls, connectors or other parts of your Clavinova, and avoid scratching or bumping it with hard objects. Further, always turn the POWER switch off after use, and close the key cover to protect the keyboard (CVP-79A/69/69A), or cover the instrument with the dust cover provided (CVP-59S).
5. Clean Carefully
Clean the cabinet and keys of your Clavinova only with a clean, slightly damp cloth. A neutral cleanser may be used if desired. Never use abrasive cleansers, waxes, solvents or chemical dust cloths since these can dull or damage the finish.
6. Never Tamper With the Internal Circuitry
Never open the Clavinova cabinet and touch or tamper with the internal circuitry. Tampering with the circuitry can result in electrical shock!
7. Electric Interference
Since the Clavinova contains digital circuitry, it may cause interference if placed too close to radio or television receivers. If this occurs, move the instrument further away from the affected equipment.
8. Check Your Power Supply
Make sure that your local AC mains voltage matches the voltage specified on the name plate on the bottom panel. In some areas a voltage selector may be provided on the bottom panel of the main keyboard unit near the power cord. Make sure that the voltage selector is set for the voltage in your area. The voltage selector is set at 240V when the unit is initially shipped. To change the setting use a “minus” screwdriver to rotate the selector dial so that the correct voltage appears next to the pointer on the panel.
9. Name Plate Location
The Clavinova name plate, including the unit's serial number, is located on the bottom panel of the main unit.
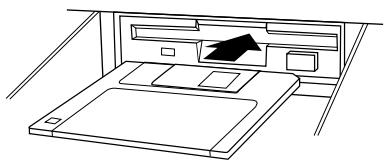
10. Handling Floppy Disks
Yamaha Disk Orchestra Collection disks are write-protected and therefore cannot be used to save songs. To save your recorded songs a blank floppy disk should be used (one blank disk is supplied with the Clavinova).
Taking Care of Your Floppy Disks
■ Do NOT eject the disk during recording or playback, or at any time when the disk drive lamp is lit. Doing so may damage both the disk and the FDD.
■ Do NOT turn the Clavinova on or off while the disk is in the drive.
■ Always eject the disk before turning the Clavinova off.
■ When ejecting a floppy disk from the disk drive:
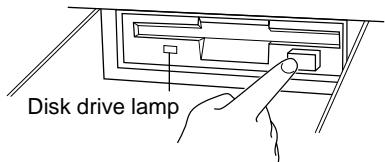
- To eject a floppy disk, press the eject button slowly as far as it will go. Then when the disk is fully ejected, remove it by hand.
- The disk may not be ejected properly if the eject button is pressed too quickly or if it is not pressed in far enough. (The eject button may become stuck halfway with the disk extending from the slot by only a few millimeters). If this is the case, do not attempt to pull out the partially ejected disk. Doing so may damage the disk drive mechanism and/or the floppy disk. To remove a partially ejected disk, try pressing the eject button once again or push the disk back into the slot, then repeat the eject procedure carefully.
■ Never open or close the key cover while a disk is extending from the drive (i.e. in the ejected position). The key cover may contact the disk, possibly damaging the disk or even the disk drive.
■ Do not insert anything but floppy disks into the disk drive. Other objects may cause damage to the disk drive or floppy disk.
■ Use the 3.5-inch 2DD or 2HD floppy disks with the Clavinova.
natural_image
Line drawing of a cabinet with an open drawer and a black arrow pointing to the tray (no text or symbols)Precautions Regarding Floppy Disk Use
- Never open the disk's shutter. Dirt or dust on the Internal magnetic surface will cause data errors.
■ Never leave disks near a speaker, TV, or other device that emits a strong magnetic field.
■ Do not store disks in places exposed to direct sunlight or sources of high temperature.
■ Do not place heavy objects such as books on top of a disk.
■ Avoid getting the disks wet.
■ Be sure to store the disks in environmental conditions as specified below: - Storage temperature: 4^ to 53^ (39° to 127°F).
• Storage humidity: 8 to 90% relative humidity. - Store in an area free from dust, sand, smoke, etc.
■ Be sure to apply the disk label at the proper position. When changing the label never cover the old label with a new label; always remove the old label first.
Head Cleaning
The head of the disk drive unit will get dirty as you use it eventually causing data errors. If this occurs, clean the head with a 3.5 inch head cleaning disk (available from most computer supply stores).
Data Backup
It is recommended that you copy your recorded songs to another disk for backup (see page 102). If the original disk is damaged or your song is deleted, the backup disk can be used instead of the original.
Protecting Your Data (Write Protect Tab)
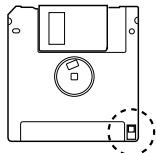
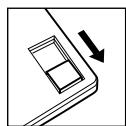
Write protect tab open (locked — write protected)
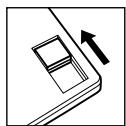
Write protect tab closed (unlocked — write enabled)
The Music Stand

natural_image
Diagram showing a mechanical component with rotational arrows and a magnified inset of its motion (no text or symbols)If you will be using sheet music with your Clavinova, raise the music stand built into it's top panel by lifting the rear edge of the music stand. Flip down the braces on either side of the rear of the music stand so that they catch inside the protrusions on the top panel. Reverse this operation o lower the stand.
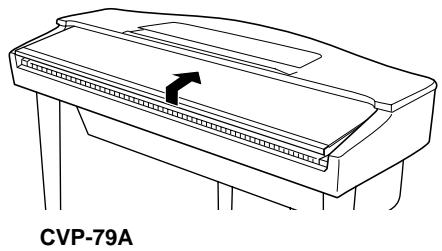
The Key Cover (CVP-79A/69/69A)
natural_image
Line drawing of a device with an arrow indicating direction, labeled CVP-79A (no text or symbols on the diagram itself)To open the CVP-79A/69/69A key cover lift it just enough to clear the keys (do not lift excessively) then slide the cover back into the main unit. To close the cover slide it forward all the way and then lower it gently until it closes completely.
The Power Switch
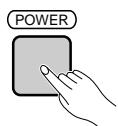
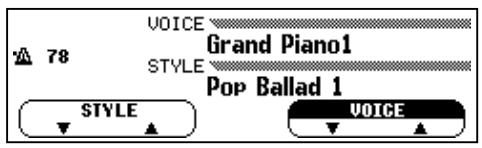
After making sure that the Clavinova's AC cord is properly plugged into the Clavinova itself and plugged into a convenient AC wall outlet (a power-plug adaptor may be provided in some areas), press the [POWER] switch located to the left of the keyboard once to turn the power on. Press the [POWER] switch again to turn the power off.
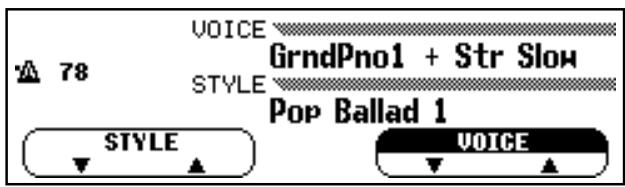
When the power is initially turned on, the PIANO voice selector indicator will light, the POP style selector indicator will light, and the display will appear as shown to the left.
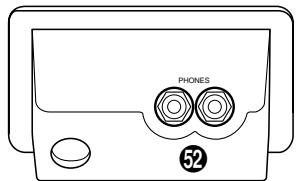
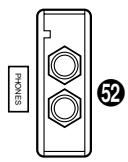
Headphones
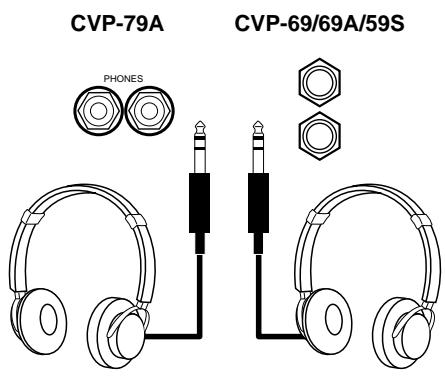
One or two standard pairs of stereo headphones can be plugged in here for private practice or late-night playing. The internal speaker system is automatically shut off when a pair of headphones is plugged into either or both of the PHONES jacks.
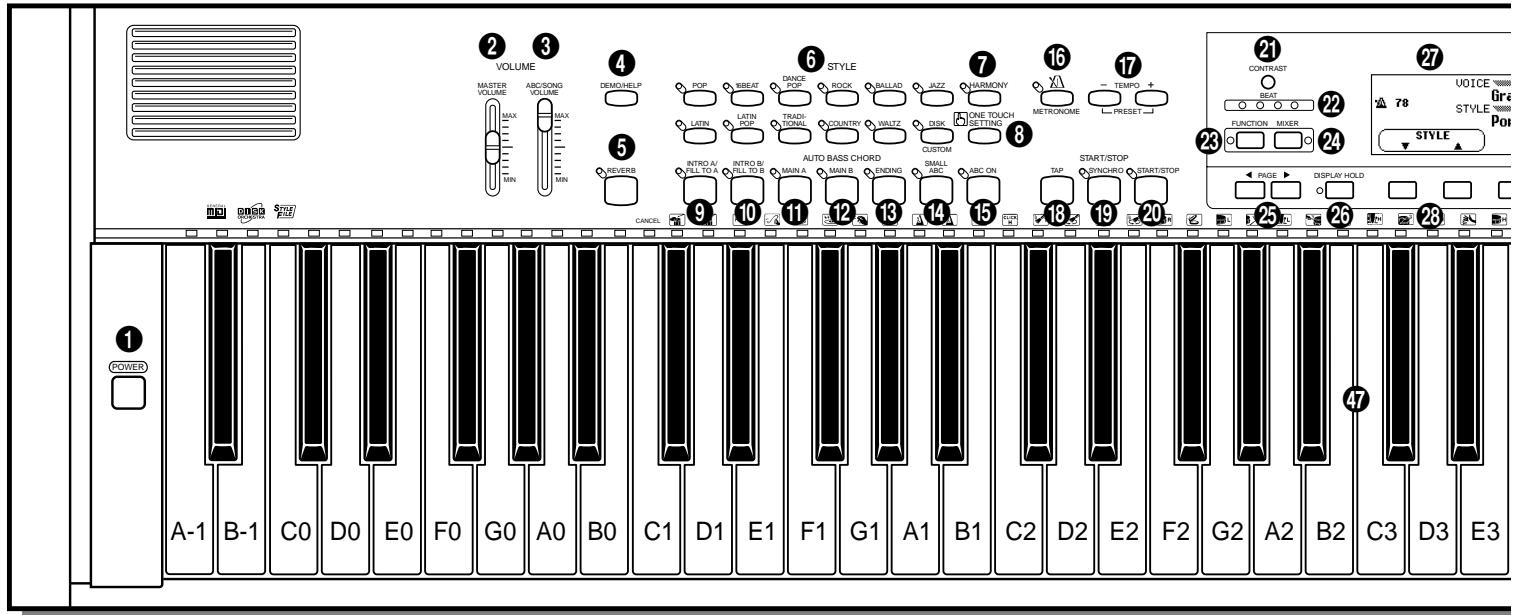
The Panel Controls
CVP-79A
CVP-69/69A
CVP-59S

CVP-79A
CVP-69/69A/59S
① POWER Switch ...... page 3
VOLUME Section
② MASTER VOLUME Control......page 6
③ ABC/SONG VOLUME Control ...... page 6, 37, 65
④ [DEMO/HELP] Button...... page 11, 13
⑤ [REVERB] Button ...... page 22
STYLE Section
⑥ STYLE Selectors ...... page 13, 28, 45
⑦ [HARMONY] Button ...... page 41
⑧ [ONE TOUCH SETTING] Button...... page 44
AUTO BASS CHORD Section
⑨ [INTRO A/FILL TO A] Button...... page 30, 32
⑩ [INTRO B/FILL TO B] Button...... page 30, 32
11 [MAIN A] Button...... page 30, 31
⑫ [MAIN B] Button...... page 30, 31
13 [ENDING] Button ...... page 32
14 [SMALL ABC] Button......page 39
15 [ABC ON] Button ...... page 35
16 [METRONOME] Button ...... page 33
⑰ TEMPO [▲] and [▼] Buttons ...... page 29
START/STOP Section
18 [TAP] Button......page 31
19 [SYNCHRO] Button ...... page 31
20 [START/STOP] Button ...... page 14, 30, 32
Display Control Section
21 [CONTRAST] Button ...... page 11
22 BEAT Display ...... page 31
23 [FUNCTION] Button ...... page 90
24 [MIXER] Button...... page 7, 10
25 PAGE [<] and [>] Buttons ...... page 10

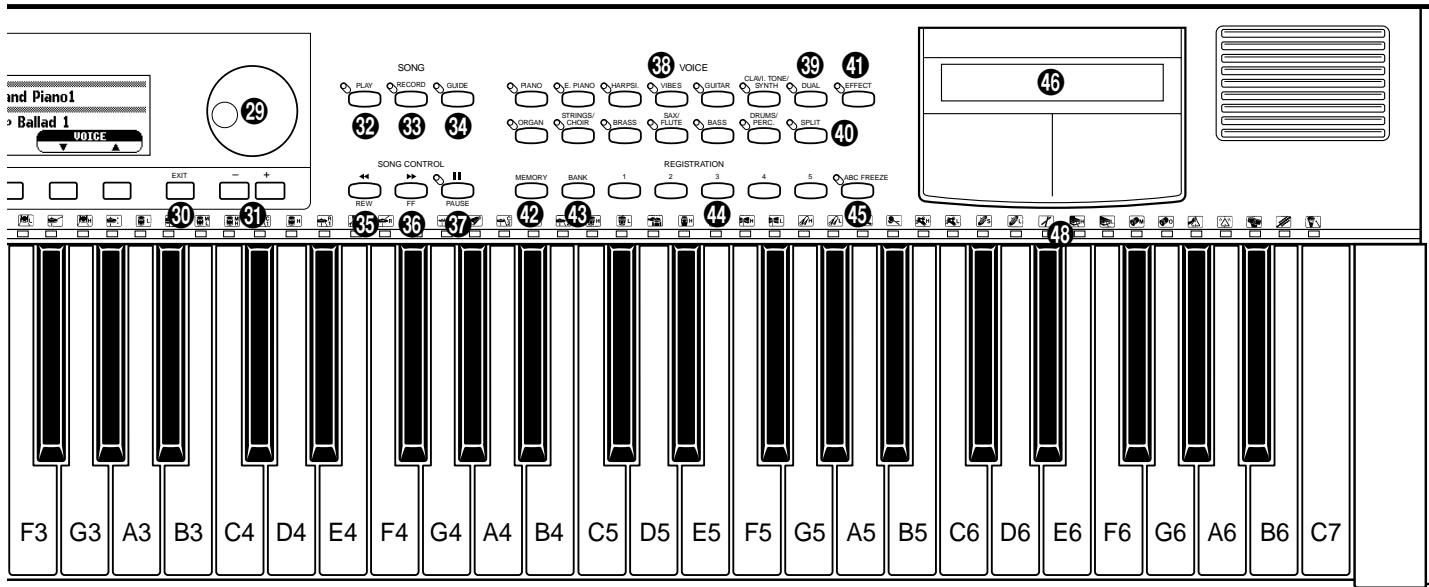
26 [DISPLAY HOLD] Button ...... page 9
27 Display ...... page 8
28 LCD Buttons ...... page 8
29 Data dial ...... page 8
30 [EXIT] Button ...... page 10
31 [+] and [-] Buttons ...... page 8
SONG Section
⑲ [PLAY] Button ...... page 61
33 [RECORD] Button ...... page 73
34 [GUIDE] Button ...... page 67
SONG CONTROL Section
35 [REW] Button ...... page 70, 78
36 [FF] Button ...... page 70, 78
37 [PAUSE] Button ...... page 70, 78
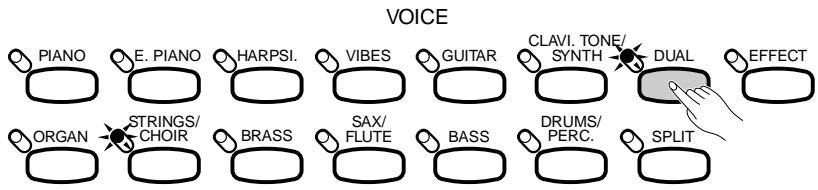
VOICE Section
38 VOICE Selectors ...... page 13, 15
39 [DUAL] Button......page 17
40 [SPLIT] Button ...... page 19
41 [EFFECT] Button ...... page 24
REGISTRATION Section
42 [MEMORY] Button ...... page 59
43 [BANK] Button ...... page 59
44 [REGISTRATION 1\~5] Button ...... page 59, 60
45 [ABC FREEZE] Button ...... page 60
46 3.5" Floppy Disk Drive ...... page 55, 61, 72, 98
47 Keyboard......page 16
48 Keyboard Guide Lamps......page 67
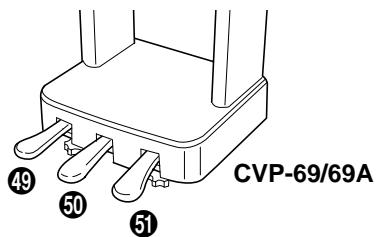
49 Soft Pedal ...... page 27
50 Sostenuto Pedal (CVP-79A/69/69A)...... page 26
⑤ Damper Pedal......page 26
52 PHONES Jacks ...... page 3
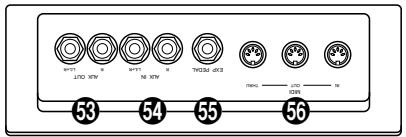
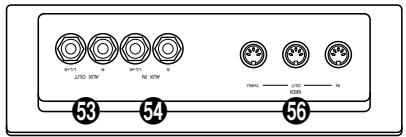
53 AUX OUT R and L/L+R Jacks......page 113
54 AUX IN R and L/L+R Jacks......page 113
55 EXP PEDAL Jack (CVP-79A) ...... page 7, 113
56 MIDI Connectors ...... page 113
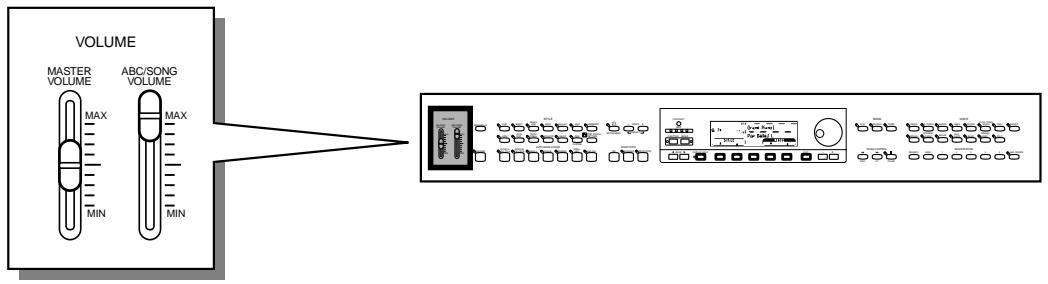
The Volume Controls
The Clavinova has two volume controls on the control panel in addition to several programmable volume levels that give you extra versatility in creating the required sound.
flowchart
graph LR
    A["MASTER VOLUME"] -->|MAX MIN| B["ABC/SONG VOLUME"]
    B --> C["Device Interface"]
Master Volume
The MASTER VOLUME control adjusts the overall volume of sound produced by the Clavinova. It also adjusts headphone volume when one or two pairs of headphones are plugged into the PHONES jacks.
Initially set the MASTER VOLUME control about half way between the “MIN” and “MAX” settings. Then, when you start playing, adjust the control for the most comfortable listening level.
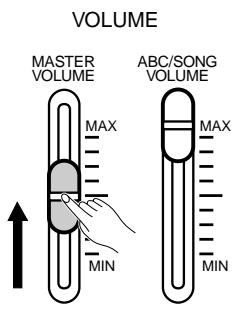

- The output signal levels from the AUX OUT jacks are also adjusted by the MASTER VOLUME control.
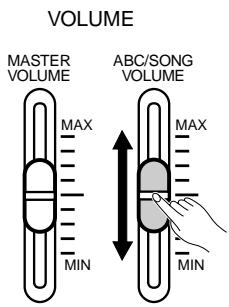
ABC/Song Volume
This control adjusts the volume of the Clavinova's auto-accompaniment and song playback sound. The volume of notes played on the keyboard is not affected.
Other Volume Controls
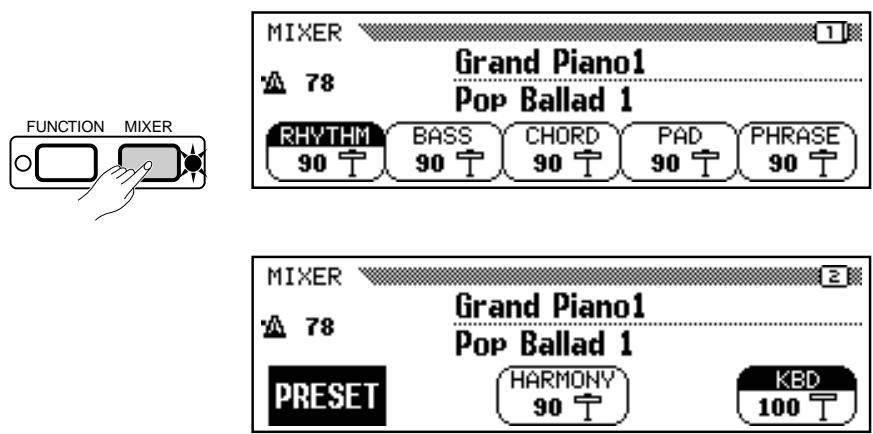
The [MIXER] button provides access to individual volume parameters for the rhythm, bass, chord, pad, and phrase parts of the auto accompaniment sound, a keyboard volume parameter, and a volume parameter for the Clavinova's harmony function — see page 41 for details. When the Clavinova's Disk Orchestra Collection playback function is in use the [MIXER] button accesses individual volume parameters for each Disk Orchestra Collection part.
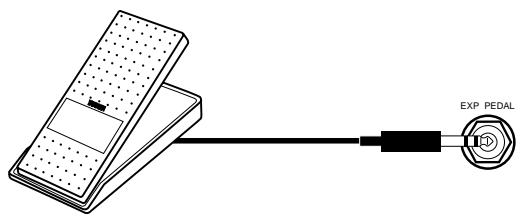
Expression Control (CVP-79A only)
An optional Yamaha FC7 Foot Controller can be plugged into the CVP-79A EXP PEDAL jack for foot volume (expression) control of the keyboard sound only (i.e. expression doesn't affect the auto-accompaniment sound). Press the pedal forward to increase volume, and backward to decrease volume.
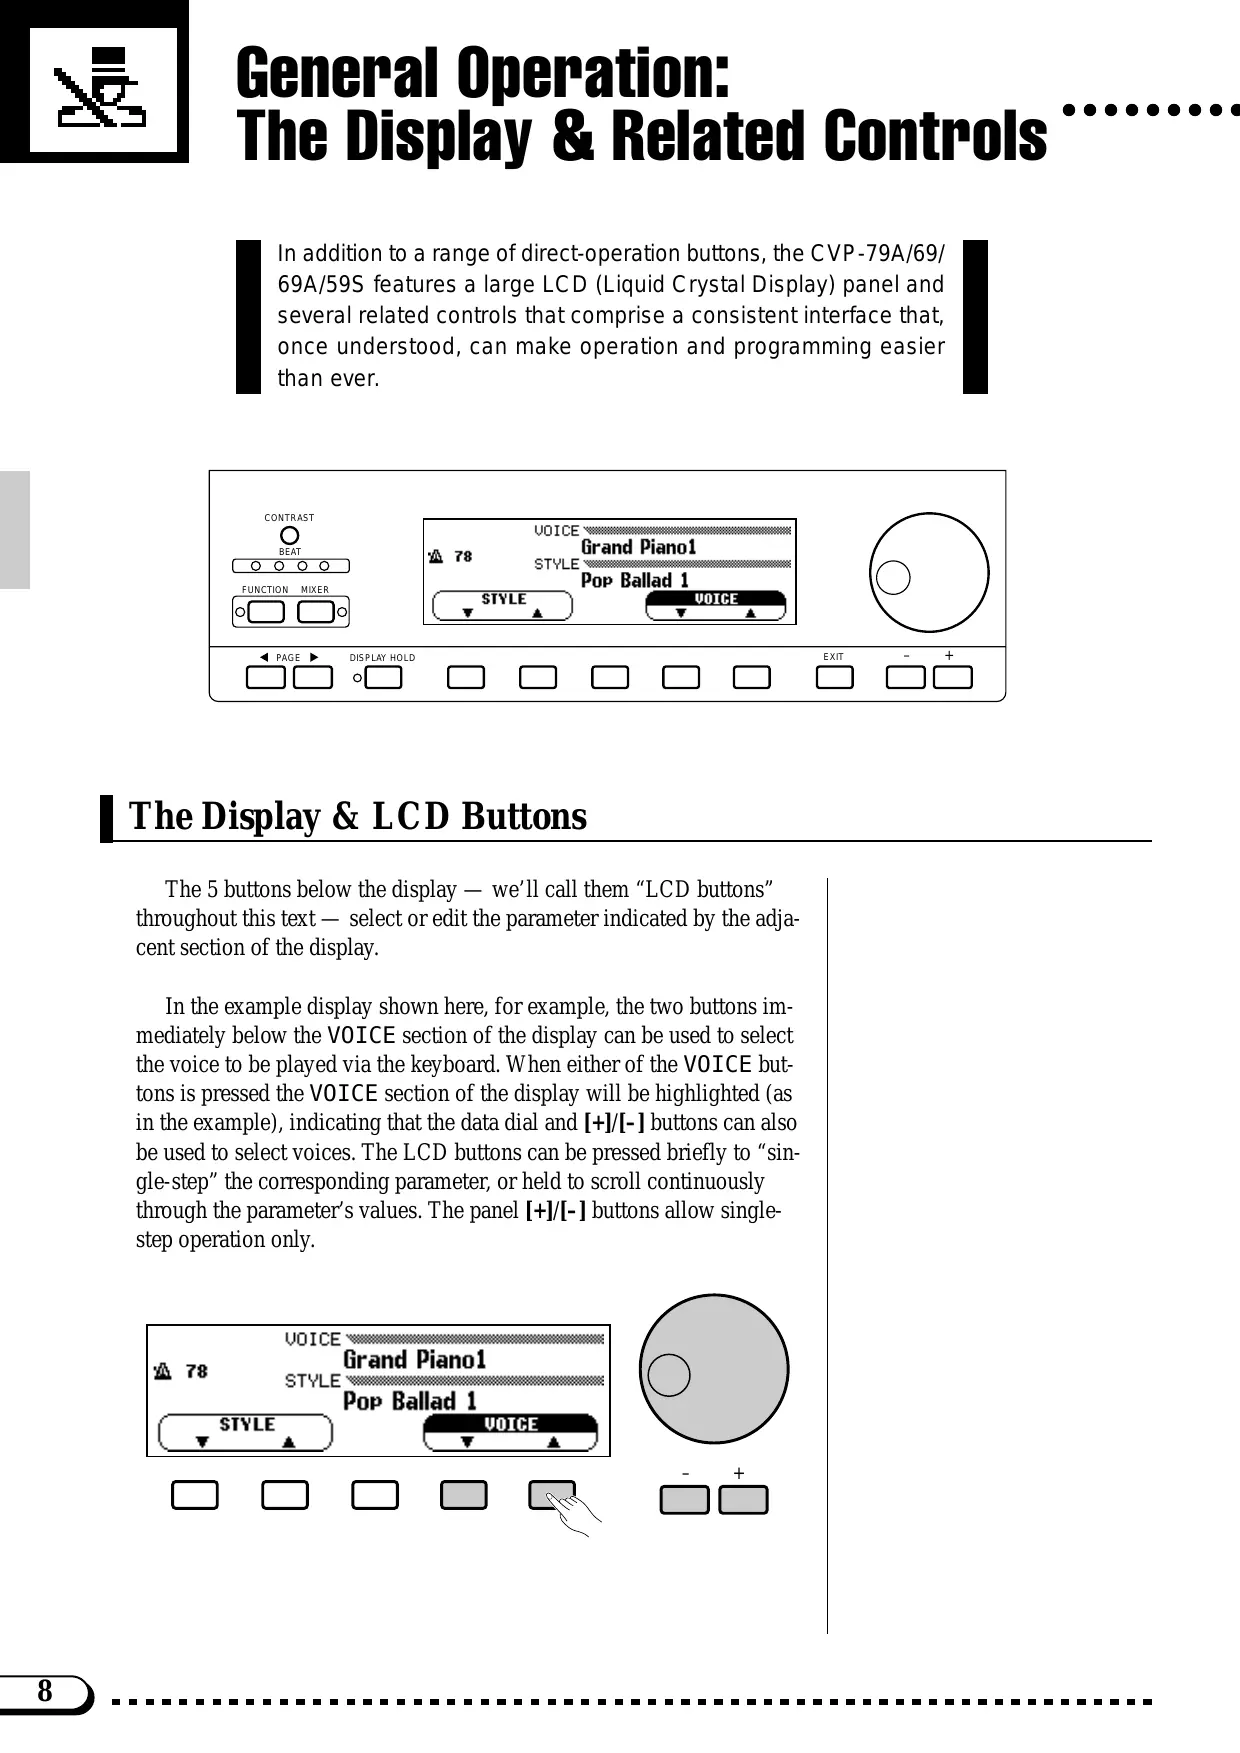
General Operation: The Display & Related Controls
In addition to a range of direct-operation buttons, the CVP-79A/69/69A/59S features a large LCD (Liquid Crystal Display) panel and several related controls that comprise a consistent interface that, once understood, can make operation and programming easier than ever.

The Display & LCD Buttons
The 5 buttons below the display — we’ll call them “LCD buttons” throughout this text — select or edit the parameter indicated by the adjacent section of the display.
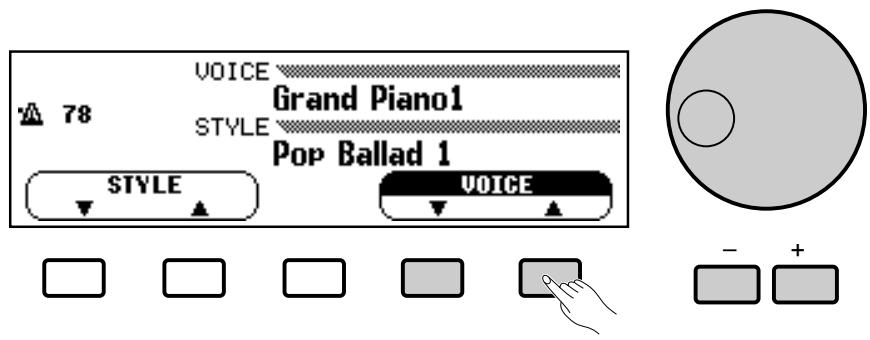
In the example display shown here, for example, the two buttons immediately below the VOICE section of the display can be used to select the voice to be played via the keyboard. When either of the VOICE buttons is pressed the VOICE section of the display will be highlighted (as in the example), indicating that the data dial and [+]/[-] buttons can also be used to select voices. The LCD buttons can be pressed briefly to “single-step” the corresponding parameter, or held to scroll continuously through the parameter’s values. The panel [+]/[-] buttons allow single-step operation only.
General Operation: The Display & Related Controls
In many cases where ▲ and ▼ or < and > LCD buttons appear, both buttons can be pressed simultaneously to recall the default setting for that parameter. The panel [+] and [−] buttons can be used in the same way. This applies to most parameters that have a range of possible settings. Parameters of this type are enclosed in a rounded frame in the display.
Parameters which are directly executed or simply switched on or off via the corresponding LCD button appear in a square frame and are not editable via the data dial and [+]/[-] buttons.
The [DISPLAY HOLD] Button
When selecting voices (page 15) or accompaniment styles (page 28), for example, the voice or style list that appears when a VOICE or STYLE button is pressed will automatically disappear after a few seconds if no selections are made. When this type of temporary “pop-up” display is selected, the [DISPLAY HOLD] button will flash indicating that the display will disappear in a few seconds. Pop-up displays can be kept on the LCD for as long as required by pressing the [DISPLAY HOLD] button so that its indicator lights continuously. Press [DISPLAY HOLD] a second time (the indicator will go out) to disengage the display hold function.
![YAMAHA CVP-79A-CVP-69-CVP-69A-CVP-59S - The [DISPLAY HOLD] Button - 2](/content/2025/01/114698/images/803e2671093f43e56b4f998142f4893f29e489e851b65f78f7e02c0fd08bfe0f.jpg)
![YAMAHA CVP-79A-CVP-69-CVP-69A-CVP-59S - The [DISPLAY HOLD] Button - 3](/content/2025/01/114698/images/0da6cc5f7bdd10a2e7b84ef870c93b5f485f3c9297f79fdb991d2afecf2f476e.jpg)
![YAMAHA CVP-79A-CVP-69-CVP-69A-CVP-59S - The [DISPLAY HOLD] Button - 4](/content/2025/01/114698/images/c8cf8e3a2ae318476087af8716719b7ea3e492854a62b16bc604ed1db0fe4c98.jpg)
![YAMAHA CVP-79A-CVP-69-CVP-69A-CVP-59S - The [DISPLAY HOLD] Button - 5](/content/2025/01/114698/images/fbb70265496d92c1e74f7681501b0f3d6e44eecf8c06e68179a36e10104ee018.jpg)
![YAMAHA CVP-79A-CVP-69-CVP-69A-CVP-59S - The [DISPLAY HOLD] Button - 6](/content/2025/01/114698/images/4b671aecbd2088c158abcddeabb15e8cd4adedf1c5920d3b893cc89010404db5.jpg)
![YAMAHA CVP-79A-CVP-69-CVP-69A-CVP-59S - The [DISPLAY HOLD] Button - 7](/content/2025/01/114698/images/cfa3aba6b511ff858fc77e6dcb50612c4af07679a517d88c079941fb5020ee83.jpg)
NOTES
- If the [DISPLAY HOLD] button is engaged when a normal display is showing, no pop-up displays will appear even when a button that normally calls a pop-up display is pressed.
- The length of time pop-up displays remain on the LCD can be set via the "Pop-up Time" function described on page 109.
The PAGE [<] and [>] Buttons
Many functions have several display “pages” that can be selected by using the PAGE [<] and [>] buttons. When more than one page is provided for the selected function or group of functions, a corresponding number of overlapping page icons will appear in the upper right-hand corner of the display, and the number of the currently selected page will appear in the top page icon.
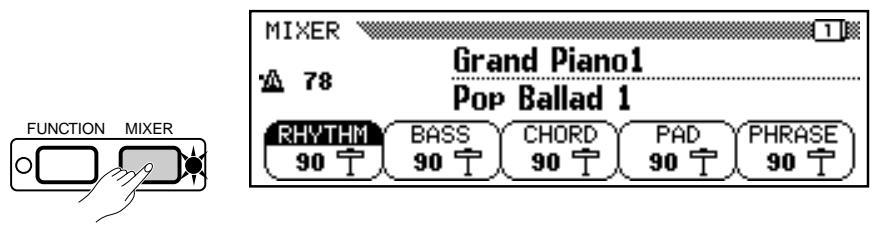
The [MIXER] Button
This button calls the CVP-79A/69/69A/59S mixer display which includes individual volume parameters for the auto-accompaniment RHYTHM, BASS, CHORD, PAD, and PHRASE parts. These parameters can be used to the achieve the best overall balance for your musical needs (see page 38 for details). The mixer parameters will disappear when the [MIXER] button is pressed a second time (or the [EXIT] button is pressed).
The [EXIT] Button
The [EXIT] button will usually take you out of the current mode, back to the previous display — often the initial play mode display.
![YAMAHA CVP-79A-CVP-69-CVP-69A-CVP-59S - The [EXIT] Button - 1](/content/2025/01/114698/images/5445ccc29dca65df55d5cd135ef78b4ef88aaad481c23b7ffb5cb2eb02394b55.jpg)
The [CONTRAST] Button
The CVP-79A/69/69A/59S display panel is a liquid-crystal type which can be adjusted for optimum legibility. Press the [CONTRAST] button and use the DARK and LIGHT LCD buttons (or data dial or [+]/[-] buttons) to set the display contrast for optimum legibility. The contrast setting retained in memory even when the Clavinova power is turned off.
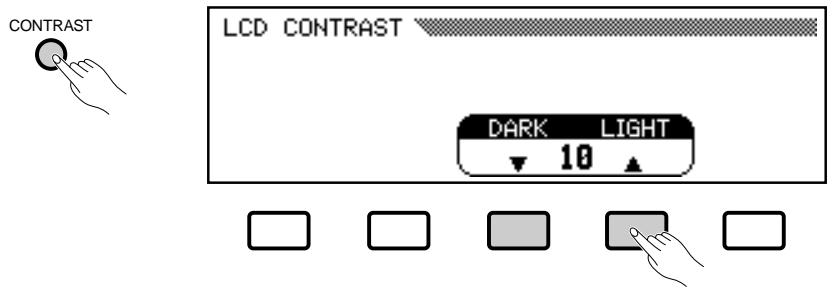
Press the [CONTRAST] button again or [EXIT] button to exit from the LCD CONTRAST display.
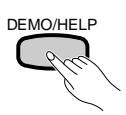
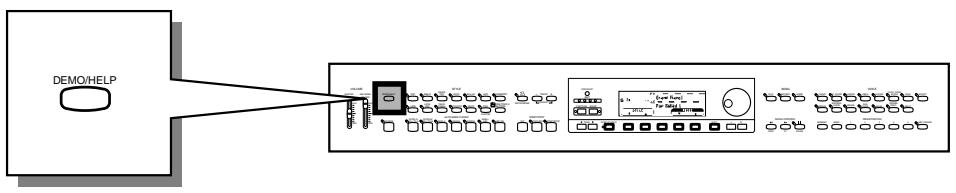
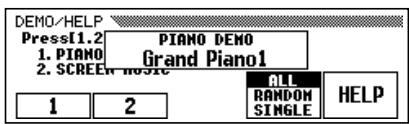
The Help Function
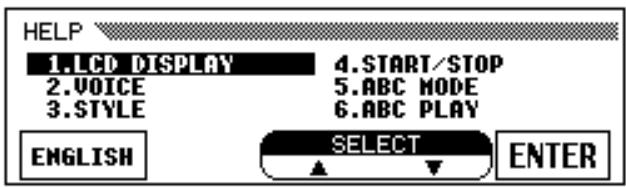
If you're ever in doubt about a function, the CVP-79A/69/69A/59S HELP function is always available. Press the [DEMO/HELP] button and then the HELP LCD button at any time to enter the help mode.
![DEMO/HELP Press[1.2],[VOICE],[STYLE]. 1. PIANO CONCERTO 2. SCREEN MUSIC ALL RANDOM SINGLE HELP 1 2](/content/2025/01/114698/images/fdfee1340ae0f35bf550eed5d5f47f5a5cc3839137fa97f38cc928efc2fcfad5.jpg)
If necessary use the first LCD button to select the language (ENGLISH, GERMAN, FRENCH or JAPANESE) you want help in. The language setting is retained in memory even when the Clavinova power is turned off. Use the SELECT ▲▼ buttons to select a topic, then press the ENTER button to view the first page of help text on the selected topic.
General Operation: The Display & Related Controls
Use the PAGE [<] and [>] buttons, the [+] and [-] buttons, or the data dial to “flip” through the available pages.
![HELP [LCD DISPLAY] (Page[◀][▶] to scroll. [EXIT] when done.) 【The LCD and LCD Buttons】 ◆The LCD shows voice, style, and song titles, etc. The buttons below the LCD edit the corres- ponding parameter in the LCD. PAGE ▶ DISPLAY HOLD](/content/2025/01/114698/images/68603a8450bc2287ad0822ec3f8392151175fc86e5e9d10b9f15a0d231259798.jpg)
The [EXIT] or [DEMO/HELP] button will take you back to the topic list if pressed while the help text is showing, or back to the initial play mode display if pressed while the topic list is showing.
Memory Backup
In addition to the contrast and language settings introduced in this section, the Clavinova has a range of parameters that can be retained in memory even while the power is off, so you don't have to reset all your favorite settings every time you want to play. The “Backup” function described on page 107 lets you select which parameters will be backed up (retained in memory), and which will be reset to their default values whenever the power is turned off.
![FUNCTION [BACKUP] VOICE SETTING TUNE/MICRO TUNING PEDAL MIDI ON OFF](/content/2025/01/114698/images/ebb66ad85ed4159812089220726cb6a715eac3b0444f57a547129162ddf28896.jpg)
Parameters that are backed up will be retained in memory for about a week if the Clavinova is not turned on during this time. All parameters will be reset to their default values if the power remains off for longer than about a week. To ensure that your backed-up settings are maintained, turn the power on for a few minutes at least once a week.
Demonstration Playback
The Clavinova features 25 demonstration tunes that effectively demonstrate its sound and accompaniment capabilities. Here's how you can select and play the demo tunes.
flowchart
graph TD
    A["DEMO/HELP"] --> B["Device 1"]
    A --> C["Device 2"]
    A --> D["Device 3"]
    A --> E["Device 4"]
    A --> F["Device 5"]
    A --> G["Device 6"]
    A --> H["Device 7"]
    A --> I["Device 8"]
    A --> J["Device 9"]
    A --> K["Device 10"]
1 Turn Power On and Set an Initial Volume Level ......
Press the [POWER] button to turn the power ON, and set the [MASTER VOLUME] control about half way between the “MIN” and “MAX” settings.
2 Press the [DEMO/HELP] button ....
![YAMAHA CVP-79A-CVP-69-CVP-69A-CVP-59S - Press the [DEMO/HELP] button .... - 1](/content/2025/01/114698/images/d57b62b79cd338f8d3423ed56717c5b59ca5ffab2a8e447bdc1c4b36dccc8987.jpg)
3 Select a Play Mode......
Use the fourth LCD button to select a play mode:
| ALL | All 25 demo tunes will repeatedly play back in sequence, starting with the tune you initially select. |
| RANDOM | All 25 demo tunes will continuously play back in random order, starting with the tune you initially select. |
| SINGLE | The selected tune will play through once, then demo playback will stop. |
![DEMO/HELP Press[1.2],[VOICE],[STYLE]. 1. PIANO CONCERTO 2. SCREEN MUSIC ALL RANDOM SINGLE HELP 1 2](/content/2025/01/114698/images/e3187809c20082739a19e39fd95f78fb026016dd438ae322bada9af78d4e9ad5.jpg)
4 Select a Demo Tune ....
The demo tunes are selected via the first two LCD buttons, and the VOICE and STYLE selectors. The VOICE and STYLE indicators flash in sequence when the [DEMO/HELP] button is pressed.

- Demo tune playback data is not transmitted via the MIDI OUT terminal.

Press an LCD button or selector to start playback of the corresponding tune. You can also start playback from the first LCD tune by pressing the [START/STOP] button when the ALL or SINGLE play mode is selected. The corresponding LCD section will be highlighted during LCD tune playback, and the VOICE or STYLE indicator will flash during voice or style tune playback.
![DEMO/HELP Press[1.2],[VOICE],[STYLE]. 1. PIANO CONCERTO 2. SCREEN MUSIC 1 2 ALL RANDOM SINGLE HELP](/content/2025/01/114698/images/cb244344af4b4954d9246b23166669058a1dae5d7dfc6018958c901bf66e7a94.jpg)
5 Adjust the Volume
Use the MASTER VOLUME control to adjust the volume.
6 Stop Playback
Demo playback can be stopped temporarily by pressing the LCD button, VOICE button, or STYLE button corresponding to the demo tune which is currently playing, or by pressing the [START/STOP] button. Press the [DEMO/HELP] or [EXIT] button when you want to stop demo playback and return to the normal mode.

- During voice or style tune playback, the currently playing voice or style name will be shown on the display.

- The tempo cannot be adjusted during demo playback.
The Demo Tunes
| Title | Composers | |
| Song Demo | ||
| 1 | Piano Concerto No.1 op.23 1st movement | Peter Ilyich Tchaikovsky |
| 2 | A Whole New World from the motion picture “Aladdin” | Alan Menken |
| Voice Demo | ||
| Piano | Polonaise No.6 op.53 “Heroique” | Frédéric François Chopin |
| Harpsi. | Sonata in C major K.159 (L.104) | Domenico Scarlatti |
| Vibes | Wonderland | Hiroaki Fujita |
| Guitar | Concierto de Aranjuez 2nd movement | Joaquin Rodrigo |
| Clavi. Tone/Synth | No, Only He Who Has Known | Peter Ilyich Tchaikovsky |
| Organ | Toccata and Fuga in D minor | Johann Sebastian Bach |
| Strings/Choir | Symphony No. 5 op.67 1st movement | Ludwig van Beethoven |
| Brass | “La Réjouissance” from Music For The Royal Fireworks | Georg Friedrich Händel |
| Sax/Flute | I Left My Heart In San Francisco | George Cory |
| Style Demo | ||
| Pop | My Way | J. Revaux, C. François & G. Thibaut |
| Latin | Sabor A Mi | Alvaro Carrillo |
| Latin Pop | The Girl From Ipanema | Antonio Carlos Jobin |
| Traditional | I Could Have Danced All Night | Frederic Loewe |
| Waltz | Tennessee Waltz | Pee Wee King & Redd Stewart |
- Some of the demonstration pieces listed above are specially-arranged excerpts from the original compositions listed above. All other songs are original (©1995 by Yamaha Corporation).
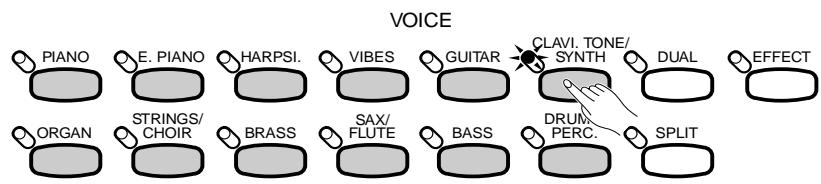
Voice Selection
The CVP-69/69A/59S has a total of 172 different voices and the CVP-79A has 192 that can be selected and played via the keyboard. There's also a "Keyboard Percussion" mode that let's you play a range of drums and percussion instruments on the keyboard.

1 Select a Voice
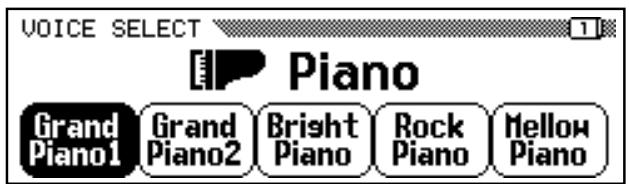
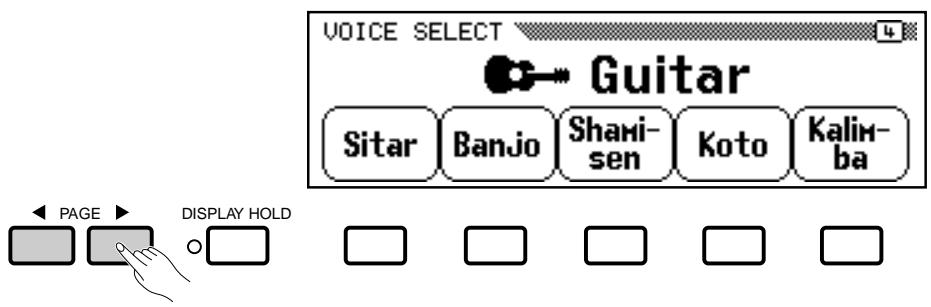
The CVP-79A/69/69A/59S voices are organized in 12 voice groups (see page 116 for a complete voice list). Use the voice group buttons to select the group from which you want to select a voice. The corresponding voice display will appear.
flowchart
graph TD
    A["PIANO"] --> B["E. PIANO"]
    B --> C["HARPSI."]
    C --> D["VIBES"]
    D --> E["GUITAR"]
    E --> F["CLAVI. TONE/ SYNTH"]
    F --> G["DUAL"]
    G --> H["EFFECT"]
    I["ORGAN"] --> J["STRINGS/ CHOIR"]
    J --> K["BRASS"]
    K --> L["SAX/ FLUTE"]
    L --> M["BASS"]
    M --> N["DRUM/ PERC."]
    N --> O["SPLIT"]
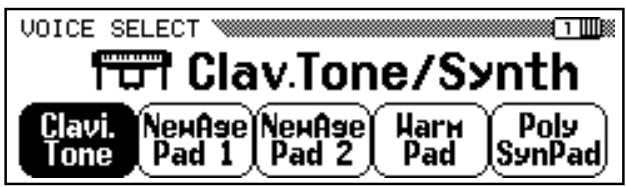
Use the PAGE buttons to select the page containing the voice you want if more than one page is available, then press the LCD button corresponding to the desired voice. You can also use the data dial or [+]/[-] buttons to select any of the voices within the selected group.
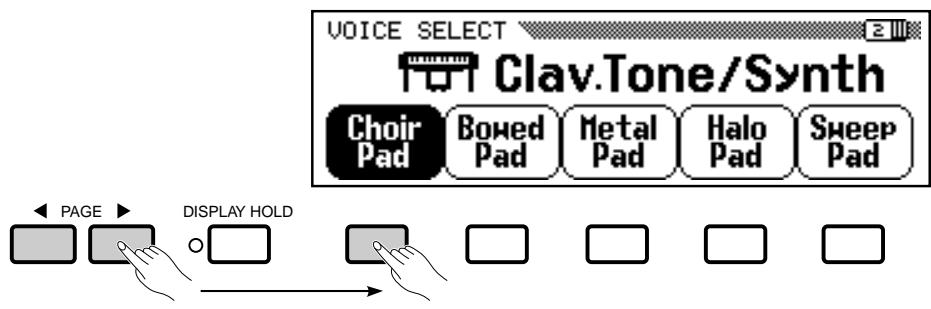
Voices within the current group can still be selected via the VOICE ▲ and ▼ LCD buttons, or the data dial or [+]/[-] buttons, once the VOICE section of the display has been highlighted, from the main play mode display.
NOTES
- The display will automatically revert to the main play mode display after a few seconds if the [DISPLAY HOLD] button is not engaged (page 9).
- The last voice selected within each group will automatically be recalled whenever a VOICE button is pressed (as long as the power remains on). The last-selected voice in each group can be backed up, even after the power is turned off, via the "Backup" function — page 107.
- The Grand Piano 1 voice is automatically selected when the power is initially turned on. However the last-selected voice can be recalled when the power is turned off and on via the "Backup" function — page 107.

2 Play & Adjust Volume
You can now play the selected voice on the CVP-79A/69/69A/59S keyboard. Use the [MASTER VOLUME] control to adjust the overall volume level.
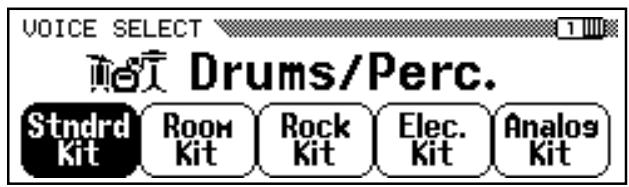
Keyboard Percussion
The Clavinova has 8 Drum Kits in the [DRUMS/PERC.] voice group which includes a range of drum and percussion voices as well as sound effects. When one of the Drum Kit voices is selected, you can play 72 different drums and percussion instruments on the keyboard. The drums and percussion instruments played by the various keys when the Standard Kit is selected are marked by symbols above the keys.
See page 121 for a complete list of the instruments in each Drum Kit.

flowchart
graph TD
    A["Piano"] --> B["E. PIANO"]
    B --> C["HARPSI."]
    C --> D["VIBES"]
    D --> E["GUITAR"]
    E --> F["CLAVI. TONE/SYNTH"]
    F --> G["DUAL"]
    G --> H["EFFECT"]
    I["ORGAN"] --> J["STRINGS/CHOIR"]
    J --> K["BRASS"]
    K --> L["SAX/FLUTE"]
    L --> M["BASS"]
    M --> N["DRUMS/PERC."]
    N --> O["SPLIT"]
NOTES
- When a Drum Kit voice is selected only the keys with drum or percussion symbols printed above them will sound.
- The TRANSPOSE, TUNE, and OCTAVE SHIFT functions described on pages 91 and 92 do not affect the Drum Kit voices.
The Keyboard & Polyphony
The CVP-69/69A/59S can play up to 32 notes at once while the CVP-79A can play up to 64. This number includes all notes being played at the same time in any single or combination use of dual, split, accompaniment, and disk functions. Further variation occurs with “1-element” and “2-element” voices: the polyphony is halved with 2-element voices. The same applies to stereo voices. The voice list on page 116 shows all stereo, 2-element, and 1-element voices in the CVP-79A/69/69A/59S.
The Clavinova also offers keyboard touch response, so the volume and timbre of notes played can be controlled according to how “hard” you play the keys. The amount of variation available depends on the selected voice and the setting of the TOUCH SENSITIVITY parameter (page 91).
The DUAL mode makes it possible to play two voices simultaneously across the entire range of the keyboard. This makes it easy to create exceptionally rich, thick tonal textures.

flowchart
graph LR
    A["Switch"] --> B["Switch Port"]
    B --> C["Switch Terminal"]
    C --> D["Dual Access"]
    D --> E["Switch Terminal"]
    style A fill:#f9f,stroke:#333
    style E fill:#bbf,stroke:#333
Engaging the Dual Mode & Selecting the 2nd Voice
After selecting the main voice in the normal way, press the [DUAL] button so that its indicator lights to engage the DUAL mode (by pressing again, its indicator goes out and the DUAL mode is disengaged).
flowchart
graph TD
    A["PIANO"] --> B["E. PIANO"]
    B --> C["HARPSI"]
    C --> D["VIBES"]
    D --> E["GUITAR"]
    E --> F["CLAVI. TONE/ SYNTH"]
    F --> G["DUAL"]
    G --> H["EFFECT"]
    I["ORGAN"] --> J["STRINGS/ CHOIR"]
    J --> K["BRASS"]
    K --> L["SAX/ FLUTE"]
    L --> M["BASS"]
    M --> N["DRUMS/ PERC."]
    N --> O["SPLIT"]
Use the 2nd VOICE LCD buttons in the DUAL mode pop-up display, that appears when the [DUAL] button is turned on, to select the 2nd dual-mode voice (all voice groups are available). The data dial and [+]/[-] buttons can also be used once the 2nd VOICE section of the display has been highlighted.
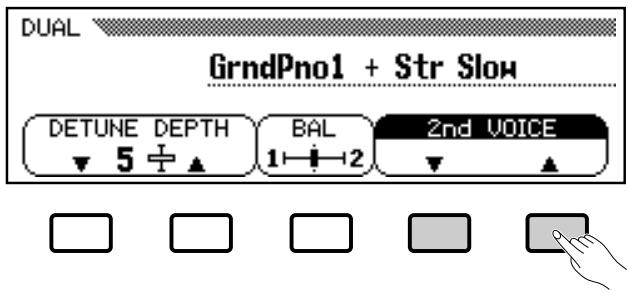
The VOICE selector indicator of the group containing the 2nd voice lights while the DUAL mode pop-up display is showing, and the 2nd voice group can be selected via the VOICE selectors. The names of both the main and 2nd dual-mode voices appear separated by a “+” symbol in the normal play mode display even after the DUAL mode pop-up display disappears. A different main voice can be selected in the normal way once the normal play mode display reappears.
NOTES
- Please note that only the VOICE group button indicator of the 2nd voice group lights while the DUAL mode pop-up display is showing, and that only the main voice group indicator lights after the DUAL mode pop-up display disappears.
- The default DUAL mode 2nd voice is Strings Slow.
The DUAL mode pop-up display can be recalled at any time in order to change the 2nd voice or other settings (see below) by pressing a VOICE selector (either the current voice or another voice to select the 2nd voice) while holding the [DUAL] button.
Dual-mode Voice Balance
The volume balance between the two voices combined in the DUAL mode can be adjusted by pressing the BAL (balance) LCD button to highlight the BAL section of the display, and then by using the data dial and [+]/[-] buttons. The BAL LCD button can be held to increase the level of the 2nd voice only. The balance bar in the BAL section of the display graphically shows the volume balance between the main (1st) and 2nd voices. Equal balance can be instantly recalled by pressing the [+] and [-] buttons simultaneously while the BAL parameter is selected.
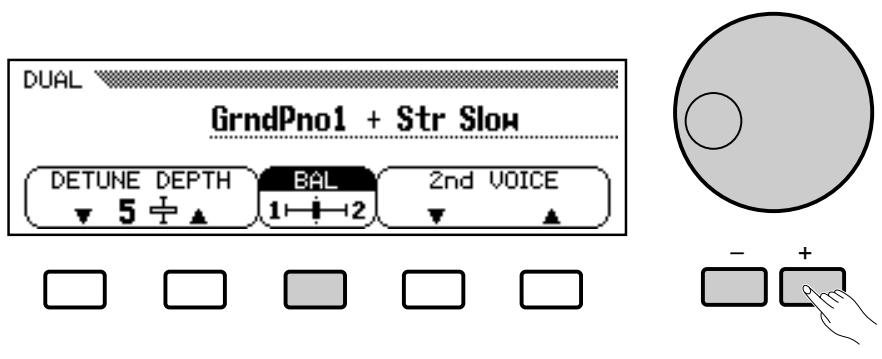
Detune Depth
In many cases an even “thicker” sound can be produced by slightly detuning the dual-mode main and 2nd voices. The DETUNE DEPTH LCD buttons can be used to set the detune depth value between 0 and 10. The data dial and [+]/[-] can also be used once the DETUNE DEPTH parameter is selected. The higher the value the greater the amount of detuning. The “normal” setting of “5” can be instantly recalled by pressing both the DETUNE DEPTH LCD buttons simultaneously.

The DUAL mode can be turned off by pressing the [DUAL] button so that its indicator goes out.
NOTES
- The dual and split modes cannot be used at the same time.
- The OCTAVE SHIFT function — page 91 — can be used to shift the pitch of the main and/or 2nd voice in the DUAL mode up or down one octave.
- The DUAL mode balance and depth settings affect all voice combinations.
- The DUAL mode settings are retained even if the DUAL mode is turned off and on while the power remains on. The DUAL mode settings can also be backed up even after the power is turned off via the "Backup" function — page 107.
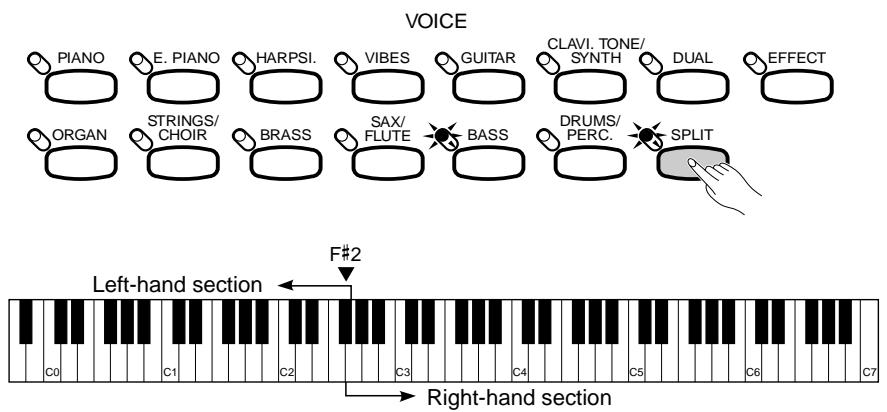
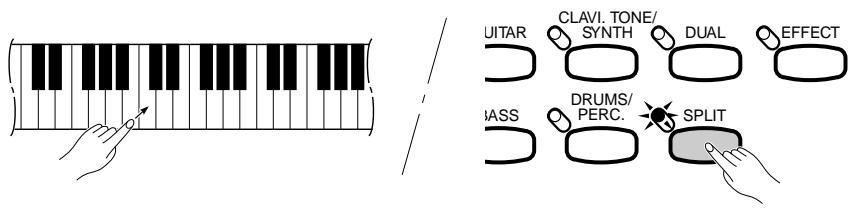
The split mode lets you play different voices with the left and right hands — bass with the left and piano with the right, for example. You can assign any of the Clavinova's voices to the left and right-hand sections of the keyboard.

Engaging the Split Mode
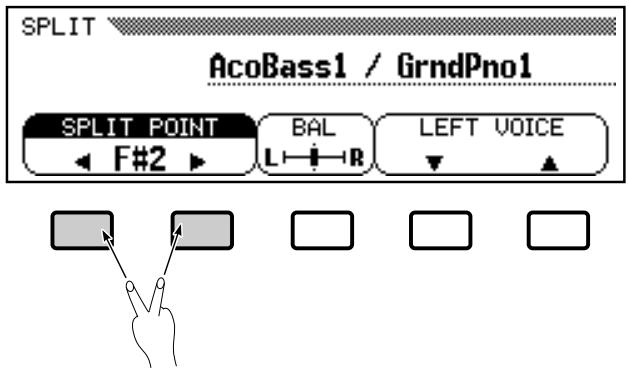
When the [SPLIT] button is pressed and its indicator lights, the keyboard is split into left- and right-hand sections and different voices can be assigned to each. (The Split mode can be turned off by pressing the [SPLIT] button again so that its indicator goes out.) The split point is initially set at the F#2 key when the power is turned on, and the Acoustic Bass 1 voice is initially assigned to the left-hand section of the keyboard (all keys up to and including F#2). The voice that was selected when the SPLIT mode was engaged is assigned to the right-hand section of the keyboard.
Changing the Split Voices
Use the LEFT VOICE LCD buttons in the SPLIT mode pop-up display, that appears when the [SPLIT] button is turned on, to select the left-hand voice (all voice groups are available). The data dial and [+]/[-] buttons can also be used once the LEFT VOICE section of the display has been highlighted.

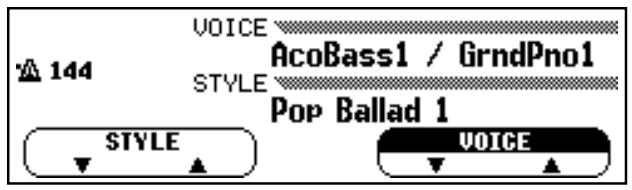
The VOICE selector indicator of the group containing the left-hand voice lights while the SPLIT mode pop-up display is showing, and the left-hand voice group can be selected via the VOICE selectors. The names of both the left- and right-hand voices appear separated by a “/” symbol in the normal play mode display even after the SPLIT mode pop-up display disappears. A different right-hand voice can be selected in the normal way once the normal play mode display reappears.
The SPLIT mode pop-up display can be recalled at any time in order to change the left-hand voice or other settings (see below) by pressing a VOICE selector (either the current voice or another voice to select the left-hand voice) while holding the [SPLIT] button.

- Please note that only the VOICE group button indicator of the left-hand voice group lights while the SPLIT mode pop-up display is showing, and that only the right-hand voice group indicator lights after the SPLIT mode pop-up display disappears.
Split-mode Voice Balance
The volume balance between the left- and right-hand voices can be adjusted by pressing the BAL (balance) LCD button to highlight the BAL section of the display, and then by using the data dial and [+]/[-] buttons. The BAL LCD button can be held to increase the level of the right-hand voice only. The balance bar in the BAL section of the display graphically shows the volume balance between the left- and right-hand voices. Equal balance can be instantly recalled by pressing the [+] and [-] buttons simultaneously while the BAL parameter is selected.
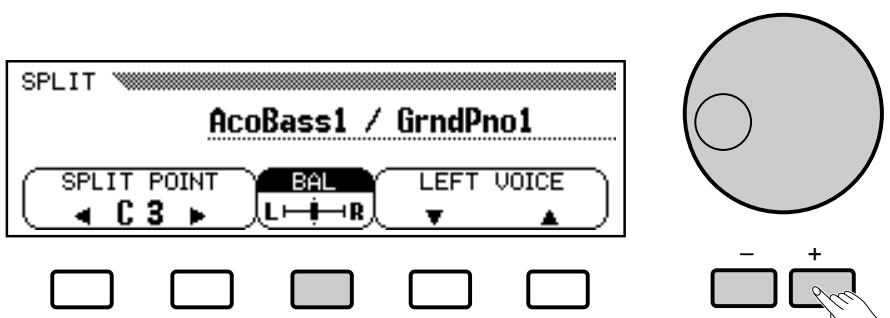
Changing the Split Point
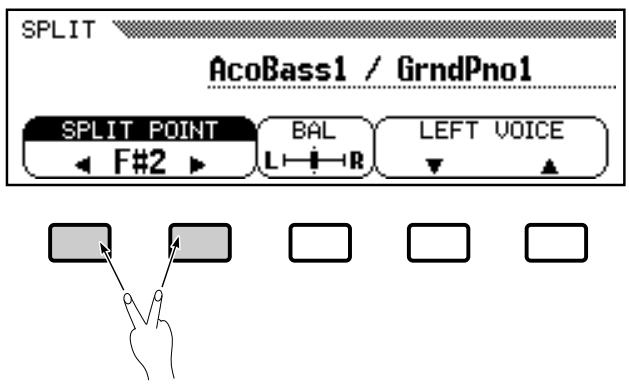
The split point can be set at any key by pressing the desired key while holding the [SPLIT] button. The split point key name will appear in the SPLIT POINT section of the display.
The split point can also be set by using the SPLIT POINT LCD buttons, or the data dial or [+]/[-] buttons once the SPLIT POINT section of the display has been highlighted. The keyboard guide lamp corresponding to the selected split point will light.
The default split point — F#2 — can be recalled by simultaneously pressing the SPLIT POINT LCD buttons or [+] and [-] buttons.
The SPLIT mode can be turned off by pressing the [SPLIT] button so that its indicator goes out.
NOTES
- The dual and split modes cannot be used at the same time.
- Whether the damper pedal affects the left voice only, the right voice only, or both voices is determined by the "DAMPER RANGE" function described on page 93 (the default is right-hand voice only).
- The OCTAVE SHIFT function — page 91 — can be used to shift the pitch of the left- and/or right-hand voice in the SPLIT mode up or down one octave.
- When the ABC Single Finger or Fingered mode (page 35) and the split mode are used simultaneously, the left-hand voice will be accompanied by the appropriate ABC chord voices.
- The SPLIT mode balance and split point settings affect all voice combinations.
- The SPLIT mode settings are retained even if the SPLIT mode is turned off and on while the power remains on. The SPLIT mode settings can also be backed up even after the power is turned off via the "Backup" function — page 107.
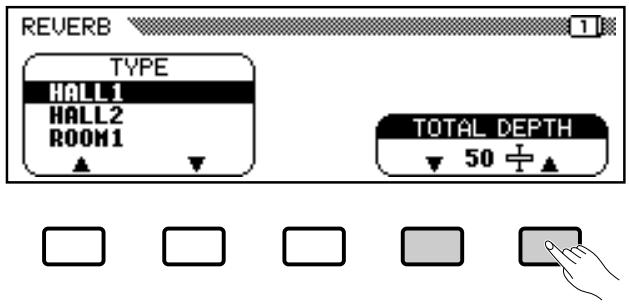
The CVP-79A/69/69A/59S provides a number of digital reverb types that you can use for extra “ambiance” and expressive power.

Selecting a Reverb Type
Press the [REVERB] button so that its indicator lights to turn the currently selected reverb effect on (since the REVERB indicator is automatically on when the power is initially turned on, you may have to turn it off and then on again). —The reverb effect is alternately turned on and off every time the [REVERB] button is pressed.

Different reverb types and depth settings can be selected via the pop-up display that appears when the [REVERB] button is turned on. Use the TYPE LCD buttons to select the desired reverb type, or use the data dial or [+]/[-] buttons when the TYPE parameter is highlighted.
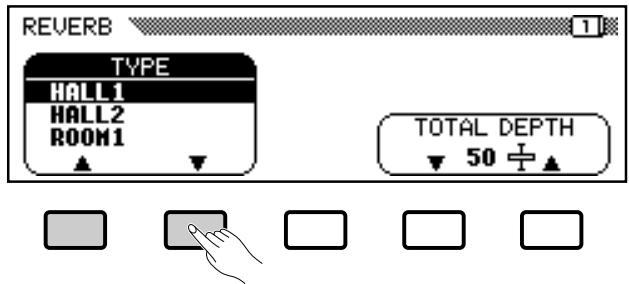
Reverb Type List
| HALL1 | Concert hall reverb. |
| HALL2 | |
| ROOM1 | Small room reverb. |
| ROOM2 | |
| ROOM3 | |
| STAGE1 | Reverb for solo instruments. |
| STAGE2 | |
| PLATE | Simulated steel plate reverb. |
| WHITE ROOM | Distinctive short reverb with initial delay. |
| TUNNEL | Simulation of long tunnel-like space. |
| CANYON (CVP-79A only) | Long, cavernous reverb. |
| BASEMENT | Small, highly reflective room reverb. |
NOTES
- Reverb is turned on and the HALL 1 effect is automatically selected when the POWER switch is turned on. However, the last setting can be recalled when the power is turned off and on via the "Backup" function — page 107.
NOTES
- "OFF" may appear if the reverb type "off" message is received via MIDI.
Total Depth Control
The overall depth of the selected reverb type can be increased or decreased by using the TOTAL DEPTH LCD buttons, or the data dial or [+]/[-] buttons when the TOTAL DEPTH parameter is highlighted. The total depth range is from “0” (no reverb) through “100” (maximum reverb). The default TOTAL DEPTH value of “50” can be instantly recalled by pressing both the TOTAL DEPTH LCD buttons or [+] and [-] buttons simultaneously.
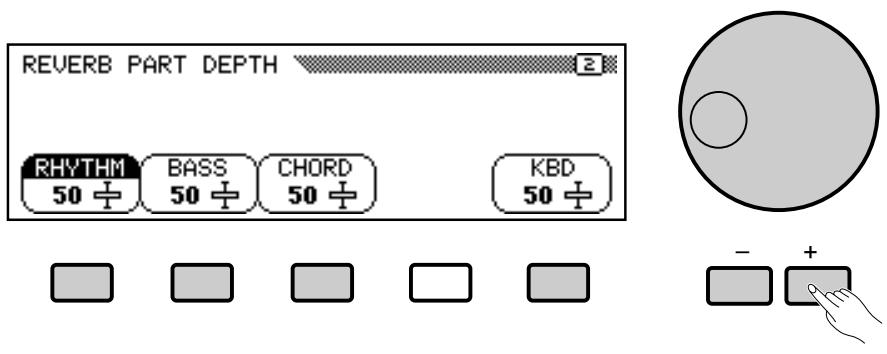
Individual Part Depth Control
The depth of the reverb effect applied to the accompaniment rhythm, bass, chord, and keyboard parts can be individually adjusted via the parameters provided in page 2 of the reverb display. These values are relative to the total depth value. Use the PAGE buttons to select page 2, press the LCD button corresponding to the part for which you want to adjust the reverb depth, then use the data dial or [+]/[-] buttons to adjust the reverb depth as required. The LCD buttons can be held to increase the depth for the corresponding part only. The individual part reverb depth range is from “0” (no reverb) to “100” (maximum reverb). The default setting of “50” can be instantly recalled for any part by simultaneously pressing the [+] and [-] buttons while the depth parameter for the desired part is selected.
NOTES
- The TOTAL DEPTH setting applies to all parts.
- The actual reverb depth for each part is determined by the product of the TOTAL DEPTH and individual part depth settings. For example, if one is "0", no reverb will be produced even if the other is "100".
- Both total and individual part depth can be adjusted in five steps.
Voice Effects
Each CVP-79A/69/69A/59S voice has individual effect type and depth settings that can be programmed as required. A range of 20 (17 in the case of the CVP-69/69A/59S) effects provides extensive musical versatility.

flowchart
graph LR
    A["Input Device 1"] --> B["Control Panel"]
    C["Input Device 2"] --> B
    D["Input Device 3"] --> B
    E["Input Device 4"] --> B
    F["Input Device 5"] --> B
    G["Input Device 6"] --> B
    H["Input Device 7"] --> B
    I["Input Device 8"] --> B
    J["Input Device 9"] --> B
    K["Input Device 10"] --> B
    L["Input Device 11"] --> B
    M["Input Device 12"] --> B
    N["Input Device 13"] --> B
    O["Input Device 14"] --> B
    P["Input Device 15"] --> B
    Q["Input Device 16"] --> B
    R["Input Device 17"] --> B
    S["Input Device 18"] --> B
    T["Input Device 19"] --> B
    U["Input Device 20"] --> B
    V["Effect"] --> W["Output Signal"]
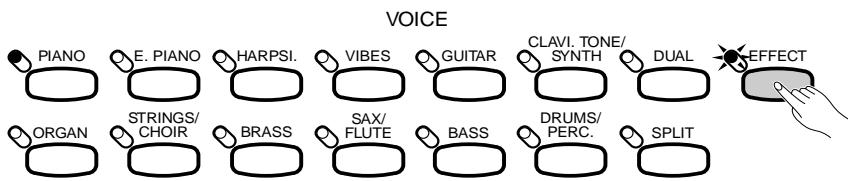
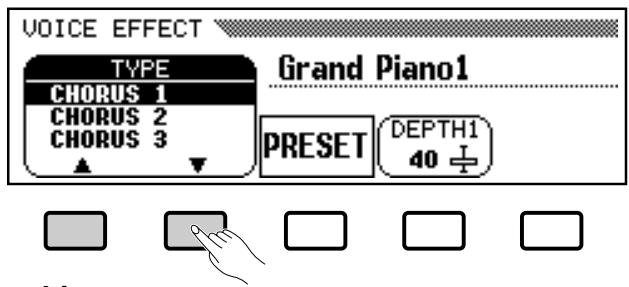
Selecting a Voice Effect
Press the [EFFECT] button so that its indicator lights to turn the currently selected voice effect on (press again so that its indicator goes out to turn the effect off).
flowchart
graph LR
    A["Piano"] --> B["E. PIANO"]
    B --> C["HARPSI"]
    C --> D["VIBES"]
    D --> E["GUITAR"]
    E --> F["CLAVI. TONE/ SYNTH"]
    F --> G["DUAL"]
    G --> H["EFFECT"]
    I["ORGAN"] --> J["STRINGS/ CHOIR"]
    J --> K["BRASS"]
    K --> L["SAX/ FLUTE"]
    L --> M["BASS"]
    M --> N["DRUMS/ PERC."]
    N --> O["SPLIT"]
Different effect types and depth settings can be selected via the pop-up display that appears when the [EFFECT] button is turned on. Use the TYPE LCD buttons to select the desired effect type, or use the data dial or [+]/[-] buttons when the TYPE parameter is highlighted.
The default effect type can be recalled by simultaneously pressing the TYPE LCD buttons or [+]/[-] buttons.

- "OTHERS" or "OFF" may appear if another effect type or off is set to a voice or received via MIDI.
Effect Type List
| CHORUS1 | Conventional chorus program with rich, warm chorusing. |
| CHORUS2 | |
| CHORUS3 | |
| CELESTE | Three-phase LFO for richer, more pronounced chorusing. |
| DETUNE (CVP-79A only) | Slight pitch change for each channel. |
| FLANGER | Pronounced three-phase modulation with slight metallic sound. |
| SYMPHONIC | Exceptionally rich & deep chorusing. |
| AUTO PAN | Several panning effects that automatically shift the sound position (left, right). |
| DELAY L,C,R | Three independent delays, for the left, right and center stereo positions. |
| DELAY L,R | Initial delay for each stereo channel, and two separate feedback delays. |
| ECHO | Stereo delay. |
| CROSS DELAY | Complex effect that sends the delayed repeats “bouncing” between the left and right channels. |
| TREMOLO | Rich Tremolo effect with both volume and pitch modulation. |
| ROTARY FAST | Rotary speaker simulation. |
| ROTARY SLOW | Rotary speaker simulation. |
| PHASER | Pronounced, metallic modulation with periodic phase change. |
| AUTO WAH | Repeating filter sweep “wah” effect. |
| TOUCH WAH (CVP-79A only) | Wah effect that varies filter sweep according to touch. |
| COMPRESSOR(CVP-79A only) | Affects the dynamics of the sound by smoothing out the high-volume peaks and soft-volume dips. |
| BOOST HL | Equalizer to boost high and low frequencies. |
Effect Depth Control
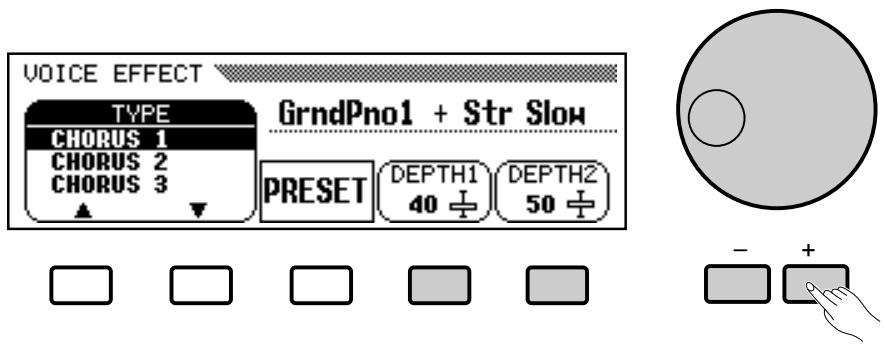
When a single voice is selected only one depth parameter will appear. When the DUAL or SPLIT mode is engaged, separate depth parameters will appear for the main and 2nd (dual) or right- and left-hand (split) voices. The depth of the selected effect can be increased or decreased by using the DEPTH1(R) and/or DEPTH2(L) LCD buttons, or the data dial or [+]/[-] buttons when the DEPTH1(R) or DEPTH2(L) parameter is highlighted. The DEPTH1(R) and DEPTH2(L) buttons can be held to only increase the depth of the corresponding voice. The depth range is from “0” (no effect) to “100” (maximum effect depth). The default DEPTH1(R) or DEPTH2(L) setting can be instantly recalled for either depth parameter by simultaneously pressing the [+] and [-] buttons while the desired depth parameter is selected — DEPTH2(L) is reset to “50”.
NOTES
- The main or right-hand voice effect type is commonly used for the 2nd or left-hand voice.
- The depth can be adjusted in five step intervals.
- The DEPTH1(R) and/or DEPTH2(L) value for some effect types may be fixed to 100 and/or 0 respectively and cannot be changed.
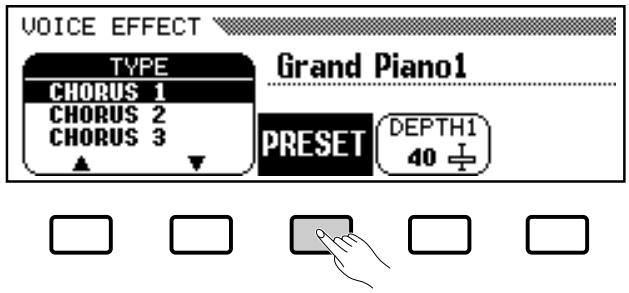
One-touch Preset Recall
Press the PRESET LCD button to instantly recall the preset effect type and DEPTH1(R) settings for the current voice. The DEPTH2(L) setting is not affected.
NOTES
- Each voice has its own individual default effect on/off, type, and depth settings. Your own settings can be backed up via the Backup function described on page 107.
- The DEPTH2(L) setting affects all voices. Its default value is "50", but your own setting can be backed up via the Backup function described on page 107.
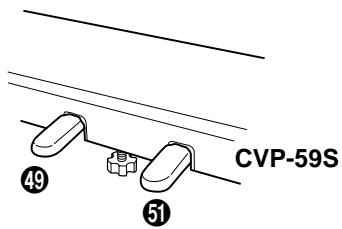
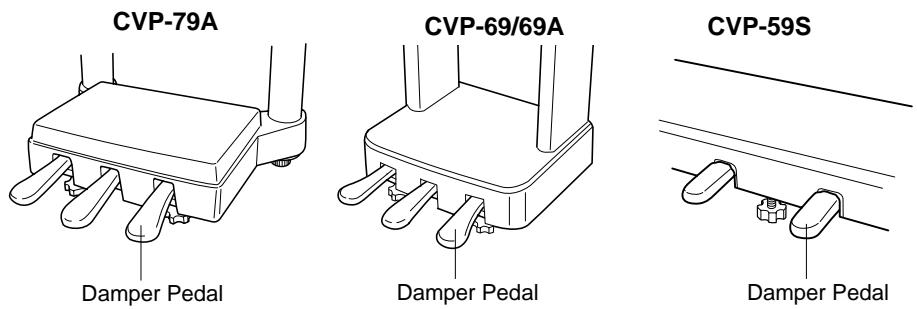
The CVP-79A/69/69A has three pedals and the CVP-59S has two pedals which offer a range of advanced expressive capabilities.
Right Pedal (Damper Pedal)
The damper pedal functions in the same way as a damper pedal on an acoustic piano. When the damper pedal is pressed notes played have a long sustain. Releasing the pedal immediately stops (damps) any sustained notes.

NOTES
- The CVP-79A damper pedal can be set for continuous (default) or on/off type damping control via the "DAMPER MODE" function (page 94).
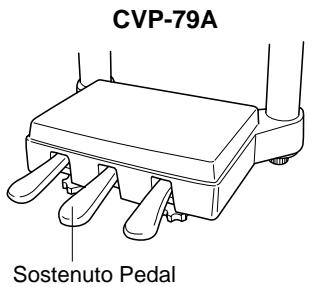
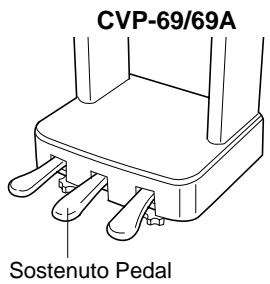
Center Pedal (Sostenuto Pedal — CVP-79A/69/69A only)
If you play a note or chord on the keyboard and press the sostenuto pedal while the note(s) are held, those notes will be sustained as long as the pedal is held (as if the damper pedal had been pressed) but all subsequently played notes will not be sustained. This makes it possible to sustain a chord, for example, while other notes are played “staccato.”
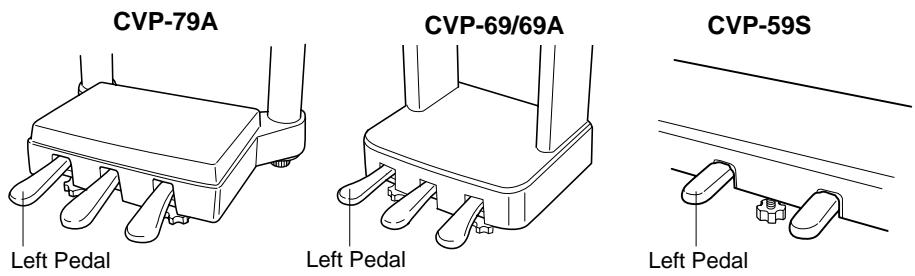
Left Pedal (Multi-function)
The left pedal has a number of functions which can be selected via the LEFT PEDAL function described on page 93.
CVP-79A
![FUNCTION [PEDAL] LEFT PEDAL SOFT DAMPER RANGE R DAMPER MODE CONT.](/content/2025/01/114698/images/7e286cf2ed402f15b7d1fd25144289332223f6cda23133152a855f490b925e92.jpg)


| Soft | Pressing the soft pedal subtly reduces the volume and slightly changes the timbre of notes played. The SOFT function is automatically selected when the POWER switch is initially turned on. |
| Start/Stop | The left pedal performs the same function as the accom-paniment section [START/STOP] button. For details on the START/STOP function, refer to the “Accompaniment” section, pages 30 and 32. |
| Harmony On/Off | Allows the Harmony function (page 41) to be turned on or off as required while playing so that harmony can be applied only to specific notes or phrases. |
| Registration + | Steps through the registration memory locations so a completely different set of panel settings can be recalled each time the pedal is pressed. See page 60 for details on the registration memory. |
| Intro A/Fill to A | The left pedal performs the same function as the accom-paniment section [INTRO A/FILL TO A] button. See pages 30 and 32 for details. |
| Intro B/Fill to B | The left pedal performs the same function as the accom-paniment section [INTRO B/FILL TO B] button. See pages 30 and 32 for details. |
| Ending/rit. | The left pedal performs the same function as the accom-paniment section [ENDING] button. See page 32 for details. |
| Break | Pressing the left pedal produces a break in the accompa-niment for as long as the pedal is held. For details on the BREAK function, refer to the “Accompaniment” section, page 32. |
| Sostenuto (CVP-59S only) | The left pedal functions in the same way as the CVP-79A/69/69A sostenuto pedal (see above). |

NOTES
- The damper and sostenuto pedal functions do not affect DRUMS/PERC. voices where inappropriate.
Accompaniment
The CVP-79A/69/69A/59S has 100 musical “styles” that can be used as a basis for rhythm accompaniment, or fully orchestrated rhythm, bass, and chord accompaniment (see “Auto Bass Chord” on page 34).

- Accompaniment playback data is not usually transmitted via the MIDI OUT connector. But it can be transmit-enabled via the MIDI 3 "Send" function described on page 97.

flowchart
graph TD
    A["STYLE"] --> B["AUTO BASS CHORD"]
    A --> C["START/STOP"]
    B --> D["OPEN/START/SHOT"]
    C --> E["OPEN/SHOT/SHOT"]
    style A fill:#f9f,stroke:#333
    style B fill:#ccf,stroke:#333
    style C fill:#cfc,stroke:#333
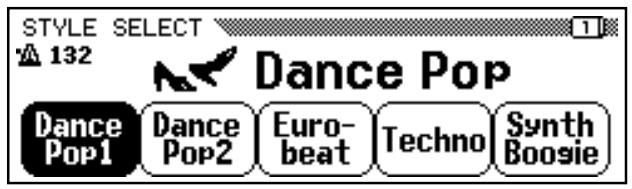
Style Selection
The CVP-79A/69/69A/59S's 100 preset accompaniment styles are organized in 11 groups (see page 120 for a complete style list). Use the STYLE selectors to select the group from which you want to select a style. The corresponding style display will appear.
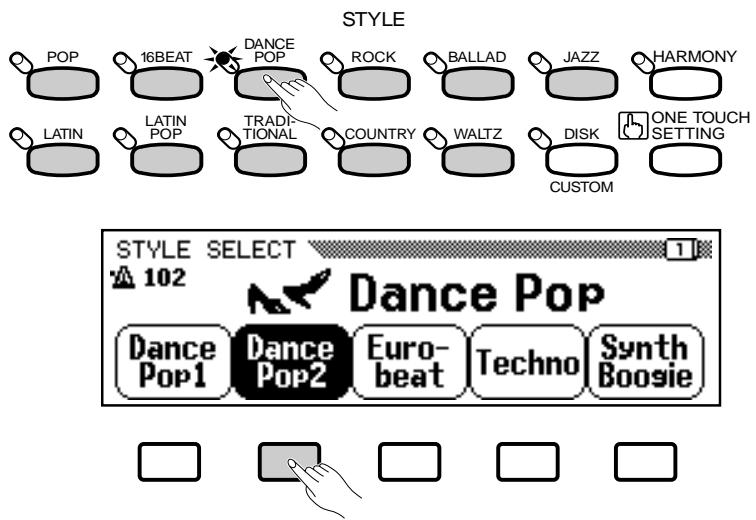
Use the PAGE buttons to select the page containing the style you want if more than one page is available, then press the LCD button corresponding to the desired style. You can also use the data dial or [+]/[-] buttons to select any of the styles within the selected group.
NOTES
- The display will automatically revert to the main play mode display after a few seconds if the [DISPLAY HOLD] button is not engaged (page 9).
- The last style selected within each group will automatically be recalled whenever a STYLE button is pressed while the power remains on. The last selected style in each group can also be backed up even after the power is turned off via the "Backup" function on page 107.
- The Pop Ballad 1 style is automatically selected when the power is turned on. However, the last-selected style can be recalled when the power is turned off and on via the "Backup" function on page 107.
- There is also a [DISK/CUSTOM] button that can be used to select styles loaded from optional Style File floppy disks or disks containing custom styles you have created yourself. See the "Style File Load" and "Custom Style" sections on pages 55 and 45 for details.
- Use the [ABC/SONG VOLUME] control to adjust the volume of the accompaniment sound.
Styles within the current group can still be selected via the STYLE ▲ and ▼ LCD buttons, or the data dial or [+]/[-] buttons once the STYLE section of the display has been highlighted, from the main play mode display.
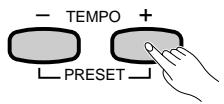
Tempo Control
Whenever you select a different style, the preset tempo for that style is also selected, and the tempo is displayed on the display in number of beats per minute (unless the accompaniment is playing, in which case the same tempo is maintained).
You can change the tempo to any value between 32 and 280 beats per minute, however, by using the TEMPO [+] and [-] buttons. This can be done either before the accompaniment is started or while it is playing. Press either button briefly to decrement or increment the tempo value by one, or hold the button for continuous decrementing or incrementing.

- The preset tempo for the selected style can be recalled at any time by pressing both the TEMPO [+] and [-] buttons simultaneously.
Starting the Accompaniment
There are several ways to start the accompaniment:
■ Straight Start
Press the [START/STOP] button.
Each of the styles also has two main variations that can be selected by pressing the [MAIN A] button or [MAIN B] button before pressing the [START/STOP] button. Normally the [MAIN A] button LED will be lit (or you can select it if the other variation is selected), indicating that the MAIN A pattern is selected. You can also switch between the [MAIN A] and [MAIN B] variations during playback — the new variation begins from the top of the next measure if the button is pressed on or after the 2nd beat of a measure.
The [START/STOP] button indicator will be lit during accompaniment playback and off when the accompaniment is stopped.

flowchart
graph LR
    A["INTRO A/FILL TO A"] --> B["INTRO B/FILL TO B"]
    B --> C["MAIN A"]
    C --> D["MAIN B"]
    D --> E["ENDING"]
    E --> F["SMALL ABC"]
    F --> G["ABC ON"]

    H["TAP"] --> I["SYNCHRO"]
    I --> J["START/STOP"]
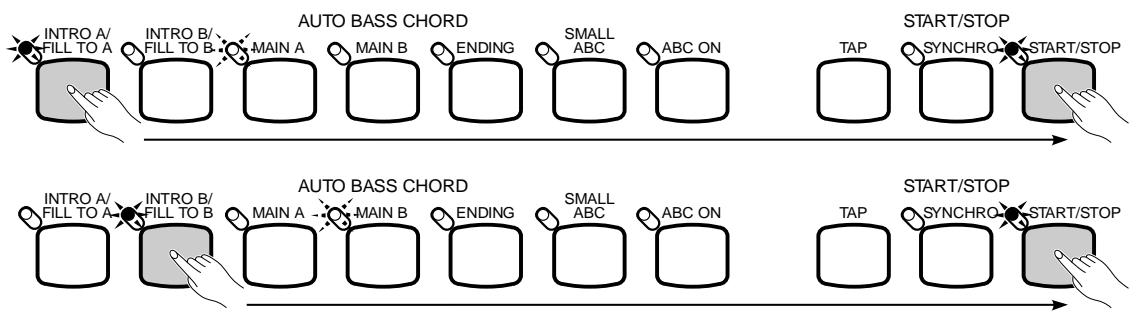
■ Start With an Introduction
Press the [INTRO A/FILL TO A] or [INTRO B/FILL TO B] button.
In the first case the [INTRO A/FILL TO A] indicator will light continuously and the [MAIN A] indicator will flash, indicating that the MAIN A variation will play after an appropriate introduction. In the latter case the [INTRO B/FILL TO B] indicator will light continuously and the [MAIN B] indicator will flash, indicating that the MAIN B variation will play after an appropriate introduction. Press the [START/STOP] button to actually start playback. The selected introduction can be disengaged before starting playback by pressing the [MAIN A], [MAIN B], or [ENDING] button.
flowchart
graph LR
    A["INTRO A/FILL TO A"] --> B["AUTO B/SCHORD"]
    B --> C["MAIN A"]
    C --> D["MAIN B"]
    D --> E["ENDING"]
    E --> F["SMALL ABC"]
    F --> G["ABC ON"]
    G --> H["TAP"]
    H --> I["START/STOP"]
    I --> J["SYNCHRO"]
    J --> K["START/STOP"]

    L["INTRO A/FILL TO A"] --> M["AUTO B/SCHORD"]
    M --> N["MAIN A"]
    N --> O["MAIN B"]
    O --> P["ENDING"]
    P --> Q["SMALL ABC"]
    Q --> R["ABC ON"]
    R --> S["TAP"]
    S --> T["START/STOP"]
    T --> U["SYNCHRO"]
    U --> V["START/STOP"]
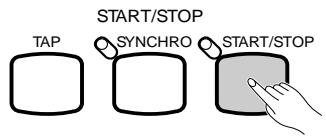
■ Synchronized Start
Any of the start types described above can be synchronized to the first note or chord played on the keyboard by first pressing the [SYNCHRO] button so that its indicator lights. When the keyboard is split or Auto Bass Chord Single Finger or Fingered mode is used, the first note played on the left-hand section of the keyboard will start the accompaniment (i.e. keys to the left of and including the split-point key — normally F#2). Use the [MAIN A], [MAIN B] and/or [INTRO A/FILL TO A] or [INTRO B/FILL TO B] buttons to select the type of start you want.
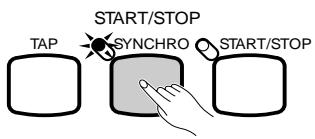
The first (red) dot of the BEAT display will flash at the current tempo when a synchronized start mode has been selected. The synchronized start mode can be canceled by pressing the [SYNCHRO] button a second time so that its indicator goes out. The synchronized start mode is automatically canceled once playback has started.
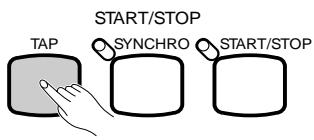
Tap start
This function lets you set the tempo and start the rhythm in one operation. Simply tap the [TAP] button at the required tempo — 3 times for a 3/4 style, 4 times for 2/4, 4/4, and 6-beat styles, and 5 times for 5-beat styles. The rhythm will start from the beginning of the next measure at the specified tempo.
■ The Beat Display
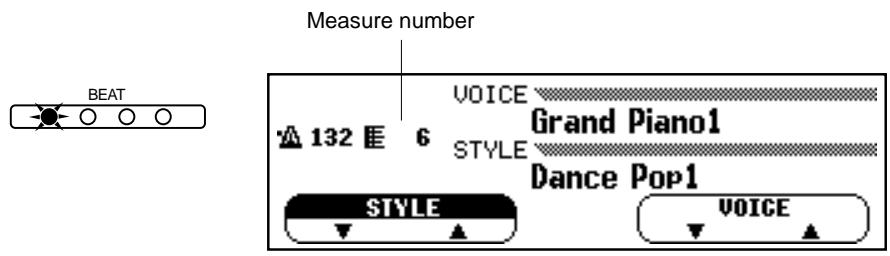
The four LED dots of the BEAT display provide a visual indication of the selected tempo during accompaniment playback. The leftmost (red) dot flashes on the first beat of each measure, the second dot flashes on the second beat, and so on (all dots except the leftmost dot are green). The current measure number appears on the LCD during playback.

- If the [SYNCHRO] button is pressed during playback, playback is stopped and the synchronized start mode is automatically engaged.

- The [TAP] button can also be used to change the tempo during rhythm playback (tap twice). In this case the "tap" click will not sound.
- If you tap the [TAP] button less than the required number of times (i.e. 3, 4, or 5), the tap tempo function will be canceled after a few seconds.
Fill-ins
The CVP-79A/69/69A/59S provides four types of automatic “fill-ins.”
● Fill To A: Press the [INTRO A/FILL TO A] button during play-back to produce a fill-in and go to the MAIN A rhythm pattern. Different fill-in patterns are produced when going from A to A or B to A.
● Fill To B: Press the [INTRO B/FILL TO B] button during play-back to produce a fill-in and go to the MAIN B pattern. Different fill-in patterns are produced when going from A to B or B to B.

If you hold one of the FILL buttons, the fill-in will repeat until the end of the measure in which button is released. If you press a fill-in button during the fill-in, the fill-in will stop and playback of the previous variation will resume.
Left-pedal Break
When the left-pedal function is set to “Break” as described on pages 27 and 93, the left pedal can be used to create a break in the accompaniment while playing. Press the left pedal to mute the accompaniment sound. Accompaniment sound will resume from the top of the next measure when the pedal is released. The break can be canceled before the beginning of the next measure by pressing the pedal a second time.
![FUNCTION [PEDAL] LEFT PEDAL BREAK DAMPER RANGE R DAMPER MODE CONT.](/content/2025/01/114698/images/5d31695fb1671fdb5a62330dc03fef96e46803127b2b19bba304245d5d68e773.jpg)
CVP-79A
Stopping the Accompaniment
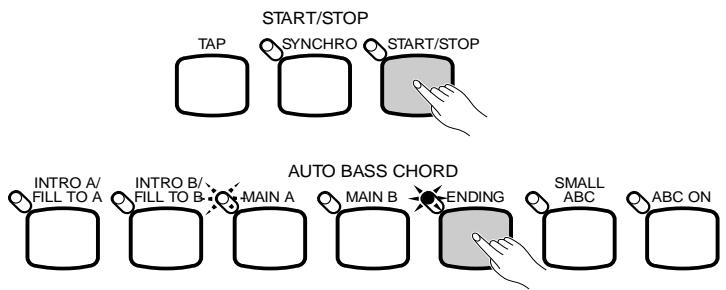
The accompaniment can be stopped at any time by pressing the [START/STOP] button. Press the [ENDING] button if you want to go to the ending pattern and then stop. Press [ENDING] a second time during ending playback to produce a ritardando (gradually slowing) ending. Different ending patterns are provided for the MAIN A and MAIN B

- Playback will start with the ending pattern if you press the [ENDING] button before starting playback. The ending can be disengaged before starting playback by pressing any other variation button.
variations (the [MAIN A] or [MAIN B] button indicator will flash during the ending). The ending will begin from the top of the next measure if the [ENDING] button is pressed on or after the 2nd beat of a measure.
flowchart
graph TD
    A["TAP"] --> B["START/STOP"]
    C["SYNCHRO"] --> D["START/STOP"]
    E["INTRO A/FILL TO A"] --> F["AUTO BASS CHORD"]
    G["INTRO B/FILL TO B"] --> F
    H["MAIN A"] --> I["ENDING"]
    J["MAIN B"] --> I
    K["SMALL ABC"] --> I
    L["ABC ON"] --> I
NOTES
- During playback the indicator of the currently-playing variation will be lit while that of the next variation to play flashes. (The only exception is: during playback of the ending, the flashing [MAIN A] or [MAIN B] button indicator indicates which ending variation is currently playing.)
- If the left pedal is switched to START/STOP operation (pages 27 and 93), it performs the same function as the panel [START/STOP] buttons (press to START, press again to STOP). The left pedal can also be assigned for INTRO A/FILL TO A, INTRO B/FILL TO B, and ENDING operation — pages 30 and 32.
Metronome
The CVP-79A/69/69A/59S also offers a metronome function that is ideal for practice.
To start the metronome, simply press the [METRONOME] button so that its indicator lights. The metronome will play at the currently selected tempo whether a style is playing or not. The metronome volume can be adjusted via the [ABC/SONG VOLUME] control.

The pop-up screen that appears when the [METRONOME] button is pressed also provides access to a range of other metronome settings. When “NORMAL” is selected the metronome click sounds continuously at the current tempo with no accented beats. The “4/4”, “3/4”, “2/4”, and “5/4” settings produce a bell accent on the first beat of each measure.
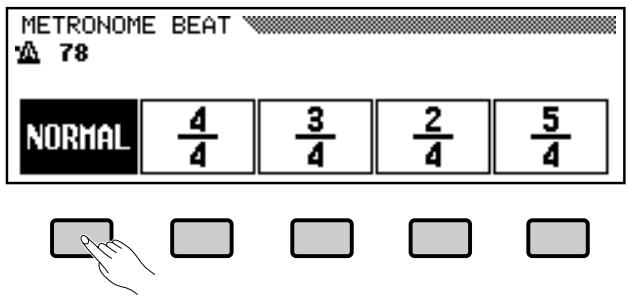
Press the [METRONOME] button again to stop the metronome sound (the METRONOME indicator will go out). The metronome will also stop automatically if the [START/STOP] button is pressed to stop a style in progress.
NOTES
- If a style is started by pressing the [START/STOP] button while the metronome is playing, the metronome will continue to sound along with the style.
- The metronome bell accent will not sound during accompaniment playback.
Auto Bass Chord (ABC)
The CVP-79A/69/69A/59S includes a sophisticated auto-accompa-niment system (Auto Bass Chord — ABC) that can provide auto-mated rhythm, bass and chord backing in a number of ways.

Single-Finger, Fingered Chord, and Full Keyboard Accompaniment
“Single Finger” accompaniment makes it simple to produce accompaniment using major, seventh, minor and minor-seventh chords by pressing a minimum number of keys in the ABC section of the keyboard. The automatic accompaniment consists of rhythm, bass and chords.
“Fingered Chord” accompaniment is ideal if you already know how to play chords on a keyboard, since it allows you to supply your own chords for the auto accompaniment feature.
When the “Full Keyboard” mode is selected the Clavinova will automatically create appropriate accompaniment while you play just about anything, anywhere on the keyboard.
1 Select a Style
Select an accompaniment style using the style selectors and STYLE pop-up screen (see “Style Selection” on page 28).
2 Set the Tempo
Use the TEMPO [+] and [-] buttons to set the desired accompaniment tempo if necessary (see “Tempo Control” on page 29 for more details).
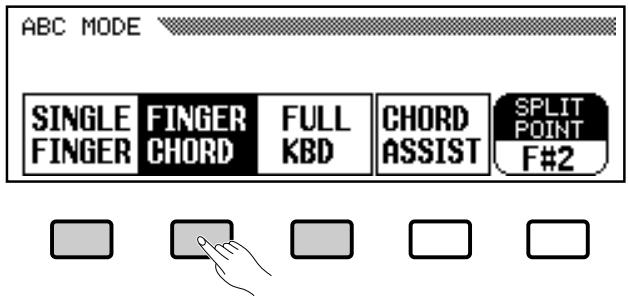
3 Turn ABC On
Press the [ABC ON] button so that its indicator lights and the ABC MODE pop-up screen appears. — The ABC mode is alternately turned on and off each time the [ABC ON] button is pressed.
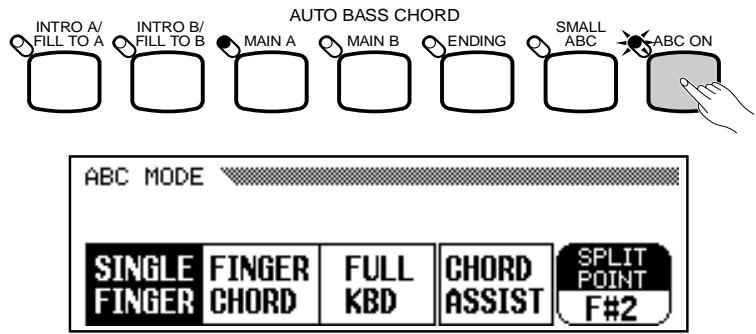
4 Select an ABC Mode
Before the ABC MODE pop-up screen disappears use the LCD buttons to select the SINGLE FINGER, FINGERED CHORD, or FULL KEYBOARD ABC mode. The default mode is SINGLE FINGER, but the mode you select is backed up even after the [POWER] switch is turned off. Backup can be turned off via the Backup function — page 107.
5 Start & Play
Start playback by pressing the [START/STOP] button or by using the [SYNCHRO] start mode.
● Single-finger Accompaniment
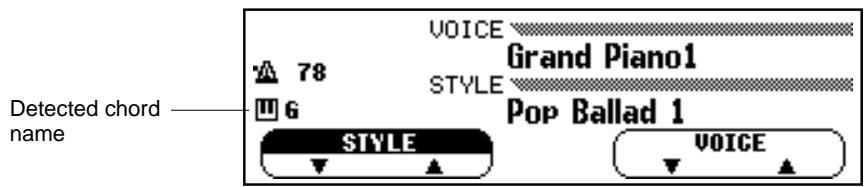
Pressing any key on the ABC section of the keyboard (up to the split point — normally the F#2 key) will cause the automatic chord and bass accompaniment to begin. If you press a “C” key, for example, a C-major accompaniment will be played. Press another key in the ABC section of the keyboard to select a new chord. The key you press will always determine the “root” of the chord played (i.e. “C” for a C chord). The name of the detected chord will appear on the display.
Single-finger minor, seventh, and minor-seventh chords can be played as follows:
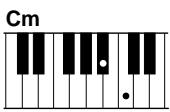
- For a minor chord, press the root key and a black key to its left.
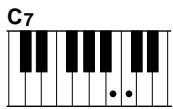
- For a seventh chord, press the root key and a white key to its left.
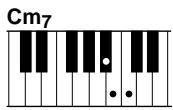
- For a minor-seventh chord, press the root key and both a white and black key to its left.
● Fingered Accompaniment
As soon as you play any chord on the lower keyboard (up to the split point — normally the F#2 key), the Clavinova will automatically begin to play the chord along with the rhythm and an appropriate bass line. The name of the detected chord will appear on the display. “*” will appear if the chord is not recognizable by the CVP-79A/69/69A/59S.
The Clavinova will accept the following chord types in the Fingered Accompaniment mode:
NOTES
- The automatic accompaniment will sometimes not change when related chords are played in sequence (e.g. some minor chords followed by the minor seventh).
- Major
- Sixth [6]
• Major seventh [M7]
• Major seventh flatted fifth [M7(b5)]
• Major seventh sharp eleventh [M7(#11)] - Added ninth [add9]
• Major seventh ninth [M7(9)] - Six ninth [6(9)]
- Flatted fifth [(b5)]
- Augmented [aug]
- Seventh augmented [7(#5)]
• Major seventh augmented [M7(#5)] - Minor [m]
- Minor sixth [m6]
- Minor seventh [m7]
• Minor seventh flatted fifth [m7(b5)]
• Minor added ninth [madd9]
• Minor seventh ninth [m7(9)]
• Minor seventh eleventh [m7(11)] - Minor major seventh flatted fifth [mM7(b5)]
• Minor major seventh [mM7]
• Minor major seventh ninth [mM7(9)] - Minor flatted fifth [m(b5)]
- Diminished seventh [dim7]
- Seventh [7]
- Seventh suspended fourth [7sus4]
- Seventh ninth [7(9)]
- Seventh sharp eleventh [7(#11)]
- Seventh added thirteenth [7(13)]
- Seventh flatted fifth [7(b5)]
- Seventh flatted ninth [7(b9)]
- Seventh added flatted thirteenth [7(b13)]
- Seventh sharp ninth [7(#9)]
- Suspended fourth [sus4]
"On-bass" chords are also recognized. Two-note fingerings will produce a chord based on the previous chord.
“No chord” (i.e. rhythm only accompaniment) can be produced by pressing any three consecutive keys (ex. C,C#,D) simultaneously.
“- - -” will appear instead of a chord name.
● Full-keyboard ABC
When this advanced auto-accompaniment mode is engaged the Clavinova will automatically create appropriate accompaniment while you play just about anything, anywhere on the keyboard: chords, a bass line, arpeggiated chords, a melody line. The name of the detected chord will appear on the display. You don't have to worry about specifying the accompaniment chords. Although Full-keyboard ABC is designed to work with many songs, some arrangements may not be suitable for use with this feature. Try playing a few simple songs in the Full-keyboard ABC mode to get a feel for its capabilities.
6 Stop the Accompaniment
Press the [START/STOP] or [ENDING] button to stop the accompaniment.

Press the [ABC ON] button so that its indicator goes out when you want to exit from the ABC mode.
NOTES
- Chord detection occurs at approximately 8th-note intervals. Extremely short chords — less than an 8th note in length — may therefore not be detected.
- The DUAL or SPLIT mode can be used with ABC.
NOTES
- The [INTRO A/FILL TO A], [INTRO B/FILL TO B], [MAIN A], [MAIN B], and [ENDING] buttons can be used in the ABC mode to create pattern variations (refer to the “Accompaniment” section on pages 30 and 32 for details).
Overall Accompaniment Volume Control
Use the ABC/SONG VOLUME control to adjust the volume of the accompaniment sound in relation to the keyboard sound. No accompaniment sound will be produced if the MASTER VOLUME control is set to its “MIN” position.
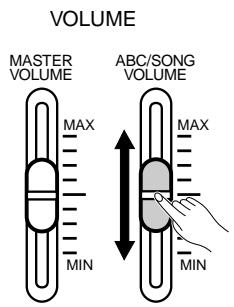
Individual Part Volume Control
The CVP-79A/69/69A/59S has five accompaniment parts — RHYTHM, BASS, CHORD, PAD, and PHRASE. — that function as follows:
| RHYTHM | This is the main rhythm part. The RHYTHM part usually plays one of the drum kits. |
| BASS | The BASS part always plays a bass line, but the voice will change to fit the selected style ... acoustic bass, synth bass, tuba, etc. |
| CHORD | This part provides the rhythmic chordal accompaniment required by each style. You'll find guitar, piano, and other chordal instruments here. |
| PAD | This part plays long chords where necessary, using sustained instruments such as strings, organ, choir. |
| PHRASE | This is where the musical embellishments reside. The PHRASE part is used for punchy brass stabs, arpeggiated chords, and other extras that make the accompaniment more interesting. |
The volume of the RHYTHM, BASS, CHORD, PAD, and PHRASE accompaniment parts can be individually adjusted via the volume parameters accessed by the [MIXER] button. Select the part you want to control by first pressing the appropriate LCD button, then use the data dial or [+]/[-] buttons to set the volume as required. The normal volume level for any part (“90”) can be instantly recalled by simultaneously pressing the [+] and [-] buttons while the desired part is selected. Several parts can be selected at once by pressing their buttons at the same time. The volume of all selected parts can then be adjusted simultaneously. The mixer parameters will disappear when the [MIXER] button is pressed a second time (or the [EXIT] button is pressed).

The second page of the MIXER display (accessed via the PAGE buttons) includes individual volume parameters for the keyboard (manually played sound) and harmony function sound — see page 41 for details on the Harmony function. There’s also a PRESET LCD button in this page which instantly resets all MIXER volume parameters to their default values (100 for KBD part, and 90 for all other parts).
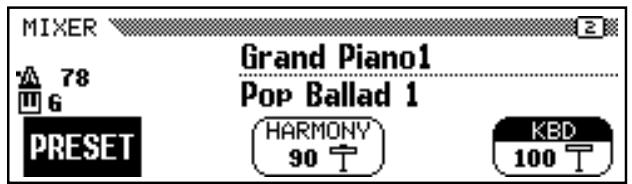

NOTES
- Some styles may not use all five parts.

NOTES
- The volume level can be adjusted in two steps intervals.

NOTES
Part volume relation:
- ABC/SONG volume is relative to the MASTER VOLUME.
• Each RHYTHM, BASS, CHORD, PAD or PHRASE part volume is relative to ABC/SONG volume. - KBD part volume is relative to MASTER volume.
• HARMONY part volume is relative to KBD part volume.
Small ABC
A simple form of “orchestration” control is provided by the [SMALL ABC] button. When this button is pressed so that its indicator lights some of the accompaniment parts are turned off to create a simpler, “smaller” accompaniment sound.

flowchart
graph LR
    A["INTRO A/FILL TO A"] --> B["INTRO B/FILL TO B"]
    B --> C["MAIN A"]
    C --> D["MAIN B"]
    D --> E["ENDING"]
    E --> F["SMALL ABC"]
    F --> G["ABC ON"]
Press the [SMALL ABC] button a second time so that its indicator goes out to turn the SMALL ABC function off.

- ABC will not sound when the [ABC ON] button is turned off, even if the [SMALL ABC] button is turned on.
Changing the ABC Split Point
The ABC split point can be set at any key by pressing the desired key while holding the [ABC ON] button. The split point can also be set by using the SPLIT POINT LCD button in the ABC MODE pop-up display, or the data dial or [+]/[-] buttons. The default split point — F#2 — can be recalled by simultaneously pressing the [+] and [-] buttons.
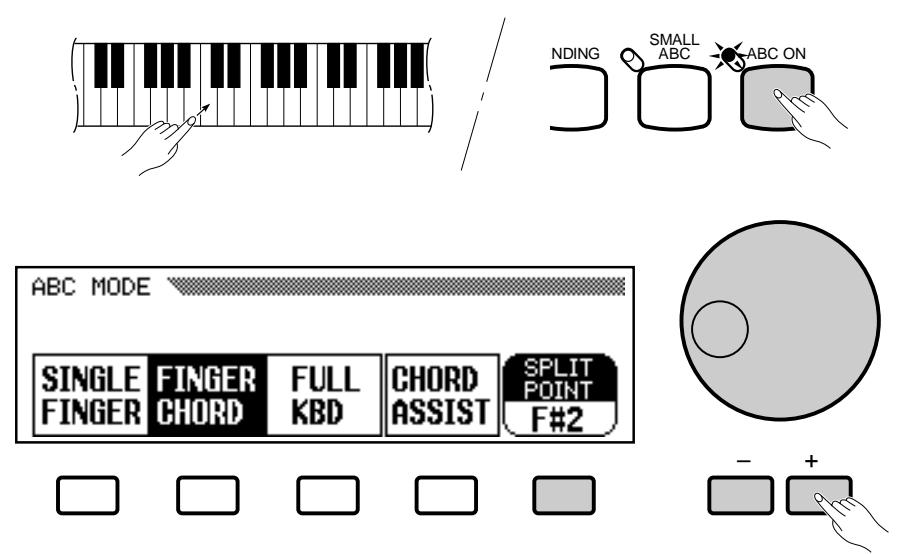

- The split point is indicated by the keyboard guide lamp above the split point key.
Chord Assist
The Chord Assist function is essentially an electronic “chord book” that will show you appropriate fingerings for chords you enter via the display. The fingerings are indicated via the keyboard guide lamps, and correspond to those recognized in the ABC Fingered mode. You can also play chords on the keyboard in the same way as in the ABC Fingered mode.
1 Select the Chord Assist Function
Press the CHORD ASSIST LCD button in the ABC MODE pop-up display.

2 Start the Accompaniment
Start the accompaniment by using any of the methods described on pages 30 and 31.
3 Enter the Chord Root
Press the ROOT LCD button to select the desired chord root, or use the data dial or [+]/[-] buttons once the ROOT parameter is selected.
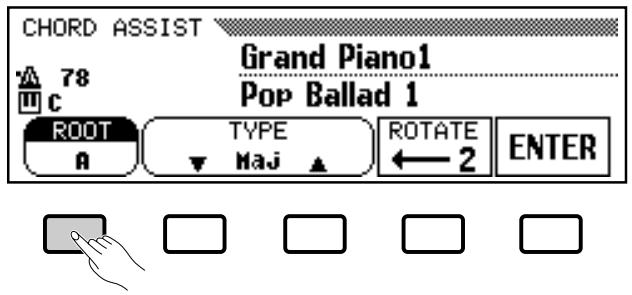
4 Enter the Chord Type
Use the TYPE ▲ and ▼ LCD buttons to select the chord type. The data dial and [+]/[-] buttons can also be used once the TYPE parameter is selected.
5 Enter the Chord
The fingering for the chord selected via the LCD buttons will appear on the keyboard guide lamps. At this point you can either play the indicated chord on the keyboard or press the ENTER LCD button to actually enter the specified chord — i.e. the specified chord accompaniment will sound.
6 Rotate the Fingering as Necessary
Press the ROTATE LCD button to shift the fingering down the keyboard. Each time the ROTATE button is pressed the next viable fingering (inversion) appears on the guide lamps. The inversion number appears in the ROTATE section of the display.
7 Stop the Accompaniment
Press the [START/STOP] or [ENDING] button to stop the accompaniment.
8 Exit When Done
Press the panel [ABC ON] button, so that its indicator goes out, to exit from the Chord Assist function and ABC mode when done.
NOTES
- The chord name entered via the LCD will appear in the TYPE and ROOT parameter locations, while the actually recognized chord name will appear next to the keyboard symbol above the parameters.
- A flashing keyboard guide lamp indicates a note which may be omitted.
NOTES
- The following chord types can be specified via the Chord Assist display: Maj, 7, m, m7, m7(b5), 6, m6, M7, sus4, aug, m(b5), 7sus4, 7(#5), dim7, (b5), 7(b5), mM7. All fingered-mode chords (page 36) can be entered via the keyboard.
- The split point is not shown on the guide lamps when the Chord Assist function is engaged.
- If the split point is set below F # 2 it will automatically be set at F # 2 .
Harmony
This feature automatically adds appropriate harmony notes or delayed decorative notes (up to three notes) to a melody or chords you play on the keyboard. The harmony notes are produced to match chords played via the ABC auto-accompaniment system.
1 Turn Harmony On
Press the [HARMONY] button so that its indicator lights to turn the HARMONY feature on.

flowchart
graph LR
    A["POP"] --> B["16BEAT"]
    B --> C["DANCE POP"]
    C --> D["ROCK"]
    D --> E["BALLAD"]
    E --> F["JAZZ"]
    F --> G["HARMONY"]
    G --> H["ONE TO SETTING"]
    I["LATIN"] --> J["LATIN POP"]
    J --> K["TRADITIONAL"]
    K --> L["COUNTRY"]
    L --> M["WALTZ"]
    M --> N["DISK"]
    N --> O["CUSTOM"]
NOTES
- The Harmony feature cannot be turned on when the Full Keyboard ABC mode is selected.
2 Select a Harmony Type
While the HARMONY pop-up display is showing, use the data dial or [+]/[-] buttons to select the desired harmony type. 16 harmony types are available.
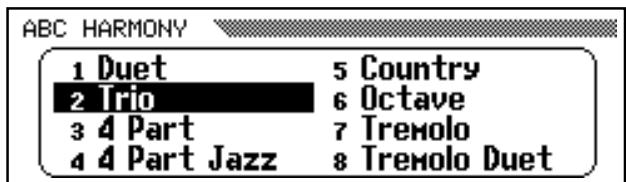
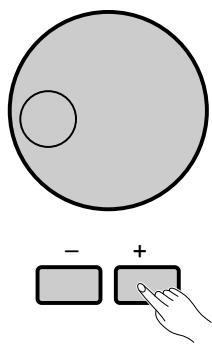
Harmony Type List
- Duet
- Tremolo Oct
- Trio
- Strumming
• 4 Part • Trio Delay
• 4 Part Jazz • Vibes & J.Gtr - Country
- Add Trp & Sax
- Octave
- Backing Vocal
- Tremolo
- Add Strings
- Tremolo Duet
- Forest
3 Set Up ABC As Required
Select an accompaniment style, tempo, and ABC mode (except Full Keyboard).
4 Start ABC Playback
Start accompaniment playback using any of the methods described on pages 30 and 31.
5 Play
Play the required chords (single-finger or fingered chord) on the ABC section of the keyboard while playing a melody line or chords on the right-hand section of the keyboard. When chords are played on the right-hand section of the keyboard, the harmony will be applied to the last note played.

- With some harmony types the voice used for the harmony will be different from the currently selected voice.

- The Harmony feature can be used while ABC is off, but only octaves will be produced.
6 Stop the Accompaniment
Press [START/STOP] or [ENDING] button to stop the accompaniment.
7 Turn Harmony Off
Press the [HARMONY] button again, so that its indicator goes out, to turn the function off.

flowchart
graph TD
    A["POP"] --> B["16BEAT"]
    B --> C["DANCE POP"]
    C --> D["ROCK"]
    D --> E["BALLAD"]
    E --> F["JAZZ"]
    F --> G["HARMONY"]
    H["LATIN"] --> I["LATIN POP"]
    I --> J["TRADI-TIONAL"]
    J --> K["COUNTRY"]
    K --> L["WALTZ"]
    L --> M["DISK"]
    M --> N["CUSTOM"]
    N --> O["ONE TO SETTING"]
■ The Left Pedal & Harmony
If the Left Pedal Function is set to HARMONY ON/OFF (pages 27 and 93), harmonization of notes played on the right-hand section of the keyboard only occurs while the left pedal is pressed. This allows you to combine normal ABC type performance with harmony as required.
![FUNCTION [PEDAL] 3 LEFT PEDAL HARMONY R DAMPER RANGE DAMPER MODE CONT.](/content/2025/01/114698/images/6719a1b0c9e5a102612d17593cef6fbaed35530a306e41a1c861daa8b6e9bae2.jpg)
CVP-79A

- Harmony can be turned on and off while playing.

- The Left Pedal HARMONY ON/OFF function is not effective when the HARMONY feature is off (i.e. the [HARMONY] button's indicator is not lit).
One Touch Setting
The CVP-79A internal styles each have 4 different preset “panel setups” that can be recalled via the [ONE TOUCH SETTING] button to create different musical textures. The CVP-69/69A styles have 3, and the CVP-59S styles have 1. The ONE TOUCH SETTING setups include settings for all of the following parameters:
One Touch Setting Parameter List
Voice Parameters
- Voice
- Keyboard Volume
- Dual Mode
- Split Mode
- Dual Voice
- Split Voice
- Dual Balance
-
Split Balance
-
Dual Detune Depth
- Reverb On/Off
- Reverb Type
- Reverb Depth (Total, Rhythm, Bass, Chord, Keyboard)
- Effect On/Off
-
Effect Type
-
Effect Depth (Main Voice, Dual Voice, Split Voice)
- Right/1 Octave Shift
- Left Octave Shift
- 2nd Octave Shift
- Right/1 Pan
- Left Pan
- 2nd Pan
Accompaniment Parameters
- ABC On
- Small ABC On/Off
- Harmony On/Off
- Harmony Type
- ABC/Song Volume
- Main A/B
-
Tempo
-
Rhythm Volume
- Bass Volume
- Chord Volume
- Pad Volume
- Phrase Volume
- Harmony Volume
1 Engage the One Touch Setting Feature
The ONE TOUCH SETTING feature can be used either while an accompaniment is playing or prior to starting an accompaniment by simply pressing the [ONE TOUCH SETTING] button. The corresponding panel setup is recalled immediately. On the CVP-79A and CVP-69/69A other ONE TOUCH SETTING setups can also be recalled in the ONE TOUCH SETTING pop-up display by using the SELECT ▲ and ▼ LCD buttons.
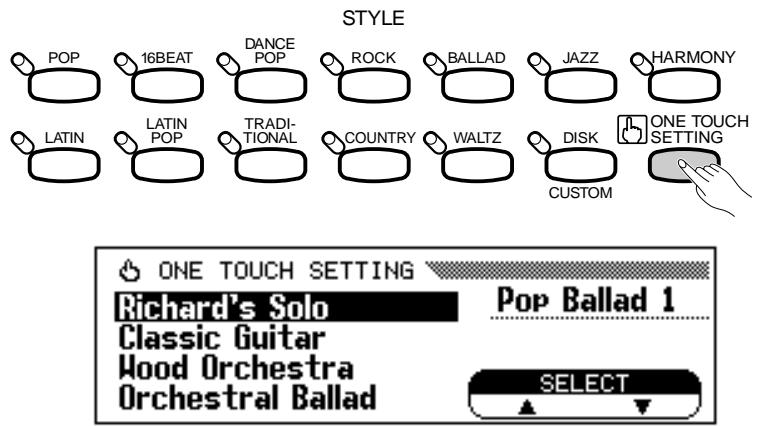
CVP-79A
2 Adjust The Settings If Necessary
Any of the parameters set by the ONE TOUCH SETTING feature can be adjusted to create the desired sound after a ONE TOUCH SETTING setup has been selected.

- To return to the settings that were active prior to engaging the One Touch Setting feature, re-select the style after selecting a different style (ABC will remain on however).
- The One Touch Setting feature cannot be used when a [DISK/CUSTOM] style is selected.
- ABC is automatically turned ON when the One Touch Setting feature is engaged.
- The synchronized start mode is automatically turned ON if the One Touch Setting feature is engaged before starting the accompaniment.
- If the STYLE SETTING parameter in the BACKUP function (page 107) is set to on, the One Touch Setting setup selection for each style will be retained in memory even when the power is turned off. This way the desired setup can be recalled immediately when the [ONE TOUCH SETTING] button is pressed. (CVP-79A/69/69A)
- Harmony will not be turned on if the ABC Full Keyboard mode is selected, even if the selected One Touch Setting setup includes "Harmony ON".
The CVP-79A/69/69A/59S Custom Style feature allows you to create original accompaniment styles that can be later recalled and played at any time, just like the presets. Up to 8 custom styles can be maintained in internal memory at the same time, and any number can be saved to disk for later reloading and use.
The basic custom style recording procedure is outlined below.

NOTES
- Custom style data is not retained in memory when the power is turned off, so be sure to save your custom styles to disk before turning the power off.
- One pre-programmed temporary style is automatically loaded into the [DISK/CUSTOM] memory whenever the power is turned on. (Memory is common to the Custom Styles and the loaded styles from the optional Style File disks — page 55.)

flowchart
graph LR
    A["DISK"] --> B["CUSTOM"]
    B --> C["Interface with Control Panel"]
    C --> D["Display 1"]
    C --> E["Display 2"]
    C --> F["Display 3"]
    C --> G["Display 4"]
    C --> H["Display 5"]
1 Engage the Custom Style Feature ....
Press the [DISK/CUSTOM] style selector so that its indicator lights, then press the CUSTOM STYLE LCD button. The “Please select a source STYLE.” message will appear on the display for a few seconds before going to the CUSTOM STYLE page 1 display and the current [DISK/ CUSTOM] style will begin playing.
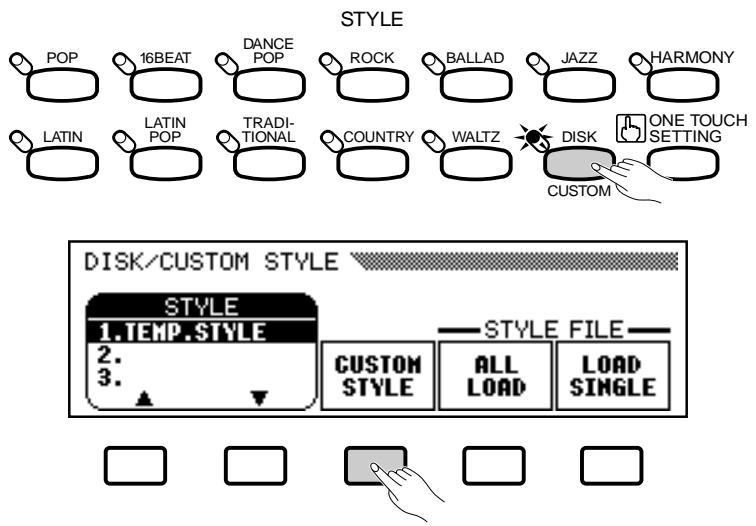
2 Select a Source Style ....
Select a preset style that is close to the style you want to create. Preset style selection is carried out in the normal way (page 28).
If you want to select a [DISK/CUSTOM] style, press the [DISK/CUSTOM] style selector once again and use the STYLE ▲ and ▼ buttons, or the data dial or [+]/[-] buttons to select a [DISK/CUSTOM] style.
3 Select the Section You Want to Record
In the CUSTOM STYLE page 1 display, press the first LCD button as many times as necessary to select the section you want to program first: MAIN A, MAIN B, INTRO, FILL IN, or ENDING. The MAIN A section is initially selected.
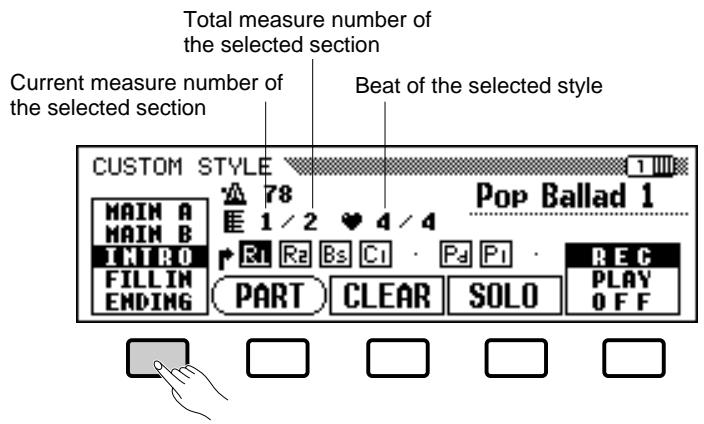
4 Change the Time Signature & Number Of Measures, If Required......
If you want to create a style in a different time signature than the current style, or change the number of measures in the selected section, Press the PAGE [>] button to go to CUSTOM STYLE page 2.
Current recording section and part
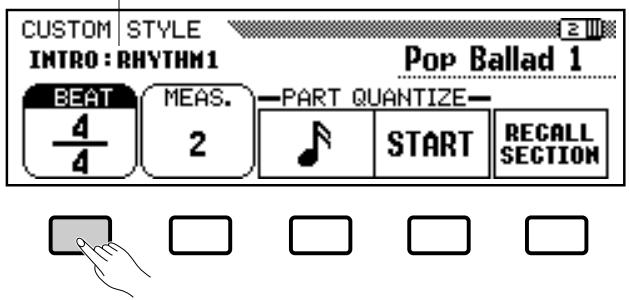
Use the BEAT LCD button to select a different time signature, or the data dial or [+]/[-] buttons once the BEAT parameter has been selected. As soon as you choose to change the beat value, the “Clear STYLE ?” prompt will appear, since you will have to completely clear all sections and parts of the style and start recording from scratch if you change the time signature. Press OK to clear the style, or CANCEL to abort. Once the style has been cleared you can select a new time signature as required: 2/4, 3/4, 4/4, or 5/4.
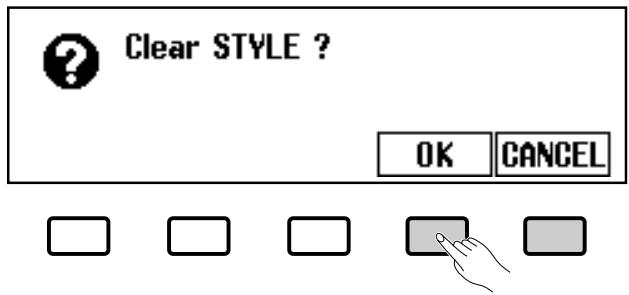
NOTES
- In the CUSTOM STYLE, MAIN A, MAIN B, INTRO, FILL IN or ENDING are referred to as "section", and RHYTHM 1/2, BASS, CHORD 1/2, PAD or PHRASE 1/2 are referred to as "part".
- Only one pattern can be created for each INTRO, FILL IN and ENDING section.
- Whether the “A” or “B” variations of the INTRO, FILL IN and ENDING sections are used as the source pattern depends on whether the MAIN A or MAIN B section was selected when the Custom Style function was engaged. (As for FILL IN, “FILL IN from A to A”, or “FILL IN from B to B” is used.)
Use the MEAS. LCD button to select a different number of measures for the selected section, or the data dial or [+]/[-] buttons once the MEAS. parameter has been selected. As soon as you choose to change the number of measures in the section, the “Clear SECTION ?” prompt will appear, since you will have to clear all parts of the currently selected section and start recording from scratch if you change the number of measures. Press OK to clear the section, or CANCEL to abort. Once the section has been cleared you can select a new number of measures as required: 1 through 8. The FILL IN section has only 1 measure and the number of measures cannot be changed although the FILL IN section can be cleared using this operation.
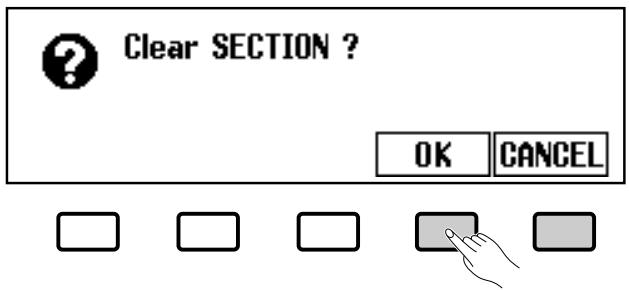
Once the BEAT and/or MEAS. parameters have been set as required, press the PAGE [<] button to go back to the first custom style page.
5 Select the Part & Voice You Want to Record ....
Use the PART LCD button, the data dial, or [+]/[-] buttons to select the part you want to record:
| R1 | Rhythm 1 |
| R2 | Rhythm 2 |
| Bs | Bass |
| C1 | Chord 1 |
| C2 | Chord 2 |
| Pd | Pad |
| P1 | Phrase 1 |
| P2 | Phrase 2 |
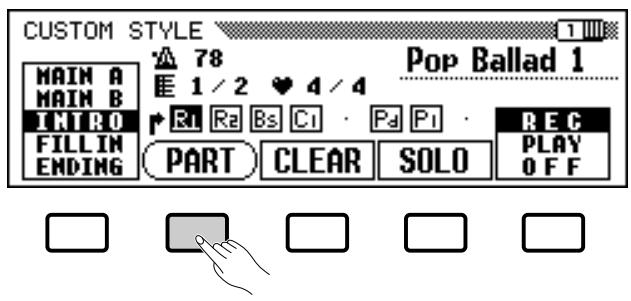
The R1 part is initially selected and set to the record mode.
Any part you select can be set to the record mode by using the rightmost LCD button to select “REC” after selecting the part (the part number will appear white in a black box). Since parts other than R1 and R2 must be cleared before they can be recorded (if the source style is a preset style or a style loaded from the optional Style File disk) the “Clear Part ?” confirmation will appear if you select a part that contains data: press OK to clear the part and continue, or CANCEL to abort. Only one part can be set to the record mode. All other parts will be set to “PLAY” (part number surrounded by box) or turned “OFF” (part number only — no box). Parts that contain no data are indicated by a dot in place of the part number.
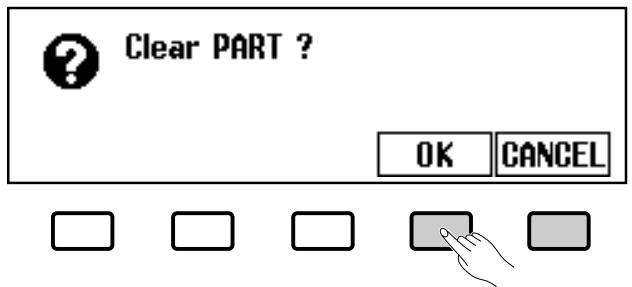
At this point you can also select the voice you want to record with (the preset voice for that part will initially be selected). Only [DRUMS/PERC.] voices can be used for the R1 part and only Drum Kit voices can be used for the R2 part, while any other voices can be selected for the remaining parts.
6 Record the Selected part.
You can now add new parts to the selected part by playing the keyboard at the appropriate timing (play in C Major seventh since the Custom Style is recorded as a C Major seventh pattern). If you want to create a totally new part from scratch, press the CLEAR LCD button to clear the selected part before beginning to record. If both the R1 and R2 parts are cleared the metronome will sound to provide a timing guide (the metronome sound is not recorded). When a drum kit voice is used, a single drum instrument sound can be cleared from the R1 or R2 part by pressing the key corresponding to the instrument to be cleared while holding the keyboard “CANCEL” (C1) key. The metronome timing guide can also be cleared in this way.
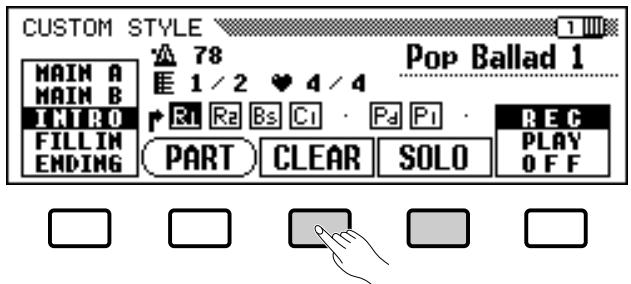
Another useful recording aid is the SOLO LCD button: when this button is pressed and highlighted, only the selected part will sound. Press the SOLO button again to turn the solo function off and hear the entire style.
7 Quantize the Recorded Part, if Necessary
You can “tighten up” the timing of a recorded part by aligning all notes to specified beats via the PART QUANTIZE function in CUSTOM STYLE page 2 (press the PAGE [>] button). Press the LCD button below the note symbol to select “quantize size” — i.e. the beats to which the notes in the current part will be aligned:
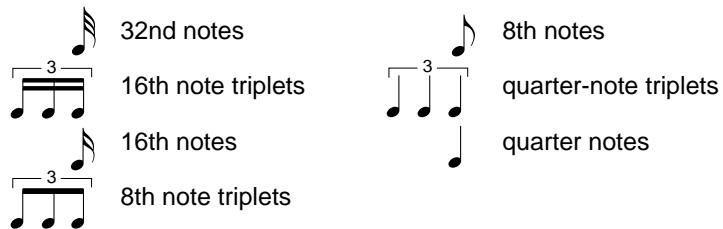

- Playback can be started and stopped via the [START/STOP] button as required while in the Custom Style mode — data cannot be recorded while playback is stopped.

- The timing guide will stop as soon as the Custom Style is stored. - The sound of all parts is automatically stopped at the end of the style — i.e. at the point between repeats when recording. It is therefore not advisable to record over this point.
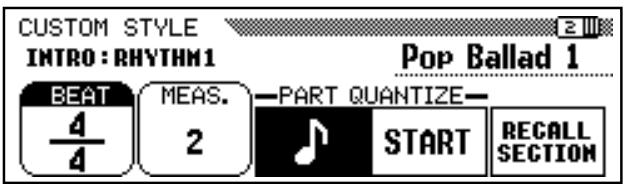
Once the required quantize size has been selected press the START LCD button to actually quantize the current part. Playback will stop for an instant while the data is being quantized, then the START LCD button will change to UNDO, allowing you to undo the quantize operation and return to the pre-quantized data if the results are not as you expected. You will not be able to UNDO once another button has been pressed.
8 Repeat Until the Custom Style is Complete ....
Repeat steps 3 through 7 until all parts or all sections have been recorded as required.
9 Name the Custom Style ....
When your custom style is complete, use the PAGE buttons to select CUSTOM STYLE page 3, and press the STYLE NAME LCD button to go to the style naming page.
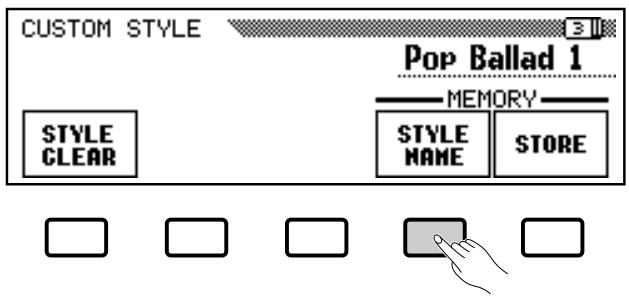
The current style name appears in the upper right corner of the display. Use the > LCD button to position the underline cursor at the character you want to change (style names can be up to 12 characters in length). Use the data dial and/or the [+]/[-] buttons to select the character you want to enter from the list in the center of the display, then press the c.set LCD button to enter the character at the current cursor position. Repeat this procedure until your name is complete. The c.del LCD button can be used to back up one space and delete a character.
![RENAME CUSTOM STYLE NAME [CUSTOM_X] "#$%&'()*+,-./0123456789:;<=>?@ ABCDEFGHIJKLMNOPQRSTUVWXYZ[¥]^-# abcdefghijklmnopqrstuvwxyz(1) ▶ c.set c.del OK CANCEL](/content/2025/01/114698/images/1737d890d7ecfcb1a501f8c41f1b9ef1c85a896fe1c7f8714b2796bdf0bef370.jpg)
When the name is complete press the OK LCD button to register the name for the current custom style, or CANCEL to abort.

- Quantization can only be applied to the current recording part. Quantization cannot be executed if no part is set to the record mode.

- During Custom Style recording, no MIXER display is available.
10 Store the Custom Style
Press the STORE LCD button in CUSTOM STYLE page 3 to store the current custom style in the internal memory. The “Store XXXXXXXX?” confirmation prompt and MEMORY No. parameter will appear (“XXXXXXXXX” is the style name). Use the MEMORY No.
▲ and ▼ LCD buttons to select the memory number — 1 through 8 — to which you want to store the custom style, then press OK to store or CANCEL to abort.
![Store CUSTOM_X? MEMORY No. 1 [TEMP.STYLE ] OK CANCEL](/content/2025/01/114698/images/a52e67923b3c913af286a9bc86db31d7826a877db8855631b002cdc8d5261f3d.jpg)
11 Exit When Done
Press the [EXIT] button to exit from the Custom Style mode and return to the normal play mode.
NOTES
- The tempo setting at the time the Custom Style is stored becomes the preset tempo for that style.
- If the selected memory number already contains a style, the style name will appear next to the memory number. The existing style will be overwritten when a new style is stored.
NOTES
- Custom style data is not retained in memory when the power is turned off, so be sure to save your custom style before turning the power off — see "Save to disk" on page 52.
Other Custom Style Functions
In addition to the various functions described in the basic custom style recording procedure, above, the CUSTOM STYLE display pages include several other functions that you may find useful when creating custom styles.
■ Recall Section
This function makes it possible to recall the last-stored version of the currently selected section (all parts of the section are recalled). Simply press the RECALL SECTION LCD button in CUSTOM STYLE page 2. If the recall operation can't be carried out (i.e. The time signature has been changed), the “Can’t recall!” alert display will appear. If this happens press OK to return to the previous display.
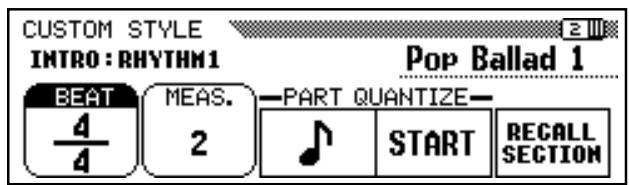
■ Style Clear
Press the STYLE CLEAR LCD button in CUSTOM STYLE page 3 to entirely clear the current custom style. The “Are you sure?” confirmation prompt will appear. Press YES to clear the style or NO to abort.
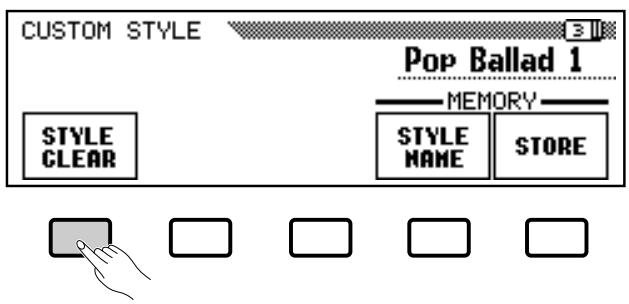
Volume & Effects
CUSTOM STYLE page 4 includes a range of parameters that let you individually set the volume, reverb, effect, and pan for each part of each custom style section. Use the SECT. parameter to select the section (or "ALL" sections), and the PART parameter to select the part (or "ALL" parts). The third LCD button selects VOLUME, REVERB, EFFECT or PAN, and the VALUE (or DEPTH) parameter sets the amount or depth. When VOLUME is selected the SECT. parameter is fixed at "ALL" and the VALUE range is from -50 to +50, relative to the preset volume of the source style. The REVERB and EFFECT DEPTH ranges are from 0 to 100. The PAN VALUE settings are L10 (full left) ... C (center) ... R10 (full right). When EFFECT is selected the TYPE parameter appears and you can also select the effect type via the TYPE LCD button. The available effect types are listed below.
Effect Type List
- CHORUS 1
- FLANGER 1
- CHORUS 2
- FLANGER 2
- CHORUS 3
- SYMPHONIC (CVP-79A only)
- CELESTE 1
- PHASER (CVP-79A only)
- CELESTE 2
- OFF
- CELESTE 3

- Normally the preset VALUE and EFFECT TYPE are initially selected. If PART is set to "ALL", the R1 part preset values are displayed. If SECT. is set to "ALL", the MAIN A preset values are displayed.
- Effect type "OTHERS" may appear if the preset effect type is other than that of what is in the list.
■ Save to Disk.
A complete set of 8 custom styles or individual custom styles can be saved to disk via CUSTOM STYLE page 5.
![CUSTOM STYLE [DISK] MEMORY No. 1 [TEMP.STYLE ] SAVE](/content/2025/01/114698/images/51b6b7423f1a9d304073658df9546412973cc4ed5aecaf1e0696dafe5f90bf7d.jpg)
After making sure that a properly formatted disk is inserted in the Clavinova disk drive (page 98), use the MEMORY No. ▲ and ▼ buttons to select the memory number of the custom style you want to save to disk, or “ALL” if you want to save a complete set of 8 custom styles. When this is done, press the SAVE LCD button to start saving the data to disk. At this point the name entry display will appear and you can enter a name for the Custom Style disk file in the same way as you entered a name for the Custom Style itself (page 49). Press SAVE when the name has been entered. If a file with the same name already exists the “Same name! Overwrite?” confirmation prompt will appear. Press OK to overwrite the existing file or CANCEL to abort.
![SAVE CUSTOM STYLE FILE[TEMP.STYLE] !"#$%&'()*+,-./0123456789:;<=>?@ ABCDEFGHIJKLMNOPQRSTUVWXYZ[¥]^-` abcdefghijklmnopqrstuvwxyz(1) ▶ c.set c.del SAVE CANCEL](/content/2025/01/114698/images/c5092945df808076482c2ccd4fc4478e61ba8a935aeb7e0bac3e935eae90746b.jpg)
Your custom styles must be stored to internal memory before they can be saved to disk (see step 10 of the basic custom style recording procedure). If a custom style has not been stored and you attempt to save it to disk, the “Please store before saving” alert display will appear. If this happens press OK to return to the previous display (CUSTOM STYLE page 3), store the custom style, then try saving again.
Press the [EXIT] button to exit from the Custom Style mode and return to the normal play mode.
NOTES
- Saved Custom Style files can be loaded via the "STYLE FILE LOAD" function described in the "Style File Load" section (page 55).
- A single floppy disk can hold up to 60 song files (page 72) and 60 style files (the total number of files however, is approximately 110 files).
Playing Back Your Custom Styles
Once created, your original custom styles can be selected for playback by pressing the [DISK/CUSTOM] button (its LED will light), and then using the STYLE ▲ and ▼ LCD buttons — or the data dial or [+]/[-] buttons — to select the custom style you want to play. The selected style can then be played and used with ABC auto accompaniment in exactly the same way as the preset styles (page 28).
NOTES
- Since only one type of INTRO, FILL IN, and ENDING section can be recorded for each Custom Style, no "A/B" variations are produced during playback.
Custom Style Alert & Error Displays
The following alert and error displays may appear in the corresponding situations.
■ Insufficient Memory To Store ....
This alert message will appear if there is not enough memory to perform a store operation.

Not enough memory! Please delete an unneeded STYLE or simplify the current STYLE.
DELETE CANCEL
In this case it will be necessary to either delete a style you don't need or simplify the style you are currently recording. Press CANCEL to return to CUSTOM STYLE page 1, at which point you can simplify the current style (by clearing a part, etc.), or DELETE to go to the “Delete STYLE ?” display:
Use the MEMORY No. ▲ and ▼ buttons to select the number of the style you want to delete, then press OK to delete the style, or CANCEL to abort.
■ Memory Full During Recording ....
This alert message will appear if the memory becomes full during recording or editing.
Press OK to return to CUSTOM STYLE page 1 and simplify the style by clearing a part, etc.

- The amount of memory being used for the selected style is also shown on the display (in approximate kilobytes) so as to set up the approximate standard which style to delete in relation to the total 160 KB memory space.
■ Exit Before Store
If you press [EXIT] button to exit from the Custom Style function before storing the style the following display will appear.
![Store CUSTOM_X? MEMORY No. 1 [TEMP.STYLE ] YES NO CANCEL](/content/2025/01/114698/images/840730eee19b03a18983e2da71e3f5f785cc3015cbb1bdcdebf7143f52f0189a.jpg)
Select a memory number and press YES to store the style and then exit, press NO to exit without storing the style, or press CANCEL to return to the Custom Style mode.
■ Style Change Before Store
If you attempt to select a different source style before storing the current style you recorded, the following display will appear.
![Store CUSTOM_X? MEMORY No. 1 [TEMP.STYLE ] OK CANCEL](/content/2025/01/114698/images/7d6bb39aed48b3daada767cc500ef8b14d5d0d24339c34899eded1c7bc8ee181.jpg)
Select a memory number and press OK to store the style and then select the new source style, or press CANCEL to return to the Custom Style mode.
■ Too Many Files
A single floppy disk can hold up to 60 style files. If you attempt to save more the following display will appear.
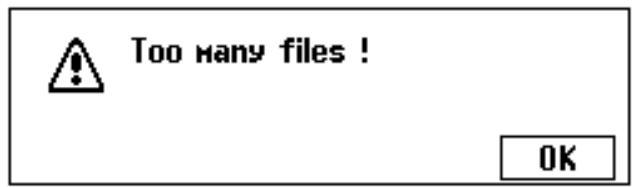
Press OK to clear the display, then prepare a new disk and save the file(s).
Disk Full
If the current disk becomes full during a save operation the following display will appear.
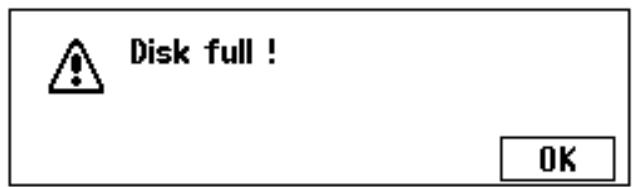
Press OK to clear the display, then either delete any unwanted song files or other files from the disk, or prepare a new disk.

- If you want to select a different source style without storing the current style, exit from the CUSTOM STYLE mode without storing the style (see "Exit Before Store" above), and then re-enter the CUSTOM STYLE mode.

- Style files cannot be deleted from the disk.
Style files from optional Yamaha “Style File” disks, or disks containing custom style files you’ve created yourself, can be loaded into the CVP-79A/69/69A/59S and played as required.

NOTES
- Loaded disk styles will be retained in memory only until the power is turned off.
- One pre-programmed temporary style is automatically loaded into the [DISK/CUSTOM] memory whenever the power is turned on.
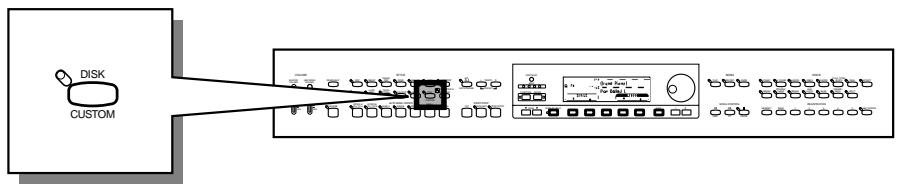
flowchart
graph LR
    A["DISK"] --> B["CUSTOM"]
    B --> C["Control Panel"]
    C --> D["Display"]
    style A fill:#f9f,stroke:#333
    style B fill:#ccf,stroke:#333
    style C fill:#cfc,stroke:#333
    style D fill:#fcc,stroke:#333
Loading Disk Styles
1 Insert the Style Disk
Insert the Style File Disk into the disk drive with the sliding door on the disk facing the drive slot and the label side facing upward. The disk should click into place and the disk lamp will light briefly while the Clavinova reads and identifies the disk. When an appropriate Style File disk is inserted, the STYLE FILE LOAD display (see step 2 below) will appear automatically. If the disk is already inserted and the STYLE FILE LOAD display is not showing, press the [DISK/CUSTOM] selector to call the DISK/CUSTOM STYLE display and press the LOAD SINGLE button.
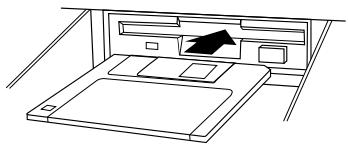
natural_image
Line drawing of a bed layout with a tray, drawer, and window (no text or symbols)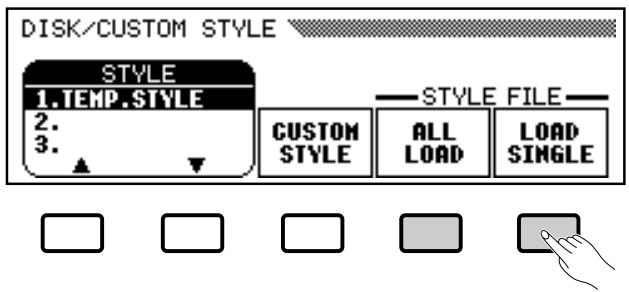

NOTES
- The "No disk!" alert will appear if no disk is currently inserted.
- The "No file!" alert will appear if the currently inserted disk contains no style files.
- If a disk containing both song and style files is loaded, the SONG PLAY mode will automatically be selected. In this case press the SONG [PLAY] button so that its indicator goes out to exit from the SONG PLAY mode, then press the [DISK/CUSTOM] button.
A set of 8 files saved by using the Custom Style save “ALL” function (page 45) can be loaded by pressing the ALL LOAD LCD button rather than the LOAD SINGLE button. The rest of the ALL LOAD procedure is essentially the same as the LOAD SINGLE procedure, as follows.
2 Select a Style File
Use the STYLE FILE ▲ and ▼ LCD buttons — or the data dial or [+]/-] buttons — to select the desired style file.
You can “preview” the selected style by pressing the LISTEN LCD button (the “LISTEN” function is not available in the ALL LOAD display).
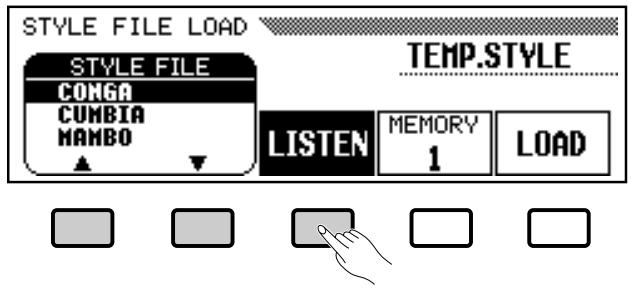
Press the LISTEN LCD button again or the [START/STOP] button to stop listening.
3 Select a Memory Number & Load the Style
Use the MEMORY LCD button to select the memory number to which the selected style file is to be loaded (1 through 8), then press the LOAD LCD button to load the style file.
Repeat Step 2 and 3 to select and load more style files as you like.
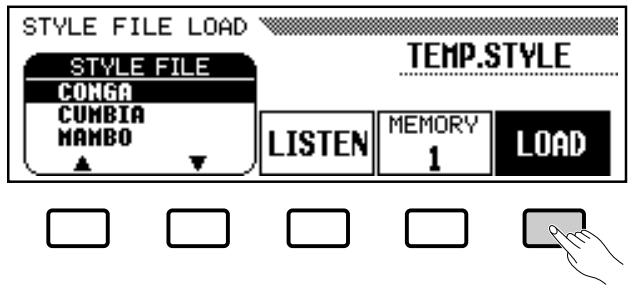
It is not necessary to select a memory number when ALL LOAD is selected in step 1. Simply press OK to load or CANCEL to abort.
If there is not enough memory to load the specified file the “Not enough memory! Delete an unneeded STYLE ?” alert display will appear. In this case it will be necessary to delete a style you don’t need before loading the new style. Use the MEMORY No. ▲ and ▼ buttons to select the number of the style you want to delete, then press DELETE to delete the style, or CANCEL to abort.
NOTES
- If a tempo is set prior to loading the style, that tempo becomes the default for the loaded style.
- Some styles are too large for the LISTEN function. In this case the "Too much data for listen! Please [LOAD]." alert display will appear. In this case load the style directly as in step 3.
- ABC is automatically turned on when the LOAD SINGLE button is pressed and the style is played back automatically with the ABC accompaniment in C Major when the LISTEN LCD button is pressed. You can also change the chord or try playing on the keyboard if you like.
NOTES
- If the selected memory number already contains a style, the style name will appear on the display. The existing style will be overwritten when a new style is loaded.
NOTES
• The ALL LOAD display is as follows:
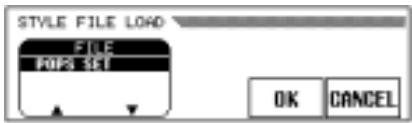
When ALL LOAD is executed, all data in the eight memories will be replaced by new data.
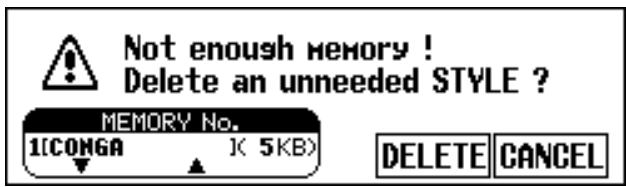
4 Eject the Disk When Done
When you've finished with the Style File disk, press the disk drive EJECT button to remove it and return to the normal play mode display. You can return to the normal play mode without removing the disk by pressing the [EXIT] button or a STYLE selector.
NOTES
- The amount of memory being used for the selected style is also shown on the display (in approximate kilobytes) so as to set up the approximate standard which style to delete in relation to the total 160 KB memory space.
NOTES
- The disk drive lamp will light while the style is being loaded. NEVER attempt to remove a disk while the drive lamp is lit.
- The LISTEN, LOAD, [EXIT] and style buttons will not function while the style data is being loaded (i.e. while the disk drive lamp is lit).
Using Loaded Style Files
Once loaded, style files can be selected for playback by pressing the [DISK/CUSTOM] button (its LED will light), and then using the STYLE ▲ and ▼ LCD buttons — or the data dial or [+]/[-] buttons — to select the style you want to play. The selected style can then be played and used with ABC auto accompaniment in exactly the same way as the preset styles (page 28).
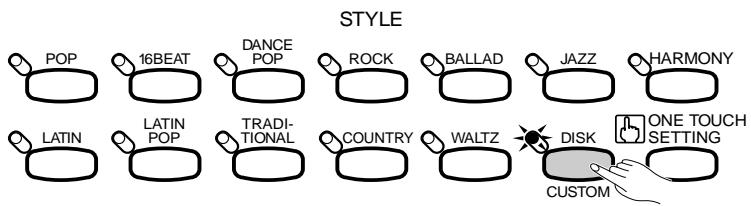
flowchart
graph LR
    A["POP"] --> B["16BEAT"]
    B --> C["DANCE POP"]
    C --> D["ROCK"]
    D --> E["BALLAD"]
    E --> F["JAZZ"]
    F --> G["HARMONY"]
    G --> H["ONE TOUCH SETTING"]
    H --> I["CUSTOM"]
    I --> J["DISK"]
    J --> K["TRADITIONAL"]
    K --> L["COUNTRY"]
    L --> M["WALTZ"]
    M --> N["LATIN"]
    N --> O["LATIN POP"]
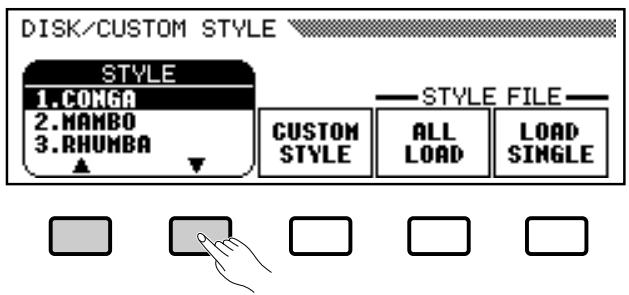
Registration Memory
The Registration Memory feature can be used to memorize a number of complete control-panel setups that you can recall whenever needed. 25 in the CVP-79A and CVP-69/69A (5 banks x 5 memories), and 15 in the CVP-59S (3 banks x 5 memories).

1 Set Up the Controls as Required
Make the desired control settings. The following settings are memorized by the Registration Memory function:
Data Stored By the Registration Memory
Voice parameters
- Voice
- Keyboard Volume
- Split Point
- Dual Mode
- Split Mode
- Dual Voice
- Split Voice
- Dual Balance
- Split Balance
- Dual Detune Depth
- Reverb On/Off
- Reverb Type
- Reverb Depth (Total, Rhythm, Bass, Chord, Keyboard)
- Effect On/Off
- Effect Type
- Effect Depth (Main Voice, Dual Voice, Split Voice)
- Touch Sensitivity
- Left Pedal Function
- Right/1 Octave Shift
- Left Octave Shift
- 2nd Octave Shift
- Right/1 Pan
- Left Pan
- 2nd Pan
- Transpose
- Damper Range
- Damper Mode (CVP-79A only)
Accompaniment parameters
- ABC Mode
- ABC On/Off
- Small ABC On/Off
- Harmony On/Off
- Harmony Type
- ABC/Song Volume
- Style
- Main A/B
- Tempo
- Rhythm Volume
- Bass Volume
- Chord Volume
- Pad Volume
- Phrase Volume
- Harmony Volume
2 Select a Registration Bank (if necessary)
Any of the 5 or 3 Registration Memory banks can be selected by pressing the [BANK] button and selecting the desired bank via the pop-up display LCD buttons (A through E in the CVP-79A/69/69A, and A through C in the CVP-59S).

flowchart
graph LR
    A["MEMORY"] --> B["BANK"]
    B --> C["1"]
    C --> D["2"]
    D --> E["3"]
    E --> F["4"]
    F --> G["5"]
    G --> H["ABC FREEZE"]
CVP-79A/69/69A
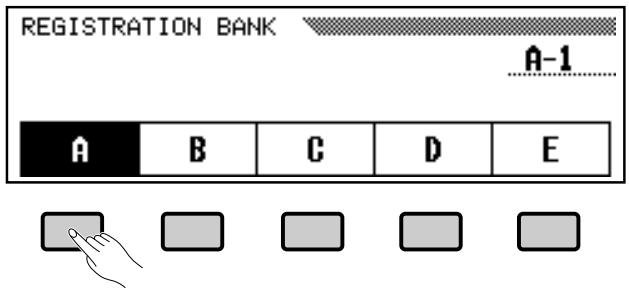
3 Register the Settings
While holding the [MEMORY] button, press one of the [REGISTRATION] buttons. Any data that was previously in the selected location is erased and replaced by the new settings. The corresponding Registration Memory number will appear next to the “R” symbol in the display.
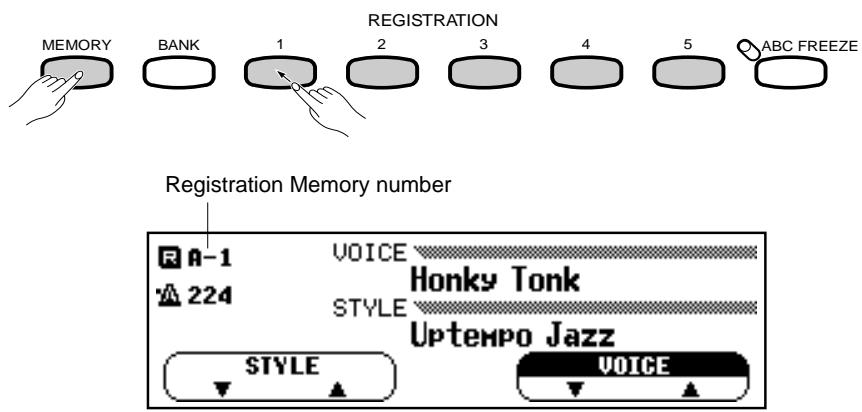
NOTES
- Registration backup is normally enabled, so the registration data is retained in memory even when the power is turned off. If registration backup is turned off via the "Backup" function described on page 107, all registration data will be initialized to the factory-preset settings when the power is turned off.
- Factory-preset data is provided for all registration banks and memory locations.
- Complete sets of registration data can be saved to and loaded from disk as described on page 99.
Recall the Registered Panel Settings
Simply select the appropriate bank as described above, then press the desired [REGISTRATION] button at any time to recall the memorized settings. The corresponding Registration Memory number will appear next to the “R” symbol in the display.
A pencil (edit) symbol will appear next to the registration number in the display as soon as any change is made to the panel settings. In other words, if the pencil symbol is showing, the current panel settings are different from those stored in the memory.
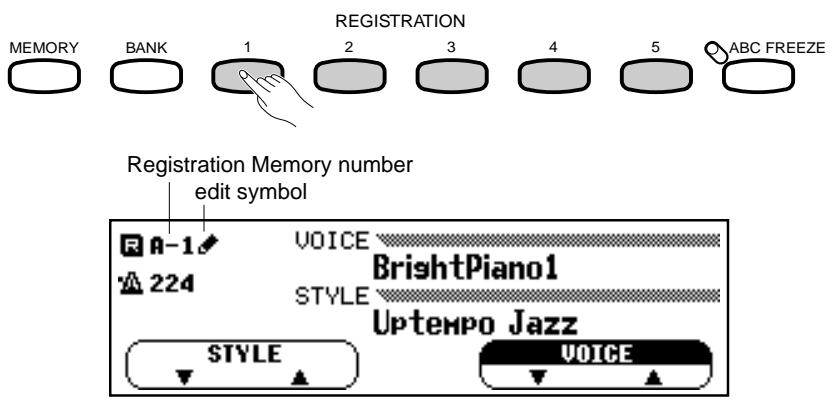
NOTES
- Selecting only a different bank will not change the registration settings. The registration settings are recalled only when the [REGISTRATION] button is pressed.
- If the Left Pedal function is set to “Registration+” (pages 27 and 93), the left pedal can be used to step through the registration memory locations so a completely different set of panel settings can be recalled each time the pedal is pressed.
The ABC Freeze Function
When the ABC FREEZE function is engaged, the accompaniment parameters listed above will not be changed when a registration memory is recalled. This allows you to recall different registration memory settings while using Auto Accompaniment, without suddenly disturbing the flow of the accompaniment. The ABC FREEZE function is turned on and off by pressing the [ABC FREEZE] button. The [ABC FREEZE] indicator lights when it is turned on.

flowchart
graph LR
    A["MEMORY"] --> B["BANK"]
    B --> C["1"]
    C --> D["2"]
    D --> E["3"]
    E --> F["4"]
    F --> G["5"]
    G --> H["ABC FREEZE"]
NOTES
- ABC Freeze remains on even if a different registration bank is selected.
Disk Orchestra Collection & Song Playback
The CVP-79A/69/69A/59S can play back songs you've recorded yourself using the song recorder function described in the next section, and songs on optional Yamaha Disk Orchestra Collection disks (one is supplied with the Clavinova). With Disk Orchestra Collection (“DOC”) disks the Clavinova will let you enjoy listening to automated performances, or function as your “private music tutor,” allowing you to practice various parts of a piece while the others are played automatically. The CVP-79A/69/69A/59S also shows you which keys to play with keyboard guide lamps that light up above each key. You can also play “in ensemble” with the complete Disk Orchestra Collection arrangement.
Different displays will appear depending on the type of data being played. But any type of data can be played back by following the operation procedure described below. Also refer to the “Playing Other Types of Music Data” section on page 71.

- Playback data is not transmitted via the MIDI OUT connector.

flowchart
graph LR
    A["Radio Station"] --> B["Play"]
    B --> C["RECORD"]
    C --> D["GUIDE"]
    D --> E["SONG"]
    E --> F["REW"]
    E --> G["FF"]
    E --> H["PAUSE"]
Straight Playback
1 Engage the Song Play Mode ....
The Song Play mode is engaged automatically when a song disk is inserted in the disk drive. Insert a disk containing songs you've recorded yourself or a DOC disk into the disk drive with the sliding door facing the drive slot and the label side facing upward. The disk should click into place and the disk lamp will light briefly while the Clavinova reads and identifies the disk. Once the disk has been identified the SONG PLAY [MAIN] display will appear and the [PLAY] button indicator will light.
If a song disk is already inserted but the Song Play mode is not engaged, press the [PLAY] button so that its indicator lights and the SONG PLAY [MAIN] display (SONG PLAY page 1) appears.

natural_image
Line drawing of a bed with an arrow pointing to the front portion of the bed (no text or symbols)
![SONG PLAY [MAIN] 144 E 1 Grand Piano1 1 Bach'sMinuet SONG 1 RIGHT LEFT ORCH START](/content/2025/01/114698/images/e1149c6e4d4a25651e3f37e3a0e28b634293027b259755773302dfc3ba243f92.jpg)
DOC
![SONG PLAY [MAIN] 78 E 1 Grand Piano1 1 SONG_001.MID SONG PART1 PART2 OTHERS START 1 TRACK 1 TRACK--](/content/2025/01/114698/images/e1a9f51cb7e9a5d0699b07bc8ddd57513ad51cd9a9e310dbff6d618b56041292.jpg)
Original song
2 Select a Song Number
The current song number and name will be shown on the display along with the currently selected tempo. Use the SONG LCD button to select the desired song number, or the data dial or [+]/[-] buttons. Select “ALL” if you want all songs on the disk to be played in order and repeated until playback is stopped, or “RANDOM” to play back all songs on the disk in random order until playback is stopped.
NOTES
- If you first select "ALL" in display page 1, and then select a song in display page 4, all songs will be repeatedly played back starting from the selected song.
- If you select a song in display page 1 or 4, and then select 1 SONG repeat mode in page 2, only the selected song will be played back repeatedly until stopped.
![DOC Keyboard voice Selected song number and name SONG PLAY [MAIN] 150 E 1 Grand Piano1 4 Swins,Swins, SONG RIGHT LEFT ORCH START](/content/2025/01/114698/images/4d3a85bb460e750180d6a5b6e5ceecd85e5d9b03eb6eee24024217d962bfe668.jpg)
Original song
![SONG PLAY [MAIN] 78 E 1 Grand Piano1 3 SONG_003.MID SONG PART1 PART2 OTHERS START 3 TRACK 1 TRACK--](/content/2025/01/114698/images/a12abbd7947882446dec3efba0ca057fb9d7e3f247517705bb5c9e6631565068.jpg)
Another convenient way to select a song for playback is to use the PAGE buttons to go to page 4 — SONG PLAY [LIST] — and use the data dial or [+]/[-] buttons to select a song from the list that appears on the display. Up to 8 song titles are shown on the LCD at a time. If more songs are on the disk, the next 8 titles will appear when you scroll past the last title shown on the LCD.
![SONG PLAY [LIST] 1 Bach's Minuet 5 Minuet In G 2 Yellow Rose 6 The Moldau 3 Under The Sp 7 Swan Lake 4 Swins,Swins, 8 Humoresque](/content/2025/01/114698/images/431c3f6fb102d7868eda8df5e7191c5223f5af5d06fdde2e800ca4eff8830e65.jpg)
3 Start/Stop Playback
Start playback of the selected song by pressing either the START LCD button or the panel [START/STOP] button. Unless “ALL” or “RANDOM” is selected, the selected song will play through to the end and playback will stop automatically. The current measure number and tempo will be shown on the display during playback.
Playback can be stopped at any time by pressing the STOP LCD button (the START LCD button changes to a STOP button once the playback has started) or the panel [START/STOP] button.
You can exit from the song play mode by pressing the [PLAY] button so that its indicator goes out, or by pressing the [EXIT] button.
NOTES
- During Disk Orchestra Collection play-back the left- and right-hand voice can be changed by using the normal voice selection procedure (page 15). In this case the selected voice also becomes the keyboard voice. The selected voice is shown in the SONG PLAY page 1 display.
- When playing back a song recorded on the Clavinova, only the keyboard voice can be changed. The keyboard voice name is shown in the SONG PLAY page 1 display.
- Please note that playback may not immediately start while the Clavinova is searching the disk for a selected song after the START LCD button or the panel [START/STOP] button is pressed.
- With some songs the displayed measure numbers may not match those marked on the score.
- Some songs start after a click count-in.
- The playback tempo can be changed freely as required. The preset tempo for the selected song can be recalled at any time by pressing the TEMPO [+] and [-] buttons simultaneously.
- Some Disk Orchestra software does not produce a tempo display (e.g. free-tempo phrases, etc.). In this case, “- - -” will appear in place of the tempo on the display, and the measure numbers shown on the display will not match the actual measure numbers of the song.
- The keyboard guide lamps corresponding to the keys being played by the RIGHT and LEFT part (or PART 1 and PART 2) will light in real time. The keyboard guide lamps can be turned off via the LAMP LCD button in SONG PLAY display page 3.
DOC
![SONG PLAY [MAIN] 150 E 1 Grand Piano1 4 Shins,Shins, SONG 4 RIGHT LEFT ORCH START](/content/2025/01/114698/images/9157f5f8b39bcab9f08c1673f56a0fc7de7b0da1cfd8c6ce50c00f706d87cd40.jpg)
Original song
![SONG PLAY [MAIN] 78 E 1 Grand Piano1 3 SONG_003.MID SONG 3 PART1 TRACK 1 PART2 TRACK-- OTHERS START](/content/2025/01/114698/images/b27dee3068e6ef70e9f85d98bbff7e80d92308b2a2e8578f3c3b697a4db963fa.jpg)
4 Eject the Disk When Done
When you've finished with the currently loaded disk, simply press the disk drive EJECT button to remove it.
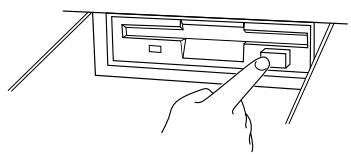
natural_image
Line drawing of a hand pressing a button on a device panel (no text or symbols)CAUTION
- NEVER eject a disk or turn the power off while:
- The disk drive lamp is on.
- A song is playing.
Playing Back Specific Parts
The RIGHT, LEFT, and ORCH LCD buttons (PART 1, PART 2, and OTHERS when an original song disk is being played) can be used to turn playback of the corresponding parts on or off. The buttons are highlighted when the parts are turned on. Use these buttons to select the parts you want to play back. You can, for example, turn off the right and/or left-hand parts so you can practice them on the keyboard. When an original song disk is being played, the tracks turned on and off by the PART 1 and PART 2 buttons can be specified via the SONG PLAY [PART ASSIGN] display (SONG PLAY page 6), described below. The default settings are: PART 1 = Track 1, PART 2 = Track -- (off).
● Turning Individual Orchestra Parts On or Off
Normally the ORCH (or OTHERS) LCD button turns all the orchestra parts (tracks 3 through 10 and the rhythm tracks), or all parts other than parts 1 and 2 on or off at once. You can, however, turn these parts on or off individually via the SONG PLAY [TRACK PLAY] display (SONG PLAY page 5).
NOTES
- When playing back Disklavier PianoSoft disks (see "Playing Other Types of Music Data", page 71) only the RIGHT or RIGHT and LEFT LCD buttons will appear.
DOC
![SONG PLAY [MAIN] 150 E 1 Grand Piano1 4 Shins,Shins, SONG 4 RIGHT LEFT ORCH START](/content/2025/01/114698/images/1542e7919f8995beeee02f75439f9ffe304f3b6a0adee94248890f5b9bbcf5ca.jpg)
Original song
![SONG PLAY [MAIN] 78 E 1 Grand Piano1 3 SONG_003.MID SONG 3 PART1 TRACK 1 PART2 TRACK-- OTHERS START](/content/2025/01/114698/images/3e3bf4002d065d19d6a1468bd6504908a38df3a7e39cad7e8438c79783325f8c.jpg)
1 Select the TRACK PLAY Page
Use the PAGE buttons to select page 5 — the SONG PLAY [TRACK PLAY] display. The numbers of tracks which contain data are shown above the TRACK LCD buttons. Tracks which are enabled for playback are indicated by a box surrounding the track number. Tracks which do not contain data appear as dots.
② Mute, Play-enable, or Solo Tracks as Required
Use the TRACK < and > buttons to select a track (an underline cursor appears under the selected track). The data dial and [+]/[-] buttons can also be used to select tracks. Use the PLAY/OFF button to mute (turn off) or play-enable the selected track. The track number box disappears when the track is muted. Any number of tracks can be muted at the same time to leave on the tracks you want to hear play-enabled. The voice used by the currently selected track is shown above the PLAY/OFF button.
![SONG PLAY [TRACK PLAY] 150 E 1 4 Swings,Swings, Grand Piano1 SOLO PLAY OFF](/content/2025/01/114698/images/d25fbefb6e8560cb5f23cbff0e799da39882c747b8fd41c4f048efb890111779.jpg)
Select a track and press and highlight the SOLO LCD button to hear only the selected track. Press the SOLO LCD button again to disengage the solo function.
![SONG PLAY [TRACK PLAY] 150 E 1 4 Swings,Swings, Grand Piano1 SOLO PLAY OFF](/content/2025/01/114698/images/492e47df2b96ee764f6a031b34d272edbe688da0a3bddf35da7b26bdacd0e6de.jpg)
NOTES
- All track numbers appear whether the tracks contain data or not when a Standard MIDI file song (see "Playing Other Types of Music Data", page 71) other than the original song is selected.
Part Assignment for Original Song Playback
Before an original song disk is played, specify the tracks to be turned on and off by the PART 1 and PART 2 LCD buttons via the SONG PLAY [PART ASSIGN] display.
Use the PAGE buttons to select the SONG PLAY [PART ASSIGN] display (SONG PLAY page 6), then use the PART 1 and PART 2 parameters to assign the desired tracks to the corresponding parts. For either part the corresponding ▲ and ▼ buttons can be used to select a track, or the data dial or [+]/[-] buttons can be used once the parameter is selected.
![SONG PLAY [PART ASSIGN] 78 E 1 3 SONG_003.MID PART1 TRACK 1 PART2 TRACK --](/content/2025/01/114698/images/7ed6b2d4df635aa92f59abc26e43abe46f0b497144ec85f69ae90d8069ea8e28.jpg)
The default settings are: PART 1 = Track 1, PART 2 = Track -- (off). Tracks 1 through 16 can be selected for both parts 1 and 2, and part 2 can additionally be turned off. The same track cannot be assigned to both parts.

- The [PART ASSIGN] display will not appear when Disk Orchestra Collection or Disklavier data (see “Playing Other Types of Music Data”, page 71) is being played.
Overall Song Playback Volume Control
The ABC/SONG VOLUME control can be used to control the overall volume of song playback. Whenever a song is first selected, however, the maximum volume setting (=standard volume level setting) is recalled regardless of the position of the ABC/SONG VOLUME control. The song playback volume can then be adjusted as required.
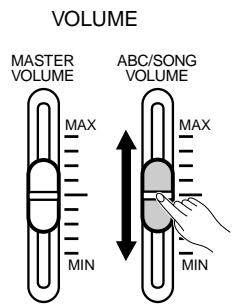

- If ABC is turned on during the playback of an original song that was recorded without ABC, the ABC/SONG VOLUME control will affect the ABC sound rather than the song playback sound.
- ABC cannot be used during playback of a song recorded with ABC or Disk Orchestra Collection playback.
Individual Part Volume Control & Voice Selection
Press the [MIXER] button while in the Song Play mode to access the song playback volume parameters, and the voice selection parameter for the left- and right-hand voice when a Disk Orchestra Collection disk is being played. The MIXER display will disappear when the [MIXER] button is pressed a second time, or when the [EXIT] button is pressed.
Disk Orchestra Collection Disk Playback
During Disk Orchestra Collection playback the MIXER display has two pages. Page 1 includes the L&R volume and L&R VOICE parameters. Use the L&R LCD button — or the data dial or [+]/[-] buttons once the L&R parameter has been selected — to set the volume of the left- and right-hand voice. Use the L&R VOICE ▲ and ▼ LCD buttons or the data dial or [+]/[-] buttons once the L&R VOICE parameter has been selected to select the voice used for the left- and right-hand parts.
Page 2 of the MIXER display includes independent volume parameters for the RHYTHM, BASS, ORCH (orchestra), and KBD (keyboard) parts, and a PRESET LCD button that resets all volume parameters to “100”. Any of the volume parameters can be selected and incremented by using the corresponding LCD button, or the data dial or [+]/[-] buttons can be used to increment or decrement the currently selected volume parameter. Press the [+] and [-] buttons simultaneously to recall the default (“100”) volume setting. Several parts can be selected at once by pressing the corresponding LCD buttons at the same time. The volume of all selected parts can then be adjusted simultaneously.
NOTES
- When playing back Disklavier PianoSoft disks (see "Playing Other Types of Music Data", page 71) only the L&R VOICE LCD buttons will appear.
- The voice change for the left- and right-hand parts by this operation does not affect the keyboard voice. But if you press the panel [VOICE] button, the result will be both the keyboard voice and the left- and right-hand part voice being changed simultaneously.
NOTES
- When a different song is selected the voice and volume settings will be reset to the default settings.
■ Original Song Disk Playback
During original song disk playback the MIXER display has 5 pages. The first four pages include independent volume parameters for each of the 16 song tracks. Page five includes the KBD (keyboard) volume parameter and a PRESET LCD button. The volume parameters are adjusted in the same way as described above.

- If ABC is turned on during the playback of an original song that was recorded without ABC, the MIXER display will function as the ABC part volume control rather than the song part volume control.
Guided Right- and Left-hand Practice
With this feature, the Clavinova indicates the notes to play via the keyboard guide lamps and waits for you to play the appropriate keys before playing ahead, so you can learn to play the piece at your own pace. The guide lamps can be turned on or off as required. Two guide modes are provided:
![SONG PLAY [GUIDE] 144 E 1 GUIDE MODE NEXT NOTE SOUND 1 Bach'sMinuet LAMP ON](/content/2025/01/114698/images/cdd3df80eea9832b5bcc20ef9d89a64e3fe709abdcc2bca8e13242a6a46d40c5.jpg)
● Next Note:
In this mode the guide lamps of the Clavinova indicate in advance, which note(s) you will have to play next. If you miss the correct timing, the lamp(s) will start to flash while the Clavinova will wait until you play the correct keys. Only then the guide lamp(s) for the next note(s) will light up and you can quickly move your hands to the corresponding area on the keyboard. This is the default guide mode.
● Sound:
Both the keyboard guide lamps and sound are used to guide you to the proper notes. In the Sound mode the Clavinova will play ahead for approximately one phrase and then wait until the appropriate notes, as indicated by the keyboard guide lamps, are played. If the appropriate notes are not played for a few seconds, the Clavinova will automatically play and repeat the phrase until it is played properly. This is an excellent way to learn to associate the keys with the notes they produce.

- When playing back the internal RAM data (see "Recording Without a Disk", page 89) or the Standard MIDI File format 1 data (see "Playing Other Types of Music Data", below) “- - -” will appear in the GUIDE MODE parameter location and only the current notes to be played will be shown on the keyboard guide lamps — i.e. the “next notes” will not appear.
- The GUIDE MODE cannot be changed during playback.
- When the DOC song recorded for the special guide mode is selected, the special guide mode for that song will be automatically engaged — in this case neither of the NEXT NOTE or SOUND sections will be highlighted. But you can re-select the NEXT NOTE or SOUND mode by pressing the corresponding LCD button. (The NEXT NOTE or SOUND mode cannot be re-selected when not at the beginning of a song or when the PHRASE REPEAT or A-B REPEAT mode (page 69) is engaged.)
The GUIDE display appears automatically when the [GUIDE] button is pressed to turn the guide function on. If the guide function is already on, the PAGE buttons can be used to select the SONG PLAY [GUIDE] display (SONG PLAY page 3). Use the GUIDE MODE NEXT NOTE or SOUND LCD button to select the desired guide mode. The settings of the RIGHT and LEFT LCD buttons (or PART 1 and PART 2) in the SONG PLAY [MAIN] display (SONG PLAY page 1) will then determine whether the guide function operates for the left-hand part (part 2) only, the right-hand part (part 1) only, or both parts, as shown below.
flowchart
graph TD
    A["SONG PLAY RECORD GUIDE"] --> B["Left- and right-hand guide"]
    A --> C["Right-hand guide only"]
    A --> D["Left-hand guide only"]
    B --> E["RIGHT LEFT"]
    B --> F["RIGHT LEFT"]
    C --> G["RIGHT LEFT"]
    C --> H["RIGHT LEFT"]
    D --> I["RIGHT LEFT"]
When you press the [START/STOP] button or the START LCD button in the SONG PLAY [MAIN] display (SONG PLAY page 1) to begin playback, the introduction will play automatically but then the Clavinova will stop and wait for you to play the correct note(s). The CVP-79A/69/69A/59S indicates the key(s) to be played via the guide lamps above the keyboard. As you play the appropriate notes, the piece will continue, pausing until you play the right notes each time.
If the guide lamps flashing above the keyboard distract you, or you want to try playing along without them, simply press the LAMP LCD button in the SONG PLAY [GUIDE] display to turn the lamps “OFF”. Repeat to turn the guide lamps back on.
As with regular playback, the song will stop automatically when the end is reached, or it can be stopped at any time by pressing the STOP LCD button in the SONG PLAY [MAIN] display (SONG PLAY page 1) or the panel [START/STOP] button.
Press the [GUIDE] button so that its indicator goes out when you want to turn the guide function off.
NOTES
- When the guide function is turned off (i.e. the [GUIDE] button indicator is off) and the SOUND mode is selected, the guide lamps light in real time corresponding to the notes played by the left- and right-hand parts, when both the left- and right-hand parts are either on or off. If one or the other of the parts is off, the guide lamps correspond only to the part that is turned off. When the guide function is turned off and the NEXT NOTE mode is selected, both the current (flashing) and next notes (continuously-lit) are shown by the guide lamps if either or both parts are turned off. (If both parts are turned on, only the current notes are shown by the guide lamps.)
- The guide part can be selected, the guide LAMP can be turned on and off, and the guide function itself can be turned on and off during playback.
- Playback tempo can be set to any desired value after a song has been selected by using the TEMPO [+] and [-] buttons.
- The positions of the guide lamps do not change if the transpose function is used to transpose the pitch of the keyboard.
- The [oPAUSE], [rREW] and [fFF] buttons will not operate during play-back when the guide function is in use.
- The guide function may not work properly with software which was not produced for independent left- and right-hand playback.
- Since the guide “phrases” used in the SOUND mode are automatically determined by the Clavinova, they may not precisely match the actual musical phrases. Also, the phrases may become shorter when the guide function is used for both the left- and right-hand parts.
Repeat Functions
The CVP-79A/69/69A/59S has a range of repeat functions that can be useful aids for learning to play difficult passages. The repeat modes are all accessible via the SONG PLAY [REPEAT] display (SONG PLAY page 2). Use the REPEAT MODE ▲ and ▼ LCD buttons, the data dial, or the [+]/[−] buttons to select the desired repeat mode: OFF, PHRASE, 1 SONG, or A-B REPEAT.
■ Phrase Repeat (Disk Orchestra Collection only)......
Use this function if you want to practice a specific phrase within a song, as indicated by the phrase marks on the Disk Orchestra Collection score.
When the PHRASE repeat mode is selected the PHRASE parameter will appear on the display. Use the PHRASE ▲ and ▼ LCD buttons, or the data dial or [+]/[-] buttons once the PHRASE parameter is selected, to select the desired phrase number (refer to the Disk Orchestra Collection book that comes with the Disk Orchestra Collection disk). Playback can be started and stopped as described above.
![SONG PLAY [REPEAT] 144 E 9 1 Bach's Minuet REPEAT MODE PHRASE PHRASE 1](/content/2025/01/114698/images/52c0734ae2a5a0157328e2aef03daf317173f0348e4fc8e40aa815b5641d6a30.jpg)
When the 1 SONG mode is selected, any song selected and played as described above will play repeatedly until stopped by pressing either the STOP LCD button in the SONG PLAY [MAIN] display or the panel [START/STOP] button.
![SONG PLAY [REPEAT] 144 E 1 1 Bach's Minuet REPEAT MODE 1 SONG 2 III 1](/content/2025/01/114698/images/5362b63a7c0aebfed9e6e3d9b19dfa3bfc1d426242b72611cf54737e8afeb851.jpg)
NOTES
- The ALL or RANDOM playback mode (SONG PLAY [MAIN] display) will be disengaged when any of the repeat modes is selected.
- Any previously set repeat mode will be reset to OFF when a different song number is selected.
A-B Repeat
This function allows you to specify any section of a song for continuous repeat playback.
When the A-B REPEAT mode is selected, A→ and B point entry buttons will appear on the display. While the song is playing, press the A→ button once at the beginning of the section to be repeated and then press the B button at the end of the section to be repeated. Repeat playback will begin automatically from the A point as soon as the B point has been specified. The programmed A and B points are retained until a different song number or a different repeat mode is selected, and the A-B repeat playback can be started and stopped again by using the [START/STOP] button.
![SONG PLAY [REPEAT] 144 E 1 1 Bach's Minuet REPEAT MODE A-B REPEAT A→ B](/content/2025/01/114698/images/d5eaddbf7384a31faffed2e227f66848527c30144d0c7d3b8aad68c75161608e.jpg)
NOTES
- The specified A-B repeat points will be erased when a new song number or another repeat mode is selected.
- A 1-measure count-in will normally be produced when phrase or A-B repeat playback is started. A count-in will not be produced for songs that do not contain a rhythm track.
- A count-in will not be produced in the 1 SONG repeat playback mode.
- When both the A and B points are specified, pressing the B button clears the B point only resulting in repeat playback between the A point and the end of the song. Pressing the A button clears both the A and B points.
Other Playback Controls
Pause
Press the [o PAUSE] button to temporarily stop song playback. Press the [o PAUSE] button again (or the [START/STOP] button or START LCD button in page 1) to resume playback from the same point.
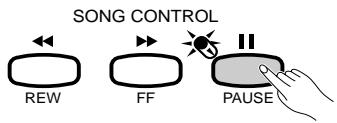
■ Rewind and fast Forward
During song playback the [r REW] and [f FF] buttons function as follows:
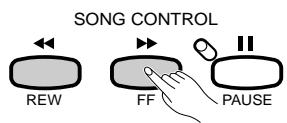
● While playback is stopped or paused the [r REW] and [f FF] buttons can be used to step backward or forward through the song a measure at a time. Either button can also be held for continuous stepping in the specified direction.
- During playback the [r REW] and [f FF] buttons allow you to move rapidly in the specified direction for as long as the button is held. No sound is produced during [r REW] operation.

- The [r REW], [f FF], and [o PAUSE] buttons do not function when playing with the guide function.
- Using the [r REW] button may cause the voice, tempo, and/or volume to change.
Playing Other Types of Music Data
In addition to original songs and Disk Orchestra Collection disks, the Clavinova can also play back Yamaha Disklavier PianoSoft™ disks, disks containing Yamaha ESEQ format sequence data, and disks containing songs recorded in Standard MIDI File format (SMF formats 0 and 1).
The Clavinova's internal tone generator is compatible with the GM System Level 1 voice allocation as well as the Yamaha DOC voice allocation.

- The [r REW] and [f FF] buttons do not function with SMF format 1 data.
- Yamaha ESEQ data recorded on other Clavinovas (CVP- 55/65/75/83S/85A/87A/89) will normally be played back with the correct voices. It may be necessary, however, to change the voice numbers of the data to conform to the CVP 79A/69/69A/59S voice allocation when other types of data are played back.
- Regardless of the type of software, only the following disk formats can be used: 3.5" 2DD 720 kilobyte format; 3.5" 2HD 1.44 megabyte format.
- The SONG PLAY [MAIN] (page 1), [TRACK PLAY] (page 5), and MIXER displays differ depending on the type of data being played. The [PART ASSIGN] display (page 6) will not appear when Disk Orchestra Collection or Disklavier data is being played.
The CVP-79A/69/69A/59S features a built-in “sequencer” which can be used to independently record up to 16 separate parts of a single musical composition. Each part is recorded on a separate song “track”. The music data that you record is stored on a 3.5" floppy disk loaded into the Clavinova’s disk drive unit. Up to approximately 60 songs can be recorded on a single disk, depending on the amount of data contained in each song. Before you can record, however, you must “format” a new disk, as described on page 98.
A number of confirmation, information, prompt, alert, and error displays may appear during operation. See the “MESSAGES” on page 110 if you need more details on any of these messages.

NOTES
- The Clavinova records data using the SMF format 0 and the Clavinova's internal voices which include GM system level 1 compatible voice assignments.
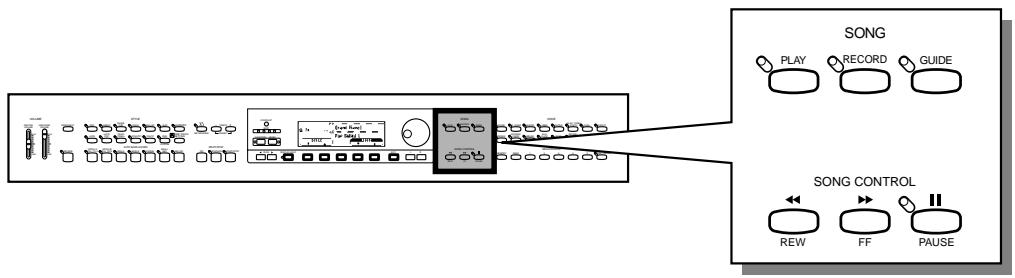
Quick Recording
1 Insert a Formatted Disk
If you haven't already done so, make sure that a properly formatted disk is loaded into the Clavinova disk drive (see page 98), and that the disk's write protect tab is set to the “write” position (tab closed).

natural_image
Line drawing of a bed with an open drawer and a black arrow pointing to the tray (no text or symbols)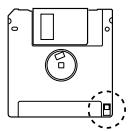
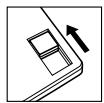
Write protect tab closed (unlocked — write enabled)
2 Engage the Record Mode
Press the [RECORD] button so that its indicator lights and the QUICK RECORD display appears. If the [RECORD] indicator is lit but the QUICK RECORD display is not showing, use the PAGE buttons to locate it (RECORD display page 1).

NOTES
- If you insert an unformatted disk, "Start disk format?" will appear on the display. Press OK to format the disk or CANCEL to abort.
- Protected disks (DOC, etc.) cannot be formatted.
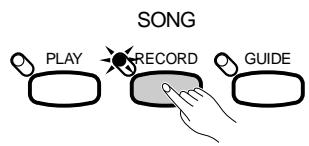
3 Select a Song Number
Use the SONG ▲ and ▼ buttons, the data dial, or the [+]/[-] buttons to select a SONG NUMBER between 1 and 60 for the piece you are about to record (up to 60 different songs, each with a different song number, can be recorded on a single disk). Make sure the song number you select has not already been used for a song previously recorded on the disk you are using.
![QUICK RECORD 78 696KB Grand Piano1 SONG 1 [ ] KBD REC ABC&RHY OFF CHORD SEQ.](/content/2025/01/114698/images/ca2bb1ca75594b1b653dff78c160fe021da55e24bf2d7b53813698f988bb5584.jpg)
4 Set the Track Modes as Required
Two tracks (actually one track and a track group) are available for quick recording: KBD (keyboard) and ABC&RHY (ABC & rhythm). When the QUICK RECORD mode is first selected and a song that does not already contain data is selected, the KBD (keyboard) track will be set to REC and the ABC&RHY track will be set to OFF. In this state the Clavinova is ready to record the keyboard track only. If you also want to record rhythm and ABC accompaniment, use the ABC&RHY LCD button to set the ABC&RHY track to REC, or press the panel [ABC ON] button.
![QUICK RECORD 78 696KB Grand Piano1 SONG 1 [ ] KBD ABC&RHY REC OFF CHORD SEQ.](/content/2025/01/114698/images/212a8173c38574b60aae8bc06fc69f1650304e23a833ab9385e270da7795629b.jpg)
If you select a song that already contains data, the track(s) which contains data can be set to PLAY. This lets you record a new track while listening to previously-recorded material. If you don't want to hear a previously-recorded track while recording, simply use the corresponding LCD button to turn it OFF.

- If a song name appears along with the song number, the selected song already contains data.

- If ABC is already on when the record mode is engaged, the ABC&RHY track will automatically be set to "REC".
- Harmony data can be recorded by turning the HARMONY mode on. Also, Dual or Split voices can be recorded by engaging the Dual or Split mode. (In this case the KBD part uses two tracks.)
- When the ABC&RHY track is set to "REC", or when the KBD track is set to "REC" and the ABC&RHY track is set to "PLAY", the metronome will sound to provide a timing guide in the synchronized start mode before recording is started
- When any track is set to "REC", the amount of disk space available for recording will appear next to the tempo display (in approximate kilobytes). An empty 2DD/2HD disk should have about 696KB/1407KB (room enough for about 50,000/100,000 notes if no other data is recorded) respectively. When recording is started this display is replaced by the measure number display.
- REC mode cannot be selected if the current song position is not the beginning of the song — e.g. the [r REW] and [f FF] buttons have been used to change the song position.
5 Select a Voice
Use the VOICE selectors and displays to select the voice you want to record with.
If you will be recording the ABC&RHY tracks you can also select a style.
6 Start Recording
Play on the keyboard. Recording will begin automatically as soon as you start playing (the synchro start mode is automatically selected when the QUICK RECORD mode is engaged — but it can be disengaged as required). You can also start recording by pressing the panel [START/STOP] button.
7 Stop Recording
Stop recording by pressing the [START/STOP] button. When recording has finished and the recorded data has been written to disk, the mode of the recorded track will automatically switch to PLAY, indicating that the track is ready for playback.
8 Play Back the Recording
Press the [START/STOP] button to play back your recording. Play along on the keyboard if you like. During playback you can use the [o PAUSE], [r REW], and [f FF] buttons, as described on page 70. You can also change the playback tempo via the TEMPO [+] and [-] buttons.
Playback will stop automatically when the end of the recording is reached, or you can press the [START/STOP] button to stop it at anytime.
Press the [RECORD] button so that its indicator goes out, or the [EXIT] button, to exit from the QUICK RECORD mode.
NOTES
- If you want to try out the selected voice on the keyboard before proceeding — turn the synchro-start mode off so that recording doesn't start automatically as soon as you play on the keyboard.
NOTES
- The Clavinova may continue to write data to the disk for a short time after you stop recording. DO NOT eject the disk while the disk drive indicator is lit or flashing.
- You can enter a name for the recorded song, as described on page 87. (When a song has been recorded, a temporary name “SONG_XXX.MID” (XXX is the song number) will be given to the song automatically.)
- During recording the [ABC/SONG] volume control and the MIXER display will function as the recorded ABC and/or keyboard part volume control.
- New data cannot be recorded to songs recorded on other instruments, also any edit in the record mode is not possible.
- The guide lamps do not light during recording.
- [ABC ON] and/or [HARMONY] button indicator(s) automatically go out when the recording of these parts has finished.
- When recording has finished, the [EFFECT] is automatically turned off (but the recorded effect remains active).
Multi-track Recording & Playback
1 Insert a Formatted Disk, Engage the Record Mode & Select a Song \_\_\_\_
The first three steps in the multi-track recording process are exactly the same as those for quick recording: insert a formatted disk, press the [RECORD] button to engage the record mode, and select a song number — see steps 1, 2, and 3, above.
2 Select the TRACK RECORD Page ....
Use the PAGE buttons to select the TRACK RECORD page (RECORD display page 2). The status of each track is shown above the TRACK LCD buttons. Tracks which are enabled for playback are indicated by a box surrounding the track number, and tracks which are record-enabled are indicated by a filled box and inverse number. Tracks which do not contain data appear as dots.
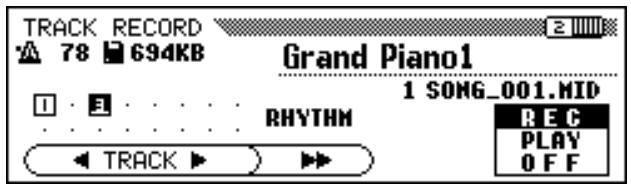
3 Set The Track Modes as Required ....
Use the TRACK < and > buttons to select a track (an underline cursor appears under the selected track). The data dial and [+]/[-] buttons can also be used to select tracks. Use the REC/PLAY/OFF LCD button to record-enable, play-enable, or turn off (mute) the selected track. Only tracks which contain data can be play-enabled. The track number box disappears when the track is muted.
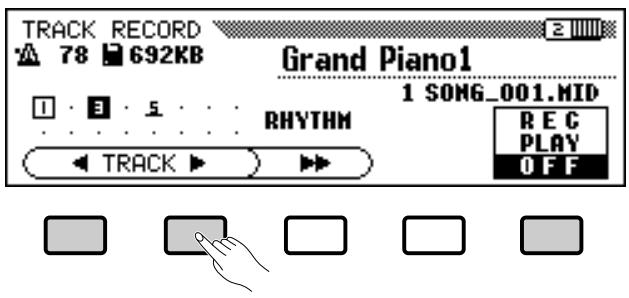
In the normal single-voice play mode only one track needs to be record-enabled at a time in order to record the keyboard part. If you intend to record using the DUAL or SPLIT mode, however, two tracks must be record-enabled — only one or two tracks can be record-enabled at a time to record the keyboard part. If ABC accompaniment is turned on tracks 9 through 16 are automatically record-enabled (these are the tracks on which the ABC data is recorded). If the HARMONY function is engaged tracks 6 through 8 are automatically record-enabled (tracks 6 through 8 are used to record the harmony data).
The TRACK f LCD button can also be used to select the RHYTHM tracks (9 and 10) if you only want to record the rhythm sound. The cursors appear under the 9 and 10 tracks, and the REC/PLAY/OFF LCD button can be used to set them to record-enabled.
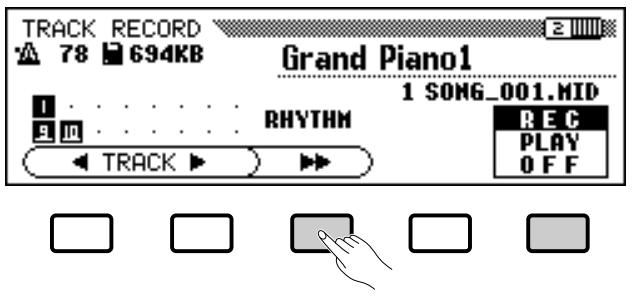
4 Set All Performance Features As Required ....
After setting the tracks to be recorded to the record-enable mode, set up all necessary performance features as required: voice, voice mode (normal, dual, or split), style, tempo, etc.
5 Start Recording....
Unlike the QUICK RECORD mode the synchronized start mode is automatically turned OFF when the multi-track recording mode is engaged. You can, however, engage the synchro start mode at this point so that recording will begin automatically as soon as any key on the keyboard is pressed. Otherwise press the [START/STOP] button to start recording on the specified track(s). The current measure number is shown on the display as you record.
The following parameters will be recorded in addition to notes you play:
NOTES
- Two tracks can be record-enabled only when the DUAL or SPLIT mode is ON, otherwise only one track can be record-enabled.
- Track 10 (and 9 in some case) can only be used to record the internal rhythm sound and cannot be used to record the keyboard part. Also, the keyboard part should be recorded on a track other than those used for ABC, RHYTHM, and HARMONY.
- When the RHYTHM, ABC, and/or HARMONY tracks are set to record-enabled, the synchronized start mode is automatically turned on.
- When the RHYTHM tracks (9 and 10) are set to record-enabled, or set to play-enabled and other track(s) are set to record-enabled, the metronome will sound to provide a timing guide in the synchronized start mode before recording is started.
NOTES
- If ABC and/or HARMONY is already on when the multi-track recording mode is engaged, the corresponding tracks are automatically record-enabled and the synchronized start mode is automatically turned ON.
Parameters recorded for Each Track
- Notes
- Voice
• Volume (initially maximum)
• Expression (CVP-79A only) -
Pan
-
Damper pedal
- Soft pedal
- Sostenuto pedal
- Reverb depth
- Effect depth
Parameters Recorded for the Entire Song
- Tempo
- Reverb type
- Reverb depth
- Effect type*
- Ending
- Style
- Main A/B
- Intro
- Fill-in
- Ending
* The last recorded track effect takes priority.
Other Recorded Parameters
- Accompaniment data is distributed to the appropriate tracks. Accompaniment data which is recorded but not listed above includes:
* Individual part volume
* Modulation
* Pitch bend
* Pitch bend sensitivity
- Harmony data is distributed to the appropriate tracks.
- DUAL mode voices are recorded on the two assigned tracks.
- SPLIT mode voices are recorded on the two assigned tracks.
6 Stop Recording
Press the [START/STOP] button to stop recording.

- If you have recorded using a preset style on RHYTHM tracks 9 and 10, a box symbol will appear next to the "RHYTHM" character in the display.
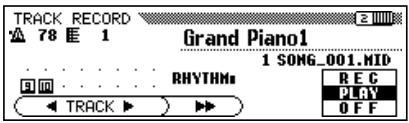
Adding New Tracks
Recorded tracks are automatically switched to the play mode when recording is stopped, so you can play back the recorded data simply by pressing the [START/STOP] button, or add a new track to your song by selecting a new record track(s) and voice(s) and recording as described above.
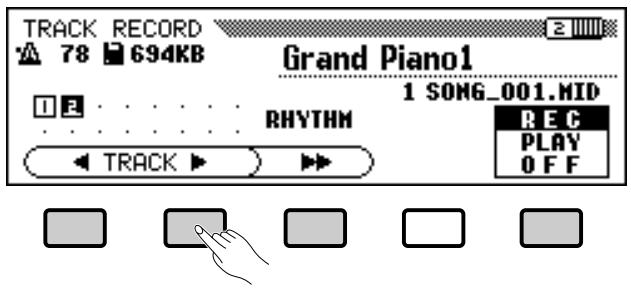
Press the [RECORD] button so that its indicator goes out, or the [EXIT] button, to exit from the multi-track recording mode.

- If you record on a track that has already been recorded, the previous material will be erased and the new material will be recorded in its place.
Punch-in/out Recording
“Punch-in/out recording” allows you to start recording from any “punch-in” point within a previously-recorded track and stop recording at any “punch-out” point, leaving all recorded material up to the punch-in point and following the punch-out point intact. The punch-in recording controls are accessed via the RECORD [PUNCH IN/OUT] display (RECORD display page 3).
1 Play the Song
Play back the song in order to locate the point you want to punch-in from.
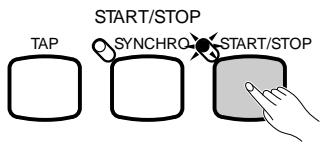
flowchart
graph LR
    A["TAP"] --> B["SYNCHRO"]
    B --> C["START/STOP"]
2 Pause Before the Punch-in Point
Press the [o PAUSE] button to pause playback a bit before the point at which you want to start recording. Leave a measure or more before the punch-in point so you'll be able to grasp the timing for the punch in.
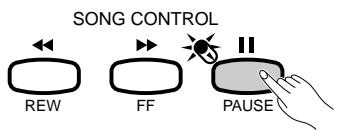
3 Select a Track
Use the TRACK ▲ and ▼ LCD buttons or the data dial or [+]/[-] buttons to the select the track to be recorded on. The voice used in the selected track will be shown on the display.
![RECORD [PUNCH IN/OUT] 3 78 E 5 1 SONG_001.MID TRACK 1 [Grand Piano1] PUNCH IN PUNCH OUT 1ST KEY PEDAL MODE](/content/2025/01/114698/images/f9bd283c3d7c2bd10b68ed536a9f81288ee398bccdb52f8a7b6b477f87bfdeb8.jpg)
NOTES
- The Punch-in/out recording function cannot be used when no disk is in the drive.
- [f FF] or [r REW] buttons cannot be used while in the [PUNCH IN/OUT] display.
NOTES
- Only tracks which allow punch-in/out recording will appear and can be selected. The RHYTHM, ABC, HARMONY, and unrecorded tracks cannot be selected.
4 Select a Punch-in Mode
Use the MODE LCD button to select the 1ST KEY or PEDAL punch-in mode.
| 1ST KEY | Recording will begin with the first key played after the PUNCH IN LCD button is pressed. |
| PEDAL | Recording will begin when the left pedal is pressed after the PUNCH IN LCD button is pressed. |
5 Engage the Punch-in Record Ready Mode
Press the PUNCH IN LCD button to engage the punch-in record ready mode — the PUNCH IN button will be highlighted.
![RECORD [PUNCH IN/OUT] 78 E 5 1 SONG_001.MID TRACK 1 [Grand Piano1] PUNCH IN PUNCH OUT MODE 1ST KEY PEDAL](/content/2025/01/114698/images/c5726a3f9b8844eabb60c793a39d374547f9bb0dab334fd666e5d35cb315da10.jpg)
6 Start Playback & Recording
Press the [START/STOP] or [o PAUSE] button to start playback from the current pause location, then, if the 1ST KEY mode is selected, begin playing at the point you want to record from. Recording will begin as soon as you begin playing on the keyboard. If the PEDAL mode is selected press the left pedal at the point you want to record from.
7 Stop Recording
Press the PUNCH OUT LCD button to stop recording at the point at which you want to “punch out”, leaving all data following the punch-out point intact. Use the panel [START/STOP] button to stop recording if you want all data following the punch-out point to be erased.
Press the [RECORD] button so that its indicator goes out, or the [EXIT] button, to exit from the punch-in/out record mode.
NOTES
- When the PEDAL punch-in mode is selected, the left pedal is used for this function only (the usual pedal function is canceled).
NOTES
When the PEDAL punch-in mode is selected:
- Recording can be started directly by pressing the left pedal while playback is paused (without first pressing the [START/STOP] or [PAUSE] button).
- Recording can also be stopped by pressing the left pedal. In this case the data following the punch-out point will be left active.
- If you start recording by pressing the left pedal while playback is paused, and stop by the [START/STOP] button, the result will be that all the data after the punch-in point will be erased. (If you stop by using the PUNCH OUT LCD button or the left pedal, only the data between the punch-in and punch-out points will be erased.)
NOTES
- If you press the [START/STOP] button or [o PAUSE] button to start recording, and the [START/STOP] button or the PUNCH OUT LCD button to stop recording without actually recording anything in between, the original data will be left untouched.
The Chord Sequence Function
The CHORD SEQUENCE function provides a convenient way to enter chord sequences and style changes one at a time.
1 Engage the Chord Sequence Function
After engaging the QUICK RECORD mode (RECORD display page 1) and selecting a song number, press the CHORD SEQ. LCD button. The CHORD SEQUENCE display will appear, ABC will be turned on, and if the FULL KEYBOARD mode is currently selected the FINGERED CHORD mode will be selected instead.
![QUICK RECORD 78 E 1 Grand Piano1 SONG KBD ABC&RHY 1 [SONG_001.MID] REC OFF CHORD SEQ.](/content/2025/01/114698/images/cbfea49dbfd89a59ea87728fc8aca0206fc5ace7c616247bd74d18f3ce60f914.jpg)
2 Move the Cursor To the Entry Point
As necessary, use the CURSOR < and > LCD buttons to move the triangular cursor to the point at which you want to enter a chord or style change.
![CHORD SEQUENCE 4/4 Pop Ballad 1 [MAIN_A] ROOT TYPE CURSOR SET](/content/2025/01/114698/images/76007b82d7237e3deb30a698abdfbf727505c008cac6e2dba230c7638899b890.jpg)
3 Enter and Set the Chords and/or Style Changes
To enter a chord either play the chord on the ABC section of the keyboard according to the current ABC mode, or use the ROOT and TYPE LCD buttons. The data dial or [+]/[-] buttons can be used to select the ROOT or TYPE once the corresponding parameter has been selected by pressing its LCD button. When a chord is entered via the keyboard the appropriate root and type appear in the corresponding parameter locations. To enter a style change (style, section, and tempo) simply make the
NOTES
- The chord Sequence function cannot be used when no disk is in the disk drive.
- The chord sequence data will replace any previous data on the ABC and rhythm tracks that was recorded in the quick record or multi-track record modes.
- Up to 999 measures can be recorded using the Chord Sequence function.
- The chord input resolution will be automatically selected according to the current style. For 3/4, 4/4, and 5/4 time styles, one chord can be entered on every 8th note or 8th-note triplet. For other time signatures one chord can be entered for each measure.
- One style change or section change (except Fill-in and Break) can be made at the beginning of each measure. — The “Button not valid! Enter at top of measure.” alert display will appear if you attempt to enter the change in any other place than the top of measure.
- ABC cannot be turned off after the chord sequence function is engaged. But the ABC mode can be altered between FINGERED and SINGLE-FINGER in the pop-up display by pressing the [ABC ON] button. The split point can also be altered.
NOTES
- If you enter the ABC part volume data via the MIXER display and the SET LCD button, the volume event symbol will appear in the box on the right side of the LCD display. (The volume event is automatically entered at the beginning of a song.)
![CHORD SEQUENCE 4/4 Pop Ballad 1 [MAIN_A] C 78 ROOT C TYPE Maj CURSOR SET](/content/2025/01/114698/images/a6f6f7112f4d58c47a8c5dc88681f7523e2838c3098a327673db387c61240c09.jpg)
appropriate selections in the normal way. Once the chord and/or style change has been entered, press the SET LCD button to actually input the chord and/or style change at the current cursor location. The location in the graphic measure symbol will become bold and the set data will be shown on the display: the time signature, the style name and section to the left, and the chord, tempo, and rhythm on/off status (see below) in the box to the right.
Continue entering chords and style changes in this manner until your sequence is complete. The data recorded by the Chord Sequence function is listed below.
Data Recorded By the Chord Sequence Function
- Style
- Accompaniment Section (MAIN A & B/Intro/Ending/Fill-in/Break)
- Chord
• ABC part volume (MIXER settings) - Tempo
- Rhythm on/off
• ABC/SONG volume (as an initial setting only)
4 Stop Recording
When all the required chords and style changes have been entered, enter an END MARK (press END MARK in display page 2), then press the END button in display page 3. The “Are You Sure?” confirmation prompt will appear. Press YES to save the recorded data and finish recording or NO to abort. Once the data has been saved, the Chord Sequence function will automatically be exited.
It is also possible to leave the Chord Sequence function during recording by pressing the [EXIT] button, or the [RECORD] button so that its indicator goes out. In this case, if any data is left unsaved, the “Save recorded data?” confirmation prompt will appear. Press YES to save the recorded data and then exit from the Chord Sequence function, NO to exit without saving the data, or CANCEL to return to the Chord Sequence function.
NOTES
- The types of chords that can be entered are the same as those listed for the ABC fingered mode (see page 36). In addition “- - -” (i.e. no chord) can be entered via the TYPE LCD button.
On-bass chords can be entered via the keyboard. - The number of each measure is shown to the left of the graphic measure symbols on the display.
- See "Chord Sequence Page-2 Functions", below, for other useful editing features.
- If no chords are entered (i.e. chord type is set to “- - -”), the result will be a rhythm-only sequence.
- A “Break” can be produced by both setting the chord type to “- - -” and rhythm sound to “OFF” (see “Rhythm OFF/ON”, below).
- The same chord, as set previously (i.e. the same chord shown in the box), cannot be entered even if the SET LCD button is pressed.
- Only data other than chord data can be entered by first moving the cursor and making the required changes without entering any chord (the ROOT and TYPE LCD sections should be blank), and pressing the SET LCD button.
- If a different style with another time signature is selected after chords have been entered, the timing of the chords will be changed accordingly.
NOTES
- The chord sequence data now resides in tracks 9 through 16, and can be played back in the normal way. Add other tracks as required by using the standard track selection and recording procedure. You can also record over individual tracks of the sequence and replace them with original material if you like by using the standard track selection and record procedure.
- The song recorded via the Chord Sequence function can be modified later by re-entering the Chord Sequence mode and making the required changes. But please note that the track data recorded over by using the standard recording procedure will be returned back to the preset style data.
Chord Sequence Page 2 & 3 Functions
The CHORD SEQUENCE page-2 and page-3 displays contain a number of functions that can make the chord-entering process more efficient and versatile.
![CHORD SEQUENCE 4/4 Pop Ballad 1 [MAIN_A] Am 78 DELETE END MARK RHYTHM OFF RHYTHM ON ALL DELETE](/content/2025/01/114698/images/9cc34fa8676f819a7692bfa1fd4c48ddf6255cf423f61bc00de481aca9199121.jpg)
- Delete
Press the DELETE LCD button to delete the data at the current cursor location. The “Are you sure?” confirmation prompt will appear. Press YES to delete or CANCEL to abort.
● End Mark
Press the END MARK LCD button to enter an “end mark” at the current cursor location. An END MARK signifies the end of the song, and should always be entered to properly end each song. The cursor can not be moved past an end mark. An end mark can be deleted using the DELETE LCD button, above.
● Rhythm OFF/ON
Pressing the RHYTHM OFF LCD button turns the rhythm sound off — i.e. the start of a rhythm break — from the current cursor location. This button has no effect if the rhythm is already off.
The RHYTHM ON LCD button turns the rhythm back on after a rhythm break. This button has no effect if the rhythm is already on.
● All Delete
When the ALL DELETE LCD button is pressed the “Are you sure?” confirmation display will appear. Press YES to erase all chord and style change data, or NO to abort.
![CHORD SEQUENCE 4/4 Pop Ballad 1 [MAIN_A] 1 2 Am 78 CHECK PLAY END](/content/2025/01/114698/images/9cf3ce63ef996f770fb2eea00cbf1ba088924f1eee0b2aaaadf41b8cecc0dc59.jpg)
- Check Play
The CHECK PLAY LCD button starts playback of the programmed chord sequence. The sequence will play through until the end of the data is reached or until the CHECK PLAY LCD button is pressed a second time.
● End
Pressing the END LCD button initiates final processing of the sequence data and saves it to the disk. The “Are you sure?” confirmation prompt will appear: press YES to save it to disk and finish recording the chord sequence or NO to abort. Once the data has been processed and saved to disk the Chord Sequence mode is automatically exited.

- Unless the end mark is entered, the song will end at one measure after the last data, or at the end of the ending section if it is entered.
- The end mark symbol will appear in the box on the right side of the LCD display when it is entered.
![CHORD SEQUENCE 4/4 Pop Ballad 1 [MAIN_A] 15 16 C 78 DELETE END MARK RHYTHM OFF RHYTHM ON ALL DELETE](/content/2025/01/114698/images/8b9af897a29637a2e82c62ba4e42ce7f61487607ce57a69beb85756654e9197c.jpg)

- The rhythm on/off status is shown in the box to the right on the LCD display.
Other Song Recording Functions

NOTES
- Track Mix, Track Delete, Track Quantize, Initial Edit, and Rename functions, described below, cannot be used when no disk is in the disk drive.
Track Mix
The TRACK MIX function combines the data from two specified tracks and places the result in a third specified track. The TRACK MIX function is accessed via the RECORD [TRACK MIX] display (RECORD display page 4).
![RECORD [TRACK MIX] A:Grand Piano1 B:Grand Piano1 TRK A 1 + TRK B 2 1 SONG_001.MID C:Grand Piano1 TRK C 3 MIX](/content/2025/01/114698/images/bd3f6647672a38481703c86773817c77aaeac91a6cc478ab797ad8e98dca941a.jpg)
1 Specify the Tracks to be Mixed ....
Use the TRK A and TRK B LCD buttons — or the data dial or [+]/[-] buttons once the TRK A or TRK B parameter has been selected — to specify the tracks you want to mix. The initial voices used for the A and B tracks are shown along with the track number.
2 Specify the Destination Track......
Use the TRK C LCD button — or the data dial or [+]/[-] buttons once the TRK C parameter has been selected — to specify the track you want the mixed data to be placed in. Any previous data in the destination track (TRK C) will be erased.
3 Execute the Track Mix Operation ....
Press the MIX LCD button to begin execution of the track mix operation. The “Are you sure?” confirmation prompt will appear. Press YES to mix the specified tracks or NO to cancel the operation.
When this is done the MIX LCD button will change to UNDO, allowing you to undo the track mix operation and return to the pre-mixed data before selecting a different track or exiting from the Track Mix mode.
Press the [EXIT] button, or the [RECORD] button so that its indicator goes out to exit from the Track Mix function.

NOTES
- Only the data-containing tracks will appear and can be selected for TRK A and B. In addition “no track” (“- -”) can also be selected for TRK B. — In this case the result will be the copy of TRK A to TRK C.
- The initial data and all data other than note data is taken from that of track A.

NOTES
- A bar graph indicating the progress of the track mix operation will appear while the data is being processed.
- You can check if the results are as you expected or not, by starting and stopping playback by using the [START/STOP] button before the UNDO operation.
Track Delete
The TRACK DELETE function accessed via the RECORD [TRACK DELETE] display (RECORD display page 5) can be used to delete all data from any specified track.
![RECORD [TRACK DELETE] 5 III 1 SONG_001.MID TRACK 1 [Grand Piano1 ] DELETE](/content/2025/01/114698/images/5519d3d74af074c3d2a442551622cfcee65dd23ec0601adc6ed2241cefd992a6.jpg)
1 Specify the Track to be Deleted ....
Use the TRACK ▲ and ▼ buttons, the data dial, or the [+]/[-] buttons to specify the track you want to delete.
2 Execute the Delete Operation ....
Press the DELETE LCD button to begin execution of the track delete operation. The “Are you sure?” confirmation prompt will appear. Press YES to delete the specified track or NO to cancel the operation. After processing the DELETE LCD button changes to UNDO, which can be used to undo the delete operation before selecting a different track or exiting from the Track Delete mode.
Press the [EXIT] button, or the [RECORD] button so that its indicator goes out to exit from the Track Delete function.
NOTES
- Only the data-containing tracks will appear and can be selected.
NOTES
- A bar graph indicating the progress of the track delete operation will appear while the data is being processed.
- You can check if the results are as you expected or not, by starting and stopping playback by using the [START/STOP] button before the UNDO operation.
Track Quantize
You can “tighten up” the timing of a recorded part by aligning all notes to specified beats via the TRACK QUANTIZE function accessed via the RECORD [TRACK QUANTIZE] display (RECORD display page 6).
![RECORD [TRACK QUANTIZE] 1 SONG_001.MID TRACK 1 [Grand Piano1] QUANTIZE](/content/2025/01/114698/images/6453c64ca8e6acbc1ac4dbed4c49d4dd8c21dddc703e8c454b32ede9534940af.jpg)
1 Specify the Track to be Quantized......
Use the TRACK ▲ and ▼ buttons, the data dial, or the [+]/[-] buttons to specify the track you want to quantize.
NOTES
- Only the data-containing tracks will appear and can be selected.
2 Specify the “Quantize Size”
Use the LCD button below the note symbol to select “quantize size” — i.e. the beats to which the notes in the selected track will be aligned:
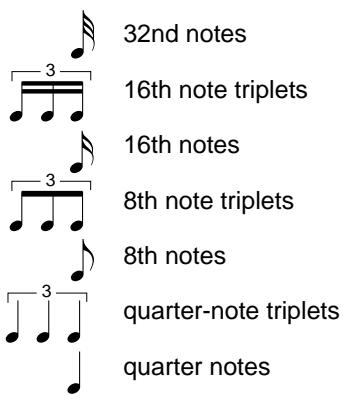
3 Execute the Quantize Operation
Once the required quantize size has been selected press the QUANTIZE LCD button to quantize the selected track. The “Are you sure?” confirmation prompt will appear. Press YES to quantize the data or NO to abort. When this is done the QUANTIZE LCD button will change to UNDO, allowing you to undo the quantize operation and return to the pre-quantized data before selecting a different track or exiting from the Track Quantize mode.
Press the [EXIT] button, or the [RECORD] button so that its indicator goes out to exit from the Track Quantize function.

- Only note and voice data is quantized.
- A bar graph indicating the progress of the quantize operation will appear while the data is being processed.
- You can check if the results are as you expected or not, by starting and stopping playback by using the [START/STOP] button before the UNDO operation.
Initial Edit
The values of the initial data can be changed for each track or the entire song by using the INITIAL EDIT parameters accessible via the RECORD [INITIAL EDIT] display (RECORD display page 8).
![RECORD [INITIAL EDIT] 1 SONG_001.MID SONG ▼ 1 ▲ EDIT](/content/2025/01/114698/images/41bd3487db99cb40722b3aec1fa199eda8764587c50ed5b04f24d1d0a1a62032.jpg)
1 Select a Song & Engage the Edit Mode
Use the SONG ▲ and ▼ buttons, the data dial, or the [+]/[-] buttons to specify the song you want to edit, then press the EDIT LCD button to go to the INITIAL EDIT pages.
2 Edit the Parameters
Three INITIAL EDIT display pages are available. Use the PAGE [<] and [>] buttons to select the various pages and edit the parameters each contains. It is possible to start and stop playback by using the [START/STOP] button while editing the parameters in order to hear how the changes affect the sound.
● Page 1: INITIAL EDIT [SONG]
This page contains the REVERB TYPE and DEPTH parameters, the TEMPO parameter, and the WRITE LCD button which is used to actually write all initial data changes once they have been made as required. The REVERB TYPE and DEPTH parameters and the TEMPO parameter affect the entire song and are edited by using the corresponding LCD buttons to select each parameter, and then the data dial or the [+]/[-] buttons to edit (see page 22 for information on the reverb types and depth settings, and page 29 for tempo information).
![INITIAL EDIT [SONG] 1 SONG_001.MID REVERB TYPE ROOM 1 DEPTH 60 ‡ TEMPO 110 WRITE](/content/2025/01/114698/images/b7580e78e1978e11b456a277cf3022fd0a9bf33357e72554e635c2c51f1295f8.jpg)
● Page 2: INITIAL EDIT [TRACK]
Page 2 includes VOICE, VOLUME, and PAN parameters that can be set individually for each track. The VOICE parameter sets the initial voice for the track; the VOLUME parameter sets the initial volume of the track, and the PAN parameter sets the initial pan position of the track. Use the TRACK ▲ and ▼ buttons — or the data dial or the [+]/[-] buttons once the TRACK parameter has been selected — to specify the track you want to edit, then set the parameters in this and the following page as required.
![INITIAL EDIT [TRACK] 1 SONG_001.MID TRACK VOICE VOLUME PAN ▼ 1 ▲ Elec. Grand 10 L H R](/content/2025/01/114698/images/995f79f2586f289243e30cf544f25e28b105111380a0616cee5a2370fb70b2cf.jpg)
● Page 3: INITIAL EDIT [TRACK]
Page 3 contains EFFECT TYPE and DEPTH parameters and a RE-VERB DEPTH parameter that can be set individually for each track. The track to be edited is selected in page 2 (see above), and the parameters can be edited as required. See page 24 for information on the available effect types and depth settings.
NOTES
- The data may not be played back accurately if you use the [x REW] and [f FF} buttons while editing the initial data.
NOTES
- In the Initial Edit mode the panel buttons relating to the editable parameters cannot be used.
NOTES
- Only the data-containing tracks will appear and can be selected.
- The VOLUME parameter's initial default value is "100" for every track. This value can only be decreased.
NOTES
- The effect type and depth may not be able to be set as expected in some cases. The other tracks are also affected and the last set track effect type takes priority.
- The VOICE and EFFECT TYPE parameters cannot be edited for the non-keyboard tracks (i.e. the RHYTHM, ABC, and/or HARMONY tracks).
![INITIAL EDIT [TRACK] 3 1 SONG_001.MID EFFECT REVERB TYPE DEPTH DEPTH ECHO 20 70](/content/2025/01/114698/images/4975a483d78a11521031966d8fdfc11396dff71db2eb7e208269b0eb83654696.jpg)
3 Write the Changes
When all the initial data changes have been made as required, go back to INITIAL EDIT page 1 and press the WRITE LCD button. The “Are you sure?” confirmation display will appear. Press YES to actually make the specified changes, or NO to abort. When this is done the WRITE LCD button will change to UNDO, allowing you to undo the write operation and return to the pre-edited data before making any other edits or exiting from the Initial Edit mode.
4 Exit
Press the [EXIT] button, or the [RECORD] button so that its indicator goes out to exit from the Initial Edit mode. If you do this after making any edits that you have not yet written, the “Write edited data?” confirmation prompt will appear. Press YES to write the edited data and then exit from the Initial Edit mode, NO to exit without writing the data, or CANCEL to return to the Initial Edit mode.
NOTES
- All edited data for any number of tracks within one song can be written in a one-time WRITE operation.
- You can check if the results are as you expected or not, by starting and stopping playback by using the [START/STOP] button before the UNDO operation.
Renaming Song Files
This function lets you enter an original name for, or change the existing name of, any song file on the disk recorded by the CVP-79A/69/69A/59S. The rename function is accessed via the RECORD [RE-NAME] display (RECORD display page 7).
1 Select a Song & Engage the Rename Mode
Use the SONG ▲ and ▼ buttons, the data dial, or the [+]/[-] buttons to specify the song you want to rename, then press the RENAME LCD button to go to the NAMING display.
![RECORD [RENAME] 7 1 SONG_001.MID SONG ▼ 1 ▲ RENAME](/content/2025/01/114698/images/c25fe6dd15d6bd8b1caeeb29ca8cc722d31c76e4b749f84c7e4eae0cb8460143.jpg)
2 Enter a Name
The current song file name appears in the upper right corner of the display. Use the > LCD button to position the underline cursor at the character you want to change (song names can be up to 12 characters in length). Use the data dial or [+]/-] buttons to select the character you want to enter from the list in the center of the display, then press the c.set LCD button to enter the character at the current cursor position. Repeat this procedure until your name is complete. The c.del LCD button can be used to back up one space and delete a character.
![RENAME RENAME FILE [CVP-Sona:01_] !"#$%&'()*+,-./0123456789;;<=>?@ ABCDEFGHIJKLMNOPQRSTUVWXYZ[¥]^_^_ abcdefghijklmnopqrstuvwxyz(1) ▶ c.set c.del OK CANCEL](/content/2025/01/114698/images/fe5bcd834bb81ca1ca2beae724da34f8edf0744cf3cb58764a787d2f19557c9b.jpg)
3 Register the Name
When the name is complete press the OK LCD button to register the name for the current song file, or CANCEL to abort.
Press the [EXIT] button, or the [RECORD] button so that its indicator goes out, to exit from the Rename mode.
Recording Without a Disk
The Clavinova has enough internal RAM memory (about 25KB) to allow recording for a while even if a disk is not loaded (up to approximately 2,500 notes if no other data is recorded).
![QUICK RECORD 78 25KB Grand Piano1 SONG - [CVP MEMORY ] KBD ABC&RHY REC OFF CHORD SEQ.](/content/2025/01/114698/images/dbba5a861bb111650a513e39bea16829d6fa408871d5339024da20145017cd12.jpg)
QUICK RECORD display when recording to internal RAM memory
![SONG PLAY [MAIN] 78 E 1 Grand Piano1 CVP MEMORY SONG PART1 PART2 OTHERS START CVP TRACK 1 TRACK--](/content/2025/01/114698/images/df6f59eb0b40fff2b200886e849bf643727c5e0dedfcdddac909e6995604379c.jpg)
SONG PLAY [MAIN] display when playing back internal RAM memory song
If you accidentally record without loading a disk, make sure you use the SONG COPY function (described on page 102) to copy the recorded data to disk if you want to keep the recorded data (the internal RAM memory is not backed up). This is necessary because the internal RAM memory is cleared automatically when a Disk Orchestra Collection, Disklavier PianoSoft, Style File disk, or a disk containing songs recorded on a different instrument is loaded. The RAM is also cleared when an original song disk is loaded and a song is selected.
![FUNCTION [SONG COPY] CVP MEMORY 1 [ ] CVP - DISK SONG→ CVP SONG 1 COPY](/content/2025/01/114698/images/78e217fb7f00dafc8f5cc8d9948cead16b2e382215521a8e405aa7616a255e03.jpg)
Playback
Original recordings can be played back and controlled in the same way as described in the “Disk Orchestra Collection & Song Playback” section, beginning on page 61. You can individually select tracks to play back (page 63), use the guide modes and keyboard guide lamps with the data recorded on any two tracks (page 67), and use the A-B repeat function (page 70).
NOTES
- Chord sequence data is not recorded to internal RAM memory. — The "Button not valid!" alert display will appear.
- The Punch-in/out Recording, Track Mix, Track Delete, Track Quantize, Initial Edit, and Rename functions (i.e. RECORD display page 3 to the last page) cannot be used with data in the internal RAM memory. — The “Button not valid!” alert display will appear.
The Utility Functions
The “utility functions” described in this chapter include keyboard, disk, MIDI, and general functions that significantly enhance the versatility and flexibility of the CVP-79A/69/69A/59S. All of the utility functions are selected and set in the same way for consistent, easy operation:
1 Press the [FUNCTION] button so that its indicator lights.
![FUNCTION [KEYBOARD] 1 OCTAVE SHIFT KEY TRANS. LEFT 2ND RIGHT/1 KEY TOUCH 0 +1 0 0 NORMAL](/content/2025/01/114698/images/162b00d1563afad80171208561c4972f5f2245f33fe40ce1aca33b06ca197f1f.jpg)
2 Use the PAGE [<] and [>] buttons to select the page containing the desired function.
![FUNCTION [SOUND] TUNE 440.0 Hz PAN LEFT 2ND RIGHT/1 L-R L-R L-R PAGE DISPLAY HOLD](/content/2025/01/114698/images/696a7d9cc154583e2bcd4e33257ab32ab484e8dedd747346db4579f04811aea9.jpg)
3 Use the LCD buttons, data dial, and/or [+]/[-] buttons to select and set the individual parameters as required.
![FUNCTION [SOUND] TUNE 440.0 Hz PAN LEFT L R 2ND L R RIGHT/1 L R - +](/content/2025/01/114698/images/b27fc6e31ca3735b5c9324eba3d6d812c15a2293dd8cd92d38ba3976bf10d678.jpg)
4 Press the [EXIT] button, or the [FUNCTION] button so that its indicator goes out when done.
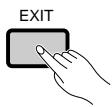

- The data dial and the [+]/[-] buttons can be used for the parameters once selected by the LCD button in the highlighted round-framed parameter box.
Keyboard
![FUNCTION [KEYBOARD] 1 OCTAVE SHIFT KEY TOUCH TRANS. LEFT 2ND RIGHT/1 NORMAL 0 +1 0 0](/content/2025/01/114698/images/0088fa26ed2532f907f3b19966cd9f6e4c993696fc25e395480f5a33da1daf33.jpg)
■ Transpose
The Transpose function makes it possible to shift the pitch of the entire keyboard up or down in semitone intervals up to a maximum of two octaves (from -24 through 0 to +24). “Transposing” the pitch of the Clavinova keyboard makes it easier to play in difficult key signatures, and you can simply match the pitch of the keyboard to the range of a singer or other instrumentalist.
Use the data dial or [+]/[-] buttons to set the desired degree of transposition.
■ Octave Shift
This function includes three parameters which determine whether the left-hand voice in a split keyboard setup (LEFT), the 2nd voice in the dual mode (2ND), and the right-hand or main voice (RIGHT/1) will be shifted up or down one octave.
Press the LEFT, 2ND, or RIGHT/1 LCD button as many times as necessary to set as required:
| -1 | Corresponding voice shifted down one octave. |
| 0 | No shift. (Default for the RIGHT/1 and 2nd voices.) |
| +1 | Corresponding voice shifted up one octave. (Default for the LEFT voice.) |
■ Touch Sensitivity
The Clavinova can be set to one of five different types of keyboard touch sensitivity to match different playing styles and preferences. Press the KEY TOUCH button as many times as necessary to select the desired touch response setting.
| SOFT 2 | Allows maximum loudness to be produced with very light key pressure. |
| SOFT 1 | Not as sensitive as the “SOFT 2” setting, but maximum loudness can still be easily produced with relatively light key pressure. |
| NORMAL | Produces a fairly “standard” keyboard response. (Default.) |
| HARD 1 | Requires the keys to be played quite hard to produce maximum loudness. |
| HARD 2 | Requires the keys to be played very hard to produce maximum loudness. |

NOTES
- Press the [-] and [+] buttons simultaneously to restore normal keyboard pitch ("0").
- The Transpose setting is retained in memory even when the power is turned off if the BACKUP page VOICE SETTING parameter is turned on (page 107), otherwise the Transpose is always set to "0" when the power is turned on.
- The transpose function does not affect the Drum Kit voices.
- Notes below and above the original 88-key range of the Clavinova sound one octave higher and lower, respectively.

NOTES
- The Octave Shift setting is retained in memory even when the power is turned off if the BACKUP page VOICE SETTING parameter is turned on (page 107).
- Notes below and above the original 88-key range of the Clavinova sound one octave higher and lower, respectively.
- In the normal play mode (i.e. single voice mode) only the RIGHT/1 setting is effective.

NOTES
- The Touch Sensitivity setting is retained in memory even when the power is turned off if the BACKUP page VOICE SETTING parameter is turned on (page 107), otherwise the NORMAL setting is automatically selected whenever the POWER switch is turned on.
Sound
![FUNCTION [SOUND] TUNE 440.0 Hz PAN LEFT 2ND RIGHT/1 L-R L-R L-R](/content/2025/01/114698/images/79caa72958a3eeb5cd6df2e4507778ceb681c92fecf7c679cb5a107ca35b67d2.jpg)
Tune
The Tune function makes it possible to tune the Clavinova over about a ±26 -Hertz ( ±100 -cent) range in 0.2-Hertz intervals. A hundred “cents” equals one semitone, so the tuning range provided allows fine tuning of overall pitch over a range of approximately a semitone. This function is useful for tuning the Clavinova to match other instruments or recorded music. Normal pitch is A3 = 440 Hertz.
Use the TUNE ▲ and ▼ LCD buttons to set the tuning as required. The data dial and [+]/[-] buttons can also be used once the TUNE parameter has been selected. The default value of 440.0Hz can be instantly recalled by pressing the TUNE ▲ and ▼ LCD buttons simultaneously.
Pan
The pan positions of the left-hand voice in a split keyboard setup (LEFT), the 2nd voice in the dual mode (2ND), and the right-hand or main voice (RIGHT/1) can be individually set via the appropriate PAN parameters.
Press the LEFT, 2ND, or RIGHT/1 LCD button according to the voice you want to pan, then use the data dial or [+]/[-] buttons to set the pan position as required. The graphic bar shows the approximate pan position between full left (“L”) and full right (“R”). The default position can be instantly recalled by pressing the [+] and [-] buttons simultaneously.
NOTES
- The Tune setting is retained in memory even when the power is turned off if the BACKUP page TUNE/MICRO TUNING parameter is turned on (page 107), otherwise the tuning is always set at 440.0Hz when the power is turned on.
- The Tune function does not affect the Drum Kit voices.
NOTES
- The pan setting is retained in memory even when the power is turned off if the BACKUP page VOICE SETTING parameter is turned on (page 107).
- The default pan position for some voices is center, while some voices feature keyboard scaling — i.e. the keyboard is spread across the stereo sound field (see the voice list on page 116). Both types appear in center position on the LCD. Any changes in the pan setting are then relative to the default position.
- The Drum Kit voices have special pan settings for each individual instrument.
• The PAN setting affects all voices. - The PAN setting affects the keyboard sound only.
- In the normal play mode (i.e. single voice mode) only the RIGHT/1 setting is effective.
Pedal
![FUNCTION [PEDAL] LEFT PEDAL SOFT DAMPER RANGE L & R DAMPER MODE CONT.](/content/2025/01/114698/images/9a6a73fc0cb3d4b784fd3ee9eb4c4fddaad7c48b8080e4a869ffd6e234f8cc2a.jpg)
CVP-79A
![FUNCTION [PEDAL] 3 LEFT PEDAL SOFT DAMPER RANGE L & R](/content/2025/01/114698/images/acff965a6aebd32f0befbd00280e1d48ffbd475600e120c645a8ff6834bf9ba6.jpg)
CVP-69/69A/59S
■ Left Pedal Function
The left pedal has a number of functions which can be selected via the LEFT PEDAL function. Use the LEFT PEDAL ▲ and ▼ LCD buttons to select the desired function. The data dial and [+]/[-] buttons can also be used. The default setting — “SOFT” — can be instantly recalled by pressing the LEFT PEDAL ▲ and ▼ LCD buttons simultaneously.
| Soft | Pressing the soft pedal subtly reduces the volume and slightly changes the timbre of notes played. The SOFT function is automatically selected when the POWER switch is initially turned on. |
| Start/Stop | The left pedal performs the same function as the accompaniment section [START/STOP] button. For details on the START/STOP function, refer to the “Accompaniment” section, pages 30, 32. |
| Harmony On/Off | Allows the Harmony function (page 41) to be turned on or off as required while playing so that harmony can be applied only to specific notes or phrases. |
| Registration + | Steps through the registration memory locations so a completely different set of panel settings can be recalled each time the pedal is pressed. See page 60 for details on the registration memory. |
| Intro A/Fill to A | The left pedal performs the same function as the accompaniment section [INTRO A/FILL TO A] button. See pages 30, 32 for details. |
| Intro B/Fill to B | The left pedal performs the same function as the accompaniment section [INTRO B/FILL TO B] button. See pages 30, 32 for details. |
| Ending/rit. | The left pedal performs the same function as the accompaniment section [ENDING] button. See page 32 for details. |
| Break | Pressing the left pedal produces a break in the accompaniment for as long as the pedal is held. For details on the BREAK function, refer to the “Accompaniment” section, page 32. |
| Sostenuto (CVP-59S only) | The left pedal functions in the same way as the CVP-79A/69/69A sostenuto pedal (see page 26). |
■ Damper Range
Determines whether the damper pedal affects the right-hand, left-hand, or both voices in a split setup.
Press the DAMPER RANGE LCD button as many times as necessary to select the desired setting.
| R | The damper affects only the right-hand voice. (Default.) |
| L | The damper affects on the left-hand voice. |
| L&R | The damper affects both the left-hand and right-hand voices. |
NOTES
- The Left Pedal function setting is retained in memory even when the power is turned off if the BACKUP page PEDAL parameter is turned on (page 107).
NOTES
- If the left pedal is assigned to the "Registration +" function, the setting of the left pedal function in the registration memory is not recalled.
NOTES
- The Damper Range setting is retained in memory even when the power is turned off if the BACKUP page PEDAL parameter is turned on (page 107).
■ Damper Mode (CVP-79A only)
Sets the damper pedal for on/off or continuous operation (refer to page 26). Press the DAMPER MODE LCD button to alternately select the continuous and switch modes.
| CONT. | Continuous damper pedal operation. (Default.) |
| SWITCH | On/off damper pedal operation. |

- The Damper Mode setting is retained in memory even when the power is turned off if the BACKUP page PEDAL parameter is turned on (page 107).
MIDI 1
MIDI, the Musical Instrument Digital Interface, is a world-standard communication interface that allows MIDI-compatible musical instruments and equipment to share musical information and control one another. This makes it possible to create “systems” of MIDI instruments and equipment that offer far greater versatility and control than is available with isolated instruments. The MIDI parameters included in the CVP-79A/69/69A/59S’s three MIDI function pages provide extensive flexibility in adapting the Clavinova to just about any MIDI system.
The parameters contained in the MIDI 1 function page include the SEND CH, which determines the BASIC and LEFT/2 voice MIDI send channels, LOCAL control setting — on or off, and the CLOCK setting — internal or external.
![FUNCTION [MIDI 1] SEND CH BASIC LEFT/2 1 OFF LOCAL CLOCK ON INT.](/content/2025/01/114698/images/7989f94956fdbd9847eec56df4453f694e1eaf4ac22016a803f2e3a0ab9f2097.jpg)
Send Channel
In any MIDI control setup, the MIDI channels of the transmitting and receiving equipment must be matched for proper data transfer (there are 16 MIDI channels). This function sets the basic and left-hand/2nd MIDI send (transmit) channels of the CVP-79A/69/69A/59S. The LEFT/2 parameter applies to the left-hand voice in split keyboard setups and to the 2nd voice in the dual mode. All other keyboard data is transmitted via the BASIC channel. Both parameters can be turned OFF or set to any channel from 1 through 16.
Press the BASIC or LEFT/2 LCD button according to the channel you want to set, then use the data dial or [+]/[-] buttons to set the channel as required.
● MIDI Reception
The CVP-79A/69/69A/59S always receives MIDI data in the “Multi-Timbre” mode. This is a mode in which the Clavinova voices can be independently controlled on different MIDI channel numbers (1 through 16) by an external MIDI device.

- The Send Channel settings are retained in memory even when the power is turned off if the BACKUP page MIDI parameter is turned on (page 107), otherwise the default BASIC send channel is 1 and the default LEFT/2 send channel is OFF.
■ Local Control ON/OFF
“Local Control” refers to the fact that, normally, the Clavinova keyboard controls its internal tone generator, allowing the internal voices to be played directly from the keyboard. This situation is “Local Control ON” since the internal tone generator is controlled locally by its own keyboard.
Local control can be turned off, however, so that the Clavinova keyboard does not play the internal voices, but the appropriate MIDI information is still transmitted via the MIDI OUT connector when notes are played on the keyboard. At the same time, the internal tone generator responds to MIDI information received via the MIDI IN connector. This means that while an external MIDI sequencer, for example, plays the Clavinova's internal voices, an external tone generator can be played from the Clavinova keyboard.
Press the LOCAL LCD button to alternately turn local control ON and OFF.
Clock
This function determines whether the Clavinova's auto-accompaniment or song record/playback timing is controlled by the Clavinova's own internal clock or an external MIDI clock signal received from external equipment connected to the MIDI IN connector.
Press the CLOCK LCD button to alternately select the EXT. (external) or INT. (internal) clock mode.

- The Local setting is retained in memory even when the power is turned off if the BACKUP page MIDI parameter is turned ON (page 107), otherwise the default setting is ON.

- The Clock setting is retained in memory even when the power is turned off if the BACKUP page MIDI parameter is turned ON (page 107), otherwise the default setting is INT.
- If the Clock Mode is set to EXT. and a MIDI clock signal is not being received from an external source, the rhythm, ABC and other clock-dependent features will not operate.
MIDI 2
The “MIDI 2” function page contains the MIDI FILTER settings which can be used to turn transmission and reception of certain types of MIDI data on or off.
![FUNCTION [MIDI 2] 5 PROGRAM MIDI FILTER SEND & CONTROL START/STOP SEND & RECEIVE SEND & RECEIVE SEND & RECEIVE](/content/2025/01/114698/images/a92b08ed715d515cc234a4f61568dfb55baab9cc25b09e48ad6123dd2a12e0b9.jpg)
Program
Normally the Clavinova will respond to MIDI program change numbers received from an external keyboard or other MIDI device, causing the correspondingly numbered Multi-Timbre mode voice to be selected on the corresponding channel (the keyboard voice does not change). The Clavinova will normally also send a MIDI program change number whenever one of its voices is selected, causing the correspondingly numbered voice or program to be selected on the external MIDI device if the device is set up to receive and respond to MIDI program change numbers.
This function makes it possible to cancel program change number reception and transmission so that voices can be selected on the Clavinova without affecting the external MIDI device, and vice versa.
Press the PROGRAM LCD button to alternately turn program change number reception and transmission ON (SEND&RECEIVE) and OFF.
Control
Normally the Clavinova will respond to MIDI control change data received from an external MIDI device or keyboard, causing the corresponding Multi-Timbre mode voice to be affected by pedal and other “control” settings received from the controlling device (the keyboard voice is not affected). The Clavinova also transmits MIDI control change information when either of its pedals are operated.
This function makes it possible to cancel control change data reception and transmission if you do not want the Clavinova to be affected by control change data received from an external device or vice versa.
Press the CONTROL LCD button to alternately turn control change data reception and transmission ON (SEND&RECEIVE) and OFF.
■ Start/Stop
Normally the Clavinova will respond to MIDI start and stop commands received from an external MIDI device or keyboard, causing the auto-accompaniment or song record/playback functions to start or stop in the same way as the panel [START/STOP] button. The Clavinova also transmits MIDI start and stop commands when the corresponding functions are operated.
This function makes it possible to cancel start/stop command reception and transmission if you do not want the Clavinova to be affected by start/stop commands received from an external device or vice versa.
Press the START/STOP LCD button to alternately turn start/stop command reception and transmission ON (SEND&RECEIVE) and OFF.

NOTES
- The Program setting is retained in memory even when the power is turned off if the BACKUP page MIDI parameter is turned ON (page 107), otherwise the default setting is SEND&RECEIVE.

NOTES
- The Control setting is retained in memory even when the power is turned off if the BACKUP page MIDI parameter is turned ON (page 107), otherwise the default setting is SEND&RECEIVE.

NOTES
- The Start/Stop setting is retained in memory even when the power is turned off if the BACKUP page MIDI parameter is turned ON (page 107), otherwise the default setting is SEND&RECEIVE.
MIDI 3
The MIDI 3 function page contains the TRANSPOSE and SEND parameters which determine whether MIDI note data will be affected by the Transpose setting (page 91), and whether the ABC, rhythm, and harmony data will be transmitted via the MIDI OUT terminal.
![FUNCTION [MIDI 3] TRANSPPOSE RECEIVE SEND ON OFF SEND ABC&RHY HARMONY OFF OFF](/content/2025/01/114698/images/2bb2d321c43fc9de7053758b4ccb3143380af2897fff2c6129fd89f1e22cd9ed.jpg)
■ Transpose
The RECEIVE parameter determines whether MIDI note pitch received by the Clavinova will be affected by the setting of the Transpose function (see page 91), while the SEND parameter determines whether MIDI note pitch transmitted by the Clavinova will be affected by the setting of the Transpose function.
Press the RECEIVE or SEND LCD button to alternately turn transposition of received or transmitted MIDI data ON and OFF.
Send
These parameters determine whether MIDI data corresponding to ABC/rhythm and harmony playback will be transmitted via the MIDI OUT terminal. Press the ABC&RHY or HARMONY button to alternately turn transmission of the corresponding data ON (9–16ch / 6–8ch) or OFF. When on, the ABC and rhythm data is transmitted on MIDI channels 9 through 16, and the harmony data is transmitted on channels 6 through 8.
NOTES
- The actual note number received or transmitted is not affected. The transposition is produced by the MIDI control change RPN coarse tune data.
- The MIDI Transpose settings are retained in memory even when the power is turned off if the BACKUP page MIDI parameter is turned ON (page 107), otherwise the RECEIVE parameter is turned On and the SEND parameter is turned OFF.
NOTES
- The Send settings are retained in memory even when the power is turned off if the BACKUP page MIDI parameter is turned ON (page 107), otherwise both parameters are turned OFF.
- If you intend to send the ABC/rhythm or harmony data via MIDI, it is a good idea to set the BASIC and LEFT/2 channels (page 94) to the different channels than the ones used for ABC/rhythm (9...16) and harmony (6...8) data to avoid data conflict problems.
- If either of these parameters is on, the ABC/rhythm and/or harmony data will be sent even if the BASIC send channel is turned OFF.
Format
The FORMAT page provides access to the Disk Format function which allows new disks or disks formatted on other equipment to be “formatted” for use with the Clavinova.
The Clavinova uses only 3.5" 2DD or 2HD floppy disks. We recommend that you use Yamaha disks. Before you can use a new disk for recording, the disk must be formatted so that the Clavinova can recognize it and correctly write the music data onto it.
1 Insert the Disk To Be Formatted
Insert a new blank disk. Make sure that the disk's write protect tab is set to the “write” position (tab closed), and insert the new disk into the disk drive unit with the sliding door facing the drive slot and the label side of the disk facing upward. The disk should click securely into place, and the disk drive lamp should light briefly. The “Start disk format?” display will automatically appear if an unformatted disk is inserted. Press the OK LCD button to format the disk or the CANCEL LCD button to abort.
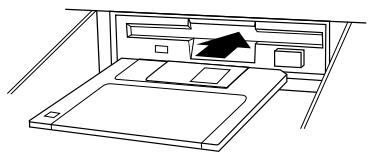
natural_image
Line drawing of a bedroom with a bed, blanket, and overhead desk (no text or symbols)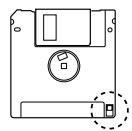
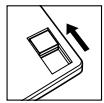
Write protect tab closed (unlocked — write enabled)

Start disk format ?
OK | CANCEL
2 Confirm & Start the Format Operation
When “Are you sure?” appears press the YES LCD button to confirm and continue, or the NO LCD button to cancel the operation. This extra confirmation step is necessary because formatting completely erases any data that is already on the disk — make sure that the disk you’re about to format does not contain any important data!
Formatting will begin the instant you select “YES”. The progress of the format operation will be indicated by a bar-graph on the display. When formatting is complete, you can go ahead and record using the Song Record function, use the Song Copy function to copy songs, or save other data to the disk.

Are you sure?
YES NO
NOTES
- If you access the FORMAT function page via the [FUNCTION] and PAGE buttons (i.e. you want to format a disk that is already inserted), press the START LCD button before proceeding to step 2 below.
![FUNCTION [FORMAT] 7 FORMAT START](/content/2025/01/114698/images/f64e9c06434eff8e7a7366a8e59c6e07e2233e19a5243a18b0c24acaf180cd04.jpg)
- "Protected disk!" will appear if a protected disk (DOC, etc.) that cannot be formatted is loaded in the drive.
- The "No disk!" alert will appear if you attempt to execute a format operation when there is no disk inserted in the disk drive.
- 2DD disks are formatted into 720 KB, while 2HD disks are formatted into 1.44 MB.
- The song record or playback mode will be turned off if the FORMAT operation is executed while they are on.
Registration
The REGISTRATION function page provides access to the Clavinova's Registration and All Setup file disk operations — save, load, delete, and rename.
Before selecting the Registration function, make sure that the disk you want to use for this operation is inserted in the disk drive, and both the song record or playback modes are not engaged.
![FUNCTION [REGISTRATION] REGISTRATION ALL SETUP LOAD SAVE DELETE RENAME START](/content/2025/01/114698/images/030079cbd2f1325df8687b3b5dda9a71fc5f13f3c6dd9b6acd5d22dfc8ca4f49.jpg)
1 Select a File Type......
Use either of the first two LCD buttons to select either REGISTRATION or ALL SETUP, according to the type of file you want to save, load, delete, or rename.
| Registration | A Registration file containing all data in the 25 or 15 Registration memories. |
| All Setup | An All Setup file containing all panel setup data in the list on page 122 including Registration data. |
2 Select a File Operation ....
Use the fourth LCD button to select the LOAD, SAVE, DELETE, or RENAME operation.
3 Press START ....
Press the START LCD button to begin the selected operation, then proceed according to the selected operation as described below:
■ SAVE ....
If you select SAVE the name entry display will appear and you will have to enter a name for the file to be saved.
![SAVE REGISTRATION FILE[_] !"#$%&'()*+,-./0123456789:;<=>?@ ABCDEFGHIJKLMNOPQRSTUVWXYZ[¥]^_^_ abcdefghijklmnopqrstuvwxyz(1) ▶ c.set c.del SAVE CANCEL](/content/2025/01/114698/images/e156837926e1feed96d3d6fba10b771b2c1583e6bef996e9a50c86d7a67bdc21.jpg)
NOTES
- The Registration function cannot be used when the song record or playback mode is engaged — the “Button not valid!” alert display will appear.
NOTES
• See page 58 for the list of data contained in the Registration memory.
An “empty” name appears in the upper right corner of the display. Use the > LCD button to position the underline cursor where you want to enter a character (file names can be up to 12 characters in length). Use the data dial and/or the [+]/[-] buttons to select the character you want to enter from the list in the center of the display, then press the c.set LCD button to enter the character at the current cursor position. Repeat this procedure until your name is complete. The c.del LCD button can be used to back up one space and delete a character.
When the name is complete press the SAVE LCD button to save the file with the name just entered, or CANCEL to abort.
If you enter a name that already exists on the disk, the “Same name! Overwrite?” alert will appear. In this case press OK if it’s OK to overwrite the original file with the new file, or CANCEL to abort the save operation.
RENAME
If you select RENAME, first use the FILE ▲ and ▼ LCD buttons to select the file you want to rename, then press the START LCD button to go to the name entry display. Enter a new file name in the same way as described for SAVE, above, then press the OK LCD button to rename the file with the name just entered, or CANCEL to abort. If you enter a name that already exists on the disk, the “Same name! Overwrite?” alert will appear. In this case press OK if it’s OK to overwrite the original file with the renamed file, or CANCEL to abort the rename operation.
LOAD
If you select LOAD, first use the FILE ▲ and ▼ LCD buttons to select the file you want to load, then press the START LCD button. When the “Are you sure?” prompt appears, press YES to load the file or NO to cancel.
DELETE
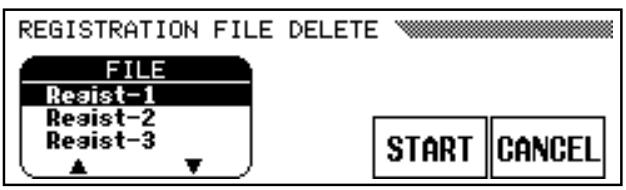
If you select DELETE, first use the FILE ▲ and ▼ LCD buttons to select the file you want to delete, then press the START LCD button. When the “Are you sure?” prompt appears, press YES to delete the file or NO to cancel.
Transform
The TRANSFORM function page allows CVP-79A/69/69A/59S performance (i.e. song) data files to be converted to CVP Performance format so that the data can be played on other Clavinova models, or to Yamaha Piano Format 1 or Piano Format 2 so that the data can be played on Yamaha Disklaviers.
Make sure that the disk (only 2dd type disks can be used for this operation) containing the song you want to convert is inserted in the disk drive, and the song record mode is not engaged. Then select the Transform function.
![FUNCTION [TRANSFORM] 9 1 [SONG_001.MID] CVP PERFORMANCE SONG PIANO FORMAT 1 1 TRANS PIANO FORMAT 2](/content/2025/01/114698/images/4a3708cb27f57c35b5ffc1972f27d11db5cdb492382ed7e869aa908d7e7c4123.jpg)
The available formats are compatible with the following Disklavier and Clavinova models:
| CVP PERFORMANCE | CVP-50/70/55/65/75/83S/85A/87A/89,CLP-705, DOM-30, DOU-10 |
| PIANO FORMAT 1 | MX80 series.Disklavier Grand.MX100 MarkII.Disklavier Grand MarkII |
| PIANO FORMAT 2 | MX100A.MX100B. |
The converted data will automatically be saved to a free song number and named according to the type of conversion selected:
| CVP PERFORMANCE | “C)XXXXXX” where “XXXXXX” is the original song name. |
| PIANO FORMAT 1/2 | “P)XXXXXX” where “XXXXXX” is the original song name. |
1 Select the Conversion Type
Use either of the first two LCD buttons to select the target format of the file: CVP PERFORMANCE, PIANO FORMAT 1, or PIANO FORMAT 2.
NOTES
- Only 2DD type disks can be used for this operation. If a 2HD disk is used the "2HD disk is not valid! Please copy to 2DD disk." alert display will appear. In this case copy the song you want to convert to a 2DD disk first (see "Song Copy" below), and then try the conversion again.
- This function can not be used when the song record mode is engaged — the "Button not valid!" alert display will appear.
- Only data on disk recorded by the CVP-79A/69/69A/59S can be converted (data in the Clavinova's internal memory cannot be converted until it is saved to disk).
- The copied data from the Disk Orchestra Collection disk (page 103) cannot be converted.
- If data converted to PIANO FORMAT 1/2 is played back on the Clavinova, tracks 1 and 2 will not sound.
- Record or edit functions cannot be executed on a converted song.
NOTES
- The original pre-converted data remains alive even after the conversion has been executed.
2 Select the Song Number to be Converted......
Use the SONG LCD button — or data dial or [+]/[-] buttons — to select the song number to be converted.
3 Start the Conversion ....
Press the TRANSFORM LCD button to begin the conversion process.
When the conversion process is finished, the “Completed! SONG No. XX” message will appear to inform you as to the SONG No. into which the data was saved.
Song Copy
Song data can be “backed up” by copying to a new song number or a different disk, as follows: (Make sure that the song record mode is not engaged before proceeding.)
![FUNCTION [SONG COPY] 1 [CVP-Sona:01 ] 2 [ ] DISK 1 - 1 SONG→ 1 SONG 2 COPY](/content/2025/01/114698/images/02ab0453f4c9c38df0f2b5e83f454a2a67da4b2c1bba09a9f73ebf0909ac712e.jpg)
![FUNCTION [SONG COPY] 1 [CVP-Song:01 ] DISK 2 SONG→ 1 DISK 1 - 1 DISK 1 - 2 COPY](/content/2025/01/114698/images/4dcc3bde731c1302e73143d20b9573167854cd89d0fd5b4efa29ba7c7c3d2dee.jpg)
1 Insert a Disk, Select the Song Copy Function, & Select the Type of Copy Operation ....
Insert the disk containing the song you want to copy, select the Song Copy function, and use either of the first two LCD buttons to select “DISK1 - 1” to copy to a different song within the same disk, or “DISK1 - 2” to copy to a different disk.
2 Select the Source Song Number ....
Use the SONG→ LCD button to select the song you want to copy. The data dial and [+]/[-] buttons can also be used once the SONG→ parameter has been selected. The selected song name will appear in the upper right corner of the display.
3 Select the Destination Song (DISK 1 – 1 type copy) ..
This step is for the DISK 1 – 1 type copy only. If you have selected the DISK 1 – 2 type copy, pass this step and proceed to the next 4 step.
Use the SONG button to select the song number you wish to copy to (i.e. the destination song number). The data dial and [+]/[-] buttons can also be used once the SONG parameter has been selected. If you select a song number that already contains data, that data will be overwritten by the new song data. If the destination song already contains data, the name of the song file will appear in the middle right corner of the display.
NOTES
- The song copy function cannot be used when the song record mode is engaged—the “Button not valid!” alert display will appear.
- If the Clavinova's internal memory contains song data, the "CVP-DISK" copy mode will be automatically selected to copy the internal memory data to disk (see the "Copying Data Recorded Without a Disk" below) and the "DISK 1 – 1" or "DISK 1 – 2" copy mode cannot be selected. In this case, copy the internal memory data to disk first, if you want to keep the data, and delete the internal memory data by using the Song Delete function (page 104). Then try the "DISK 1 – 1" or DISK 1 – 2" copy operation again.
- Only song data recorded on the CVP-79A/69/69A/59S and Disk Orchestra Collection orchestra and rhythm data can be copied using this function.
- Data cannot be copied to Disk Orchestra Collection disks, Disklavier disks, or any write-protected disk.
4 Start Copying
Press the COPY LCD button to begin the actual copy operation. If you are copying to the same disk the “Are you sure?” confirmation prompt will appear. Press the OK LCD button to continue, or NO to cancel.
If you choose to copy to a different disk, the “No. of disk exchanges” display will appear to inform you of the number of times the disk will have to be exchanged, because you may have to exchange the source and destination disks a few times if the song being copied is long and complex. Press OK to continue, or CANCEL to abort. If you press OK, the Clavinova will prompt you to insert the source and destination disks as required. Insert the source or destination disk accordingly.
| INSERT DISK 1 | Insert source disk. |
| INSERT DISK 2 | Insert destination disk. |
The first time the destination disk is inserted, the “Please select destination song No.” display will appear. Use the SONG ▼▲ LCD buttons, or data dial or [+]/[-] buttons, to select the destination song number. If the destination song already contains data, the name of the song file will appear along with the song number, and the data will be overwritten with the new song data. Press OK to execute the copy operation or CANCEL to abort.
While the data is being copied the number of times the disks will have to be exchanged to complete the copy operation will be shown on the display.
● Copying Disk Orchestra Disks ([ORCH/3-10TR] and [RHYTHM] parts only)
All Disk Orchestra data except the right-hand and left-hand parts can be copied to a separate disk by following the standard DISK 1 – 2 copy procedure outlined above. The copied data cannot, however, be copied a second time to another disk.
● Copying Data Recorded Without a Disk
If you've used the Song Record function to record data without first loading a disk: insert a formatted disk, select the Song Copy function, then select the destination song number and copy as described above. The “CVP - DISK” copy mode will automatically be selected and the “CVP” will be selected as the source song when the internal memory contains song data.
![FUNCTION [SONG COPY] CVP MEMORY 1 [ ] CVP - DISK SONG→ CVP SONG 1 COPY](/content/2025/01/114698/images/8cfdfd56aa6fd0b5ccb9ff68c83a38d3e999ed50d3d7b84864c57c4030791d0d.jpg)
NOTES
- The copy operation is not effective if the same song numbers are selected as the Source song and the Destination song in the DISK1 – 1 type copy. In this case the "Button not valid!" alert will appear.

No. of disk exchanges (3)
OK CANCEL

Insert Disk 2. (1/3)
CANCEL

Please select destination songs No.
SONG 1[SONG_001.MID]
OK CANCEL
NOTES
- Tracks 1 and 2 of a copied DOC song can be recorded, but tracks 3 through 16 cannot be recorded.
- The Phrase Repeat function (page 69) cannot be used on a copied DOC song.
NOTES
- The "DISK 1 – 1" and "DISK 1 – 2" copy modes cannot be selected when the internal memory contains song data.
Song Delete
You can delete any song from a loaded disk as follows:
(Make sure that the song record mode is not engaged before proceeding.)
![FUNCTION [SONG DELETE] 11 SONG 1 [SONG_001.MID] DELETE](/content/2025/01/114698/images/c9f34cdb592a07b56e5dda55a06a6dea50cdfb3085418ffdfb4da68fe704acaa.jpg)
1 Insert a Disk & Select the Song Delete Function......
Insert the disk containing the song you want to delete and select the Song Delete function.
2 Select the Song to Delete ....
Use the SONG ▲ and ▼ buttons to select the song number you wish to delete. The data dial and [+]/[-] buttons can also be used. It is also possible to delete song data in the internal memory: select “CVP” instead of a song number. (“CVP” will appear and can be selected only when the internal memory contains data.)
3 Confirm & Execute the Delete Operation ....
Press the DELETE LCD button — “Are you sure?” will appear on the display. Press the YES LCD button to immediately delete the selected song, or the NO LCD button if you wish to cancel the operation.
NOTES
- The song delete function cannot be used when the song record mode is engaged — the “Button not valid!” alert display will appear.
- Only song data recorded on the CVP-79A/69/69A/59S can be deleted using this function.
- Data cannot be deleted from write-protected disks.
Micro Tuning
The Micro Tuning Feature makes it possible to individually tune each key on the Clavinova keyboard in order to match different tuning standards. The pitch of each key can be raised or lowered by a maximum of 100 cents (approximately) from the standard pitch.
![FUNCTION [MICRO TUNING] 12 Play one key→C#3 TUNE 0 cent LOAD SAVE DELETE RENAME START](/content/2025/01/114698/images/7f36d4254b0b5352373dbad717d6642494c075ec31500122ce246577e02fcf95.jpg)
1 Select the Micro Tuning Function......
2 Select a Key ....
Select the key you want to tune by pressing the key on the keyboard. The selected key will appear on the display.
3 Tune
Use the TUNE s and t buttons to tune the selected key as required. The data dial and [+]/[-] buttons can also be used. You can play the key being tuned to check the sound during this operation. The maximum tuning range is ±100 cents (100 cents = one semitone). The normal tuning ( ±0 cent) for the selected key can be instantly recalled by simultaneously pressing the TUNE s and t buttons.
4 Repeat as Necessary ....
Repeat steps 2 and 3 until all the required keys have been tuned.

- The Micro-Tuning settings are retained in memory even when the power is turned off if the BACKUP page TUNE/MICRO TUNING parameter is turned ON (page 107), otherwise all keys are set to "0".
■ Disk Operations: Saving, Loading, Renaming, and Deleting Micro-tuning Files
Make sure that the disk you want to use for this operation is inserted in the disk drive, and both the song record or playback modes are not engaged before proceeding.
![FUNCTION [MICRO TUNING] 12 Play one key→C#3 TUNE 0 cent LOAD SAVE DELETE RENAME START](/content/2025/01/114698/images/62149a0f57ba49855ebb8f5f8de91ad37b6bcbca771cd3ee36a60c7b2417b30e.jpg)
1 Select a File Operation ....
Use the fourth LCD button to select the LOAD, SAVE, DELETE, or RENAME operation.
2 Press START ....
Press the START LCD button to begin the selected operation, then proceed according to the selected operation as described below:

- The Micro Tuning Disk Operations cannot be used when the song record or playback mode is engaged — the "Button not valid!" alert will be displayed.
■ SAVE
If you select SAVE the name entry display will appear and you will have to enter a name for the file to be saved.
![SAVE MICRO TUNING FILE[_] !"#$%&'()*+,-./0123456789:;<=>?@ ABCDEFGHIJKLMNOPQRSTUVWXYZ[¥]^-# abcdefghijklmnopqrstuvwxyz(1) ► c.set c.del SAVE CANCEL](/content/2025/01/114698/images/50c8dd556c1c855aa2eb32d25e4e7eaadbd2134d6c0961d9cf7cf990c3603657.jpg)
An “empty” name appears in the upper right corner of the display. Use the > LCD button to position the underline cursor where you want to enter a character (file names can be up to 12 characters in length). Use the data dial and/or the [+]/-] buttons to select the character you want to enter from the list in the center of the display, then press the c.set LCD button to enter the character at the current cursor position. Repeat this procedure until your name is complete. The c.del LCD button can be used to back up one space and delete a character.
When the name is complete press the SAVE LCD button to save the file with the name just entered, or CANCEL to abort.
If you enter a name that already exists on the disk, the “Same name! Overwrite?” alert will appear. In this case press OK if it’s OK to overwrite the original file with the new file, or CANCEL to abort the save operation.
RENAME
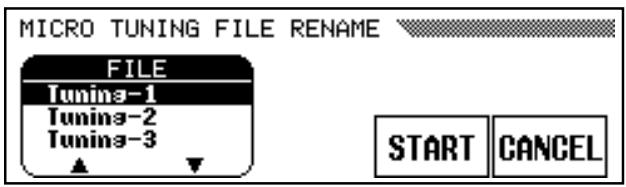
If you select RENAME, first use the FILE ▲ and ▼ LCD buttons to select the file you want to rename, then press the START LCD button to go to the name entry display. Enter a new file name in the same way as described for SAVE, above, then press the OK LCD button to rename the file with the name just entered, or CANCEL to abort. If you enter a name that already exists on the disk, the “Same name! Overwrite?” alert will appear. In this case press OK if it’s OK to overwrite the original file with the renamed file, or CANCEL to abort the rename operation.
LOAD
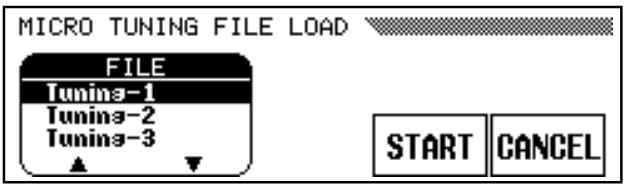
If you select LOAD, first use the FILE ▲ and ▼ LCD buttons to select the file you want to load, then press the START LCD button. When the “Are you sure?” prompt appears, press YES to load the file or NO to cancel.
DELETE
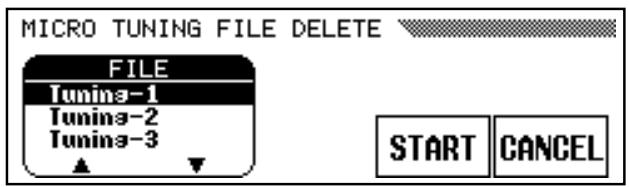
If you select DELETE, first use the FILE ▲ and ▼ LCD buttons to select the file you want to delete, then press the START LCD button. When the “Are you sure?” prompt appears, press YES to delete the file or NO to cancel.
Backup
This function allows backup of various parameter settings to be turned on or off as required. To turn backup for a parameter group on or off first use the ▲ and ▼ LCD buttons, data dial, or [+]/[-] buttons to select the parameter group (see list below), and then use the ON/OFF LCD button to turn the selected parameter group on or off. An asterisk (“*”) appears before the name of a parameter group when backup is turned on.
![FUNCTION [BACKUP] VOICE SETTING TUNE/MICRO TUNING PEDAL MIDI ON OFF](/content/2025/01/114698/images/8e89cde095c7b96c1088594e9828a9f3d2ccdd6574a699267f37b9d94683520f.jpg)
- VOICE SETTING
• TUNE/MICRO TUNING - PEDAL
- MIDI
- STYLE SETTING
- ABC MODE
- SONG SETTING
- REGISTRATION
- POPUP & ALERT
* See page 122 for the list of parameters contained in each parameter group.
Parameters that are backed up will be retained in memory for about a week if the Clavinova is not turned on during this time. All parameters will be reset to their default values if the power remains off for longer than about a week. To ensure that your backed-up settings are maintained, turn the power on for a few minutes at least once a week.

NOTES
- The default settings for the BACKUP function are ABC MODE, REGISTRATION, and POPUP & ALERT ON, the other parameter groups OFF.
- The LCD contrast, help language and this backup on/off setting itself are always backed up.
Recall
This function can be used to recall the initial factory settings for a range of parameters — individually or all at once.
To recall a parameter group first use the ▲ and ▼ LCD buttons, data dial, or [+]/[−] buttons to select the parameter group (see list below), and then press the START LCD button. When the “Are you sure?” confirmation prompt appears, press YES to recall or NO to cancel.
![FUNCTION [RECALL] VOICE SETTING STYLE SETTING SONG SETTING REGISTRATION START](/content/2025/01/114698/images/554d89015ff0ab6acbc64b265d8416637485d9323d92047783ec2daa67e3d609.jpg)
- VOICE SETTING
- STYLE SETTING
- SONG SETTING
- REGISTRATION
- MIDI
- ALL SETUP
* See page 122 for the list of parameters contained in each parameter group.

NOTES
- The initial LCD contrast, help language and the above backup on/off settings are not recalled by this function. These and all other settings can be reset to the initial factory values by turning the power on while holding the C7 key. When this is done the “Back up data erased and replaced by Factory data.” message will appear for a few seconds.
Popup Time
Sets the amount of time the pop-up displays remain on the display screen before disappearing. The pop-up time of the voice/style displays can be set independently from all other pop-up displays.
Use the VOICE/STYLE or OTHERS [▲] and [▼] LCD buttons to set the pop-up time between 1 and 20 seconds as required. The data dial and [+]/[-] buttons can also be used once the desired parameter has been selected. The default pop-up time (8 seconds) for either parameter can be recalled by pressing the corresponding ▲ and ▼ LCD buttons simultaneously.
![FUNCTION [POPUP TIME] VOICE/STYLE 8 sec OTHERS 8 sec](/content/2025/01/114698/images/f6931af2e883c6ec874a886a94254f4cd2819d27c5470f58ecfee74926ba41b0.jpg)
Song List Priority
This function determines whether a GM (general MIDI)/SMF or DOC (Disk Orchestra Collection) file will take priority and be used for playback when encountered on the same disk. Use the corresponding LCD button to select GM or DOC (default) as required.
![FUNCTION [SONG LIST PRIORITY] 16 DOC GM](/content/2025/01/114698/images/1fc7dea13bba1efd2ad1dbbe5f52c9f81bd9b65308c981c785f3f048587fe738.jpg)
Alert Sound
This function allows you to select one of six “Alert Voices” which will sound when an error is encountered, and set the alert volume.
Use the VOICE ▲ and ▼ LCD buttons to select the alert voice. The data dial and [+]/[-] buttons can also be used once the VOICE parameter is selected. Press the VOLUME LCD button to select the volume parameter and use the data dial or [+]/[-] buttons to set the volume as required. The volume range is from “0” (no alert sound) to “100” (maximum volume). The default volume level (“50”) can be recalled instantly by pressing the [+] and [-] buttons simultaneously while the VOLUME parameter is selected.
![FUNCTION [ALERT SOUND] 17 VOICE Steel Drums VOLUME 50 ⊕](/content/2025/01/114698/images/af3b4d9668f912fae46cc6c166b999b8321c6581665e4d294e465e762cfeb959.jpg)

- The default alert voice is "Steel Drums", and the alert voice will sound automatically when you change the alert voice.
| [2CXY] No disk ! | When a disk related function button is pressed (ex. [PLAY]) and there is no disk in the disk drive this prompt will appear. Put the proper disk in the drive and redo the procedure. |
| [X83X] No sons ! | When renaming or copying the original song data this prompt will alert you in the event that there is no song data in the selected song number, or in the disk. Re-select a data-containing song, or put a disk with song data into the floppy disk drive. |
| [XW8K] No file ! | This alert appears if there is no Registration Memory, Micro Tuning, or related data other than song data on the currently inserted disk when you attempt a file-related operation. Insert a disk with the proper data and do the procedure again. |
| [T83S] Start disk format ?OK CANCEL | This message appears when a new disk or a non Clavinova Formatted disk has been put into the disk drive. Press OK if you want to format the disk. Press CANCEL if you want to abort the formatting process. |
| [SYCY] Protected disk ! | The current disk is write protected and cannot be written to. Insert a disk that is not write protected and try the procedure again. |
 Protected sons ! Protected sons ! | You have attempted to edit or record over a song that was made on another system (i.e. computer sequencer, etc.). Song data made on other systems cannot be edited or recorded over. You can however, edit or record over any song that you have recorded yourself on the CVP-79A/69/69A/59S. |
 Button not valid ! Button not valid ! | A button that does not have a function in the current mode has been pressed. (ex. the [GUIDE] button has been pressed when the Song Play mode is not engaged.) |
 Clean the disk head !OK Clean the disk head !OK | The disk drive heads are dirty and should be cleaned. Clean the heads with a commercially-available floppy disk head cleaner. |
 Disk read/write error !OK Disk read/write error !OK | An error occurred while writing to or reading from the disk. Try the operation again; if the error occurs a second time the disk or drive may be faulty. If the drive has been used for some time the heads may be dirty. Clean the heads with a commercially-available floppy disk head cleaner. If the error still occurs with one disk and not others the disk should be considered faulty and discarded. If the error occurs with all disks the drive may be at fault. Refer the problem to your Yamaha dealer. |
| [242T] Completed ! | The disk operation (formatting, etc.) or data procedure is finished. |
| [VZZW0] Don't remove the disk !0% 50% 100% | The disk is currently being accessed and must not be ejected from the drive. |
| [SWC4] Are you sure ?YES NO | When an operation such as DELETE is selected, this prompt will confirm that you want to go ahead with the operation. Press YES to continue or NO to abort the operation. |
| [TW02] Disk full !OK | The currently loaded disk is full and cannot hold anymore data. Delete any unnecessary data in the current disk, use a disk that has more available space or use a new disk.If this appears during song recording (in this case “OK” doesn’t appear), recording will stop and recorded data up to that point will be saved automatically. |
| [SDZH] Too many files !OK | A single disk can only hold up to 60 files for each data type (song, style, registration, etc.). If this message appears, insert a new disk or delete any unnecessary files in the current disk. (Style Files cannot be deleted from the disk.) |
| [2736] Same name ! Overwrite ?OK CANCEL | A file with the same name exists. Press OK if it is OK to overwrite the original file with new data or press CANCEL to abort the operation. |
 No. of disk exchanges(3)OK CANCEL No. of disk exchanges(3)OK CANCEL | Informs you of the number of times the disks must be exchanged when copying a song to a different disk before the song copy operation starts. |
| [T276] Please select destination song No.SONG1(SONG_001.NID)OK CANCEL | When copying a song from the source disk to another disk, this message will ask you to specify the song number to which the song is to be copied in the destination disk when it is first inserted. |
| [XAT2] Insert Disk 1. (2/3)CANCEL | Insert the source disk to be copied in the song copy to a different disk operation. |
| [T250] Insert Disk 2. (1/3)CANCEL | Insert the destination disk to be copied to in the song copy to a different disk operation. |
| [240Y] Save recorded data ?YES NO CANCEL | If the [EXIT] button is pressed prior to storing the recorded data in the CHORD SE-QUENCE function this confirmation prompt will appear. |
| [SATX] Write edited data ?YES NO CANCEL | In the Song Recording INITIAL EDIT mode, if the [EXIT] button is pressed prior to writing the edited data, this confirmation prompt will appear. |
| [DTX0] 2HD disk not valid!Please copy to 2DD disk.OK | Only 2DD floppy disks can be used when converting data to the CVP Performance format or Piano format. If a 2HD disk is used this alert will appear. |
| [CS48] Completed ! SONG No.1 | After the song data has been converted to CVP Performance format or Piano Format this message will inform you as to the SONG No. into which the data was saved. |
| [C28A] CUSTOM STYLEPlease select a source STYLE. | This message appears when the CUSTOM STYLE mode is engaged. |
| [23V4] Clear STYLE ?OK CANCEL | When you attempt to change the beat in the CUSTOM STYLE mode this confirmation prompt will appear. |
| [2C2C4] Clear SECTION ?OK CANCEL | When you attempt to change the number of measures in the CUSTOM STYLE mode this confirmation prompt will appear. |
 Clear PART ?OK CANCEL Clear PART ?OK CANCEL | When the source style is a preset style or a style loaded from the optional Style File disk, if you are recording new parts in the CUSTOM STYLE mode prior to clearing data from parts other than R1 and R2, this confirmation prompt will appear. |
| [H2X4] Store CUSTOM_X?NEMORY No.1(TEMP.STYLE )OK CANCEL | When the STORE LCD button is pressed in the CUSTOM STYLE mode or when a new source style is selected prior to storing the current style data this confirmation prompt will appear. |


| Store CUSTOM_X? | When the [EXIT] button is pressed in the CUSTOM STYLE mode prior to storing the current style data this confirmation prompt will appear. |
| [100K] | |
| [100K] | |
| [100K] | If the CUSTOM STYLE mode's RECALL SECTION operation cannot be carried out, because the time signature has been changed, this alert will appear. |
| [100K] | If the data has not been stored in memory before saving to disk in the CUSTOM STYLE mode, this will prompt you to store the data before proceeding. |
| [100K] | If there is not enough memory to store the data in the CUSTOM STYLE store operation, this alert will be displayed. It will be necessary to delete a style or simplify the current style before storing the new style. |
| [100K] | Appears when DELETE is selected in the previous message. |
| [100K] | The memory has become full during recording or editing in the CUSTOM STYLE mode. It will be necessary to simplify the style.If this appears during song recording (in this case “OK” doesn’t appear), recording will stop and recorded data up to that point will be saved automatically. |
| [100K] | Some Style Files are too large for the LISTEN function to handle in the STYLE FILE LOAD mode. In this case the data must be loaded into the internal memory in order to be played. |
| [100K] | When you attempt to LOAD a Style File and there is not enough memory to hold the specified file this alert will be displayed. It will be necessary to delete a style before loading the new style. |
| [100K] | As long as the Clavinova is regularly used, data is retained in memory. This message will appear if the power has not been turned on for quite some time (approximately one week). In this case all data will be initialized to the factory-preset values. This message also appears when you intentionally recall all the factory data by turning the power on while holding the C7 key (see note on page 108). |
| [100K] | A problem has been detected in the hardware system during power up. Refer the problem to your Yamaha dealer. |
Although the Clavinova is a self-contained musical instrument that simply be plugged into the AC mains outlet and played, it also features a number of connectors for system expansion.
AUX IN L/L+R and R Jacks
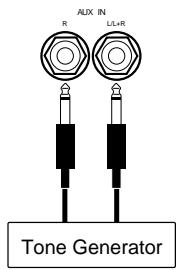
These jacks are intended primarily for use with external synthesizers or tone generator modules.
For example, the outputs of the synthesizer/tone generator can be to the Clavinova AUX IN jacks, allowing the sound of the synthesizer/tone generator to be reproduced via the Clavinova's internal amplifier and speaker system. For monaural signal input (when the connected device is monaural), use only the L/L+R jack.
AUX OUT L/L+R and R Jacks
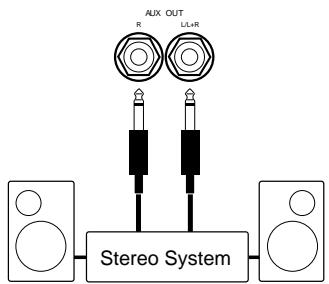
The AUX OUT L/L+R and R jacks deliver the output of the Clavinova for connection to an instrument amplifier, mixing console, PA system, or recording equipment. If you will be connecting the Clavinova to a monaural sound system, use only the L/L+R jack. When a plug is inserted into the L/L+R jack only, the left- and right-channel signals are combined and delivered via the L/L+R jack so you don't lose any of the Clavinova's sound.
MIDI IN, THRU and OUT Connectors
(MIDI IN and OUT on the CVP-59S)
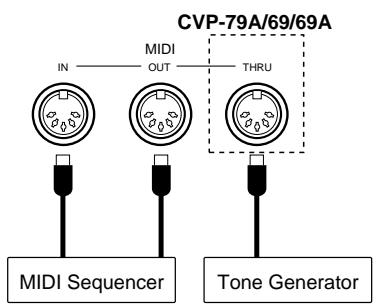
The MIDI IN connector receives MIDI data from an external MIDI device (such as a synthesizer, sequencer, music computer, etc.) which can be used to control the Clavinova. The MIDI THRU connector provided on the CVP-79A, 69, and 69A re-transmits any data received at the MIDI IN connector, allowing “chaining” of several MIDI instruments or other devices. The MIDI OUT connector transmits MIDI data generated by the Clavinova (e.g. note and velocity data produced by playing the Clavinova keyboard).
EXP PEDAL Jack (CVP-79A)
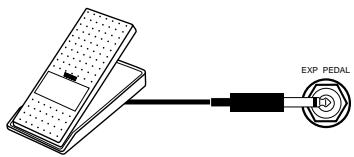
An optional Yamaha FC7 Foot Controller can be plugged into this jack for foot volume (expression) control of the keyboard sound only (i.e. expression doesn't affect the auto-accompaniment sound or disk playback). Press the pedal forward to increase volume, and backward to decrease volume.

NOTES
- The input signal from the AUX IN jacks is delivered to the AUX OUT jacks, but is not affected by the Clavinova's volume control or reverb effect.

CAUTION
- The AUX OUT jack signal must never be returned to the AUX IN jacks, either directly or through external equipment.
If you encounter what appears to be a malfunction, please check the following points before assuming that your Clavinova is faulty.
1. No Sound When the Power is Turned On
Is the AC plug properly connected to the Clavinova and an AC wall outlet? Check the AC connection carefully. Is the MASTER VOLUME control turned up to a reasonable listening level?
2. No Rhythm, ABC, or Song Playback Sound
Check the ABC/SONG VOLUME control setting. No sound is produced if it is set to the minimum position.
3. The Clavinova Reproduces Radio or TV Sound
This can occur if there is a high-power transmitter in your vicinity. Contact your Yamaha dealer.
4. Intermittent Static Noise
This is usually due to turning on or off a household appliance or other electronic equipment which is fed by the same AC mains line as your Clavinova.
5. Interference Appears On Radio or TV Sets Located Near the Clavinova
The Clavinova contains digital circuitry which can generate radio-frequency noise. The solution is to move the Clavinova further away from the affected equipment, or vice versa.
6. Distorted Sound When the Clavinova is Connected to An External Amplifier/Speaker System
If the Clavinova is connected to a stereo system or instrument amplifier and the sound is distorted, reduce the setting of the Clavinova volume control to a level at which the distortion ceases.

natural_image
Black and white icon of an information symbol (no text or numbers present)Options
- BC-8 Bench
A stable, comfortable bench styled to match your Yamaha Clavinova.
● HPE-160 Stereo Headphones
High-performance lightweight dynamic headphones with extra-soft ear pads.
● KC-883 Key Cover for the CVP-59S
A convenient way to keep your keyboard clean and dust-free.

NOTES
- Some items may not be available in certain areas.
A| A-B repeat 70
ABC freeze 60
Accompaniment 28
Alert & error displays, custom style ..... 53
Alert sound 109
All delete, chord sequence 82
Auto Bass Chord 34
Aux in jacks 113
Aux out jacks 113
B| Backup.... 107
Backup parameter list 122
Bank, registration 59
Beat display 31
Beat, custom style 46
Break, left pedal 32
C| Center pedal 26
Check play, chord sequence 82
Chord assist 40
Chord sequence recording 80
Clock 95
Connectors 113
Contrast button 11
Control change 96
Custom style 45
Custom style playback 52
CVP-59S assembly 150
CVP-69/69A assembly 142
CVP-79A assembly 136
D| Damper mode (CVP-79A) 94
Damper pedal 26
Damper range 93
Delete, chord sequence 101
Delete, registration file 82
Demo tunes 14
Demonstration Playback 13
Detune depth 18
Disk orchestra collection playback ..... 61
Disk styles, loading 55
Disk, custom style 52
Display 8
Display hold button 9
Drum/key assignment list 121
Dual mode 17
F | Effect depth ...... 25
Effect type list 24
Effects, custom style 51
End mark, chord sequence 82
End, chord sequence 82
Exit button 10
Expression Pedal 7
Expression pedal jack 113
F | Fast forward 70
Fill-ins 32
Fingered accompaniment 36
Fingering chart 123
Floppy Disk Handling 2
Format, disk 98
Full keyboard accompaniment ...... 37
G| Guide modes 67
H | Harmony .... 41 Headphones .... 3 Help function .... 11
| Initial edit 85
Introduction 30
K| Key Cover 3
Keyboard percussion 16
Keyboard utilities 91
| LCD buttons 8
Left pedal function 93
Left pedal 27
Left pedal, harmony 43
Load, registration file 100
Local control 95
M| Memory backup .... 12
Messages 110
Metronome 33
Micro tuning 104
Micro tuning disk operations ...... 105
MIDI 1 utilities 94
MIDI 2 utilities 95
MIDI 3 utilities 97
MIDI connectors 113
MIDI data format 124
MIDI implementation chart 156
MIDI reception 94
Mixer button 10
Multi-track recording & playback 75
Music data, playing other types .... 71
Music Stand 3
Mute 64
N| Name, custom style 49
O| Octave shift.... 91
One touch setting 44
Options 114
P | Page buttons ...... 10
Pan 92
Panel controls 4
Part assignment 65
Part depth, reverb 23
Part selection 63
Pause 70
Pedal utilities 92
Phrase repeat 69
Playback start/stop 62
Polyphony 16
Popup time 109
Power Switch 3
Precautions 2
Preset recall, effect 25
Program change 96
Punch-in modes 79
Punch-in/out recording 78
Q | Quantize, custom style 48
Quantize, track 84
Quick recording 72
R | Recall.... 108
Recall section, custom style 50
Recording without a disk 89
Recording, song 72
Registration memory 58
Registration recall 60
Registration, disk 99
Rename, registration file 100
Renaming song files 87
Repeat 69
Reverb type 22
Rewind 70
Rhythm ON/OFF, chord sequence ..... 82
Right pedal 26
Root, chord 80
S | Second voice ...... 17
Send 97
Send channel 94
Single finger accompaniment 35
Small ABC 39
Song copy 102
Song delete 104
Song list priority 109
Song number selection 62, 73
Song playback 61, 89
Song recording 72
Song repeat 69
Sostenuto pedal 26
Sound utilities 92
Split mode 19
Split point 21
Split point, ABC 39
Split voices 19
Start, straight 30
Start, synchronized 31
Start, tap 31
Start/stop, MIDI 96
Stop 32
Store, custom style 50
Style clear 51
Style file load 55
Style list 120
Style selection 28
T | Tempo control 29
Time signature, custom style 46
Total depth, reverb 23
Touch sensitivity 91
Track delete 84
Track mix 83
Track modes 73, 75
Track quantize 84
Tracks, adding new 77
Transform 101
Transpose 91
Transpose, MIDI 97
Troubleshooting 114
Tune 92
Type, chord 80
U| Utility function selection 90
V| Voice balance, dual mode 18
Voice balance, split mode 20
Voice effects 24
Voice list 116
Voice selection 15
Voice selection, song 66
Volume, ABC/Song 6, 37
Volume, custom style 51
Volume, master 6
Volume, other 7
Volume, part 38
Volume, song 65
Volume, song part 66
- Bank LSB: "0" refers to GM system level 1 voice allocation. (Some GM voices not listed above are not selectable on the panel but sound when the corresponding program numbers are received.)
- Pan: c=Center, k=Keyboard Scaling Pan, d=Drum Kit Pan.
• Element: (S)=Stereo voice.
| Backup | Recall | Default | |
| VOICE SETTING Backup Off | |||
| Keyboard Voice | ○ | ○ | Grand Piano 1 |
| Keyboard Volume | ○ | ○ | 100 |
| Split Point | ○ | ○ | F#2 |
| Dual Mode | — | ○ | Off |
| Split Mode | — | ○ | Off |
| Dual Voice | ○ | ○ | Strings Slow |
| Split Voice | ○ | ○ | Acous. Bass 1 |
| Dual Balance | ○ | ○ | Center |
| Split Balance | ○ | ○ | Center |
| Dual Detune Depth | ○ | ○ | 5 |
| Reverb On/Off | ○ | ○ | On |
| Reverb Type | ○ | ○ | Hall 1 |
| Reverb Depth(Total, Rhythm, Bass,Chord, Keyboard) | ○ | ○ | 50 |
| Effect On/Off | ○ | ○ | Preset for each voice |
| Effect Type | ○ | ○ | Preset for each voice |
| Effect Depth(Main Voice)(Dual Voice, Split Voice) | ○ | ○ | Preset for each voice50 |
| Touch Sensitivity | ○ | ○ | Normal |
| Right/1 Octave Shift | ○ | ○ | 0 |
| Left Octave Shift | ○ | ○ | +1 |
| 2nd Octave Shift | ○ | ○ | 0 |
| Right/1 Pan | ○ | ○ | Center |
| Left Pan | ○ | ○ | Center |
| 2nd Pan | ○ | ○ | Center |
| Transpose | ○ | ○ | 0 |
| Voice within each group | ○ | ○ | First voice within each group |
| STYLE SETTING Backup Off | |||
| ABC On/Off | — | ○ | Off |
| Small ABC On/Off | — | ○ | Off |
| Harmony On/Off | — | ○ | Off |
| Harmony Type | ○ | ○ | Trio |
| Style | ○ | ○ | Pop Ballad 1 |
| Main A/B | — | ○ | Main A |
| Tempo | ○ | ○ | Preset for each style |
| Rhythm Volume | ○ | ○ | 90 |
| Bass Volume | ○ | ○ | 90 |
| Chord Volume | ○ | ○ | 90 |
| Pad Volume | ○ | ○ | 90 |
| Phrase Volume | ○ | ○ | 90 |
| Harmony Volume | ○ | ○ | 90 |
| Metronome | ○ | ○ | Normal |
| One Touch SettingSetup Selection(CVP-79A/69/69A) | ○ | ○ | First setup in the list |
| Style within each group | ○ | ○ | First style within each group |
| SONG SETTING Backup Off | |||
| Song List Priority | ○ | ○ | DOC |
| Guide Mode | ○ | ○ | Next Note |
| Part Assign | ○ | ○ | Part1=Track1, Part2=Off |
| MIDI Backup Off | |||
| Send Channel Right/1 | ○ | ○ | 1 ch |
| Send Channel Left | ○ | ○ | Off |
| Local On/Off | ○ | ○ | On |
| Clock Internal/External | ○ | ○ | Internal |
| Backup | Recall | Default | |
| Program Change Send & Receive/Off | ○ | ○ | Send & Receive |
| Control Change Send & Receive/Off | ○ | ○ | Send & Receive |
| Start/Stop Command Send & Receive/Off | ○ | ○ | Send & Receive |
| Transpose Receive On/Off | ○ | ○ | On |
| Transpose Send On/Off | ○ | ○ | Off |
| ABC & Rhythm Send On/Off | ○ | ○ | Off |
| Harmony Send On/Off | ○ | ○ | Off |
| TUNE/MICRO TUNING Backup Off | |||
| Tune | ○ | — | 440.0 |
| Micro-tuning | ○ | — | 0 |
| PEDAL Backup Off | |||
| Left Pedal Function | ○ | — | Soft |
| Damper Range | ○ | — | R |
| Damper Mode (CVP-79A) | ○ | — | Continuous |
| POPUP & ALERT Backup On | |||
| Voice/Style Popup Time | ○ | — | 8 |
| Others Popup Time | ○ | — | 8 |
| Alert Voice | ○ | — | Steel Drums |
| Alert Volume | ○ | — | 50 |
| ABC MODE Backup On | |||
| ABC Mode | ○ | — | Single Finger |
| REGISTRATION | ○ | ○ | Backup On |
| ALL SETUP | — | ○ | — |
* "REGISTRATION" includes all of the panel setup data in the 25 or 15 Registration memories. See page 58 for a list of data contained in the Registration memory.
* "ALL SETUP" includes all of the above parameters (including the “—” marked parameters) and REGISTRATION data.
- The LCD contrast, help language and this backup on/off setting itself are always backed up.
- The initial LCD contrast, help language and this backup on/off setting itself are not recalled by the recall function. These and all other settings can be reset to the initial factory values by turning the power on while holding the C7 key. Default Values: LCD contrast= 10, Help language= English
Example for "C" chords
If you're already very familiar with MIDI, or are using a computer to control your music hardware with computer-generated MIDI messages, the data provided in this section can help you to control the Clavinova.
- The Clavinova corresponds to a portion of the XG format, the Clavinova does not perfectly correspond to all XG parameters.
1. Channel Messages
1.1 Key On and Key Off
Receivable note range: C-2 to G8 (true voice A-1 to C7)
Velocity range: 1 to 127 (Value accepted only at Note On)
1.2 Control Change
If the Control Change Filter in Function [MIDI 2] is set to “ON” transmission and reception are disabled.
1.2.1 Bank Select
| Cntrl# | Parameter | Data Range |
| 0 | Bank Select MSB | 0:Normal, 127:Drum |
| 32 | Bank Select LSB | 0...127 |
A new bank selection does not become effective until receipt of the next Program Change message.
1.2.2 Modulation
| Cntrl# | Parameter | Data Range |
| 1 | Modulation | 0...127 |
1.2.3 Data Entry
| Cntrl# | Parameter | Data Range |
| 6 | Data Entry MSB | 0...127 |
| 38 | Data Entry LSB | 0...127 |
Sets the value for the parameter specified by RPN/NRPN.
1.2.4 Main Volume
| Cntrl# | Parameter | Data Range |
| 7 | Volume MSB | 0...127 |
1.2.5 Pan
| Cntrl# | Parameter | Data Range |
| 10 | Panpot MSB | 0...127 |
| 0 = left; 127 = right |
1.2.6 Expression
| Cntrl# | Parameter | Data Range |
| 11 | Expression MSB | 0...127 |
1.2.7 Damper
| Cntrl# | Parameter | Data Range |
| 64 | Damper MSB | 0...127 |
Half pedal continuous data is received and accepted.
1.2.8 Sostenuto
| Cntrl# | Parameter | Data Range |
| 66 | Sostenuto | 0...127 |
| (0-63:off, 64-127:on) |
1.2.9 Soft Pedal
| Cntrl# | Parameter | Data Range |
| 67 | Soft Pedal | 0...127 |
Half pedal continuous data is received and accepted.
1.2.10 Harmonic Content
Cntrl# Parameter Data Range
71 Harmonic Content 0...127
(0:-64, 64:+0, 127:+63)
Applies adjustment to the resonance value set by the voice. This parameter specifies relative change, with value 64 producing zero adjustment. As values get higher the sound becomes increasingly eccentric. Note that for some voices the effective parameter range is narrower than the legal parameter range.
1.2.11 Release Time
Cntrl# Parameter Data Range
72 Release Time 0...127
(0:-64, 64:+0, 127:+63)
Applies adjustment to the envelope release time set by the voice. This parameter specifies relative change, with value 64 producing zero adjustment.
1.2.12 Attack Time
Cntrl# Parameter Data Range
73 Attack Time 0...127
(0:-64, 64:+0, 127:+63)
Applies adjustment to the envelope attack time set by the voice. This parameter specifies relative change, with value 64 producing zero adjustment.
Depending on the particular voice type, Attack Time data will have little or no affect.
1.2.13 Brightness
Cntrl# Parameter Data Range
74 Brightness 0...127
(0:-64, 64:+0, 127:+63)
Applies adjustment to the cutoff frequency set by the voice. This parameter specifies relative change, with value 64 producing zero adjustment. Lower voices produce a softer sound. For some voices the effective parameter range is narrower than the legal parameter range.
1.2.14 Portamento Control
Cntrl# Parameter Data Range
84 Portamento Control 0...127
Message should be sent with Note On already sounding. The data value sets the portamento source key number.
The channel with change from the currently sounding pitch to the next received Note-On key using Portamento Time of 0.
1.2.15 Effect1 Depth (Reverb Send Level)
Cntrl# Parameter Data Range
91 Effect1 Depth 0...127
Adjusts the reverb send level.
1.2.16 Effect3 Depth (Chorus Send Level)
Cntrl# Parameter Data Range
93 Effect3 Depth 0...127
Adjusts the chorus send level.
1.2.17 Effect4 Depth (Variation Effect Send Level)
| Cntrl# | Parameter | Data Range |
| 94 | Effect4 Depth | 0...127 when Variation Connection = 1 (System) |
Adjusts the variation effect send level. Not effective if “Variation Connection” is set to 0 (Insertion).
1.2.18 Data Increment / Decrement (for RPN)
| Cntrl# | Parameter | Data Range |
| 96 | RPN Increment | 0...127 |
| 97 | RPN Decrement | 0...127 |
The data byte has no meaning.
This message adds or subtracts 1 to/from the Pitchbend Sensitivity, Fine Tune, and Coarse Tune MSBs. Note that the Increment (Decrement) message will not change a setting that has already reached its maximum (minimum) value. Incrementation or decrementation of the Fine Tune value never carries over to the Coarse Tune value.
1.2.19 NRPN (Nonregistered parameter number)
| Cntrl# | Parameter | Data Range |
| 98 | RPN LSB | 0...127 |
| 99 | RPN MSB | 0...127 |
First send the NPRN MSB and LSB to select the control parameter, then set the value by Data Entry.
The following NRPN values are supported.
NRPN Data entry
MSBLSB MSB Parameter Data Range
| 01 | 08 | mm | Vibrato Rate mm:00 - 40 -7F (-64 - 0 - +63) |
| 01 | 09 | mm | Vibrato Depth mm:00 - 40 -7F (-64 - 0 - +63) |
| 01 | 0A | mm | Vibrato Delay mm:00 - 40 -7F (-64 - 0 - +63) |
| 01 | 20 | mm | Filter Cutoff Freq. mm:00 - 40 -7F (-64 - 0 - +63) |
| 01 | 21 | mm | Filter Resonance mm:00 - 40 -7F (-64 - 0 - +63) |
| 01 | 63 | mm | EG Attack Time mm:00 - 40 -7F (-64 - 0 - +63) |
| 01 | 64 | mm | EG Decay Time mm:00 - 40 -7F (-64 - 0 - +63) |
| 01 | 66 | mm | EG Release Time mm:00 - 40 -7F (-64 - 0 - +63) |
| 14 | rr | mm | Drum Filter Cutoff Freq. mm:00 - 40 -7F (-64 - 0 - +63) rr:drum instrument note number |
| 15 | rr | mm | Drum Filter Resonance mm:00 - 40 -7F (-64 - 0 - +63) rr:drum instrument note number |
| 16 | rr | mm | Drum EG Attack Rate mm:00 - 40 -7F (-64 - 0 - +63) rr:drum instrument note number |
| 17 | rr | mm | Drum EG Decay Rate mm:00 - 40 -7F (-64 - 0 - +63) rr:drum instrument note number (Effects both Decay 1 and Decay 2) |
| 18 | rr | mm | Drum Instrument Pitch Coarse mm:00 - 40 -7F (-64 - 0 - +63) rr:drum instrument note number |
| 19 | rr | mm | Drum Instrument Pitch Fine mm:00 - 40 -7F (-64 - 0 - +63) rr:drum instrument note number |
| 1A | rr | mm | Drum Instrument Level mm:00 - 7F (0 to Max) rr:drum instrument note number |
| 1C | rr | mm | Drum Instrument Panpot mm: 00,01 - 40 -7F (Random, L – C – R) rr:drum instrument note number |
| 1Drr mm | Drum Instrument Reverb Send Level mm:00 - $7F (0 to Max)rr: drum instrument note number |
| 1Err mm | Drum Instrument Chorus Send Level mm:00 - $7F (0 to Max)rr:drum instrument note number |
| 1Frr mm | Drum Instrument Variation Send Level mm:00 - $7F (0 to Max)rr:drum instrument note number |
The LSB 14H-1FH (for drums) message will be accepted under the following conditions, the channel must be set to the drum mode, and drum setups 1 or 2 must be set to that channel. (Default = drum setup 1.)
Note: The CVP 79A/69/69A/59S contain 3 drum setups (1 Preset Drum & Drum Setup 1, 2). Preset Drum being the preset drum setup, its parameters cannot be rewritten.
1.2.20 RPN (Registered parameter number)
| Cntrl# | Parameter | Data Range |
| 100 | RPN LSB | 0...127 |
| 101 | RPN MSB | 0...127 |
| Default:7F 7FH | ||
The following parameters are supported.
NRPN Data entry
| MSB LSB MSB | Parameter | Data Range |
| 00H 00H mmH | -- | Pitchbend Sensitivitymm: 00-0cH(0-12 semitones:1 octave)Can be set up 1 octave, in semitone units.Default: 02HLSB is ignored. |
| 00H 01H mmH | 11H | Fine Tuningmm:00H-40H-7FH(-64-0-+63) |
| 00H 02H mmH | -- | Course Tuningmm:28H - 40H - 58H(-24-+24 semitones)LSB is ignored. |
| 7FH 7FH -- -- | RPN NullClears current RPN and NRPN number settings. Does not change internal parameter settings. | |
1.2.21 Channel Mode Messages
The following Channel Mode messages are supported. (But the actual mode is fixed to Poly and can not be changed.)
| 2nd byte | 3rd byte | |
| 120 | 0 | All Sound Off |
| 121 | 0 | Reset All Controllers |
| 123 | 0 | All Notes Off |
| 124 | 0 | Omni Off |
| 125 | 0 | Omni On |
| 126 | 0 ~ 16 | Mono |
| 127 | 0 | Poly |
1.2.21.1 All Sound Off
Switches off all sound from the channel. Does not reset Note On and Hold On conditions established by Channel Messages.
1.2.21.2 Reset All Controllers
Resets controllers as follows.
| Controller | Value |
| Pitchbend change | +-0 (center) |
| Modulation | 0 (off) |
| Expression | 127 (max) |
| Damper Pedal | 0 (off) |
| Sostenuto | 0 (off) |
| Soft Pedal | 0 (off) |
| Portamento Control | Resets portamento source note number |
| RPN | Sets number to null. (Internal data remains unchanged.) |
| NRPN | Sets number to null. (Internal data remains unchanged.) |
1.2.21.3 All Notes Off
Switches off all of the channel's “on” notes. Any notes being held by HOLD1 or SOSTENUTO continue to sound until HOLD1/SOSTENUTO goes off.
1.2.21.4 Omni Off
Same processing as for All Notes Off.
1.2.21.5 Omni On
Same processing as for All Notes Off.
1.2.21.6 Mono
Same processing as for All Sound Off.
1.2.21.7 Poly
Same processing as for All Sound Off.
1.3 Program Change
If the Program Change Filter in Function [MIDI 2] is set to “ON” transmission and reception are disabled.
1.4 Pitchbend
2. System Exclusive Messages
2.1 Parameter Change
The CVP 79A/69/69A/59S models support the following Parameter Change messages.
[UNIVERSAL REALTIME MESSAGE]
1) Master Volume
[UNIVERSAL NON-REALTIME MESSAGE]
3) General MIDI Mode On
[XG NATIVE]
1) XG System on
2) XG System Data parameter change
3) Multi Effect1 Data parameter change
4) Drum Setup Data parameter change
[Others]
1) Master tuning
2) Channel Detune
3) Volume & Expression Realtime Control off
2.1.2 Universal Realtime Message
2.1.2.1 Master Volume
| 11110000 | F0 | = Exclusive status |
| 01111111 | 7F | = Universal Realtime |
| 01111111 | 7F | = ID of target device |
| 00000100 | 04 | = Sub-ID #1=Device Control Message |
| 00000001 | 01 | = Sub-ID #2=Master Volume |
| 0sssssss | *SS | = Volume LSB |
| 0ttttttt | TT | = Volume MSB |
| 11110111 | F7 | = End of Exclusive |
| or | ||
| 11110000 | F0 | = Exclusive status |
| 01111111 | 7F | = Universal Realtime |
| 0xxxnnnn | XN | = When N is received N=0~F, whichever is received.x = don't care |
| 00000100 | 04 | = Sub-ID #1=Device Control Message |
| 00000001 | 01 | = Sub-ID #2=Master Volume |
| 0sssssss | SS | = Volume LSB |
| 0ttttttt | TT | = Volume MSB |
| 11110111 | F7 | = End of Exclusive |
The volume for all channels will be changed.
*Hexadecimal representation of 0sssss ss. (Same below)
2.1.3 Universal Non-Realtime Message
2.1.3.1 General MIDI Mode On
| 11110000 | F0 | = Exclusive status |
| 01111110 | 7E | = Universal Non-Realtime |
| 01111111 | 7F | = ID of target device |
| 00001001 | 09 | = Sub-ID #1=General MIDI Message |
| 00000001 | 01 | = Sub-ID #2=General MIDI On |
| 11110111 | F7 | = End of Exclusive |
| or | ||
| 11110000 | F0 | = Exclusive status |
| 01111110 | 7E | = Universal Non-Realtime |
| 0xxxnnnn | XN | = When N is received N=0~F, whichever is received. X = don't care |
| 00001001 | 09 | = Sub-ID #1=General MIDI Message |
| 00000001 | 01 | = Sub-ID #2=General MIDI On |
| 11110111 | F7 | = End of Exclusive |
When the General MIDI mode ON message is received, the MIDI system will be reset to its default settings.
This message requires approximately 50ms to execute, so sufficient time should be allowed before the next message is sent.
2.1.4 XG Native Parameter Change
| 11110000 | F0 | Exclusive status |
| 01000011 | 43 | YAMAHA ID |
| 0001nnnn | 1n | When n is received n=0~F, whichever is received.When n is transmitted n always=0. |
| 01001100 | 4C | Model ID of XG |
| 0aaaaaaa | aaaaaaa | Address High |
| 0aaaaaaa | aaaaaaa | Address Mid |
| 0aaaaaaa | aaaaaaa | Address Low |
| 0ddddddd | ddddddd | Data |
| | | | | |
| 11110111 | F7 | End of Exclusive |
Data size must match parameter size (2 or 4 bytes).
2.1.4.1 XG System On
| 11110000 | F0 | Exclusive status |
| 01000011 | 43 | YAMAHA ID |
| 0001nnnn | 1N | When N is received N=0~F, whichever is received.When N is transmitted N always=0. |
| 01001100 | 4C | Model ID of XG |
| 0aaaaaaa | 00 | Address High |
| 0aaaaaaa | 00 | Address Mid |
| 0aaaaaaa | 7E | Address Low |
| 00000000 | 00 | Data |
| 11110111 | F7 | End of Exclusive |
When the XG System On message is received, the MIDI system will be reset to its default settings.
The message requires approximately 50ms to execute, so sufficient time should be allowed before the next message is sent.
2.1.4.2 XG System Data parameter change
See Tables 1-1, 1-2.
2.1.4.3 Multi Effect1 Data parameter change
See Tables 1-1, 1-3.
2.1.4.4 Multi Part Data parameter change
See Tables 1-1, 1-4.
2.1.4.5 Drum Setup Data parameter change
See Tables 1-1, 1-5.
If operation is in XG mode, this message reinitializes all drum setup parameters.
The drum setup will not be reset if any changes are made from the CVP 79A/69/69A/59S front panel.
2.1.5 Other Parameter Changes
2.1.5.1 Master Tuning
| 11110000 | F0 | Exclusive status |
| 01000011 | 43 | YAMAHA ID |
| 0001nnnn | 1n | When n is received n=0~F, whichever is received.When n is transmitted n always=0. |
| 00100111 | 27 | Model ID |
| 00000001 | 30 | Sub ID |
| 00000000 | 00 | |
| 00000000 | 00 | |
| 0mmmmmmmm | mm | Master Tune MSB |
| 0llllllll | ll | Master Tune LSB |
| 0cccccccc | cc | |
| 11110111 | F7 | End of Exclusive |
Changes tuning of all channels.
2.1.5.2 Channel Detune
| 11110000 | F0 | Exclusive status |
| 01000011 | 43 | YAMAHA ID |
| 0001nnnn | 73 | Clavinova ID |
| 00111001 | 39 | CVP-79A/69/69A/59S ID |
| 00010001 | 11 | Sub ID |
| 0000nnnn | 0n | n = MIDI Channel |
| 01000011 | 43 | Dual Detune |
| 0vvvvvvv | vv | Value vv: 00 -40 - $7F (-64 - 0 - +63) |
| 11110111 | F7 | End of Exclusive |
The Channel Detune message only affects the specified channel.
2.1.5.3 Volume and Expression Realtime Control Off
| 11110000 | F0 | Exclusive status |
| 01000011 | 43 | YAMAHA ID |
| 0001nnnn | 73 | Clavinova ID |
| 00111001 | 39 | CVP-79A/69/69A/59S ID |
| 00010001 | 11 | Sub ID |
| 0000nnnn | 0n | n = MIDI Channel |
| 01000101 | 45 | Volume and Expression Realtime Control Off |
| 0vvvvvvv | vv | Value vv: 00:Off7F:On |
| 11110111 | F7 | End of Exclusive |
When “On” is received subsequent volume and expression changes are only valid during key on. Normal operation resumes when “Off” is received.
2.2 Bulk Dump
The CVP 79A/69/69A/59S models support the following parameters.
[XG NATIVE]
1) XG System Data
2) Multi Effect1 Data
3) Drums Setup Data
2.2.1 XG Native Bulk Data
| 11110000 | F0 | Exclusive status |
| 01000011 | 43 | YAMAHA ID |
| 0000nnnn | 0n | When n is received n=0~F, whichever is received.When n is transmitted n always=0. |
| 01001100 | 4C | Model ID of XG |
| 0bbbbbbb | bbbbbbb | ByteCount |
| 0bbbbbbb | bbbbbbb | ByteCount |
| 0aaaaaaa | aaaaaaa | Address High |
| 0aaaaaaa | aaaaaaa | Address Mid |
| 0aaaaaaa | aaaaaaa | Address Low |
| 00000000 | 00 | Data |
| | | | | |
| | | | | |
| 0cccccccc | cccccccc | Check sum |
| 11110111 | F7 | End of Exclusive |
For information about “Address” and “Byte Count” fields, refer to attached tables.
In the attached tables “TOTAL SIZE” partitions a data series into single bulk dumps. The “address” is the first byte of the bulk data.
The checksum value is set such that the sum of Byte Count, Address, Data, and Checksum has value zero in its seven least significant bits.
If too much bulk data is received at a time there is a chance of error. The total data for a bulk dump should not exceed 512 bytes, it is recommended that data be kept under 512 bytes with an interval time of 120msec or more between 512 byte bulk.
2.2.1.1 XG System Data bulk dump
See Tables 1-1, 1-2.
2.2.1.2 Multi Effect1 Data bulk dump
See Tables 1-1, 1-3.
2.2.1.3 Drums Setup Data bulk dump
See Tables 1-1, 1-5.
2.3 Parameter Request
The CVP 79A/69/69A/59S models support the following request for parameters covered by Parameter Change specifications.
| 11110000 | F0 | Exclusive status |
| 01000011 | 43 | YAMAHA ID |
| 0011nnnn | 3n | When n is received n=0~F, whichever is received.When n is transmitted n always=0. |
| 01001100 | 4C | Model ID of XG |
| 0aaaaaaa | aaaaaaa | Address High |
| 0aaaaaaa | aaaaaaa | Address Mid |
| 0aaaaaaa | aaaaaaa | Address Low |
| 11110111 | F7 | End of Exclusive |
If the parameter's data size is 2 or 4. The Parameter Request address for that parameter is the first byte of the bulk.
2.4 Dump Request
The CVP 79A/69/69A/59S models support the following request for data covered by bulk dump.
| 11110000 | F0 | Exclusive status |
| 01000011 | 43 | YAMAHA ID |
| 0010nnnn | 2n | When n is received n=0~F, whichever is received.When n is transmitted n always=0. |
| 01001100 | 4C | Model ID of XG |
| 0aaaaaaa | aaaaaaa | Address High |
| 0aaaaaaa | aaaaaaa | Address Mid |
| 0aaaaaaa | aaaaaaa | Address Low |
| 11110111 | F7 | End of Exclusive |
For more information on the “Address” field, refer to the attached table. In the attached tables “TOTAL SIZE” partitions a data series into single bulk dumps. The “address” is the first byte of the bulk data.
3. Realtime Messages
3.1 Active Sensing
a) Transmission
Transmitted approximately once every 200msec.
b) Reception
If no MIDI data is received within 400ms following receipt of FE, the unit executes processing equivalent to ALL SOUND OFF, ALL NOTES OFF, and RESET ALL CONTROLLERS, then clears any remaining FEs.
3.2 MIDI Clock
a) Transmission
Transmitted as 1/96 clocks.
b) Reception
If the [MIDI 1] clock function is set to the External mode it will receive a resolution of 1/96 clocks.
3.3 Start/Stop
If the [MIDI 2] function Start/Stop filter is ON transmission and reception are disabled.
a) Transmission
All rhythm start and stop signals are transmitted.
b) Reception
When the relative message is received, the rhythm or song will start or stop.