CTS5190V - Tumble drier Elvita - Free user manual and instructions
Find the device manual for free CTS5190V Elvita in PDF.

| Product Type | Vented Tumble Dryer |
| Model | CTS5190V |
| Brand | Elvita |
| Drying Capacity | 9 kg |
| Energy Class | C (EU 2010/30/EU) |
| Annual Energy Consumption | 561 kWh |
| Drum Volume | 118 liters |
| Dimensions (H x W x D) | 850 x 600 x 580 mm |
| Weight | 42 kg |
| Noise Level | 67 dB(A) |
| Drying Programs | 16 including Cotton, Synthetics, Delicates, Time Dry, Anti-Allergy |
| Drying Technology | Vented with AllerTech filter |
| Control Type | Electronic with LED display |
| Delay Start | Up to 24 hours |
| Anti-Crease Function | Yes (up to 2 hours post-cycle) |
| Lint Filter Indication | Yes |
| Water Container | Not applicable (vented) |
| Mains Connection | 220-240 V, 50 Hz, 13 A |
| Power Consumption (off-mode) | 0.5 W |
| Accessories Included | Exhaust hose, user manual |
| Certification | CE, WEEE |
Frequently Asked Questions - CTS5190V Elvita
User questions about CTS5190V Elvita
0 question about this device. Answer the ones you know or ask your own.
Ask a new question about this device
Download the instructions for your Tumble drier in PDF format for free! Find your manual CTS5190V - Elvita and take your electronic device back in hand. On this page are published all the documents necessary for the use of your device. CTS5190V by Elvita.
USER MANUAL CTS5190V Elvita
natural_image
Technical line drawing of an electrical enclosure with internal components and wiring (no text or symbols)natural_image
Line drawing of a simple rectangular cabinet with a coiled cable and a label on the door (no text or symbols present)MANÖVERPANEL
natural_image
Technical line drawing of a metal shelving unit with a door and support pillars (no text or symbols)Typskylt (insida)
Plassering / fastsetting ..... 27
natural_image
Technical line drawing of a cabinet or enclosure with internal components and wiring (no text or symbols)Plassering / Fastsetting
natural_image
Line drawing of a simple rectangular cabinet with a coiled cable and a label on the door (no text or symbols present)BETJENINGSPANEL

natural_image
Technical line drawing of a metal shelving unit with a door and support pillars (no text or symbols)Typeskilt (innside)
FEILSÖKING
Slik retter man mindre feil selv
This user manual....39
Safe operation 39
Components.....40
Air flow in the cabinet.....41
Condensed water....42
Removable water tank ..... 42
Connecting to floor drain....43
Connecting to water tank . . . 43
Installation 44
Unpacking....44
Reversing the door ..... 45
Placement/securing ..... 45
Electrical supply ..... 46
Control panel 47
Buttons 47
Display 47
Language setting ..... 47
Start-up....48
Arranging items for drying . . . . 49
User advice....49
Drying programme .... 50
Selecting the drying programme. . . . . . . . 50
Starting the drying programme.....50
Ending the drying programme. . . . . . . . 50
Opening the door ..... 50
Fine-tuning the drying programme....51
Introduction....51
Method 51
Restoring default settings . . . 51
Care....52
Cleaning 52
Replacement parts ..... 52
Servicing....53
Troubleshooting 54
How to fix minor problems yourself....54
Technical data 55
THIS USER MANUAL
The contents of this manual describe the operation and use of the drying cabinet and provide instructions for its installation and maintenance.
NOTE!
Keep this user manual handy, so that it is always available for future reference
SAFE OPERATION
This advice on using the appliance safely is provided to help you avoid incorrect use and unnecessary risks, and you should read it before installing or using the drying cabinet.
WARNING!
This equipment is only intended for drying textiles that are washed in water.
- This drying cabinet can be used by children from the age of 8 upwards, and by individuals (including children) with reduced physical, sensory or mental capabilities or lack of experience and knowledge, on condition that they are supervised or instructed in how to use the drying cabinet safely, and that they understand the hazards involved.
- Do not let children play in, on or with the drying cabinet. Keep an eye on children when they are close to the cabinet.
- The power cord must be replaced immediately if it is damaged; this should only be done by the manufacturer, an authorised service representative or similarly qualified person, to avoid danger.
- Cleaning and maintenance must not be carried out by children without supervision.
- Avoid hanging items in the cabinet that are dripping or soaking wet, as it is not designed to collect large amounts of water. This could lead to water running on to the floor.
If you need to dry items that are dripping or soaking wet, we recommend that you spin-dry them first or, if this is not possible, wring them out before placing them in the drying cabinet. We also recommend that the cabinet is placed on a drip tray to prevent any water damage to the floor.
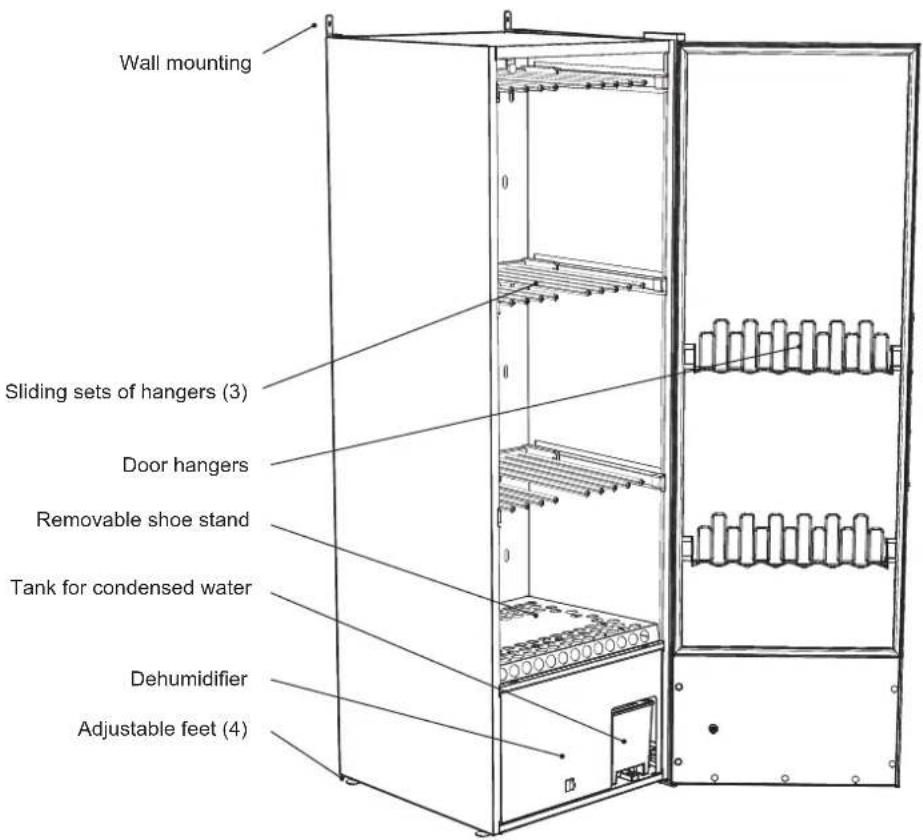
COMPONENTS
The drying cabinet works in the same way as a heat pump, by using a dehumidifier instead of a conventional hot air unit. This means that it takes less heat to dry items and uses considerably less energy.
The cabinet is a closed system. There is no need to connect it to a ventilation system. Moisture condenses during the process and the water that is produced is led to a removable water tank or by hose to a drain.
The fan is also powerful enough that it causes garments to flap, which makes the drying process even more efficient.
AIR FLOW IN THE CABINET

NOTE!
Make sure that shoes and the like do not block the air flow!
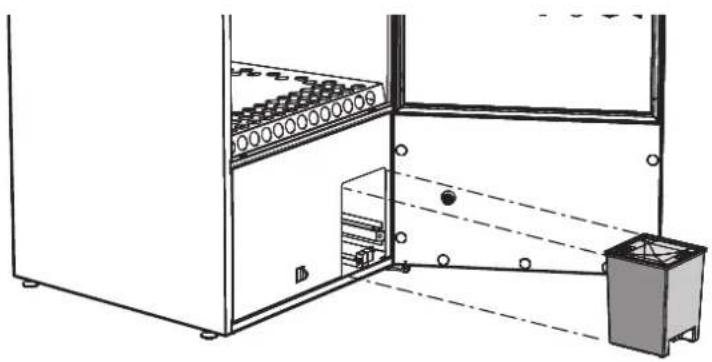
CONDENSED WATER
The condensed water can be removed in two ways: it can be collected in a removable water tank or by a hose that runs to a floor drain.
Removable water tank
The water tank has ample capacity to collect the water from a complete wash. But make it a routine to empty the water tank before you dry every wash load.
natural_image
Technical line drawing of a cabinet or enclosure with internal components and wiring (no text or symbols)Connecting to floor drain
When delivered, the drain hose in the drying cabinet is connected to the removable water tank.
To connect the hose to a floor drain, do as follows:
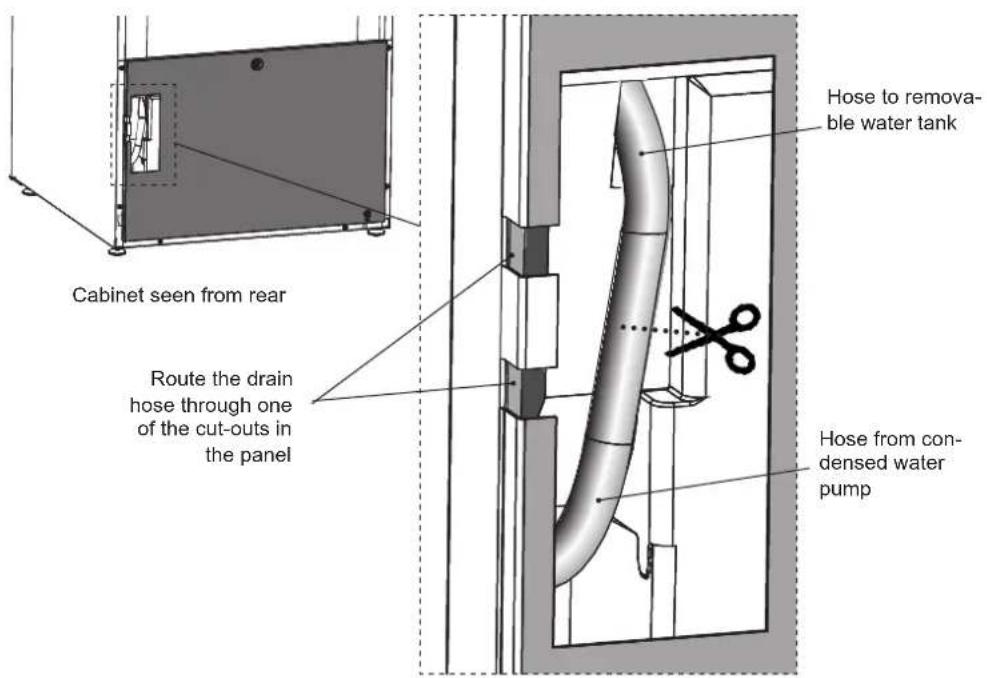
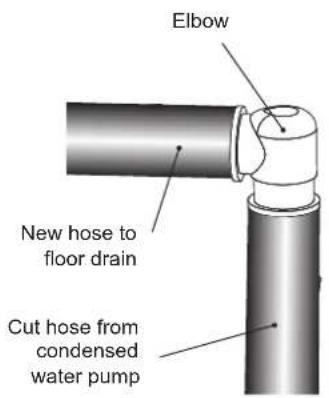
1 Carefully pull out the upper part of the hose around 2–3 cm.
2 Cut through the hose at the middle of the opening.
3 Attach the new drain hose and elbow that are supplied in the installation kit, as illustrated. The hoses are a push-fit on the elbow coupling.
4 Route the drain hose through one of the cut-outs in the panel to prevent it from being crushed.
5 Run the drain hose to the floor drain.
6 If the floor drain is higher than the outlet from cabinet, make sure that the hose hangs in an arc towards the floor and creates a water trap. Otherwise there is a risk that the condensed water could flow back towards the compartment when the pump is not running. This could cause the compartment to fill up with water and damage the drying cabinet.
Connecting to water tank
If you want to reconnect the condensed water outlet to the water tank you simply need to reconnect the two hoses with the elbow coupling.
NOTE!
The hose must never be bent so that it obstructs the flow of water.
INSTALLATION
Unpacking
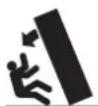
Handle the drying cabinet with care when it is standing on the pallet unsupported. RISK OF TIPPING!
Check that the goods have not been damaged in transport. Any transport damage must be reported to the retailer within 7 days.
After unpacking the product, check that it is free from damage. Any damage, faults or missing parts must be reported to the retailer immediately.
Check that all transport safety devices have been removed before connecting the drying cabinet.
Keep packaging materials such as plastics and polystyrene foam away from children.
The drying cabinet must be installed and kept indoors.
Full delivery should include:
- Cabinet with dehumidifier
• Installation kit for securing cabinet
• Installation instructions and user manual
Installation kit
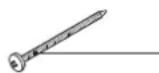
Screw TRX 5x70 zinc-plated for securing to wall 2
Qty.
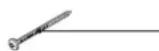
Screw MRT 5 x 20 for bracket 4
Qty.
Plastic hose 10 x 13, 1,5 m

Elbow for water hose 1
Wall plug 2
Bracket for securing to wall 2
Hand brush for filter 1
Wall instructions 1
Reversing the door
The cabinet is delivered with the door hung on the right or left. The door can be reversed if required.
If this is required, contact the manufacturer or the manufacturer's service representative.
Placement/Securing
The drying cabinet is only intended for use indoors in a dry area.
Do not place the drying cabinet in an area where high-pressure water is used for cleaning.
Levelling
The drying cabinet must be installed upright on a flat surface, and be supported by all four feet.
The feet can be adjusted from outside the cabinet.
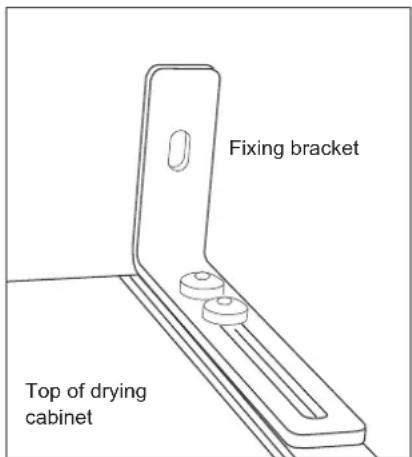
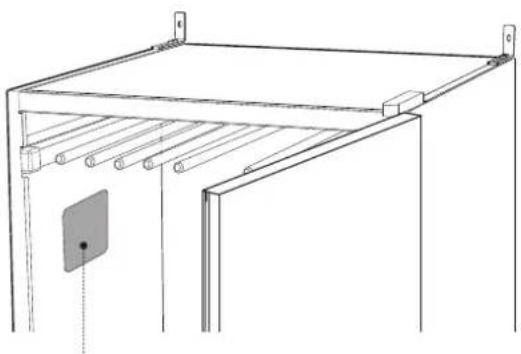
Securing to wall
The cabinet must be secured to the wall to prevent it from tipping over.
The installation kit includes two angle brackets that can be attached to the top of the cabinet, as illustrated, using the screws supplied. The brackets have slotted holes for adjusting the distance from the wall.
Secure the cabinet to the wall. Fixing screws, washers and wall plugs are provided in the installation kit.
WARNING!
The drying cabinet must not be used unless it has been secured to the wall, as it could tip forwards otherwise.
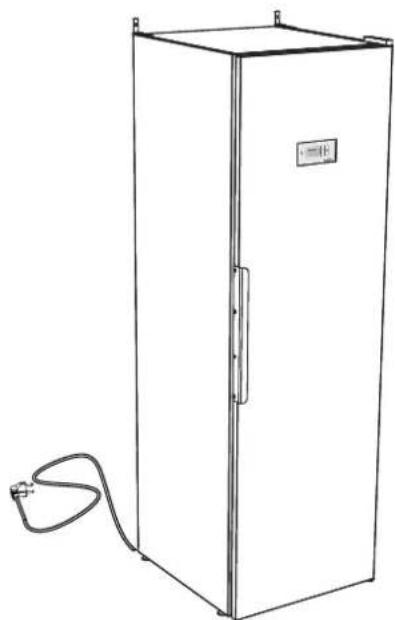
ELECTRICAL SUPPLY
The drying cabinet must be connected to a 220–240 V, single-phase supply at 50 Hz, via an earthed wall socket.
The drying cabinet is supplied ready for connection with a power cord and earthed plug.
The fuse is rated at 10 A.
The drying cabinet must be connected to an earthed wall socket using the power cord supplied, and must not be connected permanently to the supply.
The socket must be positioned so that the appliance can be easily unplugged if necessary.
Check that the electrical supply matches the data on the rating plate and that the supply is earthed correctly according to the relevant standard. We recommend that the supply is fitted with a residual current device.
The socket must have its own fused circuit.
The manufacturer will not accept any responsibility if electrical connections are not made as described in this user manual.
natural_image
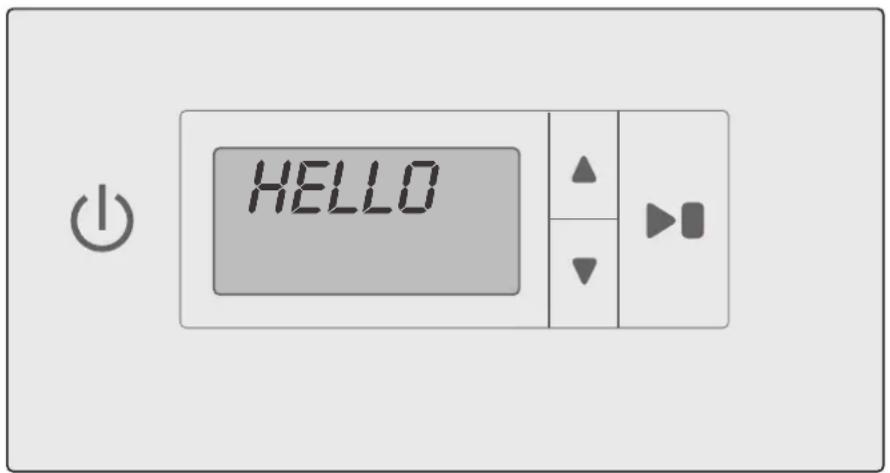
Line drawing of a simple white cabinet with a coiled cable and label on the door (no text or symbols present)CONTROL PANEL

The drying cabinet has two automatic programmes to suit different types of garments. These programmes are selected from the programme menus and controlled by four touch buttons on the menu panel. A choice of languages is available.
Buttons

ON / OFF

Start / Stopp, to start or to stop programme.
OK, to confirm choice and go to next menu level.
Language setting
The following languages are available: English, Swedish, Norwegian, Danish, Finnish, Russian, French and German.
| Language number | Display language |
| 0 | English |
| 1 | Swedish |
| 2 | Norwegian |
| 3 | Danish |
| 4 | Finnish |
| 5 | Russian |
| 6 | French |
| 7 | German |
Display
The display has two rows with 6 digits in each row. The display shows the current parameter and the value of this parameter when you set or adjust the drying process. During the drying process it displays the status.

ARROW UP, to increase value or step in one direction between programmes

ARROW DOWN, to decrease value or step in one direction between programmes.
Selection
1 Make sure the ON/OFF button is switched off. The display should be dark.
2 Press and hold the arrow up and arrow down buttons and press the ON/OFF button to turn the cabinet "ON". The display will light up and the top row will flash "P105", which is the language setting parameter. If a different value is displayed, use the arrow up or arrow down button to advance to the correct parameter.
3 Press START/STOP to confirm.
The current language will flash. Each language has a number as shown in the table below.
4 Use the arrow up and arrow down buttons to choose the desired language.
5 To save the set value, press START/STOP.
6 To return to operating mode, press arrow down and START/STOP.
START-UP

Read this user manual before starting to use the drying cabinet.
After installing and connecting the cabinet you should wait at least 3 hours before starting to use it. This is to allow the oil to run back into the compressor. Otherwise the compressor may be damaged.
WARNING! Read the safety instructions on page 39 before using the cabinet.
1 Check that the cabinet is securely attached to the wall. See page 45.
2 Check that all packaging material has been removed.
3 Clean the inside and outside of the drying cabinet using warm water and a mild detergent. Then dry it carefully. See also the section on 'Care' later on in the manual.
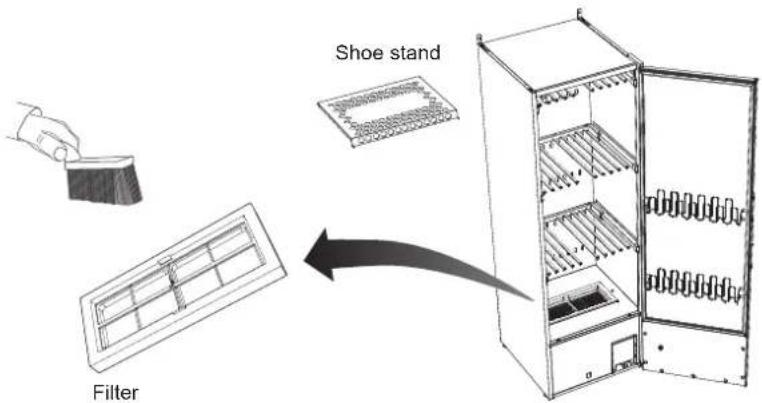
ARRANGING ITEMS FOR DRYING
There are three sets of hangers inside the cabinet. Each set has a number of rails for hanging items to dry.
- Hang the items to suit the amount of space they take up – not how much they weigh.
- Raise the two lower sets of hangers if you need to dry long items.
- Hang gloves, hats, scarves and the like on the hangers on the inside of the door.
- Slide out the top set of hanger hooks to make it easier to hang items. Slide these back when they are not in use.
-
Do not overload the drying cabinet. This causes laundry to crease and leads to uneven drying. If possible leave space between items.
-
If there is a risk of discolouration from some items, leave plenty of space around them.
- If you place shoes or the like on the shoe stand, avoid obstructing the air flow.
- Avoid drying heavy garments together with lighter items as they take much longer to dry.
- Lay knitted garments flat to dry. If these are hung they will stretch excessively due to their weight when wet.
- Avoid hanging items in the cabinet that are dripping or soaking wet, as it is not designed to collect large amounts of water.
This would also lead to very long drying times.
WARNING!
Do not dry garments or the like that have been contaminated with petrol or other volatile and flammable solvents. This could lead to the formation of an explosive gas mixture.
User advice
• Always follow the advice on the care label, if provided.
- If softener or antistatic agents are used, follow the manufacturer's instructions for these products.
- Remove laundry that is already dry. This reduces the drying time for the remaining laundry.
NOTE!
When the cabinet is cold the door seal may not close completely. But once the cabinet is warm the seal will expand and provide a complete seal.
NOTE!
If the seal does not close completely or if the door has a tendency to open by itself it may be because the filter is not fitted correctly. Press the filter and filter holder firmly into place so that there is no air leakage
DRYING PROGRAMME
The drying cabinet has two automatic programmes:
- Normal dry
- Extra dry
The automatic programmes stop the drying process automatically when the laundry is dry.
Selecting the drying programme
- Normal dry – used for drying medium-weight garments.
- Extra dry – used for drying heavier garments and for deep-drying.
Starting the drying programme
- Last-used drying programme.
Press the power button to turn the cabinet "ON" – the display lights up and shows the last programme that was run.
If you want to use this programme press START/STOPP.
Or select a different drying programme using arrow up orarrow down.
Then start the programme by pressing the START/STOP button.
- Door open.
If the door is open when a drying programme is selected and the START/STOP button is pressed, the display will show "close door".
Close the door, and the chosen drying programme should start.
- Drying.
The animated status bar on the left of the display shows that drying is in progress.
- Condensed water tank
When the condensed water tank is full the drying process stops immediately and the display shows "check water tank". Empty the water tank and restart the drying process.
- Cool-down
During the cool-down phase the display shows "cool" and the 5-minute rest time is counted down.
- Programme finish
When the cool-down phase ends, the drying process is complete and the display shows "finish" (flashing).
When the START/STOP button is pressed or the door is opened the current programme ends and the display shows the last-used programme.
NOTE!
In standby mode the display is switched off after 15 minutes and lights up again if one of the buttons on the control panel is pressed or the door is opened.
NOTE!
Empty the condensed water tank after each drying cycle.
Ending the drying programme
To interrupt the drying phase, press START/STOP.
Opening the door
If the door is opened during drying, the drying phase will continue for 5 minutes. The display shows “close door” and the programme will start a 5 minute count-down.
If the door is closed within this 5-minute period the drying phase will continue.
If the door is left open the drying phase will be cancelled after 5 minutes and will have to be restarted manually.
If you want to end the drying phase immediately, without the 5-minute pause, press START/STOP.
FINE-TUNING THE DRYING PROGRAMME
It is possible to fine-tune the two automatic programmes to get the best results.
The settings for each programme are adjusted using the control panel.
You should only do this if you feel that:
• The laundry is not being dried adequately.
- The laundry is being over-dried, or the drying time is too long.
Introduction
The drying cabinet has two automatic programmes: Normal dry and Extra dry.
The automatic programmes stop the drying process automatically when the laundry is dry.
To decide when the laundry is dry, the measured value is compared with a default setting.
Parameter P 2072 is used for the Normal dry programme, and parameter P 2071 is used for the Extra dry programme.
These are the two main parameters that can be adjusted to optimize the drying process.
- If you feel that the laundry is not being dried adequately by the:
Normal dry programme reduce the parameter value for P 2072.
Extra dry programme increase the parameter value for P 2071.
- If you feel that the laundry is being over-dried by the:
Normal dry programme
increase the parameter value for P 2072.
Extra dry programme
reduce the parameter value for P 2071.
The drying process should always be adjusted in small steps; start by adjusting the current value by 1–2 units up or down, then check the results from the next drying cycle and make further adjustments if needed.
Method
The parameter list can be accessed using the control panel. The list is displayed as follows: the top row shows the current parameter, e.g. P 2071, while the bottom row shows the set value.
1 Make sure the ON/OFF button on the cabinet is turned off. The display should be dark.
2 Press and hold the ARROW UP and ARROW DOWN buttons and press the ON/OFF button to turn the cabinet "ON". The display will light up and show "P 105" and the default setting for P 105. The row with the current parameter will flash in the display.
3 Advance to the desired parameter by pressing the ARROW UP or ARROW DOWN button repeatedly. If you go too far you can simply continue scrolling until the display shows the right parameter.
4 When the display shows the desired parameter, e.g. "P 2072", press START/STOP to confirm.
The row showing the set value for this parameter will now flash.
5 Increase or decrease the value using the ARROW UP or ARROW DOWN buttons.
6 To save the set value, press START/STOP.
7 To return to the operating value, press ARROW DOWN and START/STOP.
Restoring default settings
1 Enter parameter display mode as described in steps 1–2 above.
2 Press and hold the ARROW UP and ARROW DOWN buttons and then press START/STOP.
The default settings are restored and the display shows the last-used programme.
CARE
Cleaning
NOTE!
Do not wash with a high-pressure washer!
Cleaning and maintenance must not be carried out by children without supervision.
The walls of the cabinet can be cleaned with a damp cloth and mild detergent.
Before each drying cycle, remove the shoe stand and clean the filter underneath it.
Brush the filter clean using the brush supplied.
Replacement parts
Follow NIMO's instructions for repairs and the replacement of parts.
If the power cord is damaged for any reason it must be replaced. Genuine spare parts can be obtained from the retailer.
NOTE!
A replacement power cord should only be fitted by the manufacturer, the manufacturer's service representative or a qualified electrician!
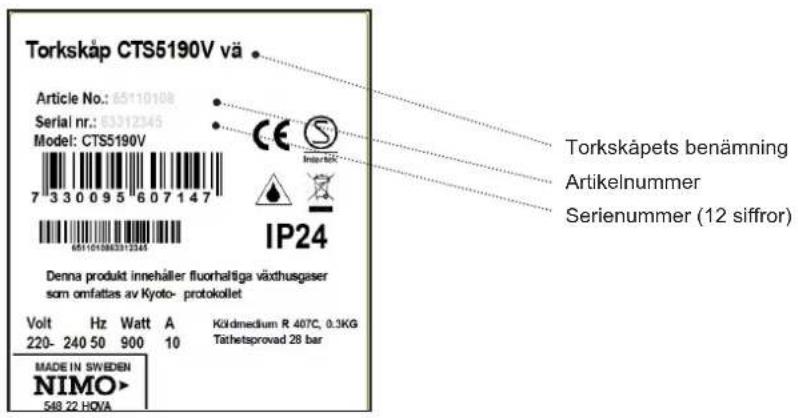
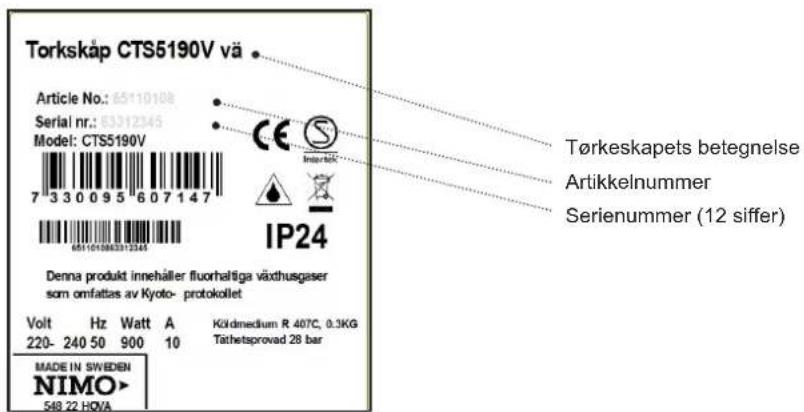
Servicing
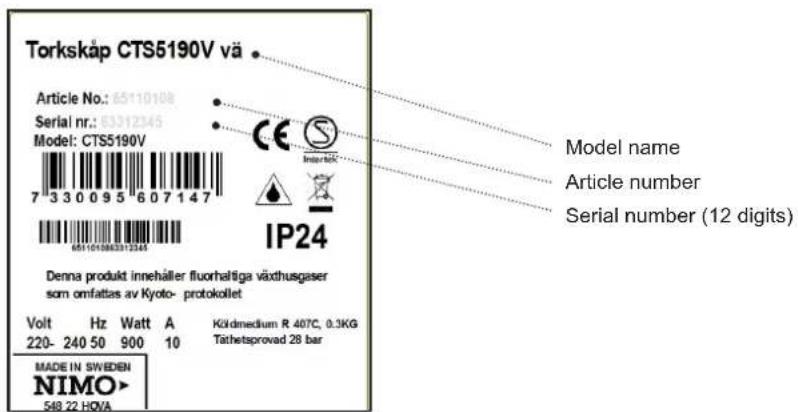
Before contacting the service department, make a note of the model name, article number and serial number of the drying cabinet.
This information can be found on the rating plate inside the cabinet.
natural_image
Technical line drawing of a metal shelving unit with a door and support pillars (no text or symbols)Rating plate (inside)
TROUBLESHOOTING
How to fix minor problems yourself
| Questions What you can do | |
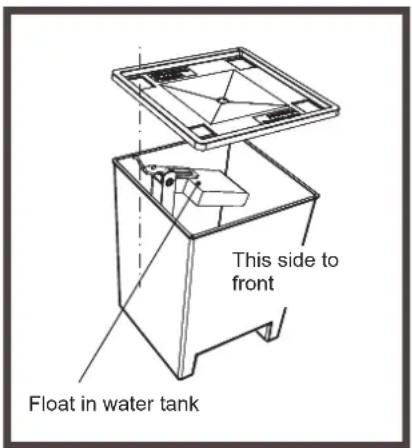
| Drying cabinet does not work | 1. Check that power cord is plugged into a socket.2. Check for tripped fuse.3. Have you pressed Start button?4. Is the door closed?5. Is the water tank in place and is it empty? |
| Display showsCheck water tankSee diagram | 1. Empty the water tank.2. Check that the lid is fitted and that the float arm is free to move through the opening in the lid.3. Check that the water tank is oriented so that the float arm faces inwards in the compartment.4. If none of the above work, a fault in the pump may have tripped the circuit breaker. In that case you need to consult a service technician. |
| The display shows an alarm/error code | This should not happen normally, but if an alarm or error code is shown, first try re-setting the alarm by pressing and holding the Start/Stop button for 5 seconds. If the problem recurs you need to consult a service technician. |
| Drying takes a long time | 1. Clean the filter (preferably after each drying cycle).2. Check that the water tank is empty.3. Check that the correct programme has been chosen to suit the type of laundry.4. Check that no items of laundry are extremely wet (poorly spin-dried).5. Check whether too much laundry has been placed in the cabinet. |
| Laundry does not dry | 1. Check that the correct programme has been chosen to suit the type of laundry.2. Check whether too much laundry has been placed in the cabinet.3. Adjust parameters 2072 and 2071 as described in the section on parameter adjustment. |
| Seal does not close tightly/door opens | 1. Check that the cabinet is upright. Check with a spirit level, and adjust the adjustable feet if necessary.2. Check that the filter and its holder are correctly fitted. The holder must be pressed down against the heat pump unit below it in order to seal correctly.3. Check that no litter, gravel or the like have been trapped beneath the filter, as this could prevent a satisfactory seal. |
TECHNICAL DATA
| Capacity:around 4.0 kg of laundry (cotton) | |
| Evaporation rate:22 g/min | |
| Electrical supply:Single phase 220–240 V, 50 Hz, 10 A | |
| Power:900 W | |
| Main fan capacity:945 m3/h (unloaded) | |
| Secondary fan capacity:160 m3/h (unloaded) | |
| Total hanger length:16 metres | |
| Dimensions:Height 1930 mmWidth 595 mmDepth 675 mm | |
| Weight:95 kg | |
| Sound level:A-weighted emission sound pressure level is below 70 dB(A) | |
| Refrigerant:R 407C, 0.3 kg | |
| Pressure tested:28 bar | |
Manufacturing standards
See cabinet rating plate, page 53
Wiring diagram
Wiring diagram can be ordered from manufacturer.
Energy consumption and drying times for laundry after spin-drying *)
| Programme | Energy consumption kWh/kg of laundry | Drying time | Max. temperature |
| Normal dry | 0,3 | 90 min | 55 °C |
| Extra dry | 0,4 | 120 min | 55 °C |
*) Values may vary depending on:
- spin speed
- temperature, humidity in premises
- ventilation in premises (intake, extraction)

natural_image
Gray circular icon with three white gears, no text or symbols presentGARANTI WARRANTY
Quality warranty applies to consumer