CTS1190V - Tumble drier Elvita - Free user manual and instructions
Find the device manual for free CTS1190V Elvita in PDF.


| Type | Tumble dryer |
| Brand | Elvita |
| Model | CTS1190V |
| Capacity | Approx. 4.0 kg (cotton) |
| Dimensions (H x W x D) | 1900 mm x 595 mm x 610 mm |
| Weight | Approx. 56 kg |
| Power Supply | 230 V ~, 50-60 Hz, single phase |
| Heating Element Power | 1500 W |
| Motor Power | 35 W |
| Evaporation Rate | 17 g/min |
| Fan Capacity | 180 m³/h |
| Timer | Adjustable up to 4 hours |
| Temperature Control | Continuously variable |
| Total Hanger Length | 16 metres |
| Noise Level | Max. 60 dB(A) |
| Door Reversible | Yes, left or right hanging |
| Adjustable Feet | Yes (4 feet) |
| Wall Mounting Required | Yes, to prevent tipping |
| Ventilation Connection | Via adapter or direct to extractor |
| Safety Features | Thermal cut-out, overheat protection |
| Cleaning | Wipe with damp cloth and mild detergent; vacuum air intake annually |
| Power Cord Replacement | Only by qualified electrician |
| Warranty | Consumer warranty applies |
Frequently Asked Questions - CTS1190V Elvita
User questions about CTS1190V Elvita
0 question about this device. Answer the ones you know or ask your own.
Ask a new question about this device
Download the instructions for your Tumble drier in PDF format for free! Find your manual CTS1190V - Elvita and take your electronic device back in hand. On this page are published all the documents necessary for the use of your device. CTS1190V by Elvita.
USER MANUAL CTS1190V Elvita
HANTERING AV UTTJÄNT TORKSKÅP
natural_image
Technical line drawing of an open refrigerator with internal compartments and ventilation slots (no text or symbols)Servicemodul
natural_image
Illustration of a cabinet with a handle and a small arrow pointing to it (no text or symbols)OMHÄNGNING AV DÖRR
natural_image
Diagram showing a beam under an upward force with a support structure, no text or symbols present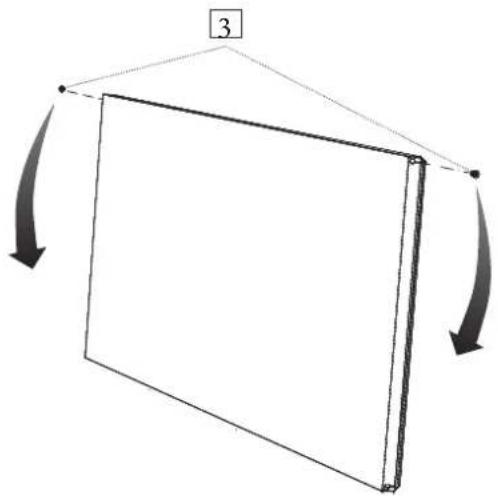
natural_image
Simple line drawing of a rectangular object with arrows indicating rotation, no text or symbols presentPLACERING
flowchart
graph TD
    A["Φ···Φ"] --> B["Downward flow"]
    B --> C["Upward flow"]
    C --> D["Downward flow"]
    D --> E["Upward flow"]
    E --> F["Downward flow"]
    F --> G["Upward flow"]
    G --> H["Downward flow"]
    H --> I["Upward flow"]
    I --> J["Downward flow"]
    J --> K["Upward flow"]
HANDHAVANDE
START
VÄRME
TORKTID
SKÖTSEL
RENGÖRING
natural_image
Line drawing of a kitchen appliance with control panel and hanging door (no text or symbols)Typskylt (insida)
FELSÖKNING
HÄNDTERING AV UTTJENT TÖRKESKAP
natural_image
Technical line drawing of an open refrigerator with cooling unit and side panel (no text or symbols)Servicemodul
Varme- og viftekomponenter sitter samlet i en uttrekkbar Servicemodul.
INSTALLERING
UTPAKKING
natural_image
Illustration of a cabinet with a handle and a small arrow pointing to it (no text or symbols)OMHENGLING AV DÖREN
natural_image
Diagram showing a beam under an upward force with a support structure, no text or symbols present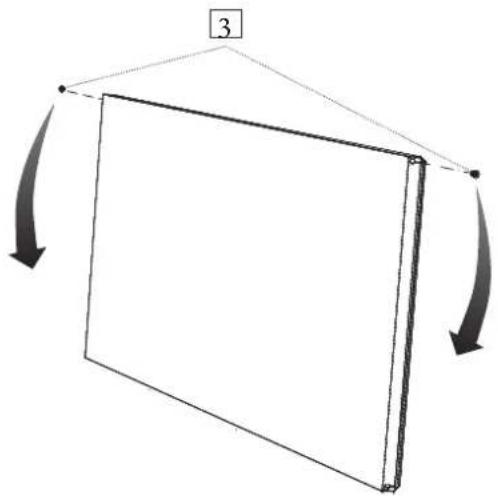
natural_image
Simple line drawing of a rectangular object with arrows indicating rotation, no text or symbols presentPLASSERING
natural_image
Technical line drawing of a mechanical device with no visible text or symbols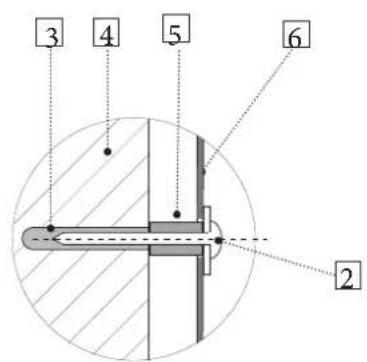
VARME
T∅RKETID
VEDLIKEHOLD
RENGJ∅RING
natural_image
Line drawing of a kitchen appliance with control panel and hanging door (no text or symbols)Typeskilt (innsiden)
FEILSÖKING
Kapasitet: ca. 4,0 kg vask (bomull)
Avvanningskapasitet: 17 g/min
Strømtilkopling: 1-fase 230 V, 50–60 Hz
Motor: 35 W
Elementeffekt: 1500 W
Overopphetingsvern: Ja
Tidsur: Innstillbart inntil 4 timer
Viftekapasitet: 180 m³/time
Important safety points.... 31
For a healthy environment 31
Packaging.... 31
Disposing of a worn-out drying cabinet. ..... 31
Drying cabinet description.... 32
Installation 33
Unpackning.... 33
Fitting the door handle 34
Reversing the door 34
Placement.... 35
Ventilation/air supply. 36
Connecting to ventilation 36
Electrical connection.... 37
Starting.... 38
Air flow 38
Operation 39
Starting 39
Arranging items for drying. 39
User advice.... 39
Controls 39
Care. 40
Cleaning 40
Replacement parts 40
Servicing.... 40
Troubleshooting 41
Service module 41
Technical data 42

Art. No.: 427001031 Rev. 01
We reserve the right to make changes.
Printed on recycled paper that meets the criteria of Friends of the Earth Sweden and the Swedish Society for Nature Conservation.
THIS USER MANUAL
The contents of this manual describe the operation and use of the drying cabinet and provide instructions for its installation and maintenance.
IMPORTANT SAFETY POINTS
This drying cabinet complies with the relevant safety requirements. Incorrect use can lead to injury and damage to property.
This advice on using the appliance safely is provided to help you avoid incorrect use and unnecessary risks, and you should read it before installing or using the drying cabinet.
WARNING!
This equipment is only intended for drying textiles that have been washed in water.
- The drying cabinet must be installed and kept indoors.
- The drying cabinet can be used by children from the age of 8 upwards, and by individuals (including children) with reduced physical, sensory or mental capabilities or lack of experience and knowledge, on condition that they are supervised or instructed in how to use the drying cabinet safely, and that they understand the hazards involved.
- Do not let children play in, on or with the drying cabinet. Keep an eye on children when they are close to the cabinet.
- Cleaning and maintenance must not be carried out by children without supervision.
- Replace the power cord immediately if it is damaged. The power cord may only be replaced by the manufacturer, an authorised service representative or a qualified electrician!
- Follow NIMO instructions when repairing and replacing parts.
FOR A HEALTHY ENVIRONMENT
PACKAGING
The packaging that protects the drying cabinet during transport was chosen with the environment in mind and is therefore recyclable.
By recycling packaging you reduce the use of new resources and reduce the amount of waste.
DISPOSING OF A WORN-OUT DRYING CABINET
When the drying cabinet has reached the end of its useful life it must be sent for dismantling. Many parts can be recycled, but the cabinet also contains materials that must be disposed of correctly. So never dispose of the drying cabinet or its components with general household waste, as this could cause health risks and harm the environment.
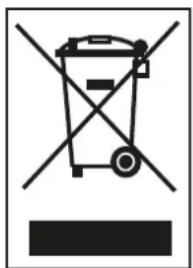
Send the worn-out drying cabinet to a recycling station instead. Contact your retailer for information if necessary.
All the plastic components of the drying cabinet are marked with standardised international symbols. These allow the parts to be sorted correctly for recycling.
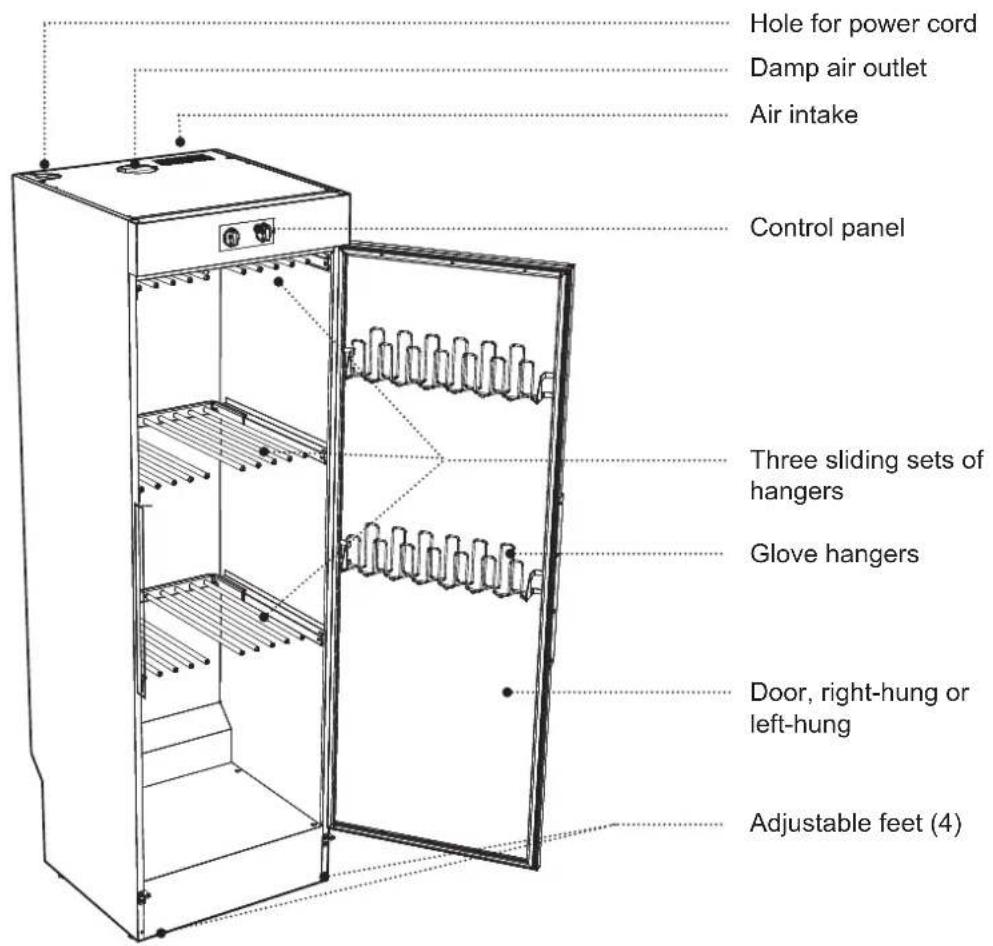
DRYING CABINET DESCRIPTION
natural_image
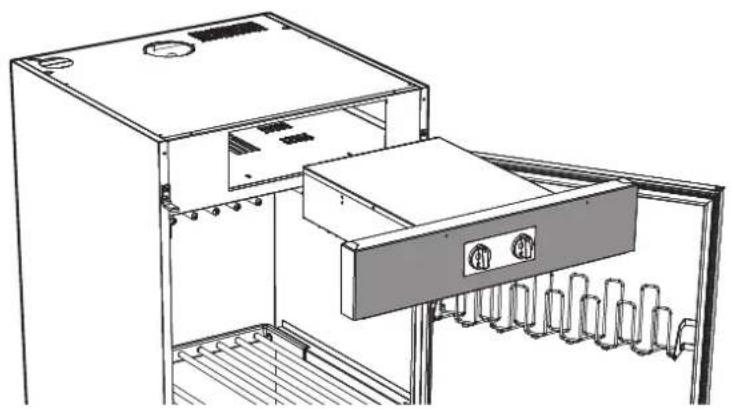
Technical line drawing of an open refrigerator with internal compartments and ventilation slots (no text or symbols)Service module
Heater and fan components are assembled in a removable service module.
INSTALLATION
UNPACKNING
NOTE! Handle the drying cabinet carefully if it is standing on a pallet! RISK OF TIPPING!!
Check that the goods have not been damaged in transport. Any transport damage must be reported to the retailer within 7 days.
After unpacking the product, check that it is free from damage. Any damage, faults or missing parts must be reported to the retailer immediately.
Check that all transport safety devices have been removed before connecting the drying cabinet.
Keep packaging materials such as plastics and polystyrene foam away from children.
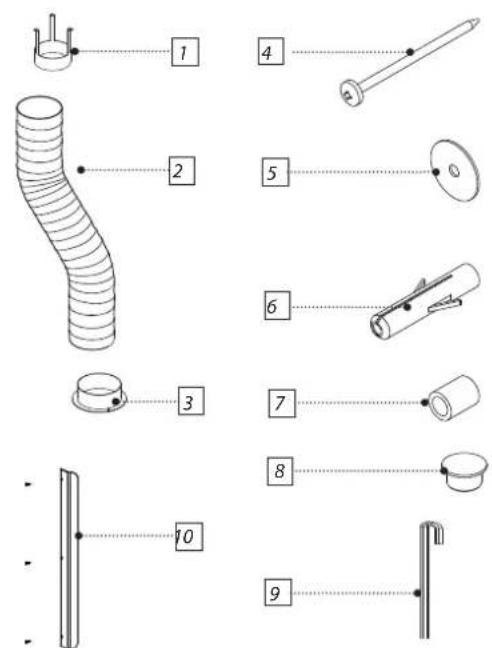
INSTALLATION KIT
Full delivery should include:
• Cabinet with pre-installed fan unit
- Installation kit:
- User manual
Qty.
- Ventilation adapter (1)
- Hose (1)
- Collar (1)
- Screw TRX 5x70 zinc-plated (2)
- Washer NB 5x25 (2)
- Wall plug (2)
- Spacer 8.2x12x15 (2)
- Cover plug, white (4)
- Allen key (1)
- Door handle with fixing screws (1)
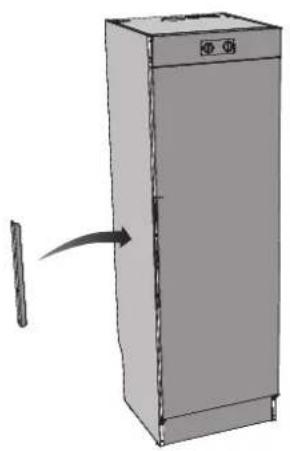
FITTING THE DOOR HANDLE
Fit the door handle using the screws supplied.
natural_image
Illustration of a cabinet with a handle and a small arrow pointing to it (no text or symbols)REVERSING THE DOOR
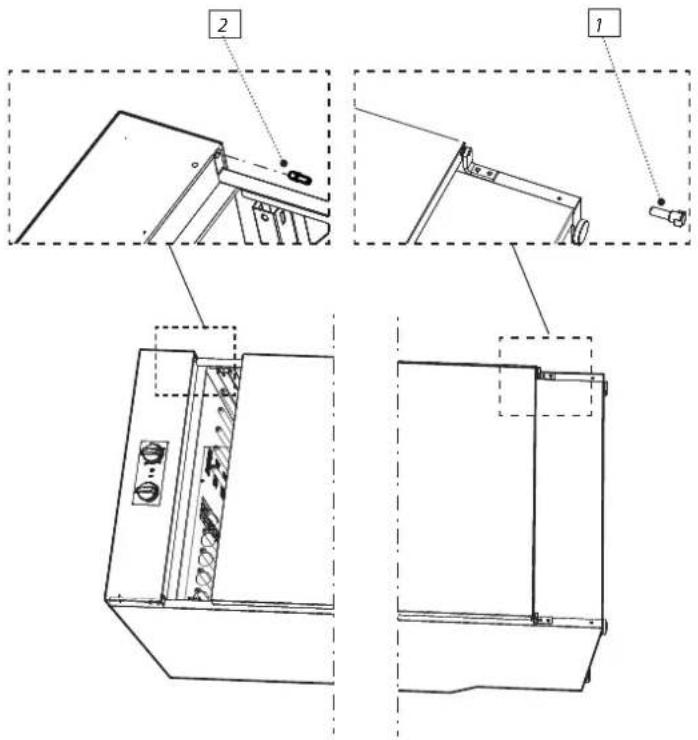
The door can be hung on the right or left.
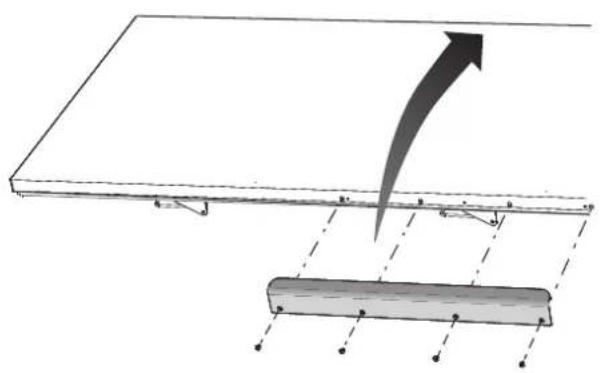
Both the upper and lower hinge pins can be removed using a 10 mm ring spanner.
1 Lay the drying cabinet on its back.
2 Remove the hinge pin from the lower hinge (1) and lift off the door.
3 Remove the hinge pin from the upper hinge (2) and place it on the opposite side.
4 Transfer the handle to the other side. Threaded holes are already provided.
5 Transfer the upper and lower hinge bushings in the door (3) to the other side.
6 Line up the door and secure it in place with the lower hinge pin.
natural_image
Diagram showing a beam under load with an upward arrow and a support structure (no text or symbols)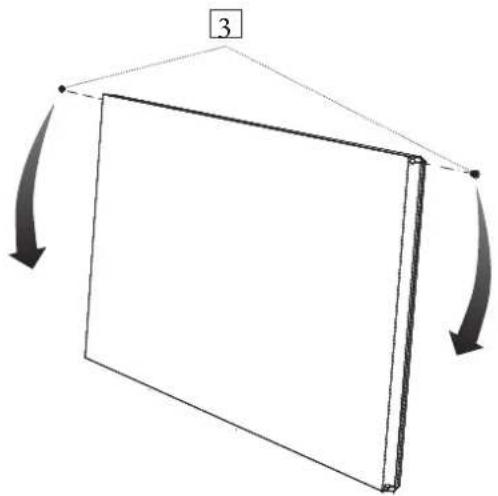
natural_image
Simple line drawing of a rectangular object with arrows indicating rotation, no text or symbols presentPLACEMENT
The drying cabinet is only intended for use indoors in a dry area.
Do not place the drying cabinet in an area where high-pressure water is used for cleaning.
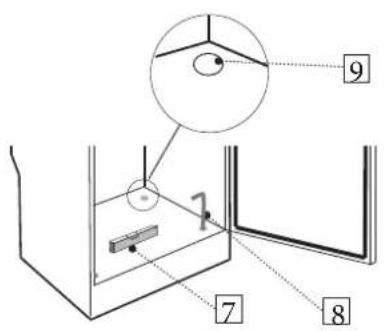
- The drying cabinet must stand on a flat surface, and be supported by all four feet.
Use the supplied Allen key to adjust all four adjustable feet through the holes in the base of the drying cabinet.
Press the four cover plugs into the holes after adjustment.
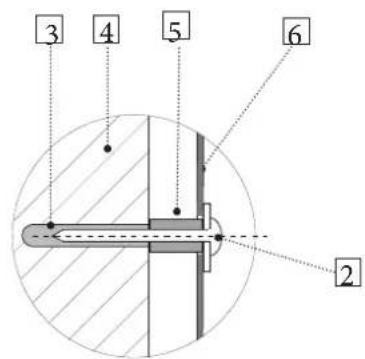
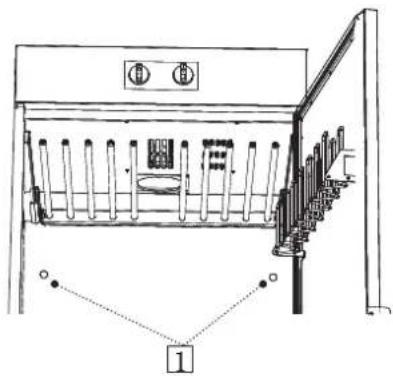
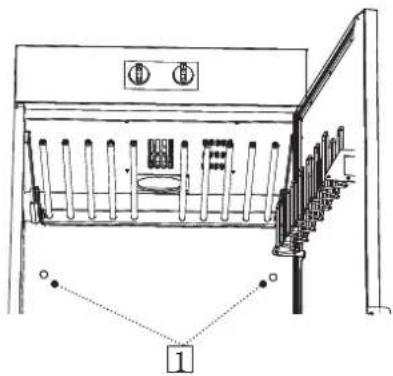
- The cabinet must be secured to the wall to prevent it from tipping over.
1 Open the door and drill two 8 mm holes in the wall through the pre-drilled holes in the rear of the cabinet.
2 Insert the wall plugs into the wall. Slide a spacer on to each screw and fit them with the washers as shown. The screws are found in the installation kit.
WARNING!
The drying cabinet must not be used unless it has been secured to the wall, as it could tip forwards otherwise.
natural_image
Technical line drawing of a mechanical assembly with no visible text or symbols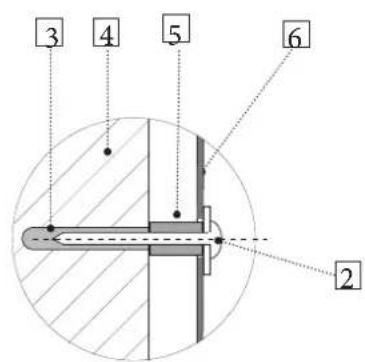
-
Pre-drilled hole
-
Fixing screw with washer
-
Wall plug
-
Wall behind drying cabinet
-
Spacer
-
Rear wall of drying cabinet
-
Spirit level
-
Allen key
-
Cover plug
VENTILATION/AIR SUPPLY
When the cabinet is running it produces 45m^3 of damp air per hour. You should therefore ensure that the room is well ventilated to replace the damp air that is extracted.
CONNECTING TO VENTILATION
The drying cabinet should be connected to a ventilation system that meets the relevant standards.
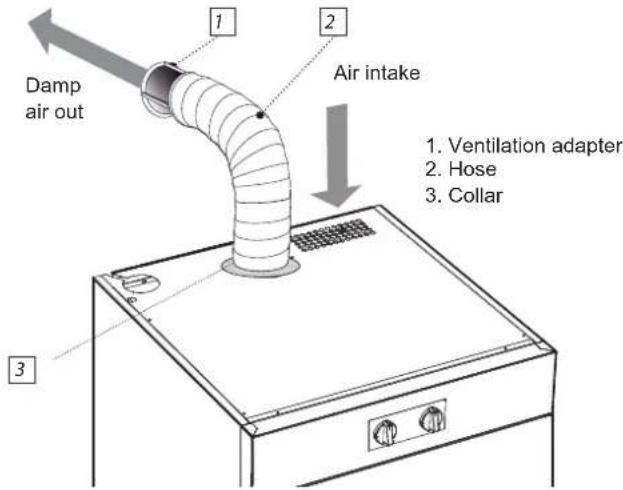
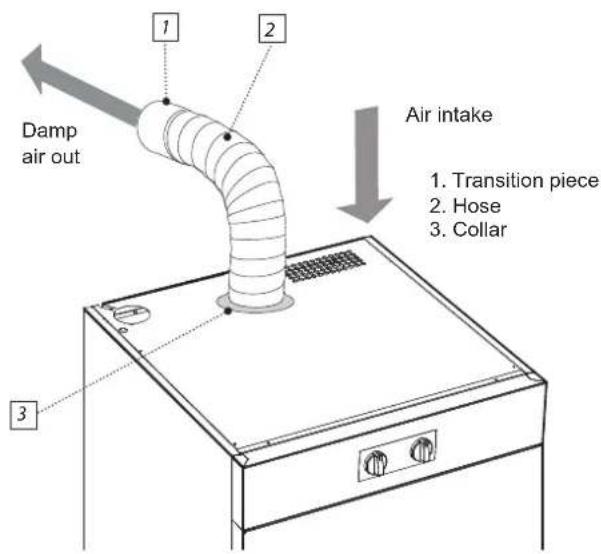
The drying cabinet can be connected to a ventilation duct in two ways, either by using the ventilation adapter, or by connecting directly to a mechanical extractor.
If the drying cabinet is connected to an existing ventilation system the ventilation adapter must always be used, to prevent interference with the general ventilation in the premises.
Direct connection should only be used when a dedicated extractor duct is provided for the drying cabinet, with a capacity of 45m^3 per hour.
The drying cabinet has been tested and set up at the factory for connection with the ventilation adapter.
1. With ventilation adapter
Fit the supplied collar to the hose. Fix the collar and hose to the top of the drying cabinet. Connect the other end of the hose to the ventilation adapter, then secure this over the exhaust vent in the room.
Do not connect the drying cabinet to an existing chimney.
Make sure the air intake is not blocked.
2. Direct connection to mechanical extractor
When the cabinet is connected directly to a ventilation duct the whole room is ventilated through the drying cabinet.
Connect the hose to the transition piece between the hose and ventilation duct.
The transition piece is not supplied.
Make sure the cabinet air intake is not blocked.
ELECTRICAL CONNECTION
The drying cabinet must be connected to a 230 V, single-phase supply at 50–60 Hz, via an earthed wall socket.
The drying cabinet is supplied with a power cord and earthed plug, ready for connection.
The drying cabinet must be connected to an earthed wall socket using the power cord supplied, and must not be wired permanently to the supply.
The socket must be positioned so that the appliance can be easily unplugged if necessary.
Check that the electrical supply matches the data on the rating plate and that the supply is earthed correctly according to the relevant standard. We recommend that the supply is fitted with a residual current device.
The supply socket must have its own fused circuit.
The drying cabinet must not be connected to the supply via an extension cord, as the required level of safety cannot be guaranteed (risk of overheating).
The manufacturer will not accept any responsibility if electrical connections are not made as described in this user manual.
STARTING

Read this user manual before starting to use the drying cabinet.
WARNING Read the safety instructions on page 31 before using the cabinet.
1 Check that the cabinet is securely attached to the wall. See page 35.
2 Check that all packaging material has been removed.
3 Clean the inside and outside of the drying cabinet using warm water and a mild detergent. Then dry it carefully. See also the section on 'Care' later on in the manual.
AIR FLOW
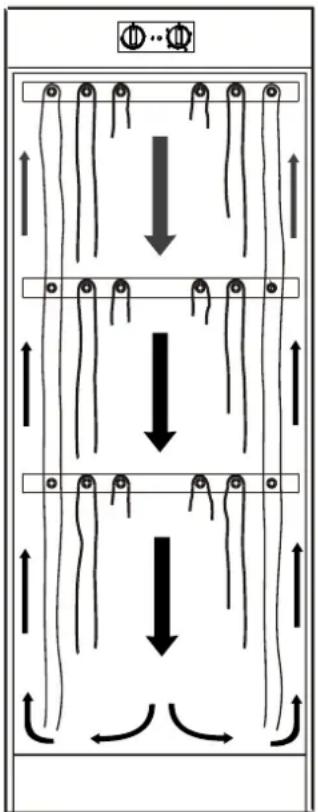
The diagram shows the air flow through the drying cabinet.
Keep the area around the ventilation duct free from dust and dirt.
Make sure the air intake and extractor duct are not blocked.
NOTE!
When the cabinet is cold the door seal may not close completely. But once the cabinet is warm the seal will expand and provide a complete seal.
flowchart
graph TD
    A["Φ···Φ"] --> B["Downward flow"]
    B --> C["Upward flow"]
    C --> D["Downward flow"]
    D --> E["Upward flow"]
    E --> F["Downward flow"]
    F --> G["Upward flow"]
    G --> H["Downward flow"]
    H --> I["Upward flow"]
    I --> J["Downward flow"]
    J --> K["Upward flow"]
OPERATION
STARTING
1 Place the items to be dried in the cabinet and close the door. Also see the section on 'Arranging items for drying'.
ARRANGING ITEMS FOR DRYING
There are three sets of hangers inside the cabinet. Each set has a number of rails for hanging items to dry.
- Hang the items to suit the amount of space they take up – not how much they weigh.
- For best efficiency – do not lay items flat on the top set of hangers.
- Hang long items closest to the walls of the cabinet and shorter items near the middle. This ensures the most efficient drying results.
- Raise the two lower sets of hangers if you need to dry long items.
- Hang gloves, hats, scarves and the like on the hangers on the inside of the door.
USER ADVICE
Setting the controls
- Set the temperature and time to suit the most delicate items.
- Adjust the temperature using the temperature knob, which can be rotated in either direction.
CONTROLS
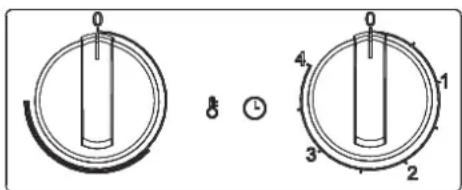
The cabinet has two knobs for adjusting the temperature and drying time settings.
The left knob is used to set the temperature and is continuously variable.
The right knob is used to set the drying time, from zero to four hours.
For the fastest drying results, turn the temperature knob to max and set the time to two hours. For more routine drying, set the tempe-
2 Set the desired temperature and drying time. See the section on 'Controls'.
- Slide out the top set of hanger hooks to make it easier to hang items. Slide these back in if they are not being used.
- Do not overload the drying cabinet. This causes laundry to crease and leads to uneven drying. If possible leave space between items.
- If there is a risk of discolouration from some items, leave plenty of space around them.
- Avoid drying heavy garments together with lighter items as they take much longer to dry.
- knitted garments flat to dry. If these are hung they will stretch excessively due to their weight when wet.
Drying
- Always follow the advice on the care label, if provided.
- If softener or antistatic agents are used, follow the manufacturer's instructions for these products.
- Remove items that are already dry. This will reduce the drying time for the remaining items.
rature knob to just past the start of the semi-circle, and set the timer between three and four hours, which considerably reduces the energy consumption.
TEMPERATURE
DRYING TIME
CARE
CLEANING
- The walls of the cabinet can be cleaned with a damp cloth and mild detergent.
- Dust tends to collect around the air intake, beneath the cabinet and on top of the cabinet. This can interfere with operation and cause the dryer to stop working.
To avoid such problems you should vacuum-clean the air intake and top of the cabinet at least once a year, or more often depending on the area the cabinet is installed in.
NOTE!
Do not wash with a high-pressure washer!
REPLACEMENT PARTS
If the power cord is damaged for any reason it must be replaced. Genuine spare parts can be obtained from the retailer.
NOTE!
A replacement power cord should nly be fitted by a qualified electrician!
SERVICING
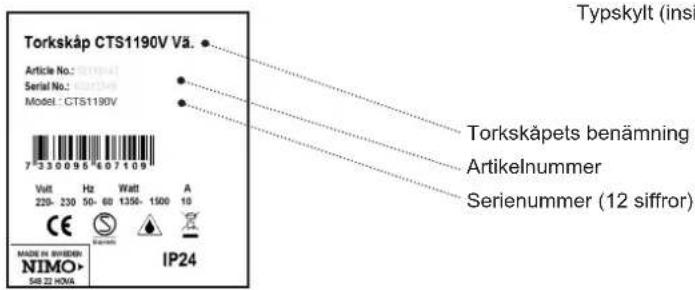
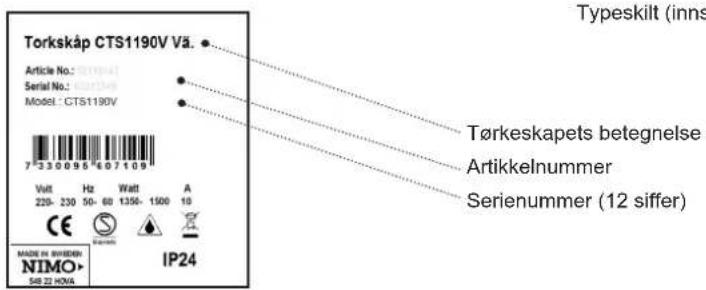
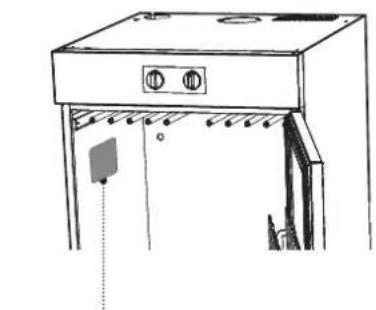
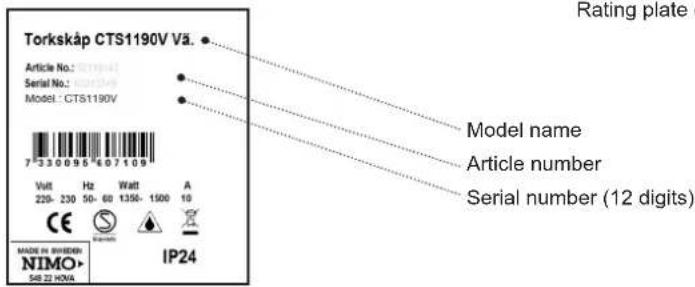
Before contacting the service department, make a note of the model name, article number and serial number of the drying cabinet.
This information can be found on the rating plate inside the cabinet.
natural_image
Line drawing of a kitchen appliance with control panel and hanging door (no text or symbols)Rating plate (inside)
TROUBLESHOOTING
| Problem Cause Action | ||
| Cabinet does not heat up even though temperature control is set to max. and fan is running. | Is the power cord plugged in? Check. | |
| Is the fuse OK? Check. | ||
| Is the correct fuse fitted? Replace with slow fuse. | ||
| Thermal cut-out has tripped. Reset by turning timer to zero and waiting 30 minutes. Try again by setting temperature control to max. and starting fan again by setting timer. | ||
| Thermal cut-out is faulty. Contact the retailer. | ||
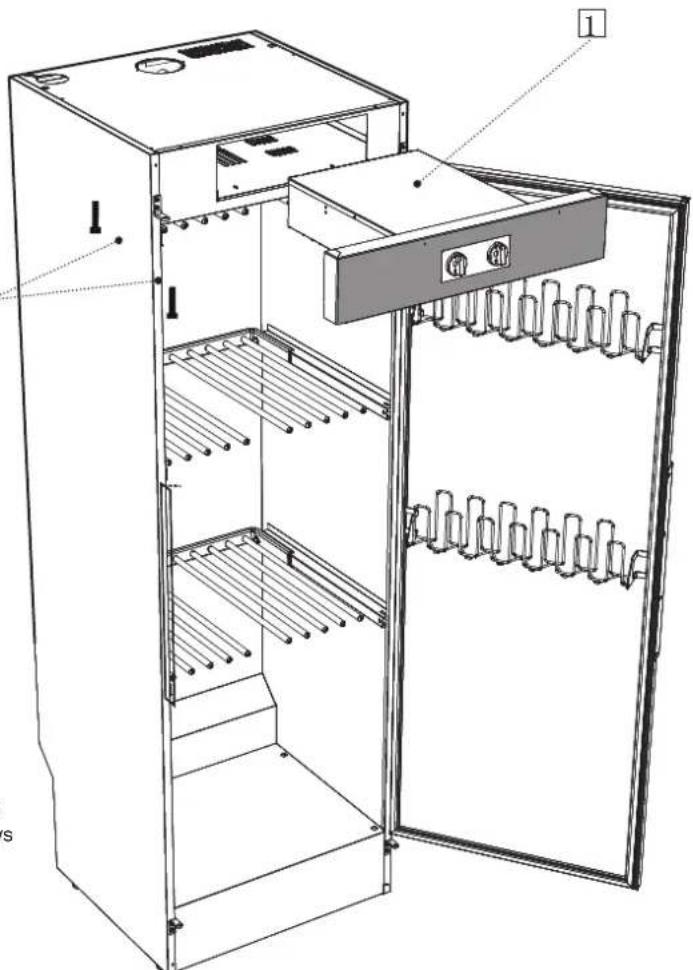
SERVICE MODULE
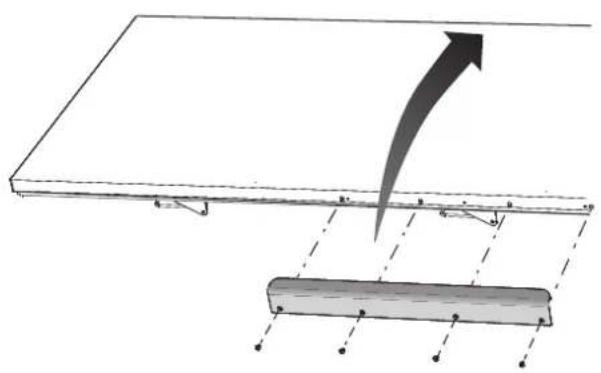
The heater and fan components are assembled in a removable service module.
WARNING!
Unplug the power cord from the socket.
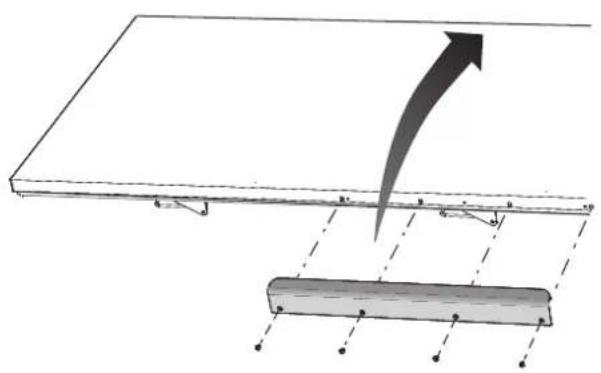
1 Undo the retaining screws for the service module. The screws are reached by opening the door. There are four screws.
2 Slide out the service module.
- Service module
- Retaining screws
natural_image
Technical line drawing of an open refrigerator with internal shelves and door panel (no text or symbols)TECHNICAL DATA
Capacity: Around 4.0 kg of laundry (cotton)
Evaporation rate: 17 g/min
Electrical supply: Single phase 230 V, 50–60 Hz
Motor: 35 W
Heating element: 1500 W
Thermal cut-out: Yes
Timer: Adjustable, up to 4 hours
Fan capacity: 180 m³/hour
Total hanger length: 16 metres
Dimensions: Height 1900 mm
Width 595 mm
Depth 610 mm
Weight: \~56 kg
Sound level: maks. 60 dB(A)
Manufacturing standards
See cabinet rating plate
Wiring diagram
Wiring diagram can be ordered from manufacturer.
Rating plate
See page 40
| Drying times for laundry after spin-drying *) | ||
| Setting | Drying time | Temperature |
| Economy | around 180 min | 45 °C |
| Quick | around 120 min | 60 °C |
*) Exact time may vary depending on spin speed.
GB

natural_image
Gray circular icon with three white gears, no text or symbols presentGARANTI WARRANTY
Quality warranty applies to consumer
- HANTERING AV UTTJÄNT TORKSKÅP
- Servicemodul
- OMHÄNGNING AV DÖRR
- PLACERING
- HANDHAVANDE
- START
- SKÖTSEL
- RENGÖRING
- FELSÖKNING
- HÄNDTERING AV UTTJENT TÖRKESKAP
- INSTALLERING
- UTPAKKING
- OMHENGLING AV DÖREN
- PLASSERING
- VEDLIKEHOLD
- RENGJ∅RING
- FEILSÖKING
- Important safety points.... 31
- For a healthy environment 31
- Drying cabinet description.... 32
- Installation 33
- Starting.... 38
- Operation 39
- Care. 40
- Troubleshooting 41
- Service module 41
- Technical data 42
- THIS USER MANUAL
- IMPORTANT SAFETY POINTS
- WARNING!
- FOR A HEALTHY ENVIRONMENT
- PACKAGING
- DISPOSING OF A WORN-OUT DRYING CABINET
- DRYING CABINET DESCRIPTION
- Service module
- INSTALLATION
- UNPACKNING
- INSTALLATION KIT
- Full delivery should include:
- Qty.
- FITTING THE DOOR HANDLE
- REVERSING THE DOOR
- PLACEMENT
- VENTILATION/AIR SUPPLY
- CONNECTING TO VENTILATION
- With ventilation adapter
- Direct connection to mechanical extractor
- ELECTRICAL CONNECTION
- STARTING
- AIR FLOW
- NOTE!
- OPERATION
- ARRANGING ITEMS FOR DRYING
- USER ADVICE
- Setting the controls
- CONTROLS
- Drying
- CARE
- CLEANING
- REPLACEMENT PARTS
- SERVICING
- TROUBLESHOOTING
- TECHNICAL DATA
- Manufacturing standards
- Wiring diagram
- Rating plate
- GARANTI WARRANTY
Brand : Elvita
Model : CTS1190V
Category : Tumble drier