
DJX - DJ Mixer Keyboard YAMAHA - Free user manual and instructions
Find the device manual for free DJX YAMAHA in PDF.

| Product Type | Portable DJ Mixing Keyboard |
| Brand | YAMAHA |
| Model | DJX |
| Category | DJ Mixing Keyboard |
| Number of Voices | 284 (140 panel voices, 128 GM, 15 drum kits, 1 sample) |
| Number of Styles | 100 rhythm styles |
| Built-in Effects | Reverb, Chorus, DSP, Arpeggiator (multiple types each) |
| Digital Sampling | Yes, up to 12 samples, end point and loop editing |
| Multitrack Recording | 3 user songs, 6 tracks (including one chord track) |
| Real-Time Controllers | 5 knobs (Cutoff, Resonance, Groove, Assign, Bass Boost), ribbon, Pitch Bend wheel, footswitch |
| Display | Custom large LCD with mode, measure, tempo indicators, etc. |
| Power Supply | Yamaha PA-5B/5C power adapter (DC 10-12V) or 6 D-size batteries (1.5 V) |
| Maintenance and Cleaning | Soft dry cloth; do not use solvents or chemicals |
| Safety | Do not open, use specified adapter, avoid moisture, observe battery polarity |
| Connectors | Headphone/Aux output, line input, mic input, MIDI In/Out, footswitch, DC IN |
| MIDI Functions | GM compatible, Bulk dump, Initial setup send |
| General Information | User manual included (60 pages), update possible via MIDI |
Frequently Asked Questions - DJX YAMAHA
User questions about DJX YAMAHA
0 question about this device. Answer the ones you know or ask your own.
Ask a new question about this device
Download the instructions for your DJ Mixer Keyboard in PDF format for free! Find your manual DJX - YAMAHA and take your electronic device back in hand. On this page are published all the documents necessary for the use of your device. DJX by YAMAHA.
USER MANUAL DJX YAMAHA
This product utilizes batteries or an external power supply (adapter). DO NOT connect this product to any power supply or adapter other than one described in the manual, on the name plate, or specifically recommended by Yamaha.
This product should be used only with the components supplied or; a cart, rack, or stand that is recommended by Yamaha. If a cart, etc., is used, please observe all safety markings and instructions that accompany the accessory product.
SPECIFICATIONS SUBJECT TO CHANGE:
The information contained in this manual is believed to be correct at the time of printing. However, Yamaha reserves the right to change or modify any of the specifications without notice or obligation to update existing units.
This product, either alone or in combination with an amplifier and headphones or speaker/s, may be capable of producing sound levels that could cause permanent hearing loss. DO NOT operate for long periods of time at a high volume level or at a level that is uncomfortable. If you experience any hearing loss or ringing in the ears, you should consult an audiologist. IMPORTANT: The louder the sound, the shorter the time period before damage occurs.
NOTICE:
Service charges incurred due to lack of knowledge relating to how a function or effect works (when the unit is operating as designed) are not covered by the manufacturer's warranty, and are therefore the owners responsibility. Please study this manual carefully and consult your dealer before requesting service.
ENVIRONMENTAL ISSUES:
Yamaha strives to produce products that are both user safe and environmentally friendly. We sincerely believe that our products and the production methods used to produce them, meet these goals. In keeping with both the letter and the spirit of the law, we want you to be aware of the following:
Battery Notice:
This product MAY contain a small non-rechargeable battery which (if applicable) is soldered in place. The average life span of this type of battery is approximately five years. When replacement becomes necessary, contact a qualified service representative to perform the replacement.
This product may also use “household” type batteries. Some of these may be rechargeable. Make sure that the battery being charged is a rechargeable type and that the charger is intended for the battery being charged.
When installing batteries, do not mix old batteries with new, or with batteries of a different type. Batteries MUST be installed correctly. Mismatches or incorrect installation may result in overheating and battery case rupture.
Warning:
Do not attempt to disassemble, or incinerate any battery. Keep all batteries away from children. Dispose of used batteries promptly and as regulated by the laws in your area. Note: Check with any retailer of household type batteries in your area for battery disposal information.
Disposal Notice:
Should this product become damaged beyond repair, or for some reason its useful life is considered to be at an end, please observe all local, state, and federal regulations that relate to the disposal of products that contain lead, batteries, plastics, etc. If your dealer is unable to assist you, please contact Yamaha directly.
NAME PLATE LOCATION:
The name plate is located on the bottom of the product. The model number, serial number, power requirements, etc., are located on this plate. You should record the model number, serial number, and the date of purchase in the spaces provided below and retain this manual as a permanent record of your purchase.
Model
Serial No. ____
Purchase Date ____
PRECAUTIONS
PLEASE READ CAREFULLY BEFORE PROCEEDING
* Please keep these precautions in a safe place for future reference.

WARNING
Always follow the basic precautions listed below to avoid the possibility of serious injury or even death from electrical shock, short-circuiting, damages, fire or other hazards. These precautions include, but are not limited to, the following:
- Do not open the instrument or attempt to disassemble the internal parts or modify them in any way. The instrument contains no user-serviceable parts. If it should appear to be malfunctioning, discontinue use immediately and have it inspected by qualified Yamaha service personnel.
- Do not expose the instrument to rain, use it near water or in damp or wet conditions, or place containers on it containing liquids which might spill into any openings.
- If the AC adaptor cord or plug becomes frayed or damaged, or if there is a sudden loss of sound during use of the instrument, or if any unusual smells or smoke should appear to be caused by it, immediately turn off
the power switch, disconnect the adaptor plug from the outlet, and have the instrument inspected by qualified Yamaha service personnel.
- Use the specified adaptor (PA-5B, PA-5C or an equivalent recommended by Yamaha) only. Using the wrong adaptor can result in damage to the instrument or overheating.
- Before cleaning the instrument, always remove the electric plug from the outlet. Never insert or remove an electric plug with wet hands.
- Check the electric plug periodically and remove any dirt or dust which may have accumulated on it.

CAUTION
Always follow the basic precautions listed below to avoid the possibility of physical injury to you or others, or damage to the instrument or other property. These precautions include, but are not limited to, the following:
- Do not place the AC adaptor cord near heat sources such as heaters or radiators, and do not excessively bend or otherwise damage the cord, place heavy objects on it, or place it in a position where anyone could walk on, trip over, or roll anything over it.
- When removing the electric plug from the instrument or an outlet, always hold the plug itself and not the cord.
- Do not connect the instrument to an electrical outlet using a multiple-connector. Doing so can result in lower sound quality, or possibly cause overheating in the outlet.
- Unplug the AC power adaptor when not using the instrument, or during electrical storms.
- Always make sure all batteries are inserted in conformity with the +/- polarity markings. Failure to do so might result in overheating, fire, or battery fluid leakage.
- Always replace all batteries at the same time. Do not use new batteries together with old ones. Also, do not mix battery types, such as alkaline batteries with manganese batteries, or batteries from different makers, or different types of batteries from the same maker, since this can cause overheating, fire, or battery fluid leakage.
- Do not dispose of batteries in fire.
- Do not attempt to recharge batteries that are not intended to be charged.
- If the instrument is not to be in use for a long time, remove the batteries from it, in order to prevent possible fluid leakage from the battery.
- Keep batteries away from children.
- Before connecting the instrument to other electronic components, turn off the power for all components. Before turning the power on or off for all components, set all volume levels to minimum.
-
Do not expose the instrument to excessive dust or vibrations, or extreme cold or heat (such as in direct sunlight, near a heater, or in a car during the day) to prevent the possibility of panel disfiguration or damage to the internal components.
-
Do not use the instrument near other electrical products such as televisions, radios, or speakers, since this might cause interference which can affect proper operation of the other products.
- Do not place the instrument in an unstable position where it might accidentally fall over.
- Before moving the instrument, remove all connected adaptor and other cables.
- When cleaning the instrument, use a soft, dry cloth. Do not use paint thinners, solvents, cleaning fluids, or chemical-impregnated wiping cloths. Also, do not place vinyl, plastic or rubber objects on the instrument, since this might discolor the panel or keyboard.
- Do not rest your weight on, or place heavy objects on the instrument, and do not use excessive force on the buttons, switches or connectors.
- Use only the stand/rack specified for the instrument. When attaching the stand or rack, use the provided screws only. Failure to do so could cause damage to the internal components or result in the instrument falling over.
- Do not operate the instrument for a long period of time at a high or uncomfortable volume level, since this can cause permanent hearing loss. If you experience any hearing loss or ringing in the ears, consult a physician.
■SAVING USER DATA
- Save all data to an external device such as the Yamaha MIDI Data Filer MDF3, in order to help prevent the loss of important data due to a malfunction or user operating error.
Yamaha cannot be held responsible for damage caused by improper use or modifications to the instrument, or data that is lost or destroyed.
Always turn the power off when the instrument is not in use.
Make sure to discard used batteries according to local regulations.
* The illustrations and LCD screens as shown in this owner's manual are for instructional purposes only, and may be different from the ones on your instrument.
Congratulations on your purchase of the Yamaha DJX!
You now own a portable keyboard that combines advanced functions, great sound and exceptional ease-of-use in a highly compact package. Its outstanding features also make it a remarkably expressive and versatile instrument.
Read this Owner's Manual carefully while playing your new DJX in order to take full advantage of its various features.
Main Features
Real-time Controls
The DJX is equipped with an amazing set of real-time performance controls, that let you “tweak” the sound of various instrument parts — as you play!
- Control Knobs
These five knobs let make various dynamic changes to the voices and patterns. - ASSIGN knob
Included in the control knobs is a special ASSIGN knob that can be assigned to control any one of a variety of functions.
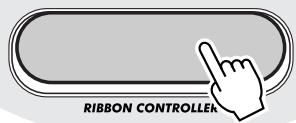
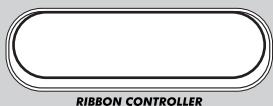
• RIBBON CONTROLLER
This expressive control can also be assigned to control any one of a variety of functions.
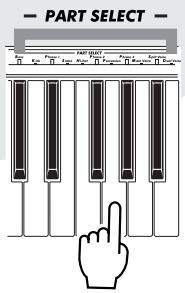
• Part Select (PART CONTROL)
Use this to select the Part you want to use with the control knobs or RIBBON CONTROLLER.
• Part On/Off (PART CONTROL)
This function lets you alternately mute and un-mute specific instrument parts of the pattern as it's playing. - PITCH BEND wheel
Use this to raise and lower the pitch of the voice as you play.
Digital Sampling
This function lets you record your own sounds to be played from the keyboard. Up to twelve different samples can be recorded. Simple editing functions, such as setting the end point and looping, are also provided.
Other powerful features include:
- Exceptionally realistic and dynamic sounds with 284 voices, utilizing digital recordings of actual instruments.
- Dual voice and Split voice modes that let you layer two voices together or assign two voices to separate sections of the keyboard
- Four high-quality effects — Reverb, Chorus, DSP, and Arpeggiator — each with a variety of different types.
- 100 pattern styles, each with different Lead In/Out and Beat A/B sections. All styles also have their own four Break Out patterns. The DJX also gives you convenient control over pattern Styles — including BPM (Tempo) and independent Pattern Volume.
- Powerful song recording operations for recording and playing back complete compositions (three User songs are available). Up to six tracks can be recorded to a song, including a special chord track for style pattern.
- Performance Setup, for automatically calling up an appropriate voice for playing with the selected style. Plus, there are 16 User Performance Setup memory spaces that let you save your custom panel settings for instant recall.
- Touch response for maximum expressive level control over the voices.
- Convenient footswitch control over various functions — including sustain, start/stop, and more.
• GM (General MIDI) compatibility and full GM voice set. - Large custom LCD gives you easy, at-a-glance confirmation of all important settings, as well as chord and note indications.
- Comprehensive MIDI functions that let you integrate the DJX into a MIDI music system, for sequence recording and other advanced applications.
• Built-in, high-quality stereo amplifier/speaker system.
PANEL CONTROLS AND TERMINALS 6
- Front Panel 6
- Rear Panel 7
SETTING UP 8
POWER REQUIREMENTS 8
TURNING ON THE POWER ...... 8
ACCESSORY JACKS 9
Quick Guide 10
Step 1 The DJX —
Take it for a spin! .... 10
Step 2 Using the Keyboard ...... 12
Step 3 Demo Song/Voice/Style ... 14
Step 4 Digital Sampling ...... 16
Step 5 Function Parameters...... 18
Step 6 Assigning Various Controls to the ASSIGN Knob, RIBBON CONTROLLER, and Footswitch .... 20
PANEL DISPLAY INDICATIONS 22
PLAYING VOICES — THE VOICE MODE 24
PLAYING A VOICE — MAIN VOICE ...25
- About Panel Voices and GM Voices .... 26
- Drum Kit Voice Chart (voices 141 - 155) ...... 26
Function Parameters — Main Voice .. 27
TRANSPOSE AND TUNING 28
Transpose 28
Tuning 29
PLAYING TWO VOICES — DUAL VOICE ...... 29
Function Parameters — Dual Voice ... 30
PLAYING TWO VOICES — SPLIT VOICE .... 31
Function Parameters — Split Voice .... 32
ADDITIONAL VOICE FUNCTIONS — VOICE SET, TOUCH SENSITIVITY, AND PITCH BEND RANGE 33
Function Parameters — Voice Set, Touch Sensitivity and Pitch Bend Range .... 33
EFFECTS 34
REVERB 34
CHORUS 35
DSP 36
ARPEGGIATOR 37
Function Parameters — Effects ...... 37
• Effect Types ...... 38
ABOUT THE BEAT DISPLAY 42
ADJUSTING THE SONG VOLUME .....43
PATTERNS — THE STYLE MODE 44
SELECTING A STYLE AND PLAYING THE PATTERN ....44
PATTERN CONTROLS 47
PATTERN SECTIONS (BEAT A, BEAT B AND BREAK OUTS) 48
CHANGING THE BPM (TEMPO) .....48
ADJUSTING THE PATTERN VOLUME .....49
FINGERING 50
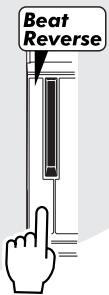
BEAT REVERSE 52
PART ON/OFF 52
- About the Parts ....53
SETTING THE PATTERN SPLIT POINT ....54
Function Parameter — Pattern Split Point .... 55
PERFORMANCE SETUP 56
PERFORMANCE SETUP — USER .....56
Recording a User Performance Setup 56
Recalling a User Performance Setup 57
- Selecting a User Bank ....57
PERFORMANCE SETUP — PRESET ..... 58
Selecting a Preset Performance Setup ....58
THE KNOBS 59
USING THE KNOBS 59
- About CUTOFF and RESONANCE ....62
- About GROOVE ...... 62
ASSIGN KNOB 63
ASSIGN Knob Parameters ...... 64
ABOUT DIGITAL SAMPLING ...... 69
RECORDING A SAMPLE AND PLAYING IT ....70
• Guidelines for sampling .....71
- Trigger Level 71
- Sampling memory capacity ...... 73
- Deleting a sample 74
• Recording additional samples ..... 74
SAMPLE EDITING 75
Setting the End Point 75
Creating Loops 78
- About the resolution settings ..... 79
SONG RECORDING 80
RECORDING A USER SONG — REALTIME RECORDING ....81
• Additional Operations ...... 84
• Additional Operations ...... 88
Replacing a Note or Rest 89
Entering Velocity Curves 90
Velocity Curve Chart 90
CLEARING A SONG 91
MIDI FUNCTIONS 92
WHAT IS MIDI? 92
Channel Messages 93
System Messages 93
CONNECTING TO A PERSONAL COMPUTER 94
• MIDI Terminals ...... 94
FUNCTION PARAMETERS — MIDI .....95
USING BULK DUMP SEND/ SAMPLING SEND TO SAVE DATA .....97
Saving Bulk Data/Sampling Data ..... 97
Loading Bulk Data/Sampling Data ....99
USING INITIAL SETUP SEND WITH A SEQUENCER ....100
Sending Initial Setup Data 100
TROUBLESHOOTING 102
DATA BACKUP & INITIALIZATION .... 103
VOICE LIST 104
DRUM KIT LIST 108
STYLE LIST 111
MIDI IMPLEMENTATION CHART ..... 112
SPECIFICATIONS 115
INDEX 116
PANEL CONTROLS AND TERMINALS
Front Panel
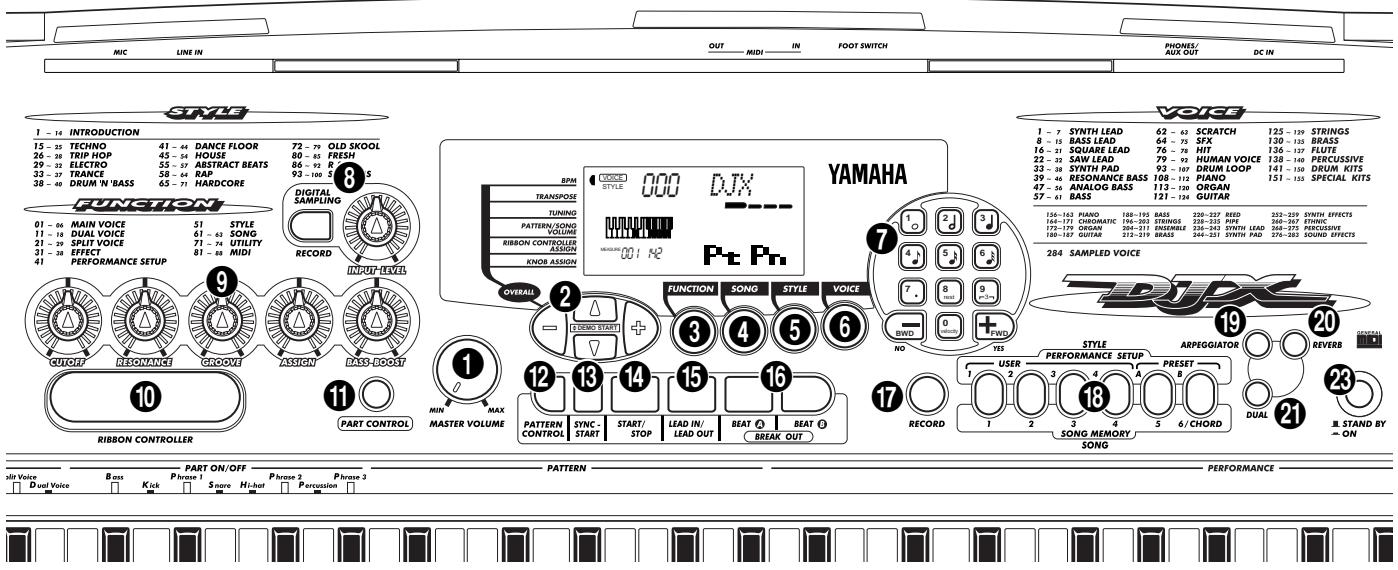
① MASTER VOLUME dial
This determines the overall volume of the DJX.
② OVERALL, DEMO START buttons (▲, ▼, +, -)
These are for selecting the various “overall” functions and setting their values. (See page 22.) They are also used to play the Demo songs. (See pages 14, 40.) In the Digital Sampling function, these are used to select and set the sample editing parameters. (See page 75.)
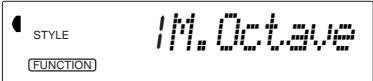
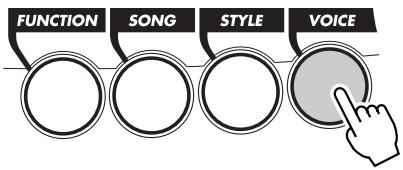
3 FUNCTION button
This selects the Function mode. (See page 18.)
4 SONG button
This selects the Song mode. (See page 40.)
⑤ STYLE button
This selects the Style mode. (See pages 15, 44.)
6 VOICE button
This selects the Voice mode. (See pages 14, 25.)
⑦ Numeric keypad, +/- buttons
These are for selecting songs, voices, and styles. (See pages 40, 25, and 44.) They are also used for making various settings, such as:
- Selecting and changing the Function parameters (page 18)
- Setting note values and other settings for the Step Record function (page 86)
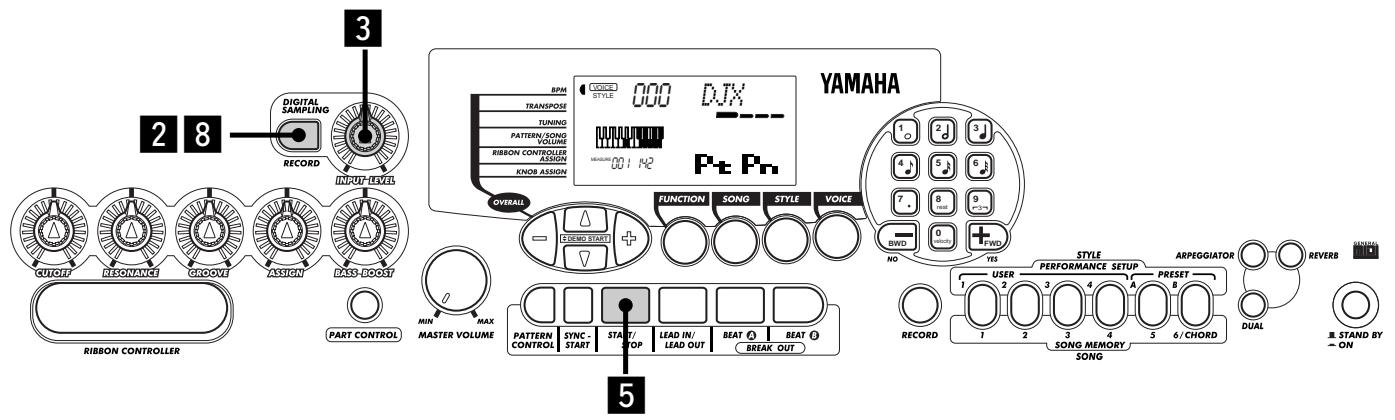
⑧ DIGITAL SAMPLING section — RECORD button and INPUT LEVEL knob
These two controls are used for the Digital Sampling functions. (See page 69.)
⑨ Knobs — CUTOFF, RESONANCE, GROOVE, ASSIGN, BASS BOOST
These controls allow you to make expressive, dynamic, real-time changes to various aspects of the voices and styles. (See page 59.)
This assignable control allows you to make expressive, dynamic, real-time changes to various aspects of the voices and styles. (See page 66.)
PART CONTROL button
This turns the Part Control function on and off. (See page 59.)
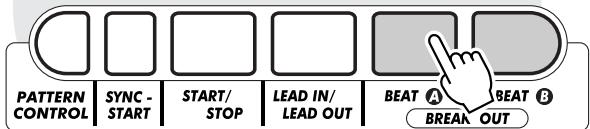
12 PATTERN CONTROL button
When the Style mode is selected, this alternately enables or disables keyboard control over the pattern chords. (See page 45.)
13 SYNC-START button
This turns the Sync-Start function on and off. (See page 46.)
14 START/STOP button
When the Style mode is selected, this alternately starts and stops the pattern. (See pages 45, 47.) In the Song mode, this alternately starts and stops song playback. (See page 41.)
15 LEAD IN/LEAD OUT button
When the Style mode is selected, this is used to control the Lead In and Lead Out functions. (See pages 46, 47.)
16 BEAT A/B (BREAK OUT) buttons
When the Style mode is selected, these are used to change pattern sections and control the Break Out function. (See page 48.)
17 RECORD button
This is used for selecting and enabling the recording functions: Song (pages 82, 85) and Performance Setup (page 56).
18 PERFORMANCE SETUP / SONG MEMORY buttons
When the Style mode is selected, these are used to select the Performance Setup registrations (pages 57, 58). When the Song mode is selected, these are used to select specific tracks (pages 82, 86).
19 ARPEGGIATOR button
This turns the Arpeggiator effect on and off. (See page 37.)
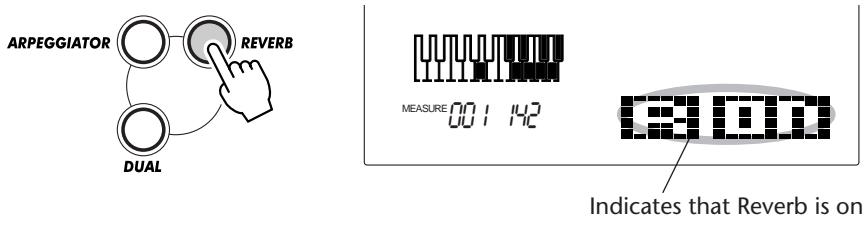
20 REVERB button
This turns the Reverb effect on and off. (See page 34.)
21 DUAL button
This turns the Dual mode on and off. (See page 29.)
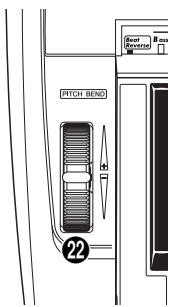
22 PITCH BEND wheel
This is used for raising or lowering the pitch of the voices as you play. It affects only the voices played in the PERFORMANCE section of the keyboard. The pitch range of the wheel can also be set (see page 33).
23 STAND BY/ON switch
Rear Panel
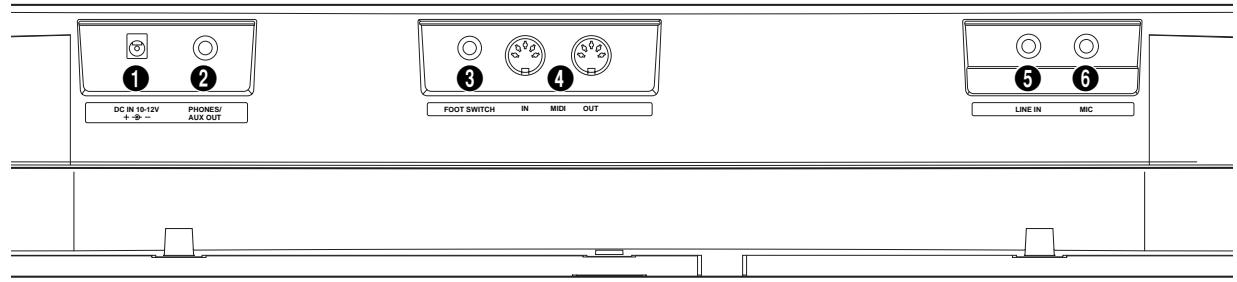
① DC IN 10-12V jack
This is for connection to a PA-5B/5C AC power adaptor. (See page 8.)
② PHONES/AUX OUT jack
This is for connection to a set of stereo headphones or to an external amplifier/speaker system. (See page 9.)
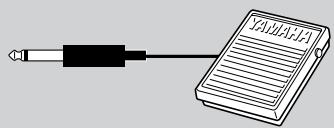
3 FOOT SWITCH jack
This is for connection to an optional FC4 or FC5 Footswitch. The footswitch is generally used to control sustain, but it can conveniently be set to control one of a variety of functions instead. (See pages 9, 21.)
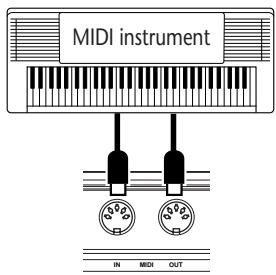
4 MIDI IN, OUT terminals
These are for connection to other MIDI instruments and devices. (See page 94.)
⑤ LINE IN jack
This is used with the Digital Sampling functions, and is for connection to and recording of an external audio source (line level), such as a CD player or cassette deck. (See pages 9, 70.) (Connector: mono, 1/4" phone jack.)
⑥ MIC jack
This is used with the Digital Sampling functions, and is for connection to a microphone for recording acoustic audio. (See pages 9, 70.) (Connector: mono, 1/4" phone jack.)
This section contains information about setting up your DJX for playing. Make sure to read this section carefully before using the instrument.
POWER REQUIREMENTS
Although the DJX will run either from an optional AC adaptor or batteries, Yamaha recommends use of the more environmentally safe AC adaptor. Follow the instructions below according to the power source you intend to use.
CAUTION

Never interrupt the power supply (e.g. remove the batteries or unplug the AC adaptor) during any DJX record operation! Doing so can result in a loss of data.
Using an AC Power Adaptor
To connect your DJX to a wall socket, you will need the optionally available Yamaha PA-5B/5C Power Adaptor. Use of other AC adaptors could result in damage to the instrument, so be sure to ask for the right kind. Connect one end of the adaptor to the DC IN 10-12V jack on the rear panel of your DJX, and the other end to a suitable electrical outlet.
WARNING

- Use ONLY a Yamaha PA-5B/5C AC Power Adaptor (or other adaptor specifically recommended by Yamaha) to power your instrument from the AC mains. The use of other adaptors may result in irreparable damage to both the adaptor and the DJX.
- Unplug the AC Power Adaptor when not using the DJX, or during electrical storms.
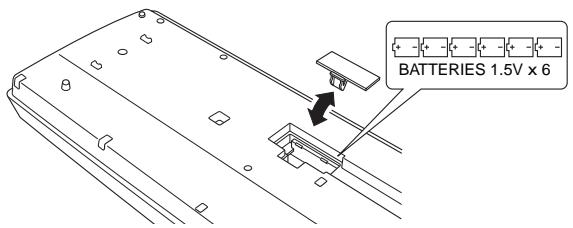
Using Batteries
■ Inserting Batteries
Turn the instrument upside-down and remove the battery compartment lid. Insert six 1.5-volt size "D" (SUM-1, R-20 or equivalent) batteries as shown in the illustration, making sure that the positive and negative terminals are properly aligned, and replace the lid.
■ When the Batteries Run Down
When the batteries run low and the battery voltage drops below a certain level, the DJX may not sound or function properly. As soon as this happens, replace them with a complete set of six new batteries.
CAUTION

- Never mix old and new batteries or different types of batteries (e.g., alkaline and manganese).
- To prevent possible damage from battery leakage, remove the batteries from the instrument if it is not to be used for a long time.
With the AC power adaptor connected or with batteries installed, simply press the power switch until it locks in the ON position. When the instrument is not in use, be sure to turn the power off. (Press the switch again so that it pops up.)
■ STAND BY
- ON
CAUTION

Even when the switch is in the "STAND BY" position, electricity is still flowing to the instrument at the minimum level. When you are not using the DJX for a long time, make sure you unplug the AC power adaptor from the wall AC outlet, and/or remove the batteries from the instrument.
ACCESSORY JACKS
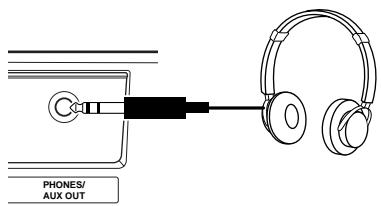
■ Using Headphones
For private practicing and playing without disturbing others, connect a set of stereo headphones to the rear panel PHONES/AUX OUT jack. Sound from the built-in speaker system is automatically cut off when you insert a headphone plug into this jack.
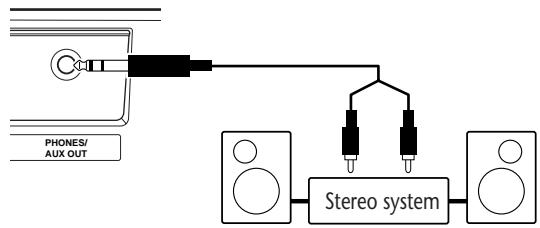
■ Connecting a Keyboard Amplifier or Stereo System
Though the DJX is equipped with a built-in speaker system, you can also play it through an external amplifier/speaker system. First, make sure the DJX and any external devices are turned off, then connect one end of a stereo audio cable to the LINE IN or AUX IN jack(s) of the other device and the other end to the rear panel PHONES/AUX OUT jack on the DJX.
flowchart
graph TD
    A["Phone/UX OUT"] --> B["Audio jack"]
    B --> C["Stereo system"]
    C --> D["Speaker"]
    C --> E["Speaker"]
CAUTION

To prevent damage to the speakers, set the volume of the external devices at the minimum setting before connecting them. Failure to observe these cautions may result in electric shock or equipment damage.
■ Using a Footswitch
This feature lets you use an optional footswitch (Yamaha FC4 or FC5) to control a variety of functions. (See page 21.)
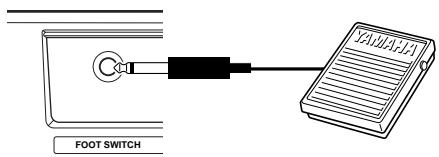
NOTE
- Make sure that the footswitch plug is properly connected to the FOOT SWITCH jack before turning on the power.
- Do not press the footswitch while turning the power on. Doing this changes the recognized polarity of the footswitch, resulting in reversed footswitch operation.
■ Using the MIDI Terminals
The DJX also features
MIDI terminals, allowing you to interface the DJX with other MIDI instruments and devices. (For more information, see page 94.)
■ Using the MIC and LINE IN jacks
These are for recording an external audio source in the Digital Sampling functions (page 70). The MIC jack is for connection to a microphone for recording vocals and acoustic instruments. The LINE IN jack is for connecting to and recording a line level signal, such as that of a CD player or cassette deck.
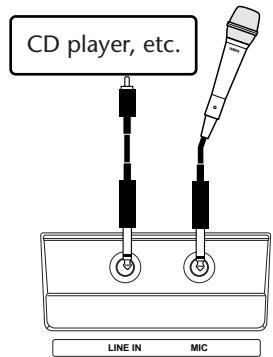
CAUTION

Never connect a line level signal (CD player, cassette deck, electronic instrument, etc.) into the MIC input jack! Doing this could damage the DJX and its Digital Sampling functions.
Quick Guide
Unless you enjoy reading manuals, you're probably eager to start playing your new DJX right now. If so, this next section is for you!
Sure, the DJX is ready to play right out of the box — but we urge you to take the time to read this short, easy-to-understand section. If you've never even touched an electronic keyboard before, following the steps in this section will make you a master of the DJX in virtually no time at all! Plus, it will give you the tools to explore and use the advanced functions in your music. Enjoy!
Enjoy!
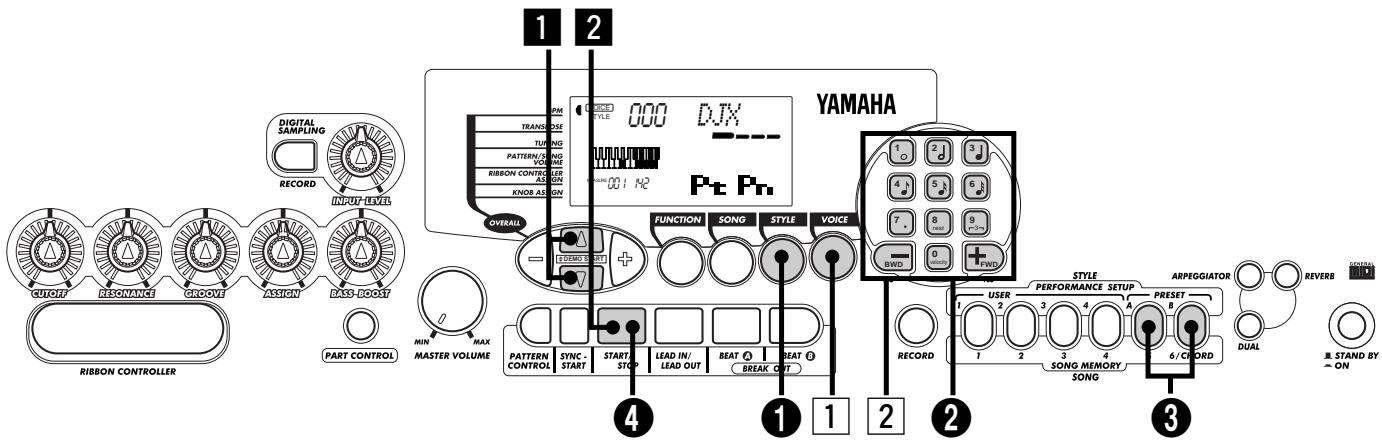
Step 1 The DJX – Take it for a spin!
Can't wait to get going? Here's all you need to lay down the beat and start jamming on your new DJX! Just follow the numbers...
Give it some juice...
1 Plug in the adaptor, and turn on the power.
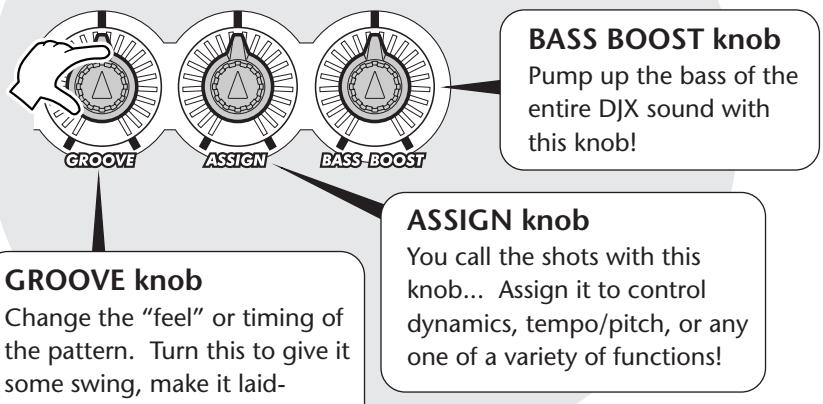
Work out on the knobs!
3 These three knobs give you dynamic, real-time control over the pattern. Try 'em out!
- Want to find out more? See page 59.
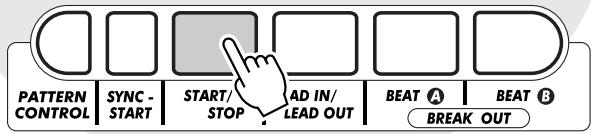
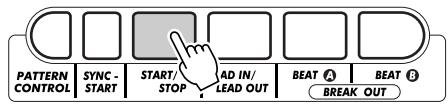
Start it up!
2 Start the pattern by pressing the START/STOP button. You can also start the pattern by pressing any one of the keys in the PATTERN section of the keyboard.
- Want to find out more? See page 45.
Cut loose on the ribbon!
4 Slide your finger along the RIBBON CONTROLLER and hear how the sound changes. There are tons of things you can assign to this, too!
- Want to find out more? See page 66.
Mix up the beats!
5 Play around with the BEAT A and BEAT B buttons, and get the rhythm to flow.
Shake it up and turn it 'round!
6 A special Beat Reverse key lets you break up the beat and hit the top of the measure. Play the key repeatedly and stutter the rhythm a bit!
- Want to find out more? See page 52.

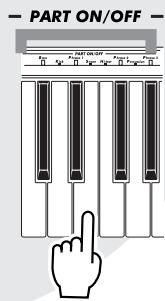
Drop Parts out, fly Parts in!
7 With the PART ON/OFF keys, you're an instant maestro of mix. Check the name of the Part (instrument) over each key, then press it to turn the Part off and on. The Parts that are currently turned on are shown by darkened keys in the display.
- Want to find out more? See page 52.

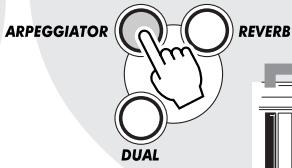
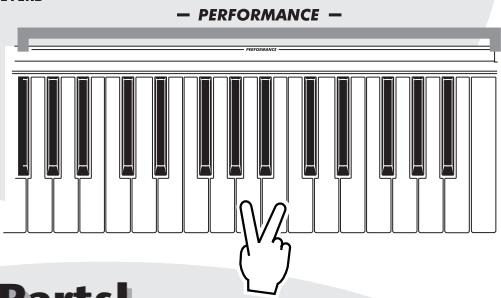
Arpeggiator magic!
8 First, press the ARPEGGIATOR button to turn the function on. Then, hold down two or three keys at the same time in the PERFORMANCE section of the keyboard, and let the Arpeggiator work its magic!
- Want to find out more? See page 37.
Tweak the voice — while you play!
9 Turn the two voice-related knobs for some wild effects, while you play the voice from the PERFORMANCE section of the keyboard.
- Want to find out more? See page 59.
Pick your own Parts!
10 You can select different Parts to be controlled with the voice-related knobs (in step 9 above) by pressing one of the PART SELECT keys. The selected Part is shown as a darkened key in the display.
- Want to find out more? See page 60.
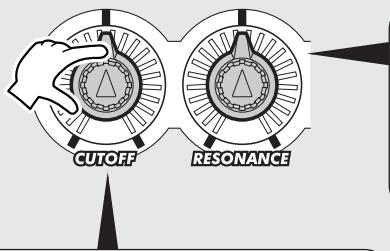
RESONANCE knob
Set this to determine how much the CUTOFF knob affects the sound. Turn it to the right for maximum filter effect, and to the left for more subtle filter changes.
CUTOFF knob
Just like on vintage analog synthesizers, this knob lets you sweep the cutoff frequency of the filter as you play the keyboard. Turn it to the right to “open up” the filter for a brighter sound, and turn it to the left to “shut down” the filter.
Play the wheel!
11 The highly expressive PITCH BEND wheel rounds out the DJX's set of amazing power tools! Play the keyboard, and bend the pitch up by moving the wheel up with your left thumb. Bring the pitch down by moving the wheel down. Let go of the wheel, and the pitch naturally snaps back to normal!
PITCH BEND
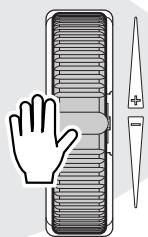
- Want to find out more? See page 7.
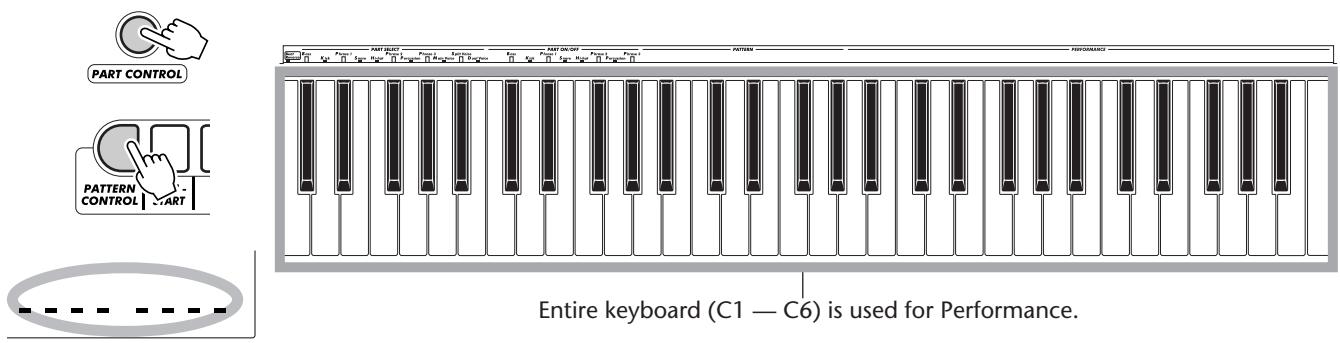
Step 2 Using the Keyboard
Using the DJX's Multi-function Keyboard
The keyboard of the DJX is far different (and more powerful!) than any you've ever seen. Let's take a look...
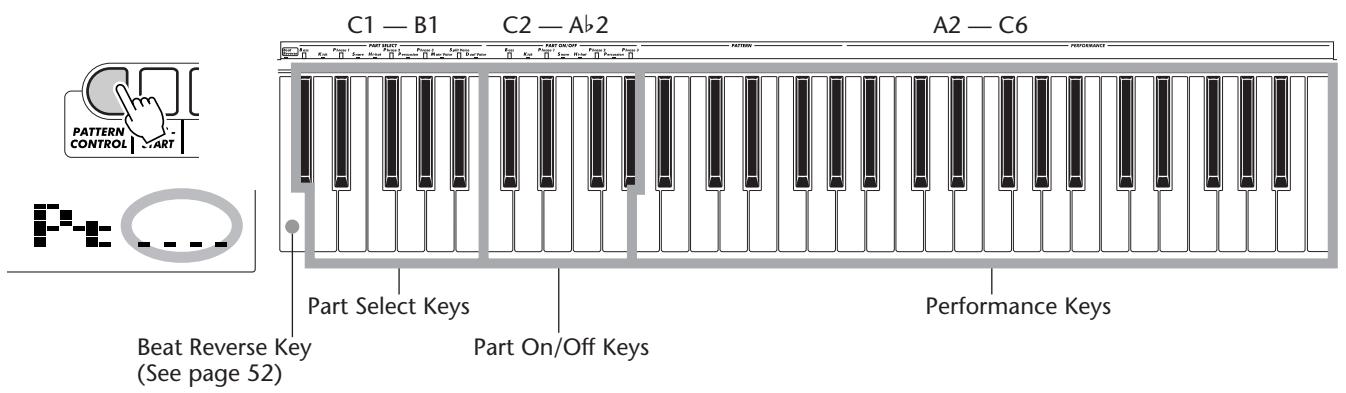
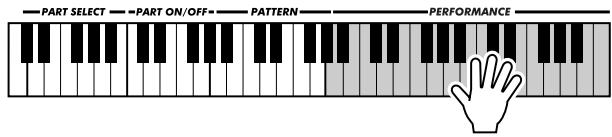
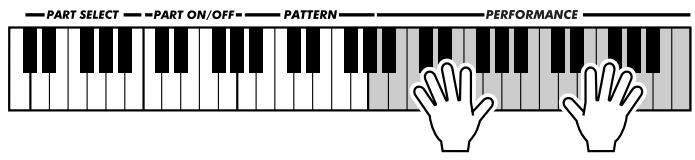
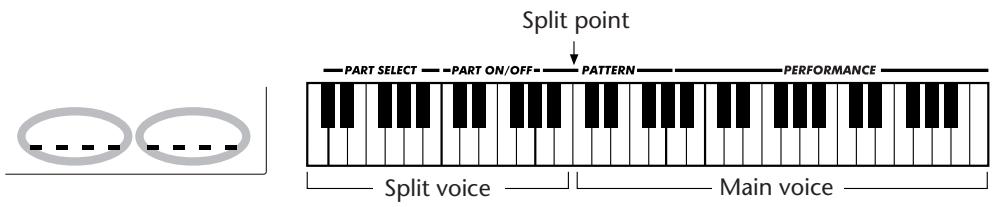
Each time you turn on the DJX, the keyboard is "split" into the following functions:
Indicates Part Control and Pattern Control are both on.
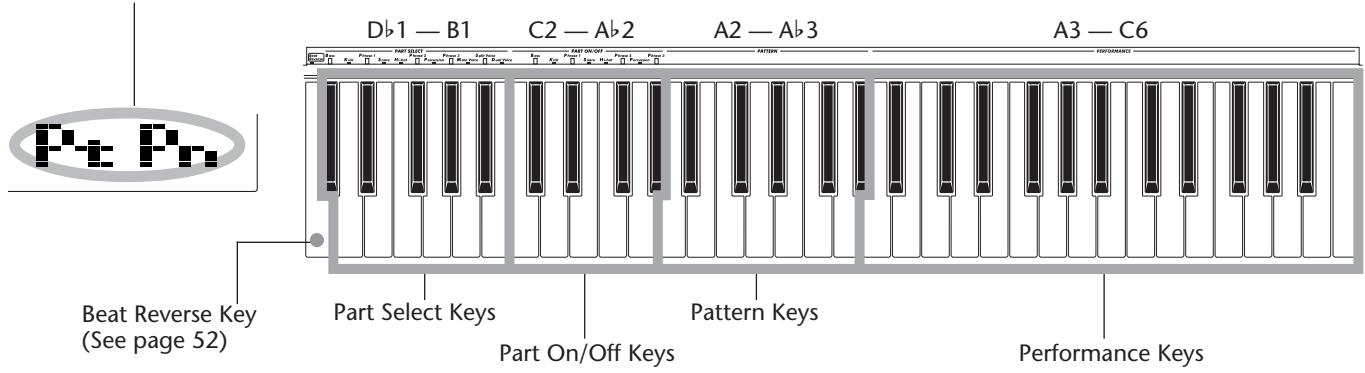
What do these keys do?
Part Select
These keys let you select specific Parts for control with the knobs and the RIBBON CONTROLLER. (See page 60.)
Part On/Off
These keys let you mute/un-mute specific Parts of a pattern before or during playback. (See page 52.)
Pattern
These keys let you instantly change the chords of the pattern. (See page 50.)
Performance
These keys are for normal playing of the selected voice (or voices).
Special DJX Demo Voice
A special DJX Demo voice (#000) is automatically selected each time you turn on the power. This voice has a huge variety of sounds, with each key playing a different sound — percussion, drum loops, scratch, special FX, human voice and many others!
To hear the DJX Demo voice properly across the entire keyboard, make sure that Part Control, Pattern Control and Sync-Start are off. (See page 13.)
1 Enter the Voice mode.
2 Select voice #000.
3 Play different keys and listen to the variety of sounds.
More keyboard settings
Other keyboard settings are available depending on the on/off settings of Part Control and Pattern Control. (You can turn these on and off with the PART CONTROL and PATTERN CONTROL buttons.)
When Part Control is off:
Turn Part Control off by pressing the PART CONTROL button.
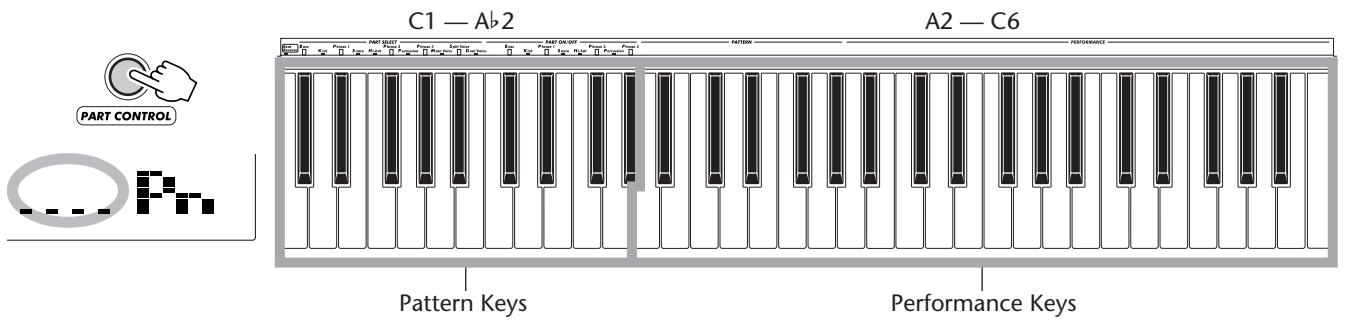
When Pattern Control is off:
Turn Pattern Control off by pressing the PATTERN CONTROL button.
When Part Control and Pattern Control are both off:
Turn Part Control off by pressing the PART CONTROL button; turn Pattern Control off by pressing the PATTERN CONTROL button. In this condition, you can play the entire keyboard normally.
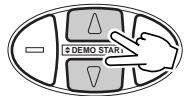
Step 3 Demo Song/Voice/Style
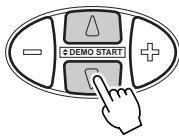
Playing back all three songs
The DJX has three Demo songs that showcase the authentic voices and dynamic patterns of the instrument.
1 Simultaneously press both OVERALL ▲/▼ buttons.
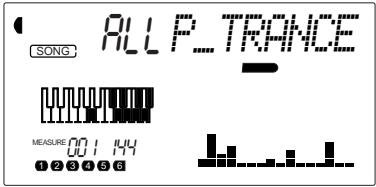
2 Stop the song.

Want to find out more? See page 41.
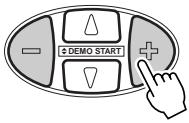
Selecting a voice
The DJX features a total of 284 high-quality voices. Let's try a few of them out...
Panel voices ...... 1 - 140 (140 voices)
141 - 155 (15 drum kit voices)
GM voices ...... 156 - 283 (128 voices)
Sampling voice ..... 284
1 Enter the Voice mode.
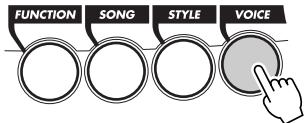
2 Select a voice.


3 Play the keyboard.
Want to find out more? See page 25.
Panel Voice List
| No. | Voice Name | No. | Voice Name | No. | Voice Name | No. | Voice Name | No. | Voice Name | No. | Voice Name |
| 0 | DJX | SAW LEAD | 45 | Nu Swing | 67 | Rave Pipe 1 | 91 | Uhh+Hit | 114 | Jazz Organ 2 | |
| Break It | 46 | Synth Bass | 68 | Rave Pipe 2 | 92 | Yeah... | 115 | Rock Organ | |||
| SYNTH LEAD | Scary | ANALOG BASS | 69 | FMTB 2 | DRUM LOOP | 116 | Cheez Organ | ||||
| 1 | Fuzzline | Move It | 47 | Analog Bass | 70 | GtrChord | 93 | 091bpmC4 | 117 | 16'+2' Organ | |
| 2 | Talkbox | Robot Lead | 48 | Dance Bass | 71 | HiquiTB | 94 | 095bpmC4 | 118 | Dance Organ | |
| 3 | Acid Sync | Fat | 49 | Snap Bass | 72 | Reverse | 95 | 096bpmC4 | 119 | MissU | |
| 4 | Universe | Seq Ana | 50 | Old Mini | 73 | Signal | 96 | 102bpmC4 | 120 | R&B Organ | |
| 5 | Adrenaline | Stab | 51 | Power Bass | 74 | Aah | 97 | 103bpmC4 | |||
| 6 | Fragile | Pulse Saw | 52 | Dub Bass | 75 | Turntable | 98 | 106bpmC4 | GUITAR | ||
| 7 | Cut Glass | Sawtooth Lead 1 | 53 | Factory | HIT | 99 | 110bpmC4 | 121 | Octave Guitar | ||
| Sawtooth Lead 2 | 54 | Hyper | 76 | Metal Hit | 100 | 114bpmC4 | 122 | Clean Guitar | |||
| BASS LEAD | Bedtime | 55 | Kidz Bass | 77 | Sharp Hit | 101 | 134bpmC4 | 123 | Muted Guitar | ||
| 8 | Killer S | SYNTH PAD | 56 | Techno | 78 | Mild Hit | 102 | 135bpmC4 | 124 | Overdriven Guitar | |
| 9 | Reso-X | 103 | 137bpmC4 | STRINGS | |||||||
| 10 | Choppy | Sequenza | BASS | HUMAN VOICE | 104 | 138bpmC4 | 125 | Strings | |||
| 11 | PhatMan | Insomnia | 57 | Acoustic Bass | 79 | Come On 1 | 105 | 144bpmC4 | 126 | Marcato Strings | |
| 12 | Organese | Wave2001 | 58 | Finger Bass | 80 | Come On 2 | 106 | 160bpmC4 | 127 | Synth Strings | |
| 13 | Happy Vibes | Amber | 59 | Pick Bass | 81 | GetUp! | 107 | Samba137 | 128 | StringPad | |
| 14 | TriTouch | Eerie | 60 | Fretless Bass | 82 | Go!! | 129 | Pizzicato | |||
| 15 | Sync | Trance Pad | 61 | Slap Bass | 83 | Huea | PIANO | ||||
| SQUARE LEAD | RESONANCE BASS | SCRATCH | 84 | Hiuhu | 108 | Funky Electric Piano | BRASS | ||||
| 16 | MC-Line | Techno Bass | 62 | Scratch | 85 | Yo-Kurt | 109 | DX Electric Piano | 130 | Techno Brass | |
| 17 | Alien | Kickin'B | 63 | Killer DJ | 86 | Oh Babe | 110 | CP 80 | 131 | Jump Brass | |
| 18 | Psyche | Bassline | SFX | 87 | Ohh 1 | 111 | Bell Electric Piano | 132 | Brass Phase | ||
| 19 | Clanger | Nu Floor | 64 | FMTB 1 | 88 | Ohh 2 | 112 | Clavi | 133 | Synth Brass | |
| 20 | Square Lead 1 | Fish303 | 65 | BLJ Trill | 89 | One More Time | 134 | Bright Brass | |||
| 21 | Square Lead 2 | No.No.No | 66 | Omen-FX | 90 | Uhh | 135 | Brass Tek | |||
| ORGAN | |||||||||||
| 113 | Jazz Organ 1 | ||||||||||
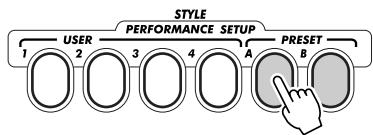
Selecting a style
The PortaTone features 100 different styles in various music genres. With the Performance Setup function, you can call up voice and other settings that best match the selected style. Each style has been programmed with two Preset Performance Setups.
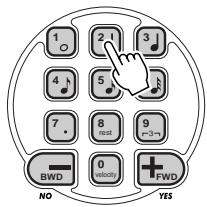
① Enter the Style mode.

② Select a style.
For a list of styles, see below.
VOICE STYLE 002 Tri-FHop
③ Press one of the Performance Setup buttons: Preset A or B.
flowchart
graph LR
    A["1"] --> B["2"]
    B --> C["3"]
    C --> D["4"]
    D --> E["A"]
    E --> F["B"]
    F --> G["PRESET"]
    G --> H["STYLE"]
    style A fill:#f9f,stroke:#333
    style H fill:#bbf,stroke:#333
4 Start the pattern and play the keyboard.
Want to find out more? See page 44.
Style List
| No. Style Name | No. Style Name | No. Style Name | No. Style Name | No. Style Name | No. Style Name | ||||||
| INTRODUCTION | 19 | Modern Detroit Techno | 36 | Hypnotic | 53 | Club House | 70 | SupaBad | R & B | ||
| 20 Vintage Detroit Techno | 37 | Dark Trance | 54 | Dub House | 71 | WestSide | 86 | Bouncy | |||
| 1 | Pop Techno | 21 | Modern Berlin Techno | DRUM'N'BASS | ABSTRACT BEATS | OLD SKOOL | 87 | Do it up | |||
| 2 | Trip Hop | 22 | Minimal Techno | 38 | Drum'n'Bass | 55 | Digital Rock | 72 | Beatbox | 88 | Hump |
| 3 | Electro Beat | 23 | Speed Garage | 39 | Hard Jungle | 56 | Underground | 73 | Delight | 89 | Plush |
| 4 | Goa | 24 | Acid Techno | 40 | Soul 2001 | 57 | Chill Out | 74 | Flares | 90 | Pow! |
| 5 | Hard Step 8th | 25 | Samba Techno | DANCE FLOOR | RAP | 75 | Funked Up | 91 | Skippin' | ||
| 6 | Handbag 1 | 76 | Jack | 92 | Solid | ||||||
| 7 | Romantic House | TRIP HOP | 41 | Euro Dance | 58 | Bomb | 77 | Old Skool | SLO JAMS | ||
| 8 | Ambient | 26 | Funky Trip Hop | 42 | Euro Latin | 59 | Dance Hall | 78 | Party | 93 | 1stLuv |
| 9 | Acid Jazz | 27 | Pop Trip Hop | 43 | Pop Reggae | 60 | Hype | 79 | Theque | 94 | Cool |
| 10 | Treach | 28 | Vintage Trip Hop | 44 | Handbag 2 | 61 | Money | FRESH | 95 | DaLadies | |
| 11 | Steppa | ELECTRO | HOUSE | 62 | Ragga | 80 | Chillin' | 96 | Daydream | ||
| 12 | Struttin' | 29 | Plastic Electro | 45 | House | 63 | Shakin' | 81 | Dreamin' | 97 | Loverz |
| 13 | All That | 30 | Cosmic Beat | 46 | Acid House | 64 | Tip | 82 | EastSide | 98 | On Hit |
| 14 | Soulful | 31 | Body Rock | 47 | Deep House | HARDCORE | 83 | Grind | 99 | Pushin' | |
| 32 | Compilation | 48 | Progressive House | 65 | Buggin' | 84 | Hezee | 100 | Sultry | ||
| TRANCE | 49 | Tribal House | 66 | Diesel | 85 | Loc | |||||
| 33 | Trance | 50 | Vintage Chicago | 67 | Hi Rolla | ||||||
| 34 | Psychodelic Trance | 51 | Hard Floor | 68 | Homies | ||||||
| 35 | Relaxx | 52 | Hip House | 69 | SuckaMC | ||||||
Join the sampling revolution!
Yes, Digital Sampling is built into your new DJX — and it's truly easy to use. Try it out!
1 Set up the DJX for sampling.
Connect in one of the two ways shown below.
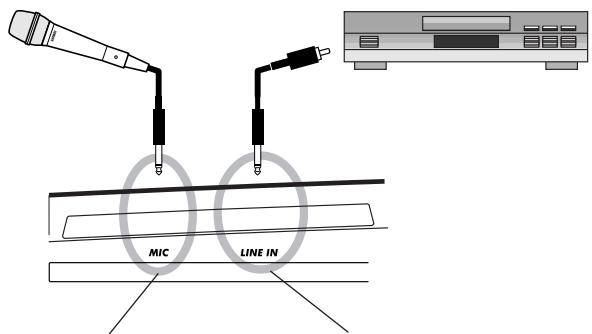
If you're using a microphone, plug it into the MIC jack on the rear panel.
If you're using a CD player, plug it into the LINE IN jack on the rear panel. (DON'T plug it into the MIC jack! This could damage the DJX!)
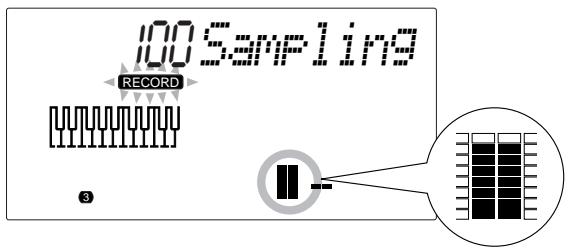
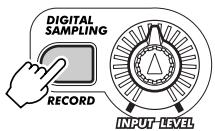
2 Enter the Sampling mode.
Press the RECORD button in the DIGITAL SAMPLING section.
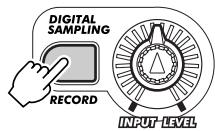
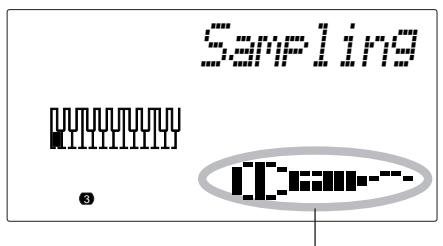
3 Set the sampling level.
Turn the INPUT LEVEL knob (while singing into the microphone or playing the CD).

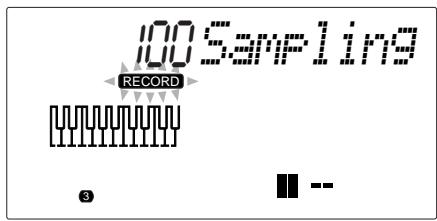
Make sure the "level meter" in the display doesn't go above this level:
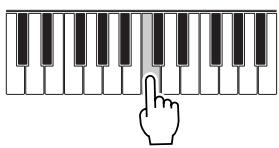
4 Press a key on the keyboard.
Press middle C (C3) for this example. The sound you record will be assigned to this key.
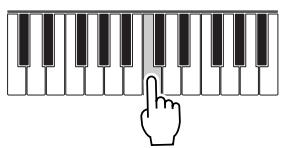
natural_image
Illustration of a hand pressing down on a piano keyboard (no text or symbols)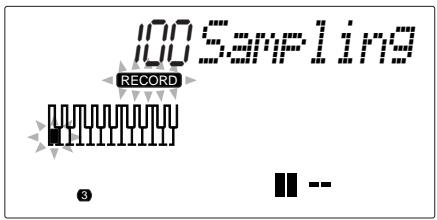
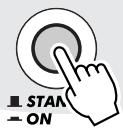
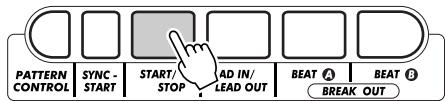
5 Set sampling to standby.
Press the START/STOP button.
Microphone icon indicates sample recording.
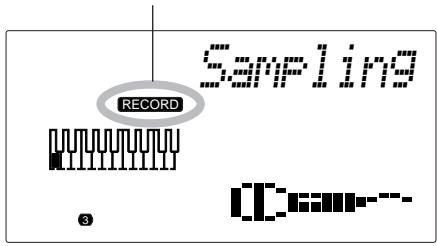
6 Start recording.
Sing into the microphone or play the CD. Sampling starts when the DJX receives the signal. Sampling also automatically stops after about three seconds.
RECORD indication stays lit during actual sampling.
7 Play the sample from the keyboard.
Try pressing and holding various keys on the keyboard and listen to your new sample.
natural_image
Illustration of a hand pressing down on a piano keyboard (no text or symbols)8 Exit from the Sampling mode.
Press the RECORD (DIGITAL SAMPLING) button again.
Voice #284 ("Sampled") is automatically selected for playing.
Want to find out more? See page 69.
Using the Function parameters
The DJX has a variety of settings in the Function parameters.
These give you detailed control over many of the DJX's features. Here's how to use them:
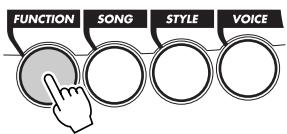
1 Press the FUNCTION button.
flowchart
graph TD
    A["FUNCTION"] --> B["SONG"]
    B --> C["STYLE"]
    C --> D["VOICE"]
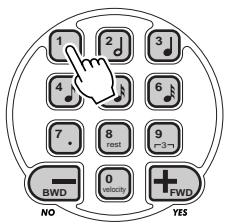
2 Select a Function number.
For a list of functions, see page 19.
The Function number can be selected while the "FUNCTION" indication is flashing.
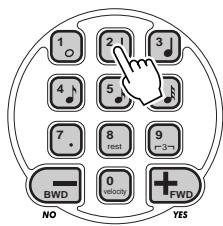
Enter the Function number on the numeric keypad.

Press the FUNCTION button; each press advances through the numbers. Hold down the button to continuously advance through the numbers.
IMPORTANT
- Since the "FUNCTION" indication flashes for only a couple of seconds, make sure to select the parameter quickly after step 1 above.
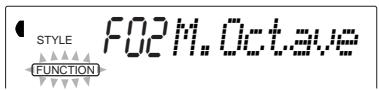
3 After "FUNCTION" in the display stops flashing, change the value or setting.
After a couple of seconds, the "FUNCTION" indication stops flashing and remains lit. At
the same time, the Function number ("F02" in the example above) changes automatically to the current value of the Function parameter.
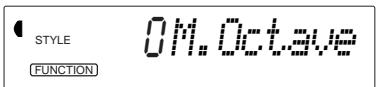
Current value of the selected Function parameter.
4 Use the numeric keypad to change the value or setting. For on/off settings, use the +/- buttons.
Restoring the Default Value
If you've changed the parameter setting, you can instantly restore the default setting by pressing both +/- buttons simultaneously.
Negative values
To directly enter negative values (for those parameters that have negative values), simultaneously hold down the - button and press the desired number button.
5 Exit the Function mode.
Once you've made all desired settings, press one of the other mode buttons (SONG, STYLE, or VOICE).
Function Parameters List
| Function | page | ||
| F01 | M.Volume | Main Voice Volume | 27 |
| F02 | M.Octave | Main Voice Octave | 27 |
| F03 | M.Pan | Main Voice Pan | 27 |
| F04 | M.RevLvl | Main Voice Reverb Send Level | 27 |
| F05 | M.ChoLvl | Main Voice Chorus Send Level | 27 |
| F06 | M.DsFLvl | Main Voice DSP Effect Send Level | 27 |
| F11 | D.Volume | Dual Voice Volume | 30 |
| F12 | D.Octave | Dual Voice Octave | 30 |
| F13 | D.Pan | Dual Voice Pan | 30 |
| F14 | D.RevLvl | Dual Voice Reverb Send Level | 30 |
| F15 | D.ChoLvl | Dual Voice Chorus Send Level | 30 |
| F16 | D.DsFLvl | Dual Voice DSP Effect Send Level | 30 |
| F17 | D.Voice | Dual Voice | 30 |
| F18 | Dual | Dual On/Off | 30 |
| F21 | S.Volume | Split Voice Volume | 32 |
| F22 | S.Octave | Split Voice Octave | 32 |
| F23 | S.Pan | Split Voice Pan | 32 |
| F24 | S.RevLvl | Split Voice Reverb Send Level | 32 |
| F25 | S.ChoLvl | Split Voice Chorus Send Level | 32 |
| F26 | S.DsFLvl | Split Voice DSP Effect Send Level | 32 |
| F27 | S.Voice | Split Voice | 32 |
| F28 | S.Flit | Split On/Off | 32 |
| F29 | S.FlitPnt | Split Point | 32 |
| F31 | Reverb | Reverb On/Off | 38 |
| Function | page | ||
| F32 | RevType | Reverb Type | 38 |
| F33 | Chorus | Chorus On/Off | 38 |
| F34 | ChoType | Chorus Type | 38 |
| F35 | Dsf | DSP On/Off | 38 |
| F36 | DsfType | DSP Type | 38 |
| F37 | Arpgator | Arpeggiator On/Off | 38 |
| F38 | ArpgType | Arpeggiator Type | 38 |
| F41 | UserBank | Performance Setup User Bank | 57 |
| F51 | PtrnSPnt | Pattern Split Point | 55 |
| F61 | USng1C1r | User Song 1 Clear | 91 |
| F62 | USng2C1r | User Song 2 Clear | 91 |
| F63 | USng3C1r | User Song 3 Clear | 91 |
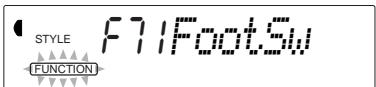
| F71 | FootSw | Footswitch | 21 |
| F72 | VoiceSet | Voice Set | 33 |
| F73 | TouchSns | Touch Sensitivity | 33 |
| F74 | PBRange | Pitch Bend Range | 33 |
| F81 | RemoteCh | Remote Channel | 95 |
| F82 | KbdOut | Keyboard Out | 95 |
| F83 | PtrnOut | Pattern Out | 95 |
| F84 | Local | Local On/Off | 96 |
| F85 | ExtClock | External Clock | 96 |
| F86 | BulkSend | Bulk Data Send | 96,97 |
| F87 | InitSend | Initial Data Send | 96,100 |
| F88 | Smf1Send | Sampling Send | 96,97 |
ASSIGN Knob and RIBBON CONTROLLER — Changing the Assignment

1 Press the OVERALL ▲ or ▼ button repeatedly until the dark bar at the left of the display is directly opposite "KNOB ASSIGN" or "RIB-BON CONTROLLER ASSIGN."
2 Change the assignment for the selected controller by using the OVERALL +/- buttons.
For more information on the ASSIGN knob and RIBBON CONTROLLER, see pages 63, 66.

Currently selected controller.
Currently assigned control or function.
ASSIGN Knob/RIBBON CONTROLLER Function List
| Function Name | Display Name | Description |
| Cutoff Frequency * | Cutoff | This is the same parameter as controlled by the CUTOFF knob (page 61). |
| Resonance * | Resonanc | This is the same parameter as controlled by the RESONANCE knob (page 61). |
| Reverb Send Level | RevLevel | This determines the depth of the Reverb effect. (See page 34.) Turning the knob also automatically turns on Reverb, if it was originally turned off. |
| Chorus Send Level | ChoLevel | This determines the depth of the Chorus effect. (See page 35.) |
| DSP Send Level | DspLevel | This determines the depth of the DSP effect. (See page 36.) |
| Modulation | Mod | This creates a vibrato-like pitch wavering effect. |
| Attack Time | Attack | This determines the “attack” of the sound — or, in other words, how long it takes for the sound to reach full volume when a note is played. For certain percussive sounds, this may have little or no audible effect. |
| Release Time | Release | This determines how long the sound sustains after a note is released. For certain percussive sounds, this may have little or no audible effect. |
| Pan | Pan | This determines the position of the sound in the stereo image (left, center, or right). |
| Volume | Volume | This determines the volume (level) of the sound. |
| Groove * ** | Groove | This is the same parameter as controlled by the GROOVE knob (page 61). |
| Dynamics ** | Dynamics | This makes both subtle and dramatic changes in the Pattern by altering the level of the individual notes. This affects the entire Pattern. |
| Dynamics Strength ** | Strength | This determines the amount or strength of the level change in the Dynamics parameter (#09, above). This affects the entire Pattern. |
| Turntable ** | Turntbl | This determines both the tempo and the pitch of the entire DJX sound, affecting all Parts of the Pattern and all voices. |
| Arpeggiator Speed *** | ArpSpeed | This determines the speed of the Arpeggiator function. (See page 37.) |
* These functions can be assigned only to the RIBBON CONTROLLER.
** These functions are effective regardless of the Part Select setting. (See page 60.)
*** These Function parameters are effective only for the Main voice, regardless of the Part Select settings.
Footswitch Control – Changing the Assignment
natural_image
Simple line drawing of a device with a pen and a notebook (no text or symbols)The DJX has a footswitch feature that can be used to control a variety of functions and operations. By using your foot to conveniently control these functions, you free your hands to concentrate on your performance.
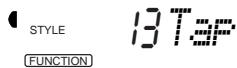
Assignment of the footswitch is done from Function parameter #71. (For instructions on using the Function parameters, see page 18.) The default setting for the footswitch is #13 Tap.

Footswitch Function List
| Function Name | Display Name | Description |
| Sustain | Sustain | Damper pedal or sustain operation. Pressing the footswitch applies a natural sustain to the keyboard-played voice. |
| Arpeggiator Hold | ArpgHold | When the Arpeggiator effect (page 37) is turned on, this lets you use the footswitch to keep the Arpeggiator cycling, even when you take your fingers from the keyboard or play different notes. Press and hold the footswitch for as long as you want the Arpeggiator effect to be active. |
| Start/Stop | StartStp | When the Song mode or Style mode is active, this provides the same function as the START/STOP button (see pages 41, 45). Each press of the footswitch alternately starts and stops song or pattern playback. |
| Lead In/Lead Out | Ld InOut | When the Style mode is active, this provides the same function as the LEAD IN/LEAD OUT button (see pages 46, 47). Pressing the footswitch twice while the Pattern is playing back causes the Lead Out section to gradually slow down (page 47). |
| Beat A | Beat A | When the Style mode is active, this provides the same function as the BEAT A (BREAK OUT) button (see page 48). |
| Beat B | Beat B | When the Style mode is active, this provides the same function as the BEAT B (BREAK OUT) button (see page 48). |
| Arpeggiator On/Off | Arpgator | When the Style mode is active, this provides the same function as the ARPEGGIATOR button (and the Arpeggiator On/Off parameter, #37). (See page 37.) |
| Dual On/Off | Dual | This provides the same function as the DUAL button (and the Dual On/Off parameter, #18). (See page 29.) |
| Split On/Off | Split | This provides the same function as the Split On/Off parameter, #28. (See page 31.) |
| Reverb On/Off | Reverb | This provides the same function as the REVERB button (and the Reverb On/Off parameter, #31). (See page 34.) |
| Chorus On/Off | Chorus | This provides the same function as the Chorus On/Off parameter, #33. (See page 35.) |
| DSP On/Off | Dsp | This provides the same function as the DSP On/Off parameter, #35. (See page 36.) |
| Tap | Tap | This useful function lets you use the footswitch to tap out the BPM (Tempo) and automatically start a selected song or pattern at that tapped speed. Simply tap (press/release) the footswitch (four times for a 4/4 time signature), and the song or pattern starts automatically at the BPM you tapped. The BPM can also be changed during playback by tapping the footswitch twice at the desired tempo. |
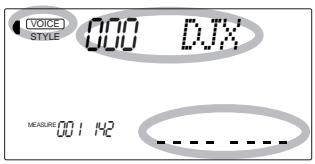
The DJX features a large multi-function display that shows all important settings for the instrument. The section below briefly explains the various icons and indications in the display.

① Mode indicators
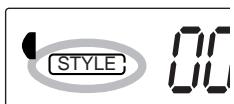
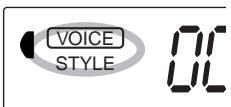
These indicate the currently selected mode — Voice, Style, Song, or Function — with the mode name encircled in a rounded rectangle. When "STYLE" or "SONG" appear without the rectangle, the corresponding mode is active in the background.
In the first example, the Style mode is selected.
In the second example, the Voice mode has been selected, but the Style mode is still active in the background. (This means that the style controls are active and can be used to play the currently selected style.)
② Overall functions bar indicator
The DJX has five Overall functions or controls. The currently selected function is indicated by a dark bar that appears next to its name (printed on the panel).
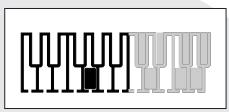
③ Keyboard
When Part Control (page 59) is turned on, this indicates the status of the PART SELECT and PART ON/OFF keys. The lower octave in the display corresponds to the PART SELECT keys; the selected Part's key is dark. The upper octave in the display corresponds to the PART ON/OFF keys; dark keys indicate the corresponding Part is on.
4 Measure and BPM (Tempo)
These show the current measure during play-back of a song or style, and the currently set BPM (Tempo) value for the song or style.
5 Beat indicators
These dark bars (one large, three small) flash in sequence and in time with the song or style. The large bar indicates the first beat of the measure. (See page 42.)
6 Chord
When a user song (with chords) is being played back, this indicates the current chord root and type. It also indicates chords played in the PATTERN section of the keyboard when the Style mode and Pattern Control are on.
⑦ Song/Voice/Style name and number
This portion of the display indicates the name and number of the currently selected song, voice, or style. It also displays the name and current value or setting of the Overall functions and the Function parameters, as well as other important operation messages.
8 Icon window
Depending on the mode or function selected, this displays various symbols (icons) and other messages to provide convenient, at-a-glance information about the DJX operation. For example, when a song or pattern is playing, this displays the level of each instrumental track.
natural_image
Abstract pixelated pattern of black squares on white background (no text or symbols)⑨ Song track indicators
In song recording and playback, these indicate the status of the tracks. (See pages 82, 86.)
10 GM icon
This appears when a GM (General MIDI) voice is selected. (See page 26.)

GM System Level 1
"GM System Level 1" is an addition to the MIDI standard which ensures that any GM-compatible music data can be accurately played by any GM-compatible tone generator, regardless of manufacturer. The GM mark is affixed to all software and hardware products that support GM System Level 1. The DJX supports GM System Level 1.
The Voice mode features 270 authentic voices (including 128 General MIDI voices), plus 15 special drum kits — all of which have been created with Yamaha's sophisticated AWM (Advanced Wave Memory) tone generation system. The Voice mode gives you many powerful and versatile tools for playing and enhancing these Voices.
The voices are divided into various instrument categories, all of which are printed on the panel for convenience. For a complete list of the available voices, see page 104.
The Voice mode is actually divided into three separate modes: Main, Dual and Split. In the Main Voice mode (see page 25), you can play a single voice over the entire range of the keyboard. The Dual Voice mode (page 29) allows you to “layer” two different voices together for rich, complex sounds. The Split Voice mode (page 31) lets you set up two different voices for playing from separate sections of the keyboard.
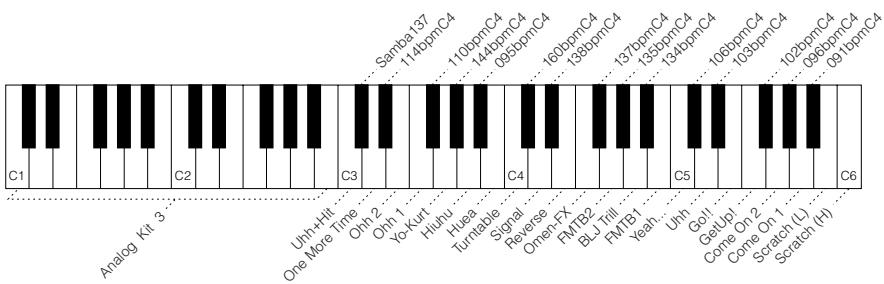
The DJX includes special Drum Kit voices — #141 - #155 — that let you play various drum and percussion sounds from the keyboard. (Refer to the Drum Kit Voice chart on page 26.) Symbols are also printed above the keyboard, conveniently indicating which sounds are played from which keys.
The DJX also has a special "Sampled" voice #284, to which your own original samples can be recorded. (See page 69.)
FAST ▶▶
▶TRACK
1 Select the Voice mode. (Press the VOICE button.)
2 Select a voice (with the numeric keypad).
You can also select a Dual voice and/or a Split voice:
1 Turn on the Dual voice. (Press the DUAL button.)
2 Select the Dual voice (from the Function mode).
Dual voice
Split voice
1 Turn on the Split voice (from the Function mode).
2 Select the Split voice (Function mode).
PLAYING A VOICE – MAIN VOICE
1 Select the Voice mode.
Press the VOICE button.

2 Select the desired voice number.
Use the numeric keypad. The basic categories of voices and their numbers are shown at the right side of the panel. A complete list of the available voices is given on page 104.
There are three ways to select voices: 1) directly entering the voice number with the numeric keypad, 2) using the +/- keys to step up and down through the voices, or 3) pressing the VOICE button to advance through the voice numbers.
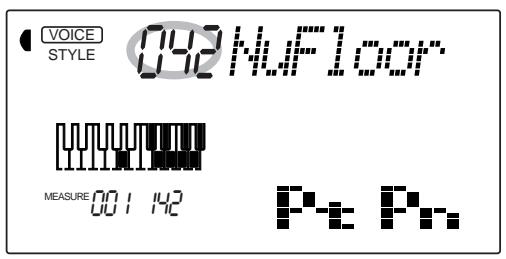
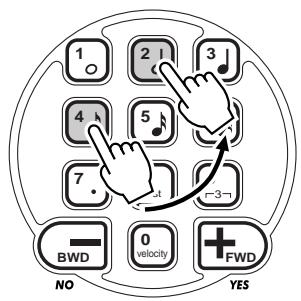
Using the numeric keypad
Enter the digits of the voice number as indicated on the panel. For example, to select voice #42, press "4" on the numeric keypad, then "2."
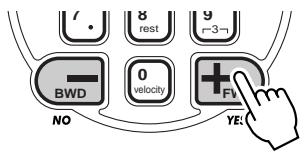
Using the +/- keys
Press the + key to select the next voice number, and press the - key to select the previous voice. Holding down either key continuously scrolls up or down through the numbers. The +/- keys have a “wrap around” feature. For example, pressing the + key from voice #284 returns to voice #000.
NOTE
All two-digit voice numbers can be selected without entering an initial "0." However, when selecting voice numbers 0 - 28, the DJX pauses briefly before actually calling up the voice. (This pause allows for entering three-digit voice numbers, such as "235." Entering the numbers "2" then "9" immediately calls up voice #29, since there are no voices #290 or higher.)
If you want to immediately call up voices #0 - #28, enter one or two zeros before the number; for example, select voice #9 by pressing "0," "0," then "9." Pressing only "0" does not change the voice.
Using the VOICE button
Press the VOICE button to select the next voice number. (This functions exactly the same as the + button.)
flowchart
graph TD
    A["FUNCTION"] --> B["SONG"]
    B --> C["STYLE"]
    C --> D["VOICE"]
3 Play the selected voice.
To change to another voice, repeat step 2 above.
About Panel Voices and GM Voices
Keep in mind that the DJX has two separate sets of voices: Panel voices and GM (General MIDI) Voices. The GM Voices can also be used for optimum playback of GM-compatible song data. This
means that any GM song data (played from a sequencer or other MIDI device) will sound just as the composer or programmer intended.
When a GM voice is selected, the General MIDI icon appears at the top left of the display.

Drum Kit Voice Chart (voices 141 - 155)
When one of the 15 panel Drum Kit voices are selected you can play different drums and percussion instruments on the keyboard.

NOTE
Each voice is automatically called up with the most suitable octave range setting. Thus, playing middle C with one voice may sound higher or lower than another voice at the same key.
HOT TIPS
When you select a voice, the DJX also automatically calls up various settings that are appropriate for the voice. [This is true when Voice Set (Function #72, page 33) is set to on — the default setting.]
| No. | Name | LCD |
| DRUM KITS | ||
| 141 | Standard Kit 1 | Std.Kit1 |
| 142 | Standard Kit 2 | Std.Kit2 |
| 143 | Room Kit | Room Kit |
| 144 | Rock Kit | Rock Kit |
| 145 | Electronic Kit 1 | ElctKit1 |
| 146 | Analog Kit 1 | AnlgKit1 |
| 147 | Dance Kit | DanceKit |
| 148 | Jazz Kit | Jazz Kit |
| 149 | Brush Kit | BrushKit |
| 150 | Symphony Kit | SymphKit |
| SPECIAL KITS | ||
| 151 | Analog Kit 2 | AnlgKit2 |
| 152 | Analog Kit 3 | AnlgKit3 |
| 153 | Electronic Kit 2 | ElctKit2 |
| 154 | B900 Kit | B900 Kit |
| 155 | DJX Kit | DJX Kit |
Function Parameters — Main Voice
The Function parameters provide additional settings for the Main voice. These settings are especially useful when using a second voice in the Dual or Split modes, since they let you change or enhance the sound of the Main voice separate from the Dual or Split voice. These settings include:
• Volume
- Reverb Send Level
- Octave
- Chorus Send Level
- Pan
- DSP Effect Send Level
Selecting and changing the Function parameters:
Press the FUNCTION button, then use the numeric keypad to select the parameter number. After "FUNCTION" stops flashing, use the numeric keypad or +/- buttons to change the setting. (For details, see page 18.)
NOTE
These settings are not saved when you turn off the power. If you wish to save them, save them to a User bank in the Performance Setup feature (page 56).
Function Parameters
| No. | Parameter Name | Display Name | Range/Settings | Description |
| F01 | Main Voice Volume | M.Volume | 0 — 127 | This determines the volume of the Main voice, letting you create an optimum mix with the Dual or Split voice. |
| F02 | Main Voice Octave | M.Octave | -2 — 2 (octaves) | This determines the octave range for the Main voice. Use this to set the most suitable range for the Main voice when using the Split mode, or use it to create an octave layer in the Dual mode. |
| F03 | Main Voice Pan | M.Pan | -7 (full left) — 0 (center) — 7 (full right) | This determines the pan position of the Main voice in the stereo image. |
| F04 | Main Voice Reverb Send Level | M.RevLvl | 0 — 127 | This determines how much of the Main voice's signal is sent to the Reverb effect. (See page 34.) Higher values result in a louder Reverb effect. |
| F05 | Main Voice Chorus Send Level | M.ChoLvl | 0 — 127 | This determines how much of the Main voice's signal is sent to the Chorus effect. (See page 35.) Higher values result in a louder Chorus effect. |
| F06 | Main Voice DSP Effect Send Level | M.DspLvl | 0 — 127 | This determines how much of the Main voice's signal is sent to the DSP effect. (See page 36.) Higher values result in a louder DSP effect. |
TRANSPOSE AND TUNING
You can also adjust the tuning and change the transposition (key) of the entire DJX sound with the Transpose and Tuning functions.
Transpose
Transpose determines the key of both the main voice and the pattern of the selected style. It also determines the pitch of the songs. This allows you to easily match the pitch of the DJX to other instruments or singers, or play in a different key without changing your fingering. The Transpose settings can be adjusted over a range of ± 12 semitones ( ± 1 octave).
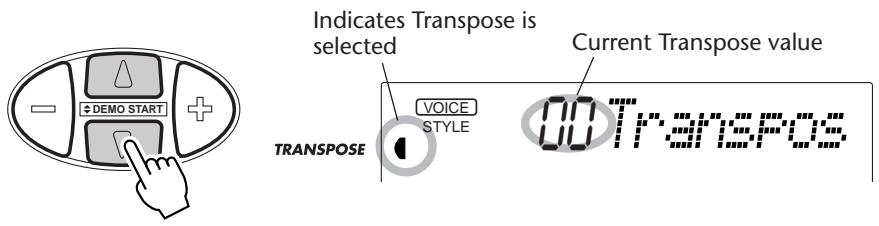
1 Select the Transpose function in the Overall menu.
Press one of the OVERALL ▲/▼ buttons, repeatedly if necessary, until "Transpos" appears in the display.
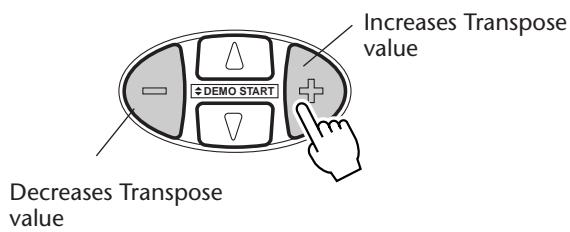
2 Change the value.
Use the OVERALL +/- buttons to increase or decrease the Transpose value. Holding down either button continuously increases or decreases the value.
NOTE
The Transpose and Tuning settings have no effect on the Drum Kit voices (#141 - #155).

Restoring the Default Transpose Value
If you've changed the Transpose setting, you can instantly restore the default setting of "00" by pressing both OVERALL +/- buttons simultaneously (when Transpose is selected in the Overall menu).
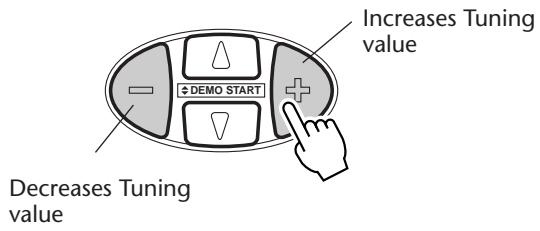
Tuning
Tuning determines the fine pitch setting of both the main voice and the pattern of the selected style. It also determines the pitch of the songs. This allows you to accurately match the tuning with that of other instruments. The Tuning settings can be adjusted over a range of ± 100 (approx. ± 1 semitone).
1 Select the Tuning function in the Overall menu.
Press one of the OVERALL ▲/▼ buttons, repeatedly if necessary, until “Tuning” appears in the display.
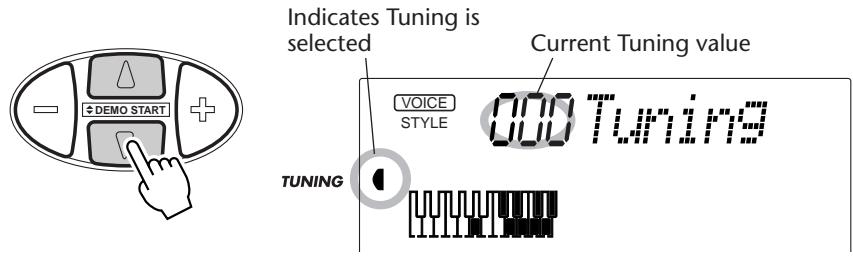
2 Change the value.
Use the OVERALL +/- buttons to increase or decrease the Tuning value. Holding down either button continuously increases or decreases the value.

Restoring the Default Tuning Value
If you've changed the Tuning setting, you can instantly restore the default setting of "00" by pressing both OVERALL +/- buttons simultaneously (when Tuning is selected in the Overall menu).
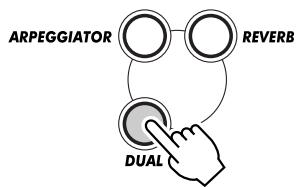
PLAYING TWO VOICES – DUAL VOICE
The Dual Voice mode lets you create richly textured sounds by “layering” two different voices together — one voice being the Main voice selected in the normal way (page 25), and the other a Dual voice selected as described below.
1 Turn on the Dual Voice mode.
Press the DUAL button.
flowchart
graph TD
    A["ARPEGGIATOR"] --> B["DUAL"]
    C["REVERB"] --> B["DUAL"]
    B --> C
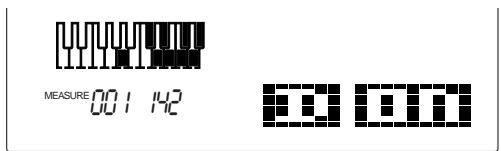
When you play the keyboard, both the currently selected Main and Dual voices will be heard.
To turn the Dual mode off, press the DUAL button again.

The Dual Voice mode can also be turned on and off with a connected footswitch. (See page 21.)
2 Select the desired Dual voice and make other settings for the voice (if desired) in the Function mode.
Selecting and changing the Function parameters:
Press the FUNCTION button, then use the numeric keypad to select the parameter number. After "FUNCTION" stops flashing, use the numeric keypad or +/- buttons to change the setting. (For details, see page 18.)
3 Exit the Function mode.
Once you've made all desired settings, press one of the other mode buttons (SONG, STYLE, or VOICE).
IMPORTANT
- For the Dual voice to be heard properly, make sure to:
* Select a different voice (#17, Dual Voice).
* Set the volume to an appropriate level (#11, Dual Volume).
NOTE
These settings are not saved when you turn off the power. If you wish to save them, save them to a User bank in the Performance Setup feature (page 56).
Function Parameters — Dual Voice
The Function parameters provide all settings for the Dual voice. Like the similar settings in the Main Voice mode, these settings let you change or enhance the sound of the Dual voice separate from the Main voice. These settings include:
• Volume
- Octave
- Pan
- Reverb Send Level
- Chorus Send Level
- DSP Effect Send Level
- Dual Voice
- Dual On/Off
Function Parameters
| No. | Parameter Name | Display Name | Range/Settings | Description |
| F11 | Dual Voice Volume | D.Volume | 0 — 127 | This determines the volume of the Dual voice, letting you create an optimum mix with the Main voice. |
| F12 | Dual Voice Octave | D.Octave | -2 — 2 (octaves) | This determines the octave range for the Dual voice. Use this to create an octave layer with the Main voice. |
| F13 | Dual Voice Pan | D.Pan | -7 (full left) — 0 (center) — 7 (full right) | This determines the pan position of the Dual voice in the stereo image. For a spacious sounding effect, set this value at or near -7, and set the Main Voice Pan (page 27) at the opposite positive value. |
| F14 | Dual Voice Reverb Send Level | D.RevLvl | 0 — 127 | This determines how much of the Dual voice's signal is sent to the Reverb effect. (See page 34.) Higher values result in a louder Reverb effect for the Dual voice. |
| F15 | Dual Voice Chorus Send Level | D.ChoLvl | 0 — 127 | This determines how much of the Dual voice's signal is sent to the Chorus effect. (See page 35.) Higher values result in a louder Chorus effect for the Dual voice. |
| F16 | Dual Voice DSP Effect Send Level | D.DspLvl | 0 — 127 | This determines how much of the Dual voice's signal is sent to the DSP effect. (See page 36.) Higher values result in a louder DSP effect for the Dual voice. |
| F17 | Dual Voice | D.Voice | 0 — 284 | This determines the Dual voice. (See list on page 104.) |
| F18 | Dual On/Off | Dual | on, off | This turns the Dual Voice mode on/off. (This is the same function as that of the DUAL button. It can also be controlled by a connected footswitch; see page 21.) |
PLAYING TWO VOICES – SPLIT VOICE
In the Split Voice mode, you can assign two different Voices to opposite parts of the PERFORMANCE section of the keyboard, and play one Voice with your left hand while your right plays another. For example, you could play bass with the left hand and play piano with the right. The right-hand (or upper) Voice is selected in the Main Voice mode (page 25), and the left-hand (or lower) Voice is selected in the Split Voice mode, as described below.
Where the Split voice is actually played on the keyboard depends on the Part Control and Pattern Control on/off settings. When both of these are off, the entire keyboard can be used for the Main and Split voices. (For details, see page 13.)
1 Turn the Split voice on in the Function parameters (#28).
To do this, press the FUNCTION button, then use the numeric keypad to select parameter number 28. After "FUNCTION" stops flashing, use the +/- buttons to change the setting. (For details, see page 18.)
2 Make other settings for the Split voice (if desired) in the Function mode.
3 Exit the Function mode.
Once you've made all desired settings, press one of the other mode buttons (SONG, STYLE, or VOICE).
IMPORTANT
- For the Split voice to be heard properly, make sure to:
* Turn the following functions off: Part Control (page 59) and Pattern Control (page 45).
* Set the volume to an appropriate level (#21, Split Volume).
* Set the octave to a musically appropriate setting (#22 Split Octave). For example, a bass voice might best be played with a "-1" setting, while a strings voice might sound best at "1."
* Set the desired Split Point (#29). For most purposes, however, the default Split Point of "071" (Main voice starts at middle C) is suitable. (See the "Parameters" list below for details.)
NOTE
These settings are not saved when you turn off the power. If you wish to save them, save them to a User bank in the Performance Setup feature (page 56).
Function Parameters — Split Voice
The Function parameters provide all settings for the Split voice. Like the similar settings in the Main Voice mode, these settings let you change or enhance the sound of the Split voice separate from the Main voice. These settings include:
• Volume
- Octave
- Pan
- Reverb Send Level
- Chorus Send Level
-
DSP Effect Send Level
-
Split Voice
- Split On/Off
- Split Point
Function Parameters
| No. | Parameter Name | Display Name | Range/Settings | Description |
| F21 | Split Voice Volume | S.Volume | 0 — 127 | This determines the volume of the Split voice, letting you create an optimum mix with the Main voice. |
| F22 | Split Voice Octave | S.Octave | -2 — 2 (octaves) | This determines the octave range for the Split voice. Use this to set the most suitable range for the Split (lower) voice. |
| F23 | Split Voice Pan | S.Pan | -7 (full left) — 0 (center) — 7 (full right) | This determines the pan position of the Split voice in the stereo image. For a spacious sounding effect, set this value at or near -7, and set the Main Voice Pan (page 27) at the opposite positive value. |
| F24 | Split Voice Reverb Send Level | S.RevLvl | 0 — 127 | This determines how much of the Split voice's signal is sent to the Reverb effect. (See page 34.) Higher values result in a louder Reverb effect for the Split voice. |
| F25 | Split Voice Chorus Send Level | S.ChoLvl | 0 — 127 | This determines how much of the Split voice's signal is sent to the Chorus effect. (See page 35.) Higher values result in a louder Chorus effect for the Split voice. |
| F26 | Split Voice DSP Effect Send Level | S.DspLvl | 0 — 127 | This determines how much of the Split voice's signal is sent to the DSP effect. (See page 36.) Higher values result in a louder DSP effect for the Split voice. |
| F27 | Split Voice | S.Voice | 0 — 284 | This determines the Split voice. (See list on page 104.) |
| F28 | Split On/Off | Split | on, off | This turns the Split Voice mode on/off. This can also be controlled by a connected footswitch. (See page 21.) |
| F29 | Split Point | SplitPnt | 000 — 127 | This determines the highest key for the Split voice and sets the Split "point" — in other words, the key that separates the Split (lower) and Main (upper) voices. (The Split voice sounds up to and including the Split Point key.) The default Split Point is 071 (B3). The value can also be set directly by pressing the desired key while this parameter is selected. While this is being set, the keyboard does not produce any sound. After setting this, make sure to select a different parameter or exit the Function mode before playing the keyboard. NOTE• The Split Point setting is related to and affected by the Pattern Split Point setting. (See page 54.)• In order to use the entire keyboard for the Split and Main voices, turn the following functions off: Part Control (page 59) and Pattern Control (page 45). |
ADDITIONAL VOICE FUNCTIONS – VOICE SET, TOUCH SENSITIVITY, AND PITCH BEND RANGE
Voice Set, Touch Sensitivity, and Pitch Bend Range are three important voice-related parameters, and are found in the Function parameters.
When Voice Set (described in greater detail below) is set to on, you can automatically call up a variety of voice-related settings that best suit the selected voice.
Touch Sensitivity (also described below) gives you dynamic, expressive control over the voices by letting you set how the volume of the DJX responds to your playing strength.
Pitch Bend Range lets you set the amount of pitch change when using the PITCH BEND wheel. (See page 7.)
Function Parameters — Voice Set, Touch Sensitivity and Pitch Bend Range
Selecting and changing the Function parameters:
Press the FUNCTION button, then use the numeric keypad to select the parameter number. After "FUNCTION" stops flashing, use the numeric keypad or +/- buttons to change the setting. (For details, see page 18.)
Function Parameters
| No. | Parameter Name | Display Name | Range/Settings | Description |
| F72 | Voice Set | VoiceSet | oFF, on | When this is set to on, selecting a voice also automatically calls up special voice-related parameters and values that best suit the voice. The parameters included in Voice Set are:Main Voice — Volume, Octave, PanDual Voice — Number, Volume, Octave, Pan,Reverb Send Level, Chorus Send Level, DSPSend LevelArpeggiator — Type, On/OffUse the panel ARPEGGIATOR and DUAL buttons to turn the respective functions on or off. |
| F73 | Touch Sensitivity | TouchSns | 1 — 3 | A setting of “1” results in limited touch response; this setting produces a relatively narrow dynamic range, no matter how lightly or strongly you play the keys. “2” lets you play over a normal dynamic range (soft to loud), while “3” is designed for playing very soft passages, giving you slightly more detailed control in the soft volume range. |
| F74 | Pitch Bend Range | PBRange | 1 — 12 (semitones) | This determines the amount that pitch is raised or lowered when using the PITCH BEND wheel. At the minimum setting, moving the PITCH BEND wheel up or down changes the pitch by a maximum of 1 semitone or half-step in either direction. At the maximum setting of 12, pitch is changed over a range of ± one octave (12 semitones). The PITCH BEND wheel affects only the voices played in the PERFORMANCE section of the keyboard. |
The DJX is equipped with a wide variety of effects that can be used to enhance the sound of the voices. Four general categories of effects are provided — Re-verb, Chorus, DSP, and Arpeggiator — and each category has many effect types to choose from.
Application of the effects is also exceptionally flexible. All four effects can be used simultaneously, and the degree of the Reverb, Chorus, and DSP effects can be adjusted independently for each of the voices: Main, Dual, and Split.
FAST ▶ ▶TRACK
1 Turn on the effect.
2 Set the effect type (Function mode).
3 Set the effect send level for the desired voices — Main, Dual, Split (Function mode). (Not necessary for Arpeggiator.)
REVERB
The Reverb effect reproduces the natural ambient “wash” of sound that occurs when a instrument is played in a room or concert hall. A total of eight different Reverb types simulating various different performance environments are available.
1 Turn on the Reverb effect.
Press the REVERB button.
2 Set the desired Reverb Type (\#32) in the Function mode.
Selecting and changing the Function parameters:
Press the FUNCTION button, then use the numeric keypad to select the parameter number. After “FUNCTION” stops flashing, use the numeric keypad or +/- buttons to change the setting. (For details, see page 18.)
For a list of the Reverb Types, see page 39.
HOT TIPS
Reverb can also be turned on and off with a connected footswitch (page 21), or from Function parameter #31 (page 38).
NOTE
- The panel REVERB on/off button affects only the keyboard played voices. If you want to turn off the Reverb effect for the overall DJX sound (including accompaniment and songs), set the Reverb Type (#9, page 39) to "off."
• These settings are not saved when you turn off the power. If you wish to save them, save them to a User bank in the Performance Setup feature (page 56).
- Three additional Reverb Types are available when controlling the DJX from a MIDI device. (For details, see page 114.)
3 Set the Reverb Send Level for the desired voice(s).
The Main, Dual, and Split voices can each be set to have different amounts of Reverb. Use the corresponding Reverb Send Level parameters in the Function mode (Main: #04, Dual: #14, Split: #24) to control this. (See pages 27, 30, 32.)
4 Exit the Function mode.
Once you've made all desired settings, press one of the other mode buttons (SONG, STYLE, or VOICE).
NOTE
If the Reverb Send Level is set to a value near or at "000," the Reverb effect may not be heard.
CHORUS
The Chorus effect lets you enhance the sound of a voice with through the use of pitch modulation. Two basic types are provided: Chorus and Flanger. Chorus produces a thicker, warmer, and more animated sound, whereas Flanger creates a swirling, metallic effect. A total of four Chorus types are available.
1 Turn on the Chorus effect (\#33) and set the Chorus Type (\#34) in the Function mode.
Selecting and changing the Function parameters:
Press the FUNCTION button, then use the numeric keypad to select the parameter number. After "FUNCTION" stops flashing, use the numeric keypad or +/- buttons to change the setting. (For details, see page 18.)
For a list of the Chorus Types, see page 39.
2 Set the Chorus Send Level for the desired voice(s).
The Main, Dual, and Split voices can each be set to have different amounts of Chorus. Use the corresponding Chorus Send Level parameters in the Function mode (Main: #05, Dual: #15, Split: #25) to control this. (See pages 27, 30, 32.)
3 Exit the Function mode.
Once you've made all desired settings, press one of the other mode buttons (SONG, STYLE, or VOICE).
HOT TIPS
The Chorus effect can also be turned on and off with a connected footswitch. (See page 21.)
NOTE
- The Chorus effect is applied only to the keyboard-played voices.
• These settings are not saved when you turn off the power. If you wish to save them, save them to a User bank in the Performance Setup feature (page 56). - Three additional Chorus Types are available when controlling the DJX from a MIDI device. (For details, see page 114.)
NOTE
If the Chorus Send Level is set to a value near or at "000," the Chorus effect may not be heard.
DSP
The DSP effect section provides many reverb and chorus effects, plus a wealth of other useful and dynamic effects for enhancing and changing the sound of the voices. Included among these miscellaneous effects are reverse gate reverb, phaser, rotary speaker, tremolo, echo, delay, distortion, equalization, and wah. A total of thirty-three DSP types are available.
1 Turn on the DSP effect (#35) and set the DSP Type (#36) in the Function mode.
Selecting and changing the Function parameters:
Press the FUNCTION button, then use the numeric keypad to select the parameter number. After "FUNCTION" stops flashing, use the numeric keypad or +/- buttons to change the setting. (For details, see page 18.)
For a list of the DSP Types, see page 39.
2 Set the DSP Send Level for the desired voice(s).
The Main, Dual, and Split voices can each be set to have different amounts of DSP. Use the corresponding DSP Send Level parameters in the Function mode (Main: #06, Dual: #16, Split: #26) to control this. (See pages 27, 30, 32.)
3 Exit the Function mode.
Once you've made all desired settings, press one of the other mode buttons (SONG, STYLE, or VOICE).

The DSP effect can also be turned on and off with a connected footswitch. (See page 21.)
NOTE
- The DSP effect is applied only to the keyboard-played voices.
• These settings are not saved when you turn off the power. If you wish to save them, save them to a User bank in the Performance Setup feature (page 56). - Eighteen additional DSP Types are available when controlling the DJX from a MIDI device. (For details, see page 114.)
NOTE
If the DSP Send Level is set to a value near or at "000," the DSP effect may not be heard.
ARPEGGIATOR
The Arpeggiator effect lets you automatically create a variety of patterns and arpeggios in the Main voice, simply by holding one or more keys in the PERFORMANCE section of the keyboard. A total of sixteen different Arpeggiator types are available.
The speed of the Arpeggiator depends on the BPM setting (page 41). The speed can also be controlled as you play with the ASSIGN knob or RIBBON CONTROLLER (when either of those controls are set to "Arpeggiator Speed"; see pages 64 and 67).
1 Turn on the Arpeggiator effect.
Press the ARPEGGIATOR button.
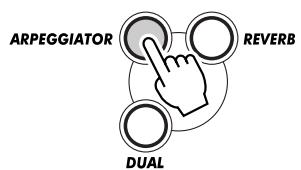
flowchart
graph TD
    A["ARPEGGIATOR"] --> B["REVERB"]
    C["DUAL"] --> B["REVERB"]
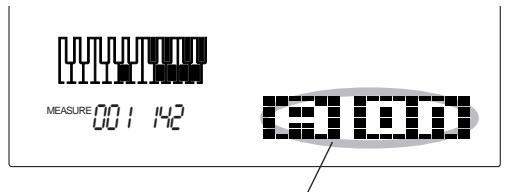
Indicates that Arpeggiator is on
2 Set the Arpeggiator Type (#38) in the Function mode.
Selecting and changing the Function parameters:
Press the FUNCTION button, then use the numeric keypad to select the parameter number. After "FUNCTION" stops flashing, use the numeric keypad or +/- buttons to change the setting. (For details, see page 18.)
For a list of the Arpeggiator Types, see page 38.
3 Exit the Function mode.
Once you've made all desired settings, press one of the other mode buttons (SONG, STYLE, or VOICE).
HOT TIPS
- The DJX also has an Arpeggiator Hold function that lets you use a connected footswitch to keep the Arpeggiator cycling, even when you take your hands from the keyboard. (See page 21.)
- The Arpeggiator effect can also be turned on and off with a connected footswitch (page 21), or from Function parameter #37 (page 38).
NOTE
• These settings are not saved when you turn off the power. If you wish to save them, save them to a User bank in the Performance Setup feature (page 56).
- If keys are being held when the Arpeggiator is turned on, the Arpeggiator effect begins only when another key is pressed. If keys are being held when the Arpeggiator is turned off, the Arpeggiator effect continues until all keys are released.
Function Parameters — Effects
The Effect Function parameters provide all effect-related settings (with the exception of the Send parameters in the Main, Dual, and Split sections). These settings include:
- Reverb On/Off
- Reverb Type
- Chorus On/Off
-
Chorus Type
-
DSP On/Off
- DSP Type
- Arpeggiator On/Off
- Arpeggiator Type
Function Parameters
| No. | Parameter Name | Display Name | Range/Settings | Description |
| F31 | Reverb On/Off | Reverb | on, off | This turns the Reverb effect on/off. (This is the same function as that of the REVERB button. It can also be controlled by a connected footswitch; see page 21.) |
| F32 | Reverb Type | RevType | (See “Reverb Type” list below.) | (See “Reverb Type” list below.) |
| F33 | Chorus On/Off | Chorus | on, off | This turns the Chorus effect on/off. This can also be controlled by a connected footswitch. (See page 21.) |
| F34 | Chorus Type | ChoType | (See “Chorus Type” list below.) | (See “Chorus Type” list below.) |
| F35 | DSP On/Off | Dsp | on, off | This turns the DSP effect on/off. This can also be controlled by a connected footswitch. (See page 21.) |
| F36 | DSP Type | DspType | (See “DSP Type” list below.) | (See “DSP Type” list below.) |
| F37 | Arpeggiator On/Off | Arpgator | on, off | This turns the Arpeggiator effect on/off. (This is the same function as that of the ARPEGGIATOR button. It can also be controlled by a connected footswitch; see page 21.) |
| F38 | Arpeggiator Type | ArpgType | (See “Arpeggiator Type” list below.) | (See “Arpeggiator Type” list below.) |
■ Effect Types
Arpeggiator Types
| No. | Name | LCD Display | Description |
| 1 | Techno-A | Techno-A | Typical Eurobeat techno pattern. |
| 2 | Techno-B | Techno-B | Typical UK techno pattern. |
| 3 | Techno-C | Techno-C | Typical Japanese techno pattern. |
| 4 | Techno-D | Techno-D | Typical German techno pattern. |
| 5 | Dance/House | DAHouse | Syncopated dance or house music pattern. |
| 6 | Syncopation | Syncopa | Syncopated pattern with extreme octave jumps. |
| 7 | BaseLine | BaseLine | Arpeggio pattern especially suited for bass. (Best with just one or two notes.) |
| 8 | Echo | Echo | Two-measure pattern with echo effect. |
| 9 | Techno echo | TekkEcho | Techno pattern with echo effect. |
| 10 | Sweep | Sweep | Two-measure pattern with extreme octave jumps. |
| 11 | Pulse | Pulse | Two-measure pattern with extreme octave jumps; works well with one note held in lower octave (for bass pulse). |
| 12 | Up | Up | Arpeggio pattern of ascending notes (for all notes held). |
| 13 | Down | Down | Arpeggio pattern of descending notes (for all notes held). |
| 14 | Up & Down (A) | UpDownA | Arpeggio pattern (version A) of ascending and descending notes (for all notes held). |
| 15 | Up & Down (B) | UpDownB | Arpeggio pattern (version B) of ascending and descending notes (for all notes held). |
| 16 | Random | Random | Random arpeggio pattern (for all notes held). |
Reverb Types
| No. | Reverb Type | Display Name | Description |
| 1 | Hall 1 | Hall1 | Concert hall reverb. |
| 2 | Hall 2 | Hall2 | |
| 3 | Room 1 | Room1 | Small room reverb. |
| 4 | Room 2 | Room2 | |
| 5 | Stage 1 | Stage1 | Reverb for solo instruments. |
| 6 | Stage 2 | Stage2 | |
| 7 | Plate 1 | Plate1 | Simulated steel plate reverb. |
| 8 | Plate 2 | Plate2 | |
| 9 | Off | Off | No effect. |
Chorus Types
| No. | Chorus Type | Display Name | Description |
| 1 | Chorus 1 | Chorus1 | Conventional chorus program with rich, warm chorusing. |
| 2 | Chorus 2 | Chorus2 | |
| 3 | Flanger 1 | Flanger1 | Pronounced three-phase modulation with a slight metallic sound. |
| 4 | Flanger 2 | Flanger2 | |
| 5 | Off | Off | No effect. |
DSP Types
| No. | DSP Type | Display Name | Description |
| 1 | Hall 1 | Hall1 | Concert hall reverb. |
| 2 | Hall 2 | Hall2 | |
| 3 | Room 1 | Room1 | Small room reverb. |
| 4 | Room 2 | Room2 | |
| 5 | Stage 1 | Stage1 | Reverb for solo instruments. |
| 6 | Stage 2 | Stage2 | |
| 7 | Plate 1 | Plate1 | Simulated steel plate reverb. |
| 8 | Plate 2 | Plate2 | |
| 9 | Early Reflection 1 | ER1 | Early reflections only. |
| 10 | Early Reflection 2 | ER2 | |
| 11 | Gate Reverb | Gate1 | Gated reverb effect, in which the reverberation is quickly cut off for special effects. |
| 12 | Reverse Gate | Gate2 | Similar to Gate Reverb, but with a reverse increase in reverb. |
| 13 | Chorus 1 | Chorus1 | Conventional chorus effect with rich, warm chorusing. |
| 14 | Chorus 2 | Chorus2 | |
| 15 | Flanger 1 | Flanger1 | Pronounced three-phase modulation with slight metallic sound. |
| 16 | Flanger 2 | Flanger2 | |
| 17 | Symphonic | Symphony | Exceptionally rich & deep chorusing. |
| 18 | Phaser | Phaser | Pronounced, metallic modulation with periodic phase change. |
| 19 | Rotary Speaker 1 | Rotary1 | Rotary speaker simulation. |
| 20 | Rotary Speaker 2 | Rotary2 | |
| 21 | Tremolo 1 | Tremolo1 | Rich Tremolo effect with both volume and pitch modulation. |
| 22 | Tremolo 2 | Tremolo2 | |
| 23 | Guitar Tremolo | Tremolo3 | Simulated electric guitar tremolo. |
| 24 | Auto Pan | AutoPan | Several panning effects that automatically shift the sound position (left, right, front, back). |
| 25 | Auto Wah | AutoWah | Repeating filter sweep “wah” effect. |
| 26 | Delay Left - Center - Right | DelayLCR | Three independent delays, for the left, right and center stereo positions. |
| 27 | Delay Left - Right | DelayLR | Initial delay for each stereo channel, and two separate feedback delays. |
| 28 | Echo | Echo | Stereo delay, with independent feedback level settings for each channel. |
| 29 | Cross Delay | CrossDly | Complex effect that sends the delayed repeats “bouncing” between the left and right channels. |
| 30 | Distortion Hard | D Hard | Hard-edge distortion. |
| 31 | Distortion Soft | D Soft | Soft, warm distortion. |
| 32 | EQ Disco | EQ Disco | Equalizer effect that boosts both high and low frequencies, as is typical in most disco music. |
| 33 | EQ Telephone | EQ Tel | Equalizer effect that cuts both high and low frequencies, to simulate the sound heard through a telephone receiver. |
| 34 | Off | Off | No effect. |
SONG PLAYBACK – THE SONG MODE
The Song mode features six songs — three demo songs that have been created using the rich and dynamic sounds of the DJX, and three User songs to which you can record your own performance.
The demo songs are generally for your listening enjoyment; however, you can also play along with them on the keyboard.
The User songs are “empty” and cannot be played until something has been recorded to them. (For instructions on recording your own songs, see page 80.)
Song Playback Display
When Part Control is turned on, this indicates the status of the PART SELECT and PART ON/OFF keys. (See page 60.)
Current measure number
Song number; "All" indicates that all songs will playback in order.

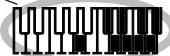
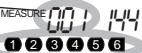
When playing User songs (with recorded Chord track), this displays the name of the current chord.
Indicates the tracks currently playing back. (These can be alternately muted and sounded during playback by pressing the corresponding SONG MEMORY buttons.)
FAST ▶▶
▶TRACK
1 Select the Song mode. (Press the SONG button.)
2 Select a song (with the numeric keypad).
3 Start (and stop) song playback (with the START/STOP button).
SELECTING AND PLAYING A SONG
1 Select the Song mode.
Press the SONG button.
2 Select the desired song number.
Use the numeric keypad.
Song numbers can be selected in the same way as with the voices (see page 25). You can use the numeric keypad to directly enter the song number, use the +/- keys to step up and down through the songs, or press the SONG button to advance through the song numbers.
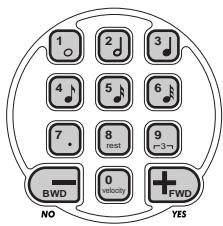
3 Start the selected song.
Press the START/STOP button. As the song plays back, the measure number and chords are shown in the display.
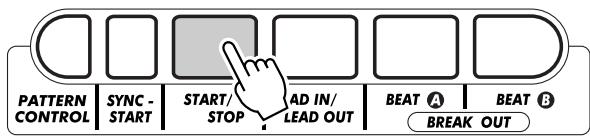
4 If you want to change to another song, repeat step 2 above.
5 Stop the song.
Press the START/STOP button. If playback was started by pressing the START/STOP button, the selected song stops automatically.
HOT TIPS
- You can play along with the song using the currently selected voice, or even select a different voice for playing along. Simply call up the Voice mode while the song is playing back and select the desired voice.
- Start/stop can also be controlled by using a connected footswitch. (See page 21.)
CHANGING THE BPM (TEMPO)
The BPM (Tempo) of song (and pattern) playback can be adjusted over a range of 32 - 280 bpm (beats per minute).
1 Select the BPM function in the Overall menu.
Press one of the OVERALL ▲/▼ buttons, repeatedly if necessary, until "BPM" appears in the display.
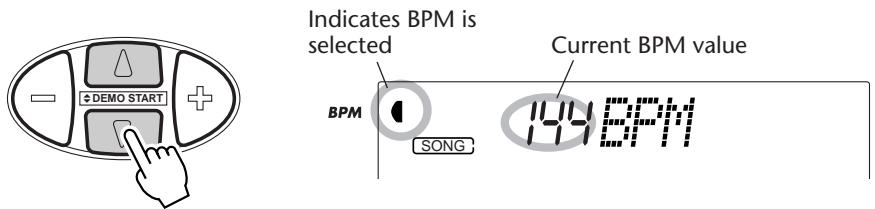
2 Change the value.
Use the OVERALL +/- buttons to increase or decrease the BPM value. Holding down either button continuously increases or decreases the value.
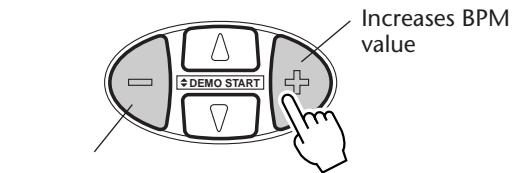
Decreases BPM value
Restoring the Default BPM Value
Each song and style has been given a default or standard BPM. If you've changed the BPM, you can restore the original default setting by pressing both OVERALL +/- buttons simultaneously (when BPM is selected in the Overall menu).
Also, the BPM (Tempo) of a song or style returns to the default setting when selecting a different song or style. (The set BPM remains, however, when switching styles during playback.) When you turn on the power of the DJX, the BPM (Tempo) is automatically set to 142 bpm.
ABOUT THE BEAT DISPLAY
This section of the display provides a convenient, easy-to-understand indication of the rhythm for song and style playback. The dark bars below the name section in the display flash in time with the beat. The first dark bar indicates the first beat of the measure, and the other bars flash in sequence to indicate subsequent beats.

ADJUSTING THE SONG VOLUME
The playback volume of the song can be adjusted. This volume control affects only the song volume. The volume range is 000 - 127.
1 Select the Song Volume function in the Overall menu.
Press one of the OVERALL ▲/▼ buttons, repeatedly if necessary, until "SongVol" appears in the display.
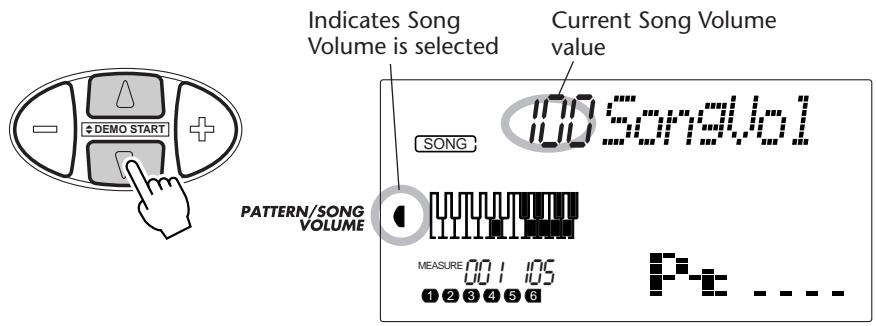
2 Change the value.
Use the OVERALL +/- buttons to increase or decrease the Song Volume value. Holding down either button continuously increases or decreases the value.
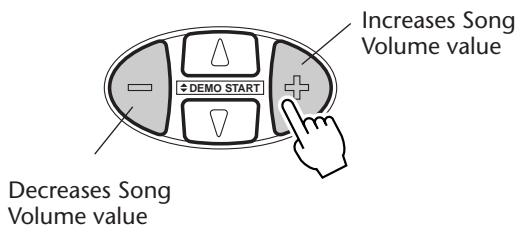
Restoring the Default Value
To restore the default Song Volume value (100), press both OVERALL +/- buttons simultaneously (when Song Volume is selected in the Overall menu).
NOTE
Song Volume cannot be changed unless the Song mode is active. (This function becomes Pattern Volume when the Style mode is active.)
PATTERNS – THE STYLE MODE
The Style mode provides a wealth of exciting, dynamic patterns — including rhythms, beats, and instrumental parts — covering virtually the entire spectrum of dance and contemporary music!
A total of 100 different styles are available, in a variety of dance music genres. Each style is made up of separate “sections” — Lead In, Beat A and B (with Break Outs), and Lead Out — letting you call up different sections as you perform. Each style also has its own “companion” voice selection — so that when you select a style, the best matching voice for that style is automatically called up.
The pattern features that are built into the styles give you the excitement of full instrumental backing for your performance. They also make it possible to easily control the backing bass, chords, and other phrases — just by playing single notes or chords in the PATTERN section of the keyboard. (See pages 50.)
FAST ▶▶ ▶TRACK
1 Select the Style mode. (Press the STYLE button.)
2 Select a style (with the numeric keypad).
3 Turn Pattern Control on (if it isn't on already).
4 Start the pattern. (Press the START/STOP button or use the Sync-Start function.)
5 Stop the pattern. (Press one of these buttons: START/STOP, LEAD IN/LEAD OUT, or SYNC-START.)
SELECTING A STYLE AND PLAYING THE PATTERN
1 Select the Style mode.
Press the STYLE button.
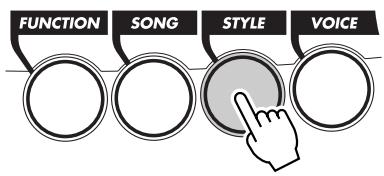
flowchart
graph TD
    A["FUNCTION"] --> B["SONG"]
    B --> C["STYLE"]
    C --> D["VOICE"]
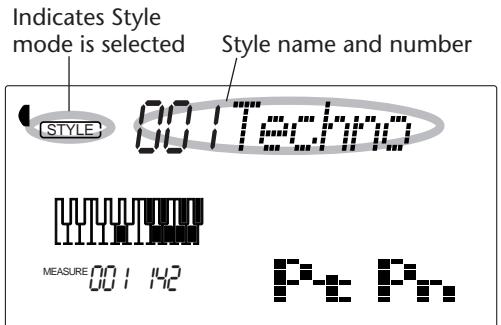
2 Select the desired style number.
Use the numeric keypad. The basic categories of styles and their numbers are shown at the left of the panel. A complete list of the available styles is given on page 111.

Style numbers can be selected in the same way as with the voices (see page 25). You can use the numeric keypad to directly enter the style number, use the +/- keys to step up and down through the styles, or press the STYLE button to advance through the style numbers.
3 Turn Pattern Control on (if it isn't on already).
If Pattern Control is off ("----" appears in the Pattern Control section of the icon window), press the PATTERN CONTROL button to turn it on.
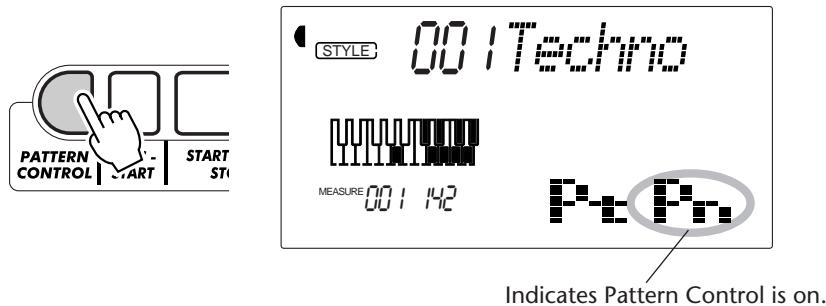
4 Start the pattern.
You can do this in one of the following ways:
Pressing the START/STOP button
The pattern starts playing immediately. The currently selected Beat A or B section will play.
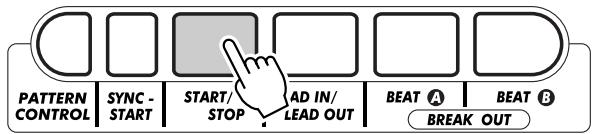
You can select the Beat A or B section by pressing the appropriate button — BEAT A or BEAT B — before pressing the START/STOP button. (The icon section of the display briefly shows the letter of the selected section: "A" or "B.")
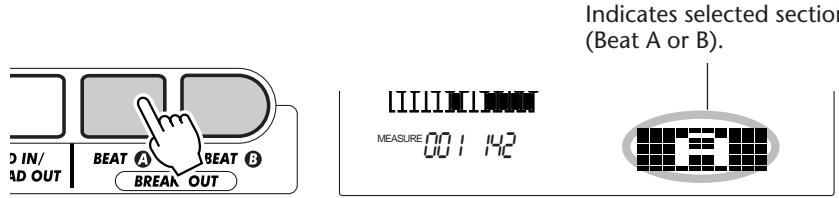
Start/stop can also be controlled by using a connected footswitch. (See page 21.)
Using Sync-Start
The DJX also has a Sync-Start function that allows you to start the pattern by simply pressing a key on the keyboard. To use Sync-Start, first press the SYNC-START button (the beat bars below the style name all flash to indicate Sync-Start stand-by), then press any key on the keyboard in the PATTERN section.
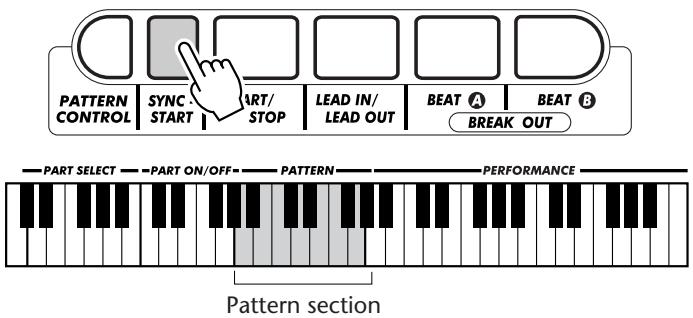
Starting with a Lead In section
Each style has its own two- or four-measure Lead In section. Many of the Lead In sections also include special chord changes and embellishments to enhance your performance.
To start with a Lead In section:
1) Press the BEAT A or BEAT B button — to select which section (A or B) is to follow the Lead In.
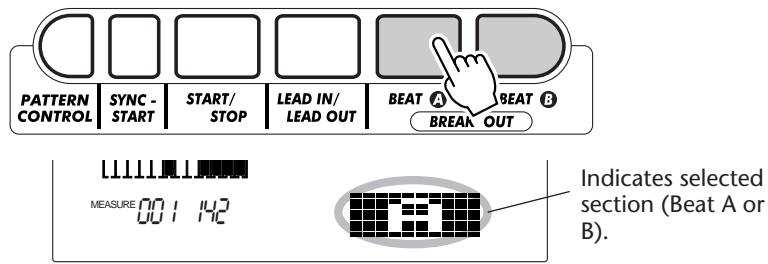
2) Press the LEAD IN button.
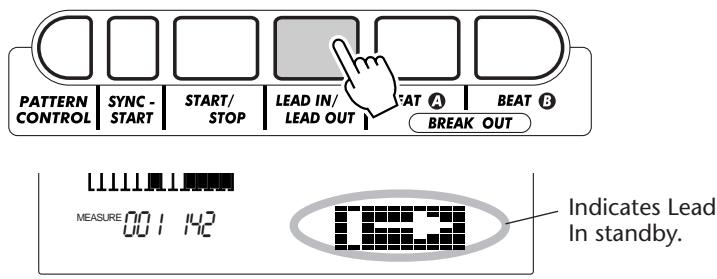
To actually start the Lead In section and pattern, press the START/STOP button.
Once the Lead In section is finished, the icon section of the display briefly shows the letter "A" or "B" to indicate that the selected Beat section is currently playing.
NOTE
Sync-Start is automatically set to standby when:
* The power is turned on.
* Part Control (page 59) is turned on.

Lead In can also be controlled by using a connected footswitch. (See page 21.)
About the Beat Display
The dark bars underneath the style name in the display flash in time with the current tempo during playback (or Sync-Start standby) of the pattern. The flashing bars provide a visual indication of both the tempo and time signature of the pattern. (For more information, see page 42.)
5 Stop the pattern.
You can do this in one of three ways:
Pressing the START/STOP button
The pattern stops playing immediately.
Using a Lead Out section
Press the LEAD IN/LEAD OUT button. The pattern stops after the Lead Out section is finished.
Pressing the SYNC-START button
This immediately stops the pattern and automatically enables Sync-Start, letting you re-start the pattern by simply playing a chord or key in the PATTERN section of the keyboard.
HOT TIPS
- Start/stop and Lead Out can also be controlled by using a connected footswitch. (See page 21.)
- To have the Lead Out section gradually slow down as it is playing, press the LEAD IN/LEAD OUT button twice quickly.
PATTERN CONTROLS
When the Style mode is active, the panel buttons below the display function as Pattern controls.
Pressing this button alternately enables and disables the PATTERN section of the keyboard. When Pattern Control is turned off (disabled), the keyboard cannot be used to change the chords of the pattern.
Pressing this button alternately starts and stops pattern playback.
Pressing this button selects the Beat A section, or adds a Break Out A section. (See page 48.)
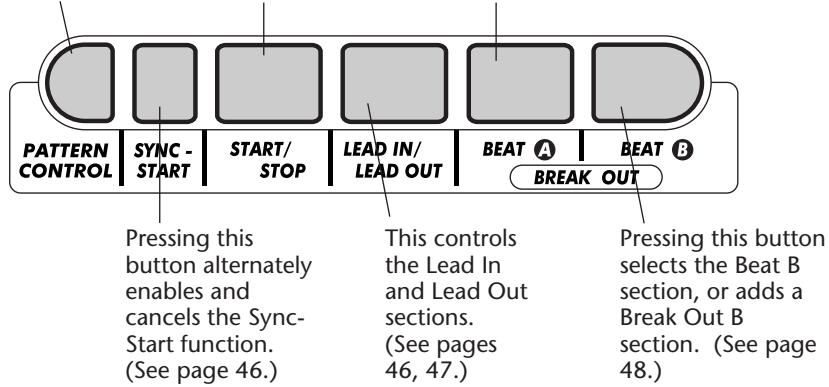
PATTERN SECTIONS (BEAT A, BEAT B AND BREAK OUTS)
While the pattern is playing, you can add variation by pressing one of the BEAT A/B (BREAK OUT) buttons. This automatically plays one of four Break Out sections, and smoothly leads into the next section — even if it is the same section.
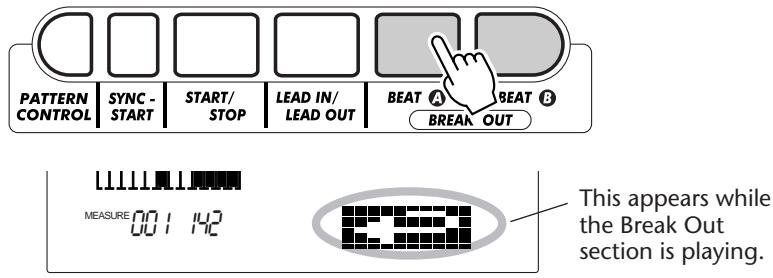
Each style has four different Break Out sections that play in the following conditions:
- Beat A Beat A (Break Out "AA")
- Beat A Beat B (Break Out "AB")
- Beat B Beat A (Break Out "BA")
- Beat B Beat B (Break Out "BB")

This function can also be controlled by using a connected footswitch. (See page 21.)
NOTE
If you press the BEAT A or B button, the Break Out will begin immediately, and the newly selected section (A or B) will actually begin playing from the top of the next measure, unless the BEAT A or B button is pressed during the last beat of the measure — in which case the Break Out will begin from the first beat of the next measure.
CHANGING THE BPM (TEMPO)
The BPM (Tempo) of song (and pattern) playback can be adjusted over a range of 32 - 280 bpm (beats per minute). For instructions on changing the BPM (Tempo), see page 41.
NOTE
Each style has been given a default or standard BPM (Tempo). (For instructions on restoring the default BPM, see page 42.) When pattern playback is stopped and a different style is selected, the BPM returns to the default setting of the new style. When switching styles during playback, the last BPM setting is maintained. (This allows you to keep the same BPM, even when changing styles.)
ADJUSTING THE PATTERN VOLUME
The playback volume of the pattern can be adjusted. This volume control affects only the pattern volume. The volume range is 000 - 127.
1 Select the Pattern Volume function in the Overall menu.
Press one of the OVERALL ▲/▼ buttons, repeatedly if necessary, until "PtrnVol" appears in the display.
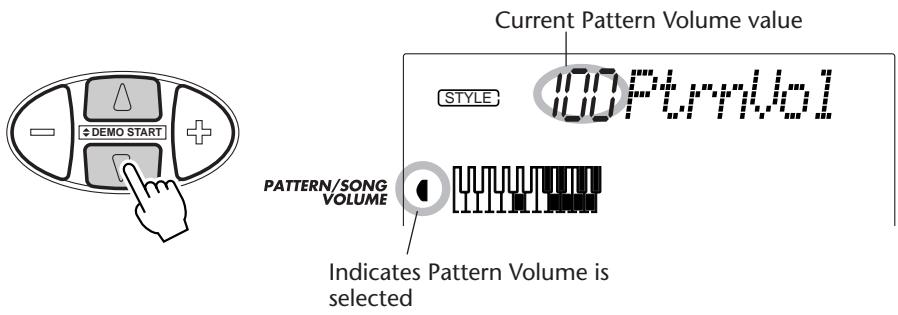
2 Change the value.
Use the OVERALL +/- buttons to increase or decrease the Pattern Volume value. Holding down either button continuously increases or decreases the value.
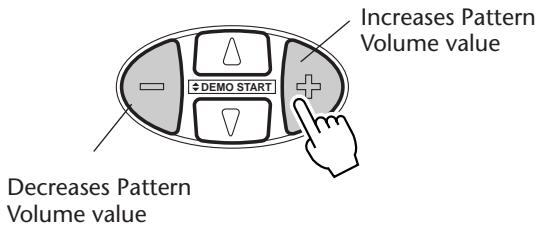
Restoring the Default Value
To restore the default Pattern Volume value (100), press both OVERALL +/- buttons simultaneously (when Pattern Volume is selected in the Overall menu).
NOTE
Pattern Volume cannot be changed unless the Style mode is active.
FINGERING
When Pattern Control is set to on (page 45), the DJX automatically creates the backing tracks — drums, percussion, bass, chords, hits, and other phrases — and changes the chords of the backing right along with you. All you have to do is play single notes or chords in the PATTERN section of the keyboard — and the DJX follows you!
Naturally, you can play full chords (like those shown in the chart below), and the pattern will change harmonically in response. When you play single notes, the DJX automatically produces chords that are based on the root note you play and are best suited to the selected style.
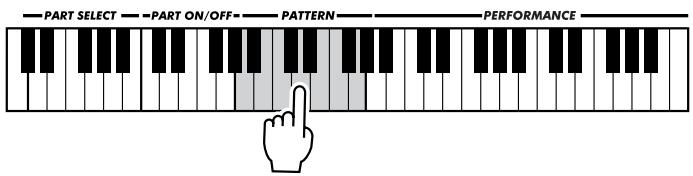
For example, all single note chords in the Techno style (#001) are minor, all chords for Trip Hop (#002) are minor 7th 11th, etc. This lets you quickly and easily play the most musically useful and stylistically appropriate chord changes — just by pressing a single key!
Using the key of C as an example, the chart below shows the types of chords that can be recognized. When Part Control is turned on, the range of the PATTERN section may be too narrow for proper recognition of all of the following chords in all twelve keys. For best results when playing full chords in the PATTERN section, turn Part Control off. (See page 59.)
NOTE
- Playing full chords may not change the pattern chord as intended. For example, playing major seventh chords will not change the chords of a pattern that has minor and dominant seventh phrases and lines.
- Chords played in the PATTERN section of the keyboard are also detected and played when the pattern is stopped. In effect, this gives you a “split keyboard,” with bass and chords in the left hand and the normally selected voice in the right.
Recognized Chords (root note: C)
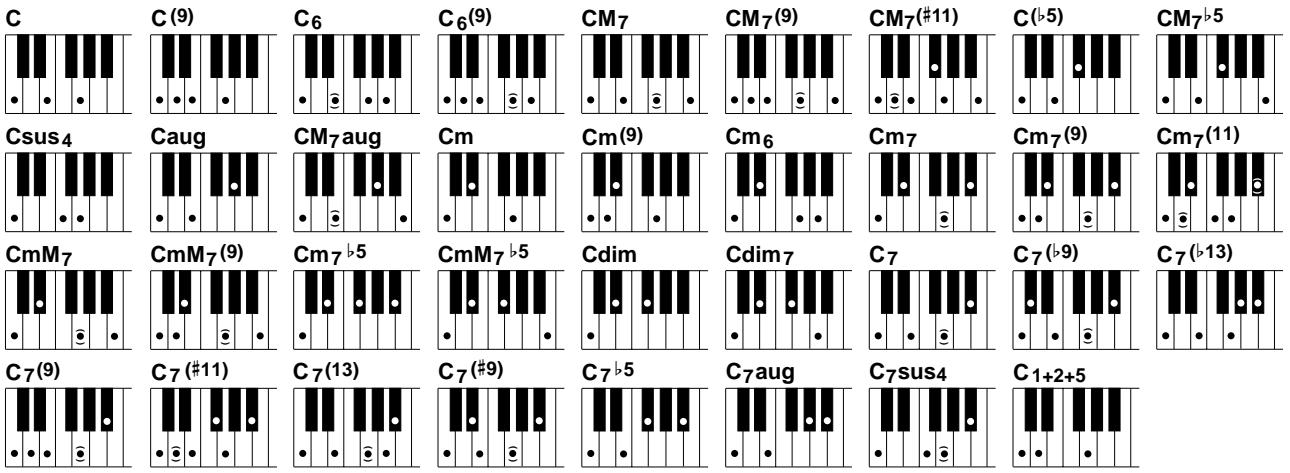
* Notes enclosed in parentheses are optional; the chords will be recognized without them.
| Chord Name/[Abbreviation] | Normal Voicing | Chord (C) | Display |
| Major [M] | 1 - 3 - 5 | C | C |
| Add ninth [(9)] | 1 - 2 - 3 - 5 | C(9) | C(9) |
| Sixth [6] | 1 - (3) - 5 - 6 | C6 | C6 |
| Sixth ninth [6(9)] | 1 - 2 - 3 - (5) - 6 | C6(9) | C6(9) |
| Major seventh [M7] | 1 - 3 - (5) - 7 or1 - (3) - 5 - 7 | CM7 | CM7 |
| Major seventh ninth [M7(9)] | 1 - 2 - 3 - (5) - 7 | CM7(9) | CM7(9) |
| Major seventh add sharp eleventh [M7(#11)] | 1 - (2) - 3 - #4 - 5 - 7 or1 - 2 - 3 - #4 - (5) - 7 | CM7(#11) | CM7(#11) |
| Flatted fifth [(b5)] | 1 - 3 - b5 | C(b5) | Cb5 |
| Major seventh flatted fifth [M7b5] | 1 - 3 - b5 - 7 | CM7b5 | CM7b5 |
| Suspended fourth [sus4] | 1 - 4 - 5 | Csus4 | Csus4 |
| Augmented [aug] | 1 - 3 - #5 | Caug | Caug |
| Major seventh augmented [M7aug] | 1 - (3) - #5 - 7 | CM7aug | CM7aug |
| Minor [m] | 1 - b3 - 5 | Cm | Cm |
| Minor add ninth [m(9)] | 1 - 2 - b3 - 5 | Cm(9) | Cm(9) |
| Minor sixth [m6] | 1 - b3 - 5 - 6 | Cm6 | Cm6 |
| Minor seventh [m7] | 1 - b3 - (5) - b7 | Cm7 | Cm7 |
| Minor seventh ninth [m7(9)] | 1 - 2 - b3 - (5) - b7 | Cm7(9) | Cm7(9) |
| Minor seventh add eleventh [m7(11)] | 1 - (2) - b3 - 4 - 5 - (b7) | Cm7(11) | Cm7(11) |
| Minor major seventh [mM7] | 1 - b3 - (5) - 7 | CmM7 | CmM7 |
| Minor major seventh ninth [mM7(9)] | 1 - 2 - b3 - (5) - 7 | CmM7(9) | CmM7(9) |
| Minor seventh flatted fifth [m7b5] | 1 - b3 - b5 - b7 | Cm7b5 | Cm7b5 |
| Minor major seventh flatted fifth [mM7b5] | 1 - b3 - b5 - 7 | CmM7b5 | CmM7b5 |
| Diminished [dim] | 1 - b3 - b5 | Cdim | Cdim |
| Diminished seventh [dim7] | 1 - b3 - b5 - 6 | Cdim7 | Cdim7 |
| Seventh [7] | 1 - 3 - (5) - b7 or1 - (3) - 5 - b7 | C7 | C7 |
| Seventh flatted ninth [7(b9)] | 1 - b2 - 3 - (5) - b7 | C7(b9) | C7(b9) |
| Seventh add flatted thirteenth [7(b13)] | 1 - 3 - 5 - b6 - b7 | C7(b13) | C7(b13) |
| Seventh ninth [7(9)] | 1 - 2 - 3 - (5) - b7 | C7(9) | C7(9) |
| Seventh add sharp eleventh [7(#11)] | 1 - (2) - 3 - #4 - 5 - b7 or1 - 2 - 3 - #4 - (5) - b7 | C7(#11) | C7(#11) |
| Seventh add thirteenth [7(13)] | 1 - 3 - (5) - 6 - b7 | C7(13) | C7(13) |
| Seventh sharp ninth [7(#9)] | 1 - #2 - 3 - (5) - b7 | C7(#9) | C7(#9) |
| Seventh flatted fifth [7b5] | 1 - 3 - b5 - b7 | C7b5 | C7b5 |
| Seventh augmented [7aug] | 1 - 3 - #5 - b7 | C7aug | C7aug |
| Seventh suspended fourth [7sus4] | 1 - 4 - (5) - b7 | C7sus4 | C7sus4 |
| One plus two plus five [1+2+5] | 1 - 2 - 5 | C1+2+5 | C |
NOTE
• Notes in parentheses can be omitted.
- If you play any three adjacent keys (including black keys), the chord sound will be cancelled and only the rhythm instruments will continue playing (CHORD CANCEL function).
- Playing two same root keys in the adjacent octaves produces a pattern based only on the root.
- A perfect fifth (1 + 5) produces a pattern based only on the root and fifth, which can be used with both major and minor chords.
- The chord fingerings listed are all in “root” position, but other inversions can be used — with the following exceptions:
m7, m7b5, 6, m6, sus4, aug, dim7, 7b5, 6(9), m7(11), 1+2+5.
- Inversion of the 7sus4 chord are not recognized if the 5th is omitted.
- The Pattern will sometimes not change when related chords are played in sequence (e.g. some minor chords followed by the minor seventh).
- Two-note fingerings will produce a chord based on the previously played chord.
BEAT REVERSE
The DJX also has a special Beat Reverse key that lets you break up the pattern with stuttering rhythmic effects and unusual syncopations. Pressing the key automatically resets the pattern to the top of the measure (first beat).
1 Select a style and start the pattern.
Do this in the normal way. (Need a refresher course? See page 44.)
2 Turn Part Control on (if it isn't on already).
Press the PART CONTROL button.

3 Press the Beat Reverse key (C1).
Press the lowest key on the keyboard (C1) each time you want the pattern to start again from the top. Press it repeatedly for stuttering effects and rhythmic hits.

PART ON/OFF
This exciting feature effectively puts you in the producer's chair — it lets you instantly and intuitively mute and un-mute individual Parts of the pattern, simply by pressing keys in the PART ON/OFF section of the keyboard.
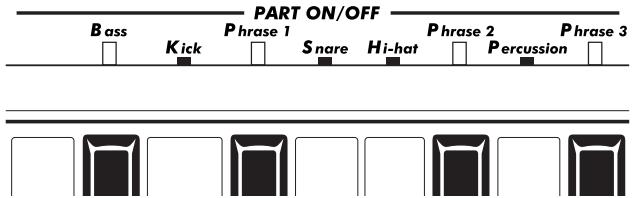
1 Select a style and start the pattern.
Do this in the normal way. (Need a refresher course? See pages 44 - 46.)
2 Turn Part Control on (if it isn't on already).
Press the PART CONTROL button.
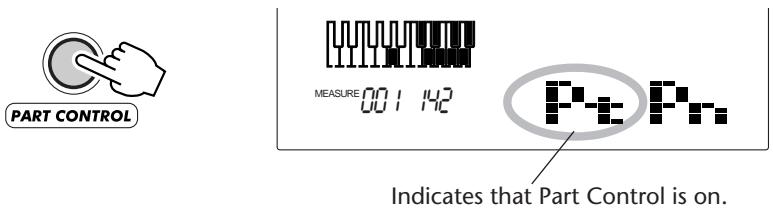
3 Press the appropriate keys to mute and un-mute the desired Parts.
As the pattern is playing back, press the key in the PART ON/OFF section that corresponds to the Part you want to mute/un-mute. (You can also press several keys at once, to instantly mute/un-mute several Parts.)

To turn the Part On/Off function off, press the PART CONTROL button again. (When Part Control is off, “- - - -” appears in the Part Control section of the icon window.)
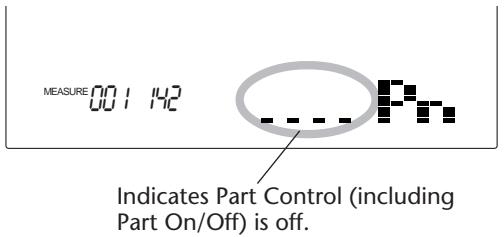
NOTE
Each time Part Control is turned off and on again, the PART ON/OFF keys are reset to the default (all Parts on).
NOTE
- On certain patterns and sections, not all of the Parts may be available — in other words, some of the Parts may be “empty” and not sound. For example, Beat A of the “Acid” style (#009) doesn’t have any Percussion, Phrase 2, or Phrase 3 Parts, so pressing the corresponding keys will have no effect; however, the Beat B section of that style does have the Percussion, Phrase 2, and Phrase 3 Parts.
- If you've recorded a pattern to the Chord track of the User song (see page 80), the Part On/Off function lets you easily mute and un-mute specific instrument Parts of the pattern as it plays back.
About the Parts
The actual instruments and musical backing used for Phrases 1, 2 and 3 may differ widely depending on the selected style. This applies to some of the other Parts as well. For example, the Snare Part in some
patterns may not sound like a snare drum at all! (In particular, "Kick," "Snare," and "Hi-hat" refer mainly to those special elements of the rhythm — and not necessarily the sounds.)
SETTING THE PATTERN SPLIT POINT
The Pattern Split Point determines the highest key for the pattern section. The pattern can be played with the keys up to and including the Pattern Split Point key.
This parameter can be set lower (but not higher) than the Split Point in the Split mode. When set to different values, the two settings affect one another in the following way:
- When the Split mode Split Point is set higher than the Pattern Split Point:
- When the Split mode Split Point is set to the same key as the Pattern Split Point:
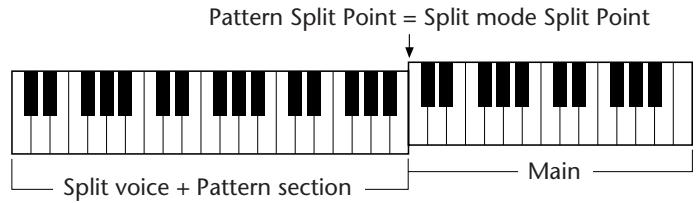
The actual split points (of both the Split voice and the Pattern keys) change according to the Part Control on/off setting. When Part Control is on, the split points are as set. When Part Control is turned off, both the split points drop one octave down, increasing the range of the Performance section. The following examples illustrate how the split points change in each case.
- When Part Control is on:
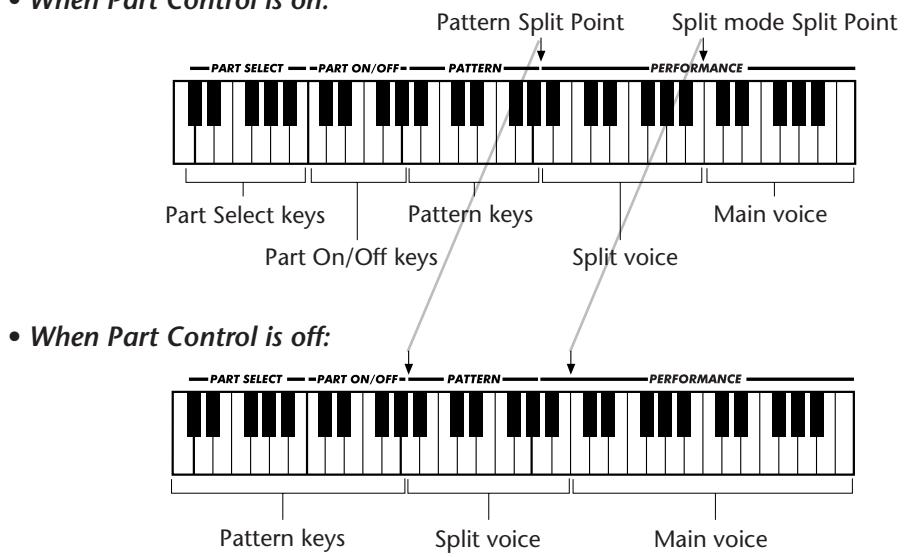
flowchart
graph TD
    A["PART SELECT"] --> B["Pattern Split Point"]
    C["PART ON/OFF"] --> D["PATTERN"] --> E["PERFORMANCE"]
    F["Main voice"] --> G["Split mode Split Point"]
    H["Part Select keys"] --> I["Pattern keys"] --> J["Main voice"]
    K["Part On/OFF keys"] --> L["Pattern"] --> M["PERFORMANCE"]
    N["Split voice"] --> O["Pattern"] --> P["PERFORMANCE"]
    Q["Pattern keys"] --> R["Split voice"] --> S["Main voice"]
Function Parameter — Pattern Split Point
Selecting and changing the Pattern Split Point:
Press the FUNCTION button, then use the numeric keypad to select parameter number 51. After "FUNCTION" stops flashing, use the numeric keypad or +/- buttons to change the setting. (For details, see page 18.)
The value can also be set directly by pressing the desired key while this parameter is selected. After setting this, make sure to select a different parameter or exit the Function mode before playing the keyboard.
Function Parameters
| No. | Parameter Name | Display Name | Range/Settings | Description |
| F51 | Pattern Split Point | PtrnSPnt | 000 — 127 | This determines the highest key for the PATTERN section and sets the pattern split “point” — in other words, the key that separates the PATTERN section and the PERFORMANCE section. (When Pattern Control is turned on, the PATTERN section sounds up to and including the Pattern Split Point key.) The default Pattern Split Point is 068 (G#3). This cannot be set higher than the Split Point in the Split mode (page 32). While this is being set, the keyboard does not produce any sound. After setting this, make sure to select a different parameter or exit the Function mode before playing the keyboard. |
Performance Setup is a powerful and convenient Style mode function that lets you instantly reconfigure virtually all settings of the DJX — with the touch of a single button. Two types of Performance Setups are available: User and Preset.
PERFORMANCE SETUP – USER
Four User banks each with four different settings — a total of sixteen — are available for your custom settings. Each of the sixteen User Performance Setups can have different settings for the following parameters:
- Main voice number
- All Main voice settings (Volume**, Octave, Pan**, Reverb Send Level**, Chorus Send Level**, DSP Send Level**, Cutoff*, Resonance*, Attack*, Release*, and Modulation*)
- Dual voice number
- All Dual voice settings (On/Off, Volume**, Octave, Pan**, Reverb Send Level**, Chorus Send Level**, DSP Send Level**, Cutoff*, Resonance*, Attack*, Release*, and Modulation*)
- Split voice number
- All Split voice settings (On/Off, Split Point, Volume**, Octave, Pan**, Reverb Send Level**, Chorus Send Level**, DSP Send Level**, Cutoff*, Resonance*, Attack*, Release*, and Modulation*)
- Reverb Type and On/Off
- Chorus Type and On/Off
- DSP Type and On/Off
- Arpeggiator Type, On/Off, and Speed*
- Style number, and style-related settings: Pattern Control On/Off, Section (Beat A or B), Pattern Split Point, Track settings (Part On/Off, Volume*, Pan*, Cutoff*, Resonance*, Reverb Send Level*, Chorus Send Level*, DSP Send Level*, Attack*, Release*, and Modulation*), Groove*, Dynamics*, and Dynamics Strength
• Part Select (Knobs and Ribbon Controller)
- Overall menu settings: BPM (Tempo), Transpose, Tuning, Pattern Volume, Ribbon Controller assignment, and Assign Knob assignment
- Footswitch assignment
- Touch Sensitivity
- Pitch Bend Range
* Last settings made with the Knobs and the Ribbon Controller are memorized.
** Last settings made in the Function mode, and with the Knobs and Ribbon Controller are memorized.
Recording a User Performance Setup
1 Make all desired settings for the DJX.
Virtually all DJX settings can be saved to a User button. Refer to the list above for details.
2 Select the PSU (Performance Setup) Record mode.
Press the RECORD button, repeatedly if necessary, until "PSU User" appears at the top of the display.


3 Select the desired bank.
Use the +/- buttons or the numeric keypad to select the desired User bank number (1 - 4).
4 Select the desired User number.
Press the corresponding USER PERFORMANCE SETUP button (1 - 4). Doing this records the settings to the selected button.
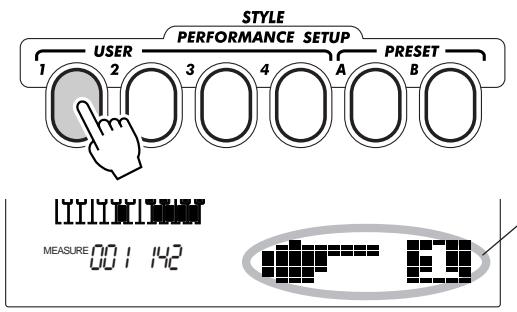
Briefly appears to indicate that settings have been saved to Performance Setup User button 1.
5 Exit from the Record mode.
Press the RECORD button.
Recalling a User Performance Setup
Once you've recorded your settings to a User button, you can instantly recall those settings any time you want.
1 Call up the Style mode.
Press the STYLE button.
2 Press the appropriate PERFORMANCE SETUP USER button.
Press the USER button (1 - 4) corresponding to the desired settings.
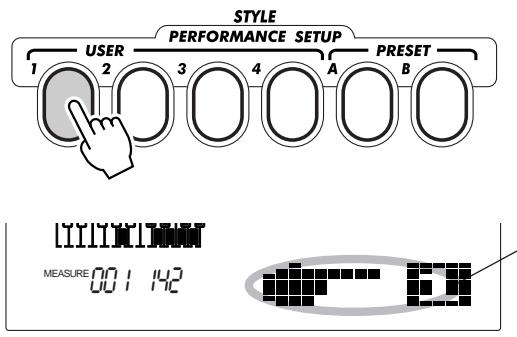
Briefly appears to indicate that Performance Setup User 1 is active.
Selecting a User Bank
Before selecting a User Performance Setup (in step #2), you may want to select a different bank. To do this:
1) Select Function #41. (Press the FUNCTION button, then use the +/- buttons or the numeric keypad to select #41.)
2) After the "FUNCTION" indication stops flashing, select the desired bank number with the +/- buttons or the numeric keypad.
PERFORMANCE SETUP – PRESET
Preset Performance Setups are used in a slightly different way than the User settings. First, select a style, then select a Preset Performance Setup. The Preset A and B settings have been specially programmed at the factory to match the selected style. This means that you can select the style you want, then choose a Preset that has the best suited voice, effect, and other settings for that style.
- Main voice number
- All Main voice settings (Volume, Octave, Pan, Reverb Send Level, Chorus Send Level, and DSP Send Level)
- Dual voice number
- All Dual voice settings (On/Off, Volume, Octave, Pan, Reverb Send Level, Chorus Send Level, and DSP Send Level)
- Split voice number
- All Split voice settings (On/Off, Split Point, Volume, Octave, Pan, Reverb Send Level, Chorus Send Level, and DSP Send Level)
- Reverb Type and On/Off
-
Chorus Type and On/Off
-
DSP On/Off
- Arpeggiator Type, On/Off, and Speed
- Style-related settings: Pattern Control On*, Sync-Start On*, Section(Beat A or B)*, Pattern Split Point*, Part On/Off, Groove, Dynamics, and Dynamics Strength
• Part Select (Knobs and Ribbon Controller) - Overall menu settings: Ribbon Controller assignment and Assign Knob assignment
- Pitch Bend Range
* Set only when pattern is stopped.
Selecting a Preset Performance Setup
1 Select a style.
Select one of the styles, as described in steps 1 - 2 on page 44.
2 Press the appropriate PERFORMANCE SETUP PRESET button.
Press the PRESET button (A, B) corresponding to the desired settings.

3 Play the pattern.
Since both Sync-Start and Pattern Control are automatically set to On when Preset Performance Setup is on, playing a key or chord in the PATTERN section of the keyboard starts the pattern.
The Control Knobs of the DJX give you enormously expressive control over various parts of the sound. You can use the knobs to “tweak” the sound of any one of the voices (Main, Dual, or Split) as you perform. Or you can use them to change the sound of individual Parts of the pattern — in real time as the pattern plays!
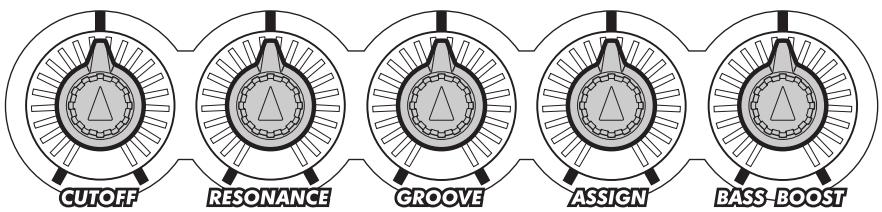
USING THE KNOBS
FAST ▶▶
▶TRACK
1 Turn Part Control on. (Press the PART CONTROL button.)
2 Select the Part you want to control. (Press one of the PART SELECT keys at the lower end of the keyboard.)
3 Start the pattern. / Start the song.
4 Turn the knobs to change the sound as you play.
1 If Part Control isn't on, turn it on by pressing the PART CONTROL button.
When you turn on the DJX, Part Control is automatically set to on — so you may not need to do this step.
To find out whether Part Control is on or not, check the icon window in the display. If Part Control is on, the icon will look like this:

If Part Control is off, the icon will look like this:

To turn Part Control on/off, press the PART CONTROL button.
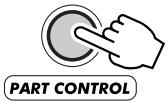
2 Select the Part you want to control.
Press one of the PART SELECT keys at the lower end of the keyboard (C#1 - B1). Each of the keys corresponds to a different voice or part of the pattern — letting you select the individual instrument sound you want to tweak with the knobs.
The name of each Part is printed above each key:
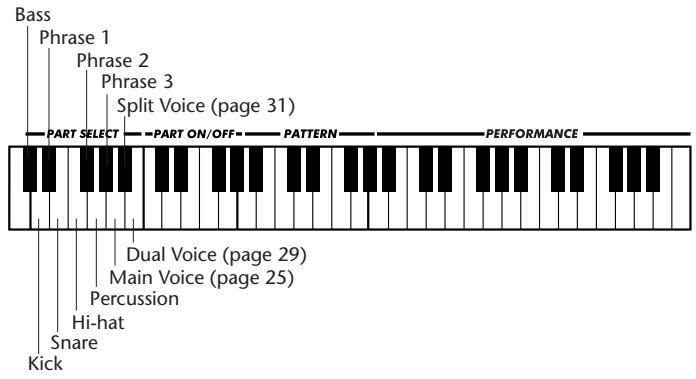
The PART SELECT keys function differently when the Song mode is selected:
The key indicating the selected part is darkened in the display.
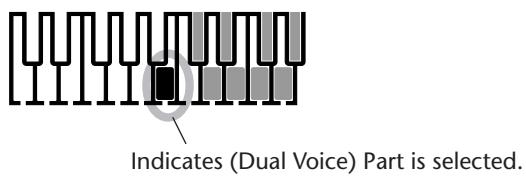
3 Start the pattern. / Start the song.
Press the START/STOP button. For instructions on other ways to start the pattern, refer to page 46.