
True X Bar 90A SR-X90A - Soundbar YAMAHA - Free user manual and instructions
Find the device manual for free True X Bar 90A SR-X90A YAMAHA in PDF.

| Product Type | Soundbar with wireless subwoofer |
| Brand | Yamaha |
| Model | SR-X90A (True X Bar 90A) |
| Surround Compatibility | TRUE X SURROUND with wireless speakers (WS-X3A) |
| Connectivity | HDMI eARC/ARC, optical digital, LAN network, Bluetooth |
| Supported Audio Formats | Dolby Atmos, DTS:X, Auro-3D, LPCM |
| Sound Modes | SURROUND:AI, 3D MUSIC, STRAIGHT, STEREO, ALL (with surround speakers) |
| Audio Functions | Clear Voice, Bass Extension |
| Control App | MusicCast Controller (iOS/Android) |
| Subwoofer | Wireless, automatic connection to soundbar |
| Power Supply | AC 100-240 V, 50/60 Hz (power cords included) |
| Included Accessories | Remote control (batteries included), power cords, wall mount brackets and washers |
| Wall Mounting | Possible, entrust to a qualified installer |
| Maintenance | Clean with a soft, dry cloth |
| Safety | Read the supplied Safety Guide carefully before use |
| Repairability | Contact a Yamaha authorized service center for any repairs |
Frequently Asked Questions - True X Bar 90A SR-X90A YAMAHA
User questions about True X Bar 90A SR-X90A YAMAHA
0 question about this device. Answer the ones you know or ask your own.
Ask a new question about this device
Download the instructions for your Soundbar in PDF format for free! Find your manual True X Bar 90A SR-X90A - YAMAHA and take your electronic device back in hand. On this page are published all the documents necessary for the use of your device. True X Bar 90A SR-X90A by YAMAHA.
USER MANUAL True X Bar 90A SR-X90A YAMAHA
natural_image
Line drawing of a desktop computer setup with a front-mounted speaker and a rear-mounted base (no text or symbols)Thank you for purchasing a Yamaha product.
This product is a bar-shaped speaker system that can be used by connecting it to a TV and/or AV device, and includes a subwoofer.
You can enjoy surround playback with a rich sense of presence, as well as a wide range of audio content over a network.
In addition, this product is compatible with "TRUE X SURROUND" which provides real surround sound using wireless speakers as surround speakers for the product.
- Before using the product, be sure to read this document and the included Safety Guide to ensure proper and safe use.

Safety Guide
Be sure to read the Safety Guide first to ensure safe use.


Quick Guide (this document)
This document mainly describes the procedure for enjoying sound from connected devices.
What to do prior to use (p. 4)
1 Installing the product (p. 5)
2 Connecting devices (p. 6)
3 Connecting the product to power and turning it on (p. 8)
4 Connecting TRUE X SURROUND compatible wireless speakers (p. 10)
5 Registering to a MusicCast network (p. 11)
6 Listening to audio through the sound bar (p. 12)
Additional Information (p. 14)

User Guide
More detailed information is described.
https://manual.yamaha.com/audio/sound_bar/sr-x90a/

What to do prior to use
Confirming the contents of the box
This product includes the following main devices and accessories. Take out all items from the box and make sure that all items are present.
■ Main devices


Sound bar (SR-CUX90A) Subwoofer (SR-WSWX90A)
■ Accessories


Remote control Power cords Batteries
(AAA, LR03, UM-4) (×2)
Use when mounting the sound bar on a wall.
- Mounting brackets (×2) • Washers (×2)
• Quick Guide (this document)
- Safety Guide
NOTE
An HDMI cable is not included with this product. If you intend to use an HDMI cable to connect this product, get one that is commercially available.
Preparing the remote control
Before placing the remote control batteries in the remote control or using it, be sure to read the Safety Guide carefully.
Placing the batteries in the remote control

While pushing the tab with the △ mark in the direction of the arrow, open the cover.
Insert the two included batteries (AAA, LR03, UM-4).
Fit the tab into the notch and then put the cover back in place.
Operating range of the remote control
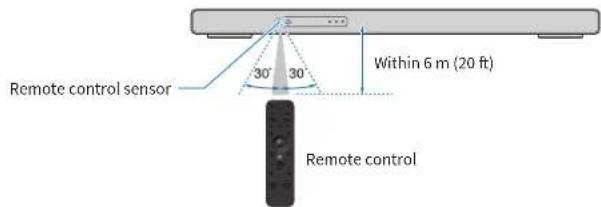
1
Installing the product
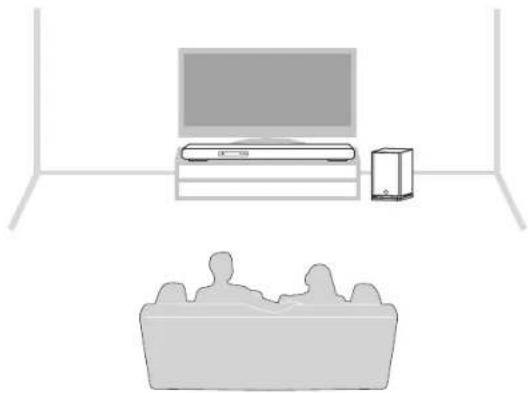
Install the sound bar and subwoofer as shown in the following illustration. Place the subwoofer to the side of the sound bar. To prevent sound from reflecting off the wall, point the front of the subwoofer slightly inward.
natural_image
Simple line drawing of a TV and a sofa in a living room (no text or symbols)NOTE
The listening position such as a sofa should be located directly in front of the sound bar.
NOTICE
The top of the sound bar is equipped with built-in height speakers that output the sound of the height channels. Since the height speakers output audio in the direction of the ceiling, allow enough space on the top of the sound bar. This will provide you the best possible surround sound field.

NOTE
The sound bar can also be mounted on a wall. For proper installation of the sound bar on a wall, make sure to have the work done by the dealer from where you purchased the product or by a contractor with qualified service personnel. For more information, visit the following website: https://manual.yamaha.com/audio/sound_bar/wallmount/sr-x90a/
2
Connecting devices
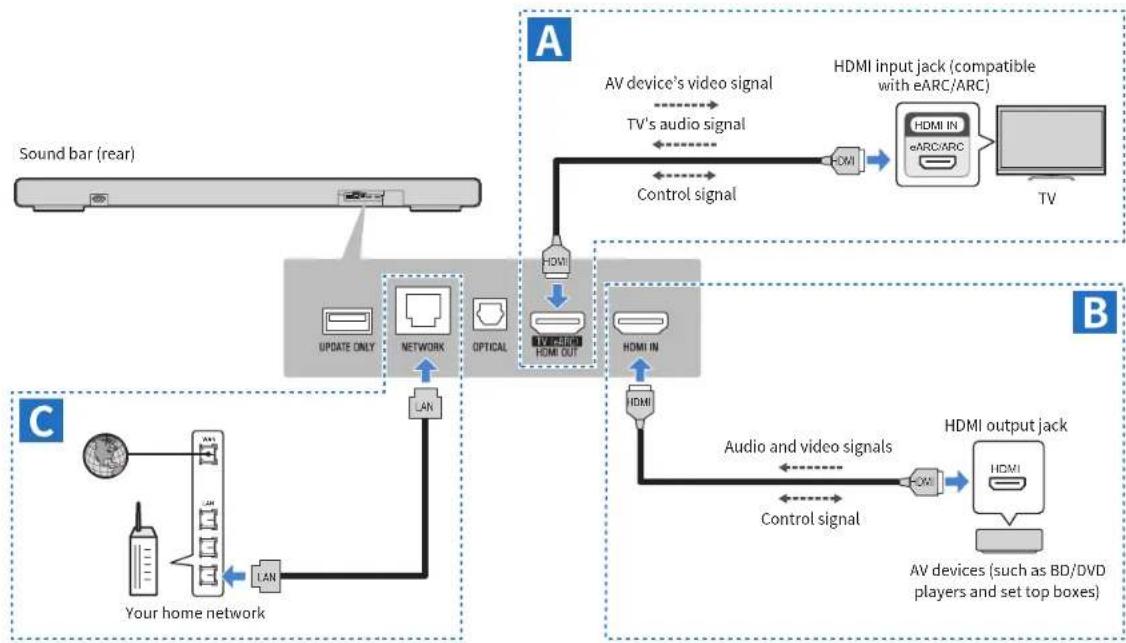
Connect the sound bar to a TV and AV devices as shown in illustrations A and B below.
In addition, if you wish to connect the sound bar to a network via a wired connection, connect the sound bar as shown in illustration C below.
flowchart
graph TD
    A["Sound bar (rear)"] --> B["UPDATE ONLY"]
    B --> C["NETWORK"]
    C --> D["OPTICAL"]
    D --> E["LAN"]
    E --> F["Your home network"]
    F --> G["LAN"]
    G --> H["TV/BRDN HOME OUT"]
    H --> I["HDMI IN"]
    I --> J["HDMI"]
    J --> K["AV device's video signal"]
    K --> L["TV's audio signal"]
    L --> M["Control signal"]
    M --> N["HDMI input jack (compatible with eARC/ARC)"]
    N --> O["TV"]
    P["Your home network"] --> Q["LAN"]
    Q --> R["LAN"]
    R --> S["Control signal"]
    S --> T["HDMI output jack"]
    T --> U["AV devices (such as BD/DVD players and set top boxes)"]
    style A fill:#f9f,stroke:#333
    style B fill:#ccf,stroke:#333
    style C fill:#cfc,stroke:#333
    style D fill:#fcc,stroke:#333
    style E fill:#cff,stroke:#333
    style F fill:#ffc,stroke:#333
    style G fill:#fcc,stroke:#333
    style H fill:#ffc,stroke:#333
    style I fill:#cfc,stroke:#333
    style J fill:#cfc,stroke:#333
    style K fill:#fcc,stroke:#333
    style L fill:#ffc,stroke:#333
    style M fill:#fcc,stroke:#333
    style N fill:#ffc,stroke:#333
    style O fill:#cfc,stroke:#333
    style P fill:#fcc,stroke:#333
    style Q fill:#ffc,stroke:#333
    style R fill:#cfc,stroke:#333
    style S fill:#fcc,stroke:#333
    style T fill:#cfc,stroke:#333
A Connecting to a TV
Connect the sound bar to an HDMI input jack compatible with Audio Return Channel (labeled as "eARC" or "ARC") on the TV using an HDMI cable (commercially available).
When connecting to a TV's HDMI input jack that is not compatible with eARC/ARC (not labeled as "eARC" or "ARC")
Connect the sound bar and TV using an HDMI cable and a digital optical audio cable.
For details, see the User Guide.
NOTE
For information on audio signal formats that can be played on the sound bar when audio signals are input from the eARC/ARC compatible HDMI input jack on the TV to the sound bar, see the User Guide.
About HDMI cables
- Use a 19-pin HDMI cable with the HDMI logo on it.
- Use a cable that is as short as possible to prevent any degradation in signal quality.
- When connecting to the eARC/ARC compatible HDMI jack, use an eARC/ARC compatible HDMI cable such as a high-speed HDMI cable supporting Ethernet.
- For playback of 3D and 4K Ultra HD video content, use a Premium High Speed HDMI cable or a Premium High-Speed HDMI cable supporting Ethernet.

B Connecting an AV device
Connect AV devices (such as BD/DVD players and set top boxes) to the sound bar using an HDMI cable (commercially available).
Audio and video signals from an AV device are transmitted to the sound bar, and the audio can be played on the sound bar.
The video signal is transmitted from the sound bar to the TV via an HDMI cable connecting the sound bar and the TV.
NOTE
The following connection methods are also available for playing audio from an AV device on the sound bar. Choose the connection method that best suits your purpose, such as the number of AV devices, or on which device you want to select the input source.
- Connecting an AV device (HDMI output jack) to the TV (HDMI input jack)
- Connecting AV devices (HDMI output jacks) to the sound bar (HDMI IN jack) and/or TV (HDMI input jack)
For details, see the User Guide.
C Connecting to a network (when making a wired connection)
Connect the sound bar to a router using a LAN cable (a CAT-5 or higher STP straight cable; commercially available).

3
Connecting the product to power and turning it on
Connecting to power
After connecting all cables of all devices, connect the sound bar and subwoofer to power using the included power cords.


Turning on the sound bar
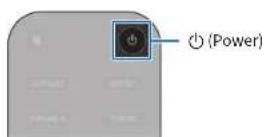
Turn this product on.
1 Turn on the TV.
2 Press the ⏻ (Power) key on the remote control.
When the sound bar is turned on, the sound bar and subwoofer are automatically connected wirelessly, and the sound bar's front display shows information on current settings.
3 On the TV, select the sound bar as the input source.
For details, see the instruction manual of the TV.
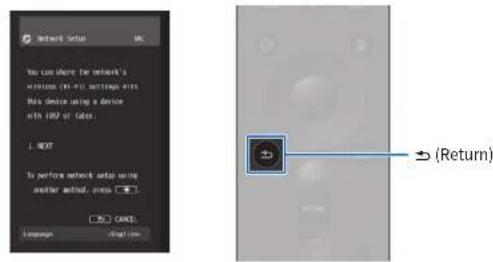
When a LAN cable is not connected, a message regarding network settings is displayed on the TV screen as shown below.
Press the (Return) key on the remote control of the sound bar to dismiss the message.
4 Confirm the subwoofer connection.
The subwoofer connection status can be confirmed with the icon on the front display of the sound bar.

NOTE
Pressing the ⏻ (Power) key when the power is on will turn the sound bar off. When the sound bar is turned off, the indicators on the front display turn off.
1 2 3 4 5 6
4
Connecting TRUE X SURROUND compatible wireless speakers
Wireless speakers can also be connected later when needed.
If you intend to connect wireless speakers later, or if you do not want to connect them, go to Step5.
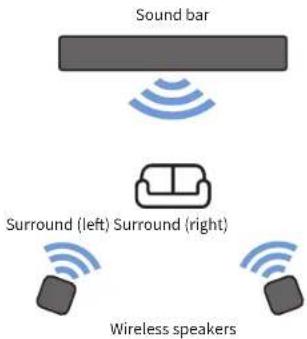
What is TRUE X SURROUND?
TRUE X SURROUND is a function to easily obtain real surround sound through use of TRUE X SURROUND compatible wireless speakers such as TRUE X SPEAKER 3A (WS-X3A) as surround speakers for the sound bar.
Connecting wireless speakers
For information on connecting wireless speakers, see the following URL:
https://manual.yamaha.com/audio/sound_bar/sr-x90a/truexsur.html

5
1 2 3 4 5 6
Registering to a MusicCast network
Use of network-based functions requires the registration of the sound bar to the MusicCast network using the free "MusicCast Controller" smartphone app.
Once the registration has been completed, the following functions can be used:
- Streaming services - Playback audio files from a media server (computer or NAS) - Internet radio
You can also configure the wireless connection settings for the sound bar when registering. For wireless connections, have the SSID and security key of the wireless router (access point) you are using ready.
Confirm that your smartphone is connected to your home router, and perform the following procedures:
1 Search for the smartphone app "MusicCast Controller" on the App Store or Google Play and install it on your smartphone.
2 Open the MusicCast Controller app on your smartphone and tap "Setup".

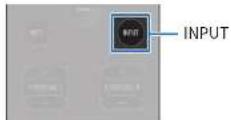
3 Following the app instructions, press and hold the INPUT/CONNECT button on the front of the sound bar for at least five seconds.

INPUT/CONNECT
4 Follow the instructions in the app to configure settings to connect to the MusicCast network.
Registration to the MusicCast network is now complete.
About MusicCast
By registering MusicCast-compatible devices to the MusicCast network, you can share music with MusicCast devices installed in multiple rooms. The smartphone app “MusicCast Controller” allows you to easily enjoy music from your smartphone, media server (computer or NAS), Internet radio, and streaming services anywhere in your home.
For more information on MusicCast and compatible devices, visit the Yamaha website.
6
Listening to audio through the sound bar
Listening to the TV's audio
Watch the TV connected to the sound bar and check that the TV's audio is output from the sound bar. If it is not, press the INPUT key on the sound bar's remote control to switch the input source to "TV".
NOTE
- Depending on the TV you are using, the TV's audio may not be output from the sound bar even if you follow the procedures described in this guide. In this case, you will need to change the settings of the sound bar. For details, see the following URL: https://manual.yamaha.com/audio/sound_bar/sr-x90a/hdmicontrol.html

- When the sound bar and TV are connected with an HDMI cable, you can turn the sound bar on/off and adjust its volume with the TV's remote control if the HDMI Control function is enabled. For details, see the User Guide. - If audio is being output from both the TV speakers and the sound bar, mute the TV.
Listening to the AV device's audio
Start playback on the AV device connected to the HDMI IN jack on the sound bar, and press the INPUT key on the sound bar's remote control to switch the input source to "HDMI".
Check that the AV device's audio is output from the sound bar.
NOTE
The video signal from the AV device is transmitted to the TV via an HDMI cable connecting the sound bar and the TV when the AV device is connected to the sound bar's HDMI IN jack.
Listening to audio from other input sources
Press the INPUT key on the remote control to switch to another input source, such as an input source via a network or a Bluetooth ^® device.
NOTE
To select the type of the input source via a network (such as SERVER or NET RADIO), you will need to use the smartphone app "MusicCast Controller".
Adjusting the sound to your preference
The sound bar is equipped with sound modes for surround playback and for stereo playback. There are also sound settings for adjusting the sound to suit your preferences even better.

1 Playing audio with your preferred sound (sound mode)
A sound mode can be selected from among sound modes for surround playback and for stereo playback.
SURROUND:AI (default setting)
SURROUND: AI creates optimal surround sound effects to suit various scenes in content.
3D MUSIC
You can select your preferred surround decoder from AURO-3D, Dolby Surround, or Neural:X. Surround playback is achieved by taking advantage of the features of the selected surround decoder.
STRAIGHT
This sound mode provides surround playback without applying sound field effects.
STEREO
This sound mode provides stereo playback without applying sound field effects.
ALL
This sound mode can be selected only when wireless speakers are connected to the sound bar for TRUE X SURROUND. The same audio is output from the sound bar and from the wireless speakers.
NOTE
The sound mode is shown on the front display (default setting). If the sound mode is not displayed, press the INFO key on the remote control to display the currently selected sound mode.
2 Emphasizing a specific range (sound settings)
CLEAR VOICE (Clear Voice)
The human voices within the audio can be heard more easily when the Clear Voice function is enabled. The function is recommended for playback at a low volume and for movies or dramas that use a lot of background music and sound effects.
Press CLEAR VOICE to enable or disable this function.
BASS EXT (Bass Extension)
The acoustic image of bass sound is enhanced when the Bass Extension function is enabled. This function is recommended when you want to increase the bass while suppressing the volume of the subwoofer, or when you want to emphasize the sounds of low-pitched instruments.
Press BASS EXT to enable or disable this function.
Additional Information
Notification of a firmware update
When new firmware is provided to add features or fix bugs, notification of the firmware update will be shown as follows:
Notification in the smartphone app "MusicCast Controller"
Notification of a firmware update is displayed on the app screen. Follow the app screen instructions to update the firmware.
Notification on the front display
When the sound bar is ready to update to new firmware, the firmware update icon on the front display will glow.

Firmware update icon
For details, see the User Guide.
Configuration
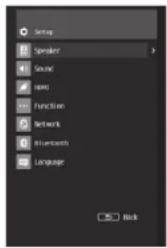
You can change settings for playback or functions of the sound bar using the menus that are displayed on the TV screen or front display.
On the TV screen, the following menus are displayed:
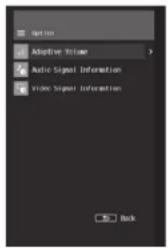
For details, see the User Guide.
(AAA, R03, UM-4) (×2)
(×2)
natural_image
Simple line drawing of a TV and a sofa with a monitor, no text or symbols presentNOTE

BASS EXT (accentuation des graves)
natural_image
Simple line drawing of a TV and a sofa in a living room (no text or symbols)NOTA
CLEAR VOICE (Clear Voice)
© 2025 Yamaha Corporation Published 05/2025 KSEI-A0
VHP4580