Mismart Smile - Smartphone Wolder - Free user manual and instructions
Find the device manual for free Mismart Smile Wolder in PDF.

User questions about Mismart Smile Wolder
0 question about this device. Answer the ones you know or ask your own.
Ask a new question about this device
Download the instructions for your Smartphone in PDF format for free! Find your manual Mismart Smile - Wolder and take your electronic device back in hand. On this page are published all the documents necessary for the use of your device. Mismart Smile by Wolder.
USER MANUAL Mismart Smile Wolder
natural_image
Two children looking at a device together, no visible text or symbols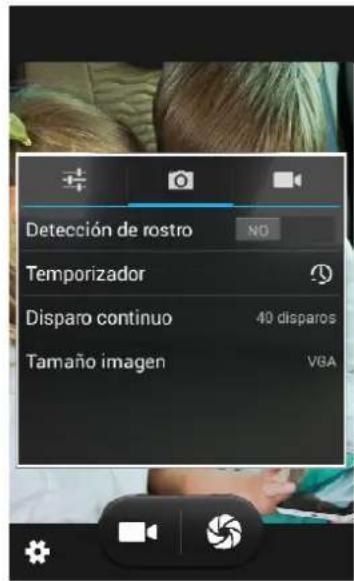
natural_image
Close-up of green foliage with a camera interface overlay (no readable text or symbols)natural_image
Scenic view of a castle with autumn foliage and mountain range in the background (no text or symbols visible)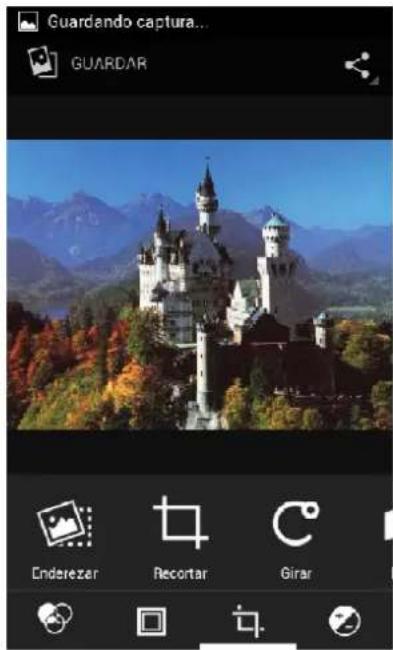
1. AppearanceAndKeypad Operationsand Keypad Operations
| KeysKeFunctions | FunctionsFunctions |
| home | ● Press this button to return home from any application or interface.● Press it to open recently opened application window. |
| menu | ● Press it to start the menuwhich allows you to perform actions in the curr interface or options’ menu. |
| back | ● Press it to return to the previous interface, or to close dialog box、options’ menu、notification panel or the keypad. |
| power | ● Press it to open the phone’s menu, then you could choose to lock the screen、turn off the phone, or set it to the silent mode. |
| up | ● Press it to increase the volume● Press it to turn the phone to vibration mode from the silent mode. |
| down | ● Press it to decrease the volume. |
| P-Serson | ● Cover it, and then the phone’s backlight will turn off |
| front camera | ● Entering the camera interface, switched to the front camera can photo yourself. |
2. Using Memory Card as U Disk2. Using Memory Card as U Disk
If you want to send music, pictures or other files to the phone's memory card from the computer, you should set memory card as u disk first.
Set memory card as u disk
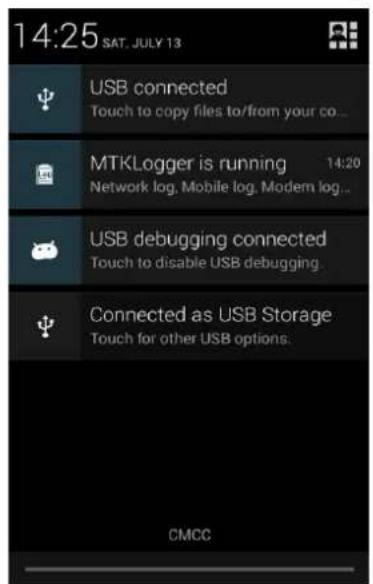
1) Connect the phone to the computer with US8 cable. The notification icon will appear in the status box.
2) Use USB mobile transmission line will connected to the computer
3) In the notification panel, touch US8 is connected, then touch "Open the US8 Storage Device"
2) After the connection can be directly in the PC check images captured on camera.
![My Picture - ACD86e Pro 3 File Edit View Tools Help Manag View Process Online Import From 870 View by: All dates (X) 2010/01/07 (X) IPC 20100107... IPC 20100107... IPC 20100107... View all View selected 3 files selected for import Choose import settings: None Choose settings to apply to all the selected files: Choose destinations: [ ] [ ] [ ] Place in subfolder(s): under folder name: Backup to: Regener Files to: Automatically rotate images Delete items from source after import Organize settings None HCP Database Active Prints Record Keywords EETF Artist Copyrights EPEC Caption Writer Keywords Categories Copyrights version Database Portfolio Categories Addem... Cancel Help Properties File List Properties Folders: 1 Files: 51 File Fac Edit Name: AutoCAD4.51 CaoFoo2 DONG-WTTS-HP27_A965 force Calendar Properties Preview Total 34 stores (60.2 KB) 家建文件夹 | Modification Date: 2018-4-6 19:41:00 | G170318 中文馆 QQ2011 Window MT6575 MT1_857 CCNS - t... 未命名 ... 未命名 ... My Picture... 14:45](/content/2026/05/1143494/images/c47c4432aeeb2aae063051d9660633a2d63dff92ed2bff88997b02032ac93aac.jpg)
- Notice: different PC operating system to how to operate to normal use the U disk.
1) WI<7 Can directly use
2) XP update windows media player to 11
3) Install wpdmtp.inf driver
4) Vista Unconfirmed
-
3. WIFIWIFI
Wi-Fi provides as far as 300 feet (100M) range of wireless network access. If you use cell phone to connect wifi, you should connect to the wireless access point or 「hot spots」.
- Notices: The availability and coverage of Wi-Fi signal depend on the number, infrastructure and other objects penetrated by the signal.
Open Wi-fi and to connect to the wireless network
1) Press home>menu, then touch settings>wifi and internet
2) Select the wi-fi box, to open Wi-Fi. Phone will automatically scan for available wireless networks.
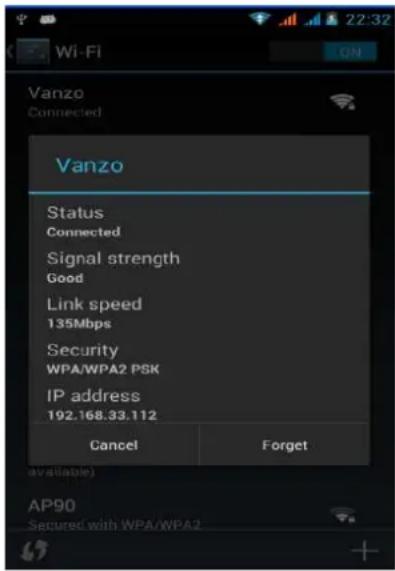
3) Touch Wi-Fi settings. Then a list of Wi-Fi network will show the founded network name and security settings. (open network or WEP、WPA/WPA2 with password). If you enable the notification in Wi-Fi settings, The status box will show this
icon ( ) when open available wireless network founded.
4) Touch one of the Wi-Fi choices to connect the network. When you choose open network, phone will connect to it automatically. If you choose WEP、WPA/WPA2 with password, you should type the password first, then
touch to connect it.
- Notices: when the phone is connected to the wireless network,
The status box will show this Wi-Fi icon, and the approximate
signal strengthen (the number of lit bars). If touch the connected network, will display the name of Wi-Fi network, status, speed, signal, strength, security, information and IP address.
If you want to delete the wireless settings, please touch "not reserve" as in the right picture. If you want to connect to this network, you should re-enter these settings.
- Notices:
Unless you choose not to reserve the network, otherwise, there is no need to re-enter the corresponding password when next time connecting to the previously encrypted wireless network. Wi-Fi will search automatically, that is, phone needn't to perform additional steps to connect Wi-Fi networks.
- Notices:
Unless you choose not to reserve the network with password, otherwise, there is no need to re-enter the corresponding password when next time connecting to the previously encrypted wireless network. Wi-Fi will search automatically, that is, phone needn't to perform additional steps to connect Wi-Fi networks.
- Connect to other Wi-Fi networks
1) In the interface of wireless and network, touch Wi-Fi settings. The founded Wi-Fi networks will show on the Wi-Fi network list.
2) Touch other Wi-Fi networks, and then you can connect to this network.
- Notices: in addition, you can surf the internet via GPRS. We default that the GPRS in SIM1 is opened after started, users can select manually, the specific location is “settings>wireless and internet>data connection”, touch “SIM1、SIM2、no data connection”, when the dot turns green, it’s already opened.
4. BluetoothBluetooth
Turn on Bluetooth or set the phone can be detected
1) Press home>menu, the touch settings.
2) Touch wireless and internet, then choose Bluetooth box to open the Bluetooth function. After started, the status box will
show this icon (☐). Touch “scan for devices” the it starts to scan for all devices within range.
3) Touch Bluetooth settings, all the devices founded will display in the list under the icon.
(select the box "can be detected", set it to be detected, the other Bluetooth devices will be able to find the phone.)
important: the maximum detecting time of the phone is 2 minutes.
• Pairing and connection of Bluetooth headset
1) Press home>menu, then touch settings.
2) Touch wireless and internet>Bluetooth settings, then select Bluetooth box, then your phone will scan for the Bluetooth devices within range, and show the founded devices in the list under the icon.
- Tips:
a. If the list can't find your equipment, touch scanning equipment to re-scan it.
b. Make sure that the devices wanted are under the detected mode.
3) Touch headset in the equipment list to finish the connection.
- Notices: generally Bluetooth devices need password to be paired, often use [0000] as the default password.4) The pairing and connecting status will show under the headset in the Bluetooth devices list. When the headset
connected to your phone, the status box will show this icon (✗) means connected. Then you can use the headset to make or receive callings.

Means that it's Bluetooth headset

Means that phone is under the mode of "can be detected"
Notices:
Only on pairing needed between two Bluetooth devices. Once connected, there is no need to identify partnership and exchange of information.
If you already connect one headset and want to connect a second one, the first one will be disconnected. If you want to switch to the first one, you should re-select it manually in the Bluetooth equipment list.
• Cut the connection to the Bluetooth
1) Press home>menu>settings>wireless and internet>Bluetooth settings.
2) In the list of Bluetooth equipment, touch or tap and hold the connected hand-free headset.
3) Press and select "cancel the pairing".
• Bluetooth proximity sensor
After pairing the two device, you can test out the signal is strong or weak by the Bluetooth proximity sensor device
5.MailMail
5.1 Gmail
• Create an electronic mail account
Select mail> settings. You can activate or edit existing e-mail accounts as well as create a new e-mail account.
a. Select mail, Google account setting interface appears. Then touch ‘next step’ > create account>enter name, last name and e-mail account.
b. Google servers determine whether the name can be used, if so, new interface appears prompting enter password, then judge the password' security, users who doesn't meet the requirements need to re-enter the password.
c. Successfully register a new Gmail account, a messenger created automatically for testing.
- Loading mail account
a. Open Gmail skip introduction screen>loading interface appears >select load
b. Enter name, password then load
E-mail account initialization, prompting "login successful" All Google accounts will be synchronized.
- Creating and sending ,mails
When creating mails, select mail > creating mails. Enter the address(recipient)、theme and contents. Press MENU you could ‘append’、‘Add Cc/Bcc’,select send or discarded.
- Receive mails
There is tone for new mails, in the status box will show this button update the number of the unread mails in a proper way.

Press Menu > 'refresh', refresh and
- Delete mails
When loading a mail account, if you want to delete it, you need to restore factory settings. When loading a second one, you could press the menu button to delete it.
Notices: many functions depend on Gmail Account, for example: Electronic Market、Google Talk、Sync Contact and Calendar.
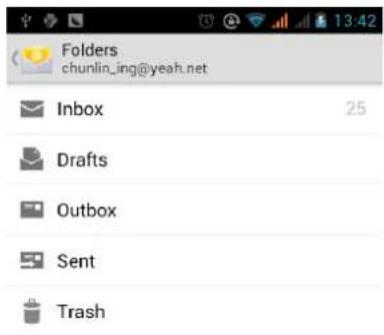
5.2 Email
- Load Email.
c. Open network connection,
d. In setting the account interface, input the correct email address and password and click next mobile phone automatically complete the sending and receiving server Settings. Pop-up mail find frequency, and user Settings interface, complete Settings, click next.
e. For account creation name, the editor of the law that email user name, and click next. Complete set, synchronous mailbox.
• Create and send Email
When creating mails, select mails > create mails. Enter the address(recipient)、theme and contents.
Press MENU you could 'append'、'Add Cc/Bcc', select send or discarded or save as draft.
- Check the Email files
Click on the bottom folder options, list all folder options
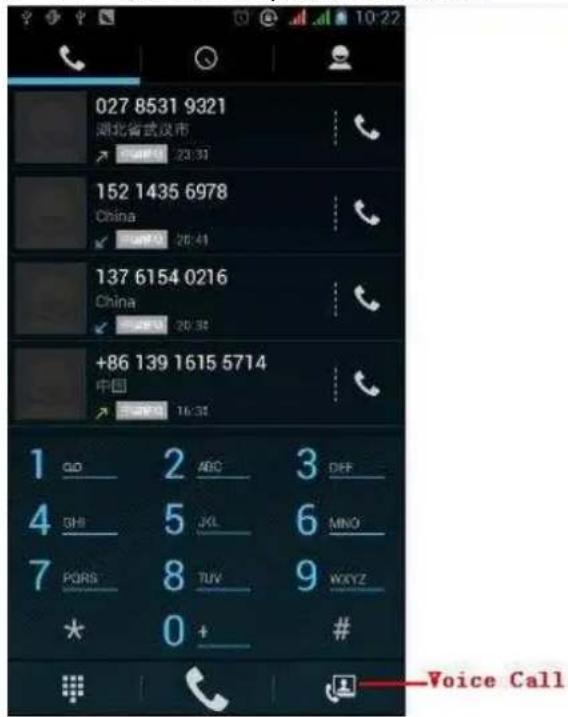
6. DiallingDialling
When the icon of internet server appears in the screen, you could dial or receive callings. The signal bar on the top right corner show the strength of network signal (the maximum with 4 signal bars).
- Start dialing
Open application's main menu>dial. You could choose SIM1 or SIM2 to do the dialing.
At the dialing Keboard, enter the phone number, and then click the dialing key, after that, you should choose one SIM card or internet call. If needed to call the extension, you could click the "dial pad" in the bottom of the screen to open the interface or press menu key to select "delay 2 seconds", and then enter the number of the extension.
The dialup keyboard input number, click Menu can IP dial-up or speed dial
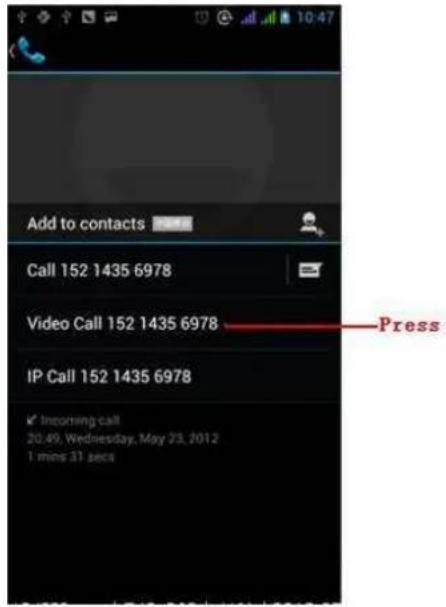
- Video call: video call usually refers to the Internet and mobile Internet based on (3 G Internet) end, through the phone between the speech of the real-time transmission and image (user of bust, photographs, items, etc.) of a way to communicate. Only 3 G to support this function. Input a number click video dial-up, each other answers the phone after both can through camera for video calls.
• Telephone calls in the call log
Every telephone number called and received in “SIM1、SIM2” will reserved in phone’s menu of call log. On the top left of every call record will show “SIM1 or SIM2”
All numbers in the call log can be dialed by clicking the button "dial" on the right side of the screen.
When number list appearing, click it to catch details; press it for long you could dial via “SIM1 or SIM 5”, meanwhile you can edit, delete, save the number or do other operations.
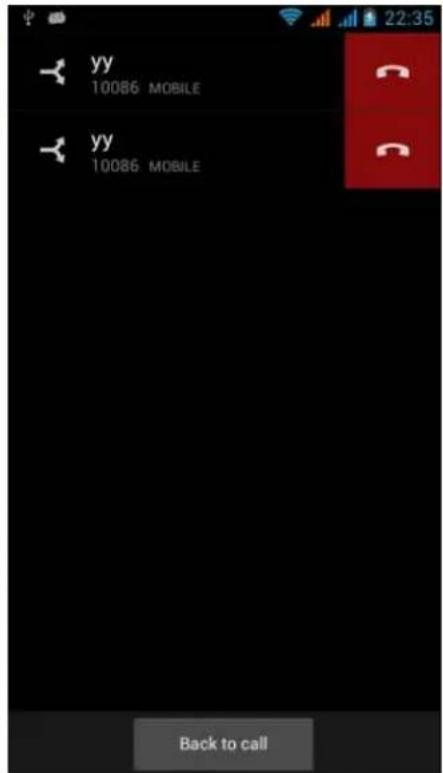
- Receive callings
When calling comes (top left will show from which SIM card) press "Answer" and slide towards right until the middle button, then you can receive callings.
- Proximity sensor
According to the distance between phone and human body, it will adjust automatically the switch of the backlight.
During the call, close the phone to the ear, the backlight will turn off automatically, which could save batteries and prevent inadvertently touching.
• Refuse to answer the phone
a. When standby, calling comes, press "refuse" button and slide towards left side until the middle button, then you could refuse the calling.
b. When using, calling comes, click on the "refuse" button to refuse the calling.
• Two-way call/multiparty call(conference call)
- <otices: this function needs that SIM card open multiparty call features.
1) Already exist a call in the phone
5) Click “Add calls”, dial another call (or receive another call, phone default open "call waiting" (settings-dialing settings-other dialing settings), after both connected, could view the status of calling.

3) select "combine call" – you can combine two calls into one way.
4) after multiparty call connected, you could separate the calls or hang up one of them via "the small arrow of conference call".
• Telephone recording
During the call, more>start record, you could record the dialog of the call.
1) settings>set other functions of the call in the dialing settings, for example: Call Transfer—after all the settings finished and turned on, you could transfer the call to a certain number.
2) In settings>dialing settings >other dialing settings, open “call waiting”. After turned on, you can receive another call when already exist one. The answering and rejecting functions are just like the ordinary phone.
- Video call
When you use video call, ensure to install 3G SIM card. in the dialing interface, enter numbers, then press the
symbol ,so that complete the video call.
The second way to use video call
Open the menu of applications>contacts, press one contact of the contacts, then press long the phone number, and select the "video call".
- Call settings
Voice CallVoice Call
1) Voice Mail: The voice mailbox in setting in the input voicemail number.
2) IP prefix number: Setting the different of SIM cards IP prefix numbers
3) Call forwarding: Can set respectively 2 a STM card, the line is busy, and no one has to receive, not be connect four connecting way
3) Call barring: Can set respectively two to the SIM card call restrictions
4) Additional Settings: a. My phone number b. Call waiting.
Video Call Video Call
1) Local video replacement: Set a picture to display when camera off use.
2) Display peer video: Display picture for replacing peer video when it is unavailable.
3) Peer video replacement: Set a picture to display when peer video unavailable.
4) Enable back camera: Available to switch cameras if turn on.
5) Bigger Peer video: Turn on to make peer video bigger than local video.
6) Auto drop back: Drop back to voice call connecting automatically
7) Outgoing video call: Display local video when make a video call.
8) Incoming video call: Display local video when accept an incoming video call.
9) Other settings: a. Call forwarding b. Call barring c. Additional settings Internet call Internet call
1) Account
2) Use Internet calling
Other Settings Other Settings
1) Fixed Dialing Numbers
2) Minute Reminder: Turn on minute reminder at 50s of every minute.
3) Quick Response: Can edit the text messages rejected by the information when content.
7. Messaging7. Messaging
- Important: the message title of this phone is the phone number, will be reserved in s similar for of dialog, instead of the usual folder structure. Messages with blue background are those received, and messages with white background are those sent.
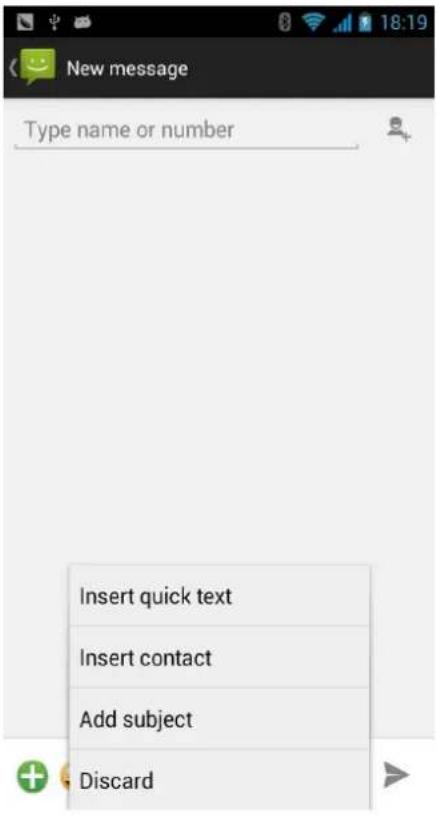
• Send SMS to certain phone number
1) Press home> messaging, touch "new messages".
2) In the interface of "edit":
a. Click “recipient” box to start input method, you can also click “enter” box to start input method, in that way you can enter characters.
b. Click the button of "send from SiM1 or SIM2" to start sending.
- Send MMS to certain phone number
When creating message, it was defaulted as SMS, it will be turned to MMS when following operations were done. You can send MMS via clicking "send" after editing.
1) In the interface of "edit", Click the button of "Menu":
2) Click “append”, you can spend the following attachments, then it will be turned to MMS automatically.
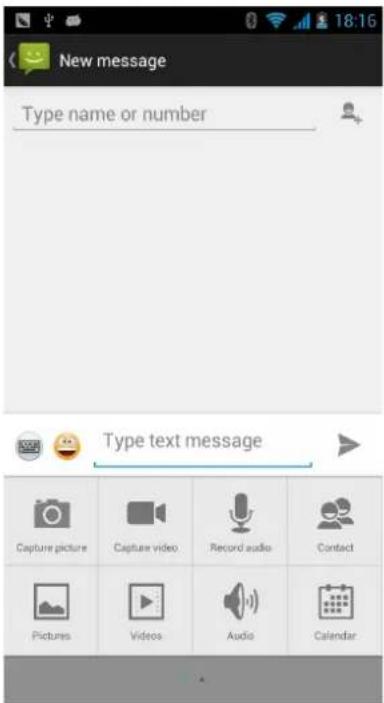
a, If you want send MMS with many pages, you should select "append PPT" in the "append" interface. b, You can append 17 pictures, with the form of GIF, JP9G. c, Click "adding themes", the box of "theme" will appear under the box of "recipient", meanwhile it is turned to MMS automatically.
- Send messages to multiple numbers
9nter multiple numbers in the box of entering, each number is divided by the comma in 9nglish. Click on the right side of the head with the receiver plus icon, can choose contact group in the address book
- <otices: For now this phone can mass messages to almost 27 numbers, the correct number depends on the characters, you can only enter 312 characters in the box of “recipient”.
When a message is sent or sent again, a little yellow letter will appear. The number 1 or 2 on the letter refers to SIM1 or SIM2.
When message sending failed, a red triangle with exclamation will appear.
when editing information other functions of Menu button
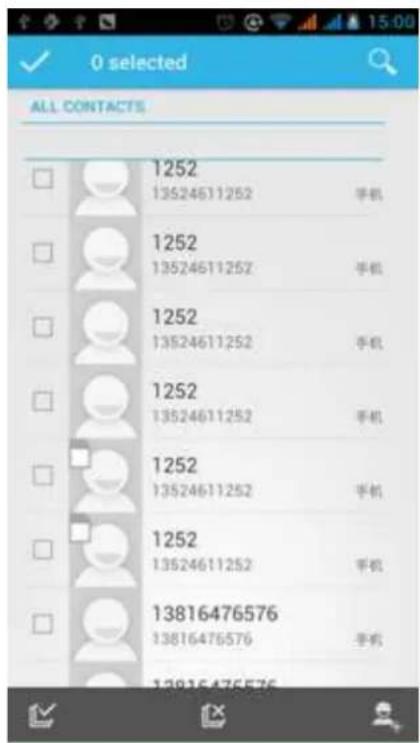
8. ContactsContacts
- Open the menu of applications>contacts
Default display phone contacts and SIM card contacts, sort contacts by first letter of alphabet.
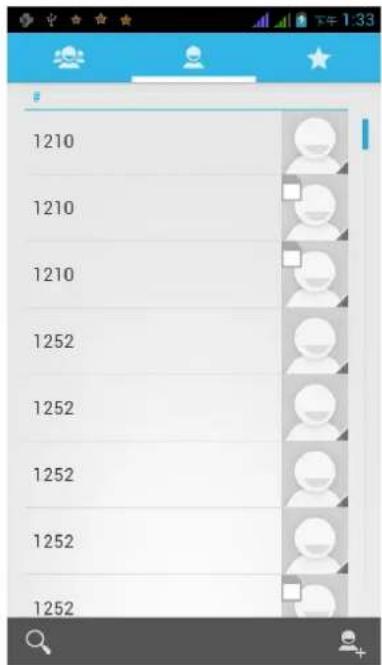
2) Click Search Icons, You can enter the contact search interface.
a. To enter the Numbers or letters and the list of names of the agreement, which will be shown in the search results.
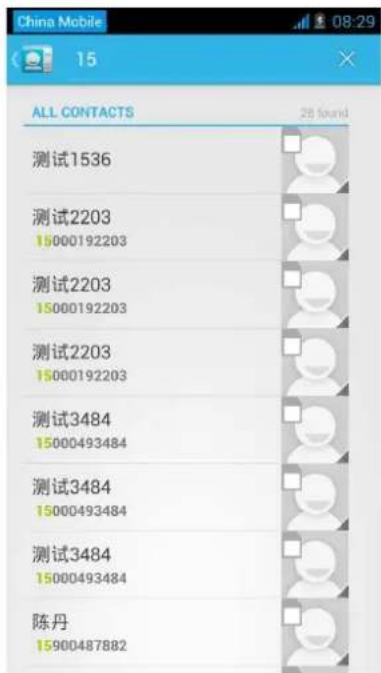
b. If it were not so search to match of the contact, interface will appear 'not find any contact.
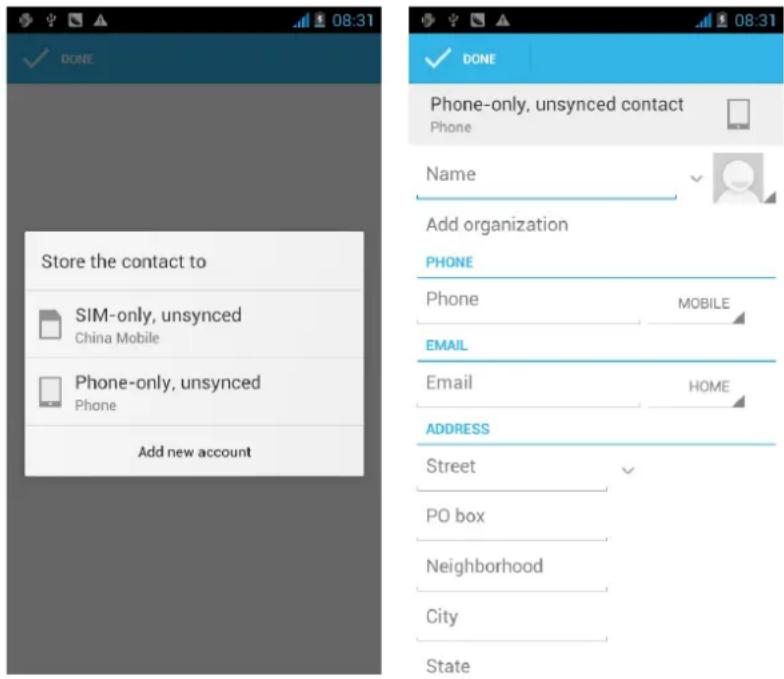
3) Click "Add Contact" Icons, Can create New Contacts
Select save contacts to phone or a SIM card, into contact editing interface.
You can edit contact head, name, telephone number, group, save to and more, and then click "finish".
4) In contact interface, click on the Menu button
a. Menu >Delete contacts
Can "All"Icons checked, click the delete button, delete all the contact person, including cell phone and SIM card of contact.
Can separate check one or more contacts, click the delete, delete the selected all contacts.
b. Menu> To display of the contact
You can choose all contact, one a SIM card of contact, the mobile phone contacts
c. Choose from the definition, but also on a SIM card and cell phone choice whether or not to show that all the lone contacts.
d. Menu >Import/export
In the mobile phone can local, SIM card and SD card three parties achieve contact information of the copy each other.
First choose the "copy source" and then select the next step, selecting copy contact to, can complete the contact's copy.
e. Menu >Accounts
Account and synchronization set routine synchronous Settings, can choose background data and automatic synchronization.
f. Menu >Share visible contacts
All contacts can be imported into the SD card, or through bluetooth, email, text message or MMS share
- Open the application interface >Contact, change to the group.
1) Click “Add group” Icons can create new group, Just to be saved in a cell phone group
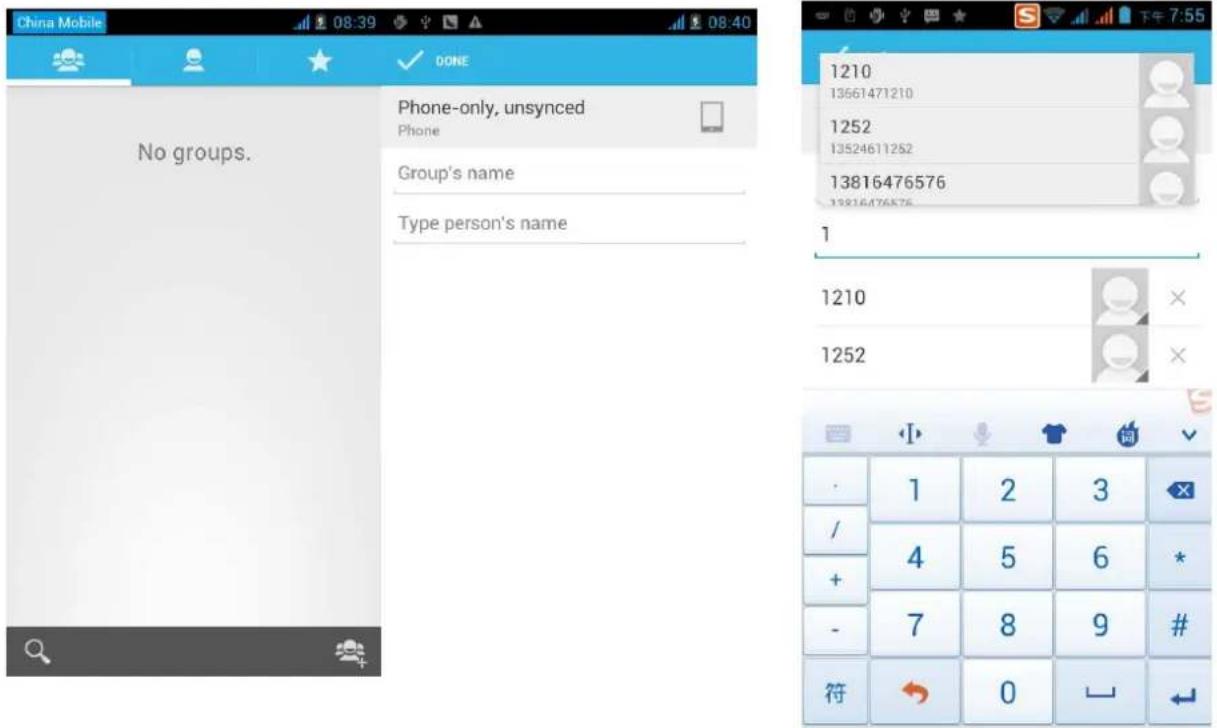
2) In "the group name" column input group name, in "type in the contact's name" column input contact key word, can be in all of contact search, and added to the group. Finally click "finish".
3) In a group, click on the Menu button, Menu functions
a. Menu>Update You can modify the group name, delete or add group of contacts
b. Menu >Delete You can delete the group, and will not delete the contact itself.
c. Menu >Send messaging by group. Automatic new information, and the group added to contact the address bar recipients
d. Menu >Send Email by group If contact group have the same email address, the automatic new mail, and E-mail address in the address to the receiver
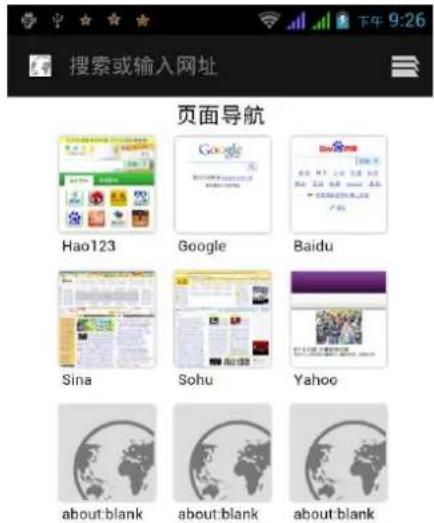
9. Internet Explorer Internet Explorer
Internet explorer
1) In the interface of internet explorer, touch address filed and enter the URL.
2) Use keypad to enter URL. The appropriate web sites will appear on the screen. You can touch it directly go to the page or continue to enter URL.
- Homepage
Select “homepage”, you could load in the set homepage. If you do not set it, you will use the vendor's pre-set sites.
- Functions of menu
1) Menu>Backward
After browsing through multiple pages, will return to the previous page the current page.
2) Menu>Farward
After browsing through multiple pages, will move to a web page after the current page.
3) Menu>Windows
You can view all open windows to the current.
4) Menu>Bookmarks
a. Click the "Bookmarks" to make the current URL as a bookmark saved.
b. Click the bookmark under the bookmarks list, will open the URL.
5) Menu>More
a. Add bookmarks, save the current URL as bookmark.
b. Find on page, search what you need in current page.
c. Select text, in the text, click and drag to select a piece of text.
d. Page info, display page address and other information of the current browsing.
e. Share page, select the Bluetooth or SMS to share the current page.
f. Downloads, show all the content downloaded.
g. History, Show your browsing history, and view the most visited pages of information.
h. Setting, contains a variety of browser settings.
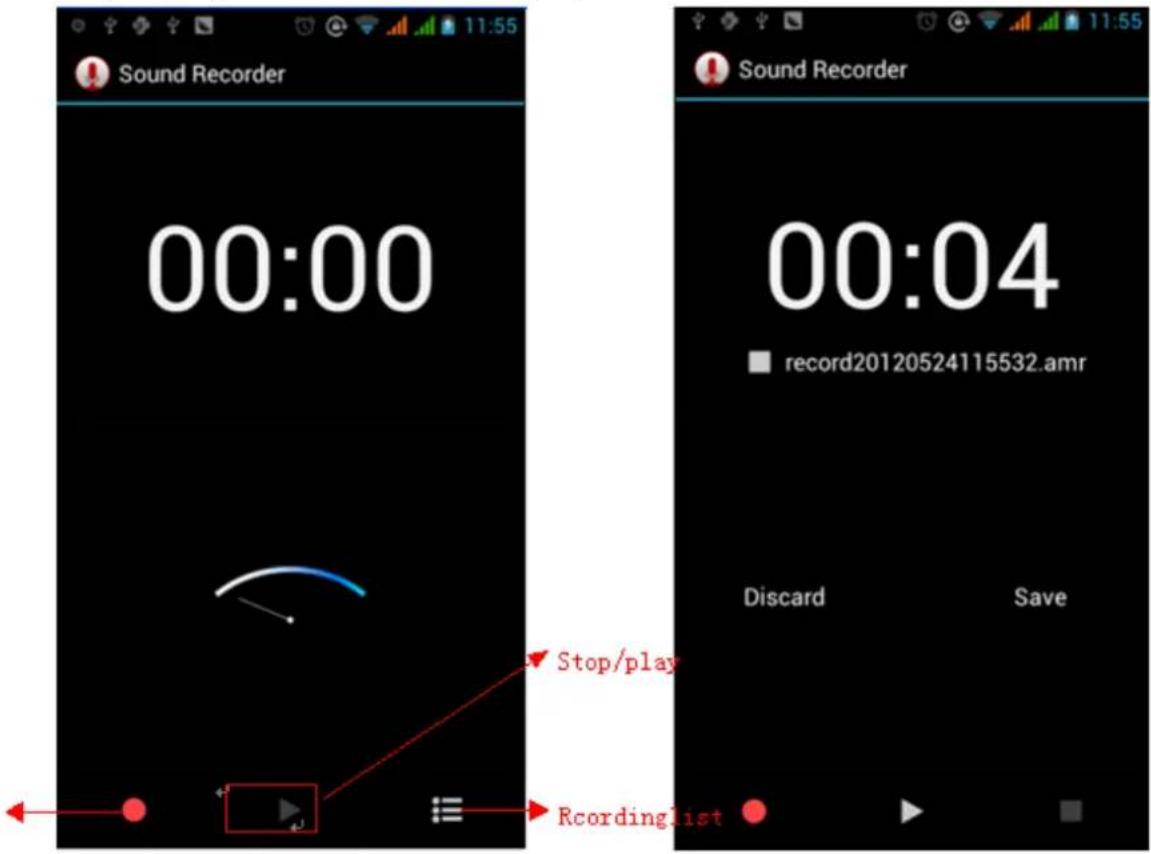
10.1 RecorderRecorder
Recorder can record voice, and send it quickly via 8 bluetooth or MMS as well as make it as ring tone.
- <otices: recorder can only save the audio files as AMR format.
1) Click the recorder application.
2) Keep the phone's microphone near the voice source.
3) Click recorder to record voices, and click to stop or Recordinglist.
All recordings save in my recording folder in the default music program.
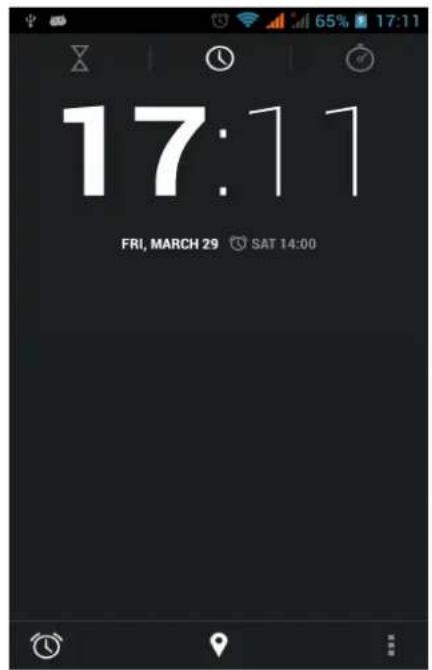
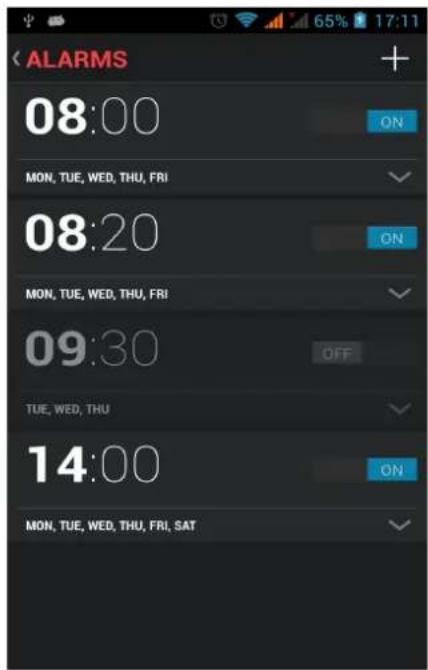
11. ClockClock

1) Open the menu of application, click Clock 2) Click screen except the alarm at any position, screens, black, time with white shows, this time the standby time to screen will not extinguish screen. Click again on the screen, and restore normal clock interface. 3) Click screen set alarm button and enter the alarm clock set interface
13. Camera. Camera
13.1 camera
- Prior preparation
Install memory card before using the camera or video camera. All your photos or videos taken by the phone are stored in memory card.
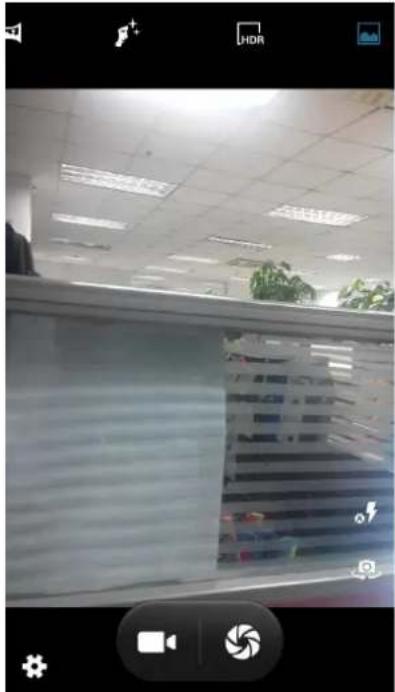
- Open camera
Press home, touch menu, select camera. Take pictures
1) Aim your object with the screen.
2) Touch the "shutter" button on the screen.
3) After taking, photos will save to the camera's galley folder with the name of taking time.
4) You can view the photos by touching the preview box button.
5) Camera settings
You can touch the button of "setting Menu" in the interface of camera to do the settings
Under camera viewfinder mode, press Menu, you can switch to video or photos' gallery.
On the top right of camera viewfinder mode, display the preview of the previous picture. Touch preview box, the photo display on full screen and you can enlarge it to view details.
natural_image
Interior view of an office with ceiling lights and a glass partition (no visible text or symbols)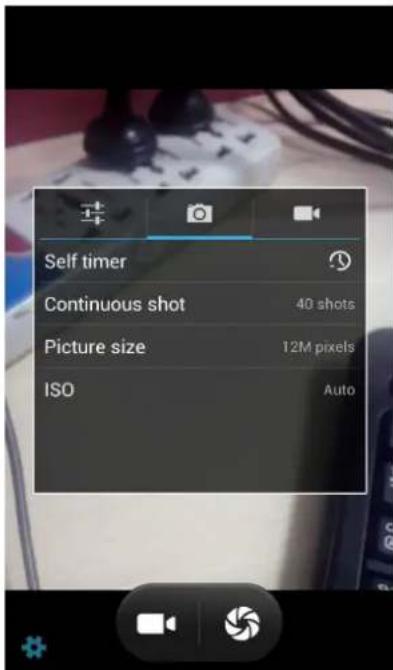
- Shared Settings of Camera and Video camera
1) Flash mode: Auto、On、off.
2) White balance: Auto、Incandescent、Daylight、Fluorescent、Cloudy、Twilight、Shade、Warm fluorescent.
3) Color effect: <one、Mono、Sepia、<egative、Aqua、Blackboard、Whiteboard.
4) Scene mode, Auto、<ight、Sunset、Party、Portrait、Landscape、<ight portrait、Theatre、Beach、Snow、Steady Photo、Fireworks、Sport、Candle light.
5) other settings: store location, exposure, image properties, anti-flicker
- Camera Settings
1) Capture mode: normal、HDR、Face beauty、Panorama
2) self timer: off, 2 seconds, 10 seconds
3) continuous shot: 40 shots, 90 shots
4) picture size: +VGA, VGA, 1M pixels, 1.3M pixels, 2M pixels, 3M pixels, 5M pixels, 8M pixels, 12M pixels
13.2 Video camera
- Prior preparation
Install memory card before using the camera or video camera. All your photos or videos taken by the phone are stored in memory card.
Take video
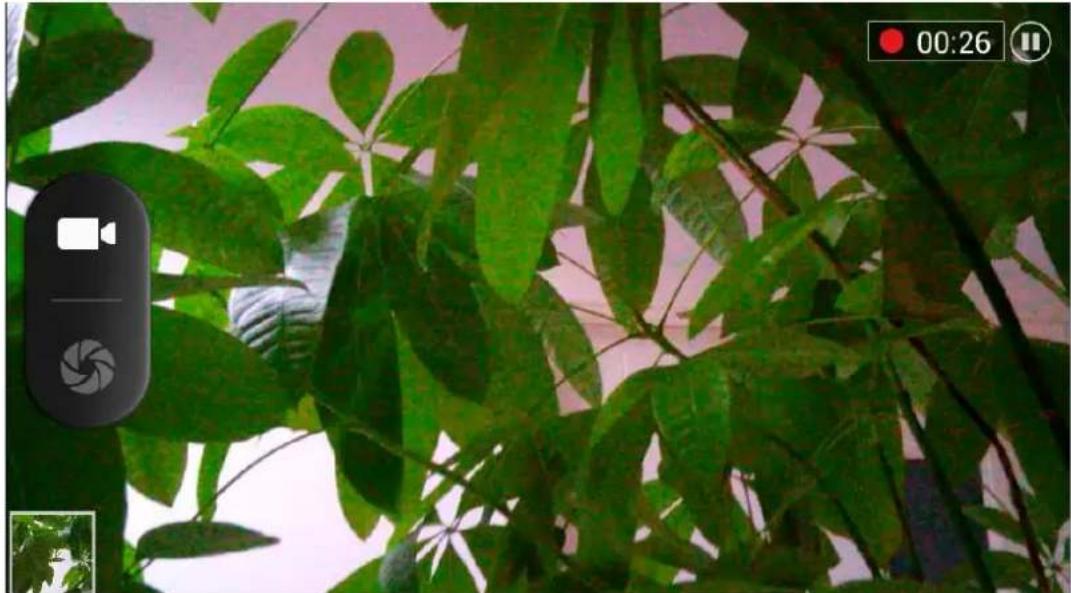
natural_image
Close-up of green leaves in a natural setting, captured through a smartphone interface (no text or symbols on the leaf image)1) Aim your object with the screen.
2) Touch the "shutter" button on the screen.
3) After taking, photos will save to the camera's galley folder with the name of taking time.
4) You can view the videos by touching the preview box button.
5) Video camera settings
You can touch the button of "set" in the interface of camera to do the settings
Under camera viewfinder mode, press Menu, you can switch to video or photos' gallery.
On the top right of camera viewfinder mode, display the preview of the previous video. Touch preview box, the video will display on full screen and you can touch the play button to view it.
• Shared Settings of Camera and Video camera
1) Flash mode: Auto、On、off.
2) White balance: Auto、Incandescent、Daylight、Fluorescent、Cloudy、Twilight、Shade、Warm fluorescent.
1) Microphone: off, on
2) audio mode: meeting, normal
3) time lapse interval: off, 1s, 1.5s, 2s, 2.5s, 3s, 5s, 10s
4) video quality: low, medium, high, fine
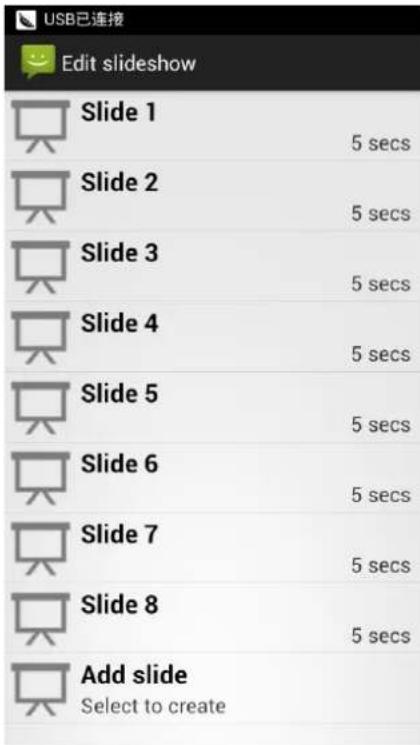
14. 14magesImages
- Open images
Press home, touch label of applications, then touch photos' galley.
In the interface of camera, Press menu to open it, then touch to operate.

1) Files Interface
a. In the library the interface, upper right a slide show the play button, click on the way to the slide circulation play all image files.
b. Click on the images, enter the picture to see interface.
c. Choose a long press image files, pop-up corresponding operation.
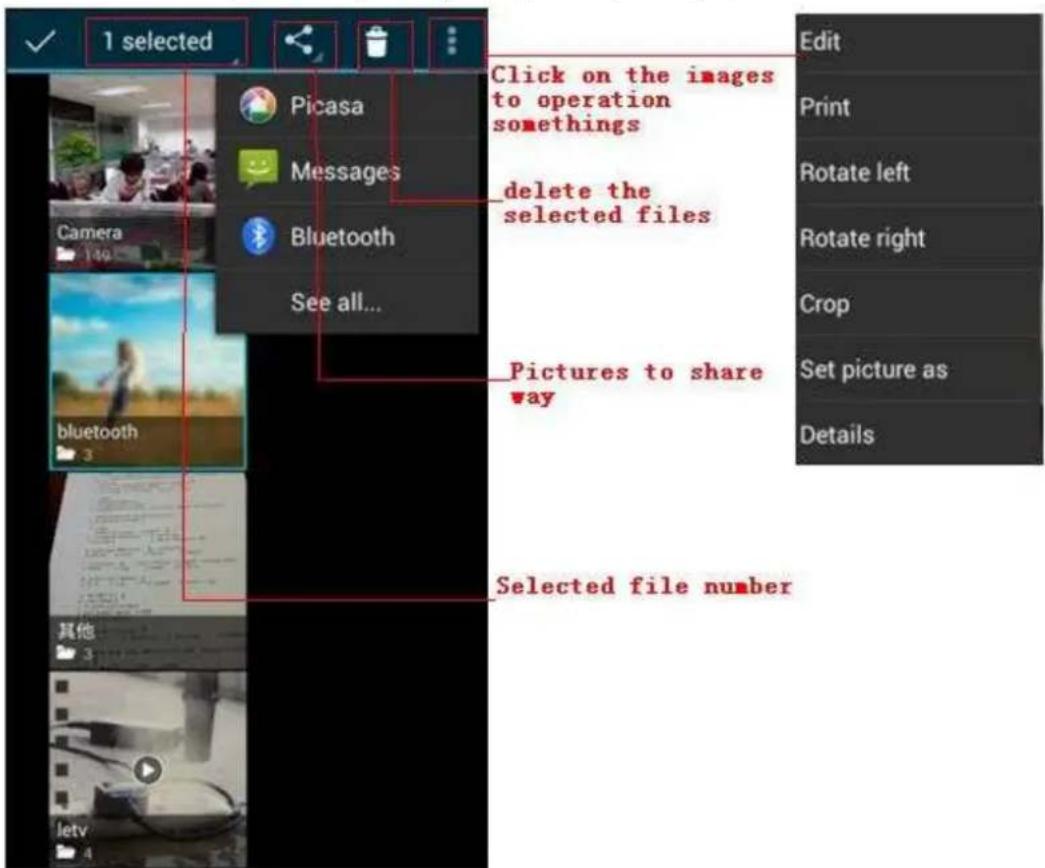
- Use images
After taking pictures, you can view them and share them with your friends.
a. Use E-mail to send pictures : choose Gmail or E-mail, pictures will be automatically added to an E-mail. Write your information, click send.
b. Use Messaging to send pictures: Select the information, pictures will be additional to the MMS. Write your information, click send.
C. Use 8 Bluetooth: Bluetooth list, select already pairing of bluetooth equipment, through bluetooth send a picture.
4) check pictures
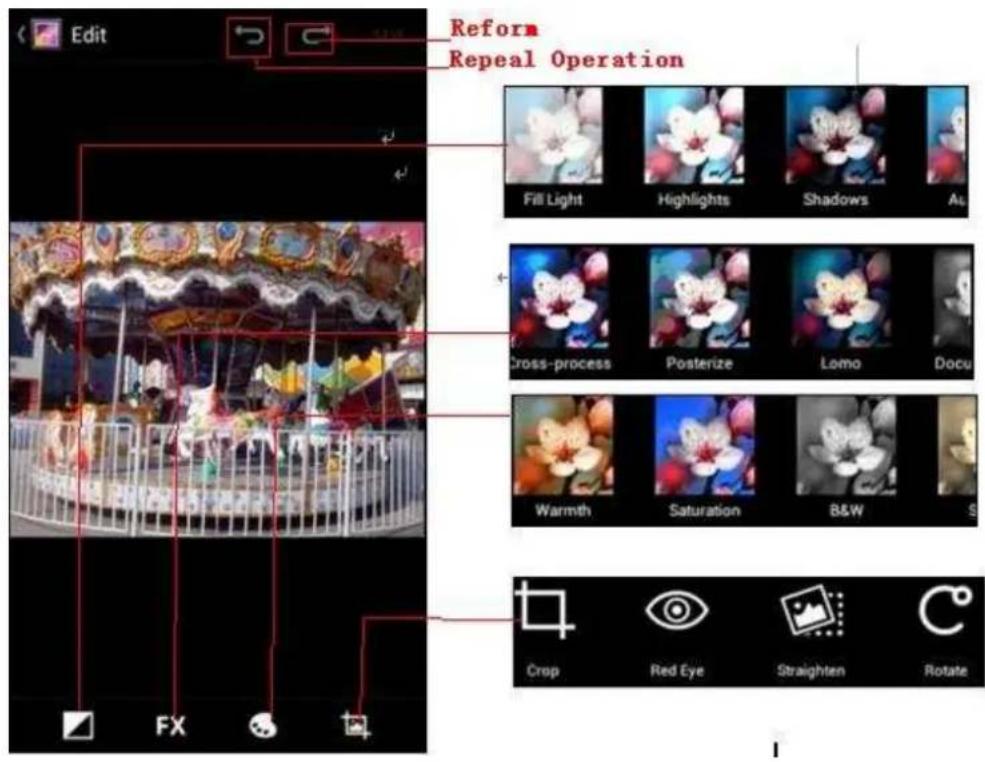
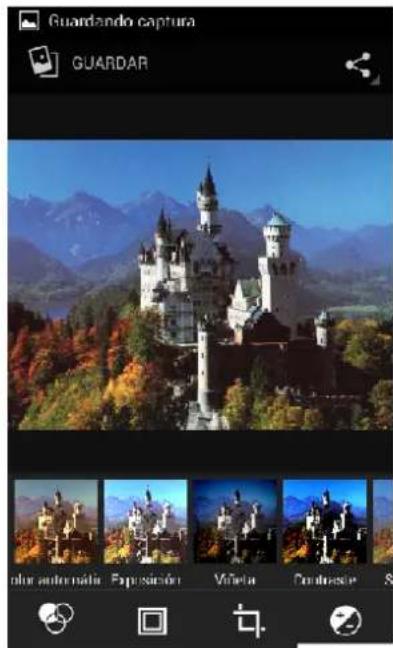
In the photo view interface, on the screen or so slip, can forward or backward view photos 9dit picture.
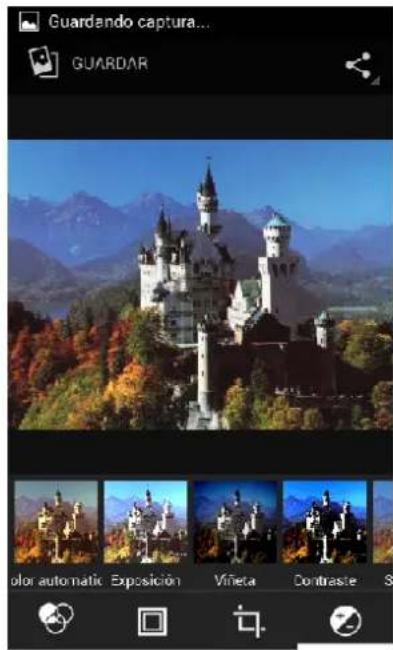
a. 9dit light: Fill Light Highlights Shadows Auto-Fix.
b. Edit image effects: Cross-process Posterize Lomo Documentary and so on.
c. Color 9 effects: Warmth Saturation 8 & W Sepia <egative Tint Duo-tone Doodle.
d. Crop>Crop Red 9ye Straighten Rotate Flip Sharpen.
6) Crop pictures>
a. If you want to adjust the size of the clip, please hold the edge of the cutting tools. The arrow appears clip, from the trim your fingers inside or outside the center to drag, can adjust its size.
b. If you want to adjust the big hours in the clip that keep proportion, please hold down any of the four corners of the one.
c. If you move to the clip of the picture area of the other, please hold cutting is internal, then move to drag the fingers to the position.
• View images
1) In the picture interface, touch photo album to view images.
2) Touch the thumbnail to view pictures on full screen.
You can choose to display small or large thumbnails. Hold down the screen towards the left side to view the next photo or towards right to view the previous one.
In the photo album or list, press and hold down the picture towards left to view the next picture, or towards right to view the previous one.

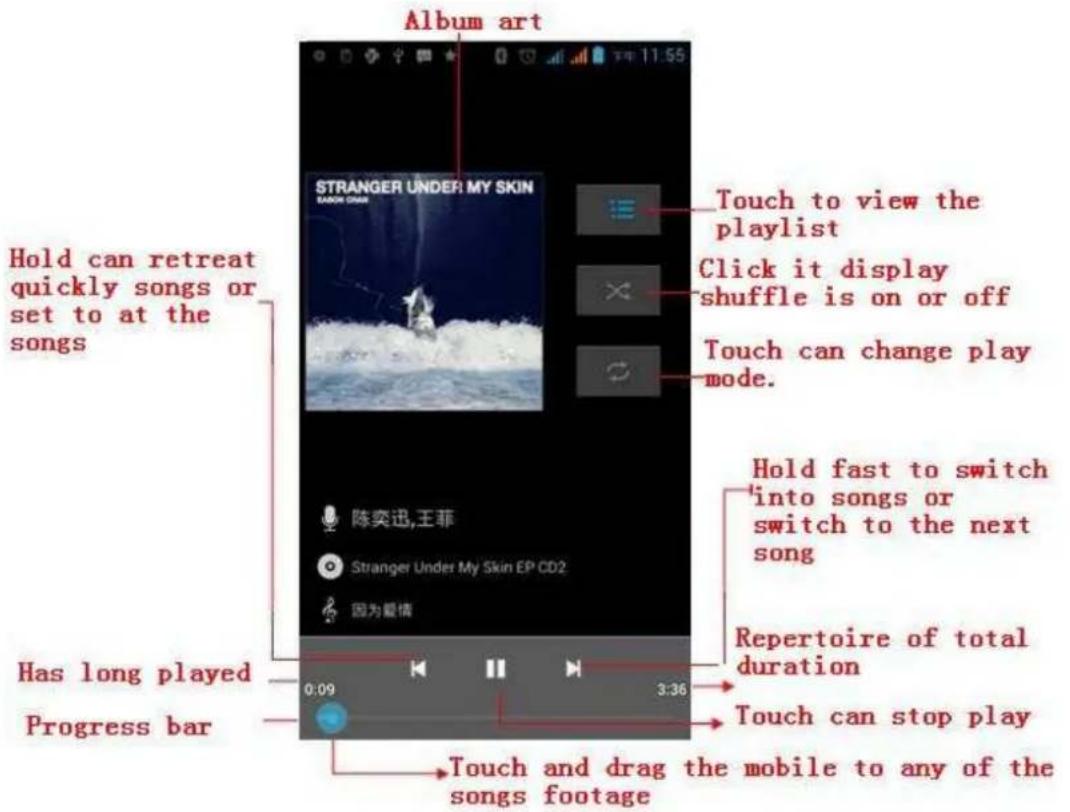
15.1 MusicMusic
The phone can play digital audio files in memory card. The following formats are available >AMRM4A、MIDI、MP3、WAV、OGG.
- Open Music
Press home, touch the label of applications, touch music. Then the interface of Music Media appears.
- Music Media
Your music files are classified according to the following four categories, albums, songs and play lists. Touch one of these categories; you can view the list inside.
Continue the operations, until your wanted music appears. Such as, if you choose Artists a list of artists sorted by the numbers in English will appear. Choose any on to open the list, then all the albums and songs will appear. Select one album, then the songs in it will be played.
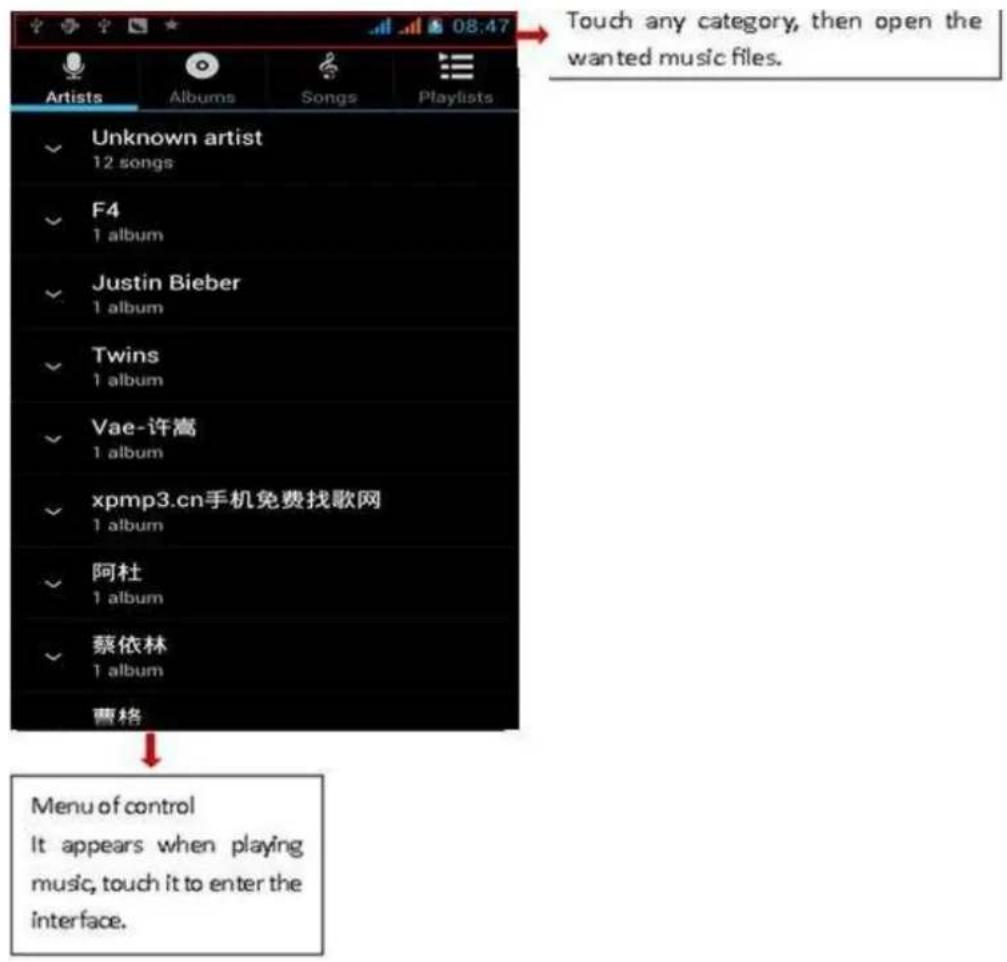
- Tips> You can play all of the songs in the interface of music media, in random sequence . Press Menu, and
then touch the Party Shuffle. Then will start playing the first song randomly selected. To close the Party Shuffle, press Menu, then touch to turn off the Party Shuffle.
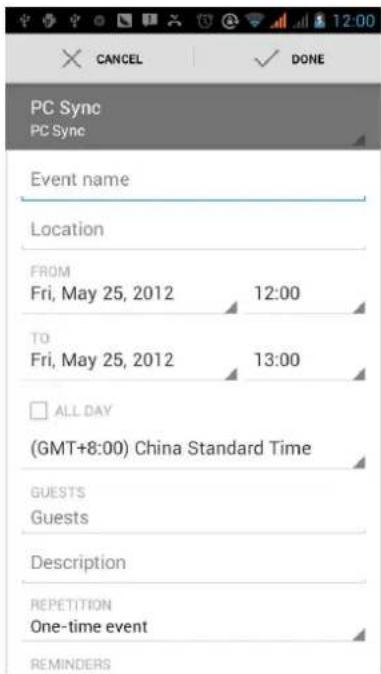
16. 16alenderCalender
Enter the calender application
Load Goggles accounts, enter the application, In the interface of month or week will use gray to highlight the day. Display default the date on the current month.
In the interface, press menu, 4 display modes will appear:
1) Schedule Intrface shows a certain schedule(click on the initial time and view forward, click the final time to view backwards)
2) day Interface displays a day's schedule (last clicked date), Slide around to turn page accoring day.
3) week Interface displays a week's schedule (last clicked date), Slide around to turn page accoring week.
4) today Interface displays a day's schedule, In the interface of month or week use gray to highlight the day.
5) month interface displays a month's schedule (last clicked date) Slide around to turn page accoring month.
- New activities
1) Press menu, more < touch new activities.
2) Enter the name of activity in the activities' box.
Notices Such as special occasions such as birthday or a day with events, set the all-day option to Yes. If the activity is at a certain time period, select the start time and end time.
3) Enter the event location, description, guests, repeat, remind time.
4) Click finish to return to calendar.

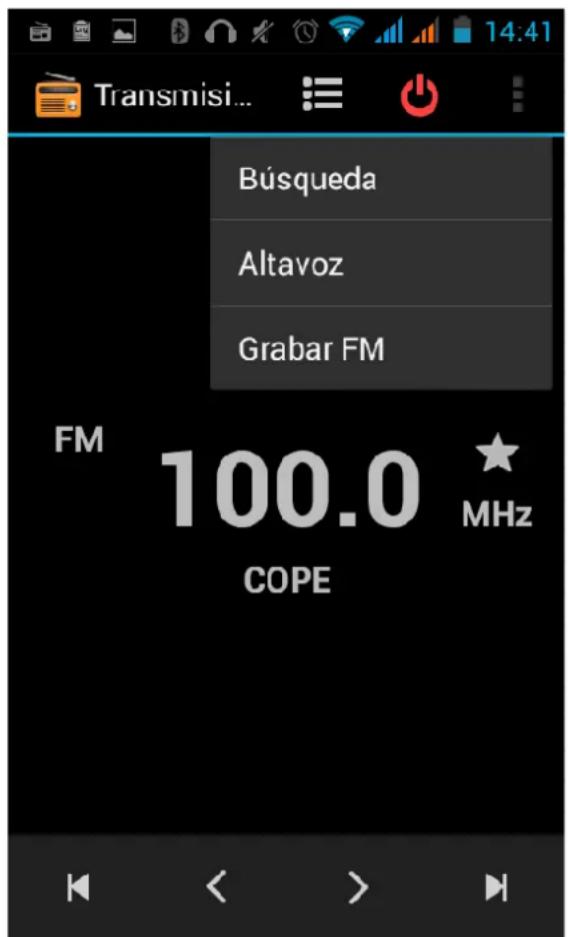
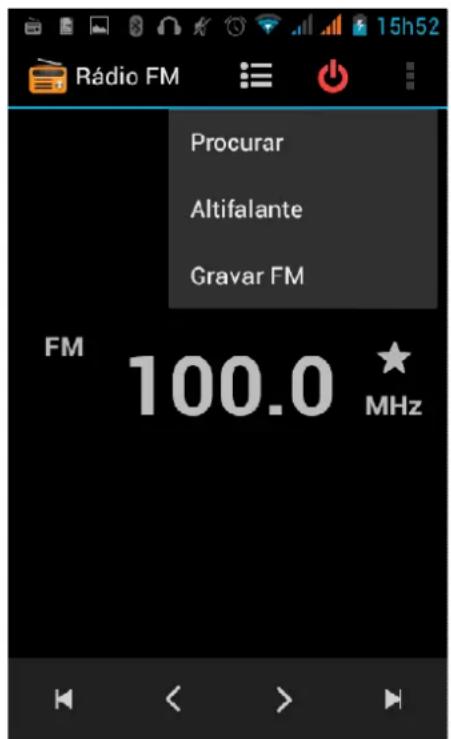
17. FM RadioFM Radio
FM Radio
Through this program, you may listen to FM radio on the device, FM radio use the wired headset as an antenna to receive signals, before opening this program, you can install the original equipment-headphones, when listening, you can switch it manually to speakers or the mode with wired headphones.
- Open FM radio
Touch this label

to open the application of FM radio.
1) Click on the "search", automatic scanning search FM channel, and channel in list interface, list all channels
2) Click "FM recording", listening to the radio to the current can be recorded. The tape recording to default file name can be arbitrary well-preserved input filename. Save to FM recording the default file.
3) Click "exit" closed FM radio, cannot listen to in the background.
4) Must be insert cable headphones as antenna, but click on the horn button, can put the FM radio.
5) Click on the frequency of the rear of the five-pointed star icon, channel was added to the collection channel list.
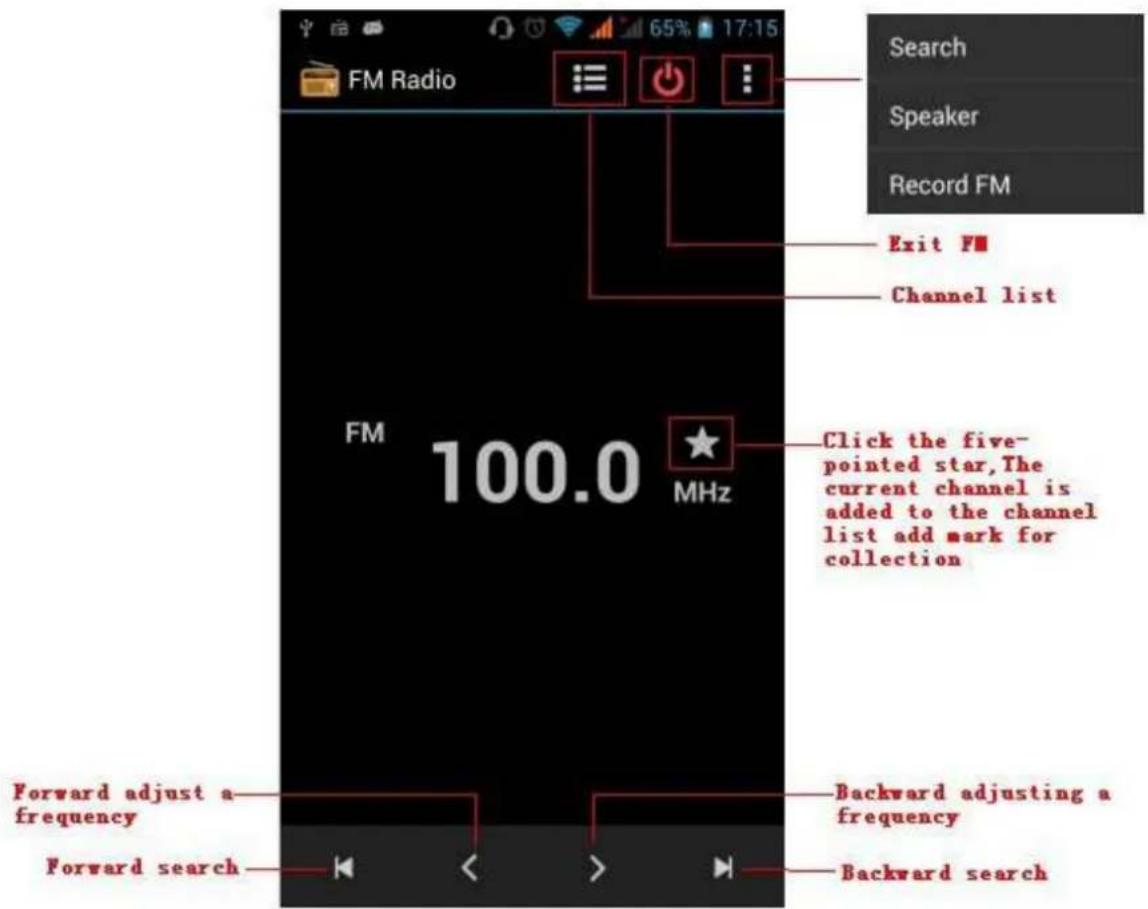
- Listen to FM radio background
Click to return to key, the radio program moved to the background, right now you can still continue to listen to the show, and can also carry out any other program.
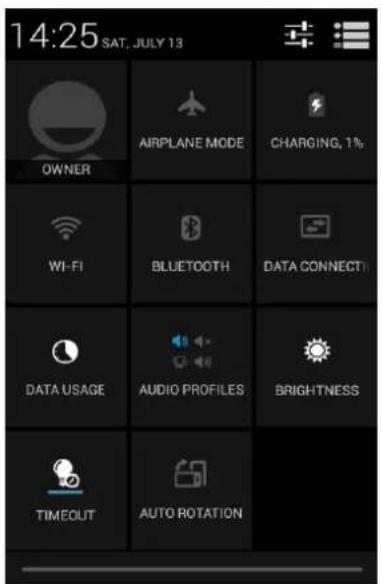
18. SettingsSettings
Your service provider may default some device settings, so you may not be able to change these settings.
• SIM management

1) Touch it to choose or to disable the SIM card, the card is grey when disabled, the flight mode displays on status bar.
5) The default SIM card, you can choose Voice call, Video call, Messaging, Data connection.
• Wireless and internet

1) Flight mode Touch to open or close.
2) Wi-Fi and Wi-Fi settings
Touch Wi-Fi

to open

Open Wi-Fi, it can search for
<notice: Open Wi-Fi then the flight mode, Wi-Fi will close automatically; Open flight mode then connect Wi-Fi, it can be used normally.
- Bluetooth

Bluetooth switch and setting up the touch bluetooth open, will automatically be search nearby bluetooth open the equipment.
- Data usage

-
Data usage set up mobile data traffic limit, flow more than limit will be close mobile data services.
-
More
Wireless & networks
a. Airplane mode
b. VP<
c. Tethering&portable hotspot
d. Mobile networks
e. GPRS transfer prefer mode
- Audion profiles

This option gives the phone tones' settings under the status of receiving calls or notification. Including Vibration, volume, ring tones, ring tones notification and feedback (8utton operation tone, select Sound, screen lock tone, touch). To adapt every environment.
1) Select “Standard / Mute / Conference / Outdoor, Touch the spot on the right, when turns green, it opens.
5) Volume: Including the ring volume and alarm clock settings, you can manually slide to select.
- Displays

a. 8 brightness Adjust the brightness b. Auto rotating screen Rotate phone to change direction
c. Animation Choose to display animations d. Screen Timeout Adjust the delay before the screen automatically locks
- Storage

a. Can view the SD card and cell phone memory usage.
b. Can Unmount SD card or Erase SD card.
c. Can choose the default memory.
- Battery

Boot time that use and each module to use power in general
- Applications

1) Unknown sources Allow to install non-electronic market applications
2) Manage applications Manage and delete the installed applications.
3) Running services Touch any of the services listed in> pop up 'to stop the service? 'two-button operation box, touch the 'Stop 'the service is stopped, and disappear from the "running services" list.
4) Storage use you can view the program of downloaded, all, on sd card or running how many memory space they occupy
5) Battery use you can see the using power situation of cell Standby, Phone idle, Display and Browser.
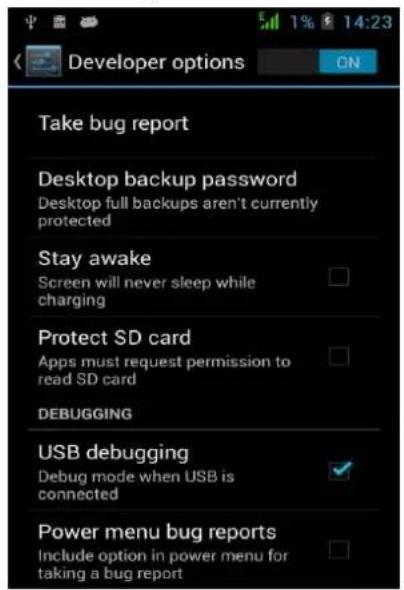
6) development a. USB debug : USB debug only apply in the develop process. This function allows copy data in computer and mobile devices.
- Location access

1) Use wireless Use wireless to find locations in the application (Google map).
Touch it to open or close
2) When using the GPS satellite positioning, set accuracy to street level(cancel it to save battery).
Touch it to open or close
3) GPS EPO assistance, use GPS assistance data(EPO) to speed uo GPS positioning
4) A-GPS Use auxiliary data can accelerate the process of GPS positioning.
Open it and remind you “it produce GPRS flows when using A—GPS”.
- Security
1) Set up screen locks Use images、PIN or password to lock the screen.
a. Touch “images”, the first time there will be a simple unlock instructions and examples, click “next step” to continue the step “make the unlocking image”.
b. Touch PIN Enter PIN numbers to unlock the screen.
c. Touch password Set password to unlock the screen.
d. Touch "no" Stop this application.
2) Set up SIM card lock Enter (4-8numbers) PIN to set the lock of SIM.
SIM card PIN (Personal Identification Number) is to prevent unauthorized use of SIM cards. PIN code provided with SIM. The service provider gives the initial value.
Change a blocked PIN code, you need to open the "SIM Lock", then go to Change Password screen, the phone will automatically prompt enter the old PIN code and asked to enter a new PIN code twice, finally the phone will prompt that change the code successfully. If you enter the PIN with error for three times, SIM card PIN codes will be automatically locked, PUK codes is usually supplied with SIM card. If no, you should go to the service provider for the codes.
If you enter 10 times wrong PUK code, the SIM card will be permanently locked.
3) Password visible Password visible when enter it
4) Select device administration Add or delete device manager.
5) Use security credentials Allow application visit security credentials or other credentials.
6) Install from SD card Install the encrypted certificate from SD card.
7) set password Set or change Certificate store password
8) clear storage Clear all the contents of the certificate store and reset their passwords.
• Languages and keyboard

1) Selecting Language District Include all the languages on the phone and totally amount of 12 kinds.
2) Custom Dictionary Add words to custom dictionary or delete.
3) Keyboard Settings Vibrating when buttons are pressed, Playing sound when buttons are pressed, Capitalizing automatically, Speech Input(by microphone on the keyboard), Inputting words(speech can be altered by sliding finger on space key), Displaying
tips(activate predictive function when you input words); Auto-Text(Automatically input certain words when press space key or specified keys)
4) Input method you can select Android keyboard or google pinyin input method.
- Backup & reset

1) Backup I data will application data, WLAN password and other Settings backup to Google's servers
2) Resetting to Factory Settings, Clear all data stored on the phone.
- Add account

a. Corporate
b. Email
c. Google
- Date and Time

1) Automation Use date and time provided by
3) Selecting Time Zone Select Time Zone according to where you are. For China please select “GMT+08>00, China Standard Time”.
4) Setting Time Touch "+" and "-" to set time.
5) Use 24 Hour Time Format O6) Select Date Format There are 3 kinds of formats you can choose from> Month-Day-Year, Day-Month-Year and Year-Month-Day, among which Year-Month-Day is the default setting.
• Schedule power on/off

You can set time of boot or shutdown by touching it. You may also select to repeat it or a certain day during a week.
- Accessibility

1) Large text
2) Power button ends call: According to the "power" button to end the call to open, call, press the "power" will end the call and not shut down the screen
3) Auto-rotate screen
4) Speak passwords
5) Touch & hold delay
6) Install web scripts
7) Quick boot
• Developer options

a. USB Debugging: USB debugging only for development and USB disk.
b. Stay awake: Screen will never sleep while charging.
c. Alow mock locations
d. Desktop backup password
e. Strict mode enabled
f. Pointer location
g. Show touches
h. Show screen updates
i. Show CPU usage
j. Force GPU rendering
k. Window animation scale:
I. Transition animation scale
m. Don't keep activities
n. Background process limit
o. Show all APRs
- About phone

You can check the information on status bar and remaining power.
19. Notices for the use of phoneNotices for the use of phone
Your phone is a product of superior design and craftsmanship and should be treated with care. The following suggestions can help you comply with the terms of repair kits, to extend the life of mobile phone.
1) Place the mobile phone and their parts and components out of reach of small children.
1) Keep the phone dry, rain, humidity and all types of liquids which contain minerals will corrode electronic circuits.
2) Don't touch the phone with wet hands when charging, it will cause electric shock or damage the phone.
3) Avoid place the device in high temperature environment. Temperatures will shorten the life of electronic devices, damage batteries, and warp or melt certain plastics.
4) Avoid place the device in too low temperature environment. When the temperature rises, the phone will produce water vapor that may damage electronic circuit.
5) Avoid place the phone in dusty, dirty places, otherwise parts may be damaged.
6) To avoid the phone in a lit cigarette, near open flame or any heat source.
7) Do not open the device, non-professional approach will do damage to the phone.
8) Do not throw it from height, knock or shake the phone, rough handling can damage internal circuit boards.
9) Do not paint the phone, because the paint will block headphones, microphones or other removable parts, and lead it not work.
10) Use clean, soft, dry cloth to clean the camera, light sensor lenses. Prohibit the use of harmful chemicals and cleaning agents, cleaning fluids to clean the phone
11) If mobile phone, battery, charger, or mobile phone accessories are defective, send to the nearest qualified service center for inspection.
12) If necessary, Service Centre staff will assist you and will arrange for phone repairs.
DECLARATION OF CONFORMITY DECLARATION OF CONFORMITY
GLOBAL WOLDER GROUP S.L, Polígono Industrial de Barros n°29, 39408 Barros, Cantabria. España, certifies that this product, referenced as miSmart SMILE, complies with the provisions of the Directive 99/05/CE about Radio Equipment and Telecommunications Terminal (R&TTE), the Directive 2006/95/CE of Low Voltage and the Directive 2004/108/CEE of Electromagnetic Compatibility standards in accordance to harmonized standards.
CE
mismart Smile :)
Manual do utilizador
Manual do Utilizador
INDICE
- APPEARANCE AND KEYPAD OPERATIONS .... 3
- USING MEMORY CARD AS U DISK 4
- WIFI....5
- BLUETOOTH....7
- MAIL 9
5.1 GMAIL 9
5.2 EMAIL....10 - DIALLING....11
- MESSAGING 15
- CONTACTS 18
- INTENET EXPLOR 21
- RECORDER 22
- CLOCK 23
- CACULATOR 24
- CAMERA 25
13.1 IMAGE MODE 25
13.2 VIDEO MODE....27 - IMAGES ...... 29
- MUSIC....32
- CALENDER 33
- FM RADIO 34
- SETTINGS 35
- NOTICES FOR THE USE OF PHONE 39
natural_image
Two children looking at a smartphone, one using the device (no visible text or symbols)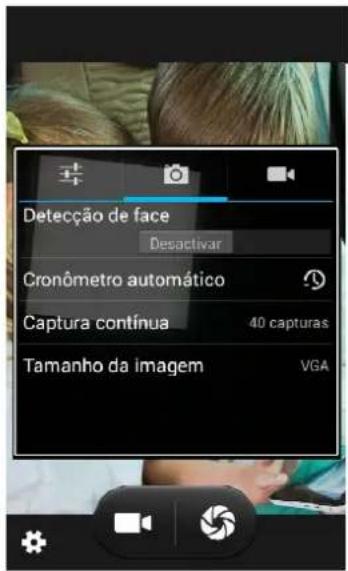
natural_image
Close-up of green leaves with a camera interface overlay (no readable text or symbols)natural_image
Scenic view of a watchtower in Bavarian mountains with autumn foliage and clear blue sky (no text or symbols visible)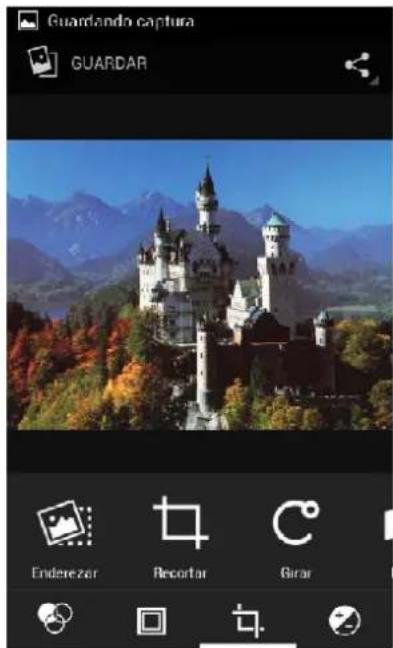
6) Cortar imagens:
• Languages and keyboard
