NVR-1615 - Video recorder Planet - Free user manual and instructions
Find the device manual for free NVR-1615 Planet in PDF.

| Product Type | Network Video Recorder (NVR) |
| Brand | Planet |
| Model | NVR-1615 |
| Channels | 16 |
| Video Compression | H.265 / H.264 |
| Maximum Recording Resolution | 4K (3840x2160) |
| Hard Drive Support | Up to 2 SATA HDDs (max 16TB each) |
| Power Supply | DC 12V, 5A |
| Power Consumption | ≤ 30W (without HDD) |
| Dimensions (W x D x H) | 300 x 230 x 45 mm |
| Weight | 2.0 kg (without HDD) |
| Network Interface | 1 x Gigabit Ethernet RJ45 |
| Remote Access | Web browser, mobile app (iOS/Android) |
| Recording Modes | Continuous, motion detection, scheduled |
| Playback | Simultaneous multi-channel, search by time/event |
| Maintenance | Keep vents clean; use dry cloth for exterior |
| Safety | Overvoltage protection; use only supplied power adapter |
| Spare Parts / Repairability | Replacement hard drives and power adapters available; contact support |
| Operating Temperature | 0°C to 40°C |
| Certifications | CE, FCC |
Frequently Asked Questions - NVR-1615 Planet
User questions about NVR-1615 Planet
0 question about this device. Answer the ones you know or ask your own.
Ask a new question about this device
Download the instructions for your Video recorder in PDF format for free! Find your manual NVR-1615 - Planet and take your electronic device back in hand. On this page are published all the documents necessary for the use of your device. NVR-1615 by Planet.
USER MANUAL NVR-1615 Planet
Central Management Software for NVR-915 / NVR-1615
CV5-M256

natural_image
Group of business professionals collaborating around a laptop in an office setting (no visible text or symbols)![PLANET Core Version 5 | Central Management Software 256-CH | Intelligent and Powerful Security Management PLANNET General Manager • Product Name: 700000000000 • System Management (Main Analysis) [BL] • Network Management System • Software Management with Object 3.0 Max • System Management (Main Analysis) [BL] • Network Management for the System • Network Management for the System (BL) • Network Management for the System (BL) • Network Management for the System (BL) • Network Management for the System (BL) • Network Management for the System (BL) • Network Management for the System (BL) • Network Management for the System (BL) • Network Management for the System (BL) • Network Management for the System (BL) • Network Management for the System (BL) • Network Management for the System (BL) • Network Management for the System (BL) ■ Product Name: 700000000000 ■ System Management (Main Analysis) [BL] ■ Network Management System ■ Software Management System ■ Network Management System (BL) ■ Network Management System (BL) ■ Network Management System (BL) ■ Network Management System (BL)](/content/2026/05/1139418/images/6a9643ab79016b3f28c982134cf7854e018b462f18a5cee21c4a29fd1301d291.jpg)
Table of Contents
Chapter 1.Main Console....4
1.1 Tool Bar 4
1.2 NVR List....5
1.3 Division List....7
1.4 Group List 9
1.5 PTZ Panel....11
1.6 Operation with sub-screen....12
1.6.1 Change display channel 12
1.6.2 Switch divisions 13
1.6.3 Remove Camera Display....13
1.6.4 Snapshot 14
1.6.5 Full Screen 15
1.6.6 Restore Division Default 15
1.7 Function menu....16
1.8 Maintenance menu 17
1.9 NVR Management Dialog:....18
1.9.1 NVR Management 18
1.9.2 NVR Configuration....20
1.10 NVR Remote UI Control Dialog 22
1.11 Division Management Dialog 23
1.12 Division Channel Management Dialog 25
1.13 Group Management Dialog....26
1.14 Group Channel Management Dialog 27
1.15 e-Map....28
1.16 e-Map Setting 30
1.16.1 Change map from e-Map setting dialog....31
1.16.2 Place configuration ....31
1.16.3 Camera Configuration....32
Chapter 2. Playback ....34
2.1 Screen Division....35
2.2 Playback Functions....37
2.2.1 Search ....37
2.2.2 Backup....38
2.2.3 Convert To AVI 39
2.2.4 Audio 40
2.2.5 Snapshot (Snapshot all)....40
2.2.6 Information Setting....41
2.3 Maintenance 41
2.4 Playback control button(s) 41
2.5 Operation with sub-screen 43
2.6 Motion Search....44
2.7 Sequential Search 45
2.7.1 Define search time period....45
2.7.2 Start search and rollback 46
2.7.3 Detail window for snapshots 46
2.7.4 Preview mode of search result....46
Minimum System Requirements
| CPU | Intel Core i7 or above |
| RAM | Minimum 2GB, 4GB or above is recommended |
| HDD | SATA 1TB or above is recommended |
| Display card | Independent display card suggestedNote: Make sure your display DPI setting is set to default at 96DPITo set DPI value, right-click on desktop, choose “settings” tab >> “advanced” |
| Ethernet interface | Gigabit Ethernet card or above |
| OS | Windows 2000(SP4), Windows XP, Windows 2003, Windows Vista, and Windows 7 |
Also it is strongly recommend to close the unnecessary programs while running CV5-M256 to monitor and record video streams from NVR.
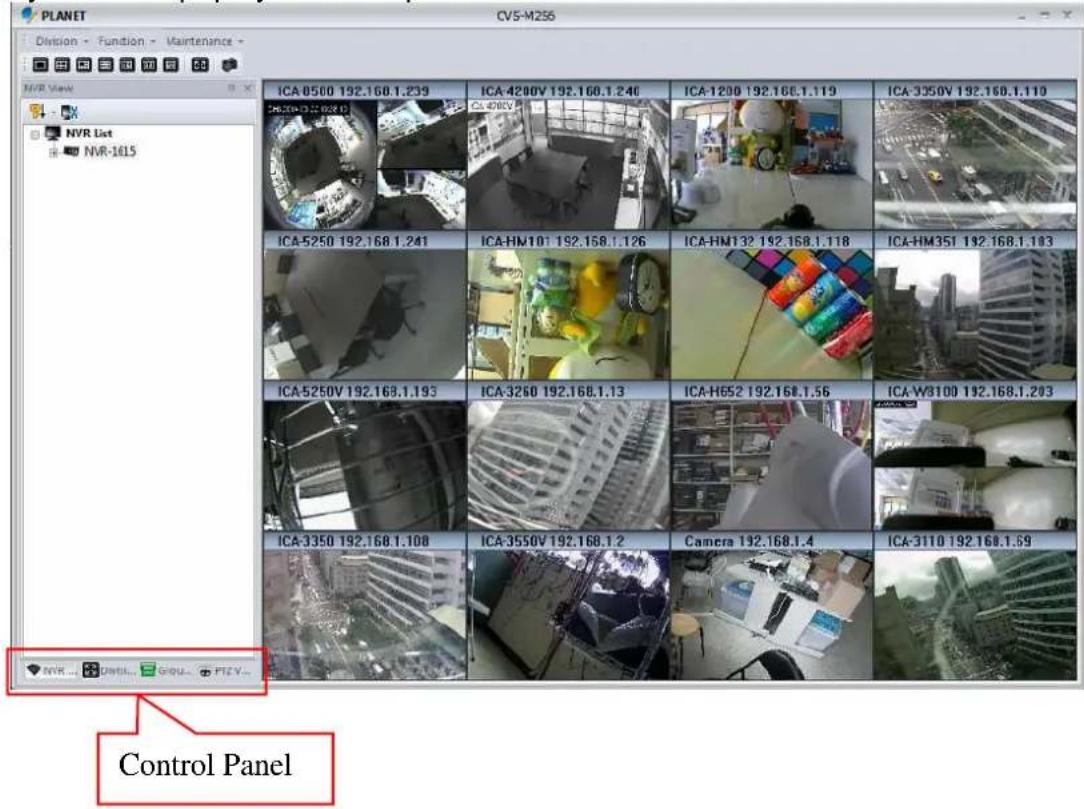
Chapter 1. Main Console
This is the main control panel of CMS that provides live stream preview, system setup, playback, snapshot and PTZ controls.
1.1 Tool Bar
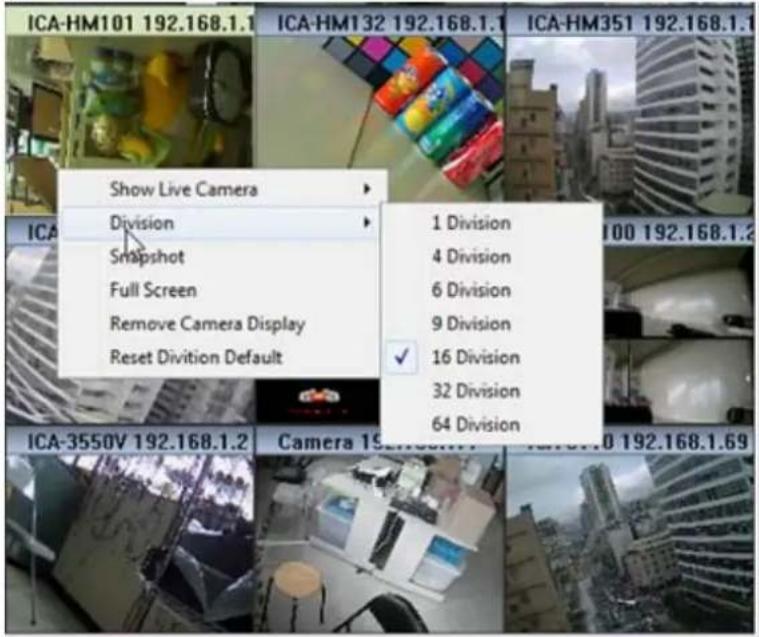
Division Switch:
You can switch to a screen division by these ways as shown below:
- Division Menu: Click on "Division" on the menu bar and select the new division that you need.
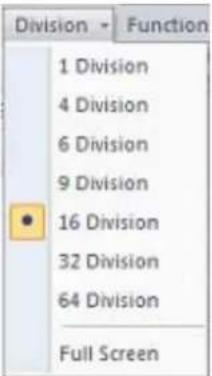
- Division Buttons: Click on the division button to switch to a new division.

Division 1 button

Division 4 button
Division 6 button

Division 9 button

Division 16 button
Division 32 button
Division 64 button
Full-Screen button
3. Snapshot All:

Click on the snapshot button and the snapshot all dialog will appear. Select the images that you need and save it.
1.2 NVR List
List the NVR and the cameras. You can connect them or go to the NVR setting page.
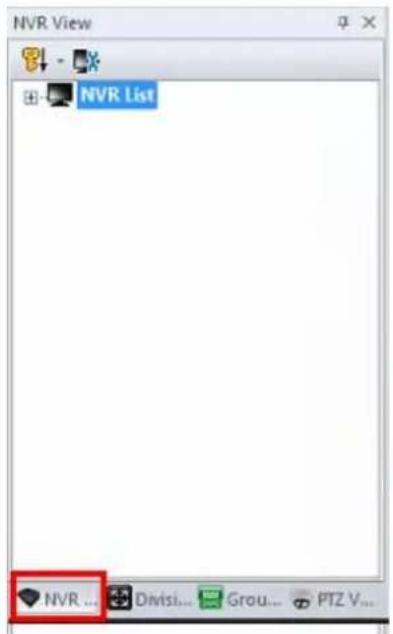
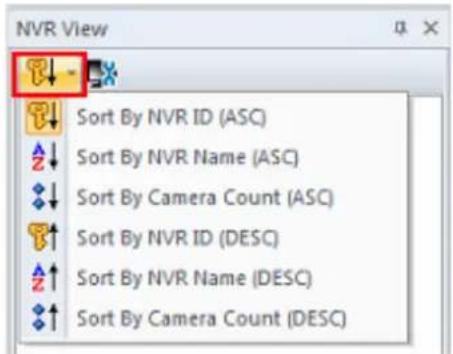
Sort NVR List: Click on the sort button and select the one you need from the menu.
NVR Management: Go to the "NVR Management Setting" page.

Sub Menu of NVR List: Right-click mouse on the NVR.
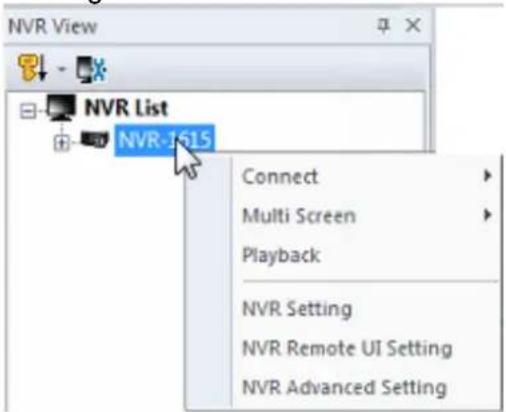
Connect Connect to the selected NVR to preview live
| streaming. | |
| Multi Screen | Create current preview window to selected screen. |
| Playback | Bring on the playback application. |
| NVR Setting | Show the NVR setting dialog. |
| Remote UI Control | Bring on the remote NVR's UI control dialog. |
| NVR Advanced Setting | Bring on the IE browser to setting with NVR. |
1.3 Division List
List the existing division and the cameras. You can connect them or go to division setting page from here.
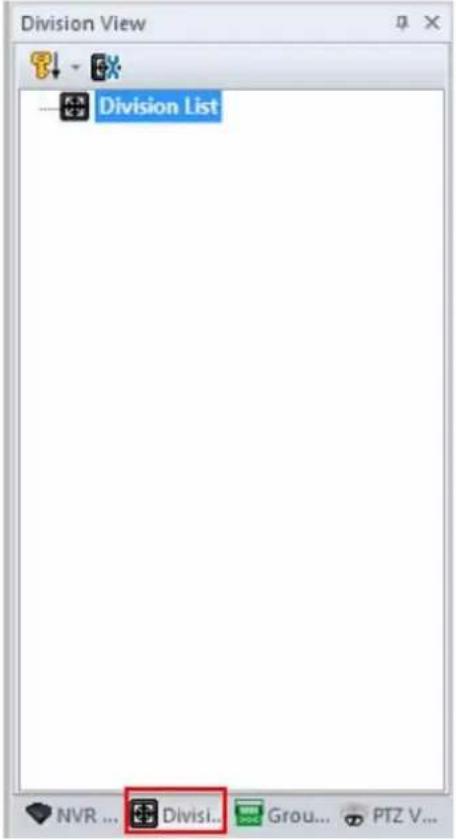
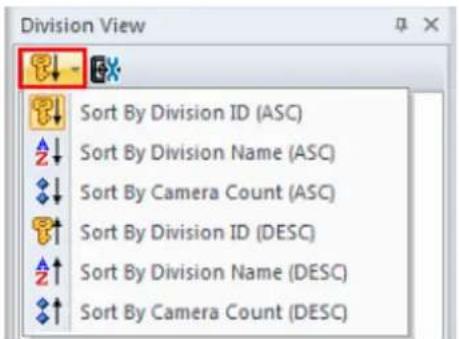
Sort Division List: Click on the sort button and select the one you need from the menu.
Division Management: Go to the "Division Management Setting" page.
Sub Menu of Division List: Right-click mouse on the division.
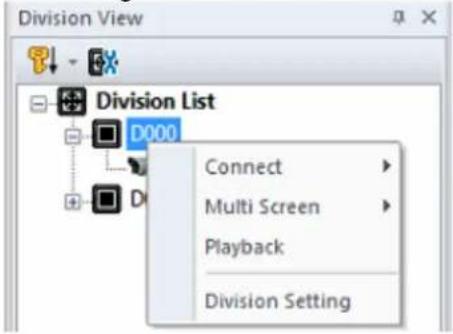
| Connect | Connect to the selected Group to preview live streaming or disconnect the division. |
| Multi Screen | Create current preview window to selected screen. |
| Playback | Bring on the playback application with the division setting. |
| Division Setting | Go to the Division Setting page. |
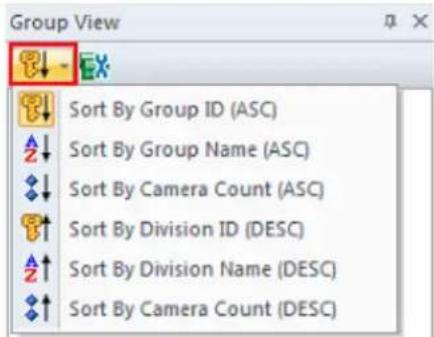
1.4 Group List
List Groups and their cameras. You can connect them or go to Group setting page from here.
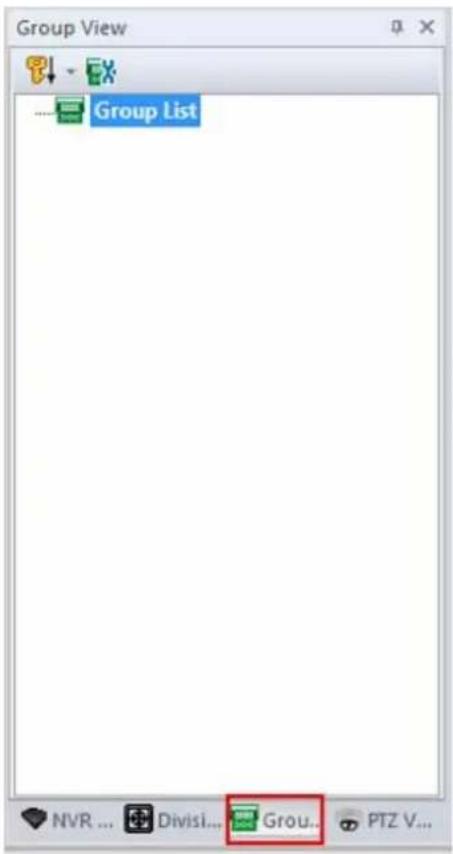
Sort Group List: Click on the sort button and select the one you need from the menu.
Group Management: Go to the "Group Management Setting" page.
Sub Menu of Group List: Right-click mouse on the group.
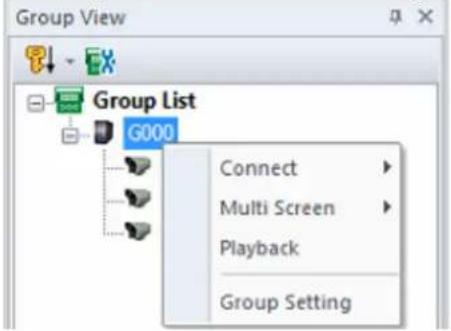
| Connect | Connect to the selected Group to preview live streaming or disconnect the group. |
| Playback | Bring on the playback application. |
| Multi Screen | Create current preview window to selected screen. |
| Group Setting | Go to the Group Setting page. |
1.5 PTZ Panel
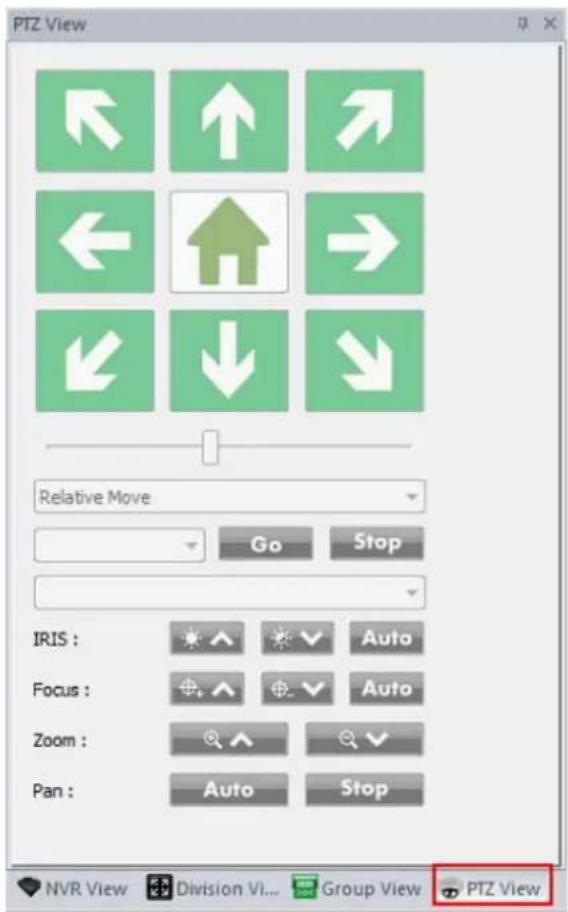
Pan /Tilt:
Direction button | Click it to move PTZ camera direction. |
Home button | Click it to make camera return to home position. |
PTZ Speed Control | Adjust the increment of the PTZ movements. The default speed is 5. You can adjust it from 1 to10. |
Relative Move /Continuous Move | Select the moving mode. |
Tour | Select a tour setting from combo box and click “go” button to start tour. Click “Stop ” button to stop tour. |
Preset | Select a preset position from combo box. Camera will move to preset position after clicking. |
| IRIS : | 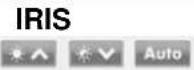 | Adjust camera's IRIS setting, or set it as Auto. |
| Focus : | 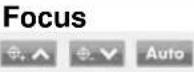 | Adjust camera's focus setting, or set it as Auto. |
| Zoom : | 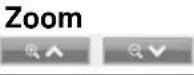 | Zoom-in or zoom-out focus. |
| Pan : |  | Begin camera auto pan or stop. |
1.6 Operation with sub-screen
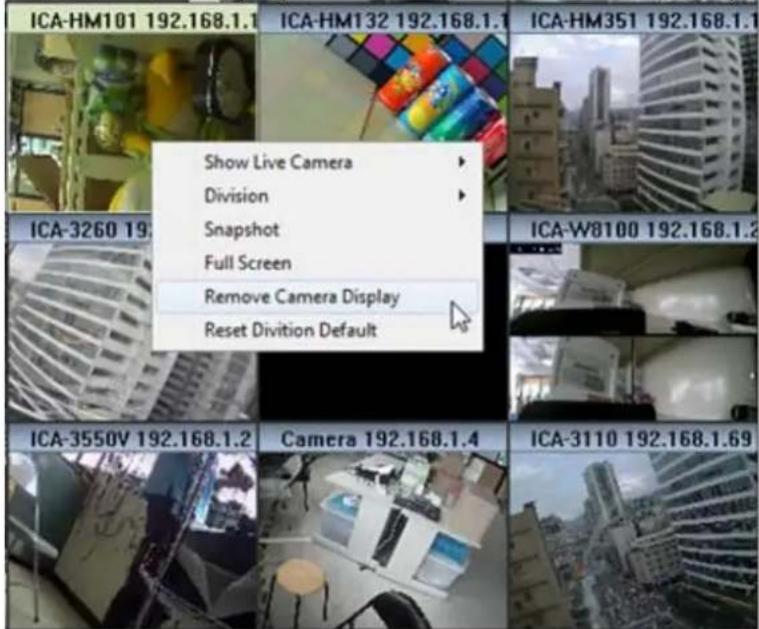
Right-click mouse and select the operation from popup menu. Some functions have quick link button on main console. You can call the functions from buttons, too.
1.6.1 Change display channel
Right-click mouse and move cursor to "Show Live Camera", and select a new camera from list. The current channel will change to selected camera.
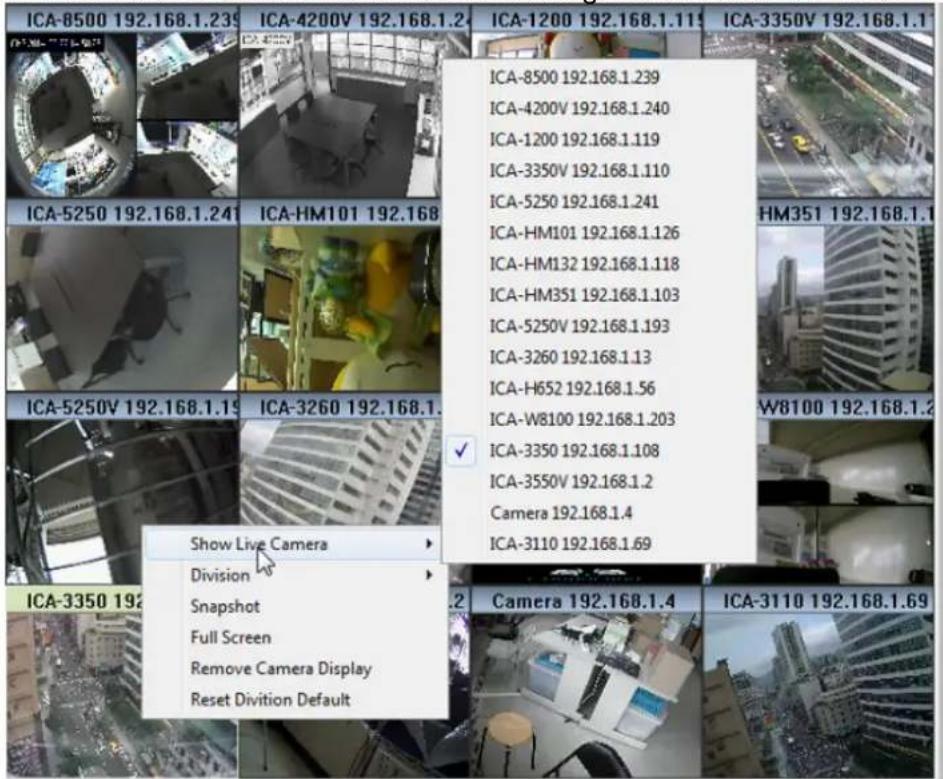
1.6.2 Switch divisions
Right-click mouse and move cursor to "Division" item, and select a new division type.
1.6.3 Remove Camera Display
Select "Remove Camera Display" to remove current channel display.
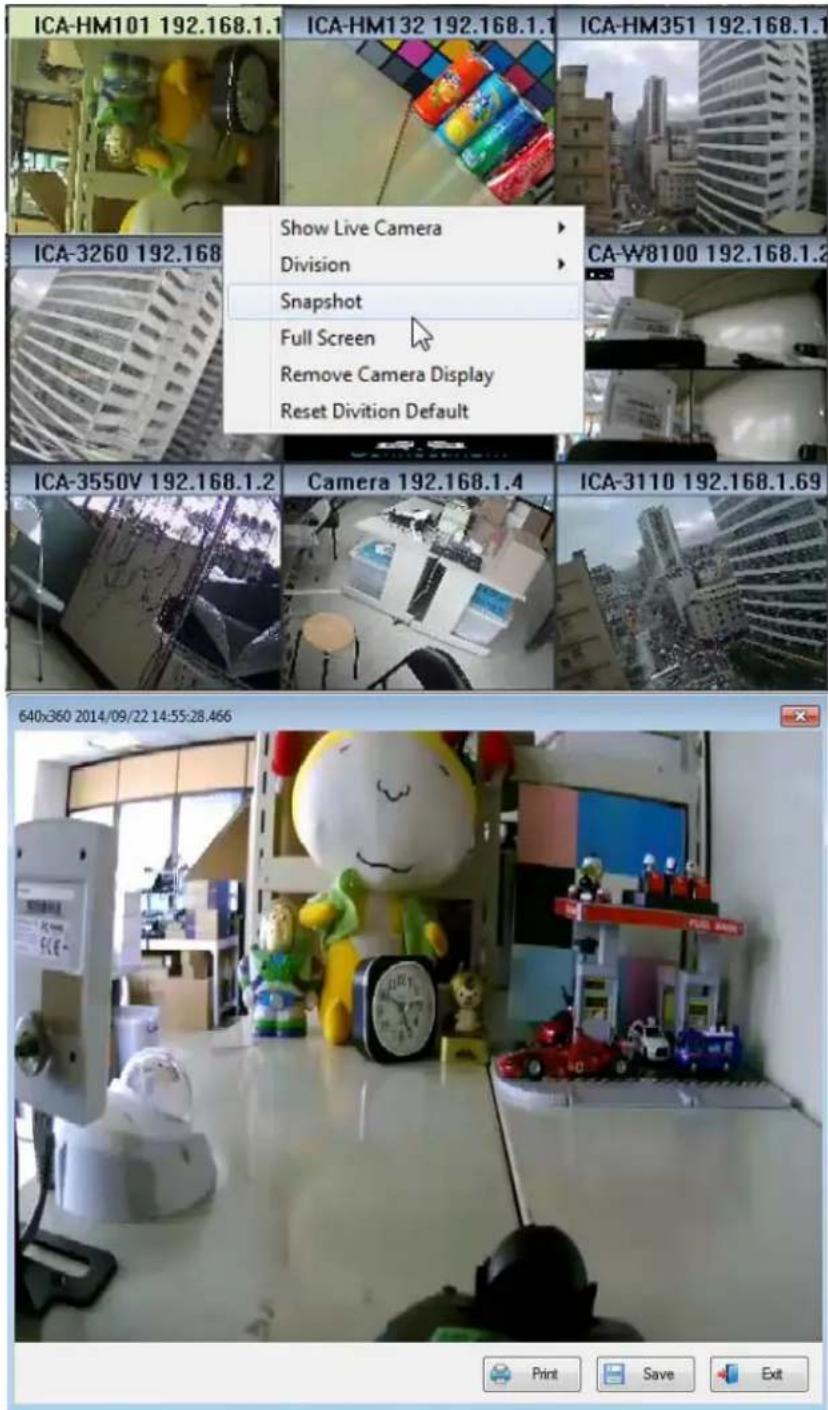
1.6.4 Snapshot
Right-click mouse on the focus channel and select the "Snapshot" item. System will snapshot the current image and save it on an assigned path or print it.
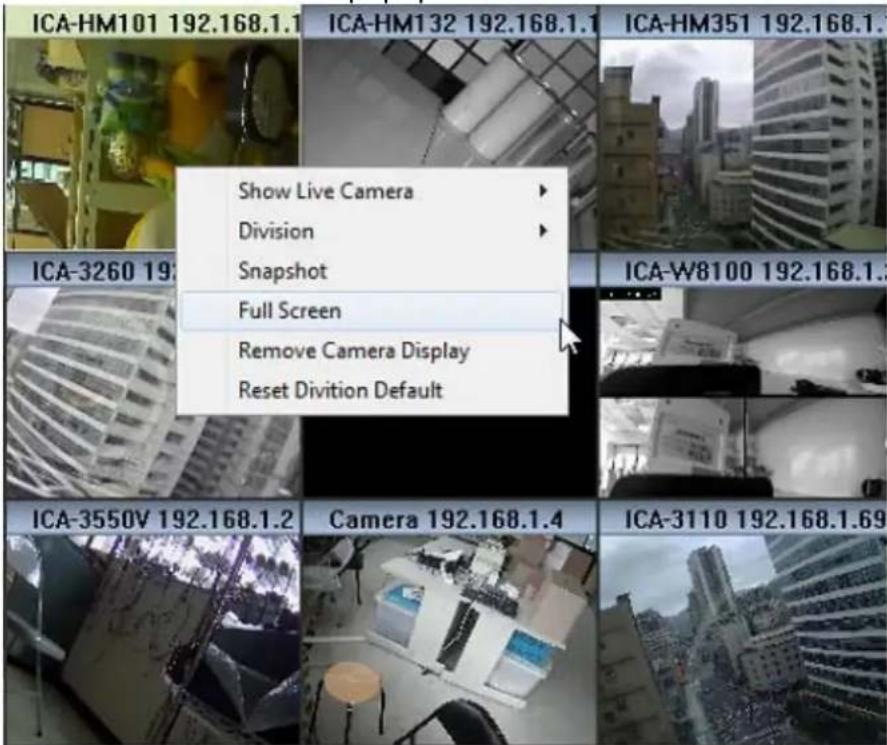
1.6.5 Full Screen
Switch to full screen mode from popup menu's "Full Screen" item.
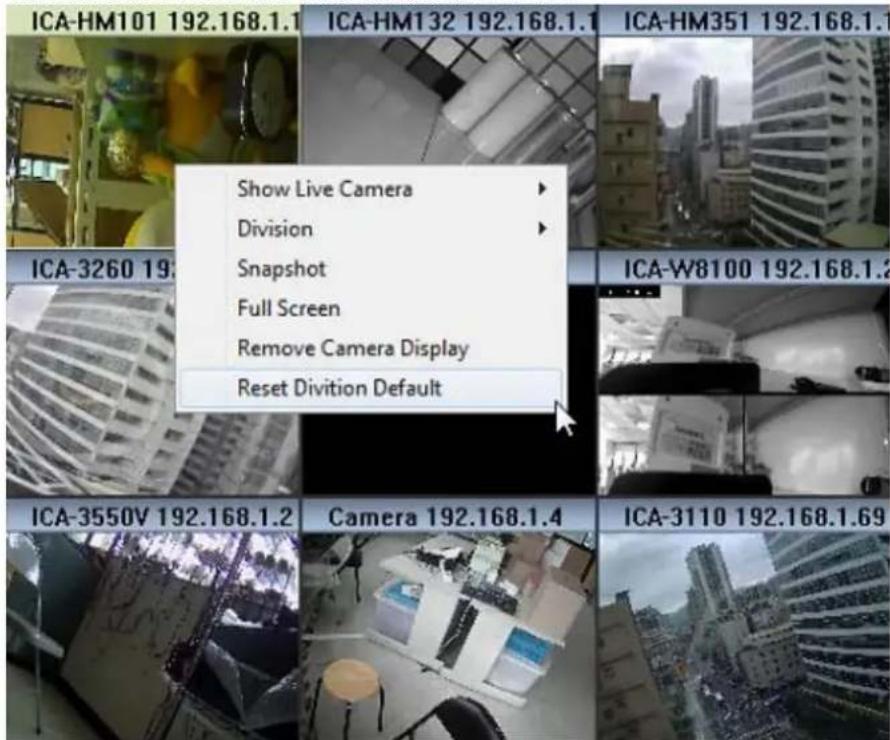
1.6.6 Restore Division Default
Select the "Restore Division Default" item on the popup menu and all sub screen channels will restore to default channels.
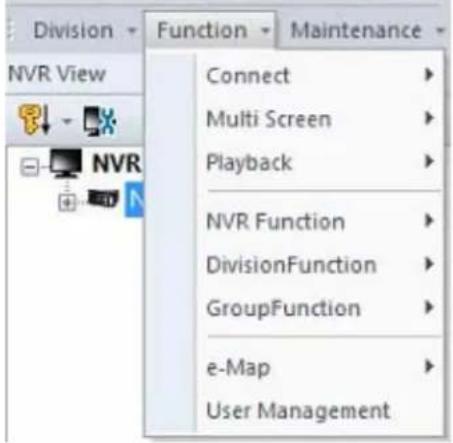
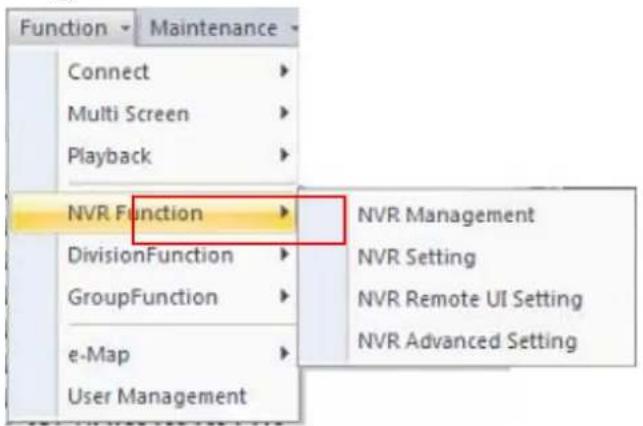
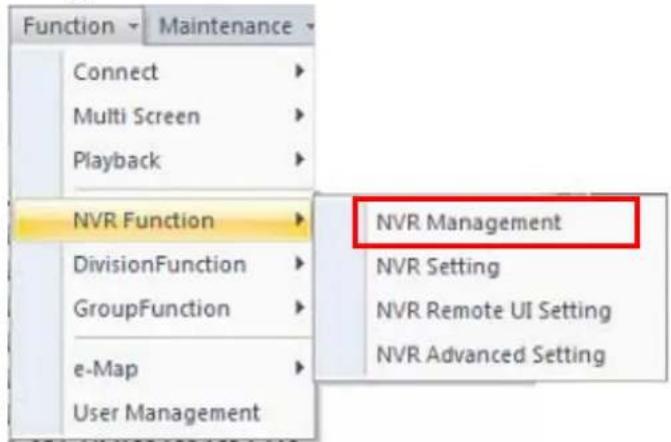
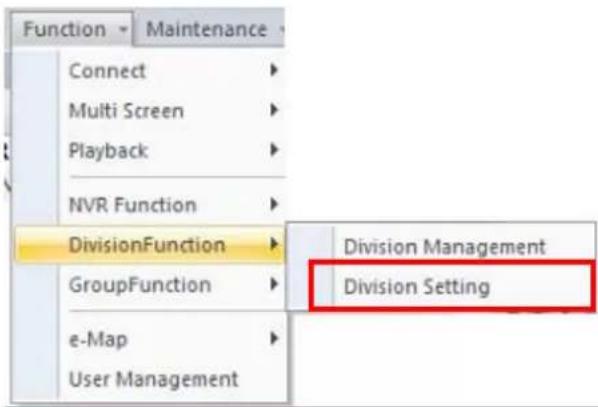
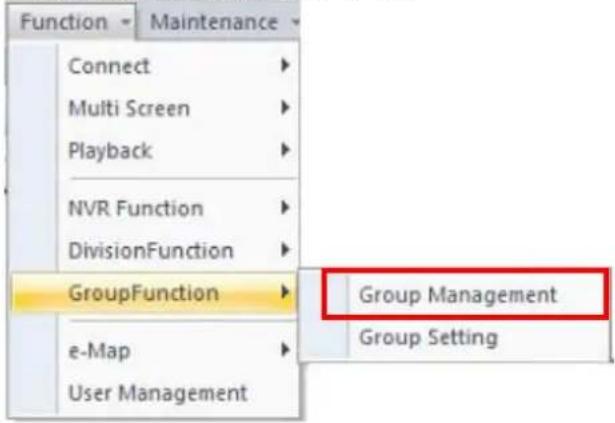
1.7 Function menu
Click on the "Function" item on the menu bar and select a function.
| Connect | Connect cameras under the currently selected NVR or Division or Group. And disconnect the current connection. |
| Multi Screen | Show the currently selected cameras on the assigned screen. |
| Playback | Choose Playback as the current mode. |
| NVR Function | NVR Management: Shows the all installed NVR list dialog.NVR Setting: Shows the NVR's channels Management setting dialog.NVR Remote UI Control: Shows the Remote UI Control dialog with the currently selected NVR.NVR Advanced Setting: Connect to NVR's web service via IE browser. |
| Division Function | Division Management: Shows the all created division list dialog.Division Setting: Shows the selected division setting dialog. |
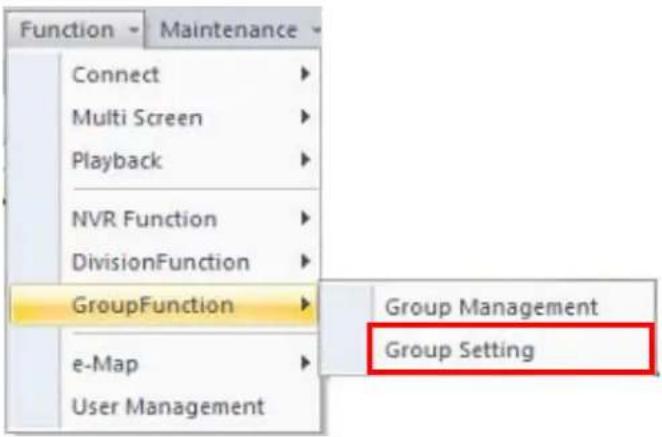
| Group Function | Group Management: Shows the Group Management setting dialog.Group Setting: Shows the Group's channels Management setting dialog. |
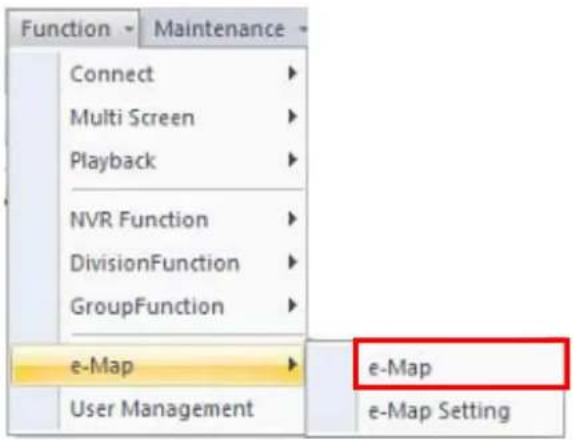
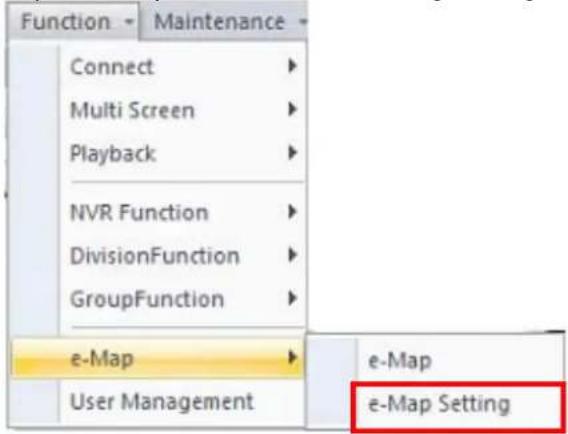
| e-Map | e-Map: Shows e-Map window.e-Map Setting: Shows e-Map setting dialog. |
| User Management | Shows the User Management setting dialog. |
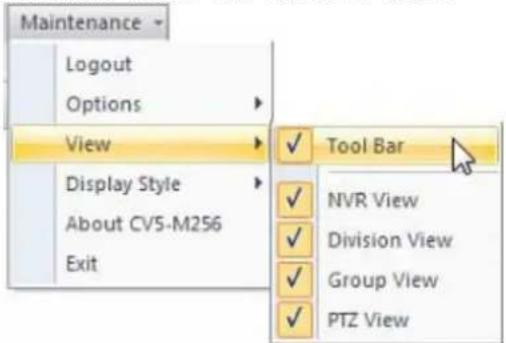
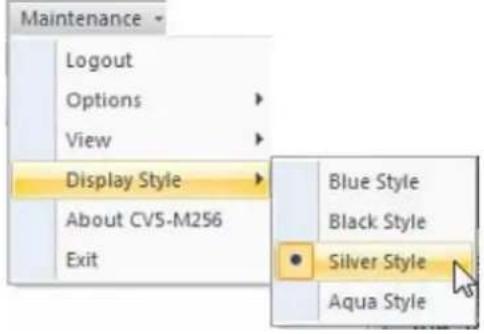
1.8 Maintenance menu
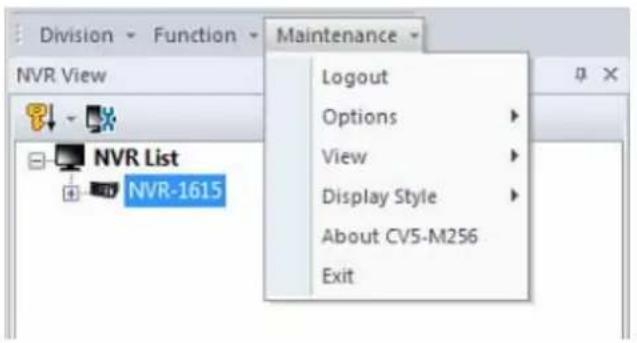
- Login / Logout: Login the system or Logout with the current login user.
- Options:
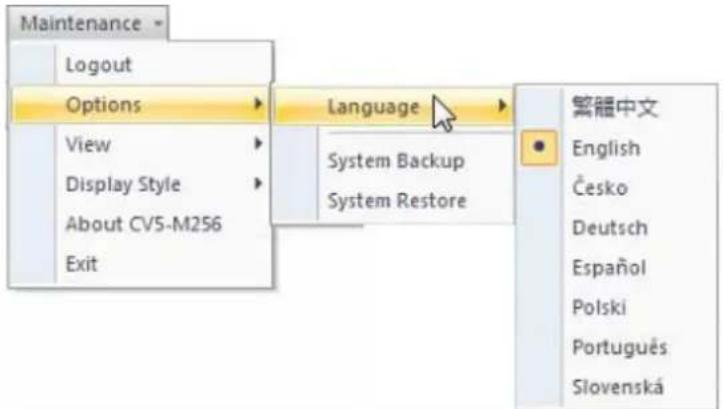
| Language | Select the language from list. |
| System Backup | Backup CMS setting files to assigned path. |
| System Restoration | Restore backup setting file from assigned path. |
• View: Select which toolbar items will show or hide.
- Display Style: Select the current display style from list.
- About: Show the CMS's "About" information.
- Exit: Leave the CMS.
1.9 NVR Management Dialog:
1.9.1 NVR Management
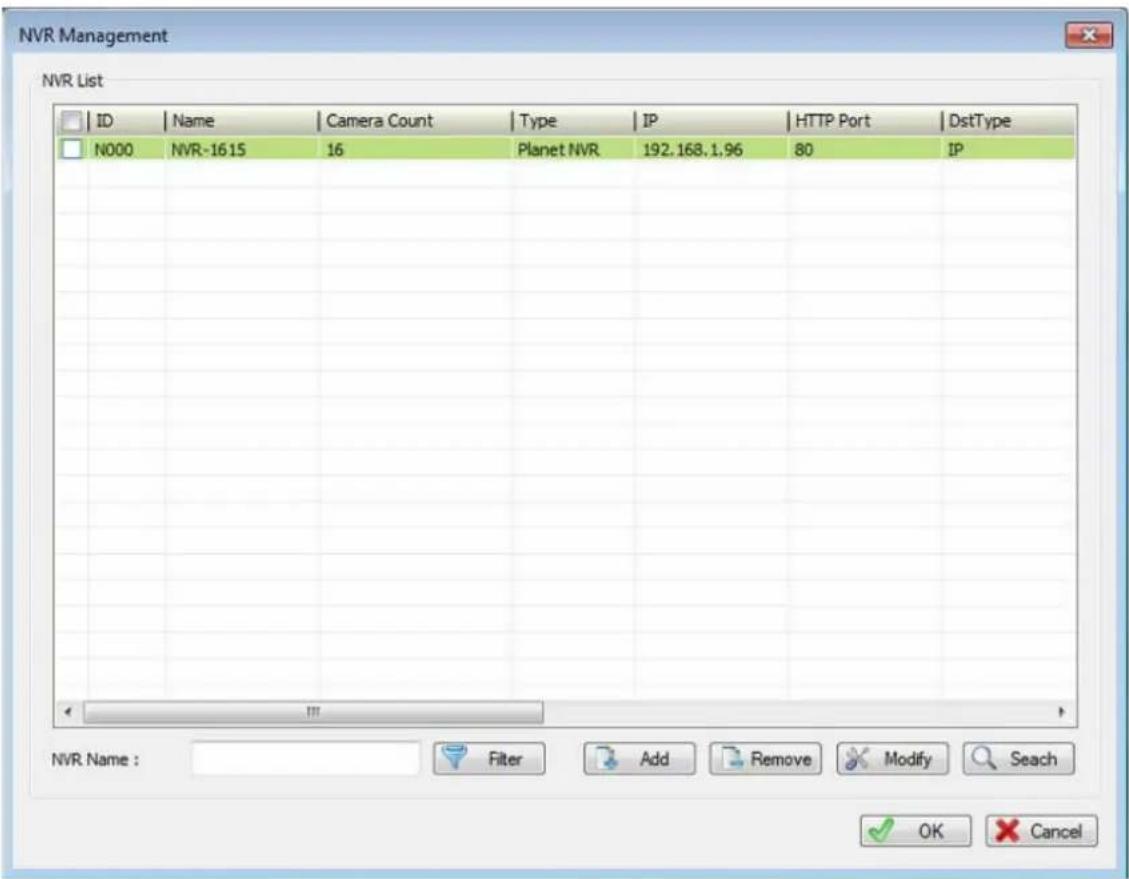
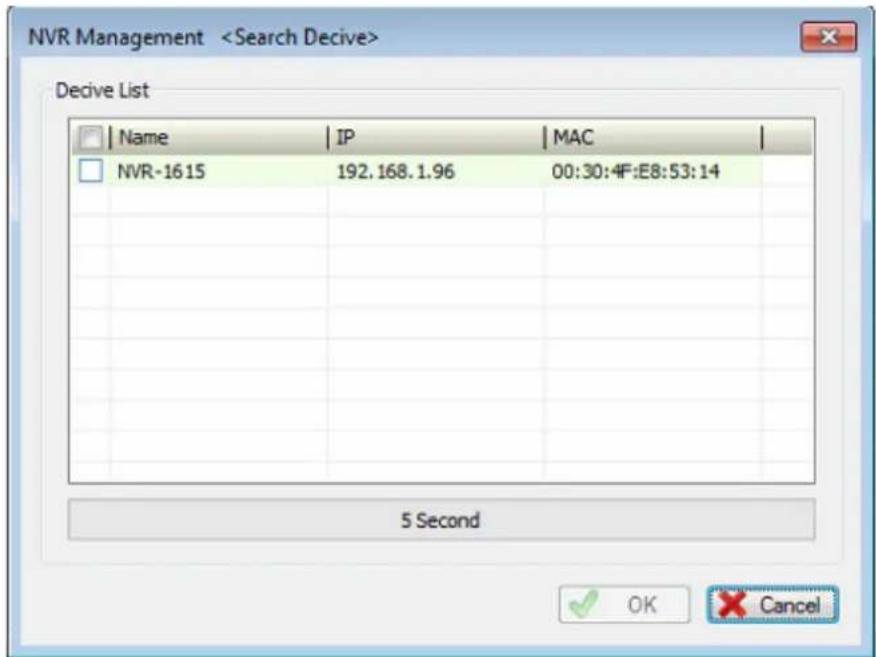
Filter | Key-in “NVR Name” and then click the “Filter” button. System will display match result in “NVR List” table. If you have many NVRs, maybe you should set filter to find out the NVR that you need to manage. If you search without any filter rule, system will show all NVRs from database. |
NVR List | Display search result with filter and select an NVR from list to modify NVR’s settings. |
Select all / Un-Select all | Click check box in the header will select or un-select all NVR in the list. |
Add | Shows NVR setting dialog with empty setting, and click on to add a new NVR to CMS. |
 Remove Remove | Click “Remove” button to remove all selected NVRs from database. |
| ModifyModify | Select an NVR from list and modify selected NVR's setting. |
| SearchSeach | Search local LAN to find out NVR. |
1.9.2 NVR Configuration
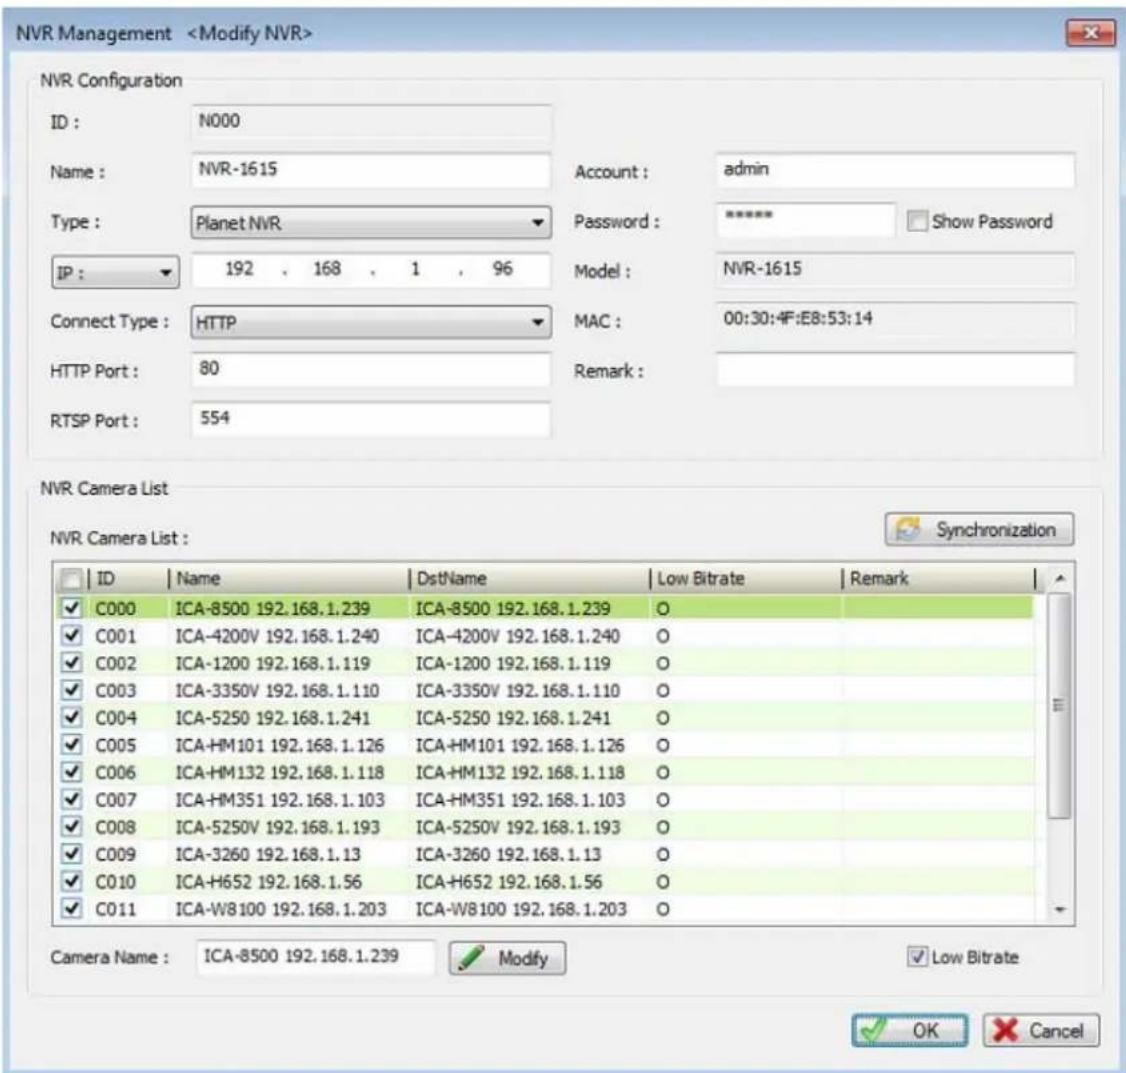
| ID | NVR's ID generate by system. |
| Name | Key-in the NVR's name. |
| NVR Type | Select the NVR type from the combo box. |
| IP / Domain / DIPS | • IP: Key-in the NVR's IP address.• Domain: Key-in the NVR's domain name.• DIPS: Key-in the NVR's DIPS ID. |
| Connect Type | Select a connection type (HTTP/TCP/UDP) from the combo box. |
| HTTP Port | Key-in the NVR's HTTP port number, default is 80. |
| RTSP Port | Key-in the NVR's RTSP port number, default is 554. |
| Playback Port | Key-in the NVR's Playback port number; only SecuGuard needs to set this port. Default is 8866. |
| Account | The User ID to login NVR. |
| Password | Key-in the password to login NVR. If you need to confirm password, you can check the box of"Show Password". |
| Model | Shows NVR's model name. |
| MAC | Shows NVR's MAC address. |
| Remark | Key-in the remark about this NVR. |
| Synchronization button | CMS will synchronize with NVR to get the current camera setting and NVR information. |
| Camera List | Select the cameras of NVR; only selected cameras will display on NVR preview. |
| Camera Name | Modify camera's name in CMS; new name can only be effective in CMS. |
| Low Bit-Rate | CMS will only connect lower bit rate stream only for saving bandwidth. |
1.10 NVR Remote UI Control Dialog
You can configure NVR's display UI at CMS like a TV wall function.
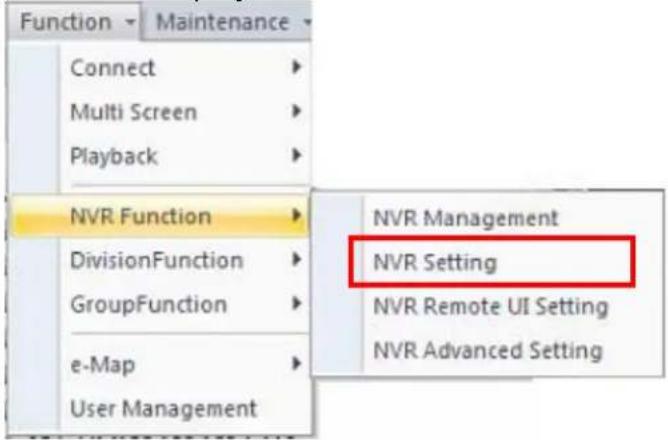
UI Style Select a UI style from the "UI Style" combo box.
| Camera | 1. Click on the division widow to select a focus channel.2. Select a new camera number from “Camera” combo box.3. The focus channel’s camera number will become the selected number. |
| Full Screen | Enable full screen by checking the “Full Screen” check box. |
| Reset Quad | Reset the division windows to default camera number. |
| Division | Switch NVR’s division by clicking the “1”, “4”, “9”, “16” button. |
| Submit | After you finish UI setting, click the “Submit” button to submit setting to the NVR. NVR will change style soon. |
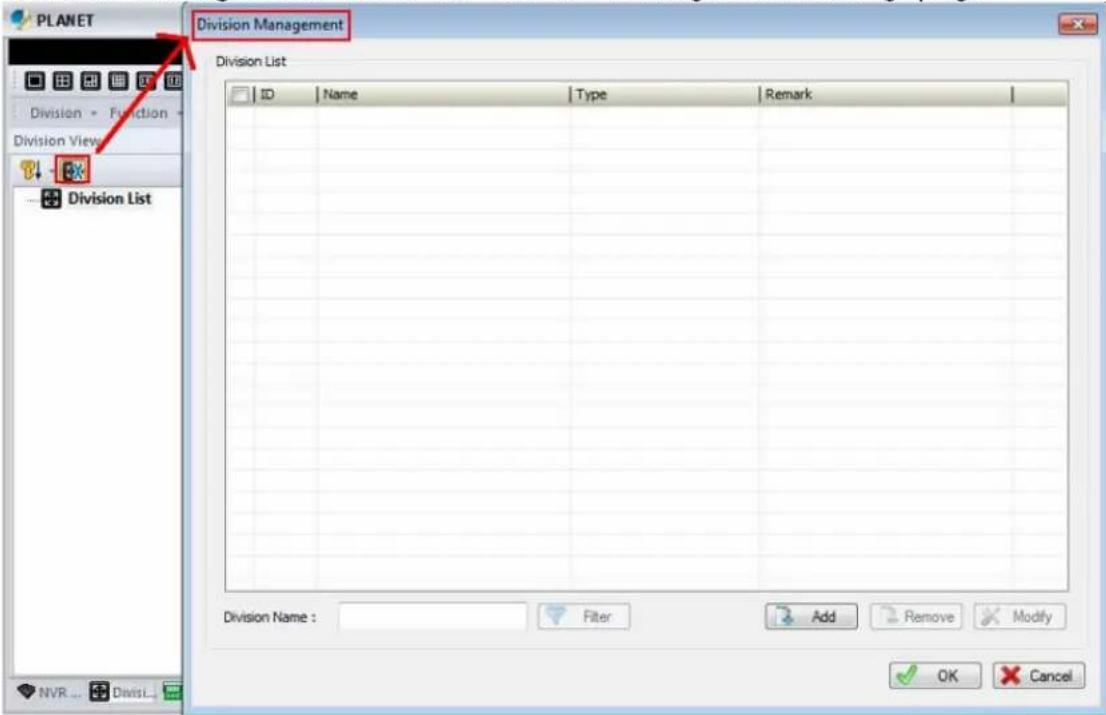
1.11 Division Management Dialog
Management Division's setting begins here.
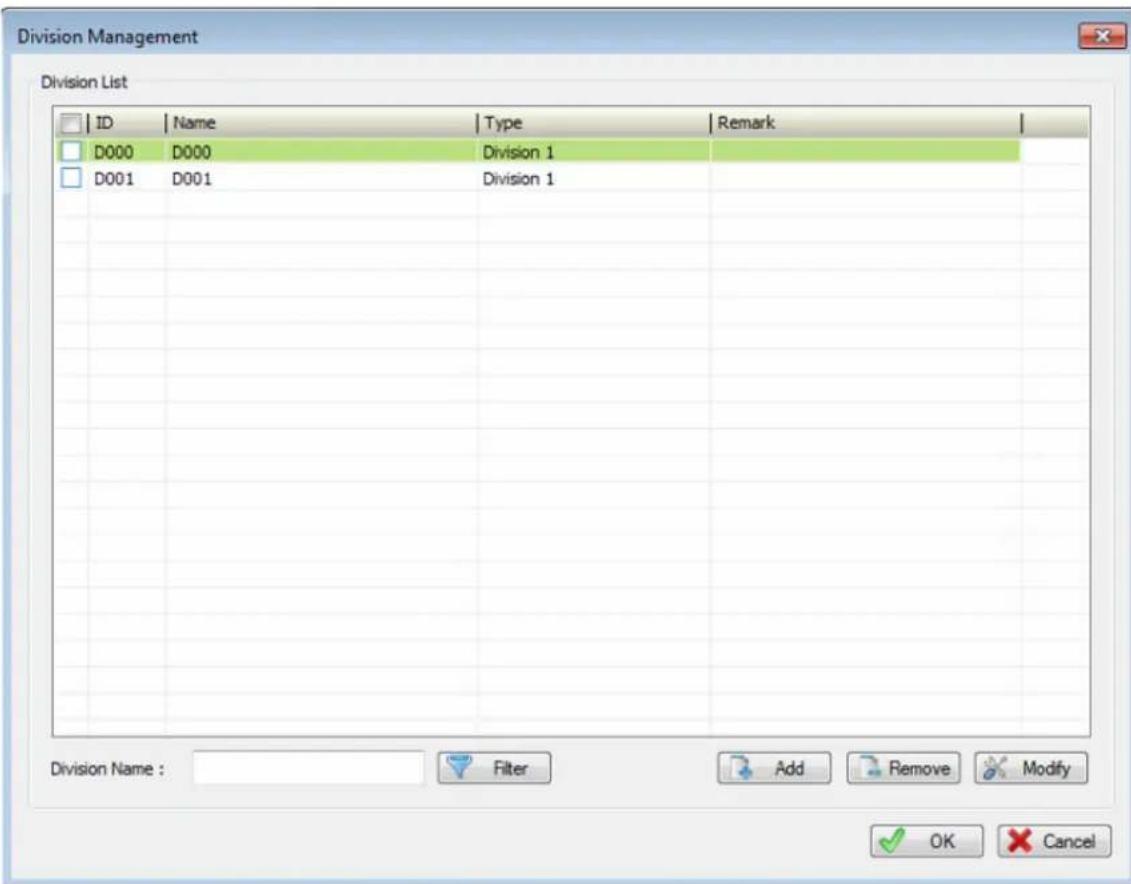
| Filter | Key-in the search filters by division name and then click the “Filter” button. System will display the search result in “Division List” table.■ If you have many division settings, maybe you should set filter to find out the division that you need for management.■ If you search without filter, system will show all divisions from database. |
| Division List | Display search result with filter; select a division from list to modify division’s settings. |
| Select / Un-Select all | Click check box on header row to select / un-select all divisions in the list. |
| Add | Shows division setting dialog with empty setting, and click on to add a new division to CMS. |
| Delete | Click “Delete” button to remove all selected divisions from database. |
| Modify | Select a division from list, and modify selected division’s setting. |
1.12 Division Channel Management Dialog
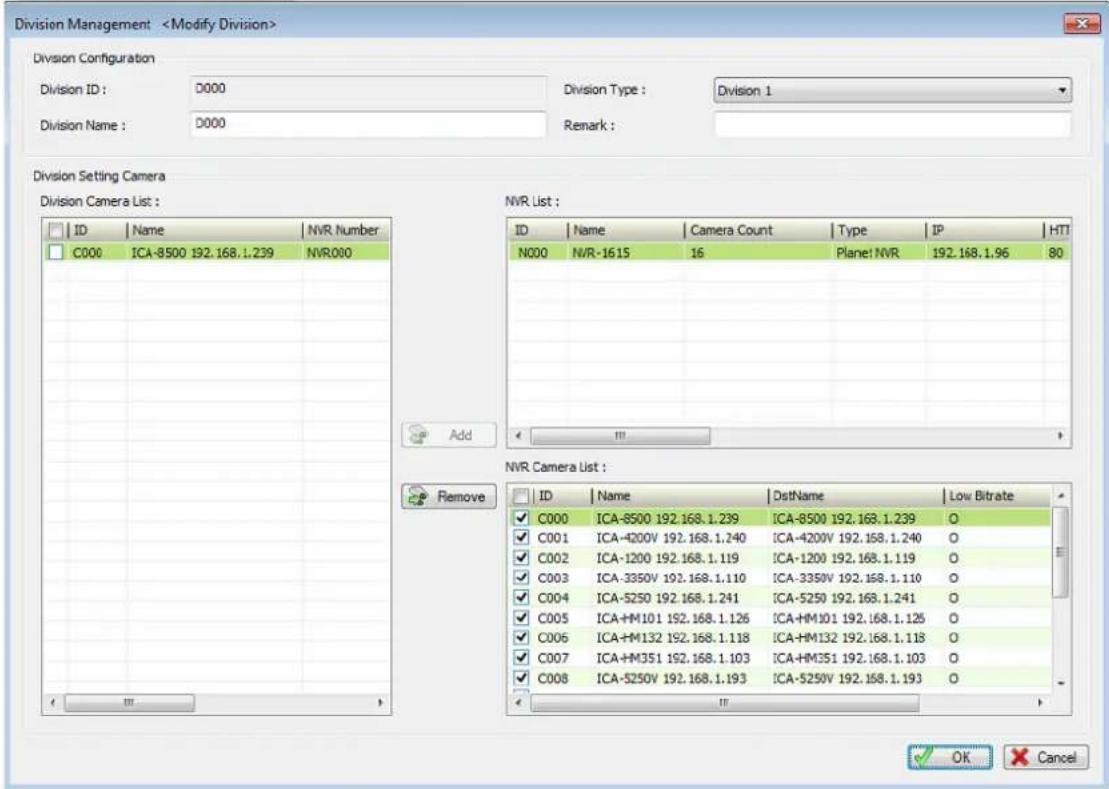
| Division ID | Automatically generated by system to identify group. | |
| Division Name | Please key-in division's name here. | |
| Division Type | Select a division type from the combo box. | |
| Remark | Please key-in division's remark at here. | |
| Camera List | Channel List table | List all cameras of current division. |
| Select / Un-Select All | Click check box on header row to select / un-select all cameras in the list. | |
| Add | Add all selected cameras from NVR's camera list to current division. | |
| Remove | Remove all selected cameras in the list from current division. | |
| NVR list | Select an NVR from NVR list for its cameras. | |
| NVR Camera List | List all cameras of the currently selected NVR. | |
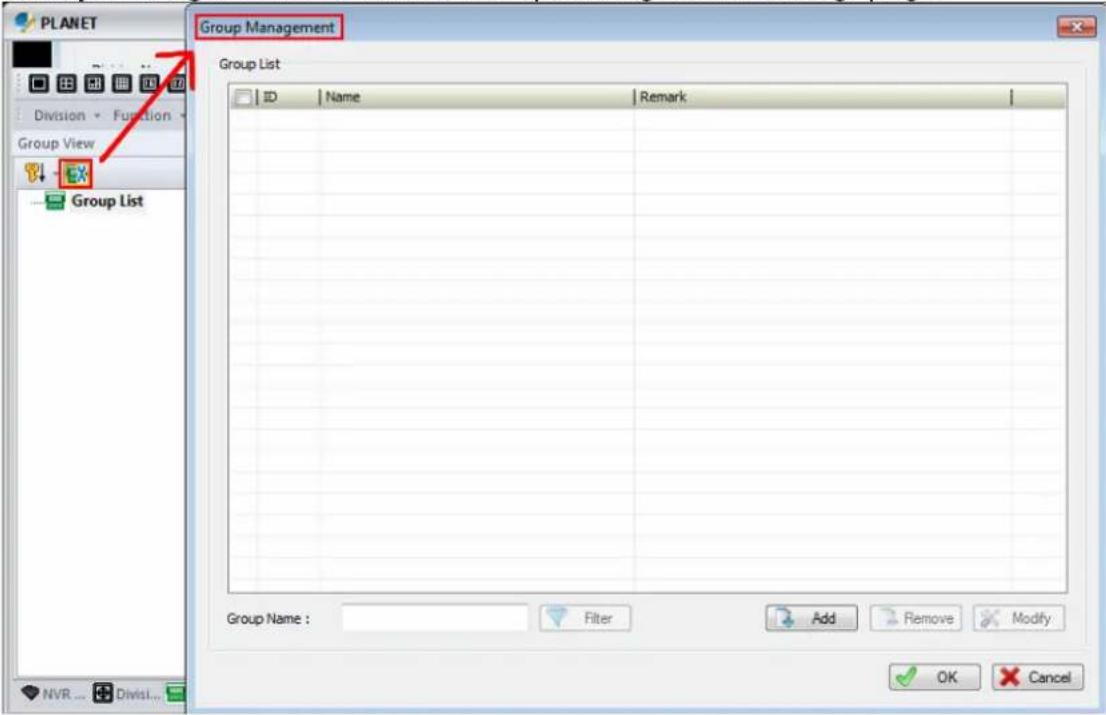
1.13 Group Management Dialog
Management Group's setting begins here.
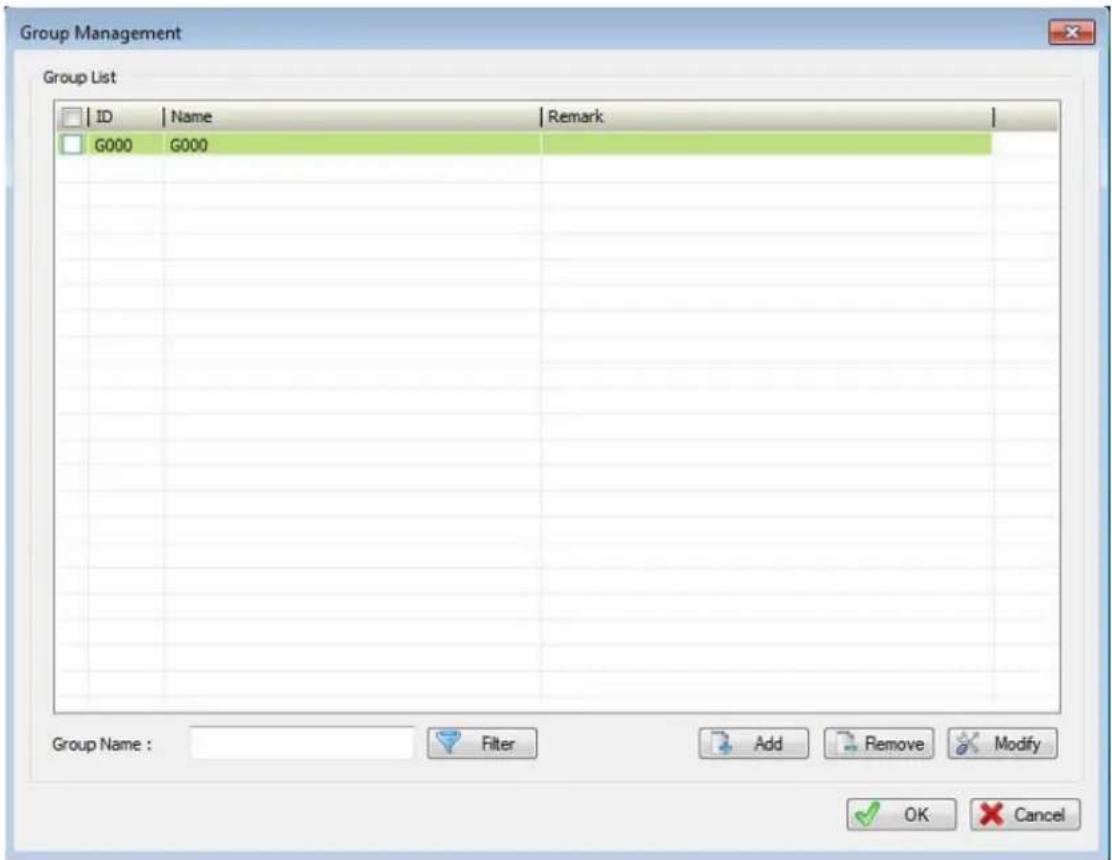
| Filter | Key-in the search filters by group name and then click the “Filter” button. System will display the search result in “Group List” table. If you have many group settings, maybe you should set filter to find out the Group that you need for management.If you search without filter, system will show all Groups from database. |
| Group List | Display search result with filter and select a Group from list to modify Group's settings. |
| Select / Un-Select all | Click check box on header row to select / un-select all Groups in the list. |
| Add | Shows Group setting dialog with empty setting, and click on to add a new Group to CMS. |
| Delete | Click “Delete” button to remove all selected Groups from database. |
| Modify | Select a Group from list and modify selected Group's setting. |
1.14 Group Channel Management Dialog
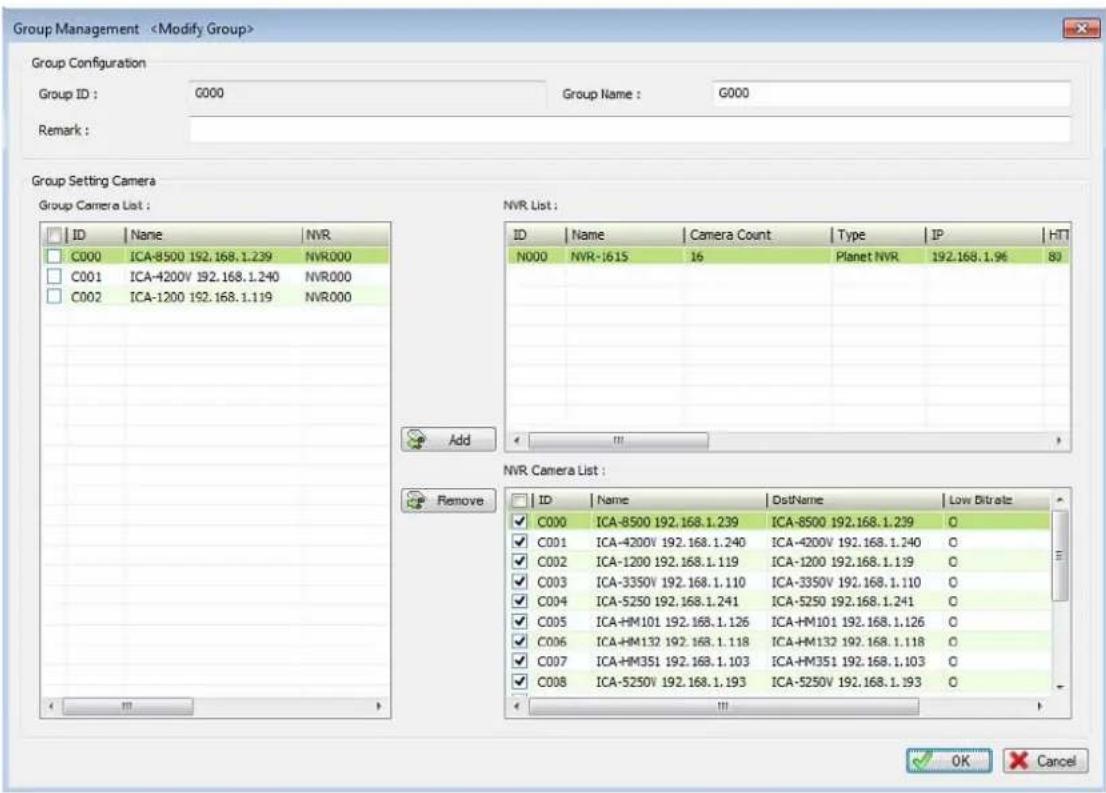
| Group ID | Automatically generated by system to identify group. | |
| Group Name | Please key-in group's name at here. | |
| Remark | Please key-in group's remark at here. | |
| Camera List | Channel List table | List all cameras of the current Group. |
| Select / Un-Select All | Click check box on header row to Select / un-select all cameras in the list. | |
| Add | Add all selected cameras from NVR's camera list to current group. | |
| Remove | Remove all selected cameras in the list from the current group. | |
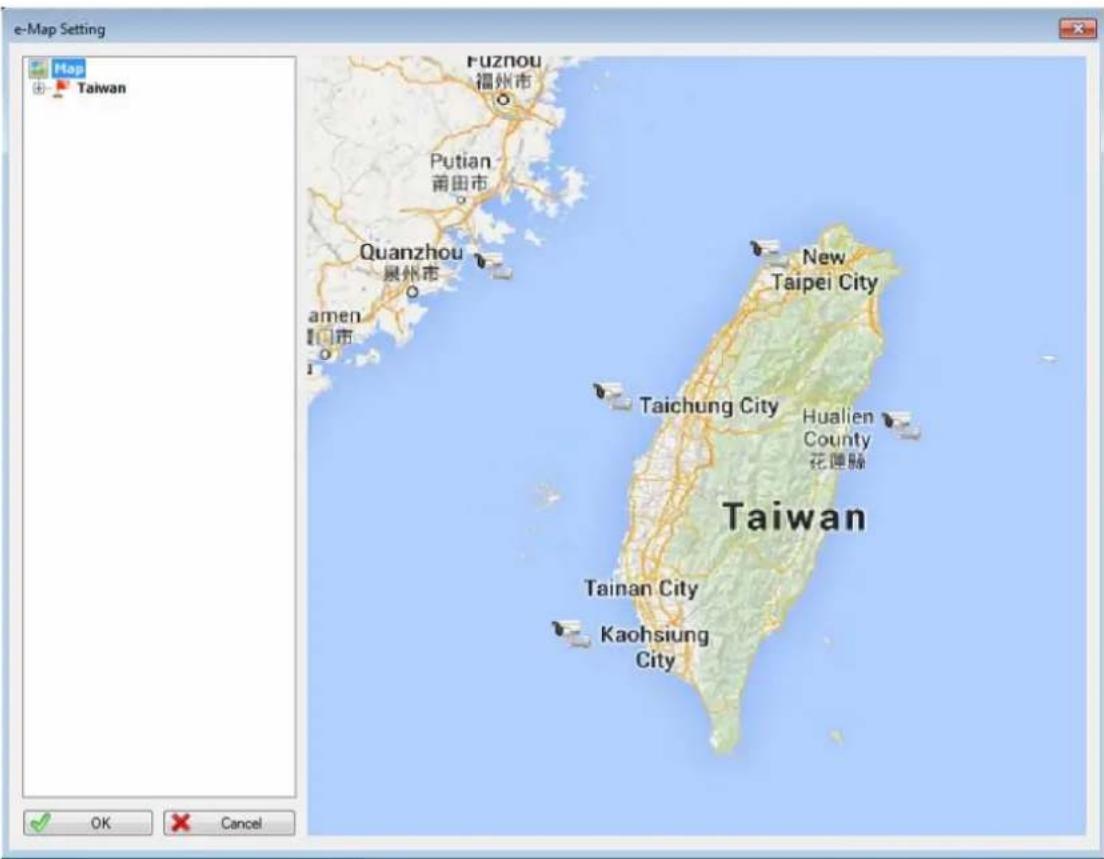
1.15 e-Map
CMS has a 3-layer e-Map, which enables you to easily manage lots of cameras.
Each layer could be added with several sub-layers and many cameras. You could move camera to any position on the map.

Live Preview: Select a map from list; the map will be shown on the dialog. Double click on the camera icon that you need to preview and e-Map will pop-up a new preview widow with selected camera's video.
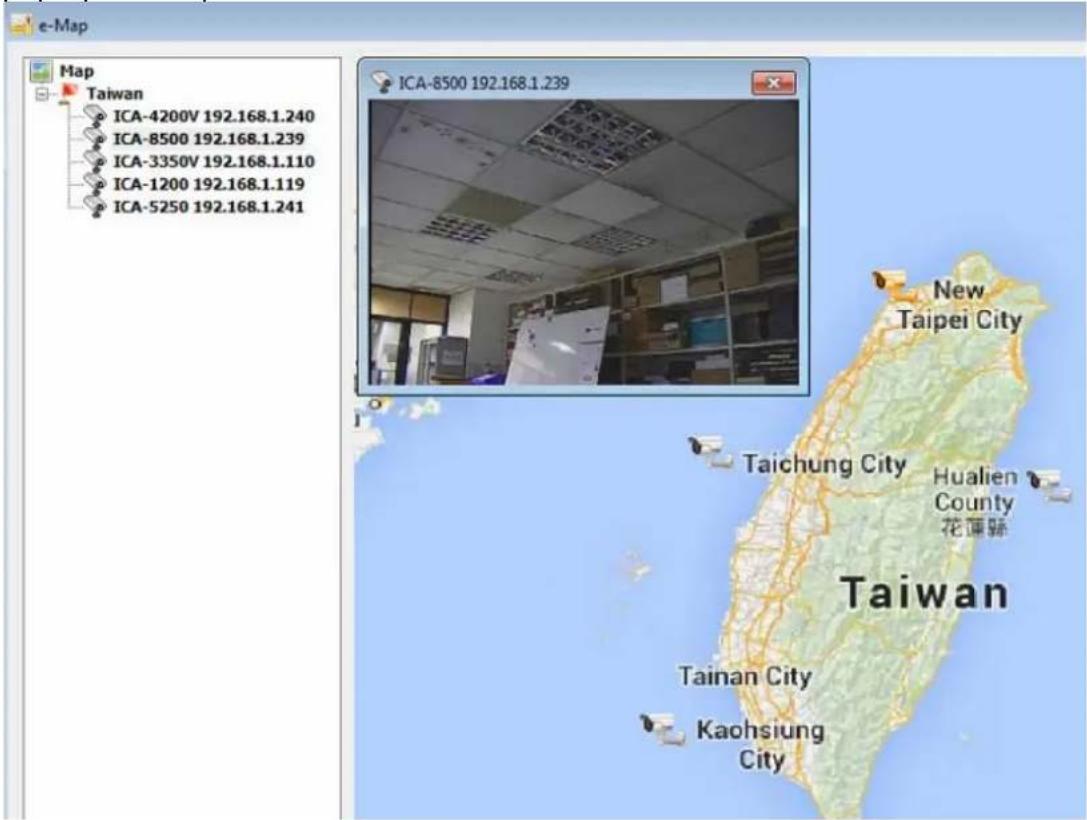
PrePage / Next Page: Move current layer to previous layer or the sub-layer.
1.16 e-Map Setting
Configure e-Map's layers, map and camera setting dialog.
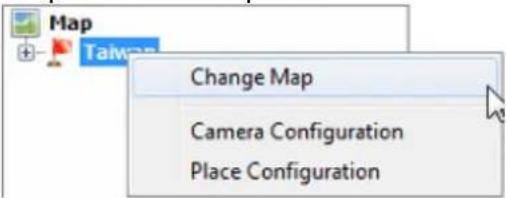
1.16.1 Change map from e-Map setting dialog
- Select a place in the list in e-Map setting dialog.
- Right-click mouse and select "Change map".
- Select a new map for selected place.
1.16.2 Place configuration
- Right-click mouse on a selected layer.
- Select "Place configuration".
- Pop-up the place configuration dialog.
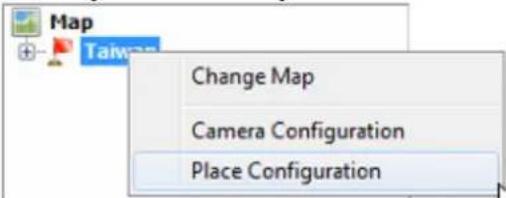
| Add a new place | 1. Select a place from table.2. Key-in place name.3. Click Add button.4. Select a picture for map.5. Click OK button to save new setting. |
| Modify Place | 1. Select a place from table.2. Change place name.3. Click change map button to select a new map.4. Click modify button to update new setting. |
| Remove Place | 1. Select places from table.2. Click remove button to remove selected place from database. |
| Map Preview | Select a place from table and the select map will be displayed on the upper right corner. |
| Filter place in table | Check or un-check layer1/layer2/layer3 check boxes to filter the places displayed in the table. |
1.16.3 Camera Configuration
-
Select a place in the list in e-Map setting dialog
-
Right-click mouse to select "Camera Configuration".

| Add Cameras to current place | 1. Select an NVR from NVR list in Camera Configuration dialog.2. Select the cameras in the NVR Camera list that you want to add to current place.3. Click add button to move selected cameras to left list. |
| Remove existing cameras from place | 1. Select cameras in the list.2. Click remove button. |
| Save to database | Click OK button to exit setting dialog. If you click cancel button, all settings will be aborted. |
Chapter 2. Playback
Playback provides historically recorded files where playback search can be converted into a file format.
NVR Playback: Select "NVR playback" from menu bar, or right-click on NVR to select "Playback" from popup menu.
If NVR playback from menu bar is selected, you should select an NVR to play back from the search NVR dialog.
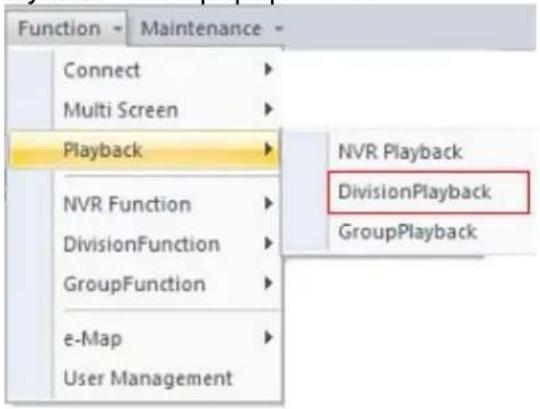
Division Playback: Select "Division playback" from menu bar, or right-click on Division to select "Playback" from popup menu.
If Division playback from menu bar is selected, you should select a Division to play back from the search Division dialog.
Group Playback: Select "Group playback" from menu bar, or right-click on Group to select "Playback" from popup menu.
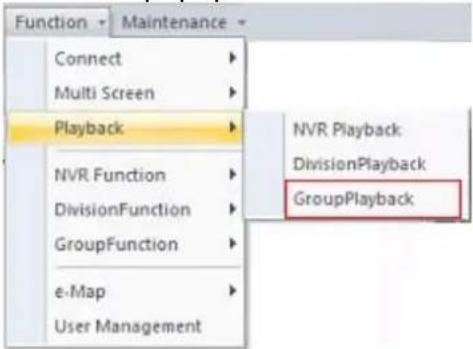
If Group playback from menu bar is selected, you should select a Group to play back from the search Group dialog.
2.1 Screen Division
You can switch to screen division by these ways as shown below:
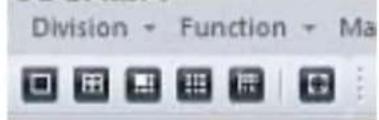
- Division Menu: Click on "Division" on the menu bar and select the new division that you need.
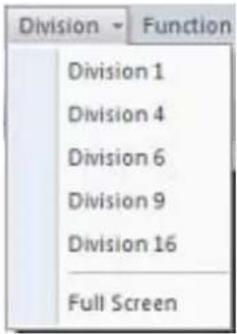
- Division Buttons: Click on the division button to switch to new division.
Division 1 button

Division 4 button

Division 6 button

Division 9 button

Division 16 button
Full-Screen button
- Popup Menu of sub-screen: Right-click mouse on the sub-screen and select a new division from the "Division" sub-menu.
2.2 Playback Functions
You can have the playback on the menu bar by clicking on the function button directly.
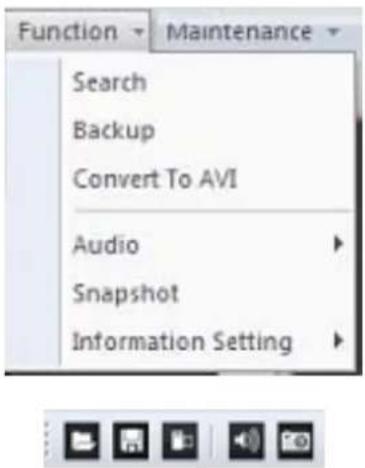
2.2.1 Search
Click the button or select "Function" item on the menu bar and the search dialog will define playback time period.
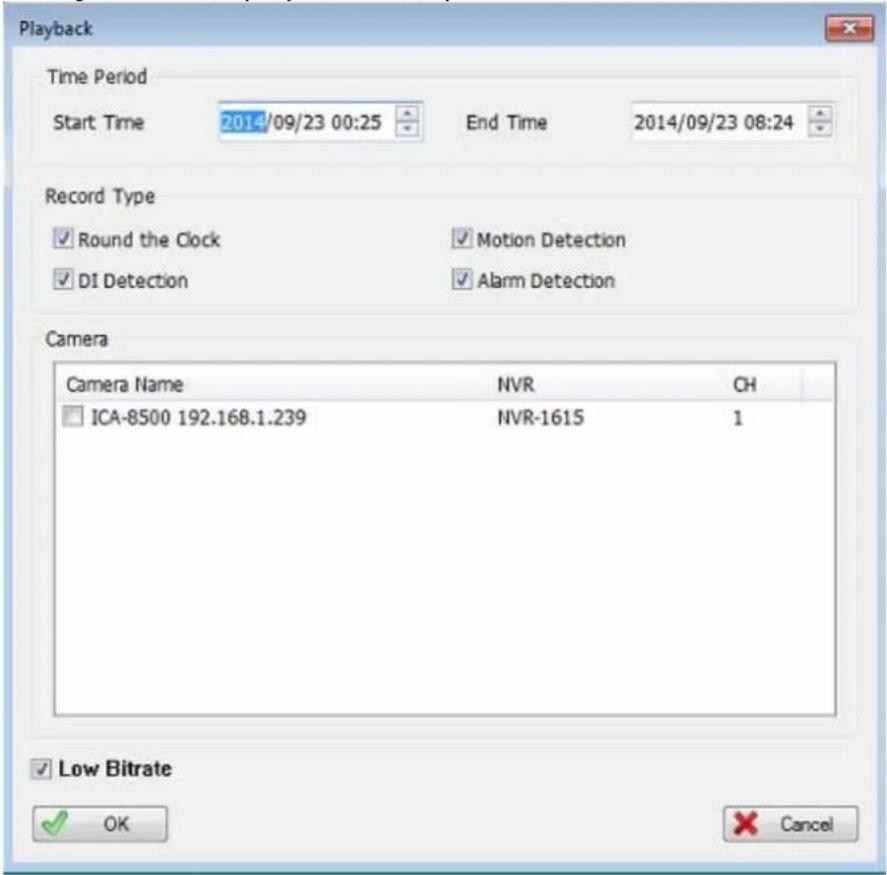
Search Dialog:
| Time Period | Start Time | Select a start time for search. |
| End Time | Select an end time for search. | |
| Record Type | Select which record type will be searched. | |
| Camera | Select which camera will be searched. | |
| Low Bit rate | Enable “Low Bit Rate” if you need faster streaming, or PC cannot decode too many channels at the same time. | |
2.2.2 Backup

Click the button or select "Function" item on the menu bar and the search dialog will define playback time period.
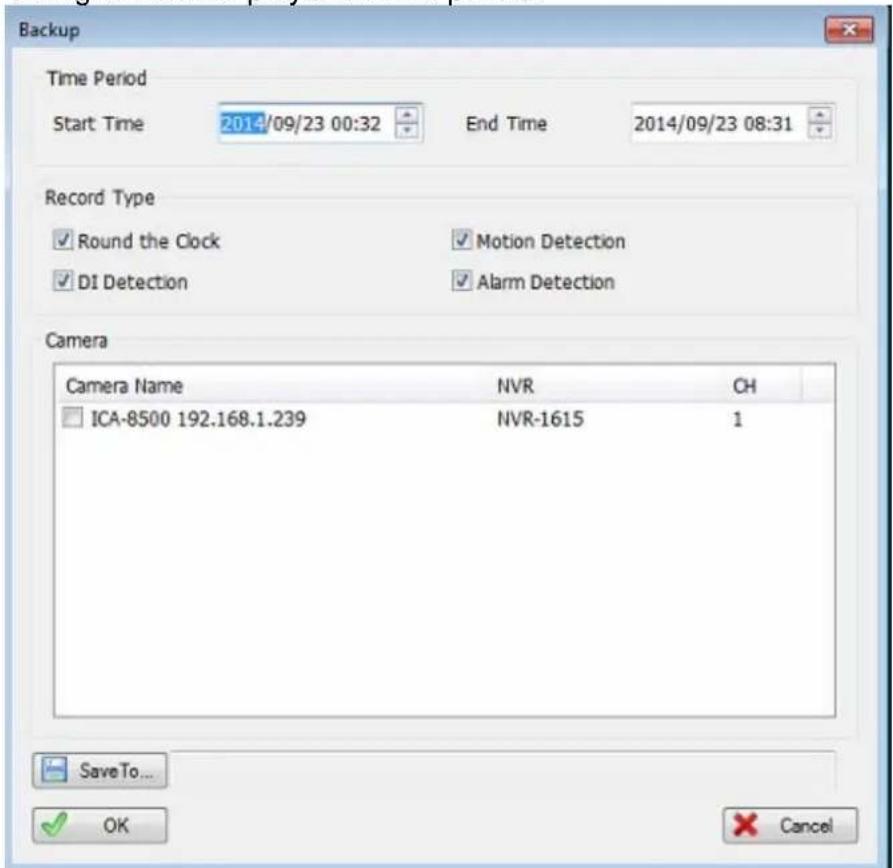
Backup Dialog:
| Time Period | Start Time | Select a start time for backup. |
| End Time | Select an end time for backup. | |
| Record Type | Select which record type will be back up. | |
| Camera | Select which camera will be back up. | |
| Save To | Select a path for output backup files. | |
2.2.3 Convert To AVI
Click the
button or select "Function" item on the menu bar and the define playback time period.
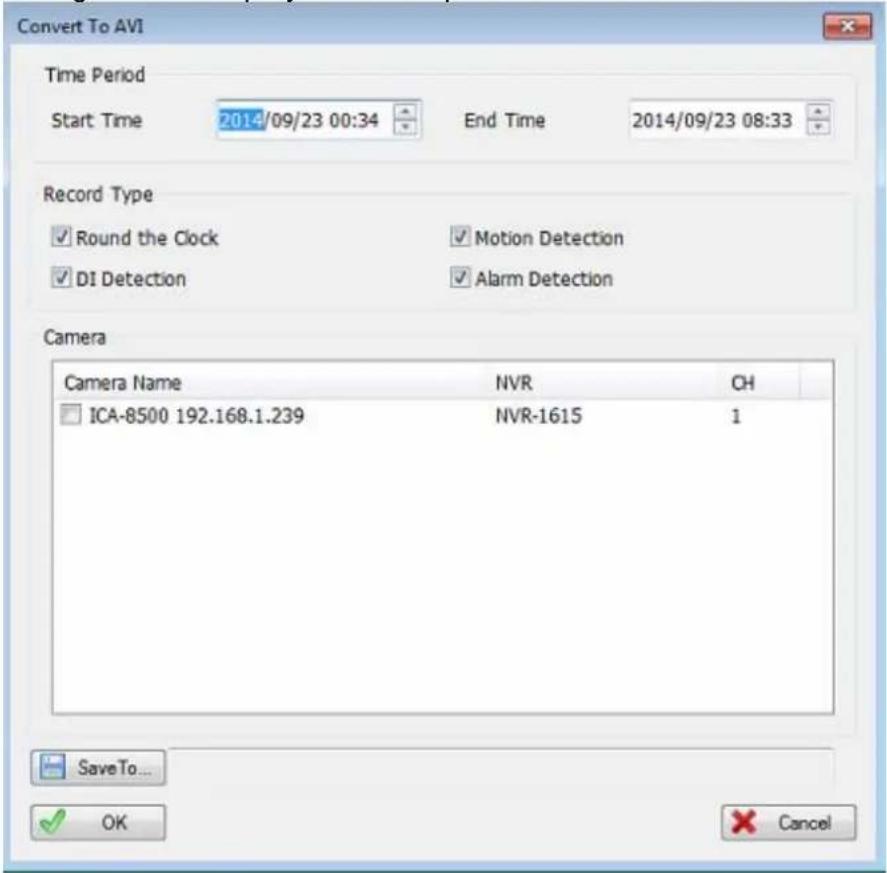
Convert Dialog:
| Time Period | Start Time | Select a start time for convert. |
| End Time | Select an end time for convert. | |
| Record Type | Select which record type will be converted into AVI. | |
| Camera | Select which camera will be converted into AVI. | |
| Save To | Select a path for output converted files. | |
2.2.4 Audio
Click button, or select "Audio" item from the menu bar and select audio mode from the sub menu.
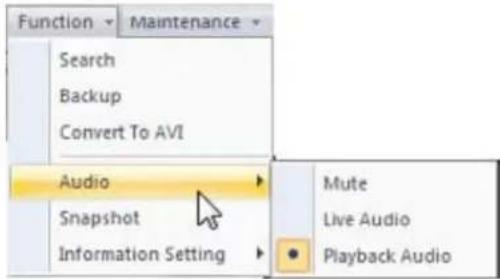
Mute
Mute the audio output.
Live Audio
Play the live audio, not the playback audio.
Playback Audio
Play the current playback audio.
2.2.5 Snapshot (Snapshot all)
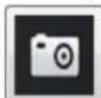
Click button or select "Snapshot" item from menu bar and system will snapshot all channels, and show them on the snapshot dialog.
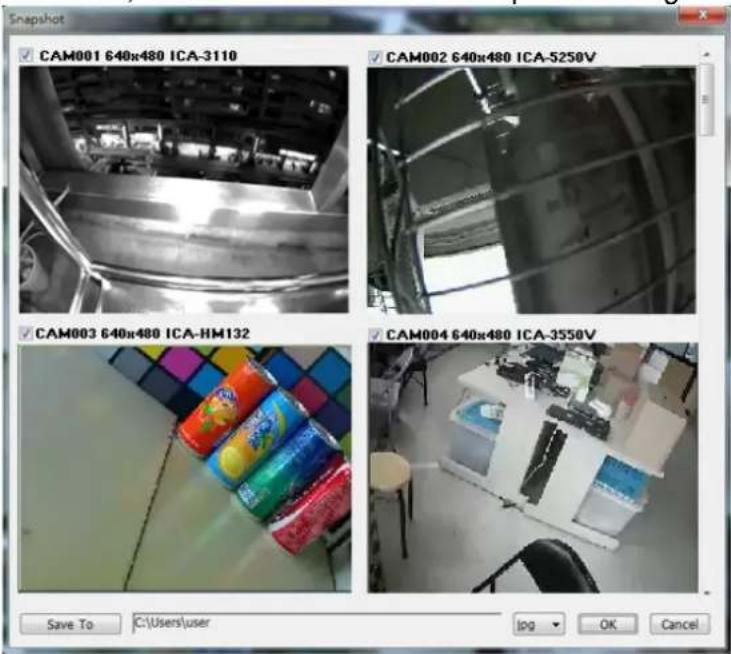
Check the picture's check box that you need, and select a path to save these images.
You could save these pictures to Jpeg or bitmap format.
2.2.6 Information Setting
Set the information on the playback channel to enable the item to show on the channel when playing back.
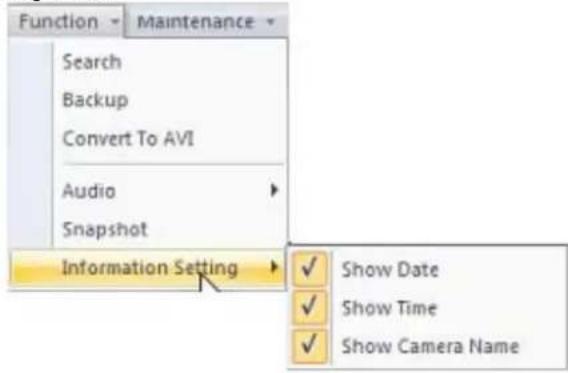
You could click

button to get "Information Setting" menu too.
2.3 Maintenance
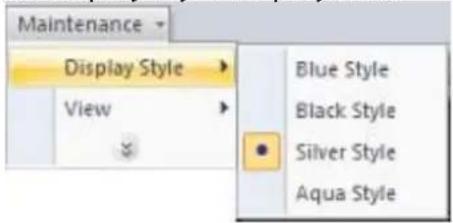
Display Style: Select the display style for playback.
View: Enable which toolbars will be shown.

About: Show the playback version information.
Exit: Leave the playback.
2.4 Playback control button(s)
- Play Video Button:

Play video forward

natural_image
Vertical sequence of black square buttons with white symbols, no text or numbers presentPause playing video
Stop playing video
Play video backward
Seek to previous frame when in pause mode
Seek to next frame when in pause mode
- Speed Button:
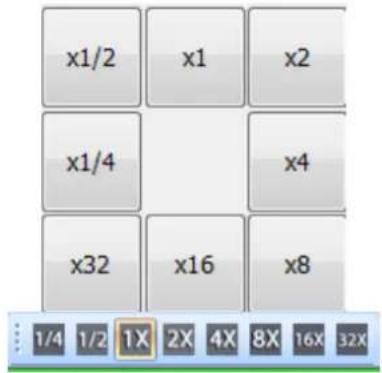
Change playback speed
- Video Time Bar

You could move the slider bar thumb to change current playback time.
2.5 Operation with sub-screen
Right-click the mouse on the sub-screen to enable you to select these items shown on the sub-screen.
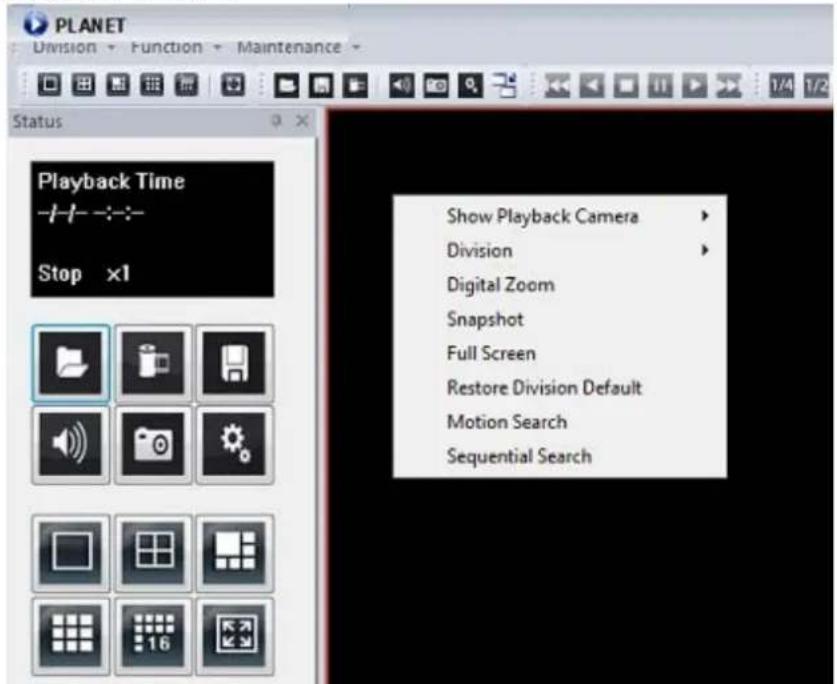
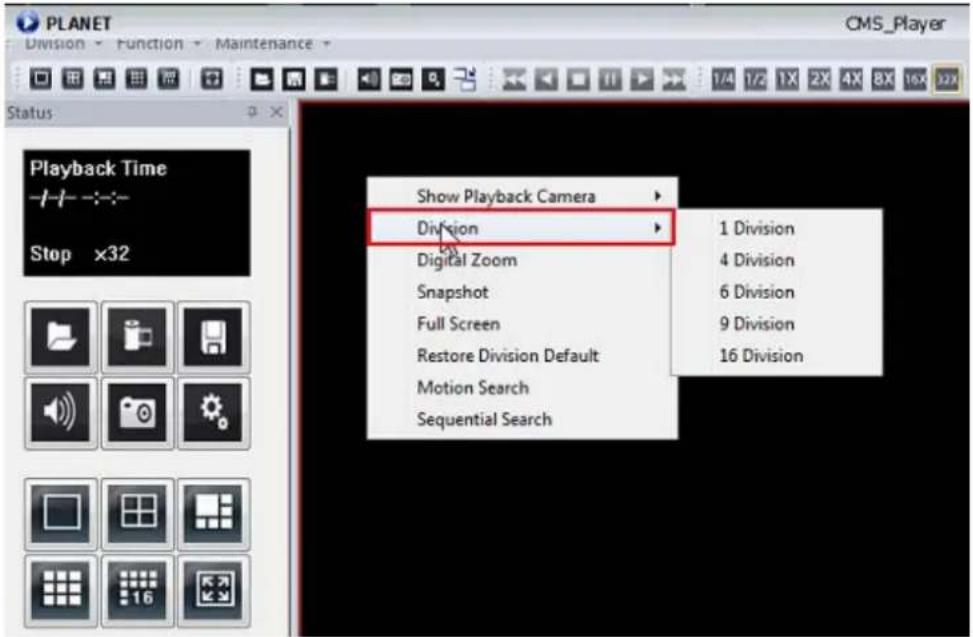
| Show Playback Camera | Change current channel to another camera. |
| Division | Switch to sub-screen division mode. |
| Remove Camera Display | Remove current channel from playback list. |
| Digital zoom | Enable or disable digital zoom mode. |
| Snapshot | Snapshot current channel and you could modify the snapshot picture from snapshot dialog. |
| Full Screen | Switch to full screen or normal mode. |
| Restore Division Default | Reset all channels in division to default camera. |
| Motion Search | Shows the motion search dialog. Please refer to the “Motion Search” chapter. |
| Sequential Search | Shows the sequential search dialog. Please refer to the “Sequential Search” chapter. |
2.6 Motion Search
Right-click mouse on the channel that you want to do motion search, and then select the "Motion Search" from the popup menu.
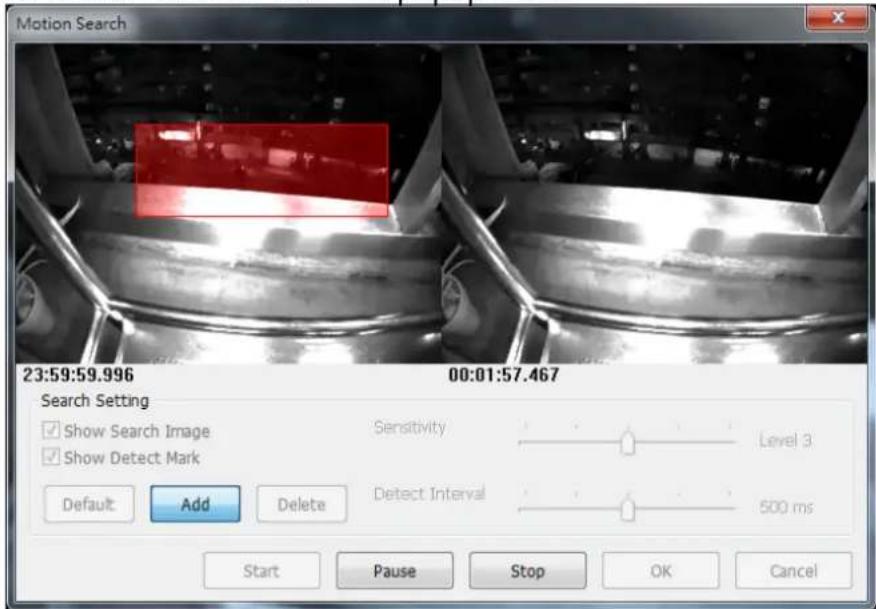
Define motion search area:
| Default | Click the “Default” button to select full image for motion detection. |
| Add | Click the “Add” button and then drag a rectangle area where you want to check. The search area will overlay a transparent red mask. |
| Delete | Define a rectangle area on the image first and then click “Delete” button to remove the region that was defined. |
| Show Search Image | Enable the “Show Search Image” to display the searching video sequence or un-check this box to only show the image once the event is found. |
| Show Detect Mark | Enable the “Show Detect Mark” to display the detect result on the image by pink rectangles. |
| Sensitivity | Select the “Sensitivity” to define the sensitivity of detection. The higher value means the event will be triggered easier. |
| Detect Interval | Select the “Detect Interval” to define the interval of motion detection. If set longer value, it means system will use less CPU computing power to check motion detection. |
When the event has been triggered, the window on the right side will display the triggered image. If the event does not match your expectation, click the "Continue" button to search next event.
If you found the matched event, click the "OK" button to return to the playback
panel, and all playing channels will be synchronized to the same timestamp of the event.
Click Cancel button to abort this motion search job.
2.7 Sequential Search
Right-click mouse on the channel which you want to do sequential search, and then select the "Sequential Search" from the popup menu.

Quick start with sequential search:
- Choose sequential search channel and time period.
- Select two images from these sequential pictures by clicking on the images, and then click the "Search" button.
- Repeat this procedure until time period is into one second resolution.
- Click "Detail picture" button to approach snapshot images dialog.
- Select these snapshot images, and save them to assigned folder.
2.7.1 Define search time period
We need to define time period for the sequential search task. We could define time period by two ways and the selected time period will display on the upper
left corner.
Select Time : 13:42:31 \~ 13:53:17
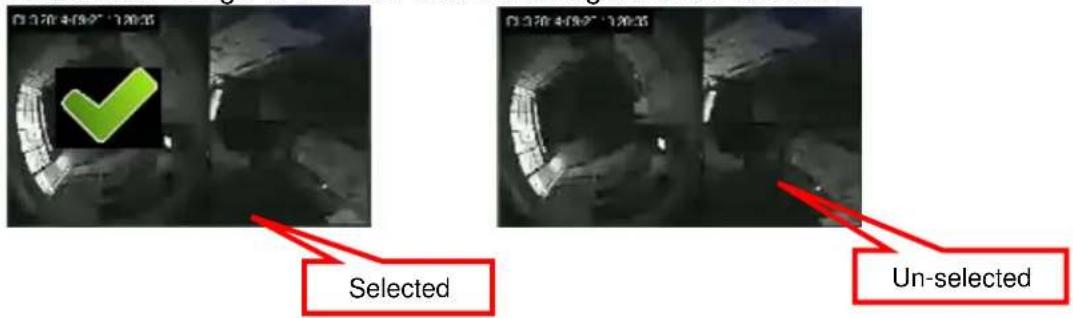
- Select two images from these sequential pictures to define search time period. Click on the image to select it and click it again to un-select it.
- Or drag on the timeline to define search time period directly.

Blue bar: The time period of selected images for sequential search. Green transparent bar: New time period to be searched.
2.7.2 Start search and rollback
After search time period is defined, click the "Search" button to display next search result.
Click "Pre search" button for rollback to previous search result.
2.7.3 Detail window for snapshots
The dialog will display small snapshot images by search result. In case you need bigger image of snapshots, you could enable "Show Detail Window" to get a resizable window for displaying the detail snapshot.
Show Detail Window
You could move the detail window and resize it to get bigger preview image size.
2.7.4 Preview mode of search result

You could define the preview mode of search result by these parameters below:
| Time Split | Define the number to divide the search time period equally, and take a snapshot at the beginning of each part. |
| Division | Select the display division mode of search result. |
| Switch page buttons | In case the search result couldn't be displayed within one page, then these buttons will be enabled. Click these buttons to switch the pages of snapshots. |