NVR-2516P - Video recorder Planet - Free user manual and instructions
Find the device manual for free NVR-2516P Planet in PDF.

| Product Type | Network Video Recorder (NVR) |
| Model | NVR-2516P |
| Brand | Planet |
| Channel Count | 16 channels |
| Power Over Ethernet (PoE) | Yes, 16 PoE ports (802.3af/at) |
| Video Compression | H.265+/H.265/H.264+/H.264 |
| Max Recording Resolution | 8MP (4K) per channel |
| Hard Drive Support | 2 SATA III HDDs up to 10TB each |
| Audio Support | 1 input, 1 output |
| Network Interface | 2 Gigabit Ethernet ports |
| USB Ports | 2 USB 2.0, 1 USB 3.0 |
| HDMI Output | 1 HDMI 1.4 (up to 4K) |
| VGA Output | 1 VGA (up to 1080p) |
| Dimensions (WxHxD) | 440 x 44 x 280 mm (rackmountable) |
| Weight | 3.5 kg (without HDD) |
| Power Supply | DC 12V, 5A (adapter included) |
| Power Consumption | ≤ 60W (without HDD) |
| Operating Temperature | -10°C to 55°C |
| Storage Humidity | 10% to 90% (non-condensing) |
| Main Features | Remote access via mobile app, motion detection, scheduled recording, email alerts, ONVIF compatible |
| Maintenance & Cleaning | Keep ventilated; clean dust with dry cloth; avoid liquids |
| Safety Certifications | CE, FCC, RoHS |
| Spare Parts & Repairability | Contact Planet support or authorized dealers for replacement parts |
| Warranty | 2 years (check local distributor) |
Frequently Asked Questions - NVR-2516P Planet
User questions about NVR-2516P Planet
0 question about this device. Answer the ones you know or ask your own.
Ask a new question about this device
Download the instructions for your Video recorder in PDF format for free! Find your manual NVR-2516P - Planet and take your electronic device back in hand. On this page are published all the documents necessary for the use of your device. NVR-2516P by Planet.
USER MANUAL NVR-2516P Planet
H.265 25-ch 4K Network Video Recorder
NVR-2500/NVR-2516P

1. Introduction
Thank you for purchasing PLANET H.265 25-ch 4K Network Video Recorder. The "NVR-25xx series" is used as an alternative name in this Quick Installation Guide. The following is the NVR-25xx series:
| NVR-2500 H.265 25-ch 4K Network Video Recorder |
| NVR-2516P H.265 25-ch 4K Network Video Recorder with 16-Port PoE |
2. Package Contents
Open the box of the NVR-25xx series and carefully unpack it. The box should contain the following items:
- The NVR x 1
- Quick Installation Guide x 1
-1--2-

Figure 3-1: Hard Disk Installation
4. Requirements
- Workstations running Windows XP/2003/2008/Vista/7/8/10, MAC OS X or later, Linux, UNIX, or other platforms are compatible with TCP/IP protocols.
- Workstations are installed with Ethernet NIC (Network Interface Card).
- Ethernet Port Connection
➢ Network cables -- Use standard network (UTP) cables with RJ45 connectors.
- HDD Screw Package x 1
- Power Cord x 1
• Power Adapter x 1 (NVR-2500 only) - Bracket & Screw Package x 1 (NVR-2516P only)
If any item is found missing or damaged, please contact your local reseller for replacement.
3. Hard Disk Installation
The hard disk is installed as shown in Figure 3-1.
(1) Unscrew the cover to open the cover.
(2) Connect one end of the hard disk data cable and power cable to the motherboard, and connect the other end to the hard disk.
(3) Turn over the chassis, mount the hard disk in the indicated position and screw it tightly.
(4) Now turn over the chassis again and cover it with screws.

Note
- Before installation, make sure the power is disconnected.
- Use the NVR dedicated hard drive for monitoring recommended by the device manufacturer.
The above PC is installed with Web browser.

Note
It is recommended to use Internet Explorer 8.0 or above to access the NVR-25xx series. If the Web interface of the NVR-25xx series is not accessible, please turn off the anti-virus software or firewall and then try it again.
5. Starting Web Management
The following shows how to start up the Web Management of the NVR-25xx series. Note the NVR-25xx series is configured through an Ethernet connection. Please make sure the manager PC must be set to the same IP subnet address.

flowchart
graph LR
    A["User PC\n92.168.0.X)"] --> B["Ethernet Switch"]
    B --> C["H.265 25-ch 4K NVR"]
Figure 5-1: IP Management Diagram

Note
- Make sure the input voltage matches the NVR consumption. Connect the device to the monitor and the power adapter (if available). Plug in the power and switch on the power button (if available) for the device to boot up.
- It is recommended that you refer to international standards for power supply input with stable voltage values and low ripple interference.
For example, the NVR-25xx series default network type is DHCP Client; to search the current IP address of the NVR-25xx series, follow the procedure below:
- Download the "PLANET Search Tools" utility from the following PLANET website link:
http://www.planet.com.tw/en/support/downloads?method=keyword&keyword=PLANET+Search+Tools&view=6#list - Install the "PLANET Search Tools" utility.
- After the utility is launched, all NVRs found in your local area network will be displayed.
- The existing NVR-25xx series in the local network.
- Search the NVR-25xx series in the network.
- Modify the IP parameters of the selected NVR-25xx series.
- Select the NVR-25xx series you want to configure and double-click on it.
- You will be connected to the NVR-25xx series via web browser automatically.
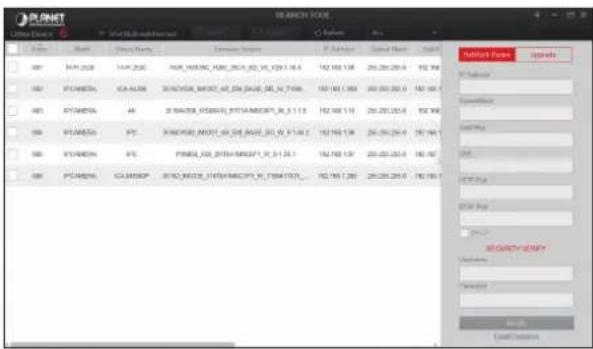
Figure 5-2: PLANET Search Tools Utility Screen
5 6
- After entering the username and password, the main screen appears as Figure 5-4 shows.
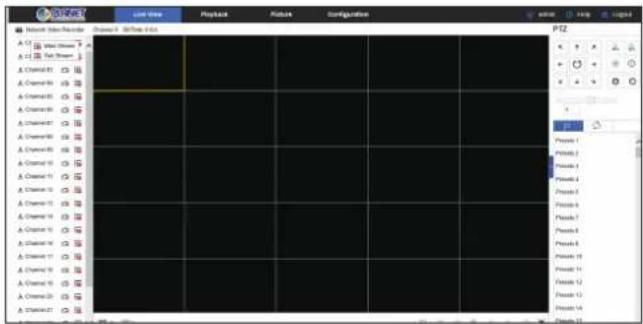
Figure 5-4: Web Main Screen of NVR-25xx series
Now, you can use the Web management interface to continue the NVR-25xx series management.
Please refer to the user's manual for more.
Customer Support
Thank you for purchasing PLANET products. You can browse our online FAQ resource and User's Manual on PLANET Web site first to check if it could solve your issue. If you need more support information, please contact PLANET support team.
PLANET online FAQs:
http://www.planet.com.tw/en/support/faq?method=category&c1=8
Support team mail address:
- Without DHCP server, the NVR-25xx series default IP address is 192.168.0.20. Then the manager PC should be set to 192.168.0.x (where x is a number between 1 and 254, except 20), and the default subnet mask is 255.255.255.0.
5.1 Logging in to the NVR-25xx Series
- When the following dialog box appears, enter the default user name and password "admin". The login screen in Figure 5-3 appears.
Default Username: admin
Default Password: admin
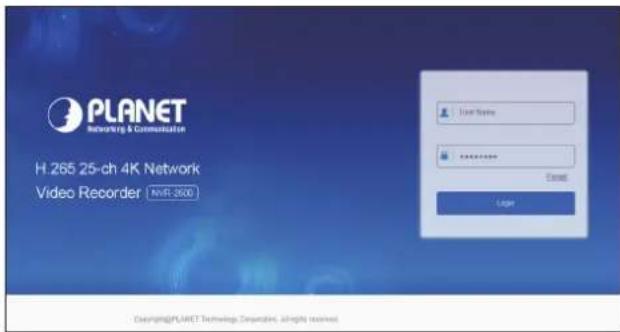
Figure 5-3: NVR-25xx series Web Login Screen

Note
When the browser fails to enter the device login interface, open IE browser, select" Tools > Internet Options > Security> Custom Level > ActiveX controls and plug-ins" and enable all of them.
NVR-25xx Series User's Manual:
https://www.planet.com.tw/en/support/downloads?&method=keyword&keyword=NVR-25&view=3#list

Android APP IOS APP


Copyright © PLANET Technology Corp. 2020.
Contents are subject to revision without prior notice.
PLANET is a registered trademark of PLANET Technology Corp.
All other trademarks belong to their respective owners.
PLANET Technology Corp.
10F., No. 96, Minquan Rd., Xindian Dist., New Taipei City 231, Taiwan
2011-AB7140-000
Warning:
This device is compliant with Class A of CISPR 32.
In a residential environment this device may cause radio interference.

Energy Saving Note of the Device
This power required device does not support Standby mode operation. For energy savings, please remove the power cable to disconnect the device from the power circuit. Without removing the power cable, the device will still consume power from the power source. In view of Saving the Energy and reducing the unnecessary power consumption, it is strongly suggested to remove the power cable from the device if this device is not intended to be active.