GTQ788X - Tablet Growing - Free user manual and instructions
Find the device manual for free GTQ788X Growing in PDF.

| Product Type | Tablet |
| Brand | Growing |
| Model | GTQ788X |
| Display Size | 10.1 inches (approx.) |
| Dimensions (W x H x D) | 240 x 170 x 7 mm (estimated) |
| Weight | 500 g (approx.) |
| Battery Capacity | 5000 mAh (typical) |
| Power Adapter | 5V/2A USB-C (recommended) |
| Processor | Quad-core 1.5 GHz (estimated) |
| Operating System | Android (likely) |
| Storage | 32 GB (expandable via microSD) |
| RAM | 2 GB (approx.) |
| Connectivity | Wi-Fi 802.11 b/g/n, Bluetooth 4.2 |
| Cameras | Front 2 MP, Rear 5 MP |
| Audio | Built-in speaker, 3.5mm headphone jack |
| Sensors | G-sensor, ambient light sensor |
| Display Resolution | 1280 x 800 pixels (typical) |
| Touchscreen | Capacitive multi-touch |
| Care and Cleaning | Wipe with soft dry cloth; avoid liquids and abrasives. |
| Safety | Keep away from water, heat sources, and do not disassemble. |
| Spare Parts / Repairability | Battery, screen, charging port, and speaker are replaceable by qualified service. |
| General Information | User manual included; supports PDF download. |
Frequently Asked Questions - GTQ788X Growing
User questions about GTQ788X Growing
0 question about this device. Answer the ones you know or ask your own.
Ask a new question about this device
Download the instructions for your Tablet in PDF format for free! Find your manual GTQ788X - Growing and take your electronic device back in hand. On this page are published all the documents necessary for the use of your device. GTQ788X by Growing.
USER MANUAL GTQ788X Growing
natural_image
Hand holding a tablet displaying a snowy, winter-themed wooden cabin with a glowing window and moonlit sky (no text or symbols visible)Índice
- Introdução ....3
All logos & trade marks are properties of the respective companies
natural_image
Hand holding a tablet displaying a snowy house scene at night with moon and smoke, no visible text or symbols on the image itself.Index
- Introduction....3
1.1 Content details of your GROWING Tablet....3
1.2 Specifications of the GROWING Tablet ....3
1.3 Installing the SIM card and Micro SD card ....4
- Basic Operations....5
2.1 Input PIN ....5
2.2 Unlock Screen....5
2.3 Work Environment....5
- Applications....8
3.1 List....8
3.2 Widgets....8
3.3 Establish and control the desktop icons....9
3.4 Deleting the shortcut to an application desktop....10
3.5 Change the image of the desktop 10
3.6 Call....11
3.7 Text Messages ....12
-
Connecting to the computer ....12
-
Management applications ....13
5.1 Install....13
5.2 Uninstall ....15
-
Video....15
-
Music....16
- Recording Function....18
- Definitions....19
9.1 Wireless Networks and Other....19
9.2 Device....19
9.3 Personnel 19
9.4 Accounts....19
9.5 System....20
- Camera....20
10.1 Capture Photography....20
10.2 Video Capture 21
- Setting Wireless Networks....22
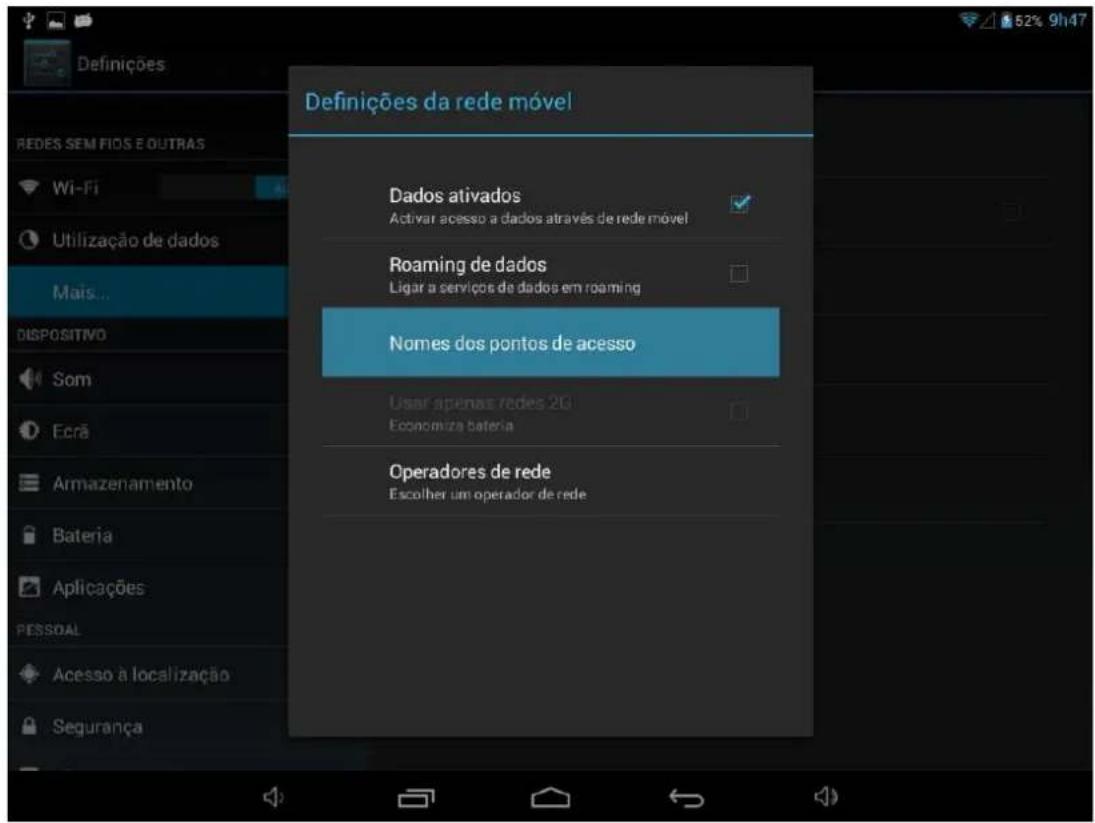
- Setting 3G Network ......23
- Setting up Bluetooth....24
- Setting GPS 25
- Warranty....26
- CE certificate 28
1. Introduction
1.1 Content details of your GROWING Tablet.
Each unit will have the following items:
- 1 x Tablet PC GROWING
- 1 x transformer
- 1 x USB cable
- 1 x USB OTG
- 1 x User Manual
1.2 Specifications of the GROWING Tablet
| CPU | Quad core Mediatek 8389 |
| GPU | PowerVR SGX544MP |
| Operating system | Android 4.2 |
| Screen Size | 7.85 Inches |
| Resolution | 1024 x 768 HD IPS |
| Flash Memory | 8GB |
| RAM | 1GB |
| Support micro SD | 2GB to 32GB |
| Multimedia | Video, Audio, Images, Ebooks, etc.. |
| WiFi | Realtek 8188ETV |
| 3G | Supports 3G and 2G |
| Battery | 3400mAh |
| Sensors | Accelerometer, Proximity, Light |
| Inputs / Outputs | 1xMicrofone; 1xMicro USB, 1x Micro SD, 1x SIM Slot, 1x Audio Jack |
| Language | Supports 22 languages |
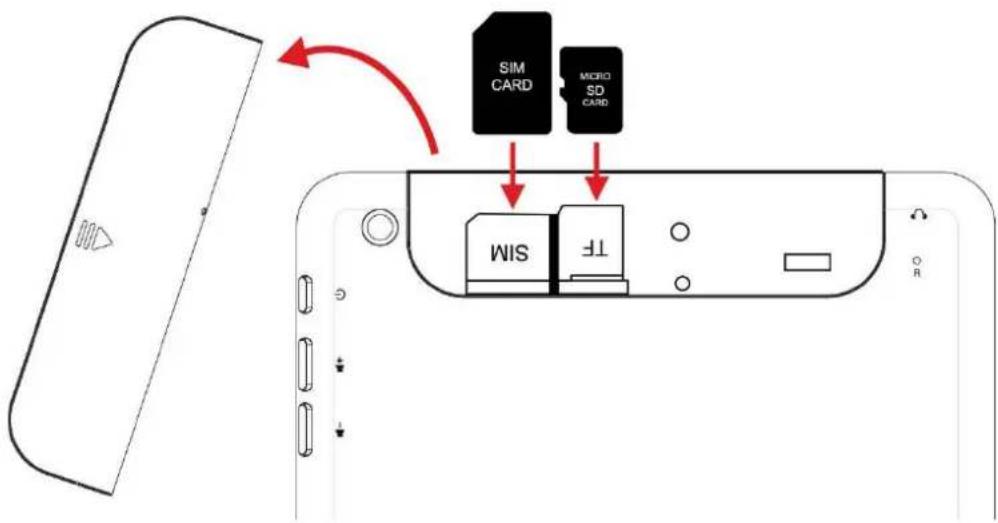
1.3 Installing the SIM card and Micro SD card
flowchart
graph TD
    A["Device Interface"] -->|Red Arrow| B["SIM CARD"]
    A -->|Red Arrow| C["Micro SD CARD"]
    B --> D["Device Interface"]
    C --> D
    D --> E["TF"]
    D --> F["MIS"]
To insert the SIM card and Micro SD is necessary to remove the back cover, and insert in the appropriate slot as in the image above. It is important that the device is turned off when you insert the SIM card to avoid damaging the GSM module. When inserting the card make sure it is not connected to any computer or power source.
Note: You can add the Micro SD card with the tablet on. However to remove it will have to go to the storage »Unmount SD Card" OK, if you do not do this may damage your Micro SD card can lose all your data entered on the card.
2. Basic Operations
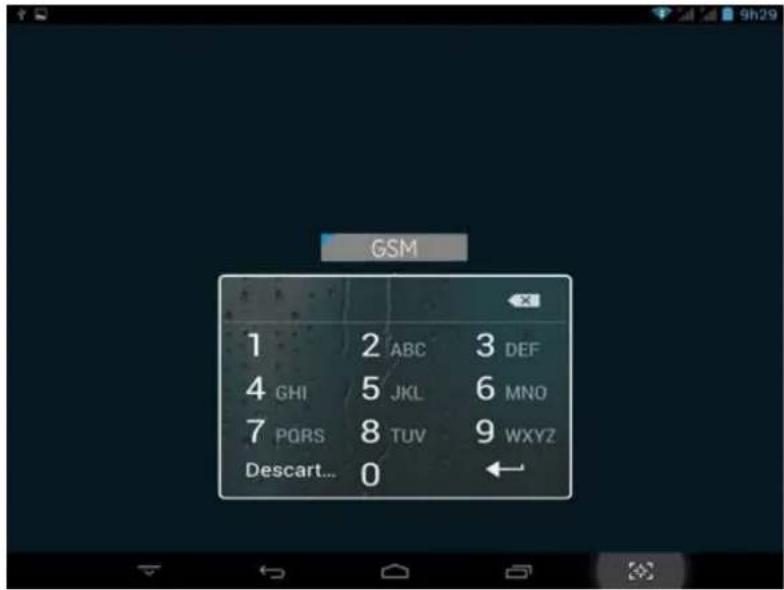
2.1 Input PIN
After you insert your SIM card and connect your tablet will appear the window to submit the PIN code. If your SIM card PIN code has not this option will not appear on your screen.
2.2 Unlock Screen
When you press the on / off once the system goes to sleep. Pressing again the system will enter the lock menu as shown in the following image.
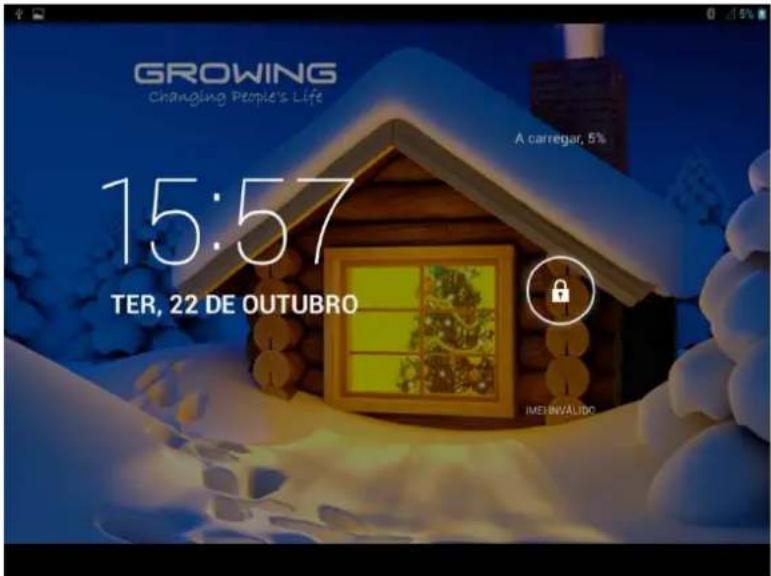
Click the unlock icon and move it to unlock the screen.
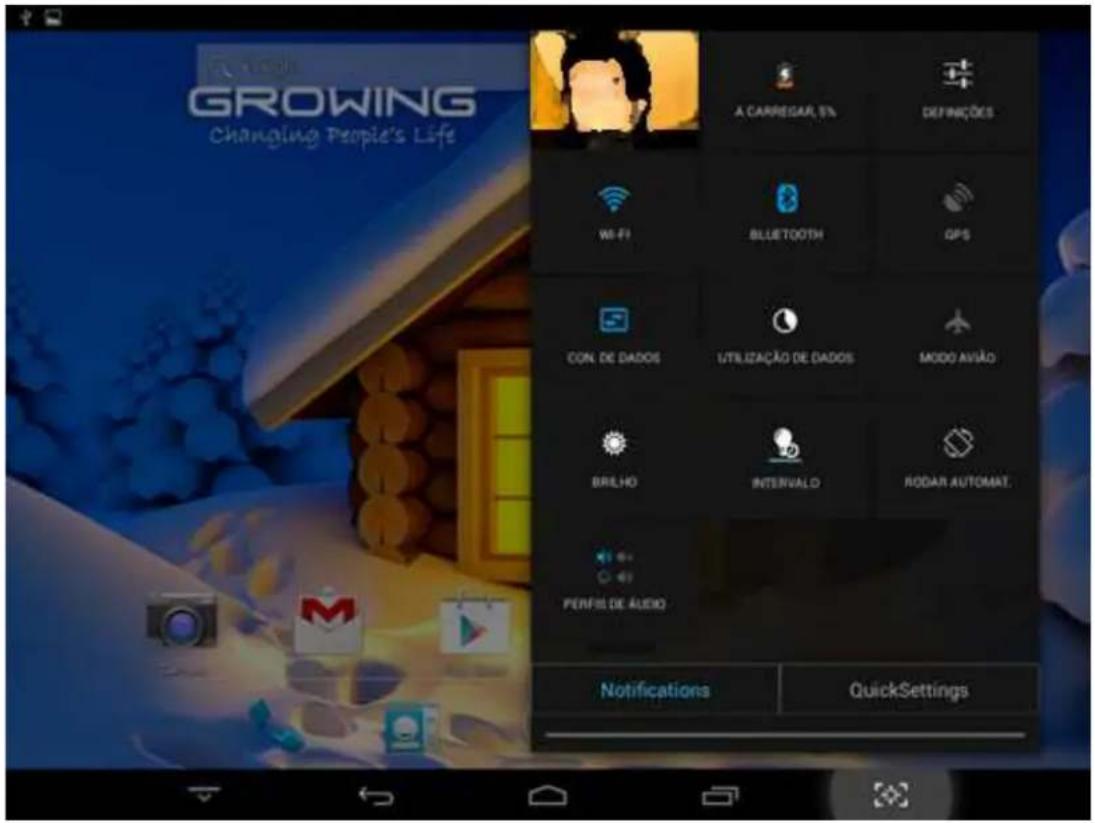
2.3 Work Environment
After unlocking the screen, the menu will appear as shown in the following image
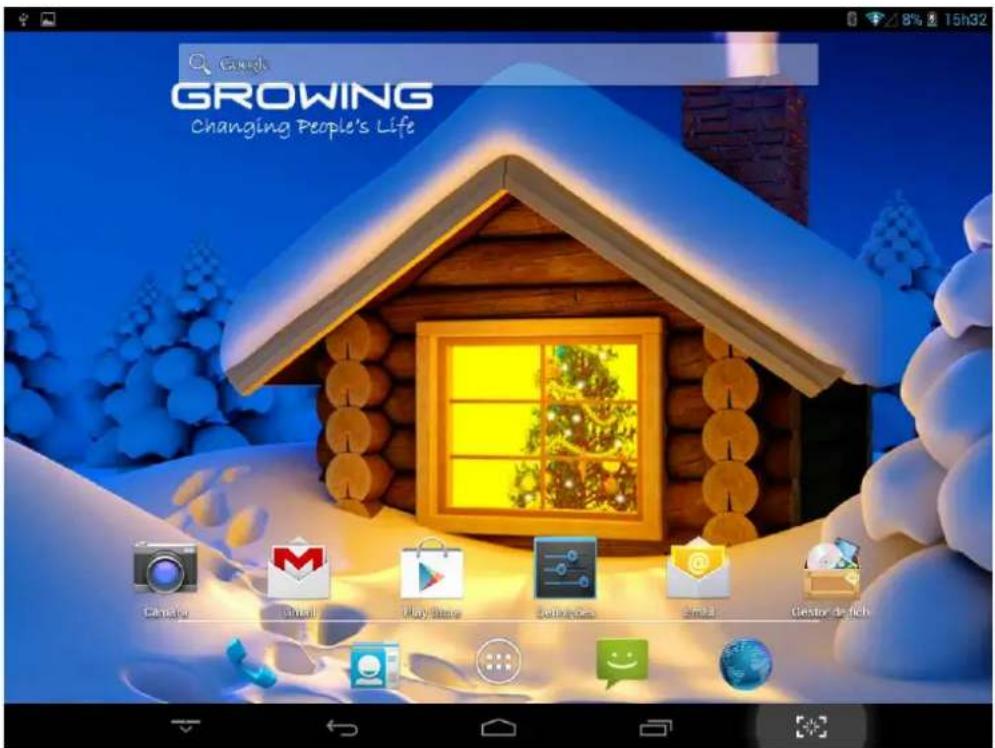
In Android 4.2.2 has up to 5 areas of work, to navigate between them will have to drag your finger to the right or left side.
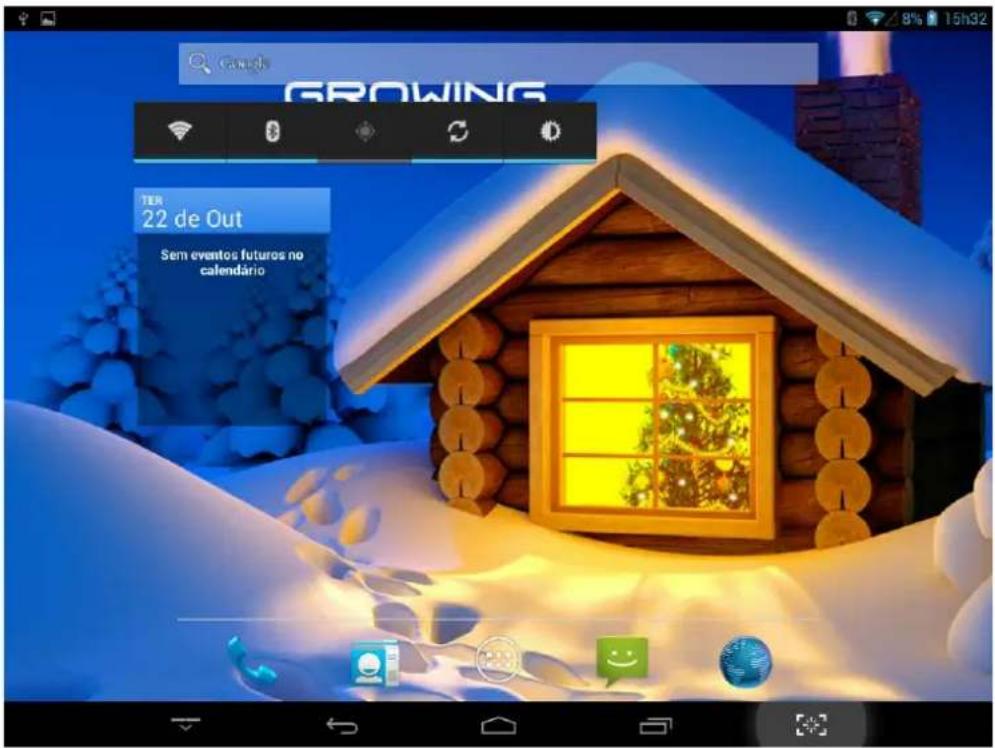
In the notification bar you can drag your finger down and more information will appear as shown in the following image.
2.3 Introduction to the main menu buttons
| Image Feature | |
 | Click this icon to return to the previous menu. |
 | Click this icon to return to the workplace. |
 | List of recent applications. |
 | Minimize the main menu buttons |
 | Take picture to the screen |
 | Notification bar (battery icon / Wi-Fi etc.). |
3. Applications
3.1 List
From the main menu (desktop) click the icon enter the application menu as shown in the following image.
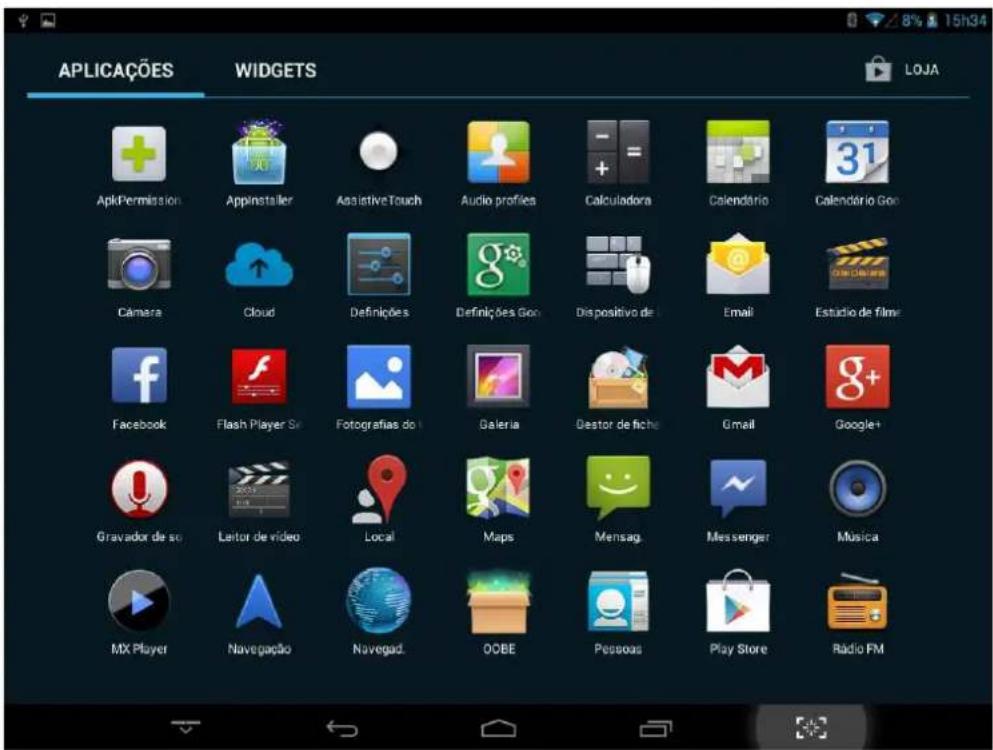
When you complete the first application screen will automatically create a second access to just drag your finger to the left and the other applications will be in the next screen.
3.2 Widgets
In the application menu, click APLICAÇÕES WIDGETS
enter the menu of widgets. Press on the widget and move to the main menu.
Note: The widgets only work in the areas of work

3.3 Establish and control the desktop icons
In the application menu or widgets, press on the icon you want to create a shortcut on the desktop. Press on the application / widget where you want to move.
Note: Some widgets require internet connection to function properly.
3.4 Deleting the shortcut to an application desktop
Press the icon you want to delete and move it up where you have an X. Keep up the icon turns red when you drop the red icon will be deleted.
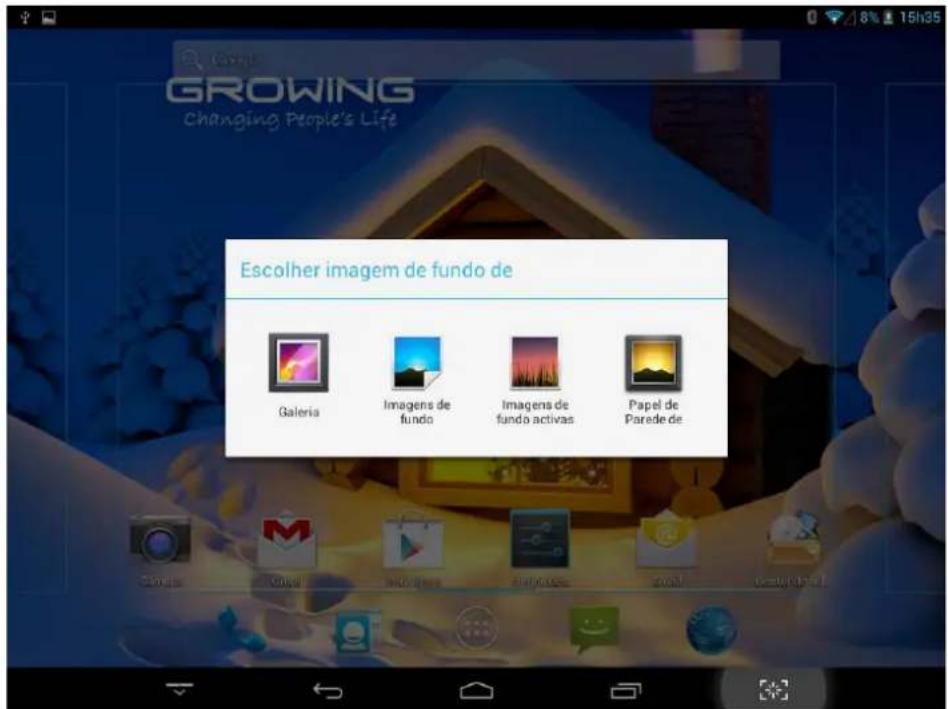
3.5 Change the image of the desktop
On the desktop press in a place that is not busy and a window will appear to select the picture. Choose images gallery system or to use a photo saved as image to the desktop.
3.6 Call
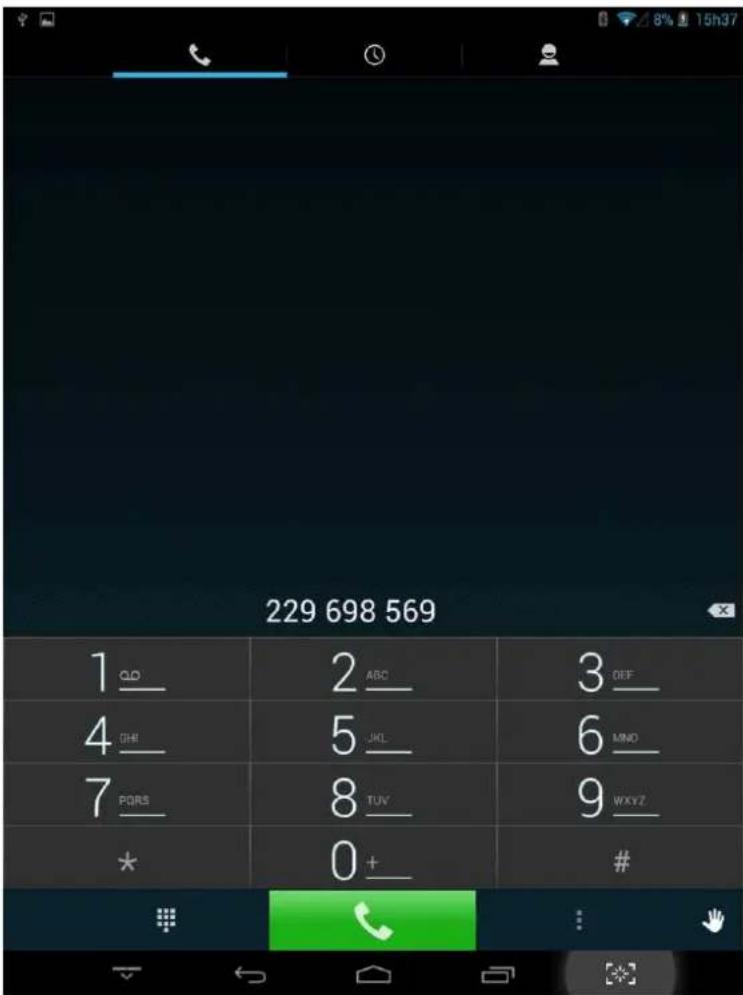
To call, click the phone icon.
You can access records called clicking.

To access contacts by clicking on the icon.

Make a call
You can make calls from the phone application
1 Click the phone icon and dial the number.
2 Click the icon below the keypad to make the call.
3 To end a call, click the icon bottom of the screen.

Answer or reject calls
When receiving a call, a notification appears incoming call with the call identifier and additional information about the issuer if it is stored in your contacts list.
All incoming calls are logged in the call log 📊 you miss a call will receive a notification of a missed call.
To silence the ringer before answering the call, press the volume key -.
When you receive a call, press the white phone icon and slide your finger on one of the
icons:
to answer the call
to reject the call
to send message
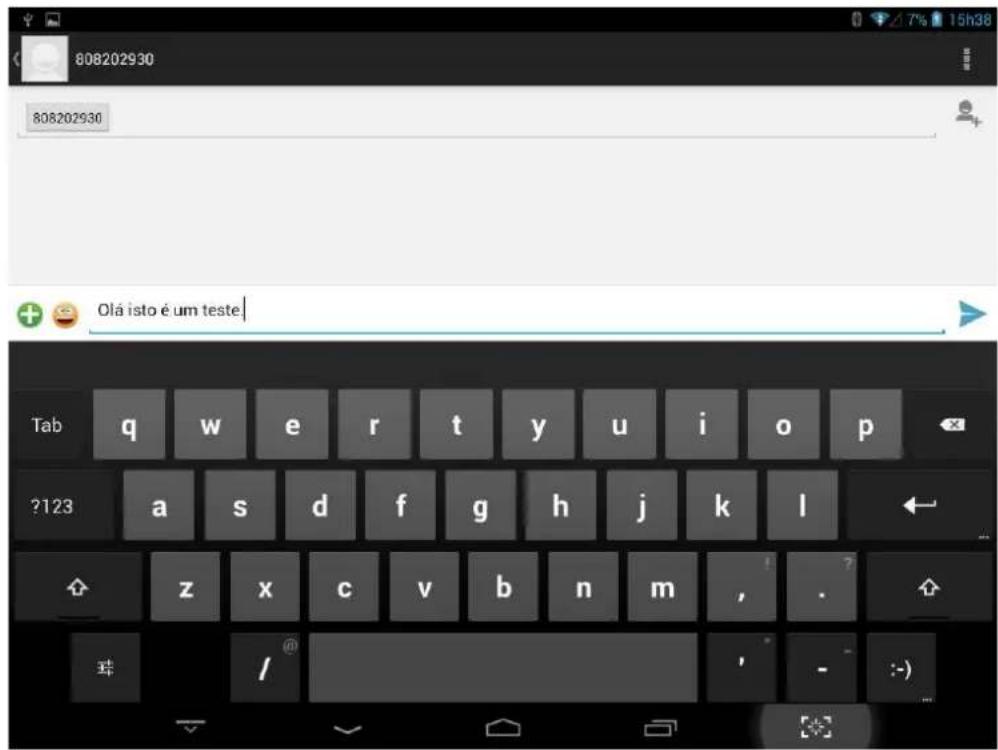
3.7 Text Messages
To send a message, open the application messages

- Write your message.
- Enter the contact you want to send the message.
- Click Submit.
Note: You can attach images or videos (Thus making the message into a multimedia message).
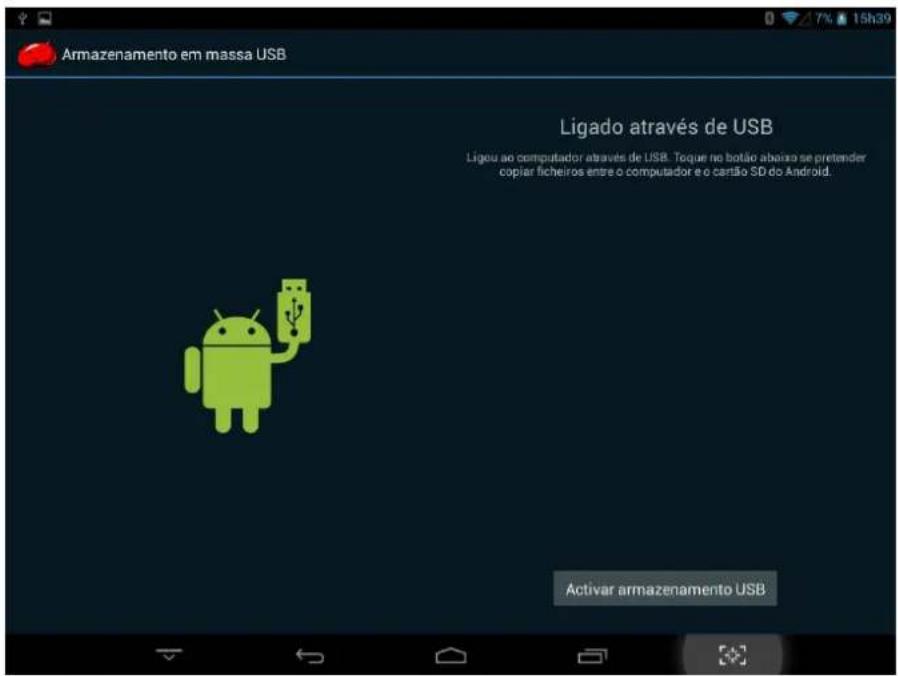
4. Connecting to the computer
When connected to the computer can be used as USB disk. Click the icon

connect the USB storage:
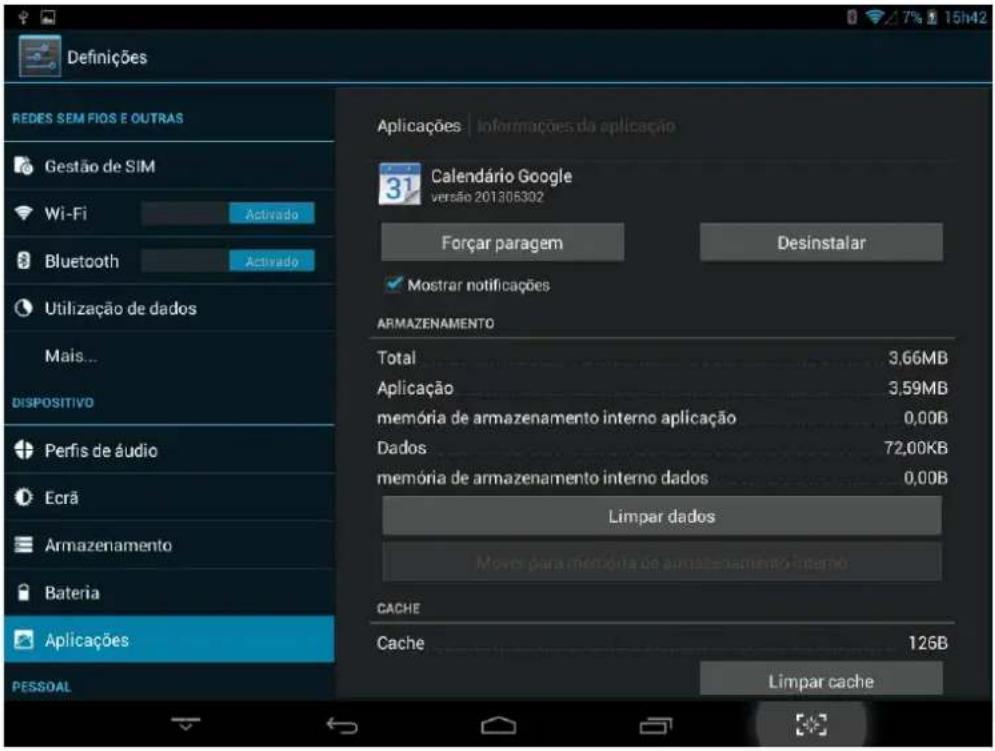
5. Management applications
5.1 Install
Opens the File Manager Choose the APK file you want to install the corresponding location where it was saved.

To install applications through Google Play (Market) will have to open the application and associate a Gmail account to your Tablet GROWING.

At settings select Applications and select the application and then uninstall. Select "Ok" and the application is uninstalled.
In the application menu select video player and select a video to be played.
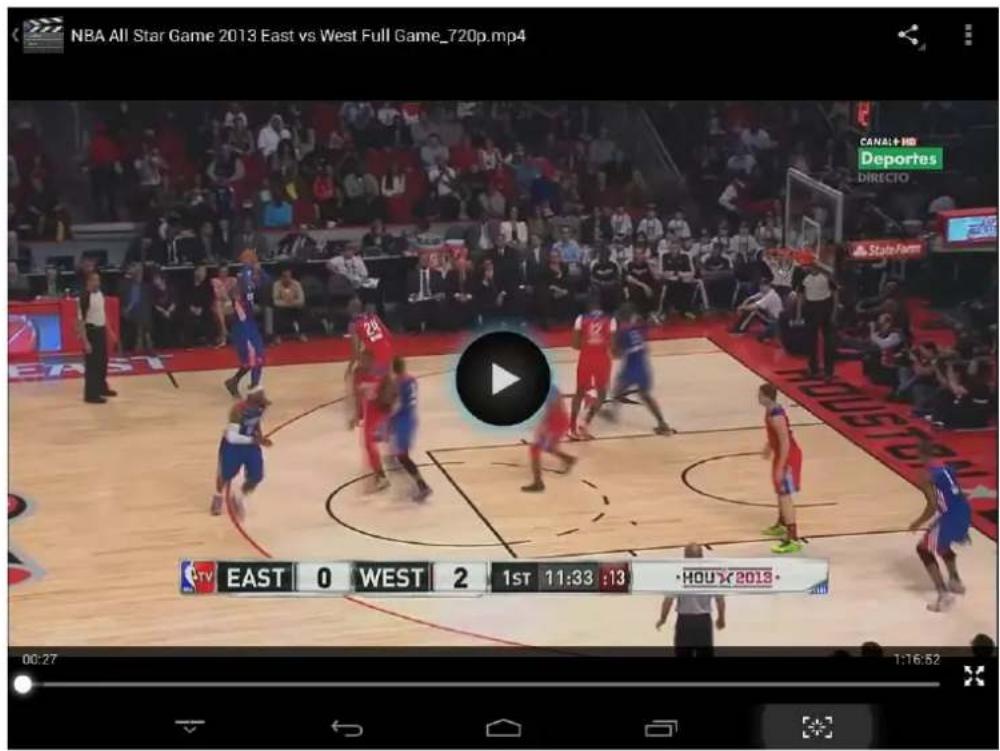
Slide the progress bar to adju process.

Click the buttons on the video player.
| Image | Function |
 | Play Video. |
 | Pause video. |
 | Other options: You can stop the video or change the repeat mode. |
 | View: Change the view mode. |
 | Function sharing: You can share the video from the email application among others. |
When there are no video files in the playlist the system will automatically load files through the card. (The Tablet GROWING supports playback formats: mp4, 3gp, avi, fiv, mpg, mov).
7. Music
In the application menu click music.
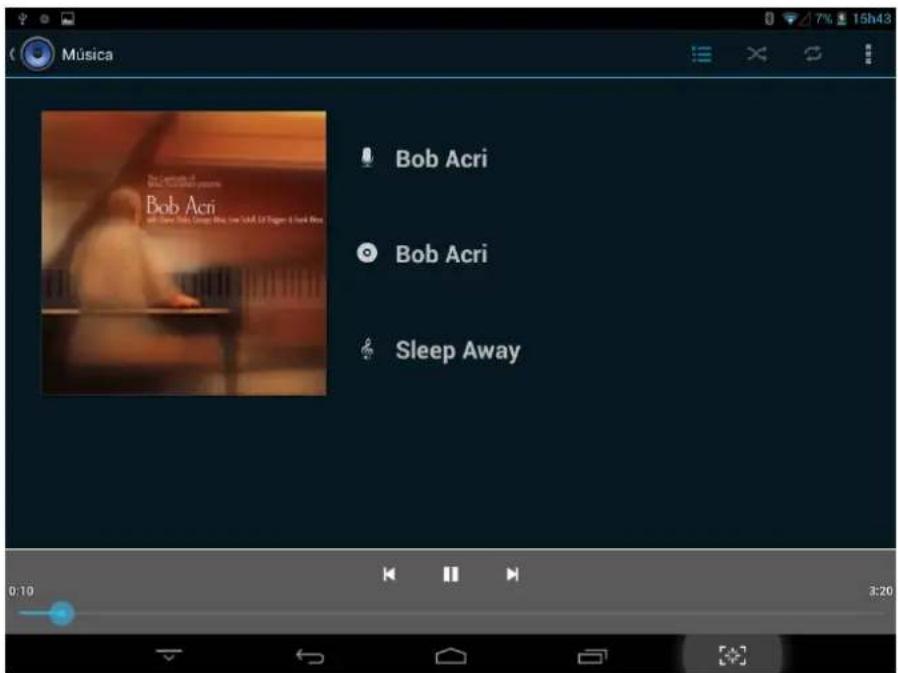
Slide the progress bar to adjust the reproduction process.
Click the buttons on the music player.
Image Function
 | Artist |
 | Music |
 | Random Music |
 | Play last song |
 | Pause |
 | Album |
 | Playlist |
 | Repeat music (s) |
 | Play next |
 | Reproduce |
When no music files in the playlist the system will automatically load music files through the card. (The Tablet GROWING supports playback formats: mp3, aac, amr, ape, flac, imy, m4a, mid, mp2, mp3, ogg, wav).
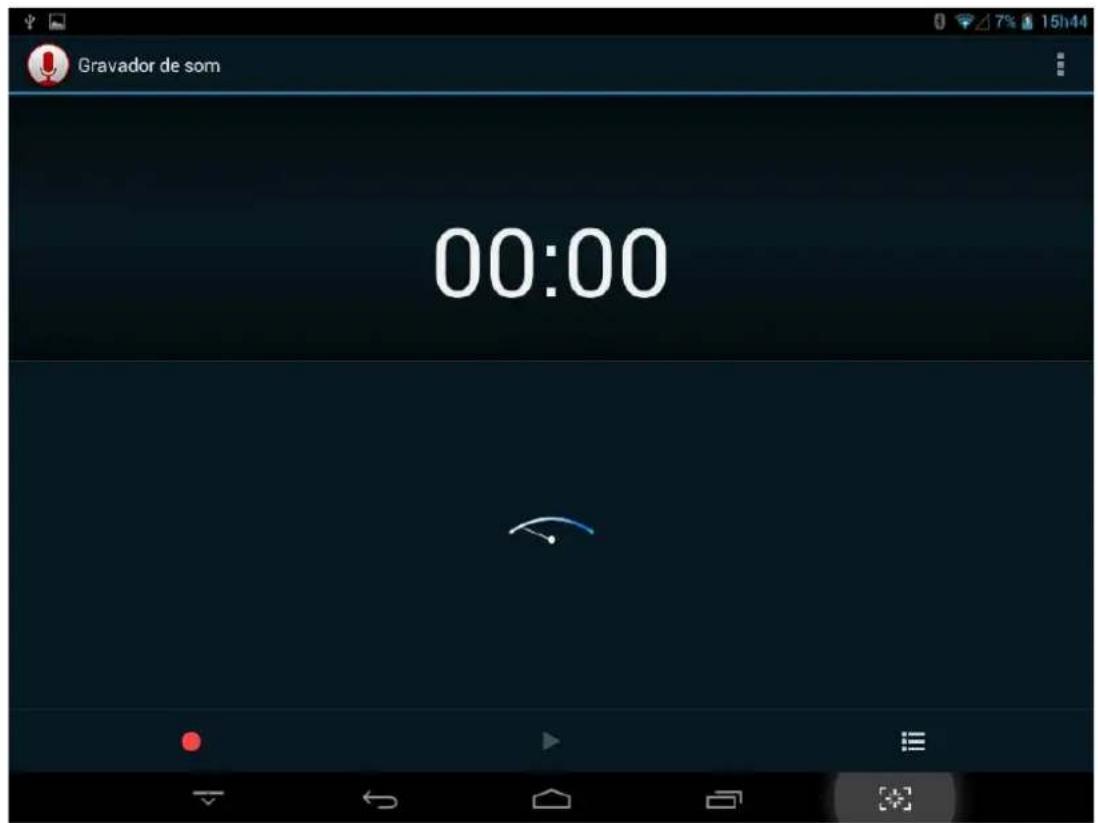
8. Recording Function
Click the recording icon to enter the recording interface, click to begin recording, click to stop recording.
Play recording: Please select a music application to play the recording.
9. Definitions
9.1 Wireless Networks and Other
You can turn on / off Wi-Fi, Bluetooth, select the flight mode, set cable internet, create a VPN, Hotspot Portable create and configure mobile networks.
9.2 Device
You can set the volume of the ringtone and notifications, ringing sound, the sound of the lock screen.
You can set brightness, hanging screen, background image, font size,
You can see the storage in use, installing micro sd card and install USB storage, view downloaded applications and uninstall and move to the micro SD, see the memory usage and see the battery usage.
9.3 Personnel
You can enable location services Google having Wi-fi or 3G turned on.
You can activate the GPS.
May submit a lock code and user information
You can choose the system language, and keyboard input method.
You can back up your data applications and make factory restore your tablet.
9.4 Accounts
You can add / remove email account, company, Google and Facebook.
9.5 System
You can set date, time zone, and view system information.
10. Camera
Click the icon to open the camera, take the picture or do video capture.
10.1 Capture Photography
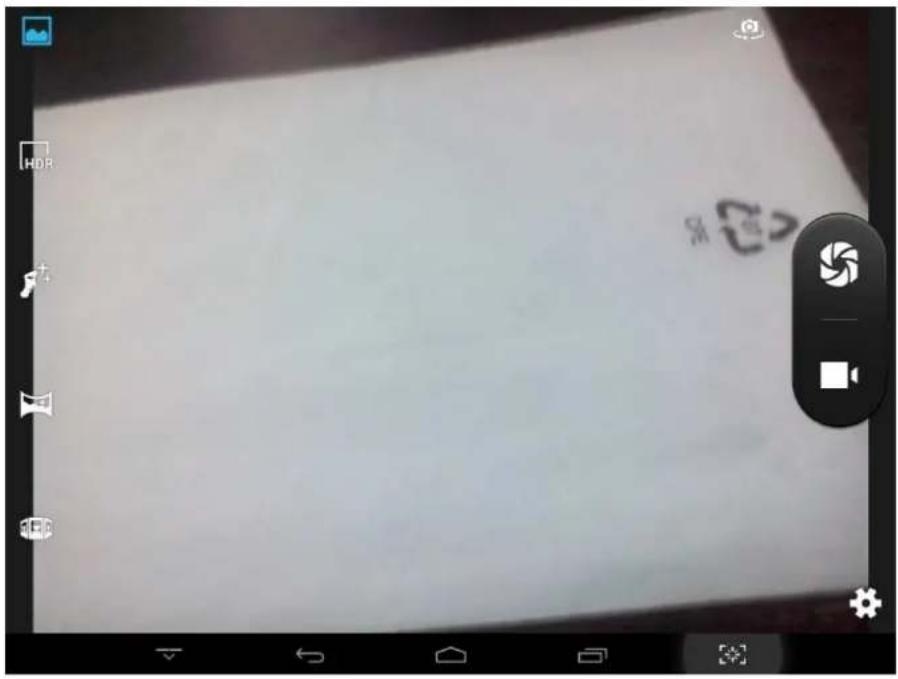
Press to take the picture.
Click the buttons on the camera.
| Image Feature | |
 | Switch camera mode front / rear |
 | Click this icon to choose the continuous shooting mode. |
 | Choose the type of camera between normal and panorama |
 | Choose the color scheme of the chamber |
 | Camera settings |

Face Detection
10.2 Video Capture
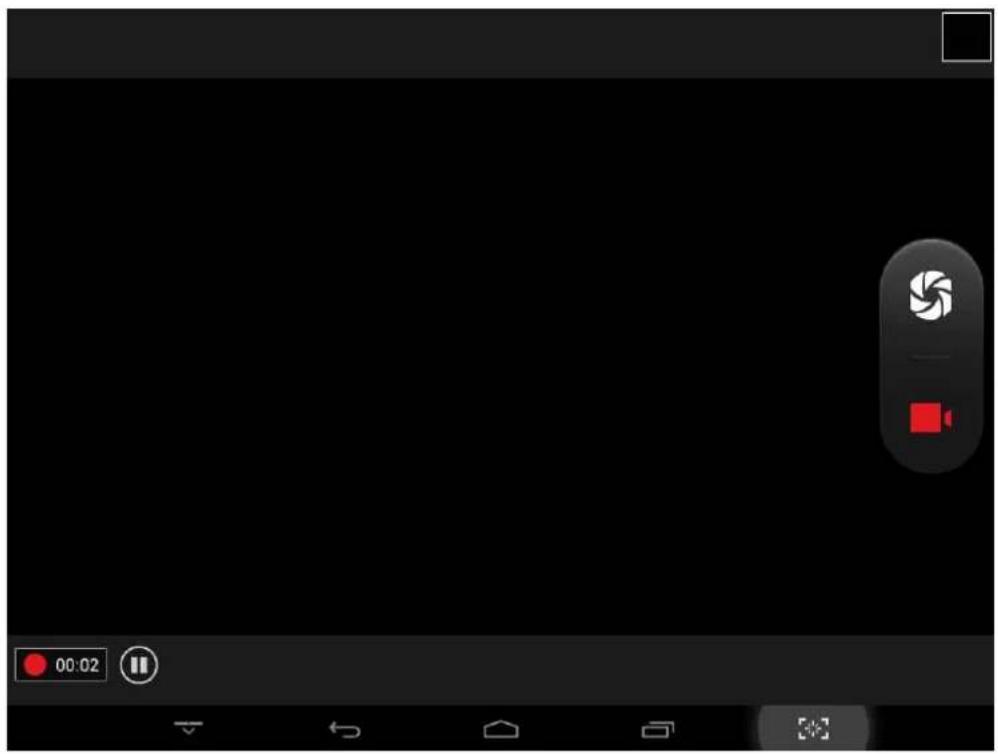
Image Feature


Switch camera mode front / rear.
Definitions of the camcorder.
Pause the video recording.
Starts recording video.
For video recording
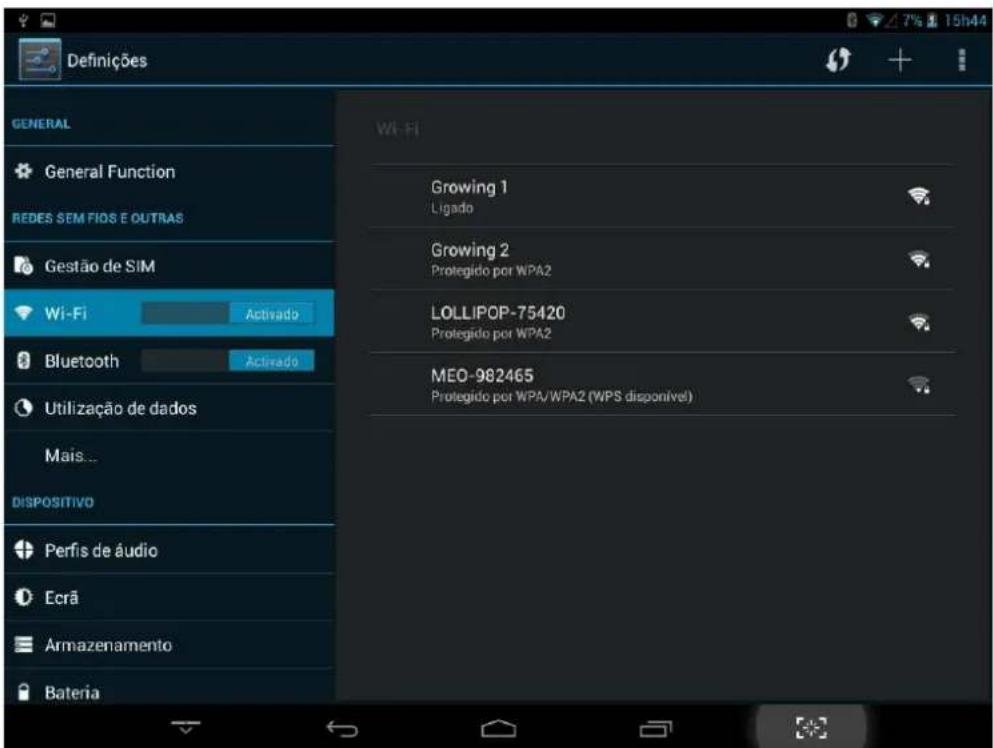
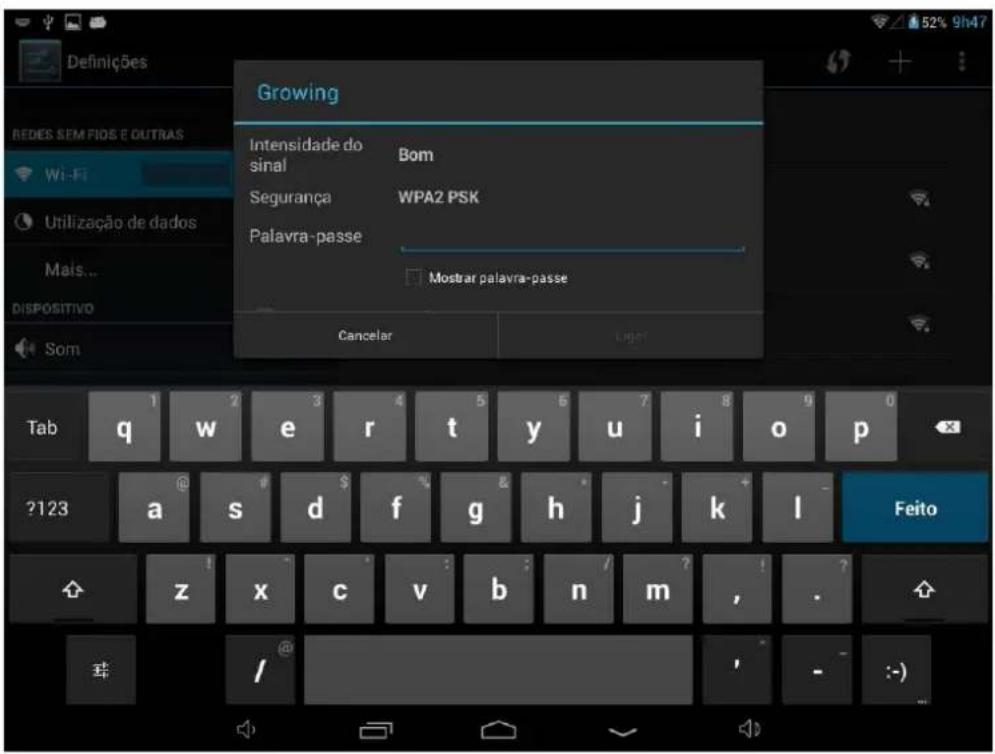
11. Setting Wireless Networks
Follow these steps to configure the wireless network:
- Turn on Wi-Fi, Wi-Fi settings press The machine will search for networks automatically.
- Choose Wi-Fi network you want to connect.
- Press Connect. Some networks may ask keyword.
- In the settings screen Wi-Fi, pressing the menu button and pressing, advanced, you can see more options of Wi-Fi
Follow these steps to configure the 3G network:
- Turn off Wi-Fi if connected.
- Access the settings, select Other Wireless Networks and select mobile networks, make sure that the option of active data is enabled. Go back.
- Enter the point name (APN's) right to obtain 3G. Note: APN's range of network operator for that call customer support from your service provider will be provided to the NPC's.
Follow these steps to configure Bluetooth:
- Turn Bluetooth on, press the Bluetooth settings. The device will automatically search for Bluetooth devices.
- Choose the device you want to connect.
- To pair with the device may request a PIN or password.
• After submitting the code the device is paired.
14. Setting GPS
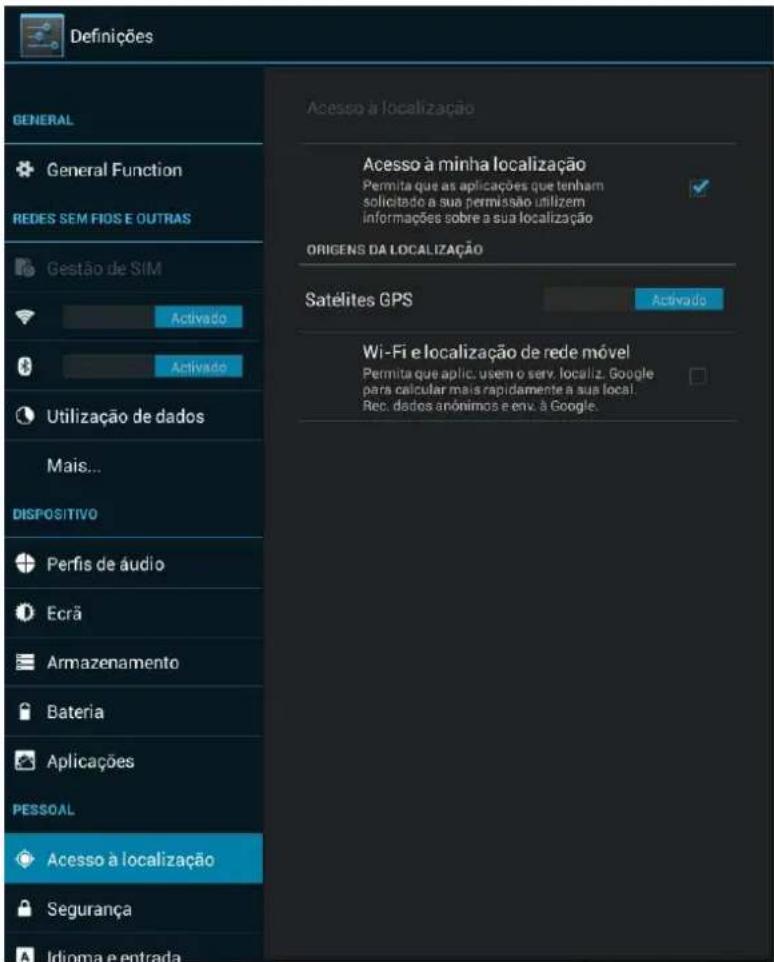
To activate the GPS slide your finger to the right side in the GPS satellites option.
Access to my location, allows applications to use data from wireless networks to determine your approximate location.
You can enable Assisted GPS, this is connected to a data server, the server sends information from satellites and also speeds up and reduces the time of calculating the approximate location. To enable assisted GPS enable the Wi-Fi and mobile network location.
You can search your own applications to use GPS through the Play Store or use the Navigation provided in Software.
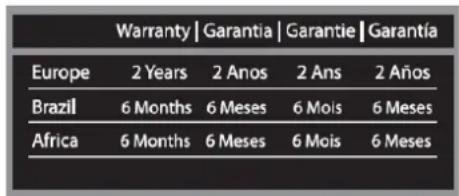
15. Warranty
This product has Growing warranty against factory defects.
The product is a sophisticated electronic device. The Growing strongly recommends that you consult the user manual and the instructions supplied with the product and for the same. In turn, should take into account that the product may contain high precision displays, camera lenses and other similar parts that may be subject to scratching or other damage if not handled with extreme care. This Warranty does not cover in any case these situations.
Under warranty is explicit time specific guarantee, which acquire the product.
bar
Warranty | Garantia | Garantie | Garantía | Region | 2 Years | 2 Anos | 2 Ans | 2 Años | | :--- | :--- | :--- | :--- | :--- | | Europe | 2 Years | 2 Anos | 2 Ans | 2 Años | | Brazil | 6 Months | 6 Meses | 6 Mois | 6 Meses | | Africa | 6 Months | 6 Meses | 6 Mois | 6 Meses |Frame Warranty
Policy Defects in LCD tablet
Despite the highest possible standards, the intricate manufacturing of screens "thin-film transistor" (TFT) liquid crystal display (LCD) may still produce slight visual imperfections.
These visual imperfections do not impair the performance of your tablet. However, the Growing will provide warranty service for the TFT LCD screen of your tablet when there are at least:
More than 5 bright spots or dark spots 8 (excluding 8).
These warranty conditions for TFT LCD screens are offered by TFT LCD manufacturers. The Growing will however, by his will, repair or replace the product.
Please note: A bright dot is a pixel or sub-pixel that is always on white. A dark dot is a pixel or sub-pixel that is always off black.
This Warranty does not cover user manuals, software, configuration, content, data or links to third party included or downloaded on the tablet, included during installment, assembly, shipping or at any other time in the delivery chain or otherwise acquired by user.
The Growing does not guarantee that the software fits your needs, to work in combination with any hardware or software from a vendor independent, or that the operation of any software will be free from suffering interruptions or errors or that any defects present in the software can be subject to correction or rectification.
This warranty does not cover:
Normal wear (including, without limitation, wear lenses of cameras, batteries or displays).
The defects caused by poor handling (including, without limitation, defects caused by sharp elements, folding, compression or falls, etc.).
Defects or damage caused by misuse of the tablet, including the use contrary to the instructions provided by Growing (eg, the manual instructions for use of the tablet).
Other acts beyond the reasonable control of Growing.
Warranty Policy Battery
The battery has 6 months Warranty.
This warranty does not cover defects caused by the fact that the battery be subjected to short-circuiting or the fact that the seals of the battery latch, tablet or cells were broken or show evidence of manipulation, either because the battery has been used in equipment for which was not specified.
Other important notices
We remind you that should make backup copies or keep written records of all important content and data stored in your Product, because there is the possibility of loss of data and content during repair or replacement.
All parts of the Product or other equipment will be replaced by Growing, from that time, ownership of Growing. If the Product is not covered by the terms and conditions of this Limited Warranty, Growing and service companies authorized by the same reserve the right to charge a fee for hand labor. To repair or replace the Product, Growing can use new products or parts equivalent to new or reconditioned.
For assistance Growing hotdog various channels:
- Contact your local vendor.
- On the site www.mygrowing.com support we have in the tool for technical support "Helpdesk".
- Directly to the Growing via phone (+351 808 20 29 30) or email to 808202930@growing.pt.
For assistance contact in Brazil for Sao Paulo phone 08007776222, other regions (11) 4979-6961 or email sac@growing.com.br
- On the site www.growing.com.br support we have in the tool for technical support "Helpdesk".
16. CE certificate

DECLARATION OF CONFORMITY
The product was tested with the standards and is in compliance with the European R & TTE Directive 1999/5/EC. It is possible to use CE marking to demonstrate compliance with the Directive.
Manufacturer / Importer: The Growing Company S, A, Address: Rua da Argila nº620 4445-027 Alfena - Portugal
Statement of Product:
Description: Tablet PC
Brand: GROWING
Model No: GTQ788X
Certificate No.: TB13065805
Normas aplicadas:
ETSI EN 301 489-1 V1.9.2: 2001;
ETSI EN 301 489-17 V2.2.1: 2002;
ETSI EN 300 328 V1.7.1: 2006;
EN 62479: 2010;
EN 60950-1: 2006+A11: 2009+A1: 2010+A12: 2011.
The test report was carried out in standard samples and is in accordance with the specifications of the respective standards. The holder of this certificate has the right to fix the CE mark for the R & TTE Directive 1999/5/EC on the product in accordance with the inspection samples.
Manufacturer / Importer

THE GROWING COMPANY, S.A.
A Administração
27-06-2013


All logos & trade marks are properties of the respective companies
natural_image
Illustration of a hand holding a tablet displaying a snowy, winter house scene with a lit window and moonlight (no text or symbols)Índice
- Introducción....3
All logos & trade marks are properties of the respective companies