BG-PM 51 S HW-E - Electric mower EINHELL - Free user manual and instructions
Find the device manual for free BG-PM 51 S HW-E EINHELL in PDF.

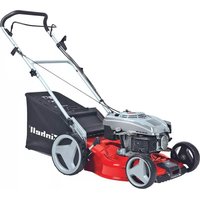
| Product type | Gasoline lawn mower with electric starter |
| Brand | EINHELL |
| Model | BG-PM 51 S HW-E |
| Engine | 4-stroke, single cylinder, 163 cc, 2.5 kW (25 kW indicated in the manual, likely a typo) |
| Fuel type | Gasoline |
| Tank capacity | Approx. 2 L |
| Engine oil | Approx. 0.61 L, type 10W30 |
| Cutting width | 510 mm |
| Cutting height adjustment | Central, 30-90 mm |
| Grass catcher | Yes, included |
| Mulching function | Yes, adapter included |
| Side discharge | Yes, adapter included |
| Starting | Electric (key) and manual (recoil starter) |
| Battery | 12 V, 7 Ah, maintenance-free |
| Charger | 100-240 V ~ 50/60 Hz, output 12 V DC, 1.5 A |
| Weight | 54.5 kg |
| Sound power level | 98 dB(A) |
| Vibration value | 5.9 m/s² (K=1.5 m/s²) |
| Spark plug | F6RTC, gap 0.5-0.6 mm |
| Fuse | 5 A |
| Safety devices | Engine brake, ejection cover, protection against projections |
| Routine maintenance | Oil change, air filter cleaning, spark plug check, blade sharpening/replacement |
| Warranty | 24 months for material defects, 6 months for wear parts |
Frequently Asked Questions - BG-PM 51 S HW-E EINHELL
User questions about BG-PM 51 S HW-E EINHELL
0 question about this device. Answer the ones you know or ask your own.
Ask a new question about this device
Download the instructions for your Electric mower in PDF format for free! Find your manual BG-PM 51 S HW-E - EINHELL and take your electronic device back in hand. On this page are published all the documents necessary for the use of your device. BG-PM 51 S HW-E by EINHELL.
USER MANUAL BG-PM 51 S HW-E EINHELL
- Safety instructions for hand mower 30
- Layout and items supplied 33
- Intended use 34
- Technical data 34
5.Before starting the equipment 35 - Operation 36
- Cleaning, maintenance, storage, transport and ordering of spare parts 39
- Disposal and recycling 41
- Troubleshooting guide 42
10.Warranty conditions. 43
Warranty certificate. 45
GB
Important!
When using the equipment, a few safety precautions must be observed to avoid injuries and damage. Please read the complete operating instructions and safety regulations with due care. Keep this manual in a safe place, so that the information is available at all times. If you give the equipment to any other person, hand over these operating instructions and safety regulations as well. We cannot accept any liability for damage or accidents which arise due to a failure to follow these instructions and the safety instructions.
1. Safety instructions for hand mower
Note
- Read the directions with due care. Familiarize yourself with the settings and proper operation of the equipment.
- Never allow children or other persons who are not familiar with the operating instructions to use the mower. Contact your local governmental agency for information regarding minimum age requirements for the user.
- Never mow in the direct vicinity of persons - especially children - or animals. Always keep in mind that the operator or user of the equipment is responsible for accidents involving other persons and/or their property.
- If you give the equipment to any other person, hand over these operating instructions as well.
Preliminary measures
-
Always wear sturdy, non-slip footwear and long trousers when mowing. Never mow barefoot or in sandals.
-
Check the ground on which the equipment will be used and remove all objects that could be caught up and violently flung out.
3. Warning:
Petrol is highly flammable! Therefore:
- Only store petrol in containers designed to hold petroleum-based liquids.
- Only refuel out in the open and do not smoke during the refueling process.
- Always refuel before starting the engine. Do not open fuel tank cap and do not refuel when the engine is running or when the scythe is hot.
- If petrol has overflowed, do not under any circumstances attempt to start the engine.
Instead, remove the equipment from the affected area. Avoid starting the engine until the petrol fumes have completely evaporated.
-
For safety reasons, the petrol tank and other tank closures must be replaced if they are damaged.
-
Replace defective mufflers.
- Before using the scythe, visually inspect it to ensure that the blade, mounting bolts and the entire cutting apparatus are in good working order (i.e. not worn out or damaged). To prevent any imbalance, replace worn out or damaged blades and mounting bolts as a set only (if applicable).
- Please note that where equipment has more than one blade, the rotation of one of the blades can cause the others to rotate as well.
Handling
- Do not let the combustion engine run in enclosed areas, as dangerous carbon monoxide gas can build up.
- Only mow in broad daylight or in well-lit conditions. If possible, avoid using the equipment on wet grass.
- Always maintain good footing on inclines.
- Only operate the equipment at a walking pace.
- For machines with wheels: Always mow across hills i.e. never straight up or straight down.
- Be particularly careful when you change direction on a slope.
- Do not mow on overly steep inclines.
- Always be extra careful when turning the mo- wer around and when pulling it towards you.
- Stop the blade whenever the mower has to be tilted to one side for
transporting over areas other than lawns and whenever the mower has to be moved from or to the area you want to mow.
- Never use the lawn mower if the blade or safety grilles are damaged, or without the attached guards, e.g. deflectors and/or grass catching devices.
- Do not adjust or overclock the engine speed settings.
- Release the engine brake, before you start the engine.
- Start the engine with caution as described in the manufacturer's instructions. Make sure that your feet are far enough away from the mower blade!
- Do not tilt the lawn mower when you start the engine unless the mower must raised off of

GB
the ground a little in order to start it. In this case, tilt it as little as absolutely necessary and only raise the side opposite to that of the user.
- Do not start the engine if you are positioned in front of the chute.
- Never move your hands or feet toward or under any rotating parts. Keep clear of the chute opening at all times.
- Never lift or carry a lawn mower with the engine running.
- Pull out the ignition key and spark plug boot. - before you dislodge any blockages or clogs in the chute.
- before carrying out any checks, cleaning, maintenance or other work on the lawn mower.
- if you have struck a foreign object. Examine the mower for signs of damage and carry out any necessary repairs before restarting and continuing to work with the mower. If the lawn mower begins to experience exceptionally strong vibrations, immediately switch it off and check it.
- when you leave the lawn mower.
- Switch off the engine and make sure that the blade and all moving parts have come to a complete standstill.
- before you refuel.
- When you switch off the engine, move the throttle lever to the "Stop" position. Close the petrol cock (if fitted).
- Operating the equipment at excessive speed may increase the risk of accidents.
- Carry out adjustment work on the equipment with care and avoid jamming your fingers between the moving blades and rigid parts of the equipment.
Maintenance and storage
- Make sure that all nuts, bolts and screws are tightened securely and that the equipment is in safe working condition.
- Never store the mower (with petrol in the tank) inside a building in which petrol fumes could come into contact with open flames or sparks.
- Allow the engine to cool before you put the lawn mower in an enclosed area.
- In order to avoid fire hazards, keep the engine, exhaust and the area around the fuel tank free from grass, leaves and leaking grease (oil).
-
Routinely check the grass basket for signs of wear and impaired functionality.
-
For your own safety, replace worn or damaged parts without delay.
- If the fuel tank needs to be emptied, ensure that it is done out in the open with a petrol suction pump (available from DIY stores).
1.1 Safety information for the charger
- Wear safety goggles and gloves when charging the battery. The caustic acid presents a high risk of injury.
- Do not wear any items of clothing made of synthetic materials so as to avoid spark formation caused by electrostatic discharge when charging the battery.
- CAUTION! Explosive gases – avoid flames and sparks
- The charger contains components such as the switch and fuse which may generate arcs and sparks. It is essential to ensure that there is good ventilation in the garage or room.
- The charger is suitable for maintenance-free 12V batteries only.
- Do not charge any "non-rechargeable batteries" or defective batteries.
Refer to the instructions supplied by the battery manufacturer. - Disconnect the equipment from the mains supply before you connect or disconnect the battery.
Important. Avoid flames and sparks. - Explosive gas is released during the charging process.
- Store the equipment in a dry indoor location only.
- Caution! Battery acid is aggressive.
- Should any acid splash onto hands or clothing, wash off immediately with soap solution. Should any acid splash into your eyes, wash it out immediately with water (for 15 minutes) and seek the advice of a doctor.
- Do not charge any non-rechargeable batteries.
Refer to the information and instructions provided by the battery manufacturer relating to charging the battery. - Do not charge more than one battery at any one time.
The mains connection lead and the charging cables must be in perfect condition. - Keep children away from the battery and charger.
- Important. If you smell an acrid odor of gas, this indicates that there is an acute danger of explosion. Do not switch off the equipment. Do not disconnect the battery from the power

GB
supply! Ventilate the room immediately. Have the battery checked by customer service staff.
- Do not use the cable for purposes other than that for which it is designed.
- Do not carry the charger by its cable and do not use the cable to pull the plug out of the socket. Protect the cable from heat, oil and sharp edges.
- Check the equipment for damage.
- Unless otherwise stated in the operating instructions, defective or damaged parts must be repaired or replaced by a customer service workshop.
Only ever use the supply voltage specified. - Keep the connectors clean and protect them from corrosion.
- Disconnect the equipment from the mains supply before starting any cleaning or maintenance work.
- Wear acid-resistant gloves and safety goggles when connecting and charging the battery.
- Important. Do not exceed the charging time. After the end of the charging time pull the plug out of the socket and disconnect the charger from the battery.
1.2 Safety precautions for batteries
- Make sure at all times that the batteries are fitted with the + and - terminals on the batteries correctly positioned as shown on the battery.
- Do not short-circuit the batteries.
- Do not recharge non-rechargeable batteries.
- Do not over-discharge the battery.
- Do not heat batteries.
- Do not do any welding or soldering directly on batteries.
- Do not disassemble batteries.
- Do not deform batteries.
- Do not throw batteries into a fire.
- Keep batteries out of the reach of children.
- Do not allow children to change batteries without supervision.
- Do not store batteries near fire, stoves or other sources of heat. Do not expose the battery to direct sunlight. Do not use or store it in vehicles in hot weather.
- Keep unused batteries away from metallic objects. This could cause the battery to short-circuit and may therefore cause damage to the battery, burns and even the risk of fire.
-
Take the batteries out of the equipment if the equipment is not going to be used for some time.
-
NEVER touch batteries which have leaked unless you have taken suitable precautions for protection. If the fluid which has leaked should come into contact with your skin, rinse down the affected area of skin immediately with running water. Make sure in any event that your eyes and mouth do not come into contact with the fluid. If this should happen, consult a doctor immediately.
- Clean the contacts on both the batteries and the equipment before inserting the batteries.
This equipment is not designed to be used by people (including children) with limited physical, sensory or mental capacities or those with no experience and/or knowledge unless they are supervised by a person who is responsible for their safety or they have received instructions from such a person in how to use the equipment safely. Children must always be supervised in order to ensure that they do not play with the equipment.
Waste disposal
Batteries: Only dispose of these items through motor vehicle workshops, special collection points or special waste collection points. Ask your local council.
CAUTION
Before you ever tilt the lawn mower, you must remove the battery first. Battery acid may leak out.
Residual risks:
Even if you use the equipment in accordance with the instructions, certain residual risks cannot be eliminated. The following hazards may arise in connection with the equipment's construction and layout:
- Damage to hearing if no suitable ear protection is applied.
- Health damage caused by hand-arm vibrations if the equipment is used over a longer period or is not properly guided and maintained.
Caution!
Read all safety regulations and instructions.
Any errors made in following the safety regulations and instructions may result in an electric shock, fire and/or serious injury.
Keep all safety regulations and instructions in a safe place for future use.

GB
Explanation of the warning signs on the equipment (see Fig. 21)
1) Read the operating instructions.
2) Take care of the danger from catapulted parts. Keep a safe distance.
3) Caution! Sharp blades - Switch off the engine and pull the spark plug boot before doing any maintenance, repair, cleaning or adjustment work.
4) Fill with oil and fuel before starting the mower.
5) Caution: Wear ear protection and safety goggles.
6) Engine start/stop lever (I=Engine on; 0=Engine off)
7) Drive lever (clutch lever)
2. Layout and items supplied
2.1 Layout (Fig. 1-20)
1a. Engine start/stop lever (engine brake)
1b. Drive lever (clutch lever)
2. Throttle lever
3. Top and bottom push bar
4a. Debris bag
4b. Side ejector adaptor
4c. Mulching adaptor
5a. Ejector flap
5b. V-belt
5c. Side ejector flap
6. Tank filler cap
7a. Oil filler screw
7b. Oil drainage screw
8. Cutting height adjustor lever
9. Starter cable
10. 1x cable clip
11. Star nut (4x)
12a. 2x screws size M8 x 40 mm
12b. 2x screws size M8 x 25 mm
13. Spark plug wrench
14. Battery charger
15. Charging plug
16. Electrical system plug
17. Battery plug
18. Battery cover
19. Fuse (5 amps)
20. 2 x cable ties
21. 2x ignition keys
22. Ignition lock
23. 12V / 7 Ah battery
24. Spark plug boot
2.2 Items supplied
Please check that the article is complete as specified in the scope of delivery. If parts are missing, please contact our service center at the latest within 5 work days after purchasing the article and upon presentation of a valid bill of purchase. Also, refer to the warranty table in the warranty provisions at the end of the operating instructions.
- Open the packaging and take out the equipment with care.
- Remove the packaging material and any packaging and/or transportation braces (if available).
- Check to see if all items are supplied.
- Inspect the equipment and accessories for transport damage.
If possible, please keep the packaging until the end of the guarantee period.
Important
The equipment and packaging material are not toys. Do not let children play with plastic bags, foils or small parts. There is a danger of swallowing or suffocating!
Petrol lawn mower
Top and bottom push bar
- Debris bag
Side ejector adaptor
- Mulching adaptor
1x cable clip
Star nut (4x)
2x screws size M8 x 40 mm
2x screws size M8 x 25 mm
Spark plug wrench
Battery charger
2x ignition keys
Battery
Cable ties (2x)
- Maintenance booklet for petrol lawn mower
Safety information on the batteries
Original operating instructions

GB
3. Intended use
The equipment may only be used for the tasks it is designed to handle. Any other use is deemed to be a case of misuse. The user/operator and not the manufacturer will be liable for any damage or injuries of any kind caused as a result of this.
The petrol lawn mower is intended for private use i.e. for use in home and gardening environments.
Private use of the lawn mower refers an annual operating time generally not exceeding that of 50 hours, during which time the machine is primarily used to maintain small-scale, residential lawns and home/hobby gardens. Public facilities, sporting halls, and agricultural/forestry applications are excluded.
The charger is designed for charging maintenance-free 12V starter batteries.
Please note that our equipment has not been designed for use in commercial, trade or industrial applications. Our warranty will be voided if the equipment is used in commercial, trade or industrial businesses or for equivalent purposes.
The operating instructions as supplied by the manufacturer must be kept and referred to in order to ensure that the lawn mower is properly used and maintained. The instructions contain valuable information on operating, maintenance and servicing conditions.
Important. Due to the high risk of bodily injury to the user, the petrol lawn mower must not be used to carry out the following work: Trim bushes, hedges or shrubs, to cut scaling vegetation, planted roofs, or balcony-grown grass, to clean (suck up) dirt and debris off walkways, or to chop up tree or hedge clippings. Moreover, the lawn mower may not be used as a power cultivator to level out high areas such as molehills.
For safety reasons, the lawn mower may not be used as a drive unit for other work tools or toolkits of any kind.
4. Technical data
Engine type......One-cylinder four-stroke engine, 163 cc/2.5 kW
Working speed n_0 : 2800 ± 100 min-1
Fuel: . Petrol
Tank capacity: approx. 2 l
Engine oil: approx. 0.6 l / 10W30
Spark plug: F6RTC
Electrode gap (spark plug): 0.5 - 0,6 mm
Cutting height adjustment: ... Central, (30-90 mm)
Cutting width: 510 mm
Weight: 54,5 kg
Battery charger
Mains voltage: 100-240V ~ 50/60Hz
Nominal output voltage: 12 V DC
Nominal output current: 1.5 A
Battery capacity: 7 Ah
Protection class: .II/回
Battery voltage: 12V
Sound and vibration
LD A sound pressure level 90 dB(A)
KpA uncertainty 3 dB
LWA sound power level 98 dB(A)
KWA uncertainty 3 dB
Wear ear-muffs.
The impact of noise can cause damage to hearing.
Vibration emission value a_h = 5.9~m / s^2
K uncertainty = 1.5m / s^2
GB
5. Before starting the equipment
5.1 Assembling the components
Some parts of the mower come disassembled. For quick and easy assembly, read and follow the instructions below.
Important. You will need the following additional tools (not supplied) for assembly, and also for maintenance work:
A flat oil drip tray (for changing the oil)
A 1 liter measuring jug (oil/petrol resistant)
A petrol can
- A funnel (suitable for the tank's petrol filler neck)
Household wipes (to wipe up oil/petrol residue; dispose of these at a filling station)
- A petrol suction pump (plastic, available from DIY stores)
- An oil can with hand pump (available from DIY stores)
Engine oil
Assembly
- Fasten the push bar (Fig. 3a/Item 3) using one screw (Fig. 3a/Item 12b) and one star nut (Fig. 3a/Item 11) on each side. For fastening choose one of the holes to suit the required height of the push bar. Important. The identical height must be set on both sides. Ensure that the cords which are fastened later are not in the way.
- Secure the top push bar to the bottom push bar using the star nuts (Item 11) and screws (Item 12a) as shown in Figure 3b.
- Insert the grip of the starter cord (Fig. 3c/Item 9) into the hook provided for that purpose as shown in Figure 3c.
- Fasten the cords to the push bar with the supplied cable clips (Fig. 3d/Item 10).
- Lift the ejector flap (Item 5a) with one hand and hook in the grass bag (Item 4a) as shown in Figure 4a.
Important. Whenever you do any work on the battery and when you dispose of the battery, you must observe the safety regulations of the manufacturer.
Warning! The person entrusted with inserting the battery should remove all metal armbands, wrist-watches, rings and similar before starting to insert the battery. There is a risk of burns if any of these objects should come into contact with the battery poles or current-conducting cables.
Warning! Check the insulation on the cables and plugs each time before use. If there are any defects in the insulation, the equipment must not be used.
Warning! Have repairs carried out only by an authorized workshop or by the manufacturer.
5.2 Inserting and removing the battery (Fig. 13-16)
Important. Use the mower only with a maintenance-free 12V battery.
Remove the battery cover (Item 18) by unscrewing the 4 fastening screws (Fig.13) with a Philips screwdriver (not included). Place the battery (Item 23) on the base (Fig. 14). First connect the red cable (+) and then the black cable (-) (Fig. 15).
Connect the battery plug (Fig. 16/Item 17) to the electrical system plug on the mower (Fig. 16/Item 16). Refit the battery cover by screwing the 4 fastening screws back in. Remove it in reverse order.
Important. Do not disconnect the battery from the electrical system during operation as this may destroy the charge electronics.
5.3 Changing the fuse (Fig. 17)
If the fuse (Item 19) is defective, replace it as shown in Fig. 17.
5.4 Charging the battery from the electrical system
The battery is charged by the generator via the electrical system during operation.
5.5 Charging the battery with the charger (Fig. 18-20)
If the battery has lost its charge, it can be charged up with the charger (supplied) via the household mains system. Disconnect the battery by pulling the battery plug (Item 17) from the electrical system plug (Item 16).
Important. Remove the battery cover (Item 18) whenever you want to charge the battery. Charging creates explosive gas which could collect under the cover if closed and lead to explosive ignition. When you charge the battery, refer to the safety regulations supplied by the battery manufacturer. After the battery has been connected to the charger by connecting the battery plug (Item 17) and the charging plug (Item 15) to the charger, you can connect the charger to a socket supplying 230V 50Hz . Do not connect it to a socket that supplies any other mains voltage.

The red lamp on the charger will indicate that the battery pack is being charged. After 8-9 hours the battery will be fully charged. This will be indicated by the green lamp on the charger. Please do not charge the battery for longer than 12 hours as this may destroy the battery.
When charging is completed (the green lamp shines), disconnect the charger from the mains power supply. Connect the battery plug to the mower's electrical system plug and fit the battery cover.
Important. Charging may create dangerous explosive gas and therefore you should avoid spark formation and naked flames whilst the battery is charging.
Calculating the charging time:
The charging time depends on the charge status of the battery. If the battery is fully discharged, the approximate charging time can be calculated using the following formula:
Charging time/h =
Battery capacity in Ah/Amp. (arithmetic charging current)
Example = 4Ah / 0.4A = 10h max.
A high initial current, approximately equal to the rated current will flow in a normally discharged battery. As the charging time increases, the charging current will fall.
5.6 Setting the cutting height
Important. Adjust the cutting height only when the engine is switched off and the plug boot has been pulled.
Before you begin to mow, check to ensure that the blade is not blunt and that none of the fasteners are damaged. To prevent any imbalance, replace blunt and/or damaged blades as a set only (if applicable). To carry out this check, first switch off the engine and pull the spark plug boot.
- The cutting height is centrally adjusted with the cutting height adjustor lever (Fig. 7/Item 8). Different cutting heights can be selected.
- Actuate the cutting height adjustor lever and pull it to the required position. Let the cutting height adjustor lever click into position.
6. Operation
Important.
The engine is supplied without oil and petrol. Therefore, be sure to add oil and petrol before starting the engine.
The battery is not connected when you take delivery of the machine. Please connect the battery as described in section 5.2 before you use the machine for the first time.
If the machine has not been used for some time, charge the battery fully (section 5.5) before using it again.
In order to avoid any unintentional start-ups of the lawn mower, it comes equipped with an engine brake (Fig. 5a/Item 1a) which must be pulled back before the engine can be started. When the engine start/stop lever is released, it must return to its initial position, at which point the engine automatically switches off.
Starting up with the electric starter
Ensure that the ignition cable is connected to the spark plug. Place the throttle lever in the position. Stand behind the mower. Use one hand to pull back and hold the engine start/stop lever (Fig. 5b). Start the engine by turning the ignition key in the ignition lock (Fig. 1/Item 22). Once the engine has started, turn the ignition key immediately back to its initial position. If you actuate the ignition key again while the engine is running, you will damage the starting system.
Starting up with the reversing starter
Ensure that the ignition cable is connected to the spark plug. Place the throttle lever in the position. Stand behind the mower. Use one hand to pull back and hold the engine start/stop lever (Fig. 5b). Start up the engine with the reversing starter (Fig. 1/Item 9) To do this pull the handle out approx. 10 - 15cm until you feel a resistance) and then start the engine with a sharp pull. If the engine does not start, pull the handle again.
Important.
Never allow the cable to snap back.
Important: In cold weather, it may be necessary to repeat the starting process several times. Set the required working speed. Before you start mowing, you should run through this process several times in order to ensure that the machine is
GB
working properly. Whenever you need to perform any kind of adjustment and/or repair work on your lawn mower, wait until the blade has come to a complete stop. Always switch off the engine before carrying out any adjustments, maintenance or repairs.
Note:
- Engine brake (Fig. 5a/Item 1a): Use the engine start/stop lever to switch off the engine. When you release the engine start/stop lever, the engine and blade automatically stop. To mow, hold the lever in the working position (Fig. 5b). Before you start to mow, check the start/stop lever several times to be sure that it is working properly. Ensure that the tension cable can be smoothly operated.
- Drive lever/clutch lever (Fig. 5a/Item 1b): If you press this (Fig. 5c) the clutch for the drive will be closed and the lawnmower will start to move with the engine running. Release the drive lever in good time to stop the moving lawnmower. Practice starting and stopping before you use the mower for the first time until you are familiar with controlling the mower.
- Warning: The blade begins to rotate as soon as the engine is started. Important: Before you start the engine, move the engine brake several times to be sure that the stop cable is properly working. Note: The engine is factory set to a speed that is optimal for cutting and blowing grass into the basket and is designed to provide many years of use.
- Check the oil level.
- Use a funnel and measuring vessel to fill the tank with petrol. Make sure that the petrol is clean.
Warning: Never use more than one safety petrol can. Do not smoke when refueling. Switch off the engine before refueling and allow the engine to cool down for a few minutes.
- Ensure that the ignition cable is connected to the spark plug.
- Stand behind the mower. Place one hand on the engine start/stop lever. Place the other hand on the starter handle.
- Start the engine using the reversing starter (Fig. 1/Item 9). To do this pull the handle out approx. 10 - 15cm until you feel a resistance) and then start the engine with a sharp pull. If the engine does not start, pull the handle again.
Important. Never allow the cable to snap back.
Important: In cold weather, it may be necessary to repeat the starting process several times.
Mulching (Fig. 4b)
In the mulching mode the cuttings are shredded in the enclosed mower housing and then spread back onto the lawn. It is not necessary to gather and dispose of the grass.
Important: Mulching is only possible if the lawn is relatively short. Optimum results can be achieved only with a mulching blade (available as an accessory).
To use the mulching function, disconnect the debris bag, slide the mulching adaptor into the ejector opening (Item 4c) and close the ejector opening.
Side ejector (Fig. 4c)
You should fit the mulching adaptor in order to use the side ejector. Connect the side ejector adaptor (Item 4b) as shown in Figure 4c.
6.1 Before mowing
Important information:
- Make sure that you are properly dressed when mowing. Wear sturdy footwear; do not wear sandals or tennis shoes.
- Inspect the blade. Blades, that are bent or otherwise damaged, must be exchanged for a genuine Einhell replacement blade.
- Do not fill the fuel tank indoors, but rather out in the open. Use a funnel and a measuring vessel. Wipe off any spilled petrol.
- Read and follow in the instructions in the operating manual as well as the information regarding the engine and accessory equipment. Store the manual in a place where it can be readily accessed by other users of the equipment.
- Exhaust gas is dangerous. Only start the engine out in the open.
- Make sure that all the guards are fitted and that they are in good working order.
- The equipment should only be operated by persons who are well informed with the way it works and who are in reasonably good physical condition.
- Mowing wet grass can be dangerous. Mow the grass when it is as dry as possible.
- Tell other persons and children to stay away from the mower.
- Never mow in conditions of poor visibility.

GB
- Pick up any loose objects and debris on the lawn prior to mowing.
6.2 Tips on mowing properly
Important. Never open the chute flap when the grass bag has been detached to be emptied and the motor is still running. The rotating blade can cause serious injuries!
Always carefully fasten the chute flap and grass basket. Switch off the engine before emptying the grass basket.
Always ensure that a safe distance (provided by the length of the long handles) is maintained between the user and the mower housing. Be especially careful when mowing and changing direction on slopes and inclines. Maintain a solid footing and wear sturdy, non-slip footwear and long trousers. Always mow along the incline (not up and down).
For safety reasons, the lawn mower may not be used to mow inclines whose gradient exceeds 15 degrees.
Use special caution when backing up and pulling the lawn mower. Tripping hazard!
6.3 Mowing
Only use a sharp blade that is in good condition. This will prevent the grass blades from fraying and the lawn from turning yellow.
Try to mow in straight lines for a nice, clean look. The swaths should overlap each other by a few centimeters in order to avoid stripes.
Keep the underside of the mower housing clean and remove grass build-up. Deposits not only make it more difficult to start the mower; they decrease the quality of the cut and make it harder for the equipment to bag the grass.
Always mow along inclines (not up and down). You can prevent the lawn mower from slipping down by holding a position at an angle upwards. Select the cutting height according to the length of the grass. If necessary, mow a number of times so that you never cut more than 4cm of grass in one go.
Switch off the engine before doing any checks on the blade. Keep in mind that the blade continues to rotate for a few seconds after the engine has been switched off. Never attempt to manually
stop the blade. Regularly check to see if the blade is securely attached, is in good condition and is sharp. If the contrary is the case, sharpen the blade or replace it. In the event that the blade strikes an object, immediately switch off the lawn mower and wait for the blade to come to a complete stop. Then inspect the condition of the blade and the blade mount. Replace any parts that are damaged.
Tips for proper mowing:
- Pay attention to ensure that you do not run into or over anything that could damage the mower. The lawn mower could be damaged and/or the machine could inflict bodily injury.
- A hot engine, exhaust or drive unit can burn the skin if touched. Do not touch these parts.
- Use extra caution when mowing on inclines and steep grades.
- Insufficient daylight or an insufficient level of artificial light is one reason not to mow.
- Check the mower, the blade and other parts if they have struck a foreign object or if the equipment vibrates more than usual.
- Do not make any adjustments or repairs until the engine has been switched off. Pull the plug boot.
- Pay special attention if you are mowing directly next to a street or are close by one (traffic). Always keep the grass chute pointed away from the street.
- Avoid mowing in places where the wheels have trouble gripping or mowing is unsafe in any other way. Before you back up, ensure that nobody is standing behind you (especially little children, who are more difficult to see).
- When mowing over thick, high grass, select the highest cutting level and mow at a slower speed. Before you remove any grass or blockages of any kind, switch off the engine and pull the plug boot.
- Never remove any safety-related parts.
- Never fill the engine with petrol when it is hot or is running.
6.4 Emptying the grass basket
As soon as grass clippings start to trail the lawn mower, it is time to empty the grass basket. Important. Before taking off the grass bag, switch off the engine and wait until the blade has come to a stop.
To take off the grass basket, use one hand to lift up the chute flap and the other to grab onto the
GB
basket carry-handle. Remove the basket (Fig. 4a). For safety reasons, the chute flap automatically falls down after removing the grass basket and closes off the rear chute opening. If any grass remains in the opening, it will be easier to restart the engine if you pull the mower back approximately 1m
Do not use your hands or feet to remove clippings in or on the mower housing, but instead use suitable tools such as a brush or a hand broom.
In order to ensure that the majority of grass clippings are picked up, the inside of both the grass bag and especially the air grill must be cleaned after each use.
Reattach the grass bag only when the engine is switched off and the blade is stopped.
Using one hand, lift up the chute flap, while grabbing onto the basket handle with the other. Hang in the basket from the top.
6.5 After mowing
- Allow the engine to cool before you put the lawn mower in an enclosed area.
- Remove grass, foliage, grease and oil before storing the mower. Do not place any objects on top of the mower.
- Before using the mower again, retighten all nuts and screws. Tighten all screws which were slackened.
- Also be sure to empty the grass basket.
- Disconnect the spark plug boot to prevent unauthorized use.
- Ensure that you do not park the mower next to any source of danger. Petrol fumes can lead to explosions.
- Only original parts or parts approved by the manufacturer may be used for repairs (see address on the warranty certificate).
- Empty the petrol tank with a petrol extraction pump if you are not intending to use the mo- wer for an extended period of time.
- Tell your children not to use the mower. It is not a toy.
- Never place petrol near an ignition source. Always use a can that is approved to store petrol. Keep petrol away from children.
- Oil and maintain the equipment.
- How to switch off the engine: All you have to do to switch off the engine is release the engine start/stop lever (Fig. 5a/Item 1a). Pull the ignition cable from
the spark plug boot in order to prevent the engine from restarting. Before you start the engine again, check the cord for the engine brake. Check that the cord is correctly fitted. If the cord is kinked or damaged, it should be replaced.
7. Cleaning, maintenance, storage, transport and ordering of spare parts
Important:
Never work on or touch any current-conducting parts of the ignition system while the engine is running. Pull the spark plug boot from the spark boot before doing any maintenance or assembly work. Never carry out any work on the equipment while the engine is running. Work that is not described in these operating instructions, should only be carried out by authorized workshops.
7.1 Cleaning
The lawn mower should be cleaned thoroughly every time after it has been used. This particularly applies to its underside and the blade mount. For this purpose, tilt the lawn mower onto its left side (opposite the oil-filler neck).
Note: Before placing the lawn mower on its side, fully drain the fuel tank using a petrol extraction pump. Do not tilt the lawn mower by more than 90 degrees. It is easiest to remove dirt and grass immediately after mowing. Dried grass remnants and dirt may impair the mowing operation. Check if the grass ejector chute is free of grass remnants and remove any if necessary. Never clean the mower using a water jet or a high-pressure cleaner. Ensure that no water can get into the interior of the equipment. Do not use aggressive cleaning agents such as cold cleaners or petroleum ether.
7.2 Servicing
Please refer to the supplied petrol service manual for information on the maintenance intervals.
Important: Dispose of soiled maintenance material and media at the appropriate collection point
GB
7.2.1 Axles and wheel hubs
A thin coating of grease should be applied to the axles and wheel hubs once per season.
To do so, remove the wheel caps with a screwdriver and loosen the fastening screws on the wheels.
7.2.2 Blades
For safety reasons, have all blade sharpening, balancing and mounting work carried out by an authorized service center. To achieve optimal results, we recommend to have the blades checked once a year.
Changing the blades (Fig. 8)
When changing the cutting unit, be sure to use only genuine replacement parts. The identification mark on the blade must correspond with the number specified in the spare parts list.
Never install a blade from a different manufacturer.
Damaged blades
If, in spite of all caution, the blade comes into contact with an obstacle, switch off the engine immediately and pull the spark plug boot.
Tilt the mower to the side and check the blade for damage. Damaged or bent blades must be replaced. Never straighten a bent blade. Never work with bent or heavily worn blades as this will result in vibrations, causing further damage to the mower.
Important: Risk of injury when working with a damaged blade.
Resharpening the blade
The blade edges can be resharpened with a metal file. To avoid imbalance, the blade resharpening work should only be carried out by an authorized service center.
7.2.3 Oil level check
Important: Never run the engine with no or too little oil. This can cause serious damage to the engine.
Checking the oil level
Place the lawn mower on a level and straight surface. Unscrew the oil dipstick (Fig. 9a/Item 7a) by turning it counter-clockwise and wipe the dipstick. Re-insert the dipstick into the filler opening as far as it will go but do not screw it in. Pull out the dipstick, hold it horizontally and read off the oil level. The oil level must be between the two marks min. and max. on the oil dipstick (Fig. 9b).
Change the oil
The engine oil is best changed at room temperature.
- Place a flat oil drip tray beneath the mower.
- Open the oil filler plug (Fig. 9a/Item 7a).
- Open the oil drain plug (Fig. 9c/Item 7b). Drain the warm engine oil into a drip tray.
- Close the drain screw again when all the used oil has been drained.
- Fill in engine oil up to the top mark on the oil dip stick
- Important. Do not screw in the oil dipstick to check the oil level – only insert it as far as the thread.
- Dispose of the used oil in accordance with applicable regulations.
7.2.4 Care and adjustment of the cable pulls
Oil the cable pulls at regular intervals and check that they move easily.
7.2.5 Maintenance of the air filter (Fig. 10)
Soiled air filters reduce the engine output by supply too little air to the carburetor. If the air contains a lot of dust, the air filter should be checked more frequently.
Important: Never clean the air filter with petrol or inflammable solvents. Clean the air filter only with compressed air or by tapping it.
7.2.6 Maintenance of the spark plug
Clean the spark plug with a copper wire brush.
Pull off the spark plug boot (Fig. 11/Item 24) with a twist.
- Remove the spark plug using a spark plug wrench.
- Assemble in reverse order.
7.2.7 Inspecting the V-belt
To inspect the V-belt, remove the V-belt cover (Fig. 12/Item 5b) as shown in Figure 12.
7.2.8 Repair
After carrying out repair or maintenance work, ensure that all safety parts are installed and in perfect condition.
Store potentially hazardous parts out of the reach of other persons and children.
Important: In accordance with the German Product Liability Act, we are not liable for any damages if they result from improper repairs to the product or if parts are replaced by items other than genuine parts or parts approved by us.
Furthermore, we are not liable for any damages if they result from improper repairs to the product.

GB
Arrange for your customer service or an authorized workshop to do the work. The same applies to accessory parts.
7.2.9 Operating times
Please observe the regulations concerning lawn mower operating times, which may differ from town to town.
7.2.10 Maintenance and care of the battery
- Ensure that your battery is always fitted securely.
- A perfect connection to the cable network of the electrical system must be ensured at all times.
- Keep the battery clean and dry.
7.3 Preparing the mower for long-term storage
Warning: Do not empty the petrol tank in enclosed areas, near fire or when smoking. Petrol fumes can cause explosions and fire.
- Drain the petrol tank using a petrol extraction pump.
- Start the engine and run it until the tank and fuel line are completely empty and the engine stalls.
- Change the oil after each season. To do so, remove the used engine oil when the engine is warm and refill new oil.
- Remove the spark plug from the cylinder head. Use an oil can to fill the cylinder with approx. 20ml of oil. Slowly pull back the starter handle, which will bathe the cylinder wall with oil. Screw the spark plug back in.
- Clean the cooling fins of the cylinder and the housing.
- Be sure to clean the entire equipment to protect the paint.
- Store the equipment in a well-ventilated place or location.
- Remove the battery if you intend to put the lawn mower into storage for any longer than 3 months.
Please read the safety information on the batteries (point 3) for information concerning the storage of the battery.
7.4 Preparing the mower for transport
- Empty the petrol tank (refer to point 7.3/1)
- Always let the engine run until it has used up the remainder of petrol in the tank.
- Empty the engine oil from the warm engine.
- Remove the spark plug boot from the spark plug.
- Clean the cooling fins of the cylinder and the housing.
- Unhook the starter cable from the hook (Fig. 3c). Slacken the star nuts and fold down the upper push bar. Make sure that the cables do not get kinked when the bar is pulled up.
- Wedge a few layers of corrugated cardboard between the upper and lower push bars and the engine in order to prevent any chafing.
7.5 Consumables, wear materials and spare parts
Spare parts, consumables and wear materials such as engine oil, V-belts, spark plugs, air filter inserts, petrol filters, batteries and blades are not covered by the warranty.
7.6 Ordering replacement parts
Please provide the following information on all orders for spare parts:
Model/type of the equipment
Article number of the equipment
ID number of the equipment
Part number of the required spare part
For our latest prices and information please go to www.isc-gmbh.info
8. Disposal and recycling
The equipment is supplied in packaging to prevent it from being damaged in transit. The raw materials in this packaging can be reused or recycled. The equipment and its accessories are made of various types of material, such as metal and plastic. Defective components must be disposed of as special waste. Ask your dealer or your local council.

9. Troubleshooting guide
Warning: Switch off the engine and pull out the spark plug boot before making any checks or adjustments.
Warning: If, after making an adjustment or repair to the engine, you let it run for a few minutes, remember that the exhaust and other parts will get hot. Do not touch these parts as they may burn you.
| Fault | Possible cause | Remedy |
| The equipment does not operate smoothly and vibra-tes intensively | - Bolts loose - Blade attachment is loose - Blade imbalanced | - Check bolts - Check blade attachment - Replace blade |
| The engine does not start | - Engine start/stop lever is not pressed - Throttle lever in wrong position - Spark plug defective - Fuel tank empty | - Press the engine start/stop lever - Check setting - Replace spark plug - Top up fuel |
| Engine does not run smoothly | - Air filter dirty - Spark plug dirty | - Clean the air filter - Clean the spark plug |
| Lawn turns yellow, uneven cut | - Blade is not sharp - Cutting height too small - Engine speed too low | - Sharpen blade - Adjust to the proper height - Set the lever to max. |
| Grass chute is not clean | - Engine speed too low - Cutting height too small - Blade is worn - Grass bag is clogged | - Set the throttle lever to max. - Set properly - Replace the blade - Empty the grass bag |
| The battery does not charge up | - Poor plug contact to the battery - Battery defective - 5A fuse (Item 19) is defective | - Clean the contacts - Have the battery checked by an expert and replace it if necessary - Check the function of the equip-ment using a different battery; re-place the fuse |
| Starter does not turn | - Battery discharged - Battery not connected - No plug-in connections | - Charge the battery - Connect the battery - Check the plug-in connections |
10. Warranty conditions
iSC GmbH guarantees the repair of defects or replacement of the equipment in accordance with the overview below, whereby statutory guarantee claims are not affected.
| Category | Example | Warranty |
| Defect with regard to material or construction | 24 months | |
| Wear parts | Air filter, Bowden cables, grass basket, tires, drive clutch | 6 months |
| Consumables | Blades | Warranty only in case of an immediate defect (24 hours after purchase / date on the bill) |
| Missing parts | 5 work days |
With regard to consumables, wear parts and missing parts iSC GmbH guarantees a correction of defects or a new delivery only if the defect is reported within 24 hours (consumables), 5 work days (missing parts) or 6 months (wear parts) after purchase and the purchase date is verified with the bill.
In case of defects concerning the material or construction, we kindly request you to submit the equipment together with the fully completed warranty card supplied with the equipment. It is important that you fill in an exact description of the defect.
To do so, answer the following questions:
Did the equipment work at all or was it defective from the beginning?
Did you notice anything (symptom or defect) prior to the failure?
- What malfunction does the equipment have in your opinion (main symptom)?
Describe the malfunction.

For EU countries only
Never place any electric power tools in your household refuse.
To comply with European Directive 2002/96/EC concerning old electric and electronic equipment and its implementation in national laws, old electric power tools have to be separated from other waste and disposed of in an environment-friendly fashion, e.g. by taking to a recycling depot.
Recycling alternative to the return request:
As an alternative to returning the equipment to the manufacturer, the owner of the electrical equipment must make sure that the equipment is properly disposed of if he no longer wants to keep the equipment. The old equipment can be returned to a suitable collection point that will dispose of the equipment in accordance with the national recycling and waste disposal regulations. This does not apply to any accessories or aids without electrical components supplied with the old equipment.
The reprinting or reproduction by any other means, in whole or in part, of documentation and papers accompanying products is permitted only with the express consent of the iSC GmbH.
Subject to technical changes
Warranty certificate
Dear Customer,
All of our products undergo strict quality checks to ensure that they reach you in perfect condition. In the unlikely event that your device develops a fault, please contact our service department at the address shown on this guarantee card. Of course, if you would prefer to call us then we are also happy to offer our assistance under the service number printed below. Please note the following terms under which guarantee claims can be made:
- These guarantee terms cover additional guarantee rights and do not affect your statutory warranty rights. We do not charge you for this guarantee.
- Our guarantee only covers problems caused by material or manufacturing defects, and it is restricted to the rectification of these defects or replacement of the device. Please note that our devices have not been designed for use in commercial, trade or industrial applications. Consequently, the guarantee is invalidated if the equipment is used in commercial, trade or industrial applications or for other equivalent activities. The following are also excluded from our guarantee: compensation for transport damage, damage caused by failure to comply with the installation/assembly instructions or damage caused by unprofessional installation, failure to comply with the operating instructions (e.g. connection to the wrong mains voltage or current type), misuse or inappropriate use (such as overloading of the device or use of non-approved tools or accessories), failure to comply with the maintenance and safety regulations, ingress of foreign bodies into the device (e.g. sand, stones or dust), effects of force or external influences (e.g. damage caused by the device being dropped) and normal wear resulting from proper operation of the device. This applies in particular to rechargeable batteries for which we nevertheless issue a guarantee period of 12 months. The guarantee is rendered null and void if any attempt is made to tamper with the device.
- The guarantee is valid for a period of 2 years starting from the purchase date of the device. Guarantee claims should be submitted before the end of the guarantee period within two weeks of the defect being noticed. No guarantee claims will be accepted after the end of the guarantee period. The original guarantee period remains applicable to the device even if repairs are carried out or parts are replaced. In such cases, the work performed or parts fitted will not result in an extension of the guarantee period, and no new guarantee will become active for the work performed or parts fitted. This also applies when an on-site service is used.
- In order to assert your guarantee claim, please send your defective device postage-free to the address shown below. Please enclose either the original or a copy of your sales receipt or another dated proof of purchase. Please keep your sales receipt in a safe place, as it is your proof of purchase. It would help us if you could describe the nature of the problem in as much detail as possible. If the defect is covered by our guarantee then your device will either be repaired immediately and returned to you, or we will send you a new device.
Of course, we are also happy offer a chargeable repair service for any defects which are not covered by the scope of this guarantee or for units which are no longer covered. To take advantage of this service, please send the device to our service address.
Also refer to the restrictions of this warranty concerning wear parts/consumables and missing parts as set forth in the warranty conditions of these operating instructions.
F
Sommaire
Chere CLIENT, Cher Client
Combustivel: gasolina
Akumulator mora biti cist in suh.
BnmaHne! N3noJ3BaIte KocayKaTa cAmo C12-BoToba aKymyIaTopHa 6aTepy, HEN3NCKBa7a O6cIyKBAHe.
OCTpaheKaKanakaHa aKymylatopHata 6aTePnra (no3.18), KaTO OTBnEte Yetnpnte BVHTa (ΦnR.13) c KpBcTATA OTBepTHa (He e BkLIOUeHa B DoCTabEHn KOMNJIeKT). NocTaBeTe aKymylatopHata 6aTePnra (no3.23) Bbpxy Kopnyca (ΦnR.14). TbpBO CbBpKeTe YerbeHn Ka6eI KbM" "I n CLEd TOBa YerHn Ka6eI KbM" (ΦnR.15). CbBpKeTe 6yKcata Ha aKymylatopHata 6aTePnra (ΦnR.16/ no3.17) c 6yHCata Ha 6OpDoBATA MpeXa (ΦnR.16/ no3.16). IocTaBeTe KAnaka Ha aKymylatopHata 6aTePnra, KaTO 3aBnEte Yetnpnte BVHTA. JEmoHTnpaHTo ce N3BbPbWA B O6paTHa NocLeDobateHIOCT:
BHMaHHe! Np BpeMe Ha pa6oTa He n3KlIOuBaIte aKymyIaTOphAta 6aTePnA OT 6OpObAta MpeHa, Tb' KaTo TOBa MoKe Da IOBpeDn eJeKTPoHnKaTa Ha 3apeKDaHeTo.
5.3 CmHa Ha nppeiNa3ntela (fur.17)
CmeHeTe Heu3npaBnH npedna3HTel (no3.19), KaKTo e noka3aHO Ha fIrgpa 17.
5.4 3apeHdane Ha anymyIaTOpHaTa 6aTePn8 or 6opdoBaMapeHa
IIO BpeMe Ha pa6oTa aKymyIaTOPHaT6aTePnIe 3apeJka OT 6OpDobTa MpeKa Upe3 reHepaTopa.
5.5 3apeHdaHe Ha aKymlaTophata 6aTepe n CbC 3apnHOy yctpoiCTBO (fHr.18-20)
Ako akymylatopnata 6aTePnna e pa3peDeHa, Tpr6Ba DaЯ 3apeDnTe CbC 3apnHOTO yCTpoCTBO (BkIIOUeHO E BDOCTaBeHHN KOMnJIeKt) Upe3 eJeNTpueeCKaTa MpeKa. N3KIOUeTe aMyIATopnata 6aTePnna, KaTO n3BaJnte 6yKcata (no3.17) OT 6yKcata Ha 6OpDoBATA MpeKa (no3.16).
BHHMaHHe!Ipei3apeKdaHToOTcPaHete KaNakaHa aKymyLaTOPHaTa 6aTePnra (no3. 18).No BpeMe Ha 3apeKdaHTo ce OTdEla Tbpmu,ra3,KoITo MOJe Da ce HATpyna NOD KaNakaHa da Ce BV3pIaMeHb V3pINBOO6pa3Ho. PInr 3apeKdaHe cNa3BaIte YKa3aHnIra 3a 6e3OpacHa pa6Ota Ha pOnI3BOIDNeHa ha aKymyLaTOPHa 6aTePnra.CleJ Kato CbvpKeHe 6yHCata Ha aKymyLaTOPHa 6aTePnra (no3.17) C 6yHCata Ha 3apJNDHOY UCTpoICTBO (no3.15), MOHeTe Da BVJIIOUHe 3apJNDHOY UCTPOICTBO B KOHTAIC HAnpeJehne 230 V~50 Hz.He ce Donycka BkJIIOUBaHe B KOHTAIC C dpyro HAnpeJehne Ha eEleKtpnueCkata MpeHa.
YerbeHata lammaHa 3apJHOTo yCTpoiCTBO noka3Ba, ye akymylatopnHaTa 6atepye ce 3apeJa.Cle8-9 Yaca akymylatopnHaTa 6atepye e 3apeDen HAnbIHO.ToBa Ce OTHTa ot 3eJeHata lammaHa 3apJHOTo yCTpoiCTBO.He 3apeJaTe akymylatopnHaTa 6atepye NOBpeO t 12 yaca,TbKaTO MoKe da Ce NOBpei.
CleI KaTo npKIOUHTe CbC 3apeKdAneto (3eHaTaNAMnA CBTe),N3KIOUHTe 3apJdHOTO yCTpoCTBO OT eJIeKTPuYeCKATA MpeKa. CbPKeTe 6yKcata Ha aKymlaTopHaTa 6aTePn c 6yKcata Ha 6opDObTa MPeKa Ha KocauKaTa n MOHTnpaIte KaNaKa Ha aKymlaTopHaTa 6aTePn.
BG
BHHMaHHe! Pn3apeJdaHeTo MoKe da Ce OTdJIeIbPmIuIra3, 3aTOBa IIO BpeMe Ha 3apeJdaHeTo N36IgBaIte O6pa3yBaHeTo Ha NCKprN OTKpNT IJaMbK.
I3uCJIaBaHe Ha BpeMeTo 3a 3apeKdAne: BpeMeTo 3a 3apeKdAne ce onpeDeJr O T cbCToHnETo Ha aKymLaTopHaTa 6aTePn. Korato aKymLaTopHaTa 6aTePn e npa3Ha, npi6bIIm3nteHnOTo BpeMe 3a 3apeKdAne MoKe Da ce I3uCIn Cbc CneDHaTc FOpMyla:
BpeMe 3a 3apeKdahe/YacObe = KaanaTeT Ha aHymylaTopHaTa 6aTePnBaMpePcaca /AmpePi (3apJeH ToK apiNTM.)
Пиимер = 4Ah/0,4A=10hmax.
ПиHopMaJIHo pa3peDeHa akymyIaTOpHa 6aTePnI NOcTBnBa NO-ROJAM HauJaIeH TOK, PnIbIIN3HTeJIHO C pA3Mepa Ha HOMHaJIHrN ToK.C yBvEInuBaHaHe Ha BPeMeTo 3a 3apeKdAne 3apJHNrT KOnCTeNeHNO cnaJa.
5.6 Perynpane Ha BncounHa Ta HnoDpy3BaHe
BHHMaHHe! PerynpaTe BncoHnata Ha nOdpra3BaHe cAmo npu n3KnIyEn dBnraTeIn n3BaDeH hakpaHnK Ha 3anaIteHnHaTc BceU.
- Прени за заочене за коси,则поверete зали рж龟што Инстугенти не са за тьсяни зали захpenbaцто лементи не са постени.За пбягваши на Deбаланс Износятne и/nлловерени рж龟што Инстугенти Трабба до сemeятВКOMПLEKT.При поверката Излючete Двигаялma и Извадете нахрайнika на Загалпелна тсveц.
BncoHata Ha noPr3BaHe ce perynipa ceHTpaJIIm3IpaHO cNoCTa 3a perylnpaHa H BncoHata Ha noPr3BaHe (fir.7/ no3.8). IMa hKoIko no3IcN 3a onpeJelAHe Ha BncoHata Ha noPr3BaHe. - IpemecTeTe loCTa 3a peylnpaHe Ha BnCOUHaTa Ha noPra3BaHe Ha JeHaHTo nIoJKeHne. OcTabeTe loCTa da ce fNkCnpa.
6.06cnyXbaHe
BHHMaHHe!
DBrAteIaTe e DoCTaBeH 6e3 rOpNBo. Ipeu nYcHaHe B EKcnloataaHaJIeTMe MacIo N 6eH3nH.
AkyMylatopHata 6aTePnHa He cBbP3Ha npn doCTabkata. IpeDn nysKaHe B EKcNloaTaunia CbPKeTe aKMyIaTOpHata 6aTePnHa, KaHTo e noka3aHO Ha fHyrgpa 5.2.
Ako He cTe H3noJI3BaIIN KocauKaTa npOdbJlnHtIeHNO BpeMe, npEi NycKaHe BekcPiOaTaun Tpr6Ba Da 3apeDInTe aKymyIaTophata 6aTeepnHaBlno (fNrgpa 5.5).
3a da ce n36eHne HeKeHaHO BVKIOUVAHe Ha KOCauKaTAt, TRe oObOpyDbaHc MOTOpHa cnIpaUka (ΦnR. 5a/ no3.1a), KOrTo TPr6Ba Da ce 3aDeiCTBa, npEdu Da CE BKNIOUHcKocauKaTa. PnO tONyCKaHe Ha IocTa 3a BVKIOUVABe/H3KIOUVAHe Ha DBNrAteJI NocTbT TPr6Ba Da c Be BbPHe B IN3XoHO POLOJKeHne IN DBNrAteJIaT N3KIOUBA aBTOMaTHNo.
BkIIOUvaBe c eI. cTapTeP
Поберета далл Кабелт 3а залианeto e CBbp3an KBm 3anaIteHnata Cbeu. Пoctabete loCTa 3a ra3ta Ha no3nuiy .3actane 3ad kocaukata.DpbHETe c ednata pbka locta 3a BkLIOUbaHe/n3KIOUBAHe Ha DBIrateJI n ro 3aDpBHTe (fmr.5b).BknOchTe DBirateJI, KaTO 3abPNTe KOHTaKTHN KIOU B nATPOHa 3a 3anaIbaHe (fmr.1/ no3.22).CneJ KaTO DBirateJI rTcAtpura, 3aBbPTeTe BeDHara KOHTaKTHN KIOU B INxOJHO NOLOKeHne.AKO 3abPNTe OTHOB KOHTaKTHN KIOU, DOKATO DBiratEJIr pa60tN, TOBa ige DOBEde Do NOBpeHa Ha 3anaIInlHaTcNCTema.
BkIIOUbaHe cpeBepcBEN CTapTep
Поберета дд Кабелтза 3аanaLbaHeto e CBbp3anKbMЗаалNTeHATAcBeeI.Пoctabete loCTa 3a ra3TaHaNo3nUIN,"3actaHETe 3ad KocacKaTApbNHTe c edHata pkaLoCTa 3a BkIOUBAHe/N3KIIOUVAHe Ha DBInrAteJI NTo 3aDpXTe (Фиг.5b).BkIOUeTe DInrAteJI CpeBercnBnH CTaTeP (Фиг.1/No3.9).3aZeJIta n3dpbnaTe pkoXBaTHATA OKOLO 10-15 cm (DOkato yceTHe CbnpOTuBLeHne) n DpBnHETe c EENO DBNKHeNE.AKO DBInrAteJIr He ce BkIOUH, DpBnHETe pkoXBaTKaTA OSe BeDHBJK.
BG
BhimaHne!
He octabrIte HINIOTo da ce BbPhe 6paTHo, CJIeKaTO rO n3DbpNaTe.
BnHmAHHe:Korato BpEmTo e cTydeHo, e Bb3MOJHO da ce haLoJHn Da nobTopnte 3anaIbaHete HraKoJIKO nTn. HAcTpOei Te JekHaHata pa60THa YecToTA Ha BpTeHe. Ppei Da 3anOChTe da KocHTe, Tpr6Ba Da NOBtopHTe IpoUcEs KaIOJIKO nTn, 3a Da ce yBepHTe, Que KocauKaTa e BnIrpABHocT. BnHaRn KORATO Tpr6Ba Da n3BbPwHTe HactPoJHa NIn peMOHT Ha KocauKaTa, N3uaKaHte, DOKATO HOHbTcnpE Da ca BbPTN. IN3HIOUHTe DnBAteLJa, Ppei Da IN3BbPWBate HAcTpOiKn, NODpBjHKa N peMOHT.
Yka3aHnHa:
- MoTOpHa cInpaUka (fHr. 5a/ no3. 1a): 3a da n3KJIIOuHTe DnBraTeJ, n3NoJ3BaIte JocTa 3a BkJIIOUbaHe/n3KJIIOUbaHe Ha DnBraTeJ. Korato OcBO6OJnte JocTa, DnBraTeJt I peKeIyrt HOK CnIPa ABTomAtNuHO. 3a Da KOCITE, 3aDpBXTe JocTa B paOToHa I03nIzma (fHr. 5b). PpeDi da 3anOHTe da KOCITE, npOBepTe HAKOLIO PbTn IocTa 3a BkJIIOUbaHe/n3KJIIOUbaHe. IpOBepTe daIIN JHHIoTO Ce DnNHN CBO6OJHO.
- loct 3a 3aDbNKBaHe/loct Ha cBeHNHtela (fir. 5a/ no3.1b): Korato dpbHnete Iocta (fir. 5c), cBeHNHtelaT 3a TpaHCMIncraTa ce 3atBaprI N KocauKaTa 3aNoUba da ce DvnHn npn paBoTeu dBnRaTeL. OcbOboKdabAte HABPeme IocTa 3a 3aDbNKBaHe, 3a Da MoJeTa da CnpTe DbnKeuata ce KocauHa. Ppei Da 3aOnHneTe Da KocHTe 3a NpBpN tBt, ynpaKnRBAIte NOTERHEo nCnnpaHTo, DOKATO CBNKHETe C NaHnHa Ha DvnHeHne.
- PpeDynpEckdHHe:HoratoDbIrataJeT Ce BkIouN,peKeIeIaHT HOK 3aNoUba Da ce BbPrtn.BaJHKo:PpeNi da cTapTnape TDbirateJI, H3npO6BaIte MOTOPHaTa CnnpaKa HAnKOLIO PbTNI, 3a Da npOBepTe DaJIi CnnpaCHOT KInIO E B N3npaBHOCT. IMaJIte PpeDbNc SlCpHO:T DBrataJIe T KOHCTpypan3a CkOpoc3a pr3aHe Ha TpeBa N 3a N3XbPJIne Ha TpeBaTa B Top6bata N e CdbJIr EKcPiLoaTaioHOH JHBOt.
- Поверявiate HNBOTo Ha MacLoTO.
- HanBaIte 6eH3nC cyHna I MepuTeJHo KaHue. IpOBepete daIbI 6eH3nHbT e YnCT.
BHHMaHHe:BnHaHn H3NoJ3BaIte cAmo 0e3oNaCeHa Tu6a 3a 6eH3nH. He npuTe, DOKaTo HaJIbATE 6eH3nH. Ppei da 3aOnOHeTe
daHaJIbAte 6eH3nH, H3KlNoUeTe DbIrTaTeI rO octaBeTe HRAKOJIko MmHyTu DA n3CTnHe.
- Поверете дал Кабелт 3а заалbaанeto e CBbp3ан кьм 3апалпелларота CBeц.
- 3acTaHete 3aJ KocauKaTa. EdHaTa pBka Tp8Ba Da 6bJe NocTaBeHa Ha IocTa 3a BkIOUBaHe/HKIOUBaHe Ha DBrGaTeJI. Dpyrata pBka Tp8Ba Da 6bJe Ha pBkoXBaTKaTa Ha CTapTePa.
- Bкнчete DВИгATEJI CpeBepCnBnIa CTapTeP (ФИR.1/ no3.9).3a ueIa n3dpbnaite PbKoXBaTKaTa OKOIO 10-15 cm.(DOKATO YcETIne CbnpOTINBJIeHne) I dPbNHte C eEDHO DVBIXeHne.AKO DBrIgATEJIaTHe Ce BkIIOU,ДрБnHete PbKoXBaTKaTa OSe BeDnBx.
BHHMaHHe! He ocTabrNte XnIIOTo Da ce BbPhe 6oPaTHO, CneI KaTO rN3DbPnATE.
BHHMaHHe:Korato BpeMeToeCTydeHo, eBb3MOxHO Da Ce HANOHNaIOBTOpNTe 3aNaIbAHeTO HRAKOJIKO NtN.
Myluipahe (fHr. 4b)
ПиMuIyIuPaHeTo OTrp3aHaTa TpeBa Ce NaKbIuBaФИNHOВЗТВОЕнЯ KOpNyc Ha KocaUkata NOTHOBO CE N3XBbPJIr Ha TpeBHaTa nIoU. He e Heo6xOdImO da cb6HpaTe TpeBaTa n DaЯ N3XbPJIrTe.
BHHMaHHe: MyIuIpaHTo MoKe da ce I3BbPbBa cAmO npi HnCKa TpeBa
OnTImaJIeH pe3yIITAT ue noCTnIHHeTe caMo C HoxHa 3a MyUHnPaHe (npedocTaBc KaTo npHnAdJeKHOCT).
3a da n3no13BaTe MynHpaAata FoHNKpN,OTkauhe Te TOp6aTa 3a Cb6npaHe Ha TpeBaTa,IOCTaBeTe npncTAbKaTa 3a MyuHpaHe (No3.4c) B OTbopa 3a N3XBpbLnHe Ha TpeBaTa N3aTbOpeTe Klanata 3a N3XBpbLnHe Ha TpeBaTa.
CtpaHnUHO n3XBbPJIHe Ha TpeBaTa (ФИг.4c)
3a da n3xBbPJIte TpeBaTa OTCpaHn,
pIpcTAbKaTa 3a MyJUnpaHe Tpr6Ba Da 6bJe
MOHTnPaHa. NocTabete npIcTAbKaTa 3a
CTpaHnUHO n3XBbPJIne Ha TpeBaTa (no3.4b),
KaKTo e nOka3aHo Ha fNpypa 4c.

BG
6.1Ппедида заночenteда кocite
Baxnn yka3aHn:
- 06JIeTeIpoJxOJaIuIdpExn.O6yIte cTa6bIJIHnO6yBKn.He O6yBaIte caHaJIu IIN MapaTOHKn.
- Поберепе ржшья HOK. Ак HOЖБТ e OгьнAT ИИ АКО ИмА дура HeиЗравноCT, ТрабБа д ro Смehnte C opигинален HOK.
- HaJIeTe roPbO B pe3epBoa pa HA oTKpnto. ⅢnoI3BaIte yHnI M mepNTelHO KaHue. Ⅲ6bpIeTe pa3JeTna 6eH3nH.
- IpooyeteTe n Cn3BaIte pBkoBOdCTBOTo 3a eKcIIIOaTauHry N yKa3aHNrTa 3a DbVraTeN 3a npInCTabHnTe.CloHete pBkoBOdCTBOTo Ha MRCTO,IOCTbINHO 3a OCTaHaJIte JInCa, KOITOn H3NOJ3BAt YpeDa.
- OTPa6oTeHnTe ra3OBe ca onaChn. BkIIOuBaIte DbIrTaTeIa camo Ha OTKpInTo.
- Поберете дал BCNUKи педпа3нустюйства с поставени далсвИЗпраВно CBCTОЯнne.
- YpeBt Tp86Ba da ce 06cnyHb caMo OT eHNO IInue, KoETo npITeKaba Heo6xOdMnTe NO3HaHnra 3a ueTta.
- KocheTo Ha MoKpa TpeBa MoKe Da 6bJe onaCHO. IIO B3MOKHOCT KOCTe Cyxa TpeBa.
- ПпсдурпдeTe OCTaHаЛNTe Лиca Ил Deцa Дa He ce Do6JInxKaBaTdo KocauKaTa.
- HnKora He n3noJ3BaIe Te KocauKaTa npi lo7a BVdMOCt.
- Ппени за заочене за косоче, отстаренье рацьсатип лрдmetи OT semята.
6.2 Yha3aHnna 3a npabulno Hocene
BHHMaHHe! HnHora He OTbapRte Klanata 3a N3xBpIRe Ha TpeBaT, KOrato yNoBHTeHOTo YcTPOiCTBO ce n3npa3Ba n DBratEJIr Ooi pa60TN. Bbptraunr Ce HOK MOKe da npuHHn HapaRaBaHHa.
BnHaR 3aKpenBaIte BHNMaTeJIHO Klanata 3a
13XbPJIne Ha TpeBata N Top6ata 3a Cb6paHe
Ha TpeBata. IpeDn Da rN CBAJIte, TbpoB
13KIIOHcTe DBNrAteJIa.
BnHaT TpA6Ba Da cna3BaTe onpeJeHeHOTO OT dpJbXkata 3a ynpaBLeHne 6e3oNaCHO pa3CToRHe N MeKdy KOpnyca Ha HoKa n OepaTopa. Tp6Ba Da 6bDeTe Oco6eHO BHNMaTeHn IO BpeMe Ha KOceH e N pRi CmHa Ha NocOKaTa Ha DnKHeHne NO CTpbMn TEpeHn Hn KaIIOH. Ocnypete CtaBnIHo NIoKeHne HA TJIOTO, Obyte ObyBnC aHTNXlb3raU,
CTa6nHn NpDMeTKn IbIgN nHaTaNHO.HocTe BnHaN HappeHo Ha HakloHa Ha TepeHa.
OTIeHaTouKaHa630nacHcCTTaHe H3nO3BaTeKocaKaTaHaTepeHcHaKnIOH Na1 15^
Быдete OCObeHOBHNMaTeHINпиDbNKeHneHa3aДипиДьрnaHHe NaKocaYkata.
CbueCTbyBa onaCHOCT O nbbBaHe!
6.3 Hoche
N3noJI3BaIte cAmO ocTpN, N3npaBHN HOJOBe, 3a da He ce HAcbCBaTcPbHOBeTe 3a da He noKbTTBa TpeBHata nloU. 3a da noOpra3BaTe TpeBaTa paBHomepHo, Tpr6Ba Da ynpablaBaTe KocauKaTa NO npaba LInHn.
Bpa3dnte BnHaTn Tp86Ba Da ce npnokpmbat C HAKOJIKO CaHTmEtpa, 3a Da He OCTabAT HEOKOCEH NBIuN. POnCTBaIte DOLHATA qACT Ha Kopnyca Ha Kocaykata N 3aDbJlnHTeJIHO OTCTpaHbAaTE HaTpynahata TpeBa.
HaTPyNaHATA TpeBa 3aTpudnBa BKNIOUcbaHETO, noHNKaba KaueCTBOTO Ha pr3aHe N I3XbPJIne Ha TpeBa. Ha NaKIoHOHe N TepeHH 6pa3dAha KocHe Tpr6Ba Da 6bJe HAppeuHa Ha NaKIoHa. PJIb3raHTo Ha KocauKaTa MoKe Da ce I36BerHe qe3 KOCO pa3noJooHe HArope. IV36epete BvCOunHaT a Ha pr3aHe CNOpeД DeIcTBInTeJHaT a BvCOUnHa Ha TpeBa. PtEmNHete HrKOJIko nTn Ipe3 TepeHa, TaKa Ye HabeDhJk Da ce OTCTpaHBA He NoBeYe OT 4 CM TpeBa.
N3KIOUOte DVBraTeJI, ppeI da N3BbPWBaTe npOBepKa Ha HOJa. IMaIte PpeDbNd, Ye CLeI N3KIOUOBAHe Ha DVBraTeJI HOXbT PpOdbJIkaBa Da ce BbPTn OSe HApOLKOceHydN. HNcORA He Ce ONITbAte Da CnpETe HOJa. PpOBepBaIte nepHOuHNO DaJI HoXbT e 3aKpeHEN npABINHO, DaJIe E B N3PpABHO CbCToHNe I DaJIe E 3aTOeH Do6pe. PIne Heo6xOJIMoCT Ro HatoTe IINr GO CMeHete. AHO DBNKeUHt Ce HOK Ce Udapn B ppeMTe, CnpETe KocauKaTa I N3aKaHte, DOKaTo HOXbT cpe NaHbLHo. CLeI TOBa npOBepTe CbCToHHeTo Ha HOJa N a DbPkaHa Ha HOJa. AHO HOXbT e NobpeH, Tpr6Ba da rO cmEHnTe.
BG
Yka3aHn 3a NaHnHa Ha KocHe:
- BhimabaTe 3a TBpDn npedmetn. KocauKaTa MoKe Da ce NobpeDu HIn Morat da Bb3HKnHaT HapaHbAHH.
- TopeuT DnBraTeI, aycnybT nIIN 3aDbNKBaUyT MexaHn3bM MoRat da npedn3BnKAT n3rapAHHa. He rN doKocBaTte!
- Hocete BHNMaTeJIHo Ha NaKJIIOHeH NII CTpbMNI TepeHn.
- П配电ТаНовerte КocHeTo,aco НЯma ДОCTaTbUH OHeBHa CBETInHa Ил ДОCTaTbUH OcIInHO I3KyCTBeH OCBetJIeHne.
- Поберете кocaykaTA, HOJA n OCTaHaJIte Yactn, aKO npemHete ppe3 npedmet NIn aKO Bn6paunTe ca no-CnIHn OT ObHKHOBEHO.
- He npomehaTe hactpoHnte n He 3BbPwBaIte peMOHTn pa60tN, 6e3 da CTe N3KJIIOUIN DBrIaTeJy. N3BaTeHaKpaHnKa Ha Ka6ena 3a 3anaIbaHeTo.
- Korato cte Ha ynua nn 6n3o do He, BHMabaTe 3a ynuHOTo DnKHeHne. He n3XbPnIe OKOceHa TpeBa Ha ynuaTa.
8.ИЗБЯВЕМecTa,HaKoNTOKOJIeJaTHe caCTaBnIHIN KOCeHTo He e63OnaCHO. ПиДвИЖЕНe Ha3aIpbPbO npOBepTe ДдИЗaBac HЯMaMaIKN Deua. - Korato TpeBaTa e TbCTa N BvCoKa, NaCTpoIte HaBvBvCoKaTa CTeEN Ha KocHe N KocTe 6aBHO. IpeDn Da OTCpaHraBaTe TpeBa NIN DpyrN OTlaRaHn, N3KlHoTe DEBiratela N N3BaTe Te Ka6eLa 3a 3anaJbAheTO.
- HnKora He oTcpaHraBai Te npedna3HInTe eIemEnTu.
- HnKora He haiBaIte 6eH3nH, aKo DnRaTeJIrE oIe ropeu nIa nAko pa60tn.
CTapTnpate DnIraTeJIa.
He oTcpanaBaiTe c pKa nn C kpaK octaTbUte O TpeBa B KOpnyCa Ha Kocaykata n no pa6OTHNnHCTpyMeHT.
3a ueIHa 3nOJ3BaIe ToDxOJaUcpeDCTBa, HAnpIMep YeTka IIN MeTna. 3a da ce Cb6npa TpeBata paBHOmePHo, cIeI yNtpe6a Tpr6Ba Da noHCTBaTe Top6aTa n peWetKaTa OT BbTpEShHaTa CTpaHa.
3aKaayTe TOp6aTcAmO,aKo DnRatEnT e n3HIOUey H aKO peXeIeNIT NHCtpMENT He ce dBnuH.NOBdInrHeTe cEHaTa pKa Klanata 3a N3XBpJIeH He TaPebaTa, a CpyraTa pKa XBaHETop6aTa 3a dpbHKaTa I 3aKaayTe OTrope.
6.5 CneI npKIOUcBaHe Ha KocHeTo
- BnHaHn octabraIte DbIraTeJIa Da n3CTInHe, npedn da npnb6epete KocauKaTaB 3aTBopeHo NOMEeHne.
- Прени за приберete Косачкata, Травь за я поочитente OT TpeBaTа, УмATA, Сma3нITEи macIoTO. He noctabraye duyrnпраздmetи Вьрху Косачкata.
- Ппедида Изпольвate КOCачkaТА OTHOBО, поверете BCИЧКИ ВИNTOBЕ и Гайки. 3aterнete pa3хлабенITE BIVNTOBE.
- Изразан electe Top6aTe 3a TpeBaTe,прдида ИЗПОЛЗВaTe KOCaHcKaTа OTHOBO.
- ɪЗbaɪdete Naɪkpaɪnɪka Ha 3aɪaɪnteɪnHaTata Cbeɪs, 3a ᵷa He MOrat HekOMπeTeHTHŋIɪuca DaɪnɪOJI3BaT KOCaɪhKaTata.
- He nocTabaIte KocauKaTa Do n3ToUHnK Ha onaChOCT. Ra3OBIne n3napEnHn MoRat da npedeN3BnKaT EKcNlO3nI.
- Пин ИЗБьршвахе на ремонт Трава на ИЗПОЛЗВATE само оригинални чacterи Или чacterи, кочTO сдожбени OT пОНЗВODИТЕЯ (ВИЖTEадра с в rapанцюнда KapTa).
- B clyaey Hma Da n3noJIbATE KocauKaTa npoDbJHKITeHOBpeMe, n3npa3HeTe pe3epBoapa C6eh3nHOBA cmyKaTeHa NOMna.
- He no3BolraBaiTe Ha dea da n3no13BaT Kocaukata. Kocaukata He e irpaKa.
- HnKora He CbXpaHЯBaIte 6eH3nH 6JIn3o Do n3ToUHnK Ha nCKpn.BuHaRn 3nO3BaIte npOBepeHa Ty6a.CbXpaHЯBaIte 6eH3nHa Ha MRCTO, HeDocTbNHO 3a Deua.
- Cma3BaIte ypea n ro noIdbpkaIte.

12.ИЗКИЮУBAнеHaДВИRATeJIa: 3aДaИЗКИЮЧITEДВИRATeJIa,OTNUCHETe loCTa 3aВHIIQUVAHe/H3KIIQUVAHe Ha DBIVaTeJIa (ФИR.5a/ no3.1a).ИЗБaIeTe HakpaHnkaHa 3anaJIteJIHATA CBEU, 3aДa npedOTbpaTHe BKHIOUVAHe Ha DBIVaTeJIa.IpeDIaBHKIOHTe DVBIGaTeJIa OTHOBO,IPOBepTeJHINOTO3aCINpaYkata.IPobepTeДaJIHJIoTOeMOHTIPAHO npabINHO.CMeHETeJHINOTO,aKOe IpeuNeHOIIIOBpeDeHO.
Cma3BaIte HJIaTa peoBHO n npOBepaIte daJIc Ce DnKAt PnaBHO.
7.2.5 PoiDpBHHa Ha Bb3dUwHnA HnTTbp (PnR.10)
3ambpcHNTe Bb3dyuHN HnItpn HamaJIaBAt MOUHOCCTTa Ha dBnIaTeJI, TbN KaTO B KAp6pyatopa Ce nOdaBa NO-MaIKo KOJIueCTBO Bb3dyx. AKO Bb3dyxbT e MHOro 3ambpcEH, npOBepraBe Bb3dyuHN HnITbp no-yeCTO. BHMaHHe: Hnkora He NoocTBAite Bb3dyuHN HnITbp c 6eH3n HnIc RopIMn pa3TBOPHTeIN. POnCtBaTe Bb3dyuHN HnITbp cAmO C Bb3dyx NOD HAJIrahe HnI KATO rO h3TynPate.
7.2.6 NopdpbXHa Ha 3anaJIteJHnTa CBeu
Почистваite заразалител haTа Cbeц c Meнha TeleHa YeTeKa.
- Изва对接е накраинka на залипелнасвец (фг. 11/ no3.24) в Бльтелювдвиженье.
- ɪЗbaɪdTe ənaɪnteɪnHaTa CbEɪs c KJIouH.
Crlno6raBaHTo ce n3BbPwBa B o6paTnA nocJeDoBaTeHOCt.
7.2.7ПобернаHaКИновna pemьн
7.2.10 POpdpbHnHa N O6cLyHbAhe Ha anymyIaTophata 6aTepeir
AkymylaTophata 6atepna Tpr6ba BnHaRn da 6bnde MOHTnpaHa Cta6nJIHO.
Cbpxhe T npabuHc MpeKaTaHa eIeKtpueckata HCTaIauJy.
- Пдьржаite akymулatopнata 6atepenya ncta n cyxa.

BG
7.3 Poirotobha Ha hocayhata 3a cbxpanenne
IpeDynpexdHne:He n3ToBaTte 6eH3nHa B 3aTbOpEni NOMEseHn,6n30 Do OrBn IIN DOkato NyuHte. Fa3OBnTe n3napenHn MoRat da npedn3BnKAT eKcnlo3nI INIOKap.
1.ИзпразнetepeЗерварас6eH3nHOBa cMykaTeJIHa nOMna.
2. Bhikoyete DbiraTeI rO octabeTe da pa60TH,doKaTO CBpUH OCTaHaITo KOJIueCTBO 6eH3nH.
3. CmehnTe MacNoTo CneI BceHn Ce3OH.3a 1eIta H3TOyeCTapOTo MaCIO npu 3aarpT DnIraTe I HaJIeTIe HOBO MacIO.
4.ИЗвадеTe 3anaJInteJIHnHaTcBSeUOT rIaBaTaHa zuINHHbpa.CpUHa macIbOHKaHaJIeIte OKoI0 20 Ml.MacIO B zuINHHbpa.I3dIbpnaIte 6abHO pboKoXbaTkata HaCTapTePa, Taka Ye MacIoTO Da BJIe3eBbTpE B zuINHHbpa.3aBNIte OTHOBO3anaJInteJIHnTa CBeU.
5.Почисте Te oxlaндашte pe6pa Ha cnlinHdbpa n Koprnyca.
6. Почисте целся урет, за за се за пьевът на лак.
7. CbxaHbAaTe ypeHa Ha do6pe BENTINIPAHO MRCTO.
8.ДемоHTираиTe aKуMЛaTOpHаТа 6aTePиЯ, aKO HЯMa Да ИЗПОЛ3ВaTe KOCaЧКaТа NOБeч eOT 3 Meceц.
BnKTe yka3aHnraTa 3a cbxpaHeHne Ha aKyMylatopHaTata 6aTePnB YyIbTbaHeto 3a 6e3oNaCha pa6Ota c aKyMylatopHa 6aTePnB (ToUka 3).
7.4 Poirotobha Ha Kocayhata 3a TpaHcnpTupahe
1.ИзпраЗHeTe pe3epBoapa(BINKTe TOnKa7.3/1).
2. Octabete Двигаела д pa6oTи,doKaTo CBbPshn octaHaIOTO KOJIInyecTBo 6eH3nH.
3.ИЗТоуЕТе MacLoTO npn 3aRpT dBnRaTeJ.
4.ИЗваде Te haKpaHnKa Ha 3aJaNTeHaTa CBeU.
5.Почирсте oxламдаштete pe6pa ha cnlnnDbpa n Koprnyca.
6. OTKaHuTe CTapTepHTo BbJHe OT KHyKaTa (ФИг.3c).Pa3BbPtTe 3Be3dOBuHnTe raHKn i CBaIeTe HaDoJy rOpHaTa YacT ha DpbKkata 3a ynpabLeHne. BnHmAbaiTe XnJaTa Da He ce npeUynT, DoKaTo CBaJIaTe DpbKkata.
7. HABINTe HAKOLKO CIOA BEllane MeKdy
rOHaTnDoJHaTa YAcT HaDpbjKkTaN DbVaTeIa, 3a Da He Ce NOLyTu TpHe.
7.5 Pa3xodHn MaTePnaJI, n3HoceHn YacTn pe3epBn YacTn
RapaHnraTaHa ypeDa He BkIIOUBa pe3ePBHN
auctn,pa3XoDNMaTePmaJI IN I3HOCEHN YacTn,
HanpImep DBNrAteJIno MaCIO,K
3anaIHTeHN CBeUINr,rapHNTpya 3a Bb3dyuHnN
fHITbp,6eH3INHOB fHITbp INI HOKOBe.
7.6 NopbUbahe Ha pe3epBn Yactn
Korato nopbybate pe3ePBn yactn, Tp6Ba da nocouHTe CJeHNTe DaHHN:
BnHa ypea
apTnKyIeH HOpE Ha ypeDa
- IndeHTnΦnKaζNoHEn HOMep Ha ypeDa
HOMep Ha Heo6xOaMaTa pe3epBHa qact.
AkyaJIHn CEHN INHΦOpMaζη Κe Hamepnte Ha HHTepHET CtpaHnζaT a www.isc-gmbh.info.
8.ИЗXBьрл�пиnpepa6OTbaHe
UpeBt e onaKOBaH C cel npedotbpaTBAHe Ha nobpei npn TpAHCnpTupaHeTo. OanaKBkatae cyPOBHa n MoKeJa da ce npepa60TH nn Da ce n3IOn3Ba OTHOBO KaTO cyPOBHa. UpeBt n PnHaadJeXHOCTNe MY Ce CbCToRrOT pa3JIuHN MaTePnaHn, HnPnMep MetaI n PIIactMaC. N3XbPraJne NOpeDeHnte qactH na CneuNlNo ppeHa3HaueHnte 3a CEJtA MeCTa. DOpblHInTeHa INΦopMaZn MOKeTe da nOlyuHte B CneuaNl3nPaHnTE MaRa3INn Nn B O6uHNAta.

9. YctaHOBAVeHa NOBpeNi
IpeynpeHdene: Ipei Da n3BbPwBaTe npOBepKn nn HactpoKn, TbpBO n3KIOUeTe DnIraTeN n 3BaTe HekpaHnka Ha 3anaJIteJIHaTc CBeu.
IpeynpeHdne: Ako cIeI n3BbPbBaHe Ha hAcTpoIHa IIN pEmoHT dBnraTeIaT e pa6OtnI HRAKOLMO MInHyTN, IMaJIte npEdbN, ye aycnyxbN oCTaHaJIte yactn ca ropeu. He rN doKocBaIte, 3a da He ce n3rOpnte.
| Пов徕а | Бъзmonна р�чина | Остсаньане |
| Неравносянхов, силино вибрирахе на урета | - Разхалбени ВИNTOBЕ - Разхалбени замрени на hoюа - HebalanCSINPAN HOJ | - Праверete ВИNTOBETe. - Праверete замрени на hoюа. - Сmedete hoюа. |
| Двигателен he paBOTи. | - Лостьт 3а вклочвае/ Излочвае на двигателен ho e nATINCHAT. - Лostьт 3а ra3а e bHe npaВилна поэци. - Запалителны сveи e nobpeDEDha. - Pezeрboaрьт e npa3eH. | - Натиchedete Л Ostа 3a вклочвае/ Излочвае на двигател. - Праверete настpoикata. - Сmedete запалителны сveи. - Наліte ropinbo. |
| Двигателен he paBOTи paBHomepno. | - Въздунягт Фильър e замьрсен. - Запалителны сveи e Замьрсena. | - Почиchedete Вьздунягфлър. - Почиchedete запалитelны сveи. |
| Травна пioшпожьлтЯва, порразьзванeto ho e paBHomepno. | - Нжьт ho e ocTbP. - Вис氧нatable на рязane ho e doCTaTBUHa. - НSCA чECTOTA ho bByptene ho duВогател. | - Нatoчete hoja. - Hac troйе похODЯ之所以 Вис氧на. - Праверete Л Ostа на мakсималha STepeH. |
| Изхьърелны trpeba e замьрсena. | - НSCA чECTOTA ho bByptene ho duВогател. - Вис氧нatable на рязane ho e doCTaTBUHa. - Нжьт e ИЗнoceH. - Top6ata e nbЛнa. | - Праверete Л Ostа на ra3ta ho makсималha STepeH. - Hac troйе похODЯ之所以 Вис氧на. - Сmedete hoja. - Изрpa3hete TOp6ata. |
| Актуларонatura 6batурые 3ambyрсena. | - Ная Контакт Можду buKcataи и akтуларонatura baTERpy. - Актуларонatura baTERpy e noBpeDEha. - Правларут (po3.19) 5A e noBpeDEH. | - Почиchedete КонтактНOTO TЯlio. - Батурыт Тябвда с ce npobervиот Stceц�лСТи и рпи HeobxodIMOCT da ce StmeHi. - Праверete Дали урededыт пботи с дугага 6batуры, Сmedete npedmaaznteYI. |
| Стартулен ho ce Вьрtn. | - Актуларонatura 6batуры e ИЗTOUSeHa. - Актуларонatura 6batуры ho e CBp3aHa. - ЛпCBВAT zuENCEJIHn CSbeDInHEnHry. | - 3azeDEte akтуларонatura 6batуры. - CBp3eTeAkтуларонatura 6batуры. - Праверete сцencSELHITe CSbeDInHEnHry. |
10. YcnoBna 3a rapaHnraTa
Фима iSC GmbH rapaHTnpa OTOCTpaHbAHeTo Ha uTeN mCmHa Ha ypeDa Bb3 ochBa H nocOueHaTa no-dolTyabnla, KaTo 3aKHOBOte npTeHcN 3a N3IbJIHeHne Ha rapaHcNra OCTaBaT He npomehen.
| Hateropnia | Празмер | Гаранця |
| Дeфент на материалы илlosьнструкцията | 24 месда | |
| Износваши се части | Въздуншени Фелтыр, жиILA на Бolyден, торба за травata, рим, съединения | 6 месда |
| Износсану mATERпалл/ Износени части | Нож | Гаранця сamo при мочentен Дeфент (24 ча сLEMД зakуныанeto/дана та на Насовя вон за Извъшени покупka) |
| Линсваши части | 5 paебтни дни |
3a n3HocBaIte ce qactn, n3HOceHITe MaTePnAIn I nnCbaIte qactn fipma iSC GmbH rapaHTnpaOTcpanBaHe Ha deΦeKtA n 13BbPwBaHe Ha doCTaBk caMo, aKO yBeDomITE 3a deΦeKtAB pamKnTe ha 24 caca (n3HOceHn MaTePnAIn), 5 pa6OTHn dHn (JINCBAu Nactn) nN 6 Meceua (n3HOceHn ce qactn) cIed 3aKnyBaHeTo n aKO yDcTObepnte daTaHa 3aKnyBaHe C kacOBra 6oh.
Pn deefektn Ha Maaterna IIN KOHcTpyKzra Ta Bn MoIM B cIyauHa rapaunza da npedocabte ypea 3aeHNO C npilooKeHaTa rapaHOnHa KapTa n daЯ nonbJIInTe n3zJIo. BaJHo e da oniWeTe defektnte ToUHO.
3a ueIta OTROBOpTe Ha cIeIHNITE BbIpocn:
- YpeBbT pa60tHnIe Bce HnIeΦeKbT Ce e IpoRbN B cAmTo HaHaNo?
Heio hnpabnlo nBn BneuataIeHne npedn da ce npoBn deΦeKbT (nHnKaun 3a deΦeKta)?
CnopeBacKaKBOce cBcToNdeΦeKbTHa ypeHa (OCHOBHa INDnKaunia)?
OnnueTe deekeKa.
Camo 3a cTpaHn OTEC
He n3xBpIyTe eJeKtpoHCTpyMeHTne npi 6ntOBtte OTnaDbzll!
CbflacHO Ebponeckata DnpeKTHBa 2002/96/EO 3a eJekTprueeCKN eJekTPOHH CTapn ypeDN IN npnilaraheto B nauhoHaHNOTo npabo ynoTpe6eHNte eJekTPOHNCTpyMeHTN Tp86Ba da ce cb6upat OTdeIHO I da ce doctabRT 3a ekOLOrHuNa NobTOPha ynoTpe6a.
AnTePHaTnBa 3a peuzKlnpahe nO OTHoSeHne Ha npzInBa 3a BpbIaHe:
CobCTBeHKnBt Ha eIeKtpOpyPeDa BmecTo BpBlaHe aItePHaTnBHO C cIe CbdeICTBHe e 3aIbJIHe IIO OTHOWeHHe Ha cIeLcBo6pa3HOTo ONOL3OTBOPraBaHe B ClyaH Ha OTKa3 OT CO6CTBeHocT.
CTapnT ypeI 3a ceIeta cIbIcTaKa MoJHe Da Ce npedocTabN B nyHKT 3a o6paTHO B3emaHe, KbTeTo CE n3BbIpWBA OTCpAraBaHe NO CMNCbIa Ha NaIOHaJIHnTE 3aKOH N 3a CbIpaHTo, INBO3BaHTo, CKlaIpaHTo I peuKIIpaHTo H a OTNaIbI. ToBa He 3acra I pniloKeHIne KbM CTapnTe ypeiOn OTdJIHn Yactn OT npHaIeKHOCTHe I NOMOuHN CpeCTBa 6e3 eJeKtpUeCKn KOMNoHeHTn.
Прениатваимудг вид разMHОжаване на дOKум entaцьи и спювоNTeJIHи дOKум entnHa npodykTHTe,сьто така на часу садуctnmO само сизрчноTo cbrflacne Ha iSC GmH /ICHrM6X/.
3anaeHoe e npaBTo 3a n3BpUbaHe Ha Texnueckn npomeHn
Гаранцноен дokумент
YBaKaemnKJIneHTN,
HaunTe npOdykTn noJleKnat Ha cTpor kauEcTBen KOHTpOJI. B cLuya, ue bIpeKIn TOBa V daJeH MOMeHT To3n UpeD He pa60n 6e3ynpueHNO, n3ka3BaMe CbKaJaleHHeTo cN Hb MoJIM, da ce o6bPheTe KbM Haata cepBn3Ha cLyk6a Ha nocouEHHa Ta3n rapaHOnHHa KapTa aDpec. C yOboNCTBne Cme Ha BaWe pa3noJokHeH N IO TeLEFOHa Ha nocouEHH TeLEFOH Homep B cepBn3a. 3a IpeJRABaHToHa npTeHcUNTe No OTHoEHHe Ha rapaHuaTep E B cnla CLeHOTO:
- Te3n rapaHcIOnHH yCIOBnY ypeKdA t DoJIbIHNteJIH rapaHcIOHH yClyrN. BaIHTe 3aKOHn npaba npn HeDocTaTbUHa npeCTaunra THe 6NBat 3aceRHaTH o Ta3n rapaHcIyra. Haata rapaHcIOHH yClyra e 6e3IPLaTHa 3a Bac.
2.「rapaunonHata ycnyra ce pa3npocTnpa nKJIuHTeHbBpxy deEeKTH, KOINTce dJIHnat Ha deFeKTn B cypoHNATA nn npO3BOcTBeHn deEeKTH n CE orpaHnUba DO oTcPAnBaHe Ha Te3n deEeKTH, pecn. do npDMHa HA ypeDa. MoJr, obpHete BnHMaHne HA TOBa, ye HauHte ypeDi CbIacHO npedHa3NaueHMeTO He ca KOHCTpynPaHH 3a npOMnUHe, 3aHaTynckA nn HnducnHa yNtpe6Ba. RAPaunOnen HdoTaeNoBOP npi ToBA He ce CKIOUBy, KOrato YpeBt Ce n3no3Ba B pomnHEn, 3aHaTnckn nn HndCpMaJIHn npednpnTn, KaTTo n npi paBHocToHN Ha TRe DeHocTN. OT hawata rapaunCe ne3KIOUcbAT cbIoTo tKa aDOnbHnTeHNyClyr 3a TPAHCNOPTn 5eTn, 5eTn Nopadn He cb6IoudaBaHe Ha UyTBaHeTO 3a MOHTaHa nn Bz OCHOBa Ha He npeun3Ha INcTaIaQn, He cb6IOdABaHe Ha yNbTBaHeTO 3a yNtpe6Ba (kato HAp. npadn CbBp3BaHe KbM HeNDxOJaIO eJeKTPueCKo HnpEKeHne nn BnTDok), rpy6n nn HenoXoJr 3a ZeIa npinloJHn (kato Hap. npeTOBapBaHe Ha yPeDa nn HnOJ3BaHe Ha neO3BOJeHn HcTpyMeNTn 3a yNtpe6Ba nn OboUpBaHe), He cna3BaHe Ha paope6Bte 3a PndpBjHKs n 6e3oNacOCT, Habl3ane Ha YyKn DteA bypeA (kato Hap. PAcBk, KaMbHn nn npax), yNtpe6Ba Ha cnla nn YyKnDn HameCn (kato Hap. 5eTn, noLyuHen ype3 naJaHe) KaKTo nn npadn ObnuaHto n3xA6BaHe npi yNtpe6BaT. TOBA BaKn No-CneuaIHO 3a AkymlaTopri, 3a KOnTO BbPekn TOBa OcnHyprBAME rapaunOnen CpOK ot 12 Meeca. Iparoto 3a rapanZma I3TnuA, kORATO NO ypeDa Beue ca 6nnl n3BbPseHn HameCn. - Гаранционнгт перiod e 2 rodiHи 3anOuBa OT daTata Na noKyIka Ha ypeHa. Гаранционнгte npaba Tp86Ba Da ce pdeBrtпрdNn3TuHaHe Ha rapaHcOnHnHЯ пeNoD B pamKnTe Ha nBe cEdMnU, cIed KaTo CTe OTKPnIi DeΦeKtA. ПрдяВаHoTo Ha rapaHcOnHnTe npaba CpeI n3TuHa He rapaHcOnHnHЯ пeNoD e n3KlIoUeHo. ПОпrabКaТa NII NOmJHa tHa ypeDa He BODn Do ydbJIkBaHaHe Ha rapaHcOnHnHЯ пeNoD, KaKTo N C Ta3n YcLyra 3a ypeDa NII 3a EbeHTyaJIHn MOHTnpaHn pe3epBn Yuactn He 3anOuBa HOB rapaHcOnHnHЯ пeNoD. ToBa BaJx CbIoo n npri N3PON3BaHe Ha cepBn3Hn YcLyTuHa MЯCTO.
- 3a npedraBaHTo Ha BaIeTo rapaunOHNo npaBO, MoJI, nIpaTe DeEkeKTHnHa ypeD ha nocouhenno no-dOly aIpc6 6e3 3aIIaUaHe Ha noIeHcKa TaKca. PpIIOKeTe KBNTaHuaTb A bOpIINa IIN dpyr yOocTOBepRAu pOKyPkata DOKyMeT c DaTa. MoJI, 3aTOba Na3eTe Do6pe KacOBn B0N KaTO dOKa3aTeLCTBO! MoJI, ONIwTe Hn npuHnA ta 3a peKlAmauTb Bb3MOJHO hAI-TOHNO. Ako DeEkeKbT Ha yPeDa e BkIoUeH B HAwaTa rapaHcuOnHa ycLyra, BeDHar a Ie nOLyuHTe o6paTHo nonpaBeH nII Ho ypeD.
Pa36npa ce, B 3aMraHa Ha Bb3cTaHOBRABaHTo Ho pa3XoIte Hne C yDObOJIcTBne OTCpaHBAme CbIo N DeΦeKTHI NO ypeA, KOHTo He ca IIN BeYe He ca BHLIOUeHN B oxbaTa Ha rapaHcNtA. 3a ueTtA, MoJIA, n3npaTeTe ypeA ha HsInr aDpc B cepBn3a.
3a n3hcBaun ce/In3pa3xoDbAHn IN deΦeKTHn Yactn Bn npinomHme opranuHneHra Ta Ha Ta3n rapaun CbflacHO rapaunOHnTe yCIOBn HA hAcTOrIoTO pBkoBOdCTBO 3a 06cIyXBAHe.
GR
περιεχόμενα
6.1 Piv to kópsi o tsx λoNs
Notified Body: Notified Body No.:
Reg.No.:
2000/14/EC_2005/88/EC
Annex V
Annex VI
Noise: measured L_WA = 112 dB (A); guaranteed L_WA = 115 dB (A)
P=2,5KW; L/0=cm
Notified Body: TUV SUD Industrie Service GmbH Westendstrasse 199
80686 München (0036)
2004/26/EC
Emission No.: e1197/68SA2004/26098900
Standard references:
EN 836; EN 55014-1; EN 55014-2; EN 60335-1;
EN 60335-2-29; EN 61000-3-2; EN 61000-3-3
Subject to change without notice
Archive-File/Record: 3400780-10-4155050-10
Documents registrar: Robert Mayn
Wiesenweg 22, D-94405 Landau/Isar


EH 08/2011 (01)