
DUO 32/60 - Scarifier SABO - Free user manual and instructions
Find the device manual for free DUO 32/60 SABO in PDF.


| Product type | Electric scarifier |
| Brand | SABO |
| Model | DUO 32/60 |
| Working width | 32 cm |
| Motor power | 1200 W |
| Power supply | Electric, 230 V / 50 Hz |
| Dimensions (L × W × H) | 68 × 45 × 30 cm |
| Weight | 15 kg |
| Cutting type | Scarifying and dethatching |
| Depth adjustment | Central, 6 positions |
| Collection bag | Yes, 30 L |
| Handle | Ergonomic folding |
| Safety | Emergency stop, thermal circuit breaker |
| Noise level | 84 dB(A) |
| Maintenance | Clean after use, annual blade sharpening |
| Spare parts | Blades, belt, wheels available |
| Repairability | Repairability index 7.2/10 |
| Warranty | 2 years |
| Recommended use | Lawns from 200 to 500 m² |
Frequently Asked Questions - DUO 32/60 SABO
User questions about DUO 32/60 SABO
0 question about this device. Answer the ones you know or ask your own.
Ask a new question about this device
Download the instructions for your Scarifier in PDF format for free! Find your manual DUO 32/60 - SABO and take your electronic device back in hand. On this page are published all the documents necessary for the use of your device. DUO 32/60 by SABO.
USER MANUAL DUO 32/60 SABO
natural_image
Two industrial lawn mower machines with clear cleaning handles, displayed against a plain background (no text or symbols visible)When you are reading the instructions for use, please unfold the front and back pages.

Nederlands
D Vor Arbeiten an den Schneidwerkzeugen Netzstecker ziehen!
F Avant de travailler sur l'outil de coupe, enlevez la prise de courant!
GB Before you work on the cutting equipment, pull the plog out!
NL Voor werkzaamheden aan de snijinrichting, netstekker uit trekken!
E ¡Quitar el enchufe de la red antes de efectuar trabajos en las herramientas cortadoras!
Prima di eseguire lavori sui dispositivi di taglio estrarre la spina!
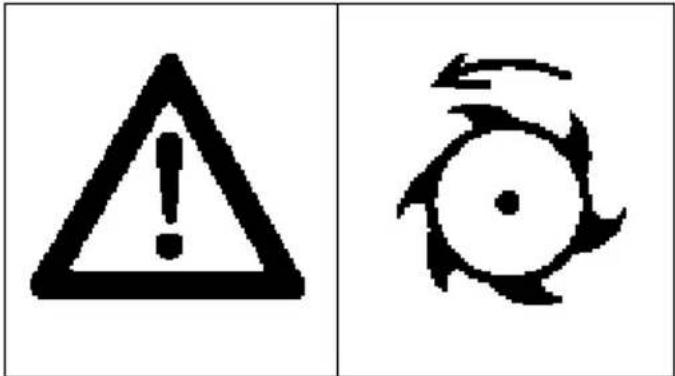
D Achtung Gefahr! Umlaufendes Schneidwerkzeug!
F Attention danger! Outil tournant!
GB Attention danger! Moving cutters!
NL Opgelet gevaar!
Draaiende messen!
E ¡Atención, peligro!
¡Herramienta cortadora en rotación!
Attenzione pericolo!
Dispositivo di taglio in funzione!

D Vor Inbetriebnahme lesen Sie die Gebrauchsanweisung!
F Avant la mise en marche, prière de lire le mode d'emploi!
GB Read the operating instructions before you use the machine!
NL Voor inbedrijfstelling gebruiksaanwijzing aandachtig lezen!
E ¡Lea por favor las instrucciones para el uso antes de efectuar la puesta en marcha!
Prima della messa in funzione leggere le istruzioni d'uso!
Dritte aus dem Gefahrenbereich fernhalten!
F Tenez toute tierce personne à l'écart de la zone dangereuse!
GB Keep third parties away from the danger zone!
NL Andere personen uit het gevarenbereik houden.
E ¡Mantenga alejadas a terceras personas de la zona de peligro!
I Tenere le persone lontano dalla zona di pericolo!
1
5
2

natural_image
Line drawing of a two-wheeled vehicle chassis with no visible text or symbols
natural_image
Technical line drawing showing a screw fastening tool inserted into a bracket with a clamp attachment (no text or symbols)
natural_image
Technical line drawing of a mechanical assembly with no visible text or symbols
natural_image
Line drawing of a hand holding three cables, no text or symbols present
natural_image
Line drawing of a mechanical clamp or bracket with a central hook and two curved arms (no text or symbols)

natural_image
Diagram of a mechanical device with rotating arm and cable, no text or symbols present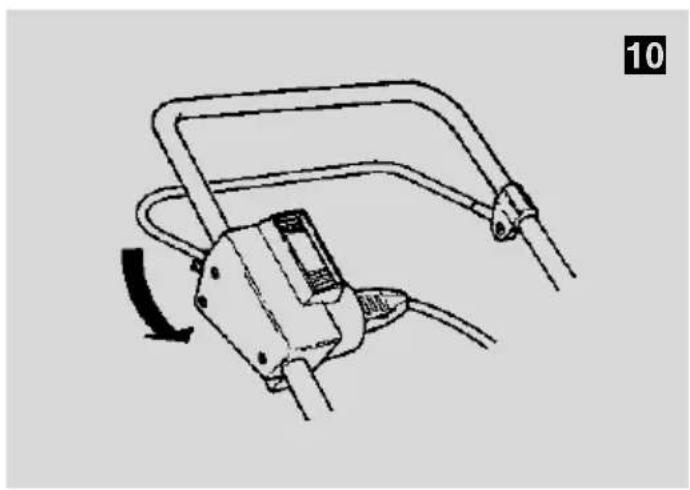
natural_image
Line drawing of a mechanical device with curved and straight lines, showing a rotating arm (no text or symbols)
flowchart
graph TD
    A["Device"] --> B["Coiled Coil"]
    B --> C["Directional Arrow"]
    C --> D["Arrow to Center"]
    style A fill:#f9f,stroke:#333
    style D fill:#ccf,stroke:#333


natural_image
Technical line drawing of a mechanical device with a lever and base, showing no text or symbols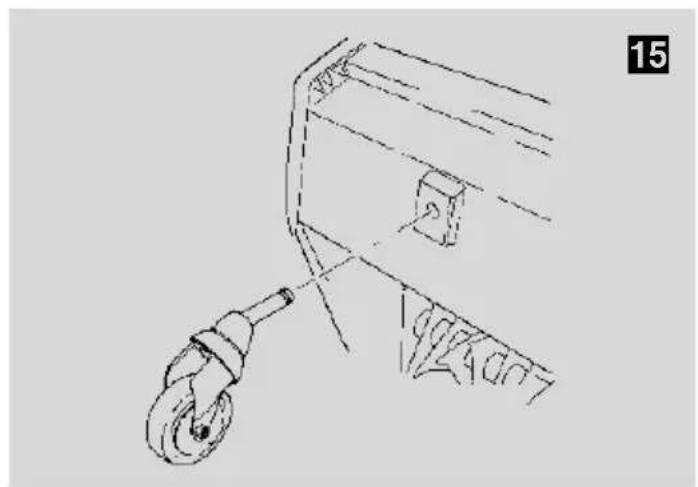
natural_image
Line drawing of a mechanical component with a curved handle and circular base, no text or symbols present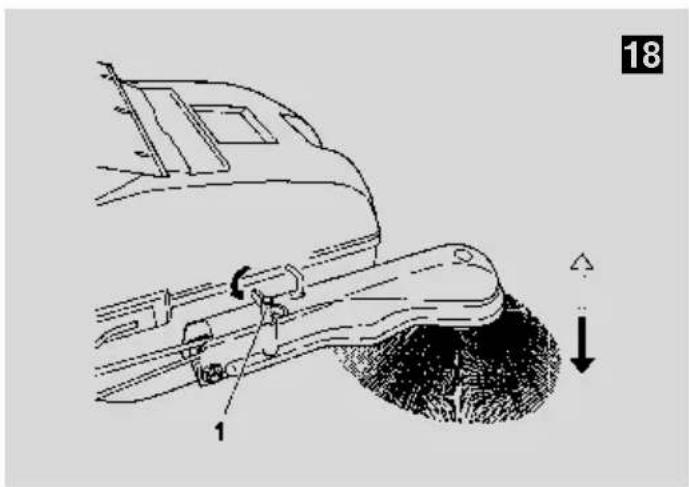
natural_image
Technical line drawing of a car interior showing a lever and directional arrows (no text or symbols)
natural_image
Technical line drawing of a vehicle chassis frame with labeled components (no text or symbols present)


natural_image
Line drawing of a cleaning or cleaning vehicle with brush and brushstroke details (no text or symbols)
natural_image
Line drawing of a car cleaning a surface with a brush (no text or symbols)
natural_image
Technical line drawing of a mechanical assembly or vehicle component (no visible text or symbols)
natural_image
Technical line drawing of a mechanical device with labeled components (no text or symbols)
natural_image
Technical line drawing of a mechanical device with labeled component 1 (no text or symbols beyond label)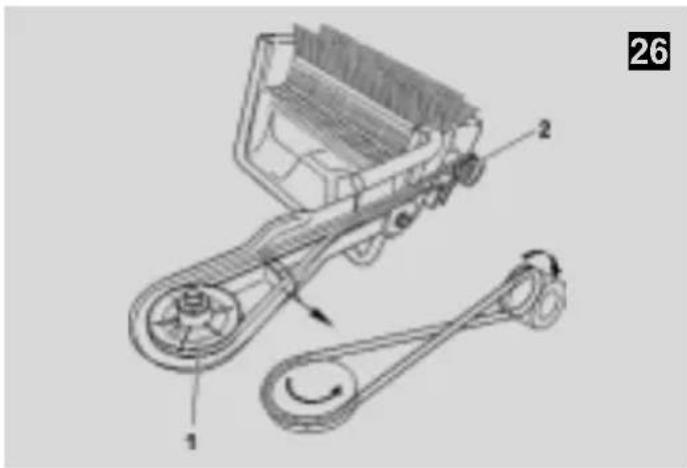

natural_image
Technical illustration of a mechanical conveyor system with a close-up inset showing internal components (no text or symbols)
natural_image
Mechanical assembly diagram showing a shaft, pulley, and wheel components with an arrow indicating motion (no text or symbols)EG-Konformitätserklärung · Déclaration de conformité pour la CEE EC Declaration of Conformity · EG-Conformiteitsverklaring CEE Declaración de Conformidad · Dichiarazione CE di Conformità
according to Directives 89/392/EEC and 73/23/EEC
to which this declaration relates corresponds to the relevant basic safety and health requirements of the Directive 89/392/EEC and conforms to the Directive 73/23/EEC.
Brush halves Order No. Side brush Order No.
Borstelhelfte Bestel-nr. Zijbezem Bestel-nr.
Order No. Toroidal belt Order No.
| 1. Key to pictures | 19 |
| 2. General safety guidelines | 19-21 |
| 3. Specifications | 21 |
| 4. Preparation | 22 |
| 5. Before first use | 22 |
| 6. Starting the lawn aerator | 22 |
| 7. Lawn aerator operation | 22-23 |
| 8. Care and servicing of the aerator | 23 |
| 9. Converting the lawn aerator to being a sweeping machine | 24 |
| 10. Starting the sweeping machine | 24 |
| 11. Using the sweeping machine | 24 |
| 12. Care and servicing of the sweeping machine | 24-25 |
| 13. Converting the sweeping machine to being a lawn aerator | 25 |
| 14. Warranty | 25 |
| 15. Causes of faults and elimination them | 26 |
E
Indice Página
81/1051/EWG = L_pA 70 dB (A)
Schwingungen am
Führungsholm* a hw = 4 m/s ^2
Tours/minute = 3000 mn ^-1
Niveau sonore = L_WA84dB(A)
- Position balayage: Cliché 2
with this SABO-DUO 32/60 you have a top performance lawn aerator which has two functions. Firstly, the Duo is an electric lawn aerator perfectly configured for small to medium size lawns. Secondly, the Duo is a handy, powerful sweeping machine for your yard, driveway and footpaths.
Please read through these operating instructions carefully before you use your Duo for the first time. The greater the attention you give to the technical instructions, the more reliable your SABO-DUO will be.
We would like to point out that any damage caused to the Duo by incorrect operation is not covered by the warranty.
Safety instructions are printed in bold in the text and are marked with this symbol.

Special attention should be paid to these sections for your own safety!
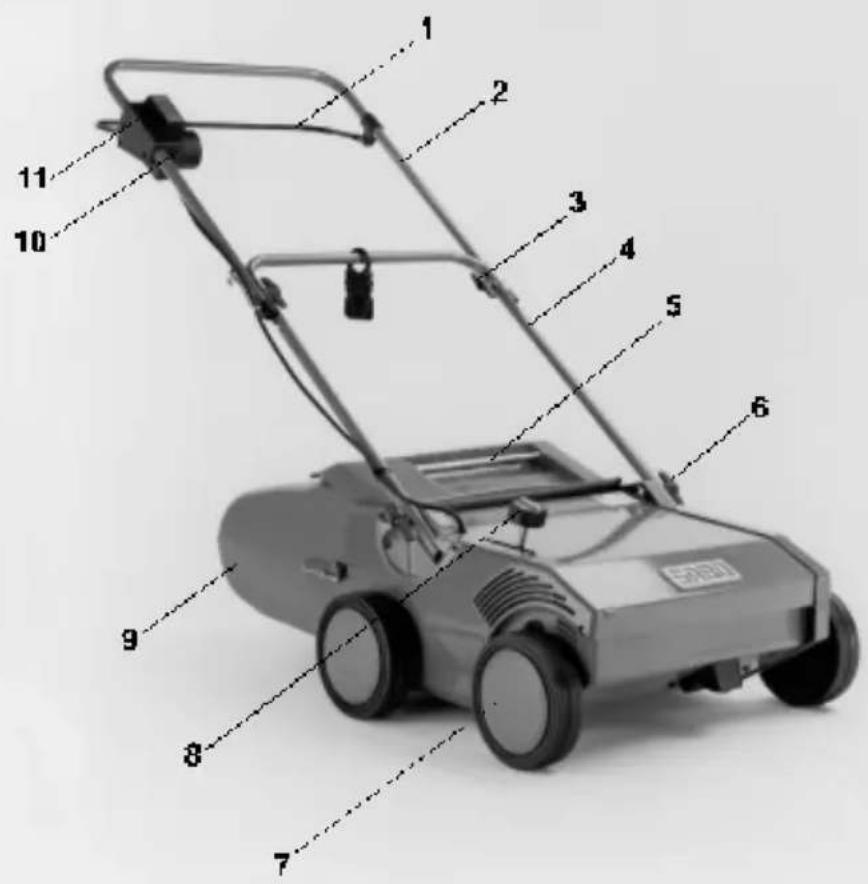
1. Key to picture 1: Aerator
- Safety switch bow
- Handle, upper part
- Wing nut connection
- Handle, lower part
- Grass ejection flap
- Handle connection
- Running wheel
- Adjustment screw to set the lawn aerator height and quick lifter for the cutter shaft
- Collector box
- Electric cable socket
- Locking switch
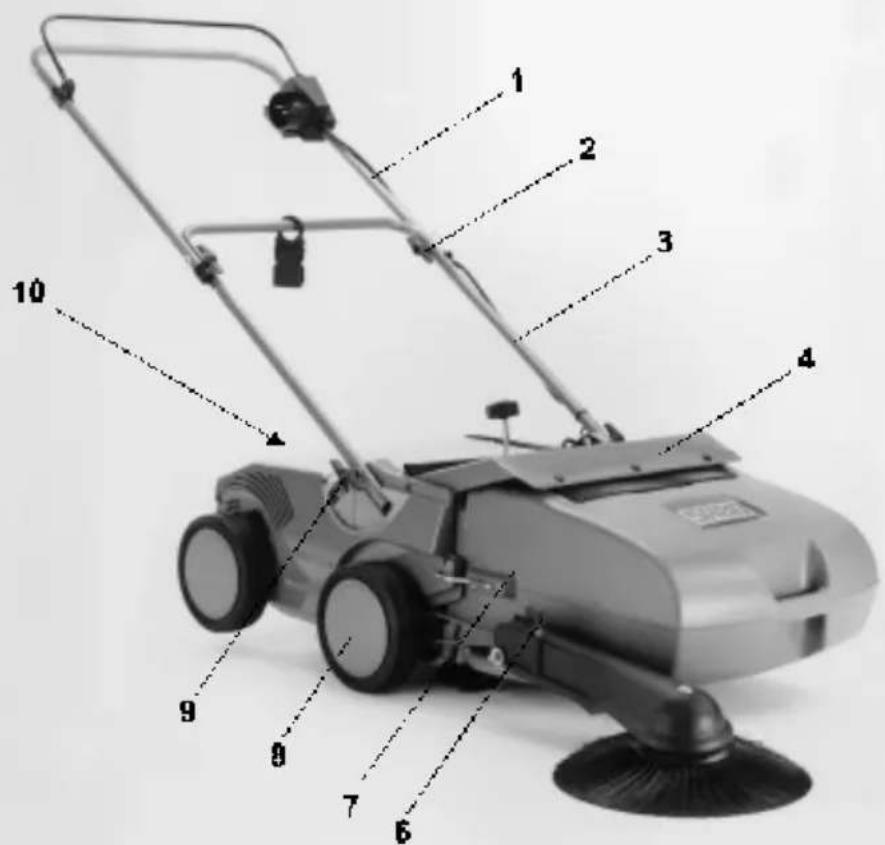
Key to picture 2: Sweeping machine
- Handle, upper part
- Wing nut connection
- Handle, lower part
- Grass ejection flap
- Side brush
- Side brush adjusting arm
- Collector box
- Running wheel
- Handle connection
- Tail wheel

2. General Safety Guidelines for the SABO-DUO 32/60
- Read these instructions carefully for your own safety and to ensure the correct function of the SABO-DUO 32/60. Familiarise yourself with the control elements and the correct method of using the Duo.
- Please remember that the person operating or using the Duo using the Duo is not only responsible for injury to other people or damaging their property but is also responsible for accidents caused by the Duo.
- These operating instructions are part of the SABO-DUO 32/60 and must be passed on to the purchaser if the Duo is resold.
- Please explain the possible dangers and how to prevent accidents to every person who may work with the Duo.
- Please store your SABO-DUO 32/60 in a safe place. When the Duo is not being used it should be stored in a dry, locked room and be inaccessible to children.
- The hand-over permit and all warranties become invalidated if the Duo is used with any accessories or attachments which have not been approved by SABO.
General Safety Guidelines for the Electric Lawn Aerator
- Never allow children and persons under the age of 16 or other persons who are not familiar with the operating instructions to use the SABO-DUO 32/60. Please note that local regulations can determine the minimum age of machinery operators.
- The lawn aerator is only intended for private use for the care of grassed areas and lawns in house or hobby gardens; however not in public areas, parks, sports grounds, on roadsides and in agricultural and forested areas.
- The lawn aerator is not to be used as a motorised hoe or to level uneven ground such as mole hills.
- Never use the lawn aerator if people, especially children, or animals are nearby.
Preparatory measures for aerating
- Always wear robust shoes when aerating. Never aerate barefoot or when wearing sandals.
- Always fully check the area where you use the SABO-DUO 32/60, both before and during use, and remove all stones, sticks, wires and other objects.
-
The power cable needed to operate the SABO-DUO 32/60 must have a minimum quality rating of H 05 RN-F in accordance with DIN 57 282/VDE 0282, a cross-section of 3 × 1 ~mm^2 . The connection must be made to a shockproof earthed 220/230 V a.c. socket.
-
Power cable connections must be made from rubber or covered in rubber and comply with the standard DIN/VDE 0620. Original SABO power cables satisfy these requirements.
- The plug must be fused with a 16 Ampere time-lag fuse.
- We recommend the use of a fault current protective device with a rated fault current of 0.03 Ampere or an equivalent safety device.

WARNING
– Electrical equipment is not to be changed.
- The power cable must be checked at regular intervals for signs of damage and ageing and may only be used if it is in a perfect condition.
- Before using the lawn aerator check that the screwed connections are tight, the lawn aerator is assembled correctly and check the condition of the cutter shaft.
Using the lawn aerator
- Keep the power cable away from the operating tools.
- Whilst you are aerating never drive the lawn aerator over the power cable, always maintain a safety distance when guiding the power cable. If the power cable becomes damaged switch off the lawn aerator, wait until the blades come to a standstill and pull the mains plug from the socket. Faulty power cables must be replaced.
- Always ensure that the cable can move freely, do not bend it, rub it or squeeze it.
- Only aerate during daylight or if the lighting is good.
- Ensure you are standing securely when aerating on slopes.
- Operate the Duo at walking pace.
- Mow at right angles to the slope, never straight up or straight down.
- Please be especially careful when you change direction when aerating on a slope.
- Never use the lawn aerator on excessively steep slopes.
- Please be especially careful when you turn the lawn aerator around or pull it towards you.
- There is a danger of stumbling when you walk backwards with the lawn aerator. Therefore avoid walking backwards.
- Avoid unnatural body positions. Ensure that you are standing securely and keep your balance at all times.
- Always keep the safety distance to the lawn aerator which is maintained by the length of the handle.
-
Turn off the motor and wait until the blades have come to a standstill whenever the lawn aerator is lifted for transportation, whenever areas other than grassed areas are crossed and whenever the lawn aerator is transported to and from the aerating area.
-
Never lift or carry a lawn aerator when the motor is running.
- Never operate the mower with damaged, missing or incorrectly fitted safety equipment. Only aerate when the lawn aerator is closed or a grass collecting box is properly fitted.
- When you start the lawn aerator make certain that your feet are at a safe distance from the operating tools.
- When you start the motor, the lawn aerator is not to be in a slanting position, but if it is necessary slant the lawn aerator then only do this in such a way that the operating tools are pointed away from the user.
- Never put your hands or feet near to moving parts. Always make sure that your hands or feet do not go under the housing.
- Turn off the motor and pull the mains plug out of the socket:
– before you check the power cable;
– before you check, clean or carry out maintenance work on the lawn aerator;
– before you release blockages or remove blockages from the ejection chute.
- If the lawn aerator becomes blocked, for instance by driving into an obstacle, a specialist must check whether lawn aerator parts have been damaged or deformed.
- An inspection is to be carried out immediately if the lawn aerator starts to vibrate unusually strongly.
-
The motor is to be switched off,
-
if you have to lift or tilt the lawn aerator, e.g. to transport it
- if you drive outside of grassed areas;
- if you leave the lawn aerator unattended for a few minutes.
Maintenance and storage of the lawn aerator
- Please ensure that all screwed connections have been tightened securely.
- The engine is to be switched off whenever the ejection flap is opened or the grass collection box is removed.
- Regularly check the grass collecting system for wear and tear or loss of function.
- For reasons for safety always replace worn or damaged parts.
- Always wear protective gloves whenever working in the area of the blades.
- Maintenance and cleaning work is only to be carried out when the motor is switched off and the mains plug has been pulled out of the socket.
Do not clean the lawn aerator with running water or pressure cleaners.
Notes for Switzerland:
- Electric lawn aerators may only be used if a non-operating automatic circuit breaker with a maximum actuating current of 30 mA is fitted into the circuit.
Notes for Austria:
- The power cable socket must be spray-proof.
General Safety Guidelines for the sweeping machine
- The sweeping machine is only intended for private use in yards, driveways and on footpaths; however not in public areas, parks, sports grounds, on roadsides.
- The sweeping machine is not to be used to sweep up inflammable, explosive, poisonous, carcinogenic or other substances that are injurious to health.
- Never sweep up burning or glowing objects such as, for instance, cigarettes, matches or similar.
- The sweeping machine is not suitable for use to sweep up liquids.
- Never use the sweeping machine close to heat sources or in areas that have an explosion hazard.
- Do not use the sweeper to clean steps or stairs.
- Only use the sweeper to sweep on all types of hard grounds.
- When you are using the sweeper look out for other people, especially children.
Preparatory measures for sweeping
- To reduce the potential of danger the sweeper is to be inspected before use to check that the screwed connections are tight, the sweeper has been assembled correctly and check the condition of the sweeping parts.
- Before you use the sweeping machine remove string, wires, packaging tapes or similar long items from the brushes. Wear robust gloves to prevent injury.
Handling the sweeping machine
- Adjust your driving to match local conditions.
- The collector box should be emptied after use.
- Whenever dirty objects have been swept up it is advisable to empty the collector box.
Maintenance and storage of the sweeping machine
- Please ensure that all screwed connections have been tightened securely.
- Regularly check the collecting system for wear and tear or loss of function. Pay particular care to the rubber lip.
- For reasons for safety always replace worn or damaged parts.
Do not clean the sweeping machine with running water or pressure cleaners.
- Wear robust gloves to prevent injuries whenever you empty glass, metal or other materials from the collector box.
- Do not oil cog wheels or other components.
For warranty and safety reasons only original SABO parts may be used and are to be fitted in accordance with the manufacturer's instructions.
3. Specifications
Lawn aerator: DUO 32/60
Length = 1300 mm
Width = 610 mm
Height = 950 mm
Weight = 26 kg
Working width = 320 mm
Mowing speed = 600 m ^2 /h
Wheels = 180 mm ∅
Bearings
Front = Cup and cone bearing
Rear = Needle bearing
Collector box volume = 38 Litre
Motor: Alternating current motor
Voltage = 230 V
Power = 1300 W at 3000 min ^-1
RPM. = 3000 min -1
Sound power level = L WA 84 dB (A)
Sound pressure
level = L _pA 70 dB (A)
Vibrations on the
lawnmower's
handlebars ^* a _hw = 4 m/s ^2
* measured according to prEN 1033, using an operator, substitute floor and machine setting according to prEN 836.
Sweeping machine: DUO 32/60
Length = 1730 mm
Width = 700 mm
Height = 980 mm
Weight = 30 kg
Working width = 600 mm
Sweeping speed = 1700 m ^2 /h
Collector box volume = 25 Litre
Rights to make technical alternations reserved!
4. Preparation
The following parts must be in the pack for the assembly of the lawn aerator:
. Duo 32/60
- Grass collection box
- Sweeping unit
- Tail wheel
- Tool box with the following contents
- Operating instruction
- SABO service centres directory
- Cable grips
Should a part happen to be missing please contact your dealer.
Assembling the handle 3 + 4 + 5
- Pull the Z shaped handle apart in an upward direction 3.
- When the upper and lower parts of the handle are on the same level screw both wing nuts tightly by hand 4.
- Push the ends of the lower part of the handle apart so that both ends can catch in the corresponding recesses on the housing. The handle can be used in two positions dependant upon the requirement:
- Handle position for aerating: Figure 1
- handle position for sweeping: Figure 2
- Before tightening the wing nuts, ensure that the square heads of the handle fastening bolts are positioned in the relevant square bores.
- Fix the cable to the upper and lower parts of the handle using cable grips.
5. Before using the lawn aerator for the first time

Check that all connections are positioned correctly. Tighten the screws if necessary. Check the screwed connections again after approx. 20 hours of operation. Make sure that all safety devices are fitted properly and are not damaged.
6. Starting the lawn aerator
Handle position
The handle position for aerating must be selected to be the one shown in figure 1.
Attaching the connection cable 6
NOTE

A connection cable of minimum quality H 05 RN-F as specified by DIN 57282/VDE 0282, with a cross section of 3 x 1 sq. mm and a rubber covered plug are necessary to operate the machine. The SABO connecting cable will fulfil these requirements. 25 meter-long cables are available from your dealer. The connection must be made to a socket outlet with earthing contact 230V alternating current, fusing 16A, time lag.
The connecting cable should be at least 15 meters long – through a maximum of 40 meters. Longer connecting cables reduced the electric motor's output.
Attaching the connection cable to the cable grip 7
To ensure that the cable is securely fixed to the lawn aerator it must be attached to the cable grip. This will prevent the socket being pulled from the lawn aerator.
- Make a semicircular loop in the cable approx. 120 cm from the connecting cable for the clutch.
- Push the cable from below through the cable grip and loop it to the left and right around the fastening stays (see Fig. 7).
- Take the cable by both ends and pull tight in the strain relief clamp.
- The connection cable with the cable socket must be guided to the connection plug on the upper handle.
- Only then should the connection cable be connected to the mains.
Before removing the cable the cable plug should be disconnected from the mains.
Hanging the collector box 8
- Open the aerator ejection flap (1) upwards.
- Lift the collector box and sweeper lip (2) upwards using the handle and hang it in place on the housing (4) using the two side hooks (3) (see the symbol on the collector box).
– Fold the ejector flap onto the collector box.
Starting the motor 9
Before switching on the electric motor apply reassure to the handle so that the aerator is lifted at the front. This will ensure that the cutter shaft can turn unhindered and will thus facilitate the starting of the motor.

Make sure that the cable is always a safe distance from the lawn aerator housing.
- To switch on the engine: first press and hold the red button and then pull the switch contact on the upper part of the handle.
– The bar must be held in this position during operation.
WARNING

The cutters work as soon as the motor starts to run. Make sure that hands and feeds are kept away from beneath the housing. The motor must be switched off whenever you leave the lawn aerator unattended. The connector must also be removed when working on the lawn aerator.
Switching off the motor 10
After releasing the safety operating bar it will return to its original position by spring power and the motor will switch off.
The electric motor of the lawn aerator is protected against overheating by a thermo-couple which switches off the motor automatically; the motor is ready for operation again after approximately 15 minutes cooling time.

Always allow the motor to cool when switched off with mains plug disconnected.
In the event of the motor switching itself off again after a short period the cooling time is to extended accordingly.
7. Lawn aerator operation

For your own safety you should observe the safety instructions at the beginning of these operating instructions when operating the aerator.
Handling the cable during use
Position the cable in such a way that the lawn aerator can pull it along easily over the lawn surface that has already been worked. When the mower turns the cable grip automatically positions the cable to the other handle side. Ensure that the cable is kept well alway from the cutters and that no loops are formed.

Check the mains cable regularly for signs of damage and only use it in perfect condition.
Operating position 11
The cutter shaft is set in the transportation position when the machine is new. Adjust the operating position as follows:
- To lower the blade shaft: swing the adjustment screw for the vertical cut depth out of the transport position into the operating position: i.e. slightly raise the unit, press in the adjustment screw and hold (1), the swing (2).
Adjusting vertical cut depth
- Turn the rotary knob (3) to the left until the cutter is just scratching the surface of the lawn.
- Turn the pointer (4) (arrow) in the rotary knob towards the aerator operator (zero adjustment).
- Now turn the rotary knob to the left so that the cutter cuts into the ground. As you do this the pointer is automatically rotated.
- A complete rotation (360°) to the left will lower the cutter shaft by 1.5 mm. The operating depth should be approx. 3-5 mm, this means 2-3 rotations of the rotary knob to the left.
- Slightly raise the unit and move the adjustment screw in the opposite direction to raise the cutter shaft from the preset working position. This does not change the aerator depth.
- After several hours of operation the cutter will need to be reset as a result of wear. Adjustment of the operating depth is to be carried out in exactly the same way as described above.
Emptying the collector box 12 WARNING

The motor must be switched off when opening the ejector flap and removing the collector box. Ensure you empty the collector box before it gets too full. Collection is impaired if the cutter is set too low.
- Switch off the motor.
- Raise the ejector flap.
- Take the filled collector box upwards from the aerator using the carrying handle.
- Close the ejector flap.
- Hold the box by the rear carrying handle and shake it out well.
- Replace the box using the reverse procedure.
Operation without the collector box

The ejector flap on the aerator housing must always be closed (folded down) when operating without a fitted collector box.
Tips on caring for your lawn 13
When aerating your lawn guide the aerator in straight lines with a moderate cutting speed.
Owing to the forward movement of the cutter shaft a slight amount of pressure only is needed to push the aerator forward. Depending on the nature of the ground it may be necessary to hold the aerator back against the working direction. Avoid sharp corners.
To turn: slightly raise the vertical cutter at the front, turn to the desired position and lower again. Where the lawn contains much moss or weeds it is recommended that the lawn be aerated a second time at right angles to the first direction. Remove the cuttings before starting again.
8. Care and servicing of the lawn aerator

The motor should always be switched off and the mains plug disconnected before starting any work on the aerator.
This always applies
– before you check the connecting cable;
— before you check, clean or perform jobs on the lawn aerator;
– before you remove blockages or remove items clogging up the ejection chute.
Cleaning
Remove all dirt and grass directly after aerating.
Turn the machine over onto its side and use a brush or cloth to clean. The air input slits for the cooling of the electric motor must be free from dirt and grass cuttings.

Never spray the lawn aerator with water since this could damage the electrical system and the motor (danger of short-circuiting).
Storing the lawn aerater
See: Storing the machine (Chapter on „Care and maintenance of the sweeping machine“)
Checking operating safety
Retighten all screws and nuts after the first few operating hours and from time to time thereafter. In order to avoid damage, check the condition of the cutter shaft and ensure that it is secure before aerating.
If the cutter is blocked, e.g. by driving over an obstacle, have a specialist check whether parts of the lawn aerator are damaged or deformed.
A specialist only should be entrusted with any repairs which may become necessary.
Tightening the V-belt tension 14
– Tilt the aerator to one side.
- Release the bolts on both front wheels under the wheel caps and remove the wheels.
- Remove screw (1).
- Move each cam (2) by one position in the direction of the arrow to tighten the tension of the V-belt.
– Tighten screw (1) and fit the running wheels.
Ensure that the cam is in the same position on both sides. The V-belt must be replaced when the cam is in the last position as this means that the V-belt can not be tightened any more.
Allow only a specialist workshop to change the V-belt.
Changing the aerator cutter
The complete cutter set must be replaced if the limit of wear has been reached and it is no longer possible to reset the aerator height (see chapter on „Setting the aerator depth“).
Allow only a specialist workshop to change the aerator cutter.
Servicing the wheels
See: Servicing the wheels (Chapter on „Care and maintenance of the sweeping machine“)
9. Converting the lawn aerator to being a sweeping machine
- Set blade shaft to transport position.
- Switch off the motor
- Remove the cable
- Always unplug the cable at the mains plug before you remove the cable, only after you have done this take the cable socket off the aerator. Remove the cable from the cable relief element.
- Adjust the handle
- Loosen the winged nuts on the housing 5. sufficiently to be able to move the handle to the sweeping position (fig. 2).
- Unhook the collector box
- Raise the ejector flap.
- Using the carrying handle lift the collector box upwards from the aerator and empty it if necessary.
- Clean the unit.
- see „Starting the sweeping machine“.
10. Starting the sweeping machine
Handle position
The handle position for sweeping must be selected to be the one shown in figure 2.
Fixing the tail wheel 15
– Turn the machine over onto its side.
- Insert the tail wheel into its mounting.
Hanging the sweeping unit 16
- Place the sweeping unit on the frame and hang it on the lower side hooks (1) on the housing.
– Lift the locking mechanism (2), press the sweeping unit into position and lock it in place. - Press the brush part onto the brush head until the two hooks click in place.
- Move the side brush into its operating position by pressing on the brush head.
Hanging the collector box 17
- Open the sweeping machine ejection flap (1) upwards.
– Lower the collector box and sweeper lip (2) downwards using the handle and hang it in place on the housing using the two side hooks (3) (see the symbol on the collector box).
– Fold the ejector flap onto the collector box.
11. Using the sweeping machine
Lightly push the sweeping machine at normal walking speed (approx. 1 m/s) over the area to be cleaned.
The sweeping performance depends upon the speed of the roller brushes and this is, in turn, dependant upon the speed at which the sweeping machine is pushed. Therefore do not walk too slowly. The sweeping machine has been adjusted at the factory for operation on flat ground.
The depth of the brushes should always be set so that they touch the ground with light pressure.
Adjusting the side brush 18
The height of the side brushes is set using the wing screw (1) on the side arm.
– Turn the wing screw to the right: the side brush moves upwards
– Turn the wing screw to the left: the side brush moves downwards
Resetting the sweeper roller 19
When it is delivered the roller brush is in the highest position. The sweeper roller must be reset if there is evidence of wear on the brushes after a certain time.
- To adjust the roller brush, dismantle the sweeping unit and turn each cam (1) one position in the direction of the arrow. Check that the adjustment is exactly the same on both sides so that the roller brush is horizontal in the sweeping machine.
- If the last position has been reached the roller brush can not be adjusted any further and the brush halves must be replaced.
Tips on sweeping 20 + 21
Lightly push the sweeping machine over the area to be cleaned to carry out sweeping. Please remember that the rotary speed of the roller brush, and therefore the sweeping performance, is dependant upon the operating speed. You can easily brush out corners and edges with the side brush.
To sweep up piles of dirt 21 you must approach the pile at the left side and use the side brush to spread the dirt in front of the roller brush. Individual bristles on the roller brush have different lengths, therefore a new roller brush does not sweep optimally. However, after a few minutes operation the bristles are all the same length and the best possible sweeping results are achieved. It is advisable to empty the collector box if dirt remains on the ground.
Emptying the collector box 12
- Raise the ejector flap.
– Lift the filled collector box upwards from the sweeping machine using the carrying handle. - Close the ejector flap.
- Hold the box by the rear carrying handle and shake it out thoroughly.
- Then replace the box using the reverse procedure.
12. Care and servicing of the sweeping machine
Empty the collector box and clean the sweeping machine every time it is used. Lay the sweeper on the left side (driving direction) and use a brush or cloth to clean it. Check whether string, wire or tape has become wrapped around the roller brush. If so, remove it immediately otherwise the effectiveness of the brushes may become impaired. Wear robust gloves to avoid injury when removing objects.
WARNING
Never oil cog wheels or other components (except for wheel bearings). Do not clean the sweeping machine with running water or pressure cleaners.
Storage of the sweeping machine 22
Always store the machine in a clean condition in a locked, dry room.
- To reduce storage space undo the four wing nuts sufficiently so that the handle can be folded in a Z shape 3.
- Do not buckle the cable when doing this.
- You can store the machine vertically (with the wheels towards the wall) so that only a small amount of storage space is required. to do this you must undo the lower wing nuts, bring the handle to a level position and tighten the wing nuts. Store the machine vertically as shown in fig. 22.
Storage of the sweeping unit and tail wheel 23
- Always store the sweeping unit as is shown in fig. 23. This looks after the bristles on the roller brush and side brush and avoids you deforming the bristles over a long period of time.
- The tail wheel (1) can be inserted into the side arm and stored together with the sweeping unit to avoid it getting lost.
Changing the brush halves 24
– Dismantle the sweeping unit.
– Turn the roller brush until a screw becomes visible at both sides.
- Remove both screws and then both halves of the brush.
- The new brush halves (order no. 35740) are fitted in the reverse sequence.
- After changing the brush halves, the eccentric must be positioned on both sides in such a way that the sweeper roller is in the highest position.
Replacing the side brush 25
- Dismantle the sweeping unit.
- Press the snap hooks (1) in the centre of the brush part inwards.
– Pull off the brush part of the side brush and replace it (order no.35732). - Press the new brush part onto the brush head until the two hooks click in place.
Changing the toroidal belt 26
- Dismantle the sweeping unit.
- Pull off the side brush 25.
- Take the belt from both pulley wheels.
- To fit the new belt (order no. 35731) firstly lay it on the pulley wheel on the side arm (1), turn it by 90^ and lay it in the cog wheel groove (2) as shown in the sketch.
NOTE

The side brush must turn in the direction of the roller brush.
Servicing the wheels
Front wheels
Oil the wheel bearings once a year. To do this undo the screws and remove the wheels.
After oil has been trickled into the bearings, replace the wheels and tighten the screws.
Rear wheels 27
- Remove the rear wheels after undoing the fixing screws.
- Remove dirt and grease residue.
– Lightly lubricate the bearings (multi-purpose grease e.g. FINA MARSON or SABO roller bearing grease, order no. 31731). - When the wheels are replaced onto the cog wheels make sure that the cog teeth mesh with one another.
– Tighten the fixing screws.
13. Converting the sweeping machine to being a lawn aerator.
- Unhook the collector box
- Raise the ejector flap.
- Using the carrying handle lift the collector box upwards from the aerator and empty it if necessary.
- Remove the sweeping unit (fig. 16)
- Raise the locking mechanism, hold the sweeping unit on the frame and remove it upwards.
- Take off the tail wheel (fig. 15)
– Turn the collector box (with sweeping lip at the top, see the symbol) and hang it (fig. 8). - Adjust the handle
- Loosen the winged nuts on the housing sufficiently to be able to move the handle to the aerator position (fig. 1).
- Fitting the power cable
- Attaching the connecting cable to the cable grip 7.
- Firstly connect the cable socket at the control box plug (fig. 6)
- Only then connect the power cable to the mains supply.
14. Warranty
SABO conditions of warranty. SABO provides complete warranty for every SABO product for 1 year as from date of purchase. This warranty applies where the machine has been used correctly in accordance with its designated purpose and handled properly in accordance with the operating instructions.
Any faults and defects occurring on the machine will be eliminated free of charge for the duration of the warranty insofar as they are attributable to material, processing and/or design faults. This warranty does not apply to damage arising through normal wear and tear, improper treatment, negligent use, fitting of spare parts other than original SABO parts, insufficient care and/or maintenance, failure to observe the operating instructions. The period of warranty will be extended to 3 years for the housing insofar as the machine is used exclusively for private purposes. The warranty only covers material and not labour costs after expiry of 12 months as from date of purchase. The warranty for the housing does not cover damage to the paintwork as a result of normal wear and tear. Any claims exceeding the assured warranty will not be recognised by SABO.
In case of complaint, please consult your dealer or your next SABO service station, presenting the receipt of purchase. Any complaints may not be remedied by persons not expressly authorised so to do. All claims will become extinct should complaints be remedied in the above manner.
The competent sales point must be notified immediately of any damage sustained during carriage.
15. Causes of faults and how elimination them
Aerator
| Fault | Possible cause | Remedy |
| Motor does not start | -No power.-Power cable, plug or plug connector damaged.-Power cable damaged.-Thermocouple has activated due to-motor overheated-cutter shaft blocked. | -Connect mains plug.-Have it checked at a SABO-service station.-Have it checked at a SABO-service station.-Allow it to cool for 15-20 mins depending upon outside temperature.-Clean dirt and grass from the air input slits for cooling the electric motor.-Check the aerator depth (see „Adjusting the aerator depth“), clean the cutter shaft. |
| Strong vibration | -Motor mounting loose.-Cutter shaft not balanced. | -Have it checked at a SABO-service station.-Have it checked at a SABO-service station. |
| Cutter shaft does not turn | -V-belt loose or defective. | -Have it checked at a SABO-service station. |
Sweeping machine
| Fault | Possible cause | Remedy |
| Side brush does not turn when machine operates | - Toroidal belt has jumped off- Toroidal belt twisted or worn. | - Fit toroidal belt as shown in sketch 25- Replace toroidal belt |
| Main roller brush only turns occasionally or not at all | - Cog wheels soiled | - Clean cog wheels |
| Sweeping machine is difficult to push | - Side brush set too deep- Roller brush set too deep | - Adjust side brush higher- Adjust roller brush higher |
| Roller brush does not sweep | - Roller brush worn | - Adjust roller brush |
Please consult the next SABO service station for any disorders and faults that are not shown here. This applies in particular to equipment with electric motors, as an insulation test always requires to be carried out when such equipment is repaired. Repair work on electrical devices is to be carried out by qualified electrical specialists only.
Do not carry out repairs yourself! If you have already repaired your SABO electrical equipment in the past we recommend that an
insulation protection test be carried out by a SABO service expert for your safety.
The address can be found in the list of SABO Service Stations.
Your SABO service station will also be happy to help you should you not wish to carry out the maintenance and adjustment work described above yourself.
Geachte klant.
sonora = L _pA 70 dB (A)

- Nederlands
- EG-Konformitätserklärung · Déclaration de conformité pour la CEE EC Declaration of Conformity · EG-Conformiteitsverklaring CEE Declaración de Conformidad · Dichiarazione CE di Conformità
- E
- Indice Página
- Key to picture 1: Aerator
- Key to picture 2: Sweeping machine
- General Safety Guidelines for the SABO-DUO 32/60
- General Safety Guidelines for the Electric Lawn Aerator
- Preparatory measures for aerating
- WARNING
- Notes for Austria:
- Specifications
- Preparation
- Before using the lawn aerator for the first time
- Starting the lawn aerator
- Handle position
- Hanging the collector box 8
- Starting the motor 9
- Switching off the motor 10
- Lawn aerator operation
- Handling the cable during use
- Operating position 11
- Adjusting vertical cut depth
- Emptying the collector box 12 WARNING
- Operation without the collector box
- Tips on caring for your lawn 13
- Care and servicing of the lawn aerator
- Cleaning
- Storing the lawn aerater
- Checking operating safety
- Tightening the V-belt tension 14
- Changing the aerator cutter
- Servicing the wheels
- Converting the lawn aerator to being a sweeping machine
- Starting the sweeping machine
- Fixing the tail wheel 15
- Hanging the sweeping unit 16
- Hanging the collector box 17
- Using the sweeping machine
- Adjusting the side brush 18
- Resetting the sweeper roller 19
- Tips on sweeping 20 + 21
- Emptying the collector box 12
- Care and servicing of the sweeping machine
- Never oil cog wheels or other components (except for wheel bearings). Do not clean the sweeping machine with running water or pressure cleaners.
- Storage of the sweeping machine 22
- Storage of the sweeping unit and tail wheel 23
- Changing the brush halves 24
- Replacing the side brush 25
- Changing the toroidal belt 26
- NOTE
- The side brush must turn in the direction of the roller brush.
- Front wheels
- Rear wheels 27
- Converting the sweeping machine to being a lawn aerator.
- Warranty
- Causes of faults and how elimination them
- Geachte klant.
Brand : SABO
Model : DUO 32/60
Category : Scarifier