PLS 300 SET - Measuring tool BOSCH - Free user manual and instructions
Find the device manual for free PLS 300 SET BOSCH in PDF.

| Product type | Tile sawing and cutting station |
| Brand | BOSCH |
| Model | PLS 300 SET |
| Article number | 3 603 M04 1.. |
| Max. cutting length (sawing) | 315 mm |
| Max. cutting height (sawing) | 25 mm |
| Horizontal miter angle | ±45° |
| Vertical miter angle | ±45° |
| Max. cutting length (tiles) | 340 mm |
| Max. cutting height (tiles) | 10 mm |
| Weight (with PTC 1) | 3.6 kg |
| Saw blade dimensions (max.) | Total length 100 mm, tooth length 76 mm |
| Compatibility | Bosch PST jigsaws |
| Main functions | Longitudinal, cross cutting, miter cutting, tile cutting |
| Maintenance | Clean with compressed air or brush after each use |
| After-sales service France | Tel. 0811360122, email contact.outillage-electroportatif@fr.bosch.com |
Frequently Asked Questions - PLS 300 SET BOSCH
User questions about PLS 300 SET BOSCH
0 question about this device. Answer the ones you know or ask your own.
Ask a new question about this device
Download the instructions for your Measuring tool in PDF format for free! Find your manual PLS 300 SET - BOSCH and take your electronic device back in hand. On this page are published all the documents necessary for the use of your device. PLS 300 SET by BOSCH.
USER MANUAL PLS 300 SET BOSCH
Power Tools Division
70745 Leinfelden-Echterdingen
Germany
www.bosch-pt.com
1 609 929 W68 (2010.03) PS / 224 UNI

1 609 929 W68
PLS 300
PLS 300 Set

BOSCH
de Originalbetriebsanleitung
en Original instructions
fr Notice originale
es Manual original
pt Manual original
it Istruzioni originali
nl Oorspronkelijke gebruiksaanwijzing
da Original brugsanvisning
sv Bruksanvisning i original
no Original driftsinstruks
fi Alkuperäiset ohjeet
el TpwrTtUTo 08nyiw Xphonc
tr Original isletmet talimati
pl Instrukcja oryginalna
cs Puvodni navod k pouzivani
sk Póvodny námod na použitie
hu Eredeti hasznalati utasitas
ru OpunHaIbHoe pyKOBOaCT-BO IIO 3KcIaYatauIN
uk OnprihaIbHa iHCTpyKciI 3 ekTnayataii
ro Instruetiuni originale
bg OpunHaHa HnctpyKuia
sr Originalno uputstvo za rad
sl Izvirna navodila
hr Originalne upute za rad
et Alguparane kasutusjuhend
Iv Instrukcijas originalvaloda
It Originali instrukcija


2
Deutsch. 9
English. Page 17
Francais.. Page 25
Espanol . 33
Portugues Pagina 41
Italiano 49
Nederland . 57
Dansk . 65
Svenska. 73
Norsk. 80
Suomi . 87
Eληνικα Σελiδa 95
Türkce. Sayfa 104
Polski Strona 112
Cesky. Strana 121
Slovensky Strana 129
Magyar. Oldal 138
Pycckn. ..CtpaHua 146
UkpaIHcbKa 155
Româna.. 163
General Safety Rules

Read all warning notes and instructions enclosed with the sawing station and the power tool to be mounted. Failure to follow the warnings and instructions may result in electric shock, fire and/or serious injury.
SafetyWarnings for Sawing Stations
Pull the plug from the mains receptacle and/or remove the battery from the power tool before making adjustments on the tool or changing tool accessories. Unintentional switching on of the power tool is the cause of many accidents.
- Assemble the sawing station in the proper manner before mounting the power tool. Safe guiding of the power tool is possible only when the sawing station is properly assembled.
- Place the sawing station on a firm, level and horizontal surface. If the sawing station can slip off or wobbles, the power tool or the workpiece cannot be uniformly and securely guided.
Attach the power tool securely to the sawing station before using it. Slipping off of the power tool on the sawing station can lead to loss of control.
Take care that the cable of the power tool does not come between the base unit and the guide rail. When the cable is damaged or cut through, there is danger of electric shock.
- Remove the power tool before modifying the sawing station or folding up the guide rails. The power tool can fall down, become damaged or cause injuries.
Do not use a defective sawing station. Only an intact sawing station can guide the power tool securely.
Ensure that long and heavy workpieces do not affect the equilibrium of the sawing station. Long and/or heavy workpieces must be supported at the free end.
Wear protective gloves when cutting tiles. Sharp edges develop on broken tiles and can cause injuries to the operator.
Use the saw station only for cutting the materials listed under Intended Use. Marble or granite as well as tiles with a rough surface structure and natural stone tiles cannot be cut.
Functional Description
Intended Use
PLS 300: Together with the power tool, the sawing station is intended for sawing straight lengthway and crossway cuts in boards and profiles of hardwood and softwood, as well as aluminium and plastic.
Horizontal metre angles from a maximum of -45^ to +45^ as well as bevel angles from a maximum of 0^ to 45^ can be set.
The sawing station is intended for operation exclusively with jigsaws from the Bosch PST DIY program.
Only use the saw blades recommended by Bosch (see page 223). When using saw blades that are too thin, danger is given that the cut runs out of centre.
PLS 300 Set, PTC 1: Together with the tile cutter, the sawing station is intended for cutting ceramic and nonvitreous tiles to a maximum thickness of 10mm .
Horizontal metre angles from a maximum of -45^ to +45^ can be set.

18 | English
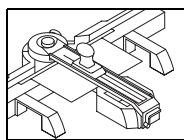
Product Features
The numbering of the product features refers to the illustration of the sawing station on the graphics pages.
PLS 300
1 Base unit
2 Scale for metre angle (horizontal)
3 Locking knob for height adjustment
4 Guide rail with sawing slot
5 Side stops of the guide rail
6 Support extension
7 Additional support
8 Bridge
9 End stop for bevel cuts
10 Locking lever of the guide rail
11 Alignment mark
12 Locking knob for various metre angles (horizontal)
13 Angle indicator (horizontal)
PTC 1*
14 Tile cutter
15 Stop with scale
16 Break-off cones
- only in combination with PLS 300 Set
Technical Data
| Sewing station | PLS 300 | PLS 300 Set (PLS 300 + PTC 1) | |
| Article number | 3 603 M04 0.. | 3 603 M04 1.. | |
| Sewing | |||
| - Max. cutting length for crossway cuts (90°) | mm | 315 | 315 |
| - Max. cutting height | mm | 25 | 25 |
| - Mitre/Bevel Angle | |||
| Horizontal | ° | ±45 | ±45 |
| Vertical | ° | ±45 | ±45 |
| Cutting tiles | |||
| - Max. cutting length for crossway cuts (90°) | mm | - | 340 |
| - Max. cutting height | mm | - | 10 |
| - Mitre/Bevel Angle | |||
| Horizontal | ° | - | ±45 |
| Weight according to EPTA-Procedure 01/2003 | kg | 3.4 | 3.4 + 0.2 |
Dimension of suitable saw blades
| Max. overall length | mm | 100 |
| Max. toothed length | mm | 76 |
Only use the saw blades recommended by Bosch (see page 223). When using saw blades that are too thin, danger is given that the cut runs out of centre.
English | 19
Operation Sawing
Preparing for Operation
The saw station must be assembled depending on the respective sawing application:
- Sawing Panels
(e. g. laminate flooring panels)
Sawing Profiles
(e.g.baseboards)
The use of screws/bolts is not required.
Panel (cross section) (see figures A1-A3)
- Mount the support extensions 6 left and right to the base unit 1.
Depending on the workpiece size, mount the additional supports 7 to the inner or outer guide of the support extensions. - Loosen the locking knob 3 a few turns.
- Turn the locking lever 10 of the guide rail leftward and fold the guide rail 4 upward.
- Mark the desired cutting line on the workpiece.
- Place down the workpiece with the visible side flat against the stop of the base unit 1.
- Fold the guide rail downward and align the workpiece to the cutting line of mark 11.
- Lock the guide rail 4 with locking lever 10.
- Tighten the locking knob 3.
Panel (mitre cuts) (see figure B)
The horizontal metre angle can be set in the range from 45^ (left side) to 45^ (right side).
- Loosen locking knob 12.
- Turn the guide rail 4 left or right until the angle indicator 13 indicates the requested mistre angle.
- Tighten the locking knob 12 again.
For swift and precise adjustment of standard litre angles, the guide rail engages at 0^ and 45^ .
- For additional worksteps, see "Panel (cross section)" on page 19.
Profile (bevel cuts) (see figures C1-C3)
- Mount the support extensions 6 left and right at the front position of the bridge 8.
- Fold the red end stop 9 by 180^ to the rear.
- Loosen the locking knob 3 a few turns.
- Turn the locking lever 10 of the guide rail leftward and fold the guide rail 4 upward.
- Mark the desired cutting line on the workpiece.
- Place down the workpiece flat against the stop of the support extensions 6.
- Fold the guide rail downward and align the workpiece to the cutting line of mark 11.
- Lock the guide rail 4 with locking lever 10.
- Tighten the locking knob 3.
- Adjust the base plate of the jigsaw accordingly to the desired angle.
Notes on the adjustment are given in the operating instructions of the jigsaw.
Note: The folded back red end stop 9 is used as the stop for the base plate of the power tool.
20 | English
Panel (lengthway cuts, recesses) (see figure D)
- Loosen the locking knob 3 a few turns.
- Remove the guide rail 4 and the bridge 8 from the base unit 1.
- Mount the support extensions 6 left and right to the base unit 1.
Depending on the workpiece length, mount the additional supports 7 reversed (see figure D) into the inner or outer guide of the support extensions.
Take care that the cutting line in the notched area is between the additional supports, to ensure that you do not saw into the saw station.
Note: When sawing lengthway cuts, the saw station is used only as a supporting surface. The workpiece cannot be clamped. Therefore, hold it tightly while sawing.
Working Advice
Only use the saw blades recommended by Bosch (see page 223). When using saw blades that are too thin, danger is given that the cut runs out of centre.
The base plate of the jigsaw must always be in the front position.
The thickness of the material to be cut depends on the sawing capacity of the respective jigsaw. For further information, see the operating instructions of your jigsaw.
To ensure optimal operational safety, the workpiece must always be affixed.
Sawing
Position the base plate of the power tool in such a manner on the guide rail 4 that you always saw in the direction of locking knob 3.
- Switch on the machine.
- Saw through the workpiece applying uniform feed.
- Switch off the machine and wait until the saw blade has come to a complete stop.
- Remove the power tool from the guide rail and release the workpiece.
Transport
- Remove the power tool before transporting.
English | 21
Practical Advice
The following tips are for performing length or litre cuts (90^ / 45^)
| Problem | Cause | Corrective Measure |
| Cut runs out of centre | Guide rail 4 not affixed | Affix guide rail according to height of workpiece; provide for firm clamping of the workpiece |
| Saw blade too thin | Use the provided saw blade T144DP | |
| Sawing feed too high (apply less feed with power tool) | Saw through workpiece applying less and uniform feed | |
| Do not apply pressure against the side stops 5 | ||
| Angle adjustment of base plate to saw chain incorrect | Align base plate to saw chain and retighten | |
| Saw blade does not run in guide roller (see figure E) | Adjust guide roller in such a manner that the saw blade is guided (see operating instructions of the jigsaw) | |
| Wood surface unsatisfactory after cut | Workpiece was sawn with the visible side facing up | Saw workpiece with the visible side facing down (see figure A3) |
| Saw blade worn | Insert new saw blade | |
| Sawing feed too high (apply less feed with power tool) | Saw through workpiece applying less and uniform feed | |
| Do not apply pressure against the side stops 5 | ||
| Sawing was carried out with orbital action switched on | Switch orbital action off |
For working instructions and practical advice on the PLS 300 saw station, log onto: www.bosch-do-it.com/pls300
For further questions, please refer to our customer hotline:
Great Britain
Tel: +44 (0844) 736 0107
Australia, New Zealand
Phone: +61 (01300) 307 044
22 | English
Operation Cutting tiles
Preparing for Operation
When the sawing station is to be used for cutting tiles, the additional PTC 1 kit is to be used.
The stop 15 is supplied as two parts, folded together.
Before using for the first time, put the two parts of the stop 15 together, so that they cannot be taken apart afterwards.
Lengthway Cuts (see figures F1-F3)
- Loosen the locking knob 3 a few turns.
- Turn the locking lever 10 of the guide rail leftward and fold the guide rail 4 upward.
- Place stop 15 centred in the groove of bridge 8 and slide it flush into base unit 1.
- Mark the desired cutting line on the workpiece.
- Place down the workpiece with the visible side up, flat against the stop 15.
- Fold the guide rail 4 down and align the workpiece cutting line to the scale of the stop 15.
- Press down the guide rail 4 in the area of the workpiece with your flat hand.
- Tighten the locking knob 3.
- Lock the guide rail 4 with locking lever 10.
Diagonal Cuts (see figure G)
The horizontal metre angle can be set in the range from 45^ (left side) to 45^ (right side).
- Loosen locking knob 12.
- Turn the guide rail 4 left or right until the angle indicator 13 indicates the requested metre angle.
- Tighten the locking knob 12 again.
For swift and precise adjustment of standard litre angles, the guide rail engages at 0^ and 45^ .
- For additional worksteps, see "Lengthway Cuts" on page 22.
Working Advice
Cutting Tiles (see figures H1-H3)
- Insert the tile cutter 14 into the sawing slot of the guide rail 4 above stop 15.
The arrow on the tile cutter must face you.
Pull the tile cutter 14 over the complete tile with uniform pressure. - Remove the tile cutter 14 from the guide rail 4.
- Turn the locking lever 10 of the guide rail leftward and fold the guide rail 4 upward.
- Place the break-off cones 16 on a firm surface.
Place the tile on the break-off cones in such a manner that the break-off cones are positioned below the cutting line and at the edges of the tile.
For diagonal cuts, the break-off cones should be positioned below the cutting line and somewhat further toward the inside.
- Apply both of your thumb balls at the same time to the outer sides of the tile until the tile breaks.
Practical Advice
| Problem | Cause | Corrective Measure |
| Tile does not break along the cutting line | Scoring line not continuous from front to end | Apply more pressure (uniformly) when scoring the tiles and score over the complete surface |
| Tile cutter 14 incorrectly inserted | Insert tile cutter correctly (see figure H1) | |
| Surface structure of tile uneven | Apply more pressure (uniformly) when scoring and increase the scoring (cutting) speed | |
| Break-off cones incorrectly positioned when breaking the tile | Position break-off cones below the cutting line and at the edges of the tile (see figure H3) For diagonal cuts, position the break-off cones somewhat further toward the inside | |
| Scoring line not continuous from front to end | Increase scoring pressure when cutting the tiles |
For working instructions and practical advice on the PLS 300 saw station, log onto:
www.bosch-do-it.com/pls300
For further questions, please refer to our customer hotline:
Great Britain
Tel: +44 (0844) 736 0107
Australia, New Zealand
Phone: +61 (01300) 307 044
Maintenance and Service
Maintenance and Cleaning
If the saw station should fail or become damaged despite the care taken in manufacture and testing, repair should be carried out by an authorised customer services agent for Bosch power tools.
In all correspondence and spare parts orders, please always include the 10-digit article number given on the type plate of the saw station.
Cleaning
Remove dust and chips after each working procedure by blowing out with compressed air or with a brush.
Warranty Condition
Through faulty usage, sawing into the guide rail 4 or bridge 8 can occur. No warranty claims whatsoever shall arise thereof, as this does not affect the function of the saw station.
24 | English
After-sales Service and Customer Assistance
Our after-sales service responds to your questions concerning maintenance and repair of your product as well as spare parts. Exploded views and information on spare parts can also be found under:
www.bosch-pt.com
Our customer service representatives can answer your questions concerning possible applications and adjustment of products and accessories.
Great Britain
Robert Bosch Ltd. (B.S.C.)
P.O.Box 98
Broadwater Park
North Orbital Road
Denham
Uxbridge
UB95HJ
Tel. Service: +44 (0844) 736 0109
Fax: +44 (0844) 736 0146
E-Mail: boschservicecentre@bosch.com
Ireland
Origo Ltd.
Unit 23 Magna Drive
Magna Business Park
City West
Dublin 24
Tel. Service: +353 (01) 466 67 00
Fax: +353 (01) 466 68 88
Australia, New Zealand and Pacific Islands
Robert Bosch Australia Pty. Ltd.
Power Tools
Locked Bag 66
Clayton South VIC 3169
Customer Contact Center
Inside Australia:
Phone: +61 (01300) 307 044
Fax: +61 (01300) 307 045
Inside New Zealand:
Phone: +64 (0800) 543 353
Fax: +64 (0800) 428 570
Outside AU and NZ:
Phone: +61 (03) 9541 5555
www.bosch.com.au
Republic of South Africa
Customer service
Hotline: +27 (011) 6519600
Gauteng - BSC Service Centre
35 Roper Street, New Centre
Johannesburg
Tel.: +27 (011) 493 93 75
Fax: +27 (011) 4930126
E-Mail: bsctools@icon.co.za
KZN - BSC Service Centre
Unit E, Almar Centre
143 Crompton Street
Pinetown
Tel.: +27 (031) 7 01 21 20
Fax: +27 (031) 7 01 24 46
E-Mail: bsc.dur@za.bosch.com
Western Cape - BSC Service Centre
Democracy Way, Prosperity Park
Milnerton
Tel.: +27 (021) 551 25 77
Fax: +27 (021) 5513223
E-Mail: bsc@zsd.co.za
Bosch Headquarters
Midrand, Gauteng
Tel.: +27 (011) 6519600
Fax: +27 (011) 6519880
E-Mail: rbsa-hq.pts@za.bosch.com
Disposal
The saw station, accessories and packaging should be sorted for environmental-friendly recycling.
Subject to change without notice.
Robert Bosch (France) S.A.S.
Bosch Service Center
Telegrafvej 3
2750 Ballerup
Tel. Service Center: +45 (4489) 8855
Fax: +45 (4489) 87 55
E-Mail: vaerktoej@dk.bosch.com
Bortskaffelse
Bosch Service Center
Telegrafvej 3
2750 Ballerup
Danmark
Tel.: +46 (020) 41 44 55
Fax: +46 (011) 187691
Avfallshantering
EuouLec yia tn xphon
Bosch San. ve Tic. A.S.
Ahi Evran Cad. No:1 Kat:22
Polaris Plaza
80670 Maslak/Istanbul
Müsteri Danismani: +90 (0212) 335 06 66
Müsteri Servis Hatti: +90 (0212) 335 07 52
Tasfiye
Robert Bosch Sp. z o.o.
Bosch Service Center PT
K Vapence 1621/16
692 01 Mikulov
Yka3aHnI IO TpIMHeHHIO
HcTIOb3yIe TObKO peKOMeHDoBaHHbIe 0HPMOB Bosch TINbHbIe TIOToHa (CM. cTp.223).Pn INcTIOb3OBAHn OueHb TOHKnX TINbHbIX TIOIoTeH cyIecCTByET OTaCHOCTb CMeUeHN AHHN pAcTHNABaHn.
OToPnHa TnTa 3eKtpoo63nKa DoJxHa BceIa HaxoHtbcraB TepeDne IIO3uIN.
ToIuHa paTINHnBaEMoMaTeepNaA 3aBnCnT OT IPOUN3BOADNTeMbHOCTN pe3AHn COOTBeTCTByIOUeRO 3AEKtpOAn63nKa. COOTBeTCTByIOUne yka3AHn Bb HaJdTe BpykoBOAcTe PO 3KcTIayataun 3AEKtpOAn63nKa.
TpoAoBhbI paTnA (cm. pHc. F1-F3)
- HeckoIbKIMn 6obopotamn ocIa6bTe pyky fHKcaunn 3.
Повернite рычаг 10дя Фнcaиниправлюшей peйки веBOи ПОДHMITE наравлюшуpeйky4 Вьрх. - BcTaBbTe yIop 15 IO ueHTpy B Ia3 IepemBykN 8 INIpiHCTaBbTe erO 3aIOAnIO K 6a3OBomy y3Ny 1.
- OtmTe JKeAeMyIO AHHIO pACnNBAHnHa 3aTOrTOBKe.
ПрилloxКITEЗагOTOBKу rOPI3OHTaIbHo IuIeBOI CTOpOH BnI3 K yIToP 15. - OTKINbTe HAnpaBAAIOUyO peKy 4 BnH3 N BblPOBHNrTE AHHIO paCINla 3aROTOBKn IIO Kkane ynpa 15.
ПиЖМЛТЕ LAОHьЮ HAлравlaюую peйКу 4В 3OHe 3aROTOBKN BHN3. - Tyro 3aKpyTnTe pyuKy fNkcaunn 3.
3aФнксрУTe HaItpaBIAJIOUуpeiKy4 c TOMOsbIO pbIyara10.
PacTHHbAHHe IIO dHaROHaHn (cm. pnc. G)
TOpH3OHTaBbHbI yrO paCnHa MoXHO peYyHnPOBaTb B dHaPnAzoHe oT 45^ (cAeBa)do 45^ (cnpaba).
- Ocna6bTe pykU kcaunu 12.
-ПоворачиBaHTeHaIIpaBIAIOUyU peIky4 HaIeBOHnHaIIpaBO,TOKaHINDKaTOP yIa 13 He TOKaKcET HxKbIyRToA CKOca. - 3aTaNHe pyuKy φnKcnpoBaHn 12.
Aa 6bictpoi n ToCHoY yCTaHOBKn CTaHApTHbIX yIaOB HnPaBaJIooJa peKa BXOaNT B 3auePHe Ha yrKe 0^ n 45^
- DaaBneHnpe pa6oue oIepaun cM. 《PpoAoHbIpaTnA》Ha cTp.148.
Yka3aHnI To TpHMeHeHHIO
Pe3ka PAnTKn (cm. pnc. H1-H3)
BCTaBbTe PAnTKOpe3 14 B Pn3 DnA PnNbHa HnPpBaAHOSeI peKe 4 HaD yTOpOM 15. CTePkA Ha PAnTKOpe3 DoAxAHc CMOTpeTB BaUy CTopoHy.
-ПрOTЯнITE ПИNTKOpe3 14do KOHua ПИNTKN, paBHOMePHO HaaBaAиBaI Ha Hero.
BbItaunTe PAnTKope3 14 n3 HappaBIAHoupei peiKn 4.
ПовернITEpbuig10ДЯФИКcaин haIpaBIAIOJIe peIKN BAEBO I IOHIMTe haIpaBIAIOJyO peKy4 BBepx.
-Пложнтулоры Дд разома 16 Ha cta6иьню поверхноctb.
TIOLOXHTe TANTKHy Ha yTOpblAra pa3LOMa TaKIMo6pa3OM,yTO6blyTOpblAra pa3LOMa HaxOAnHcB TOD AHHne PaCTnla NTO KpaAM TANTKN.
Pn paTnHbAHnn TIO dHaRoHaHyItpbl Ipa3lOMa Heo6XoAMo pacToIaRaTb ITOAHHne paTnHa C He6OaBWM CMeueHHeM BHyTpB.
HaabaTe OndHOBpeMeHHO oBeHMn AaDOHmHa HapyKhIe 6oka PNTKN, YTO6bl Oha pa3Amalacb.
Pycckn | 149
Cobetbl IO TpIMHeHHIO
KoMaekTnB KOHCyIbTaHTOB Bosch OxOTHO TOMO-KeT Bam B BoPocax ToKpyIKN, IpiMHeHEnI NaCTPOJKN IPOdYkTOB IN PInHaAeXHoCTeN.
Pocch
OOO «Pobert BoW»
CepBnchbI ueHtp IO o6cLyXnBaHHIO 3aekTPOHNCTpyMeHTa
yI. Akademika KopoIeBa 13, cTpoEHe 5 129515, MockBa
TeA.: +7 (495) 9358806
c: + 7 (495) 9358807
E-Mail: rbru_rt_asa_mk@ru.bosch.com
OOO «PobepT BoW»
CepBnchbI ueHtp IO o6caykBaHHo
3aektpoHCTpymehTa
yI. IJIbeIOBa, 41
198095, CaHKT-TeTp6ypr
TeA.:+7(812)4499711
c: + 7 (812) 4 49 97 11
E-Mail: rbru_rt_asa_spb@ru.bosch.com
OOO «PobepT BoW»
CepBnchbl ueHtp T0 o6cIyXnBaHnIO 3aekTPOHHCTpymeHa
Topckn MmKpopaNoH, 53
630032, HOBOSHPCK
TeA.: +7 (383) 359 94 40
c: + 7 (383) 3599465
E-Mail: rbru_rt_asa_nob@ru.bosch.com
OOO «PobepT BoW»
CepBnchbl ueHtp T0 o6cIyXnBaHnIO 3aekTPOHHCTpymeHa
YI.ΦoHToBbIX 6pHraA,14
620017, EkaTePunH6ypr
TeA.:+7(343)3658674
TeA.:+7(343)3787756
c: + 7 (343) 3 78 79 28
Belaapycb
IIT «Po6ept BoW» OOO
220035, r.MnHcK
yI. TmMnRp3eBa, 65A-020
TeA.: +375 (17) 254 78 71
TeA.: +375 (17) 2 54 79 15
TeA.: +375 (17) 254 79 16
a c: + 375 (17) 2 54 78 75
E-Mail: bsc@by.bosch.com
YTHAN3aun
TINbHyIO CTaHcIIO, PpHaADJeXHOCTN uYPaKOBky CLeAeYET yTNAn3nPoBaTb 6e3OITaCHbIM AOKpykaHOSe cpebl o6pa3OM.
Bo3MOxHbI n3MeHeHHa.
Bka3iBkn 3 Texhikn 6e3neKn
3araAbyhi Bka3iBKN 3 Texhikn 6e3neKn

Пючтаite BcidoaHIdo TINAAIbHOI CTanuii a6o DO eLEKtpoiHCTpymEnTu,ЯкIM MOHTyETCBY,ПOTepeXKeHHa 7Bka3iBKn. HeBnKOHaHHN TpaBnI 3 texhIKn 6e3neKN Ta Bka3iBOK MOpKe TpN3BOAnTH Do yDapy eLEKtpnUHM CTPymOM,TOxKexi Ta/a6o BaXknx cepno3HnX TpaBM.
Bka3iBKn 3 Texhikn 6e3TneKn dAaTHAAbbHx CTahci
Tepsi, hix hactpoioBatn pnilaad a6o mihrtn pnilaada, BNTIAYte 1eTINCEb 3 po3eKt Ta/a6o BNImaiTe akymyAToPHy 6atapei. Hehabmnche BMkacHH ealeKTOPIpnilaAdiB qacto pIN3BOADtB DO HeuacHx BInTaKiB.
Pepu hix MOHTyBaTH eAEKtpoiHCTpyMeHT, TpaBnAbHO 36epiB TnAraBHy CTAnciIO. Aniue 6e3DoaHHMOHTax 3a6e3neye HaDiHe BeDeHH eAEKtpoiHCTpyMeHTy.
YctaHOBtB NAAHbHy CTaHcIO Ha MiHy, pIBHy rOpN3OHTaMbHy TOBepXH. Jkso PnAHa bHa cTaHcIg KOB3ae a6o XHTaETbcr, To eLeKtpoiHCTpyMeH a6o 3aTOrOBka He MoKyb pIBHomipHO Ta HAdiHo IpepecyBaTncr.
HaIiHo yctahOBiB eEKeTPOIpHnlaHa TnAaHbHi CTaHcII, Iepu HIX KOpNCTyBaTHCA Hm. KoB3aHHe EKeTPOiHCTpyMeHTy Ha TnAaHbHi CTaHcII MOKe PIPBEcTN DO BTPaTH KOHTPOIAIO.
Caikyte 3a THM, 0o6 shyp eektpoiHCTpymeHTy He notpanHB mixk 6a3OBuByoA Ta HaprrmHy PAnHKy. Raio shyp TooKoJKeHH a6o Tepepi3aHH, BnHnKae pN3NK ypaKeHHaEkeTpnuHm CTpyMOM.
3HimaTe eAeKtpoiHcTpyment, nepu Hix Tepe6yDaBTH NnAaBHy cTahciu o6o TiADHTN HATPmHy TlaHky. EeAeKtpoiHcTpyment MOKe BNTaCTH, ToWkoDHTncb a6o CnPnUHNHTI TnpaHeHHa.
He KopnctyItecb TOnkOxehoTINABHOO CTaHcIeIO.TiBKn CnpaBHAnIIABHa cTaHci MOpE 3a6e3TeuHTNaDiHe IpeceBaHHe eAEKtpoiHCTpymEnTy.
Caikyte 3a TMM, uo6 doBri i Baxkii 3arotOBKn He npH3BOAnH Do An6aAHCy TnAAbbHO CTauu. Dobri Ta Baxkii 3arotOBKn nToPi6Ho NiIeptn a6o TiaklaCTn 0o-He6yAb PiAD HIX.
Пд час pi3aHHа керамчhoII ПANTКI Oягайтс зхшсп ркавиц. РозамаHA ПИNTka MaE roctpi kpaI, o6Як Bi можete TOPaHITNCJ.
3actocobyte TINAAhby CTaHcIO ANe piaHH MaTepiAIB, 0o Bkazhi B po3dIi npo Pn3hauehn IHCTpymEnTy. Ha TINAAhHi CTaHcII He MoXHa piaTn MapMyp a6o rpaHIT, a TAKOX TANTKY 3 rpy6OIO IOBepxHeTo Ta TANTky 3 HAtypaHbHOro KaMeHIO.
OtticHHI pHHuTy po60Tu
PpH3NaueHH npHaAy
PLS 300: B KOMTIAKTI i3 eAEKTPoPpAaDM TINAAbHa cTAHcIg TIPNAHaueHa dIg TPRAMOJIiHiHO rIO3AOBxHbOTo Ta IIOpeuHOro PO3IIIOBAHHa OIoK o3 TBepDoTo M'koI DepeBHH, a TAKOX aHOMiHIO Ta IIACTMaH. MoXnBi rOpNtOHTaBHi KTyN pO3IIIOBAHH MaKc. BiD -45^ Do +45^ , a TAKOX BePtnKaBHi KTyN pO3IIIOBAHH MaKc. BiD 0^ Do 45^ .
Пляьна сатця пиз haeta BnKluOho Ду po60tn 3 eektpoLo63knakm i3 acoptmeHt y inctpymentiv dmaomauhix po6it Bosch PST.
BVKOPHCTOByTe AHepe peKOMeHDoBaHi fipMoIO Bosch TnAkoBI IToLToHa (ANB. cTOp.223).Ipn BVKOpHCTaHHI 3aHaT0 TOHKIN TnAkoBxN ToLoTeH icHyE He6e3TeKa 3MiueHHA iHii PO3TNHOBAHH.
PLS 300 Set, PTC 1:В кOMПАЕКТI i3 ПИNTKOPi3OM ПИЯьнСаТицIpyИЗHAчЕпДя рi3aHHЯ КерamИHоIТаФaHRCoBOI ПИNTKN TOBиHIOМakc.10 MM. МoxKиBI rOpi3OHTaBHi KUTn pO3ПИIOBAHHЯ mAkC.Bi-45°do+45°.


3o6paxehi KOMTOHEHTN
Hymepaui 3o6paKeHHKOMTOHeHTiB TocnlaeTbcra Ha 3o6paKeHHIINIAbHOI CTAHcII HA CTOpIHkax 3 MaIOHkAmN.
PLS 300
1 Ba3OBuBv3Oa
2 ⅢKaIaДЯ HabToPOIbAHHry KyTa pO3ΠIaIOBAAHH (rOpN3OHTaIbHO)
3 Pyuka φikcaüiДЯperyIIOBaHHBnCOTN
4 HaPpMa HnAHa Ka 3i Wluiom DnI nn
5 BoKoBi yTOpH NaPrrMHOI PAnHKN
6 IoobXyBaOtnOpn
7 OToTOMixHa OTopa
8Перемпчka
9 KiHueBn yIop dAe BepTnKaIbHnx KytIB pO3IIIOBAHH
10 BaxiIb IaI iKcaui HapmHoI IaHKn
11 To3naKa DnB BnpiBHOBaHH
12 Pyuka φíkcaüi ΔЯ BiñHOro HactpoIbAHnKyTa po3πΠIoBaNHH (rOp3OHTaBHO)
13 IHAnKaTOp KyaTa (Topn3OHTaNbHorO)
PTC 1*
14 PANTKopi3
15 Ynp3i kkaio
16 YItop AIApo3AOMy
* ANWE B KOM6iHaui3 PLS 300 Set
TexhiHi daHi
Pn BNKOpNCtAHHII NIAIbHOI CTaHcii Ip3aHHI PANTKNIOTPI6HNI DOaTkoBNI KOMTIeKT PTC 1.
Ytop 15 ToctaayetbC B po3i6paHomy Ha Dbi yactHH i CKlaedeHomy CTahi.
IpeepnHm 3acTocyBaHnM 3'eHaJte o6uBbi yactHHn yTnpa 15 taK, uo6 noRo He moxHa 6byo 6iIbwe po3'edHaTH.
P03AOBXHpeo3THAUOBAHRA(ANB.MaA.F1-F3)
- Pocla6Te pyuKy pfikcaui 3, POBepHyBwn II DekiIbKa pa3iB.
Поверніть Вадь 10 ВИBO ДАФ�ікcaцьиНаірмноі Панки Та пДимпь НаірмHyпанky 4уropу.
BCTaBTe yTOp 15 nO ceHtpy B nA3 nPeMnUKN 8i nocyNbTe NOro pIBHO do 6a30BOrO By3la 1. - Pto3hauty He 3aTOrTOBci Heo6xIHHy AiHIO p03nIIOBaHHJ.
-ПрикладызагOTOBkyИцьовиб 6OKOM BBERXВгориэталь窝у ПОLOжehндоунopa15.
-BiDKNbTe HaIpMaHy PAnHky 4 BHN3 i BnIPIBHnIe AhiIO po3PiNIOBaHHra 3aROTOBKn ITO WkAli yIopa 15.
-ПиNTNCHITb DOLOHEO pyKN HaIIpRmHy IaHky 4 BHN3 y 30Hi 3aTOrTOBKn.
Miuho 3akpyitb pyky pfikcaii 3. - 3aφikcyiTe HaIpyMHy IlaHky 4 3a DOTTOMORHO BaxeA 10.
Po3TNIOBAHnI IO iaROHaI (MnB. MaI. G)
TOpH3OHTaBHN KYt PO3NIIIOBAHHa MOXHa BCTaHOBIAbTu BdiIa3OHi Bi4 45^ (IbOpyu) Do 45^ (IpaBOpyu).
- Pocla6te pyuKy φikcaii 12.
Повертуге habрмну панку 4 iВоруабоправору, поkn iHДКаТОр КУТа 13 Heпokалж Heo6xHn KUТ рo3ПИНOBaHHЯ. - 3HOby 3aTARHITb pyuKy φikcaii12.
Aa WbNdkoro Ta Tochoro HactpoOBaHHaTtHaapTHNX KytIB HaipmHa TlaHka BXoHTb B3auePHeHHa Kyti 0^ i 45^
HactyPiPi pO6oui oepauii nB. «I03doBXHe po3nHOBaHHa» Ha cTOp. 156.
Bka3iBkn 0oDo po6oTu
PizAHHn TANTKn (MnB.MaA.H1-H3)
BCTABTe PANTKopi3 14 B Wluiu DnA po3TINHOBaHH HaIPrAmHOI PAnHKn 4 HaD yTopoM 15.
CtpiKaHa\PANTKopi3I\POBHHa HBNTNCy BaWOMy HAPPMKy.
ПотгнітБ ПИТКОПЗ 14do KINцЯ ПИNTKN, pIBHOMIPHO HaTNCkyOuH Ha HbOTo.
BHTaHITb IANTKopi3 14 i3 HAnpMHOI IaHKn 4.
Поверніть Вадь 10 ВИВО ДА ФИССИII
Нацрмно Ппанки Та ПИДИМИТь Нацрмну
ПпанКу 4уropу.
IoklaTb ytopn dpa po3lomy 16 ha ctaibHy IOBepxHIO.
TOKlaIb TlNTky Ha yIopn DAnpo3AmOy TaK, 06 yIopn dApo3AmOy 6yAn po3TaioBaHi iAiHieIO PO3NIAIOBAHHra Ta IIO KpaX TlNTKn.
Ppi p03HIOBAHHI IO diaorHai yTOpN A
pO3lOMy IOTpi6HO KIACTn IiA iHiHO
pO3TIIOBAHH 3 HeBeAMKm 3MiueHHM
BcepeAnHy.
HaTnCKyIte OAnOchaoCHO O6OMa DOLOHrMaN pyK Ha 3OBHIuHi 60Kn PANTKN, POKN BOHa He pO3AOMNTbcra.
TopaH 0oOo 3actocybaHHA
JaKIO He3BaKaIOUH Na peTeABy IPOueDpy BnroTOBAAHHI BnIpo6yBaHHN TnAABHa CTaHcIe BCE-TaKN BnIe 3 AaNy, pEmOH T MaE BVKOHyBaTH AnIe MaIcTePN, ABTopu3OBAHa DAe EAEKToPiHCTpymEnTIB Bosch.
При BCIXdoDAtKOBINx 3aINTaHHx Ta 3aMOBLeHHi 3aTuaCTH,6yIb Iacka,3a3Haayate 10-3Haunn HOMepAIA 3aMOBLeHH,IO CTOITb Ha 3aBOOcbKi Ta6HnCi PIIABHOI CTAnii.
OuHnHn
Ticra Koxhoi pOboooi Oepaui 3dyBaHTe TnI i CTpykky CTncHEHM IOBITpAm a60 3mitaHTe ix 1tTOKIO.
YMOBN rapaHTII
BhaclioK He npabHbHoro 3actocybaHH MoKe TpaHntcb Ta, 0o Bn pepeHae He npramHy PAnky 4 a6o nepemnyk 8. B TaKx BnTaKaX rapaTir He HaadaTbcR, OckIbK ue He BtANBaHa ho p6oty nAABHOi CTahii.
Cepbicha MaicTeprn i o6cLyroByBaHHKJIeHTiB
B cepbicii MaictepHi Bn OTPMaTe BiIIOBiBaHa BaWi 3aITaHH CTOCOBHO peMOHTy i TexHHyHoro 06cAYROByAHN BaWoO IPOdKy.
MaIOHKn B dTaX iINΦopMaio IO Oo 3aTuaCTNH MoKHa 3HaTn 3a aDpecoIo:
www.bosch-pt.com
KohcybTaHTB Bosch 3 paadicto DOIOTOMOxyt Bam npn 3aINTAHX CTOCOBHO KyPiB, 3actocybaHn i HalaorDxKeHH npOdykTIB i pnnlaAdo do Hnx.
YkpaHa
Bou CepBic LENTp EAnKtpoHCTpyMeHTIbByL.KpaHn,1,02660,KiIB-60
TeA.: +38 (044) 5 12 03 75
TeA.:+38(044)5120446
TeA.:+38(044)5120591
ΦaKc: +38 (044) 5 12 04 46
E-Mail: service@bosch.com.ua
AApeca PerioHaBnHex rapaHTiHnHex cepbichix MaICTepeHb 3a3HaueHa B HaioHaBHomy rapaHTiHOMy TaIoHi.
Ytuaiaia
ПлЯьну санцio,пладя i ytnakOBky trpe6a 3daBaN Ha ekOLOIuHNo uHCTy IOBTOpy nepepo6ky.
MOXANBI 3miHn.
Instructiuni privind siguranta si protectia muncii
Instruktiuni de ordin general privind siguranta si protectia muncii

Bosch Service Center
Str. Horia Macelariu Nr. 30-34,
013937 Bucuresti
Tel. Service scule electrice: +40 (021) 4 05 75 40
Fax: +40 (021) 405 7566
E-Mail: infoBSC@ro.bosch.com
Tel. Consultanta tehnica: +40 (021) 4 05 75 39
Fax: +40 (021) 405 7566
E-Mail: infoBSC@ro.bosch.com
www.bosch-romania.ro
Eliminare
6 YdIaXHTeHa OToPHaTa IIOBbPxHOCT
7 OITbAHHTeHa OITOPHa TIOBbpxHOCT
8 MoCT
9 OgrpaHnUHTeI 3a cpe3OBe IoA NaKLoH BbB BePTNkaHa paBHHa
10 Aoc3a 3actoToopBaHe Ha HnpaBbBaaTa
11 MapknpoBka 3a IIOpaBnBaHe
12 PbkoXBaTKa 3a 3aCTOOPBaHe TIOA IIPOH3BOLeH bTbA (B XOpH3OHTaHa paBHnHa)
13 CtpeIka 3a otUHTaHe Ha bTbla (B XOpN3OHTaHa paBHHa)
PTC 1*
14 INCTpymEn3a pR3aHe Ha IIOUOKN
15 Onopa cbcckaana
16 KoHyc 3a oTuynBaHe
*camoB KOM6nHauncPLS300Set
TexHnueeKn DaHHN
| Станця за рязANE | PLS 300 | PLS 300 Set (PLS 300 + PTC 1) |
| Каталожен homep | 3 603 M04 0.. | 3 603 M04 1.. |
| РязANE | ||
| - макс. Дыжина на сpezeа при наоч Neu сpezeоve (90°) | mm | 315 |
| - макс. Височina на сpezeа | mm | 25 |
| - Нakлон | ||
| хоризонтailingno | ° | ± 45 |
| Вертыкалho | ° | ± 45 |
| РязANE на п loчkin | ||
| - макс. Дыжина на сpezeа пri наоч Neu сpezeоve (90°) | mm | - |
| - макс. Височina на сpezeа | mm | - |
| - Нakлон | ||
| хоризонтailingno | ° | - |
| Маса съласно EPTA-Procedure 01/2003 | kg | 3,4 |
Pa3mepn Ha IOxOaHn cHpKyAarpHn DnCKOBe
| м akс. об shaа дыжина | mm | 100 |
| м akс. дыжина на назьбени сerg myself | mm | 76 |
13no3BaIte cAmo IpeOpBvBaHn OT BoW peKeuAnCTOBe (BHXTe CtpaHnua 223).
Korato H3IOA3BaTe TBbPde TbHKn pexeun
HICTOBe, CbIeCTByBa ONaCHOCT OT
H3KpNBBAHe Ha Cpe3a.

Pa6ota c ypeda Pyahe
IpoAroTobka 3a pa6ota
CtaHnIyTa 3a p3aHe ce crIo6Ba pa3AuNo B 3aBNCIMoCT OT KOHKpETHOTO PnIooKeHne:
PraaHe Ha PAnHeI (Haip. lamHaT)
PraHaHe Ha IpoΦnAn (HaIπp.IePbA3n)
He e Heo6xoAMMo 3axBaAaHETo C BnHTOBe.
Панели (нарpeун сретов) (Винсту phурун A1-A3)
BkapaTe yIbIaXnTeIeIteHa OITOpHaTa IOBbpxHOCT 6OTABIO IOTACHO Ha OCHOBHnMoay1.
B 3aBnCmOCT OT dBxHnHa Ta Ha DeTaIa BkapaIte OOTbHnHTeHnTe OTOpI 7 BB BbTpEeHNHe IAN BbHnHn BOaUH Ha yDbxHnTeHnTe Ha OTOPHa TIOBbpxHOCT.
- Pa3BnIte 3actoTOpRABaUaTa pBkoXBaTKa 3Ha HrkOIAKo o6opota.
3aBbptTe HaAIBO AocTa 10 3a 3actoTOpBaHe Ha HApBaBAuTa 5nHa pa3rBHeTe 5nHaTa4 Harope.
- MapknupaTe JeklaHaTa LInHna Ha Cpe3a Bbpxy DeTaIa.
IIOCTaBeTe DaTaHa IeHaC PpeHaTa My CTpaHa HaOAny DoOpJH Do OToPapaHa OCHOBHnMoA1.
CπychHeHaπpaBλBaμaTaIηHaHαOly IIOpaBHeTe έTeAɪa TaKa, Ye IInHŋrTa Ha cpe3a Da CbBΠaDa C MapKnipOBkata 11.
- 3actonopeteHaippaBaaataaHa4c locta10.
3aTeHHeTe 3actoTOpBaAata pkoXBaTaK3
PanaeAn (cpe3OBe IOa bIbA B XOpH3OHTaHa paBHHHa) (BnXTe qHr. B)
bIbIbT ha cpe3a B xOpH3OHTaHa paBHHa MOKe Da 6bDe HAcTpoEH BdHaPi3oHa ot 45^ (HaJIBO) Do 45^ (HaJrCHO).
- Ocbo6oTe 3aCToIopRaAaTa pbKoXBaTka 12.
3aBbpteteHaIpaBAIbAuta 7HnHa4 HAnBO Hn HaACHO,doKaTO CTpeAkata 13 TOKaKe XeAHHN OTo Bac bTbA. - 3aTeHHeTe OTHOBo pbKoxBaTkata 3a 3aCTOITOPRABe IIOI pON3BOAeH bTb12.
3a 6b30To N ToUHO NaCTpoBaHe Ha CTAHapTHn bTn B POn3uNIne 0^ n 45^ HApPabBaaTa uHaPiTaC pPeuPaKaBaHe.
HaAaBxHn pa3p3BaHe (BnxTe fHpyn F1-F3)
Pa3BnIte 3aCTOITOPRAaTa pkoXBaTKa 3Ha HAKoKo O6Opota.
3aBbPTeHe HAnBaLoCTa 103a 3acToTOpRABaHe Ha HApBaVABaUaTa 7nHa pa3rBHeTe 7nHaTa4Harope.
IocTaBeTe OToPaTa 15 B KaHaHa Ha MoCTa 8 Ipi6An3HteAHO TcpeAta HЯ Пb3HeTe N DoTpeTe PbTHO DO OCHOBHHM MoyI 1.
- MapKnpaTe JKeIaHaTa IHHnHa Hcpe3a Bbpxy DeTaNla.
IocTaBeTe DaTaa C BnHMaTa cTpaHa Harope I Go DOnPiTe PAnbTHo Do OToPopaTa 15.
HaKaLoHete HaIpaBIABaIaTa IINHa 4 HAdOly N IOdpaBHeTe LHNHa Ta Ha Cpe3a Ha DeTaNla CTPrMo CkaIaTa Ha OTopata 15.
Cpbka npntncheHa nppaBbBaaata uHa4 HaOy KaM DeTaHa.
- 3aterheTe 3actoToppBaata pkoBxBatka 3.
- 3actoIopeteHaIIpaBAAaataUHHa4c locta10.
DnaRaHaen Cpe3 (BnKTe pHrypa G)
bIbIbT Ha cpe3a B XOpH3OHTaHa paBHHa MoKe Da 6bDe HAcTpoEH BdHaPi3oHa oT 45^ (HaJIBO) Do 45^ (HaJrCHO).
- Ocbo6oTe 3aCToIopRaUaTa pbKoXBaTka 12.
3aBbpteteHaIpaBAIbAuta 7HnHa4 HAnBO Hn HaACHO,doKaTO CTpeAkaTa 13 TOKaKe XeAHHN OTo Bac bTbA. - 3aTeHHeTe OTHOBo pbKoXBaTkKaTa 3a 3aCTOITOPRABe IIOI pON3BOAeH bTb12.
3a 6b30To n ToUHO NaCTpoBaHe Ha CTAHapTHn bTn B POn3uNIne 0^ n 45^ HAnpabAbaTa uHaPiTaC pPeuPaKaBaHe.
- 3aДоПьБИНTeIипабOTиСТьПКИВЖTe《HаДБЖнО pa3рЯЗBaHe》Ha CTpaHица 172.
Yka3aHnHa 3a pa6ota
Prahe Ha IIOUKn (BnXTe fHpyn H1-H3)
-ПoctabeTe INHCTpyMeHTa 3a pr3aHe Ha ПLOUKN14В kaHaHa Ha HApBaBbBaTa 5HHa 4HaOnTopaTa 15.
CtpeKkataHaHnHCTpymeHTa3aPra3aHe Ha TIOUOKTNp6BaDaehacOeuHa KbM Bac.
I3aBpTnTe HNCTpyMeHTa 3a pR3aHe Ha TlOuKn14c paBHomepeH XoA IIO UaHa Ta DbXKnHa Na IIOUKaTa.
- OTeIeTe HNCTpyMeHTa 3a pIaHa Ha IIOUKN 14 OT HAIIpaBIABaAata WInHa 4.
3aBbPTeTe HaJIyBO IocTa 10 3a3actoTOpRABaHe Ha HApBaVBaUaTa 5HHa pa3rBHeTe 5HHaTa4Harope.
-ПoctabeTe KOhyca 3a cuyTBAhe 16 Ha 3dpaba nCTa6nHa NOBbpxHOCT.
TIOCTaBTe PLOUkata Bbpxy KOHyca 3a CuyTBAHe, Taka Ye KOHycT Da a DOIpa TOH0 IOd AHHnraHa Cpe3a N B 6An3OCT Do p6a Ha PLOUkata.
При рязану ТО Дэноюн Трябва д ТоCTавп Te KOnHyca TОД LAHInЯт ha Cpe3a MaANO TO-HaBbTpe.
- HaTncheTe eNHOBpeMeHNo C DBeTe pBue BbHnHTe CTpaHn Ha IAnOuKaTa, DOKaTo Tc CE CyYTI.
Быларск | 173
Yka3aHnna 3a pa6ota
| ПюбLEM | Прична | Одстразовае |
| Плочкata He ce чупи поDbλжинаТа на линьтA | Срет bt He e по сялалata дыжина | УBELANCHETe силалata на причесkanепri рязане на пioчкота и ceстарite срет bt Дa e paВноререн |
| Инструмент bt 3a рязане на пioчки 14 e поставен Heправлино | Посtabete Иструмentsa 3a рязанe на пioчки правлино(Bижte Фигура H1) | |
| Повьхhoeftа на пioчкata e hepaВнa | УBELANCHETe edHOBpeMeHNO силалata на причесkanе пri рязанe на пioчкота и скорocт trade на рязанe | |
| При OTчYPBaHeto Na пioчкata koHycSITe ca пostавени Heправлино | Посtabete KOHycSITe TOUH NO pOd линьтА на срета и до рьба на пioчкatura (Вижte Фигура H3)Пri рязанe по диагона Пос tabete KOHycSITe пд линьтА на срета малко пo-Habbtrpe | |
| Срет bt He e по сялалata дыжина | УBELANCHETe силалata на причесkaneпri рязанe на пioчkaТа |
Yka3aHnra 3a pa6Ota n IIOle3HN cBBeTn 3a CTaHcIyTa 3a p3aHe PLS 300 MoKTe Da HAmepHTe Ha:
www.bosch-do-it.com/pls300
Ako HMaTe N ApyrN BbIpiocn, MoJ, IIO3BaIte T Opeuata H N IINH 3a KAneHTN:
Po6epT BoW EOOD - BbIrapn
TeA.:+359(02)9625295
Подьржан ecpви3
IopdbpkaHe n IounctBahe
Ako BbIpeKn Ipeuzn3HOTI pOnH3BOdCTBO HBNMaTeHaHO n3NTBaHe CTaHcUra Tc IOBpeu, peMOHTTp8Ba Da 6bDe n3BbPseH B OToPi3npaH cepBn3 3a eLeKTPoHnHCTpyMeHTn Ha BoW.
Korato ce 6pbuatake bM ppeaTaBHTeHa BoHnPi np TOpbUka Ha pe3epBHN uactn BNHaNTOcoCbAte 10-ncppeHn KaTALoXeH Homep, nTncaH Ha Ta6eKaTa Ha cTaNtya.
Почистван.
BnHa n CLea pa60ta PocnCTBaHte Ppaxa n CTbPOTnHInTe C PPOyXBaHe CbC CbCTeH Bb3dyx Hn C MeKa YeTka.
TapaHunOHn yCIAOBNA
BcIeCTBHe Ha HeIpaBnHa yIOTpe6a e Bb3MOxH0 peKeuT ANCT Da pa3peKe HaIpaBAAbaTa 11Ha 4 Nm MoCTa 8. TaKnBa cLyuaH He ca o6eKt Ha rapaHNoH0 O6caykBaHe.
CepBn3 n KOHCyIaIuN
CepBn3bT Ⅲe OTROBOpH Na BbIpiocnte Bn OTHOCHO peMOHTN IIOADpbXka Ha 3aKyuTeHH naT BACIPOdYKT, KaKTo N OTHOCHO pe3epBHN qactN. MoTAtxHn cepTeKn INHΦopMaun 3a pe3epBHN qactN MOKeTe Da HamePnte CbIo n Ha www.bosch-pt.com
EkntbT OT KOHCyIaHTn Ha BoW ige Bn IOMorHe C yD0BOCTBNE PnB BIIPOCS OTHOCHO3aKpyBaHe, PpILOXeHne N Bb3MOxHocTN 3a HAcTpoiBaHe Ha pa3AnuHN PIOyKTN OT PpOn3BOdCTBeHaTa rama Ha BoW n DOITbANHTeAHn PpNCPTOC6LeHnra T8x.
Po6epT Bow EOoA -BbIrapn
Bow CepBn3 LcHbP
「rapaunohnnn n3BbHrapaunohnn peMOHTny. Cpe6bpHa No 3-9
1907 Codner
TeA.: +359 (02) 962 5302
TeA.: +359 (02) 962 5427
TeA.: +359 (02) 962 5295
c: + 359 (02) 624649
BpaKyBaHe
CtaHunraT,oHTbHnHTeHnHTe PnncTOcO6LeHHN OToKOBKInTe Tp6Ba Da ce IpeDaBAt 3a OToA3OTBOPRaHe Ha CbApKaUHTe Ce B T8X BTOpuHN CyPOBHN.
Ppabata 3a n3MeHenna 3aTa3eHn.
Uputstva o sigurnosti
Opsta uputstva o sigurnosti

Citajte sve opomene i uputstva koji su priloženi uredjaju za testerisanje ili elektrichnom alatu koji treba da se montira. Propusti kod ne poštovanja sigurnosnih uputstava i saveta mogu prouzrokovati elektrichni udar, požar i/ili teške povrede.
Sigurnosna uputstva za uredjaje za testerisanje
Izvucite utiakic iz utičnice i/ili izvadite akumulator iz elektrčnog alata pre nego što preduzmete podesavanja uredjaja ili promenite delove pribora. Nenameran start elektrčnih alata je uzrok nekih nasreca.
Sklopi turedjazesterisanjekorektno, pre nego sto montirate elektricni alat. Samo besprekorna konstrukcija omogucava sigurno vodjenje elektricnog alata.
Postavite uredjaj za testerisanje na cvrstu, ravnu i horizontalnu povrsinu. Ako uredjaj za testerisanje moze klizati ili se klatiti, ne moze se elektrichi alat ili radni komad ravnomerno i sigurno voditi.
Postavite elektrichi alat sigurno na uredjaj za testerisanje, pre nego ga koristite. Proklizavanje elektrcnog alata na uredjaju za testerisanje moze uticati na gubitak kontrole
Pazite na to, da kabl elektricnog alata ne zapadne izmedju bazne jedinice i sine vodjice. Ako se kabl osteti ili presece, postoji rizik od elektricnog udara.
Uklonite elektrichi alat pre nego sto sklopite uredjaj za testerisanje ili preklopite uvis sinu vodjice. Elektrichi alat doitaste pasti dole, ostetiti se ili doprineti povredama.
Ne koristite uredjaje za testerisanje u kvaru. Samo ispranan uredjaj za testerisanje moze sigurno voditi elektricni alat.
Uverite se, da dugi i teški radni komadi ne izbace iz ravnoteže uredjaj za testerisanje. Dugi i teški radni komadi moraju se podupreti ili osloniti na slobodnom kraju.
Nosite zašitne rukacive pri presecanju pločica. Na prelomljenim pločicama nastaju ostre ivice na koje se možete povrediti.
Upotrebljavaje uredjaj za testerisanje samo za presecanje materijala koji su navedeni u preporucenoj upotrebi. Mermer ili granit kao i pločice sa grubom povrsinskom strukturom i pločice sa prirodnim kamenom ne mogu se presecati.
Opis funkcija
Upotreba prema svrsi
PLS 300: Zajedno sa elektricnim alatom je uredjaj sa testerisanje odredjen za testerisanje dužnih i poprečnih preseka sa pravim presecanjem dasaka i profila od tvrdog i mekogDRVeta, kao i aluminijuma i plastike. Mogu se poděšavati horizontalni ugloví iskošenja od maksimalno -45^ do +45^ kao i vertikalni ugloví iskošenja od maksimalno 0^ do 45^ . Uredjaj za testerisanje je zamíšljen, da isključivo radi sa ubodnim testerama iz Bosch-programa kućnog alata PST.
Upotrebljavajeismo listove testere koje je preparuocio Bosch (pogledajte stranu 223). Ako upotrebite suviše tanke listove testere, postoji opasnost da se rez testere postepeno udalji.
PLS 300 Set, PTC 1: Zajedno sa uredjagem za presecanje pločica zamisljen je uredjaj sa testerom za presecanje keramickim pločica i pločica od kamenih materijala do maksimalne debljine od 10mm
Mogu se podesavati horizontali uglov iskosenja od maksimalno -45^ do +45^ .


176 | Srpski
Komponente sa slike
Oznacavanje brojevima componenti sa slika odnosi se na prikaz uredjaja za testerisanje na grafickim stranama.
PLS 300
1 Bazna jedinica
2 Skala za ugao iskoosenja (horizontalan)
3 Drska za fiskiranje za所提供sedavanje visine
4 Sina vodjica sa prorezom za testeru
5 Bočni grančnici šine vodjice
6 Produzetak oslonca
7 Dodatni oslonac
8 Most
9 Zaustavlianje na kraju za vertikalne preseke sa iskoosenjem
10 Poluga za blokadu šine vodjice
11 Oznacavanje centriranja
12 Dugme za fiksiranje za zejljeni ugao iskošenja (horizontalan)
13 Pokazivač ugla (horizontalan)
PTC 1*
14 Uredjaj za presecanje pločica
15 Granicnik sa skalom
16 Breg za prelamanje
Uldised ohutusjuhised