
Spacemaker CO75 - Can opener BLACK & DECKER - Free user manual and instructions
Find the device manual for free Spacemaker CO75 BLACK & DECKER in PDF.


| Product type | Under-cabinet electric can opener |
| Brand | Black & Decker |
| Model | Spacemaker CO75 |
| Power supply | 120 V, 60 Hz, 1.5 A |
| Main functions | Can opening, bottle opener |
| Installation | Under a cabinet, with screws and mounting shims supplied |
| Dimensions (approx.) | 25 cm (L) x 10 cm (W) x 12 cm (H) |
| Weight (approx.) | 1 kg |
| Materials | Plastic, metal (steel knife) |
| Power cord | With built-in storage, polarized plug |
| Cleaning | Removable knife, hand washable; body cleaned with a damp cloth |
| Safety | Do not immerse, unplug before cleaning, do not open pressurized cans |
| Spare parts | Knife (ref. CO75-01), mounting kit (ref. CO75-02) |
| Repairability | Tamper-proof screws, repair by authorized center only |
| Warranty | 1 year limited (United States and Canada) |
Frequently Asked Questions - Spacemaker CO75 BLACK & DECKER
User questions about Spacemaker CO75 BLACK & DECKER
0 question about this device. Answer the ones you know or ask your own.
Ask a new question about this device
Download the instructions for your Can opener in PDF format for free! Find your manual Spacemaker CO75 - BLACK & DECKER and take your electronic device back in hand. On this page are published all the documents necessary for the use of your device. Spacemaker CO75 by BLACK & DECKER.
USER MANUAL Spacemaker CO75 BLACK & DECKER
CO75Pub60006GR1 7/21/06 3:10 PM Page 1

Please Read and Save this Use and Care Book
natural_image
Exterior view of a black and white robotic device with a bowl of food in the foreground (no visible text or symbols)
USA/Canada 1-800-231-9786
Mexico 01-800-714-2503
www.blackanddecker.com
Accessories/Parts (USA/Canada)
When using electrical appliances, basic safety precautions should always be followed, including the following:
□ Read all instructions.
☐ To protect against electrical hazards, do not immerse appliance in water or other liquid.
☐ Close supervision is necessary when any appliance is used by or near children.
☐ Unplug from outlet when not in use, before putting on or taking off parts, and before cleaning.
□ Avoid contact with moving parts.
☐ Do not operate any appliance with a damaged cord or plug, or after the appliance malfunctions, or has been dropped or damaged in any manner. Return appliance to the nearest authorized service facility for examination, repair or electrical or mechanical adjustment.
☐ The use of attachments not recommended or sold by the appliance manufacturer may cause fire, electric shock or injury.
□ Do not use outdoors.
☐ Do not let cord hang over edge of table or counter or touch hot surfaces.
☐ Do not open pressurized (aerosol-type) cans.
☐ Do not open cans of flammable liquids such as lighter fluids
☐ Do not use appliance for other than intended use.
☐ To reduce the risk of fire or electric shock, do not operate any heating appliance beneath the mounted unit.
☐ Do not mount the storage bracket/unit over or near any portion of a heating or cooking appliance or a sink or basin.
SAVE THESE INSTRUCTIONS.
POLARIZED PLUG
This appliance has a polarized plug (one blade is wider than the other). To reduce the risk of electric shock, this plug is intended to fit into a polarized outlet only one way. If the plug does not fit fully into the outlet, reverse the plug. If it still does not fit, contact a qualified electrician. Do not attempt to modify the plug in any way.
ELECTRICAL CORD
The cord of this appliance was selected to reduce the possibility of tangling in or tripping over a longer cord. If more length is needed, use an extension cord rated no less than 15-amperes. (For 220 volts rated products, use an extension cord rated no less than 6-amperes). When using an extension cord, do not let it drape over the working area or dangle where someone could accidentally trip over it. Handle cord carefully for longer life; avoid jerking or straining it at outlet and appliance connections.
TAMPER-RESISTANT SCREW
Warning: This appliance is equipped with a tamper-resistant screw to prevent removal of the outer cover. To reduce the risk of fire or electric shock, do not attempt to remove the outer cover. There are no user-serviceable parts inside. Repair should be done only by authorized service personnel.
Note: If the power supply cord is damaged, it should be replaced by qualified personnel or in Latin America by an authorized service center.
Product may vary slightly from what is illustrated.

-
Locating post (not shown)
-
Cord storage (not shown)
-
Piercing lever
-
Knife sharpener (Models CO85 & CO85BM)
† 5. Blade assembly with magnet
White Blade (Part# CO75-01)
Black Blade (Part# CO85BM-01)
- Bottle opener
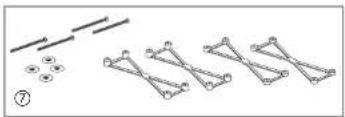
† 7.4 mounting washers and 4 mounting screws
(2) 1/2", (2) 1/4" spacer mounting assemblies
(Part # CO75-02)
† Consumer replaceable/removable parts
How to Use
This product is for household use only.
Important: For warranty verification, do not remove line cord sticker.
UNPACKING BOX CONTENTS
- Remove the unit from the cardboard packaging.
- Remove the blade assembly from cardboard insert and any stickers attached to the blade assembly. To replace blade assembly, follow instructions under Care and Cleaning, Replacing Blade Assembly.
- Verify that you have received 4 mounting washers with 4 mounting screws, (2) 1/2" and (2) 1/4" spacer mounting assemblies.
CHOOSING A MOUNTING LOCATION
Important: Do not try to open cans or sharpen knives unless the unit is properly mounted.
When selecting a mounting location:
- Consider your normal work pattern and the possible addition of other under-the-cabinet appliances.
- To reduce risk of fire or electric shock, do not place any heating or cooking appliance under the unit.
- Do not mount near or over a sink.
- Do not mount the unit behind, under or in front of under-cabinet lighting appliances.
- Be sure to mount the can opener within reach of an electrical outlet.
INSTALLING YOUR CAN OPENER

First, determine if your cabinet has a flat bottom (A)—or an overhang (lip extending down) bottom (B).
If your cabinet has a flat bottom, you will need to use one 1/2" spacer mounting assembly.
If it has an overhang, measure the overhang with a ruler to determine how many 1/2" or 1/4" spacer mounting assemblies you will need. For example, if the measurement is 1", then use two 1/2" spacer mounting assemblies.
With the doors of the cabinet open, use the spacer mounting assembly as a guide to mark one rear and one front hole.
a. If your cabinet has an overhang:
Slide the mounting assembly forward until one side of the assembly touches the inside surface of the overhang.
b. If your cabinet has a flat bottom:
Place the mounting assembly approximately 1/4"-1/2" back from the front edge of the cabinet. Important: Be sure the can opener is not set too far back.


- Close the cabinet door, hold the unit up to the cabinet floor, and lift the lever to be sure it clears the cabinet door (C).

-
Mark the 4 holes through the assembly onto the underside of the cabinet with a pencil (D).
-
Remove the spacer mounting assembly.
-
Empty the contents from the bottom shelf. Be sure the underside of the cabinet is free of grease or dirt.
-
Cover the countertop to catch wood chips from drilling. Caution: Wear eye protection to prevent injury from shavings when drilling.
-
Make a small starter hole by hammering a nail or using a small drill bit.
-
Hold the 1/4" drill vertically at the hole marks and drill up through the bottom of the cabinet.
-
Place a plastic washer on each screw with the flat side of the washer resting on the cabinet shelf (E).
-
For a flat bottom cabinet:
a. Drop the screw through the drilled hole from inside the cabinet.
b. Repeat the procedure with the remaining screw and washer.
For cabinets with an overhang:
Push the proper number of spacer assemblies onto the screws coming through the cabinet bottom.
-
Line up the 4 holes in the top of the can opener with the exposed screws beneath the spacer assemblies and tightenthe screws into the top of the can opener.
-
Pull out the cord form the cord storage and plug into electric outlet.
Your unit is ready for use!
OPENING A CAN
-
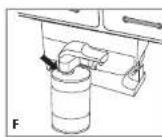
Lift the piercing lever.
-
Tip the can so that the rim is under the locating post, then push down on the lever, making sure the cutter blade is inside the rim (F).
Note: Because of the hands-free feature, it is not necessary to hold the lever down or hold the can during cutting. However, you may have to support very tall or heavy cans.
Tip: When the can is opened, the can opener will stop automatically.
- To remove the can, hold it with one hand and raise the lever with the other.
Caution: Avoid contact with the cut edges of the can or lids — they are sharp. Carefully discard the lid from the magnet.
USING KNIFE SHARPENER (models CO85 & CO85BM)

-
For best results, sharpen the entire blade length in one continuous stroke carefully pressing down on the blade as you pull it through the slot (G).
-
Repeat for desired sharpness.
Important Tips:
- Use caution when washing and drying knives after sharpening.
- Do not sharpen serrated blades, as this will smooth their edges.
- Do not sharpen scissors.
USING BOTTLE OPENER

-
Grasp the bottle.
-
Position the cap under the metal "hook" and pull sideways to the right (H).
Important Tips:
- Do not use this can opener to open cans with a pull tab, peel-off foil seal, or rolling key, rimless cans or cans with angled corner.
- Open frozen juices or foods in cardboard cans right from the freezer. Aluminum lids will not stick to the magnet.
Care and Cleaning
This product contains no user serviceable parts. Refer service to qualified service personnel.
Important: Unplug the cord before cleaning the unit.
REMOVING BLADE ASSEMBLY
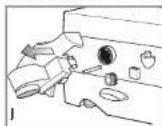
- Lift the piercing lever up as far as it will go.
- Carefully grip the blade assembly and pull it away from the can opener (J).
- Wash in sudsy water by hand and dry thoroughly. Do not put the blade assembly in the dishwasher.
- Before replacing the blade assembly, wipe the can opener body, knife sharpener (Models CO85 & CO85BM) and area around the geared wheel with a slightly damp cloth or sponge.
REPLACING BLADE ASSEMBLY
- Align key post on the blade assembly with key slot on the unit (K).
- Push in blade assembly and turn clockwise until it locks into position (L).


natural_image
Diagram showing a chain of connected nodes and a separate series of circular nodes, no text or symbols present.
REPLACEMENT DU COUTEAU
For service, repair or any questions regarding your appliance, call the appropriate "800" number on the cover of this book. Do not return the product to the place of purchase. Do not mail the product back to the manufacturer nor bring it to a service center. You may also want to consult the website listed on the cover of this manual.
One-Year Limited Warranty
(Applies only in the United States and Canada)
What does it cover?
- Any defect in material or workmanship; provided; however, Applica's liability will not exceed the purchase price of the product.
For how long?
• One year after the date of original purchase.
What will we do to help you?
- Provide you with a reasonably similar replacement product that is either new or factory refurbished.
How do you get service?
- Save your receipt as proof of the date of sale.
- Check our on-line service site at www.prodprotect.com/applica, or call our toll-free number, 1-800-231-9786, for general warranty service.
- If you need parts or accessories, please call 1-800-738-0245.
What does your warranty not cover?
• Damage from commercial use
• Damage from misuse, abuse or neglect
- Products that have been modified in any way
- Products used or serviced outside the country of purchase
- Glass parts and other accessory items that are packed with the unit
- Shipping and handling costs associated with the replacement of the unit
- Consequential or incidental damages (Please note, however, that some states do not allow the exclusion or limitation of consequential or incidental damages, so this limitation may not apply to you.)
How does state law relate to this warranty?
- This warranty gives you specific legal rights, and you may also have other rights that vary from state to state or province to province.
¿NECESITA AYUDA?
San Jose, Costa Rica
Tel.: (506) 257-5716
223-0136
Ecuador
Castelcorp
Km 2-1/2 Avenida Juan T.
Guatemala City, Guatemala
Tel.:(502)331-5020
360-0521
Honduras
Lady Lee
Centro Comercial Mega Plaza
Carrelera a la Lima
San Pedro Sula, Honduras
Tel.: (504) 553-1612
México
Authorized Service Center
Electrodomésticos, 5.A
33 Independence Square,
Port of Spain
Trinidad, W.I.
Tel.: (868) 623-4696
Venezuela
Col. Centro, Mexico D. F., CP 06050
BLACK & DECKER is a trademark of The Black & Decker Corporation, Towson, Maryland, USA
Marca registrada de The Black & Decker Corporation, Towson, Maryland, E.U.
HSpacemaker is a registered trademark of General Electric Company, USA.
Copyright © 2005 - 2006 Applica Consumer Products, Inc.
Pub. No. 600066-00-RV01
Made in People's Republic of China
Printed in People's Republic of China
Importado por:
- SAVE THESE INSTRUCTIONS.
- POLARIZED PLUG
- ELECTRICAL CORD
- TAMPER-RESISTANT SCREW
- How to Use
- UNPACKING BOX CONTENTS
- CHOOSING A MOUNTING LOCATION
- INSTALLING YOUR CAN OPENER
- OPENING A CAN
- USING KNIFE SHARPENER (models CO85 & CO85BM)
- USING BOTTLE OPENER
- Important Tips:
- Care and Cleaning
- REMOVING BLADE ASSEMBLY
- REPLACING BLADE ASSEMBLY
- REPLACEMENT DU COUTEAU
- One-Year Limited Warranty
- (Applies only in the United States and Canada)
- For how long?
- What will we do to help you?
- How do you get service?
- What does your warranty not cover?
- How does state law relate to this warranty?
- ¿NECESITA AYUDA?
- Ecuador
- Honduras
- México
- Venezuela
Brand : BLACK & DECKER
Model : Spacemaker CO75
Category : Can opener