
Spacemaker EC70 - Can opener BLACK & DECKER - Free user manual and instructions
Find the device manual for free Spacemaker EC70 BLACK & DECKER in PDF.


| Product | Under Cabinet Electric Can Opener |
| Brand | Black & Decker |
| Model | Spacemaker EC70 |
| Mounting Type | Under Cabinet (Built-in) |
| Power Supply | 120 V AC, 60 Hz, 30 W |
| Dimensions (L x H x D) | 20 x 10 x 15 cm |
| Weight | 0.9 kg |
| Housing Material | White ABS Plastic |
| Opening Mechanism | Motor-driven Rotary Blade |
| Can Retention | Built-in Magnet to Hold Lid |
| Automatic Stop Function | Yes, when the can is opened |
| Power Cord | Approx. 60 cm, plug-in |
| Switch | Start/Stop Lever |
| Cleaning | Removable blade and support, washable with soapy water |
| Maintenance | Wipe housing with a damp cloth |
| Safety | Never immerse in water; unplug before cleaning |
| Available Spare Parts | Replacement blade, magnetic support |
| Repairability | Repairability index: 6/10 (standard parts) |
| Warranty | 2 years, parts and labor |
Frequently Asked Questions - Spacemaker EC70 BLACK & DECKER
User questions about Spacemaker EC70 BLACK & DECKER
0 question about this device. Answer the ones you know or ask your own.
Ask a new question about this device
Download the instructions for your Can opener in PDF format for free! Find your manual Spacemaker EC70 - BLACK & DECKER and take your electronic device back in hand. On this page are published all the documents necessary for the use of your device. Spacemaker EC70 by BLACK & DECKER.
USER MANUAL Spacemaker EC70 BLACK & DECKER
SAVE THIS USE AND CARE BOOK
Can Opener (English, see page 2)
MODEL/MODELO/MODÈLE EC70
IMPORTANT SAFEGUARDS
When using electrical appliances, basic safety precautions should always be followed, including the following:
■Read all instructions.
■To protect against risk of electric shock, do not place can opener, cord, or plug in water or other liquid.
■Close supervision is necessary when any appliance is used by or near children.
■Turn unit off and unplug from outlet when not in use, before putting on or taking off parts, and before cleaning.
■Do not operate any electric or gas heating appliance beneath this unit. Do not place on or near a hot gas or electric burner or in a heated oven.
■Avoid contacting moving parts.
■Do not install the can opener over a sink or basin or any portion of a heating or cooking appliance.
■Do not operate this appliance with a damaged cord or plug or after the appliance malfunctions or is dropped or damaged in any manner. Return the can opener to an authorized service facility for examination, repair, or electrical or mechanical adjustment.
■The use of attachments not recommended or sold by the appliance manufacturer may result in fire, electric shock, or injury.
■To reduce the risk of fire or electric shock, do not operate any heating appliance beneath the mounted unit.
■Do not use outdoors.
■Do not let cord hang over the edge of table or counter, or touch hot surfaces.
■Do not open pressurized (aerosol-type) cans.
■Do not open cans of flammable liquids such as lighter fluids.
■Do not use this can opener for anything other than its intended use.
■Do not operate this appliance in the presence of explosive and/or flammable fumes.
■This product is intended FOR HOUSEHOLD USE ONLY and not for commercial or industrial use.
SAVE THESE INSTRUCTIONS
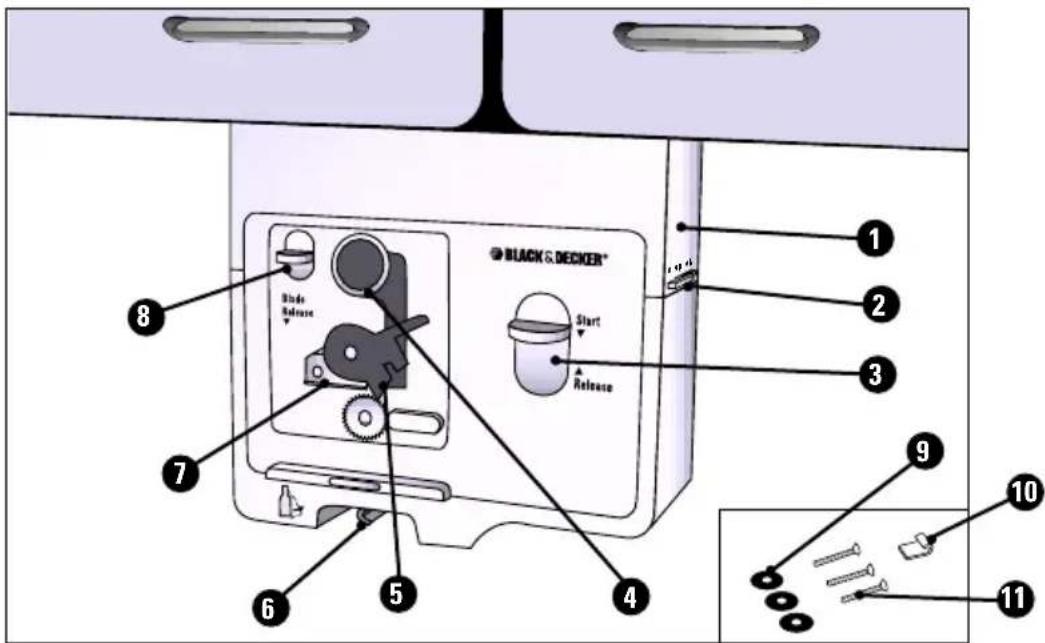
- Mounting Bracket 7. Locating Tab
- Bag Opener 8. Blade Assembly Release Lever
- Operating Switch 9. 3 Washers
- Retractable Magnet 10. Cord Hook
- Cutting Blade 11. 3 Screws
- Bottle Opener
POLARIZED PLUG
This Spacemaker* Can Opener has a polarized plug—one blade is wider than the other. To reduce the risk of electric shock, this plug will fit into a polarized outlet only one way. If the plug does not fit fully into the outlet, reverse it. If it still does not fit, contact a qualified electrician. Do not attempt to defeat this safety feature by modifying the plug in any way.
ELECTRICAL CORD
The cord length of this Can Opener was selected to reduce safety hazards that may occur with a longer cord. If more cord length is needed, an extension cord with a polarized plug may be used. It should be rated not less than 10 amperes, 120 Volts, and have Underwriters Laboratories (in USA) or CSA listing (in Canada). A properly rated extension cord may be purchased from a Black & Decker, Household Appliance Company-Owned or Authorized Service Center. When using a longer cord, be sure it does not drape over a working area or dangle where it could be pulled on or tripped over. Handle cord carefully for longer life; avoid jerking or straining it at outlet and appliance connections.
How To Use
CHOOSING A MOUNTING LOCATION
The Spacemaker* Can Opener is designed to be mounted under a cabinet to save counter space. Although the motor can be turned on without having the unit mounted, DO NOT ATTEMPT TO OPEN CANS UNLESS THE UNIT IS PROPERLY INSTALLED. The can opener can be mounted to wood or metal cabinets.
*Trademark of General Electric Company, U.S.A.
natural_image
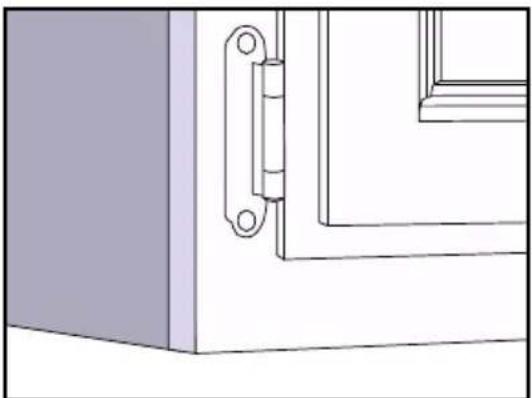
Technical line drawing of a door frame with handle and bracket (no text or symbols)Figure A1 - Flush Bottom
natural_image
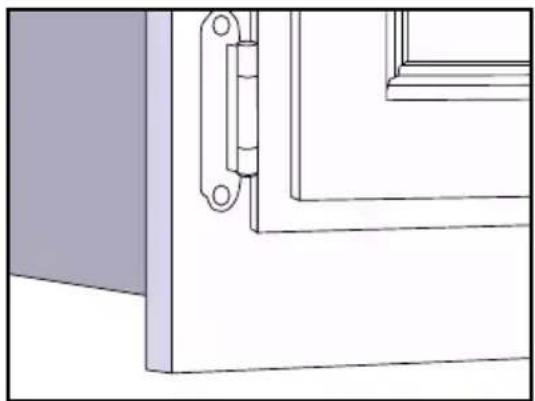
Pure technical line drawing of a door frame with no text or symbolsFigure A2 - Overhang Bottom
natural_image
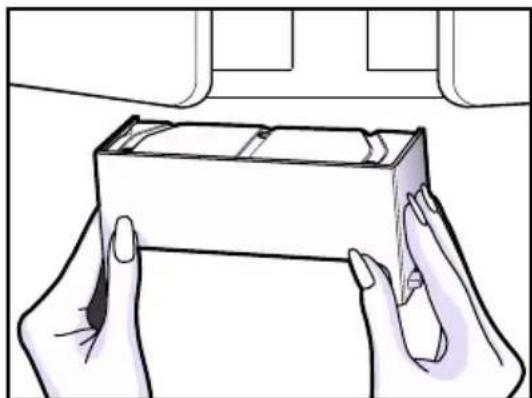
Illustration of two hands holding a rectangular box, no text or symbols presentFigure B
natural_image
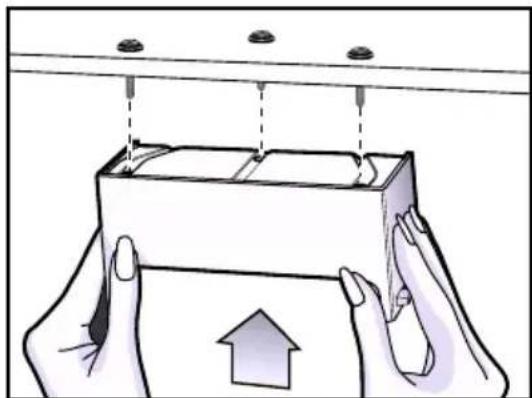
Illustration of hands installing a rectangular box with an upward arrow, no text or symbols presentFigure C
- Do not install the Can Opener over another cooking or heating appliance or behind, under, or in front of an under-cabinet lighting fixture.
- Unwind the cord and extend it to the nearest polarized or adapted outlet to be certain it will reach.
- Allow about 5 inches (12.7 cm) to the right and left side between the Can Opener and any adjacent wall or appliance.
INSTALLING YOUR CAN OPENER
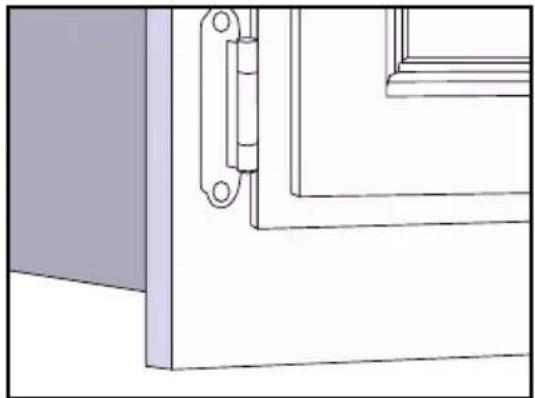
- First determine if your cabinet has a flush bottom or an overhang bottom (see Figures A1 and A2). If your cabinet has a Flush Bottom—a flat level surface—skip to the "Mounting Instructions".
- If your cabinet has an Overhang Bottom—a lip extending below the bottom of the cabinet front—measure the overhang with a ruler. You may have to use a wooden shim (a piece of wood that fits between the Cabinet and the Bracket) if the lip extends 2 inches (5.1 cm) or more below the cabinet bottom.
- Use the Mounting Bracket as your guide to locate and drill holes in the shim for the screws to pass through. At least 1/2" (1.3 cm) of the screw must be visible once it is dropped through the cabinet floor and the shim to provide secure mounting. You may need screws longer than those provided.
- If your overhang is less than 2 inches (5.1 cm), you can avoid using a shim by simply mounting the Bracket behind the overhang so that the can opener will be set back slightly from the front edge. See the mounting instructions below.
MOUNTING INSTRUCTIONS
- Empty the bottom of your cabinet and clean the underside.
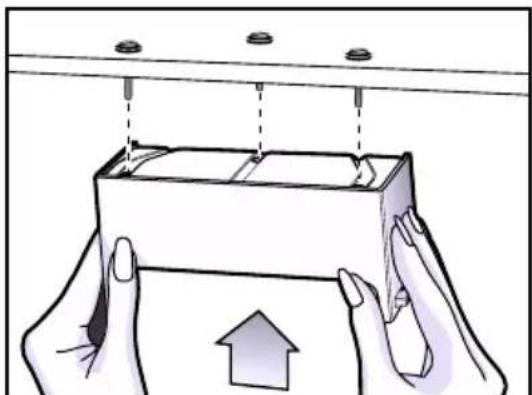
- With the cabinet doors open, hold the Mounting Bracket up to the underside of the cabinet. (Figure B) For flush bottom cabinets, it is easiest to mount the can opener at the front edge of the cabinet; for cabinets with an overhang less than 2 inches (5.1 cm), set it back behind the overhang.
- Use the Mounting Bracket and a pencil to mark the location of the three holes to be drilled on the bottom of the cabinet. Use a hammer and nail (or center punch) to tap in starter holes at your pencil marks.
natural_image
Technical line drawing of an electrical connector assembly with cable and terminal blocks (no text or symbols)Figure D
natural_image
Illustration of hands holding a device with a knob and control panel, no visible text or symbolsFigure E
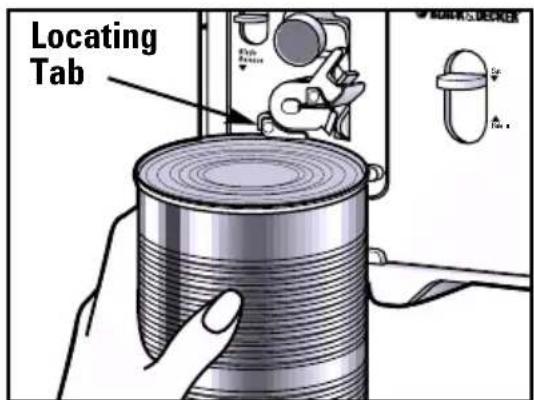
Figure F
natural_image
Illustration of a hand using a knife to clean a cylindrical container with a battery cover (no text or symbols visible)Figure G
CAUTION: It is strongly recommended that you wear suitable eye protection such as goggles to prevent injury from shavings when using a drill.
- With a 1/4"(6mm) drill bit, drill straight up through the bottom of the cabinet at your starter holes. Sandpaper or file splinters or rough edges on cabinets.
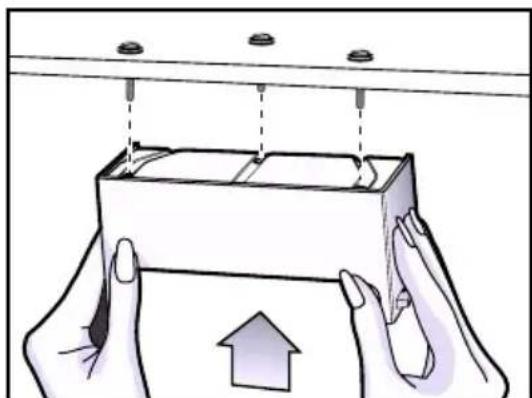
- Slip the washers onto the screws so that they rest on the cabinet interior. (Figure C)
- Hold the Mounting Bracket up to the underside of the cabinet and thread the screws into the holes on the Mounting Bracket. Tighten them with a screwdriver.
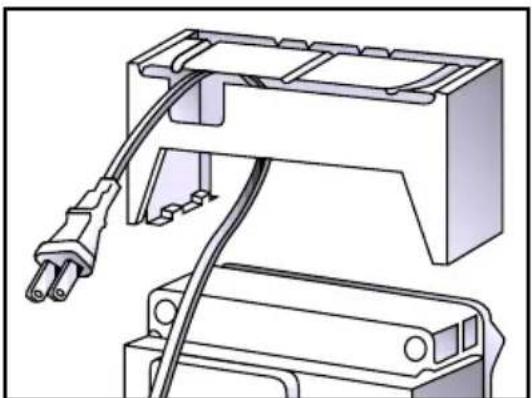
- Slip the cord out through the opening on the back of the Mounting Bracket. (Figure D)
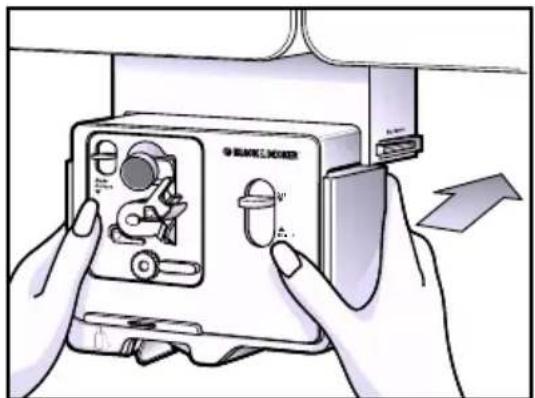
- Push the can opener onto the Bracket and slide it toward the wall until it snaps into place. (Figure E) Because the can opener fits tightly, you may have to shimmy it back and forth and put pressure at the top as you push it onto the Bracket.
- Extend the Power Cord to a suitable polarized or adapted electrical outlet. You may store extra cord length by pushing it into the hood of the Bracket or by using the Cord Hook To use the Cord Hook, peel off the paper to expose the adhesive back and place the Hook at the back edge of the cabinet or on a back wall.
NOTE: For safety, NEVER PUT TACKS THROUGH OR AGAINST THE CORD.
TO OPEN A CAN
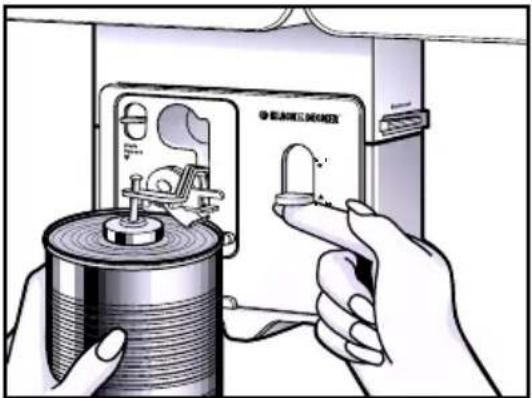
- Position the can so that the Locating Tab is resting on the rim. (Figure F)
- Press the Operating Switch down to START and let go of the can as it starts to turn. This is a "hands free" can opener so it is not necessary to hold the Operating Switch or the can during the cutting action. You may want to support tall or large cans over 2 lbs. (0.9 kg).
- The Retractable Magnet will automatically come down and grab the lid and the can opener will shut off automatically once the lid is cut. Hold down the Operating Switch if the lid is not completely cut.
natural_image
Illustration of hands operating a black box device with a coiled cable nearby (no text or symbols visible)Figure H
natural_image
Illustration of a hand holding a bottle, interacting with a device labeled 'BLUKE C. MOODER' (no text or symbols on the device itself)Figure I
natural_image
Illustration of hands installing or adjusting a component on a machine (no text or symbols visible)Figure J
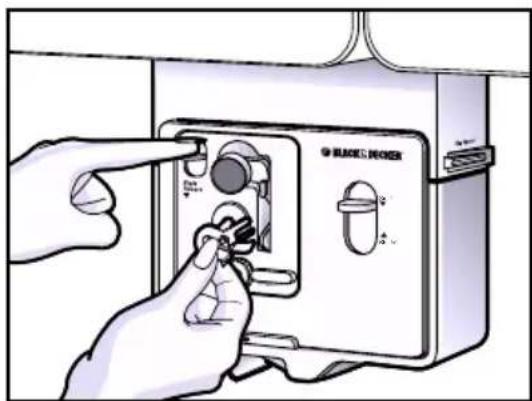
Figure K
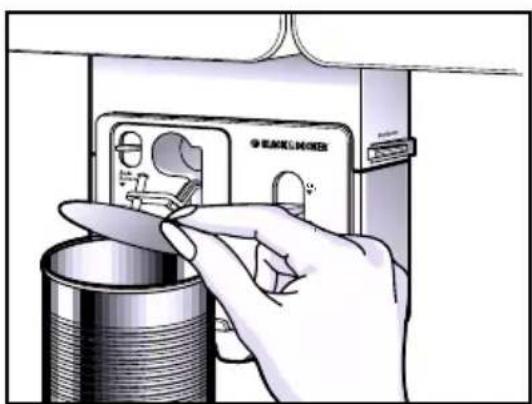
- To avoid dripping or splatter, pull the cut lid out before removing the can. (Figure G)
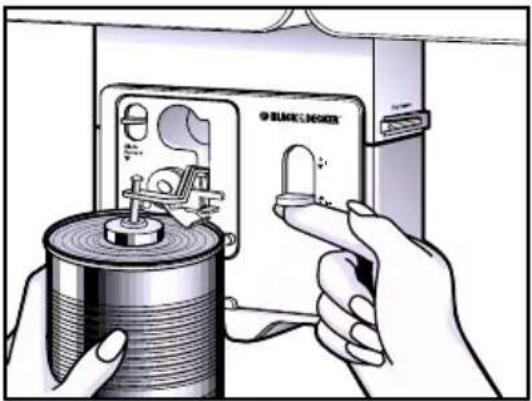
- To remove an opened can, hold it with one hand and push the Operating Switch up with the other. (Figure H) The Retractable Magnet will lift automatically.
CAN OPENING TIPS
■If there is a bump or dent in the rim of the can, open the other end or start cutting just beyond the dent.
■Cans with heavy seams, uneven rims, or odd shapes may stall the Can Opener. Turn the can slightly by hand to help the cutting action.
NOTE: If the Cutting Blade needs to be replaced, the Can Opener must be returned to a Black & Decker Inc., Household Appliance Company-Owned or Authorized Service Center. A list of the Company-Owned Service Centers can be found on the insert included with this book.
TO OPEN BOTTLES
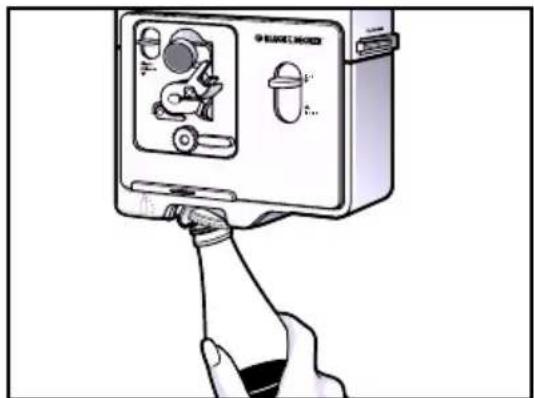
- The bottle opener is located at the bottom of the unit and requires a side-to-side motion. Use it to remove metal bottle caps only.
- To open a bottle, grasp it and position the cap under the metal "hook" in the bottle opener. Pull sideways to the right. (Figure I) "
IMPORTANT: Be sure the "hook" is not under the bottle neck or the glass may break.
TO OPEN BAGS
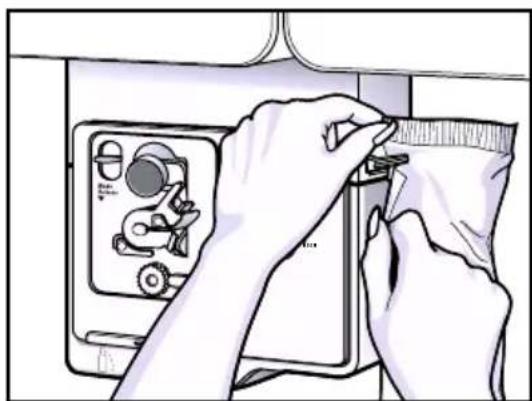
- The bag opener is located at the right side of the Mounting Bracket:
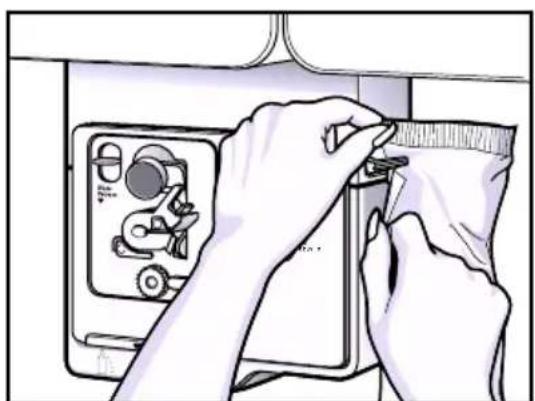
- To open a bag, grasp it with both hands and pull the top of the bag from back to front through the slot on the Bracket. (Figure J)
CAUTION: If the plastic guide over the cutting slot breaks off, the blade inside will be exposed causing a cutting hazard. If that occurs, or if the blade becomes dull, remove the Mounting Bracket and bring or send it to a Black & Decker, Household Appliance Company Owned or Authorized Service Center.
CLEANING YOUR CAN OPENER
- Unplug the can opener.
- Press down on the Blade Release Lever to pop the Cutting Assembly loose. Remove it carefully. You may wash it in hot, sudsy water or a dishwasher. (Figure K)
- Dry the Cutting Assembly thoroughly before replacing it. Insert the pin on the Assembly into the opening. If necessary, twist the Assembly back and forth until it is "seated", then push it in.
- The body of the can opener and other stationary parts can be cleaned with a damp cloth. The entire unit may be removed from the Mounting Bracket for more thorough cleaning.
SERVICE OR REPAIR
Service, if necessary, must be performed by a Black & Decker, Household Appliance Company-Owned or Authorized Service Center. The Service Center nearest you can be found in the yellow pages of your phone book under “Appliances-Small-Repairing.” For your convenience, a complete listing of our Company-Owned Service Centers can be found on the insert sheet included with this book.
If mailing or shipping your Can Opener, remove it from the Mounting Bracket by grasping the unit and pulling forward. Pack it carefully in a sturdy carton with enough packing material to prevent damage. You may use original packaging as long as you've include packing material suitable for shipping. Include a note describing the problem to our Service Center and be sure to give your return address. We also suggest that you insure the package for your protection. Consumer-replaceable parts and accessories are available at Black & Decker, Household Appliance Company-Owned or Authorized Service Centers.
FULL TWO-YEAR WARRANTY
Black & Decker warrants this product against any defects that are due to faulty material or workmanship for a two-year period after the original date of consumer purchase or receipt as a gift. This warranty does not include damage to the product resulting from accident or misuse.
If the product should become defective within the warranty period, we will repair it or elect to replace it free of charge. We will return your product, transportation charges prepaid, provided it is delivered prepaid to any Black & Decker (U.S. or Canada) Inc., Household Appliance Company-Owned or Authorized Service Center.
This warranty gives you specific legal rights, and you may also have other rights which vary from state to state or province to province.
Answers to any questions regarding warranty or service locations may be obtained by calling Consumer Assistance and Information in the U.S.A. at 1-800-231-9786 or in Canada at 1-800-465-6070.
natural_image
Pure technical line drawing of a door or cabinet corner with no text, numbers, or symbolsnatural_image
Pure technical line drawing of a door frame with no text or symbolsnatural_image
Illustration of two hands holding a rectangular object with a lid, against a background vehicle (no text or symbols)llus. B
natural_image
Illustration of hands installing a rectangular box with an upward arrow, no text or symbols presentllus. C
natural_image
Technical line drawing of an electrical connector assembly (no text or symbols)llus. D
llus. E
natural_image
Illustration of a hand using a can to clean food items from a washing machine (no text or symbols visible)llus. G
natural_image
Illustration of hands operating a mechanical device with a coiled spring (no text or symbols visible)llus. H
llus. l
CONSEJOS PARA ABRIR LAS LATAS
natural_image
Illustration of hands installing or adjusting a mechanical component with a ruler (no text or symbols visible)llus. J
llus. K
PARA ABRIR BOTELLAS
natural_image
Technical line drawing of a door frame with handle and bracket (no text or symbols)Figure A1 - Sans lambrequin
natural_image
Pure technical line drawing of a door frame structure without any text or symbolsnatural_image
Illustration of two hands holding a rectangular object, possibly a box or container, with no visible text or symbols.Figure B
natural_image
Illustration of hands installing a rectangular object with a directional arrow, no text or symbols presentFigure C
INSTRUCTIONS RELATIVES AU MONTAGE
natural_image
Technical line drawing of an electrical connector assembly (no text or symbols)Figure D
natural_image
Illustration of hands holding a device with a control panel and a directional arrow (no text or symbols)Figure E
natural_image
Illustration of a hand using a knife to clean a cylindrical container inside a washing machine (no text or symbols visible)Figure G
Figure H
CONSEILS PRATIQUES RELATIFS AU PERÇAGE
natural_image
Illustration of a hand inserting a bottle into a device labeled 'BANANA PROCESSED' (no text or symbols on the device itself)Figure I
natural_image
Illustration of hands installing or adjusting a mechanical component with a ruler (no text or symbols visible)Figure J
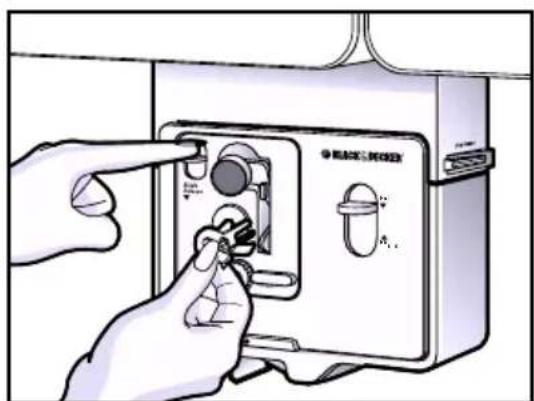
Figure K
UTILISATION DU DÉCAPSULEUR
Listed by Underwriters Laboratories, Inc. and Canadian Standards Association (CSA) Printed in People's Republic of China
Copyright ©1995, 1996 Black & Decker Pub No. 168633-46-RV00
- IMPORTANT SAFEGUARDS
- SAVE THESE INSTRUCTIONS
- POLARIZED PLUG
- ELECTRICAL CORD
- How To Use
- CHOOSING A MOUNTING LOCATION
- INSTALLING YOUR CAN OPENER
- MOUNTING INSTRUCTIONS
- TO OPEN A CAN
- CAN OPENING TIPS
- TO OPEN BOTTLES
- TO OPEN BAGS
- CLEANING YOUR CAN OPENER
- SERVICE OR REPAIR
- FULL TWO-YEAR WARRANTY
- CONSEJOS PARA ABRIR LAS LATAS
- PARA ABRIR BOTELLAS
- INSTRUCTIONS RELATIVES AU MONTAGE
- CONSEILS PRATIQUES RELATIFS AU PERÇAGE
- UTILISATION DU DÉCAPSULEUR
Brand : BLACK & DECKER
Model : Spacemaker EC70
Category : Can opener