Royal P3159 - Car radio Multilaser - Free user manual and instructions
Find the device manual for free Royal P3159 Multilaser in PDF.


| Type | Car Stereo |
| Brand | Multilaser |
| Model | Royal P3159 |
| Power Output | 45W x 4 (quadriphony) |
| Power Supply | 12V DC car battery (negative ground) |
| Current Consumption | Max 15A |
| FM Frequency Range | 87.5 - 108 MHz |
| FM Sensitivity | 3 µV (usable) |
| FM Signal-to-Noise Ratio | > 50 dB |
| MP3 Signal-to-Noise Ratio | > 60 dB |
| Media Playback | USB, SD/MMC card, AUX IN |
| Supported Audio Formats | MP3 |
| Preset Stations | 18 FM (automatic memory) |
| Equalizer | DSP tone (EQ off, EQ1, EQ2, EQ3) |
| Audio Controls | Volume, Bass, Treble, Balance, Fader |
| Additional Functions | Mute, Clock (24h), Loudness, Auto scan |
| Installation Size | 1 DIN (standard) |
| Weight | Approx. 0.8 kg |
| Operating Temperature | -10°C to 55°C |
| Fuse Rating | 12V/15A tube fuse (yellow wire) |
| Included Accessories | Mounting sleeve, trim ring, wiring harness |
Frequently Asked Questions - Royal P3159 Multilaser
User questions about Royal P3159 Multilaser
0 question about this device. Answer the ones you know or ask your own.
Ask a new question about this device
Download the instructions for your Car radio in PDF format for free! Find your manual Royal P3159 - Multilaser and take your electronic device back in hand. On this page are published all the documents necessary for the use of your device. Royal P3159 by Multilaser.
USER MANUAL Royal P3159 Multilaser
About the Operating Instructions .... 13
Major Features .... 13
Attentions 13
Function & Operation .... 13
Volume Control 13
Bass Control 13
Treble Control 14
Balance Control BAL for Front Left/Right Loudspeakers 14
Balance Control FAD for Rear Left/Right Loudspeakers 14
Manual & Automatic Tuning and Fast Forward and Rewind .... 14
Radio Mode by Band Switch Button 14
EQ: Control Button 14
Power Switch(POWER) 14
Mute Key (MUTE) 15
Mode Switch Button (MODE) 15
MMC/SD Compartment & USB Jack and the Relevant Operation 15
Clock Function 15
Equal-loudness Control Button (LOUD) 15
USB/SD Card Switch Button 15
Major Indexes 15
FM information 15
Explanation for Installation 16
Power Supply and Polarity 16
The Installation of Metallic Sheath 16
The Connection of Power Supply 16
The Connection of Loudspeaker 16
The Installation of Host Machine 16
Disassembly 16
Replacement of Fuse 16
Explanation for Common Faults 17
Solutions of Problems 17
INDICE (español)
About the Operating Instructions
The product is featured with a series of important integrated functions to guarantee high-standard reception and operation. All the designs aim at the possibility of easy operation. However, many of the functions need to be explained. For the purpose, the
Operating Instructions will enable you to be favored by the following significant features and share the best audio effect as much as possible. Before using the car, we advise you to have some acquaintance with the functions and operations through the Operating Instructions. In the Operating Instructions, all the basic operations are summarized, including some simple operations.
Major Features
Ability to play any USB disk, SD card/ MP3 files in MMC cards, Automatic memory function for 18 FM stations/ LED display/stereo control/ mute control/ (fullelectronic volume/ menu control)/equal-loudness compensation AUX IN/clock, function (24-hour system).
Attentions
- Any operation affecting your safe drive cannot be made but after parking safely.
- No working in the extremely high-temperature or low-temperature environment, e.g. the starting temperature in the car is in the extent from -10 to 55.
- To avoid any short circuit or other accidents, do not fall any metal (screw, coin or tools) into the device.
- Do not touch the automatic antenna with an earthing conductor for the avoidance of any short circuit.
- Because of the momentary high voltage caused by startup of the car, please turn on the player after the full startup of the car and turn off it if the car is to be stopped.
- While playing USB, please avoid any collision to break the player and withdraw the USB if stop playing.
- While inserting any USB or SD card, please avoid any hair or impurity entering the cassette of USB or SD card.
Function & Operation
- SEL buttons (Big rotating knob) are volume control and menu buttons (+) (-) Bass/Tred/ Bal/ Fad/ EQ
a) Click the big rotating round SEL button to start up the following circular selection modes of
electronic audio: -> Bass (BASS) -> Treble (TRED);
b) Balance of left/right loudspeakers (BAL) -> Balance of front/rear loudspeakers (FAD) ->Eq
During any mode, the standby time surpasses 5 seconds, the system will return to the former functional mode automatically.
Volume Control
- When the audio mode is set in the default of volume control mode, revolve SEL button clockwise/ anticlockwise to adjust the volume at will by your requirement;
- When the audio mode is not set in the default of volume control mode, you can press SEL button repeatedly until the LED displays "VOL"; then revolve rotating volume button SEL. In this way, you can adjust the volume according to your requirement.
Bass Control
- Press SEL button repeatedly until the LED displays "BASS";
- A clockwise rotation can turn up the volume and an anticlockwise rotation can turn down the volume and adjust the bass effect.
Treble Control
- Press SEL button repeatedly until the LED displays "TRE";
- Revolve rotating volume button VOL to adjust the treble effect.
Balance Control BAL for Front Left/Right Loudspeakers
- Press SEL button repeatedly until the LED displays "BAI";
- Revolve SEL button clockwise/ anticlockwise to adjust the audio balance of front left/right loudspeakers.
Balance Control FAD for Rear Left/Right Loudspeakers
- Press SEL button repeatedly until the LED displays "FAD";
- Revolve SEL button clockwise/ anticlockwise to adjust the audio balance of front/rear loudspeakers.
Manual & Automatic Tuning and Fast Forward and Rewind
Buttons for Selecting Forwards or Backwards
a) During the reception of a radio:
Press transitorily CH+ or CH- The buttons can be operated to receive your desired broadcasting station by manual incremental tuning forward or backward. Press longtime CH+ or CH- will automatically tune to the stronger-signal broadcasting station backwards;
b) During playing a MMC/SD card or USB:
Press transitorily .The button will enter the next song; Press transitorily . The button will enter the prior song.
BAND/AMS Button (Automatic Memory for Stations and Automatic Scan for the Memory of Preset Stations)
- Auto Scan: Hold AMS button for a few seconds, radio then automatically scan and save the received radio stations (save up to 30 stations), the radio will play the first saved chanel after the completion of automatic searching.
- Automatic selection: Press the CH +, CH-, or the number keys to select radio stations which have been stored already. It supports the selection by the key combination (for example: press the key 1 and then press the key 2 to select the stored radio station No. 12)
- The frequency adjustment, Automatic Tuning: press the up or down key to adjust the radio frequency in 0.1MHZ steps, hold the UP or DOWN button with long press to automatically select a radio station, it will paly the current station after it is received.
Radio Mode by Band Switch Button
Click AMS button to select your desired band.
EQ: Control Button
DSP tone (EQ off/EQ1/EQ2/EQ3)
Power Switch(POWER)
Switch on the unit by pressing the POWER, then the button light will be on. It stays the mode of FM radio before inserting the SD card and USB flash disk. Or it keeps the mode as the lastest shutdown. Press the POWER key in any mode, it will display the time, and then short press or press for 3 seconds without keying action to return to the currently displayed mode.
Mute Key (MUTE)
The button is used for controlling the mute switch: Click MUTE button to restrain sound temporally, in this way, you'll get the mute effect. If you click the button again, the normal sound will be resumed.
Mode Switch Button (MODE)
Click MODE button to switch modes among radio, AUX and MP3 playing modes.
MMC/SD Compartment & USB Jack and the Relevant Operation
During the reception of a radio, if you want to play MMC/SD or USB, you can insert MMC/SD card or USB into the corresponding hole and the player will play the songs in MMC/SD or USB automatically. Meanwhile, the relevant information will appear on the display (if MMC/SD and USB are inserted in the same time, the later inserted one will be played) and then the music will be played.
Clock Function
During standby status, click CH+ button to start time-setting status. Press button, the time can be switched between Hour and Minute modes and the relevant information will appear on the display. After 3 seconds, the display will return to the former status.
USB/SD Card Switch Button
Press MODE transitorily (when a MMC/SD card and a USB are inserted at the same time) to switch between SD and USB playing modes.
Major Indexes
• Power output: 45W 4x
• MP3 crosstalk: > 55 dB
• MP3 SNR S/N: > 60 dB
• FM crosstalk: >35 dB
• FM signal-to-Noise S/N: > 50 dB
• FM sensitivity: 30 dB S/N < 9dB
• Voltage: 12V DC car battery (the cathode is earthed))
- Current sinking: maximum - 15A (12V)
• Maximum output: 45W 4x
• Number of tracks: quadriphony
FM information
• Frequency coverage: 87,5 MHz \~108 MHz
- Usable sensitivity: 3uV
• IF (intermediate frequency): 10,7 MHz
• RCA Line Output (option)
• Output 1200 Mv (MAX)
- Playing MMC/SD and USB
- MP3 Sound System
• Frequency: 20 Hz \~ 20 kHz
• Signal to noise (MMC/SD and USB): 50dB (1 kHz)
- A tube fuse is installed the red wire (Power) and 12V/15A tube fuse is installed in yellow wire (Battery). Therefore, replace tube fuses according to the requirements.
Explanation for Installation
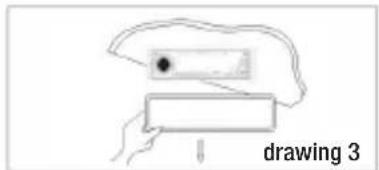
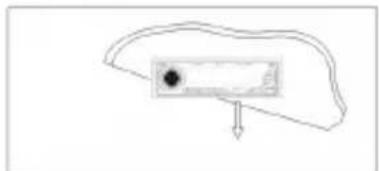
Please refer to Installation Drawing.
Power Supply and Polarity:
The anode should be connected with the anode of car battery and the cathode should be earthed (the cathode of battery or body frame).
Note: To avoid any short, please connect the cathode of battery after finishing installation.
The Installation of Metallic Sheath
• Install metallic sheathes on the instrument panel (see Installation Drawing I).
- Fasten a metallic sheath on the instrument panel and remove the card on the metallic sheath with a driver to fasten the metallic sheath.
The Connection of Power Supply
- Red (ACC wire): Connect it with the anode in 12V constant voltage (it is controlled by ignition device of the car);
- Yellow (Power cable): Connect it with the 12V power switch (the power is for the player's memory).
The Connection of Loudspeaker
- The device can be adopted the loudspeaker with load impedance of 4-8. Before connecting a loudspeaker, please cut off the power to avoid any short.;
- Note: Do not contact the loudspeaker cable with the car's ground wire; especially, avoid any contact between the loudspeaker cable and power cable; otherwise, the loudspeaker will be damaged seriously.
The Installation of Host Machine
- Insert the aerial plug into the antenna pedestal (adjust the antenna for a good effect);
- Push the machine into the metallic sheath until it is locked (see Drawing II).
Disassembly:
- Remove the panel's frames and then insert two brackets into the hole until they are locked; then pull the machine out (See Drawing III, IV and V).
Replacement of Fuse
Pull out the invalid fuse and insert a new fuse with the same specification into the blank socket.
Installation Drawing

Diassembly Drawing

natural_image
Simple line drawing of a fish silhouette with a rectangular object inside, no text or symbols presentExplanation for Common Faults
During using the player, common faults can be solved as the following table. If any unmentioned fault is found, please contact with the nearby franchiser immediately.
Solutions of Problems
Lack of Power Supply
The car is not ignited/ if any power supply has been installed in the car's accessory, you can turn the ignition switch to ACC/ if the fuse has broken, you can replace a new fuse/ the player cannot work normally/ if the temperature in the car is too high, you can enable the temperature to be normal and then try again.
Soundless:
If the volume is set as the minimum, you can adjust it to a proper level. Improper wiring, unsuitable or broken format of memorizer's (SD/USB) file may cause the soundless effect.
Failure of Reception of a Radio
If the antenna is not connected well or the signal is too weak, you can insert the antenna into the antenna hole firmly; if the searched broadcasting station cannot be locked in the automatic search, the station's signal may be too weak, you can select the station manually; besides, if you start MONE mode, you'll obtain a better effect.
Versión en Español

Panel de control
Installation Drawing

Diassembly Drawing

natural_image
Simple line drawing of a hand holding a rectangular object with a dot and label 'drawing 3' (no other text or symbols)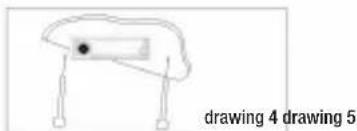
natural_image
Simple line drawing of a fish-like shape with two legs and a central dot, no text or symbols present
- INDICE (español)
- About the Operating Instructions
- Major Features
- Attentions
- Function & Operation
- Volume Control
- Bass Control
- Treble Control
- Balance Control BAL for Front Left/Right Loudspeakers
- Balance Control FAD for Rear Left/Right Loudspeakers
- Manual & Automatic Tuning and Fast Forward and Rewind
- Buttons for Selecting Forwards or Backwards
- a) During the reception of a radio:
- BAND/AMS Button (Automatic Memory for Stations and Automatic Scan for the Memory of Preset Stations)
- Radio Mode by Band Switch Button
- EQ: Control Button
- Power Switch(POWER)
- Mute Key (MUTE)
- Mode Switch Button (MODE)
- MMC/SD Compartment & USB Jack and the Relevant Operation
- Clock Function
- USB/SD Card Switch Button
- Major Indexes
- FM information
- Explanation for Installation
- Power Supply and Polarity:
- The Installation of Metallic Sheath
- The Connection of Power Supply
- The Connection of Loudspeaker
- The Installation of Host Machine
- Disassembly:
- Replacement of Fuse
- Installation Drawing
- Diassembly Drawing
- Explanation for Common Faults
- Solutions of Problems
- Lack of Power Supply
- Soundless:
- Failure of Reception of a Radio
- Versión en Español
- Panel de control
Brand : Multilaser
Model : Royal P3159
Category : Car radio