One P3213 - Car radio Multilaser - Free user manual and instructions
Find the device manual for free One P3213 Multilaser in PDF.


| Product Type | Car Stereo |
| Brand | Multilaser |
| Model | One P3213 |
| Dimensions (W x H x D) | Approx. 180 x 50 x 150 mm |
| Weight | Approx. 1.0 kg |
| Power Supply | 12V DC (Car Battery) |
| Radio Bands | AM, FM |
| Connectivity | USB, SD Card, AUX Input |
| Bluetooth | Yes (Hands-free calling & audio streaming) |
| Display Type | LCD with backlight |
| Audio Output Power | 4 x 50W max |
| Supported Audio Formats | MP3, WMA, WAV |
| Equalizer | Preset EQ modes (Rock, Pop, Classic, etc.) |
| Remote Control | Included |
| Installation Size | Single DIN |
| Front Panel | Detachable for theft protection |
| Operating Temperature | -10°C to 60°C |
| Cleaning Instructions | Use a soft dry cloth; avoid liquids |
Frequently Asked Questions - One P3213 Multilaser
User questions about One P3213 Multilaser
0 question about this device. Answer the ones you know or ask your own.
Ask a new question about this device
Download the instructions for your Car radio in PDF format for free! Find your manual One P3213 - Multilaser and take your electronic device back in hand. On this page are published all the documents necessary for the use of your device. One P3213 by Multilaser.
USER MANUAL One P3213 Multilaser
- Safety Instruction....17
- Back Panel Wiring Diagram....18
- Installation and Removal Steps ...... 19
3.1 Installation....19
3.2 Dismantling....20 - Panel Key Functions ......21
- The basic operation ....22
-
Specifications 26
6.1 FM 26
6.2 Power amplifier section....26
6.3 General 26 -
Troubleshooting ....28
INDICE | ESPAÑOL
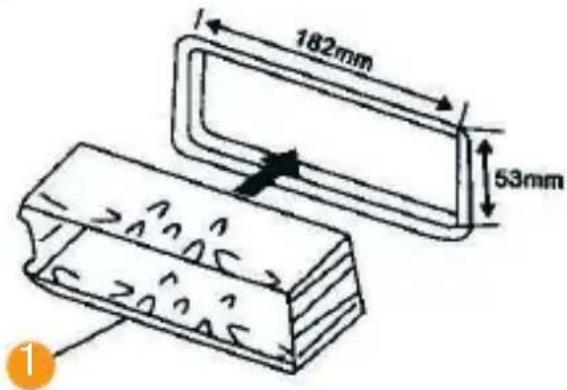
Lista de partes
1
natural_image
Simple line drawing of a screwdriver inserted into a rectangular component, with a separate view showing a cable (no text or symbols)1. Safety Instruction
- This machine is suitable for +12V vehicle power supply system, please do not install the unit to a +24V truck or bus, otherwise the machine will be damaged.
- Please do not replace the power fuse without professional guidance. Improper use of fuses may cause damage or fire.
- To ensure safety and normal use, please install by professional staff. Do not disassemble or repair the machine by yourself. Please contact your local professional car audio sales stations for any consultation.
- To avoid electric shock caused by short circuit, or any unnecessary damage and fire, please prevent the product from a wet environment and water.
Note:
- When the machine is abnormal in operation, please tip the Reset key on the panel, the machine will resume to factory settings.
- When the inside temperature of car is higher or lower, please adjust the interior temperature, and then use the machine.
- EAvoid the machine suffered a strong impact, which will damage to structural components of the machine.
-
Operate the unit in accordance with the instruction manual, illegal operation in damage is not covered under warranty.
-
Back Panel Wiring Diagram

3. Installation and Removal Steps
3.1 Installation
This is security installation, please refer to the illustration and detailed step-by-step installation:
- Put the machine on the right location in the car, connect the machine with reference to the wiring diagram, test if machine can work properly.
- After test OK, wrap the connect wire with insulating tape to ensure that the wiring completely insulated.
- Press hook of sets 1 inward, set sets 1 into the dashboard and fix it.
- Push machine 2 into metal frame and lock it.

Parts List

Put into the mounting sleeve.

natural_image
Simple line drawing of a screwdriver inserted into a rectangular component with a wavy line nearby (no text or symbols)Bend these clown outward for a thig fit, if necessary..
- Fasten the rear bracket serows and back side harness, and fix the unit well.
Remooac, inset key into the set then pull the set out trow dash board.

3.2 Dismantling
Insert the dismantling key into the key hole of device until the hook lock is open, then get the device and key out.
Remark:
- Don't install the device in the place of impeding driving or may hurt passenger by emergency brake.
- In order to install the device properly, please use our accessories only, or else it may cause unnecessary damages. If it needs to drill or have any necessary changes during the installation process, please contact with the nearby dealer.
4. Panel Key Functions

1 Volume, Power on/off, EQ
2 Numeric key 1\~4/4+
③ Mute, Light on/off
4 RPT/Pause/Play/Scan
5 PREV/Folder backward
6 Next/Folder forward
7 Mode switch
8 Reset
9 Display
10 SD Socket
11 Aux Socket
12 USB Socket
5. The basic operation
Power ON/OFF
In standby status, long press(2 seconds) button to power it off; short press button to power it on.
Mode
In the state of power on, short press 📄 button to shift among the following states:
FM>LIN>USB>SD>FM (Remark: Make sure facilities requested are workable, if not, would skip without display), Default status: FM.
Vol
Turn button left/right to decrease or increase the volume.
Vol Class: 0 \~ 40
Encoder SEL
Short press button continuously, it shows:
"BASS > TREBLE > BALANCE > FADER > EQ > LOU > VOL"
- BASS: Turn the knob left/ right to decrease/increase Bass. Bass Class: -7 \~ +7.
- TREBLE: Turn the knob left/ right to decrease/increase Treble. Treble Class: -7 \~ +7.
- BALANCE: Control R/L speaker balance, turn left to plus L and minus R, turn right to plus R and minus L. R/L speaker balance Class: L9 \~ R9.
- FADER: Control B/F speaker balance, turn left to plus Back speaker and minus Front speaker, turn right to plus Front speaker and minus Back speaker. B/F speaker balance Class: F9 \~ B9.
- EQ: To shift among POP > ROCK > JAZZ > CLAS > NORM.
- LOUD: Turn the knob left/ right to on/off LOUD.
- VOL: Turn the knob left/ right to decrease/increase volume. Vol Class: 0 \~ 40.
Mute / Button Light
While power on, short press 📄 button to turn ON/OFF the mute function.
Button light default as ON, long press (2 seconds) to turn off the light in key button, long press (2 seconds) again to turn it on.
FM Function
• Varredura Automática (SCAN)
In FM mode, short press 4 button into automatic scan.
The radio station that found will be played by 1 second and saved accordingly, then go for next one. To stop auto scan function, you can press 4 button again.
- Radio station shift, fine adjustment of radio frequency and semi-auto scan (PREV/NEXT)
In FM modelong press button 7 an shift between fine adjustment of frequency and radio station shift mode. Default Radio station shift mode.
Short press 5 switch radio station backward, long press (2 seconds) to search radio station backward.
Short press 60 switch radio station forward, long press (2 seconds) to search radio station forward.
Fine adjustment of frequency mode: short press 5 button to backward (0.1MHz), short press button 6 to forward (0.1MHz).
Long press this two buttons can go into semi-auto scan function accordingly.
- Save radio station by hand
Preset with 50 radio stations, in FM mode, long press numeric key button can save the current radio station in this button position, numeric key button can be used alone or continuously, or mixed.
Single numeric key
- Long press numeric key button 2 to save the current radio station in P02, same way to the other numeric keys.
- Short press numeric key 2 then long press (2 seconds) numeric key 2 to save the current radio station in P22, same way to the other numeric keys.
- Short press numeric key 2 then long press (2 seconds) numeric key 3 to save the current radio station in P23, same way to the other numeric keys.
Composite numeric keys
- Short press numeric key 4+ then long press numeric key 3 to save the current radio station in P07, same way to the other numeric keys.
- Continuously short press key 4+ twice and long press key 3 to save the current radio station in P11, same way to the other numeric keys.
Select radio station by numeric keys
In FM mode, short press numeric key button can play the saved radio station, numeric key button can be used alone or continuously, or mixed.
- Single numeric key
- Short press key 2 to callout the radio station saved in P02, same way to the other numeric keys.
- Continuously short press key 2 twice to callout the radio station saved in P22, same way to the other numeric keys.
- Short press key 2 then short press key 3 to callout the radio station saved in P23, same way to the other numeric keys.
-
Composite numeric key
-
Short press key 4/4+ then short press key 3 to callout the radio station saved in P07, same way to the other numeric keys.
-
Continuously short press key 4/4+ twice and short press key 3 to callout the radio station saved
in P11, same way to the other numeric keys.
Playing Music Function
- Play/Pause
In music playing mode, long press(2 seconds) button to pause, and short press button again to play.
- Repeat playing music
In music playing mode, continuously short press button to shift among “REPEAT ALL > RANDOM > REPEAT SINGLE > REPEAT SINGLE FOLDER”.
- Shift folder/ PREV/NEXT
In music playing mode, short press play music backward, long press (2 seconds) to shift folder backward. Short press play music forward, long press (2 seconds) to shift folder forward.
- Numeric keys
In music playing mode, numeric keys can be used alone or continuously, or mixed.
Stereo LINE IN function
- AUX mode
Short press MODE button into AUX mode, external audio source can be connected to AUX port.
(RRemarks: other buttons have no function now, except button POWER / MODE / MUTE / VOLUME)
6. Specifications
6.1 FM
| Tuning range FM tuning interval: | 100 kHzswitchable87.5 – 107.9 MHz |
| Aerial terminal External aerial connector | |
| Intermediate frequency 10.7 MHz | |
| Usable sensitivity 11 dBf | |
| Selectivity 75 dB at 400 kHz | |
| Signal-to-noise ratio 65 dB (stereo) | 68 dB (mono) |
| Harmonic distortion at 1 kH 0.7 % (stereo),0.5 % (mono) | |
| Separation 33 dB at 1 kHz | |
| Frequency response 30 – 15,000 Hz |
6.2 Power amplifier section
| Outputs Speaker outputs | (sure seal connectors) |
| Speaker impedance 4 – 8 ohms | |
| Maximum power output | 4 outputs at 12,5 W |
6.3 General
| Outputs Audio outputs | Power aerial relay controllead | |
| Tone controls Bass ± 9 dB at 100 Hz | Treble ± 9 dB at 10 kHz | |
| Requisitos de energia | 12 V DC bateria automotiva(pólo negativo) | |
| Dimensions Approx. | 178 • 50 • 130 mm(w/h/d) | |
| Mounting dimensions Approx. | 187 • 57 • 137 mm(w/h/d) | |
| Mass Aprox. 0.7 kg | ||
7. Troubleshooting
If you come up against some problems shown in the following table, please first check if wires are properly connected. If wires are properly connected but there are still problems, please contact the nearest service agents and do not disassemble the machine by yourself.
| Faults Analyze Causes Solutions | ||
| Failure of being powered on | It is not powered on. If the vehicle power is properly installed, turn the shift knob to ACC. | |
| Fuse is burnt. Make sure no short circuit occurs on the line and replace the fuse. | ||
| No sound It is mute or | the volume is at zero. | Adjust the volume to your required level. |
| Wires are improperly connected. | Check the wiring diagram and make sure wires are properly connected. | |
| Failure of reading U disk or card | Poor contact. Please pull out the device and reinsert it. | |
| Noises and sound distortion | Speaker cables are pressed by screws. | Check the speaker cables. |
| Speaker cables are short-circuited. | Properly connect wires. | |
| Failure of Radio Antenna | is not pulled out or connection is wrong. | Properly connect the antenna and pull it out as long as possible. |
| Weak signal. Rotate the antenna to proper direction. | ||
| Parou de funcionar CPU | can not work normally. Turn off the power and power it on again. | |
| Files are damaged. Skip this file and please select next file. | ||
Español
Lista de partes

natural_image
Simple line drawing of a screwdriver inserted into a rectangular component with internal markings (no text or symbols)- INDICE | ESPAÑOL
- Safety Instruction
- Note:
- Installation and Removal Steps
- Installation
- Dismantling
- Remark:
- Panel Key Functions
- The basic operation
- Power ON/OFF
- Mode
- Vol
- Encoder SEL
- Mute / Button Light
- FM Function
- Single numeric key
- Composite numeric keys
- Select radio station by numeric keys
- Playing Music Function
- Stereo LINE IN function
- Specifications
- FM
- Power amplifier section
- General
- Troubleshooting
- Español
Brand : Multilaser
Model : One P3213
Category : Car radio