BOT63MXD - Built-in oven THOMSON - Free user manual and instructions
Find the device manual for free BOT63MXD THOMSON in PDF.

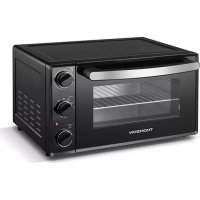
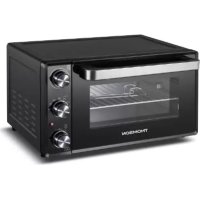
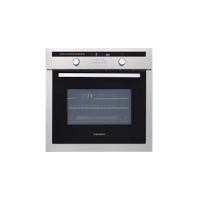
| Product type | Built-in oven |
| Brand | THOMSON |
| Model | BOT63MXD |
| Power supply | 230 V / 50 Hz |
| Cooking modes | Fan-assisted, Natural convection, Pulsating heat, Eco, Defrost, Pulsating grill, Intensive grill |
| Programmer | Electronic with digital display |
| Functions | Immediate cooking, programmed (immediate/delayed start), timer |
| Temperature range | 35°C to 275°C depending on mode |
| Interior lighting | Lamp |
| Included accessories | 2 safety grills with handle, 1 grid for 45 mm dish, 1 grid for 20 mm dish |
| Cleaning | Manual (not pyrolytic) |
| General information | Manual available for free download at notice-facile.com |
Frequently Asked Questions - BOT63MXD THOMSON
User questions about BOT63MXD THOMSON
0 question about this device. Answer the ones you know or ask your own.
Ask a new question about this device
Download the instructions for your Built-in oven in PDF format for free! Find your manual BOT63MXD - THOMSON and take your electronic device back in hand. On this page are published all the documents necessary for the use of your device. BOT63MXD by THOMSON.
USER MANUAL BOT63MXD THOMSON
MAINTIEN AU CHAUD / PATE A PAIN
OBER- UND UNTERHITZE (ECO)
(empfohlene Temperatur 200^ mindestens 35^ , maximal 275^ )
You have just acquired a THOMSON oven and we would like to thank you.
Our research teams have created this new generation of appliances for you. Their quality, appearance, functions and technological advances make them exceptional products, showcases of our unique know-how.
Your new THOMSON oven will blend harmoniously into your kitchen and perfectly combine cooking performance and ease of use. We wanted to offer you a product of excellence.
In the line of THOMSON products, you will also find a wide range of microwave ovens, steamers, hobs, ventilation hoods, dishwashers, washing machines, laundry dryers, refrigerators and freezers, all of which can be built in and coordinated with your new THOMSON oven.
Of course, in an ongoing effort to better satisfy your demands with regard to our products, our after-sales service department is at your disposal and ready to listen in order to respond to all of your questions and suggestions.
THOMSON
As part of our commitment to constantly improving our products, we reserve the right to make changes to them based on advances to their technical, functional and/or aesthetic properties.

Important:
Before installing and using your appliance, please read this Installation and Usage carefully, as it will allow you to quickly familiarise yourself with its operation.
TABLE OF CONTENTS
EN
1 / DESCRIPTION OF YOUR APPLIANCE
• Introduction to your oven 4
- Accessories 4
- Introduction to the programmer 5
2 / USING YOUR APPLIANCE
- Using the programmer
- How to set the time
- Immediate cooking
- Programmed cooking
- Immediate start
- Delayed start
Using the timer function 10
3/OVENCOOKINGMODES 11
EN 1 / DESCRIPTION OF YOUR APPLIANCE
INTRODUCTION TO YOUR OVEN
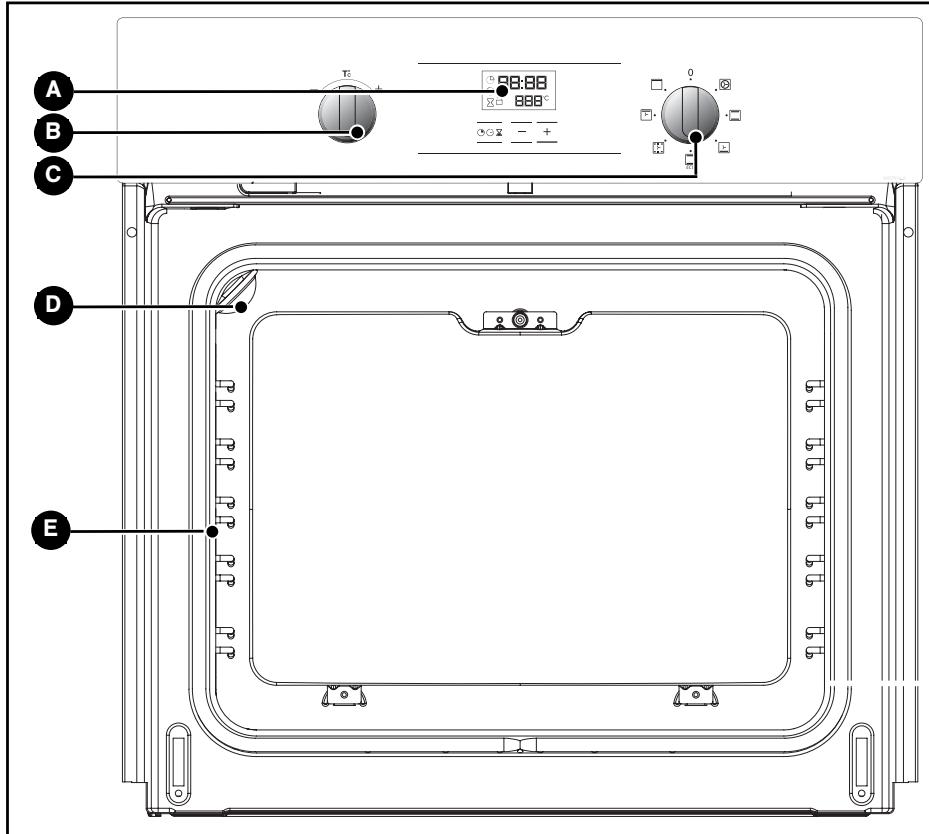
A Programmer

Light
Temperature selector switch
E Wire shelf supports
C Function selector switch
- Accessories
Your appliance has a safety grid with a handle, one with handles for a 45 mm dish, a Lissium pastry dish and a 45 mm dish.
1 / DESCRIPTION OF YOUR APPLIANCE
EN
INTRODUCTION TO THE PROGRAMMER
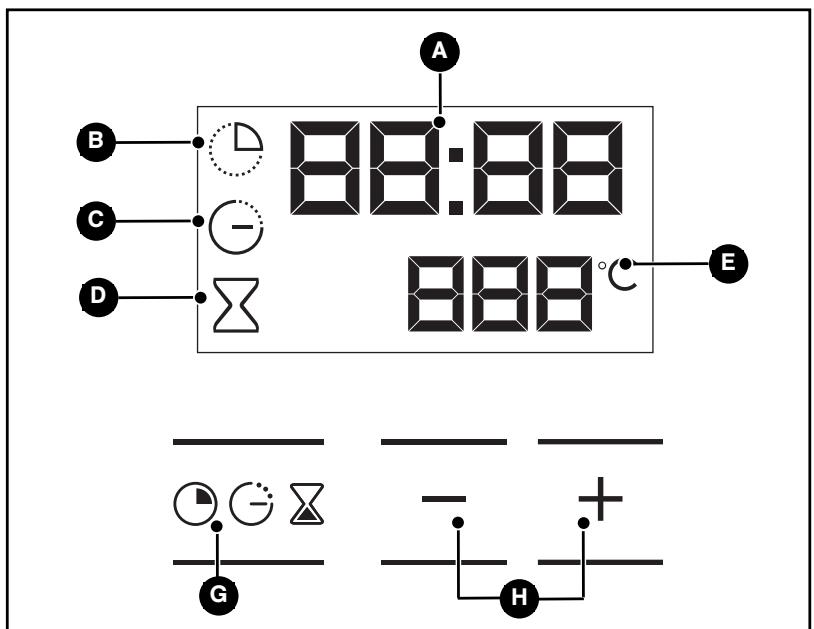
A Time and cooking time display
E Temperature display
E Cooking time indicator
Selection button (cooking time and time)
Cooking end time indicator
Time setting buttons
D Timer display
EN 2/USING YOUR APPLIANCE
- USING THE PROGRAMMER
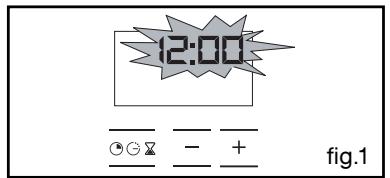
How to set the time
- When plugged in
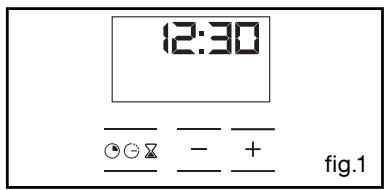
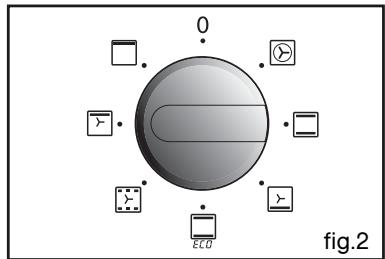
The display flashes 12:00 (fig.1).
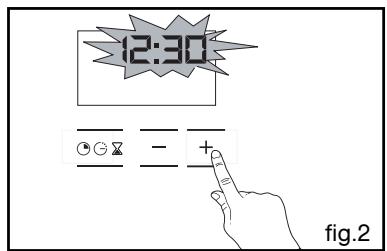
Set the time by pressing the + or - buttons (holding your finger on the button allows you to scroll through the numbers rapidly) (fig.2).
Example: 12:30
Press the "L" button to confirm. The display stops flashing.
- To set the time on the clock
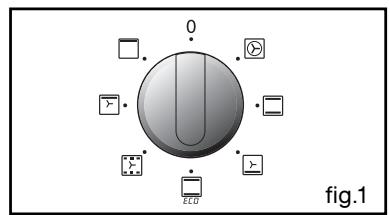
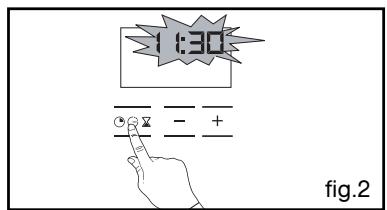
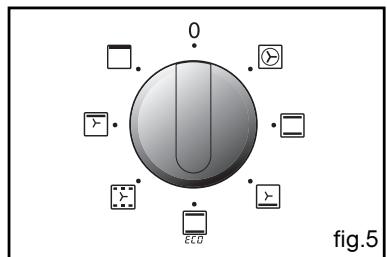
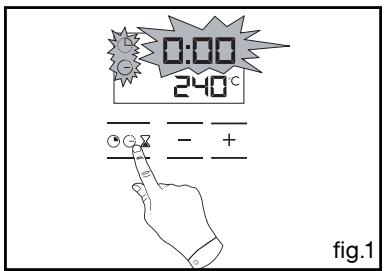
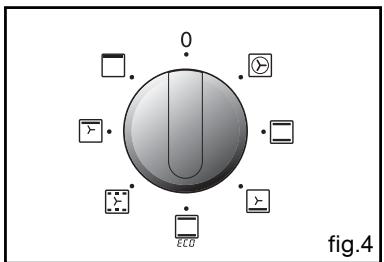
The function selector switch must be in the 0 position (fig.1).
Press and hold the “L” button for a few seconds until the display starts flashing (fig.2), then release. Audible beeps indicate that it is now possible to set the time.
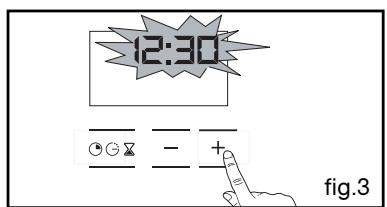
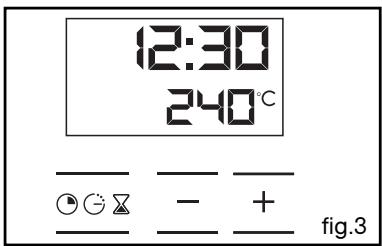
Adjust the clock setting with the + and - buttons (fig.3).
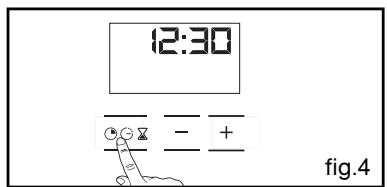
Press the "L" button to confirm (fig.4).

Warning
If there is no confirmation from the
"按钮,the time is recorded automatically after a few seconds.
2 / USING YOUR APPLIANCE
EN
- Immediate cooking
- The programmer should display only the time.
It should not be flashing (fig.1).
Turn the function selector to the position of your choice.
Example: position (fig.2).
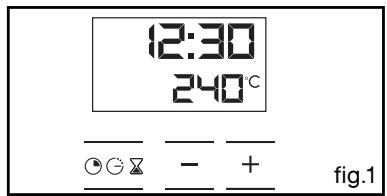
Your oven recommends the optimal temperature for the chosen cooking mode (fig.3).
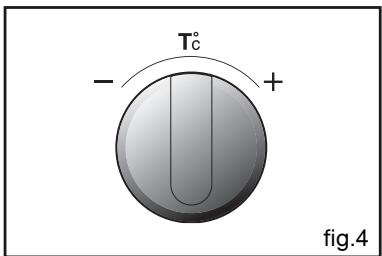
It is, however, possible to adjust the temperature by pushing the selection lever towards ^+ or-(fig.4).
Place your dish in the oven based on the recommendations provided by the cook book.
After these steps, the oven heats up and the temperature indicator flashes.
A series of beeps will sound when the oven reaches the selected temperature.
The temperature stops flashing.
To stop this heating, return the function selector to 0.
Warning After a cop
After a cooking cycle, the cooling fan continues to operate for a period of time in order to guarantee optimal oven reliability.
Warning All types of
Warning All types of cooking are done with the door closed.
EN 2/USING YOUR APPLIANCE
PROGRAMMED COOKING
- Cooking with immediate start and programmed duration
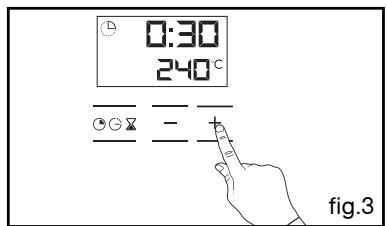
- Select the desired cooking mode and adjust the temperature (fig.1).
- Press the “ ” button until the cooking time indicator starts to flash .
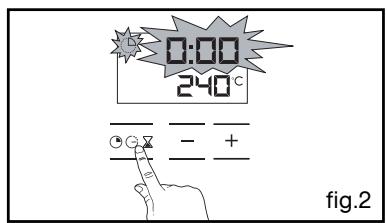
The display flashes 0:00 to indicate that you can now adjust the setting (fig.2).
- Press the + or - buttons to set the desired time.
Example: 30 mins cooking time (fig.3).
The cooking time is automatically recorded after a few seconds.
The cooking time display stops flashing.
The countdown of the cooking time begins immediately after it has been set.
After these three steps, the oven heats up:
A series of beeps will sound when the oven reaches the selected temperature.
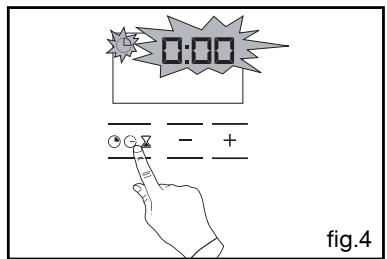
At the end of cooking (end of programmed time),
- the oven turns off,
- the cooking time indicator and 00:00 both flash (fig.4),
- a series of beeps sounds for a few minutes.
Press any button to stop the beeping.
The display shows the time once again when the function selector switch is returned to 0 (fig.5).
2 / USING YOUR APPLIANCE
EN
COOKING POSTPONED
- Cooking with delayed start and chosen cooking end time
Proceed as with programmed cooking.
- After setting the cooking time, press the “ ” button until the end of cooking indicator flashes “ ”.
The display flashes to indicate that you can now adjust the setting (fig.1).
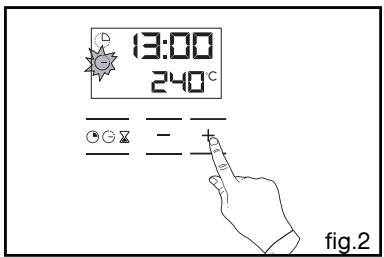
- Press the + or - button to set the desired cooking end time.
Example: end of cooking at 13:00 (fig.2).
The cooking end time is automatically recorded after a few seconds.
The cooking end time display stops flashing.
After these 3 steps, the oven heating is delayed so that cooking ends at 13:00.
At the end of cooking (end of programmed time),
- the oven turns off,
- the cooking time indicator and 0:00 both flash (fig.3),
- a series of beeps sounds for a few minutes. Press any button to stop the beeping.
The display shows the time once again when the function selector switch is returned to 0 (fig.4).
The light inside the oven turns on when cooking starts and goes out when cooking stops.

EN 2/USING YOUR APPLIANCE
- USING THE TIMER FUNCTION
- Your oven's programmer can be used as an independent timer that allows you to count down a time without operating the oven.
In this case, the timer display has priority over the clock display.
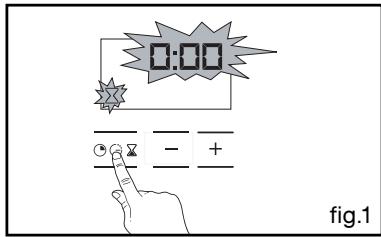
- Press the " " button (fig.1) until the timer symbol begins flashing.
> 0.00 and a small hourglass both flash.
- Adjust the chosen time by pressing the buttons + or - (fig.2)
- Press the button “ ” to confirm, or wait for a few seconds.

The display stops flashing after a few seconds and the timer starts working, counting down the time in seconds.
Once the time has expired, the timer emits a series of beeps to notify you.
Press any button to stop the beeping.

Warning
It is possible to change or cancel the timer at any time.
- Cooking is controlled by the heating element located at the back of the oven and the fan
- Rapid temperature increase: Some dishes can be placed in the oven while it is still cold.
- Recomended for meat, fish, vegetables, preferably placed in a terracotta dish.
TRADITIONAL
(recommended temperature 225^ min 35^ max 275^ )
- Cooking controlled by the upper and lower heating elements.
- Requires preheating before placing the dish in the oven.
- Recommended for slow, gentle cooking: rich game... For retaining the juices in red meat roasts. For simmering in a covered stew pan dishes that were begun on the hob (coq au vin, stew).

GRILL FAN ASSISTED
(recommended temperature 200^ min 180^ max 180^ )
- Cooking controlled by the upper element and by the fan.
- No need for preheating. Roasts and poultry that are crispy and juicy all the way around.
Ability to roast a large piece of meat placed on the special grid with the hollow dish underneath to catch the cooking juices.
\* TRADITIONAL ECO (recommended temp Cooking is cont
(recommended temperature 200^ min 35^ max 275^ )
- Cooking is controlled by the upper element with some heat from the lower element.
- This position provides energy saving while preserving the quality of the cooked poultry.
- Place the poultry in a terracotta dish, preferably on the grid in the first shelf support.
There is no need to preheat the oven. You can turn the poultry half-way through cooking if you wish.

PULSED OVEN SHELF
(recommended temperature 205^ min 35^ max 275^ )
- Cooking is controlled by the lower element combined with reduced input from the grill and use of the fan.
-
Cooking heat from the bottom with a small amount of heat from the top. Place the grid on the lowest shelf support.
-
Recommended for moist dishes (quiches, juicy fruit tarts, etc...). The crust will be thoroughly cooked on the bottom. Recommended for dishes that rise (cakes, brioche,
kugelhopf...) and for soufflés that will not be stuck by a crust formed on the top.

HOLD WARM FUNCTION
(recommended temperature 200^ min 35^ max 275^ )
- Heat regulated by the upper element with use of fan.
- Stabilisation at low temperatures.
- Recommended for rising dough for breads, brioche, and cakes... without exceeding 40^ (warming plates, defrosting).

HIGH TEMPERATURE GRILL
(recommended temperature 275^ min 180^ max 275^ )
- Cooking controlled by the upper element.
- Preheat the oven for five minutes. Slide the drip tray onto the bottom shelf support.
-
Recommended for grilling chops, sausages, toast or prawns placed on the grid.
-
Program(s) used to obtain the results indicated on the energy label in accordance with European standard EN 50304 and European Directive 2002/40/CE.