
VL-WD613EX - Video Intercom PANASONIC - Free user manual and instructions
Find the device manual for free VL-WD613EX PANASONIC in PDF.

User questions about VL-WD613EX PANASONIC
0 question about this device. Answer the ones you know or ask your own.
Ask a new question about this device
Download the instructions for your Video Intercom in PDF format for free! Find your manual VL-WD613EX - PANASONIC and take your electronic device back in hand. On this page are published all the documents necessary for the use of your device. VL-WD613EX by PANASONIC.
USER MANUAL VL-WD613EX PANASONIC
natural_image
Illustration of a remote control device with buttons and a screen (no text or symbols)Wireless Monitor Station
Model No. VL-WD613EX
Table of Contents
| Introduction | 2 |
| Accessory information | 2 |
| General information | 2 |
| For your safety | 3 |
| Important safety instructions | 4 |
| Other important information | 4 |
| Battery installation | 4 |
| Charging the sub monitor | 5 |
| Wall mounting | 5 |
| Registering the product to the Video Intercom System | 5 |
| Cleaning | 6 |
| Specifications | 6 |
Introduction
This product is an additional product designed to be used with the following Panasonic Video Intercom Systems.
- VL-SWD501EX/VL-SWD501UEX (Main monitor station: VL-MWD501EX)
(The corresponding models are subject to change without notice.)
You must register this product with your Video Intercom System before it can be used.
- This manual describes only the steps needed to register and begin using the product. Please read the Operating Instructions of the Video Intercom System for further details.
- The illustrations in the supplied manual(s) may vary slightly from the actual product.
Product names used in this manual
| Model No. | Product name | Name in this manual |
| VL-MWD501EX | Main monitor station | Main monitor |
| VL-WD613EX | Wireless monitor station | Sub monitor |
Accessory information
Supplied accessories
| Accessory item | Quantity |
| AC adaptor/PNLV226CE*1 | 1 |
| AC adaptor/PNLV226E*1 | 1 |
| Rechargeable batteries *2 | 2 |
| Charger | 1 |
*1 Appropriately dispose of the AC adaptor that will not be used.
*2 Please read the Operating Instructions of the Video Intercom System for information about replacement batteries.
Note:
- You will need the following additional items (locally procured) to install the charger on the wall.
- Screws x 2 (for wall mounting):
Prepare the screws according to the material, structure, strength and other factors of the mounting area and the total weight of objects to be mounted.
- Please read the Operating Instructions of the Video Intercom System for additional/replacement accessories.
General information
- In the event of problems, you should contact your equipment supplier in the first instance.
- Please read the "General Information" section in the Operating Instructions of the Video Intercom System for information regarding R&TTE Directive.
For your future reference
We recommend keeping a record of the following information to assist with any repair under warranty.
| Serial No. | Date of purchase |
| (found in the battery compartment of the product)Name and address of dealer |
Attach your purchase receipt here.

natural_image
Empty rectangular frame with dashed lines, no text or symbols presentFor your safety
To prevent severe injury and loss of life/property, read this section carefully before using the product to ensure proper and safe operation of your product.

WARNING
Preventing fire and electric shock
- Use only the power source marked on the product. If you are not sure of the type of power supplied to your home, consult your dealer or local power company.
- Use only the specified AC adaptor.
- Do not attempt to disassemble or modify this product. Contact an authorised service centre for repairs.
- Never touch the AC adaptor with wet hands.
- Do not perform any actions (such as fabricating, twisting, stretching, bundling, forcibly bending, damaging, altering, exposing to heat sources, or placing heavy objects on the AC adaptor) that may damage the AC adaptor. Using the product with a damaged AC adaptor may cause electric shock, short circuits, or fire. Contact an authorised service centre for repairs.
- Do not overload the power outlet above the specified levels. Overloading by having many connections on one power outlet may cause heat generation, resulting in a fire.
- Never put metal objects inside the product. Never spill any liquid on the product.
If metal objects enter the product or the product becomes wet, unplug the product from the power outlet and contact an authorised service centre.
- Do not use a microwave oven or other devices, such as electromagnetic cookers, to speed up the drying process of any parts of the product.
- Completely insert the AC adaptor into the power outlet. Failure to do so may cause electric shock and/or excessive heat resulting in a fire. Do not use damaged AC adaptors or power outlets.
- Regularly remove any dust, etc., from the AC adaptor by unplugging it from the power outlet, then wiping it with a dry cloth. Accumulated dust may cause an insulation defect from moisture, etc., resulting in a fire.
- Unplug the product from the power outlet if the product emits smoke, an abnormal smell or makes unusual noise, or if the product has been dropped or physically damaged. These conditions can cause fire or electric shock. Confirm that smoke has stopped emitting and contact an authorised service centre.
- Hold the main body (not the metal parts) of the AC adaptor when unplugging it. Unplugging the AC adaptor while holding its cord or the cord's plugs may result in fire, electric shock, or injury.
Preventing accidents
- Do not use the product in health care facilities if any regulations posted in the area instruct you not to do so. Hospitals or health care facilities may be using equipment that could be sensitive to external RF (radio frequency) energy.
- Do not install or use this product near automatically controlled devices such as automatic doors and fire alarms. Radio waves emitted from this product may cause such devices to malfunction, resulting in an accident.
- Consult the manufacturer of any personal medical devices, such as pacemakers or hearing aids, to determine if they are adequately shielded from external RF (radio frequency) energy. (The product operates in the frequency range of 1.88 GHz to 1.90 GHz, and the RF transmission power is 250 mW (max.).)

CAUTION
Preventing fire and electric shock
- Do not use the product in areas that are exposed to rain, moisture, steam, or oily smoke, or areas that have excessive dust.
Preventing accidents, injuries, and property damage
- Do not use the product in unstable areas or areas prone to strong vibrations. This may cause the product to fall, resulting in damage to the product or injury.
- Do not put your ear(s) near the speaker, as loud sounds emitted from the speaker may cause hearing impairment.
- Do not place coins or other metal objects in the charger. Metal objects may become hot, causing burns.
- Do not place magnetic cards or other devices that store data magnetically (such as credit cards) near the charger. Failure to do so may make the cards or devices unusable.
Sub monitor batteries
Preventing leakage, heat generation, rupture, or accidents
- We recommend using the batteries noted on the Operating Instructions of the Video Intercom System. USE ONLY rechargeable Ni-MH batteries AAA (R03) size.
- Do not mix old and new batteries.
- Do not open or mutilate the batteries. Released electrolyte from the batteries is corrosive and may cause burns or injury to the eyes or skin. The electrolyte is toxic and may be harmful if swallowed.
- Charge the batteries provided or identified for use with the product only, in accordance with the instructions and limitations specified in this manual.
-
Do not heat batteries or dispose of batteries in a fire.
-
Do not touch the ends of batteries (⊕, ⊖) with metal objects.
- Handle the batteries with care. Do not allow conductive materials such as rings, bracelets or keys to touch the batteries, otherwise a short circuit may cause the batteries and/or the conductive material to overheat and cause burns.
- Only use the specified charger and AC adaptor to charge the batteries. Failure to follow these instructions may cause the batteries to swell or explode.
Important safety instructions
When using this product, basic safety precautions should always be followed to reduce the risk of fire, electric shock, or personal injury.
- Do not use this product near water. For example, near a bathtub, wash bowl, kitchen sink, or laundry tub, in a wet basement, or near a swimming pool, etc.
- Use only the AC adaptor and batteries indicated in this manual.
Do not dispose of the battery(ies) in a fire.
They may explode. Check with local codes for possible special disposal instructions.
SAVE THESE INSTRUCTIONS
Other important information
- The AC adaptor is used as the main disconnect device. Ensure that the power outlet is installed near the product and is easily accessible.
- See the Operating Instructions of the Video Intercom System for information about cautions in regards to using the product and the installation environment.
- Operating the product near electrical appliances may cause interference. Move away from the electrical appliances.
Caution:
- Risk of explosion if battery is replaced by incorrect types. Dispose of used batteries according to the instructions.
Repairing, transferring, disposing, or returning the product
Requesting repairs for the product
- Note that the settings of the product may be altered or changed to the default settings during repairs.
Note for product disposal, transfer, or return
- Perform the "Initialize" setting for the product. (→ See the Operating Instructions of the Video Intercom System.) Settings are returned to their default values when initialization is performed.
Information for Users on Collection and Disposal of Old Equipment and used Batteries
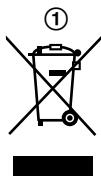
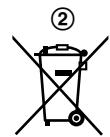
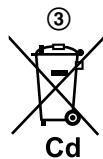
These symbols (①, ②, ③) on the products, packaging, and/or accompanying documents mean that used electrical and electronic products and batteries should not be mixed with general household waste.
For proper treatment, recovery and recycling of old products and used batteries, please take them to applicable collection points, in accordance with your national legislation and the Directives 2002/96/EC and 2006/66/EC.
By disposing of these products and batteries correctly, you will help to save valuable resources and prevent any potential negative effects on human health and the environment which could otherwise arise from inappropriate waste handling.
For more information about collection and recycling of old products and batteries, please contact your local municipality, your waste disposal service or the point of sale where you purchased the items.
Penalties may be applicable for incorrect disposal of this waste, in accordance with national legislation.
For business users in the European Union
If you wish to discard electrical and electronic equipment, please contact your dealer or supplier for further information.
Information on Disposal in other Countries outside the European Union
These symbols (①, ②, ③) are only valid in the European Union. If you wish to discard these items, please contact your local authorities or dealer and ask for the correct method of disposal.
Note for the battery symbol
This symbol (②) might be used in combination with a chemical symbol (③). In this case it complies with the requirement set by the Directive for the chemical involved.
Others
- It is prohibited to disassemble or modify this product. Contact the dealer where you purchased this product for repair.
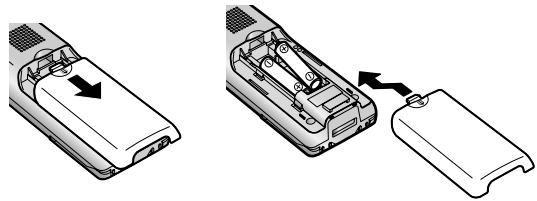
Battery installation
– USE ONLY rechargeable Ni-MH batteries AAA (R03) size.
- Do NOT use Alkaline/Manganese/Ni-Cd batteries.
- Confirm correct polarities (⊕, ⊖).
natural_image
Diagram showing two views of a remote control device with arrows indicating movement (no text or symbols present)Note:
- Use the supplied rechargeable batteries (Ni-MH ONLY). For replacement, we recommend using the Panasonic rechargeable batteries noted on the Operating Instructions of the Video Intercom System.
- Wipe the ends of batteries (⊕, ⊖) with a dry cloth.
- Avoid touching the ends of batteries (⊕, ⊖) or the unit contacts.
Charging the sub monitor
Only connect the charger with the supplied Panasonic AC adaptor ( page 2).
AC adaptor connections
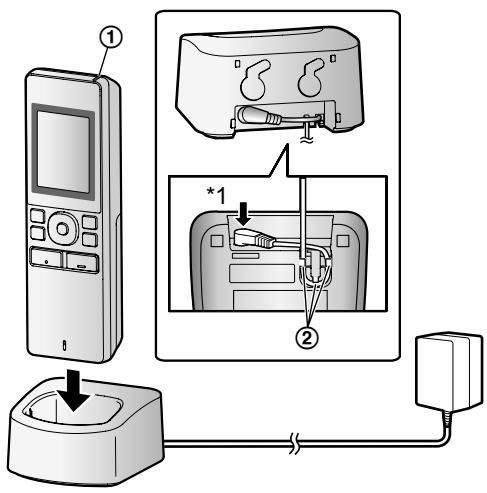
*1 Press plug firmly.
- Connect the charger to the power outlet, and then place the sub monitor in the charger to charge it. Charging usually takes about 8 hours.
① Charge indicator
-
when charging: lights
– when charging is completed: off
② Hook -
Charge the sub monitor for at least 15 minutes before registering it to the main monitor. Make sure to completely charge the sub monitor after the registration is completed.
-
Charging may take longer in the following situations.
-
When the operating temperature is low. (→ page 6)
- When the sub monitor is picked up off the charger or used during charging.
- When the sub monitor's signal is out of range (TX).
- The sub monitor does not overcharge even if it is continuously placed in the charger.
Battery level
| Icon | Battery level |
| DBM40 | High |
| DYNDG | Medium |
| DHEDD | Low |
| Needs charging |
- See page 6 for a guide on operating times for the sub monitor.
Note:
- When the sub monitor is off the charger or the AC adaptor is disconnected for 1 week or more, remove the batteries in order to maintain battery performance and prevent the batteries from discharging.
- Recharge the batteries before using the sub monitor again.
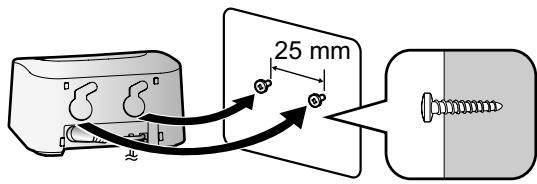
Wall mounting
Note:
- Make sure that the wall and the fixing method are strong enough to support the weight of the unit.
- Drive the screws (locally procured) into the wall.
Registering the product to the Video Intercom System
The operations described here are based on the VL-SWD501EX series main monitor. See the Operating Instructions of the Video Intercom System for more information.
1

From the top menu, touch

→

→ [Register/Cancel] → [Register] → [Sub
monitor station] → select the number of the sub monitor to be registered.
- After this, use the sub monitor and complete the following steps within about 2 minutes.
2 *1: When "Please register the device." is displayed
on the sub monitor screen, press (OK) → F1 (Yes).
- "Registering completed" is displayed.
3 : Press OFF.
*1 To re-register cancelled sub monitors:
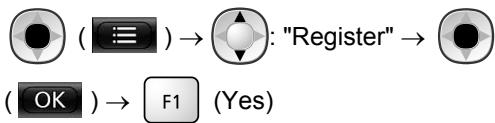
flowchart
graph LR
    A["OK"] --> B["F1"]
    C["Register"] --> D["Yes"]
Cleaning
Wipe the product with a soft, dry cloth.
For excessive dirt, wipe the product with a slightly damp cloth.
Cleaning the charger:
For safety, disconnect the charger from the power supply before cleaning.
Cleaning the sub monitor:
To avoid mistakenly operating the sub monitor, remove its batteries before cleaning.
Specifications
Main body
| Power source | Rechargeable nickel metal hydride (Ni-MH) battery |
| Dimensions (mm) (height × width × depth) | Approx. 173×52×30 (excluding protruding sections) |
| Mass (weight) | Approx. 160 g (including the batteries) |
| Operating environment | Ambient temperature: approx. 0 °C to +40 °C Relative humidity (non-condensing): up to 90 % |
| Display | Approx. 2.2 inches, colour display |
| Frequency range | 1.88 GHz to 1.90 GHz |
| Talking method | Hands-free |
| Operating time*1 | Standby use: approx. 80 hours |
| Charging time*2 | Approx. 8 hours*3 |
| Transmitting range | Approx. 100 m (line-of-sight distance from the main monitor) |
*1 When used fully charged in an operating temperature of 20 °C.
*2 When the operating temperature is 20 °C. The charging time may increase when the operating temperature is lower than this.
*3 When registered to the main monitor.
Charger
| Power source | AC adaptor (PNLV226CE/PNLV226E)Input: 220-240 V AC, 0.1 A,50/60 HzOutput: 5.5 V DC, 0.5 A |
| Power consumption | Standby: approx. 0.4 W(when the sub monitor is not placed in the charger)During charging: approx. 1.4 W |
| Dimensions(mm) (height × width × depth) | Approx. 43×81×76(excluding protruding sections) |
| Mass (weight) | Approx. 70 g (excluding the AC adaptor) |
| Operating environment | Ambient temperature: approx.0 °C to +40 °CRelative humidity(non-condensing): up to 90 % |
Note:
- Design and specifications are subject to change without notice.
- The software of this product is based in part on the work of the Independent JPEG Group.
- Names, company names, product names, software names, and logos mentioned in this manual are trademarks or registered trademarks of the companies concerned.
natural_image
Illustration of a remote control device with no text or symbolsInformations relatives aux accessoires 2
Informations relatives aux accessoires
Accessoires fournis
natural_image
Illustration of a mobile phone with an arrow indicating left-side motion (no text or symbols present)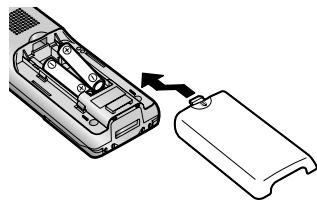
natural_image
Diagram showing a device with internal components being inserted into a housing (no text or symbols present)Remarques :
natural_image
Illustration of a remote control device with no text or symbolsFunk-Monitorstation
Modellbez. VL-WD613EX
Inhalt
Einführung 2
natural_image
Diagram showing two views of a remote control device with arrows indicating movement (no text or symbols present)Hinweis:
natural_image
Illustration of a remote control device with no text or symbolsnatural_image
Empty rectangular frame with dashed lines, no text or symbols presentnatural_image
Illustration of a mobile phone with a black arrow pointing to the screen (no text or symbols)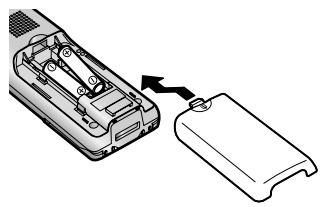
natural_image
Diagram showing a device with internal components being inserted into a labeled case (no text or symbols present)Nota:
natural_image
Illustration of a remote control device with no text or symbolsnatural_image
Two-step diagram showing a device being inserted into a clip, with arrows indicating the process (no text or symbols present)Nota:
natural_image
Illustration of a remote control device with no text or symbolsDraadloos Monitorstation Model VL-WD613EX
Inhoud
Inleiding 2
Accessoires 2
natural_image
Empty rectangular frame with dashed lines, no text or symbols presentVoor uw veiligheid
natural_image
Diagram showing two views of a remote control device with arrows indicating movement (no text or symbols present)Opmerking:
1-62, 4-chome, Minoshima, Hakata-ku, Fukuoka 812-8531, Japan
http://www.panasonic.net/
© Panasonic System Networks Co., Ltd. 2013