
VL-SWD501EX - Video Intercom PANASONIC - Free user manual and instructions
Find the device manual for free VL-SWD501EX PANASONIC in PDF.

| Product Type | Wireless Video Intercom |
| Brand and Model | Panasonic VL-SWD501EX / VL-SWD501UEX |
| System Composition | Main monitor VL-MWD501EX, secondary monitor VL-WD613EX, intercom VL-V554EX (surface mount) or VL-V554UEX (flush mount) |
| Main Monitor Power Supply | Specified Panasonic AC adapter PNLV226CE or PNLV226E |
| Secondary Monitor Power Supply | 2 Ni-MH rechargeable AAA batteries (type HHR-4MVE) via charger with adapter PNLV226CE/E |
| Intercom Power Supply | Wired (via door station) - 12 V DC typical |
| Operating Frequency | 1.88 GHz - 1.90 GHz, RF power 250 mW max |
| Maximum Range (open field) | Approximately 100 m |
| Main Monitor Screen | Color touchscreen (type not specified, approximately 17.8 cm / 7 inches estimated) |
| Secondary Monitor Screen | Color (type not specified, approximately 6.6 cm / 2.6 inches estimated) |
| SD Card Support | SDXC/SDHC/SD up to 64 GB (sold separately) |
| Maximum Number of Connectable Devices | Intercom: 2, Secondary monitor: 6, Camera: 4, Repeater: 2 |
| Main Functions | Incoming video call, audio/video monitoring, SD card recording, call transfer, walkie-talkie, electric lock control, motion detection |
| Maintenance and Cleaning | Wipe with a soft, dry cloth. Do not use chemicals or water. Clean the unplugged AC adapter regularly. |
| Safety | Use only the specified adapters. Do not expose to moisture, rain, or excessive dust. Only Ni-MH batteries. Do not disassemble. |
| Spare Parts and Repairability | Rechargeable batteries (HHR-4MVE) available from the dealer. Repair only by authorized center. |
| General Information | Compliant with directive 1999/5/EC. Warranty: keep the receipt and serial number (on the back of the main monitor). |
Frequently Asked Questions - VL-SWD501EX PANASONIC
User questions about VL-SWD501EX PANASONIC
0 question about this device. Answer the ones you know or ask your own.
Ask a new question about this device
Download the instructions for your Video Intercom in PDF format for free! Find your manual VL-SWD501EX - PANASONIC and take your electronic device back in hand. On this page are published all the documents necessary for the use of your device. VL-SWD501EX by PANASONIC.
USER MANUAL VL-SWD501EX PANASONIC
Operating Instructions
Wireless Video Intercom System
Model No. VL-SWD501EX
VL-SWD501UEX
natural_image
Illustration of a digital camera with control panel and indicator lights (no text or symbols)
natural_image
Simple diagram of a monitor and two boxes, no text or symbols present
natural_image
Illustration of a remote control device with a display and keypad (no text or symbols)Thank you for purchasing a Panasonic product.
Please read this manual before using the product and save it for future reference.
Installation Guide is supplied separately.
1. Introduction
Introduction
1.1 Model composition ....3
1.2 Accessory information ....3
1.3 General information ....4
1.4 Operating procedures and icons ....4
1.5 Trademarks and registered trademarks ....5
1.6 Abbreviations ....5
2. Important information
Important information
2.1 For your safety 6
2.2 Important safety instructions .....7
2.3 For best performance .....7
2.4 Other important information .....7
3. Preparation
Preparation
3.1 Using SD cards (sold separately) .....10
3.2 Controls 10
3.3 Displays 12
3.4 Battery installation .....14
3.5 Charging the sub monitor .....14
3.6 Wall mounting .....15
3.7 Setting the language, date and time .....15
3.8 Wide/zoom settings and zoom position settings 15
4. Talking/Monitoring
Talking/Monitoring
4.1 Answering calls ......17
4.2 Transferring doorphone calls .....17
4.3 Monitoring the outside with the doorphone 18
4.4 Talking between the main monitor and the sub monitor ....18
5. Recording/Playing
Recording/Playing
5.1 Image and audio recording .....19
5.2 Recording doorphone images and conversations ....20
5.3 Playing recorded images (main monitor only) 20
6. Using a camera
Using a camera
6.1 Connecting with a camera .....23
6.2 Monitoring the outside with the camera 23
6.3 When camera sensors are triggered .....24
6.4 Turning off camera sensor detections for specified periods of time (main monitor only) 24
6.5 Recording camera images and conversations 25
6.6 Changing camera settings .....26
7. Using electric locks
Using electric locks
7.1 Connecting with electric locks .....29
8. Incoming call operations
Incoming call operations
8.1 When another incoming call is received - main monitor ....30
8.2 When another incoming call is received - sub monitor ....31
9. Additional functions
Additional functions
9.1 Changing how images are displayed (wide/zoom and pan/tilt settings) ....33
9.2 Audio and display settings for talking and monitoring ....33
9.3 Ringtone settings ....34
9.4 Functions settings list - main monitor .....35
9.5 Function settings list - sub monitor .....37
10. General information
General information
10.1 Registering sub monitors ....39
10.2 Using repeaters ......39
10.3 Cancelling sub monitors, cameras, and repeaters 40
10.4 Using SD cards (formatting/copying data/playing images) 41
10.5 Cleaning 42
10.6 Specifications 42
11. Troubleshooting
Troubleshooting
11.1 Troubleshooting ....44
11.2 Error messages - main monitor .....49
11.3 Error messages - sub monitor .....50
12. Index
12.1 Index....51
1.1 Model composition
| Model composition | Main monitor station (Main monitor*1) | Wireless monitor station (Sub monitor*1) | Door station (Doorphone*1) |
| VL-SWD501EX | VL-MWD501EX | VL-WD613EX | VL-V554EX |
| VL-SWD501UEX | VL-MWD501EX | VL-WD613EX | VL-V554UEX |
*1 Product names used in this manual.
| Product figure | ||
 |  |  |
| VL-MWD501EX | VL-WD613EX | VL-V554EX (surface mount)/VL-V554UEX (flush mount) |
- The illustrations in the supplied manual(s) may vary slightly from the actual product.
Caution:
- Before attempting to connect or operate this product, please read the label on the rear of the main monitor.
1.2 Accessory information
1.2.1 Supplied accessories
For the sub monitor
| Accessory item | 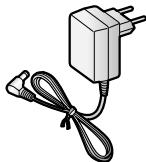 | 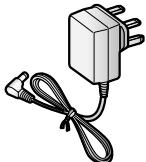 |  |  |
| AC adaptor/PNLV226CE*1 | - AC adaptor/PNLV226E*1 | Rechargeable batteries | Charger | |
| Quantity | 1 | 1 | 2 | 1 |
*1 Appropriately dispose of the AC adaptor that will not be used.
Note:
- Accessories for installing the main monitor and the doorphone are described in the supplied Installation Guide.
- You will need the following additional items (locally procured) to install the charger on the wall.
- Screws × 2 (for wall mounting):
Prepare the screws according to the material, structure, strength and other factors of the mounting area and the total weight of objects to be mounted.
1.2.2 Additional/replacement accessories
Please contact your nearest Panasonic dealer for sales information.
As of November, 2013
| Accessory item | Order number | Number of devices that can be connected |
| Rechargeable batteries | HHR-4MVE^*1 Battery type:–Nickel metal hydride (Ni-MH)–2 x AAA (R03) size for each handset | - |
| Door station (called doorphone) | VL-V554EX (surface mount) | Max. of 2 (including the supplied devices) |
| VL-V554UEX (flush mount) | ||
| Sub monitor | VL-WD613EX | Max. of 6 (including the supplied devices) |
| Wireless sensor camera (called camera) | VL-WD812EX | Max. of 4 |
| DECT repeater (called repeater) | VL-FKD2EX | Max. of 2 |
*1 Replacement batteries may have a different capacity from that of the supplied batteries.
1.3 General information
- In the event of problems, you should contact your equipment supplier in the first instance.
Declaration of Conformity:
- Panasonic System Networks Co., Ltd. declares that this equipment (VL-SWD501EX/VL-SWD501UEX) is in compliance with the essential requirements and other relevant provisions of Radio & Telecommunications Terminal Equipment (R&TTE) Directive 1999/5/EC. Declarations of Conformity for the relevant Panasonic products described in this manual are available for download by visiting:
http://www.ptc.panasonic.eu
Contact to Authorised Representative:
Panasonic Testing Centre
Panasonic Marketing Europe GmbH
Winsbergring 15, 22525 Hamburg, Germany
For your future reference
We recommend keeping a record of the following information to assist with any repair under warranty.
| Serial No. | Date of purchase |
| (found on the rear of the main monitor)Name and address of dealer |
Attach your purchase receipt here.

natural_image
Empty rectangular frame with dashed lines, no text or symbols present1.4 Operating procedures and icons
■ This manual provides operating procedures for the product. These operating procedures can be understood in the following way:
Main monitor example:
From the top menu of the main monitor, touch

flowchart
graph LR
    A["Tool Icon"] --> B["Menu Adder"]
    B --> C["[Register/Cancel"] → [Register] → [Camera].]
Meaning
From the top menu of the main monitor, touch
![, [Register/Cancel], [Register], and then [Camera].](/content/2019/11/105822/images/c3ae16a319f8687e9db4140dace2771324025047ad150aa469bc77e755795720.jpg)
- Words written in [ ] indicate touch buttons.
- Words written in " " indicate items or messages displayed on the screen that cannot be selected.
Sub monitor example:

flowchart
graph LR
    A[" "] --> B["Ringtone"]
    B --> C["OK"]
Meaning
Press the round button in the centre of the multifunction button (☐), select "Ringtone" by pressing up or down with the multifunction button (☐), and then press the round button (☐).
- Words written in " " indicate settings, items, and messages displayed on the screen.
- Words or icons written in "( )" after multifunction buttons (F1, F2), or (F2) indicate the words or icons displayed on the screen above the multifunction buttons.
■ Icons are used in the following way in this manual.

: Indicates that the information or procedure is for the main monitor.

: Indicates that the information or procedure is for the sub monitor.

: Indicates that the information or procedure is for the camera.

: Indicates that the information or procedure is for the repeater.
1.5 Trademarks and registered trademarks
- SDXC Logo is a trademark of SD-3C, LLC.
- Mac OS, QuickTime, and the QuickTime Logo are trademarks of Apple Inc., registered in the U.S. and other countries.
- Microsoft, Windows, Windows Vista, and Windows Media are either registered trademarks or trademarks of Microsoft Corporation in the United States and/or other countries.
- The software of the sub monitor is based in part on the work of the Independent JPEG Group.
- All other trademarks identified herein are the property of their respective owners.
1.6 Abbreviations
The following abbreviations are used in this manual.
- Microsoft® Windows® XP operating system is described as Windows XP.
- Microsoft® Windows Vista® operating system is described as Windows Vista.
- Microsoft® Windows® 7 operating system is described as Windows 7.
- Microsoft® Windows® 8 operating system is described as Windows 8.
- SDXC/SDHC/miniSDHC/microSDHC/SD memory card/miniSD memory card/microSD memory card are described as SD card.
2.1 For your safety
To prevent severe injury and loss of life/property, read this section carefully before using the product to ensure proper and safe operation of your product.

WARNING
Preventing fire and electric shock
- Use only the power source marked on the product. If you are not sure of the type of power supplied to your home, consult your dealer or local power company.
- Use only the specified power supply unit and AC adaptor.
- Do not attempt to disassemble or modify this product. Contact an authorised service centre for repairs.
- Never touch the power supply unit and AC adaptor with wet hands.
- Do not touch the power supply unit and the AC adaptor during an electrical storm.
- Do not use the product (excluding the doorphone) in areas that are exposed to rain, moisture, steam, or oily smoke, or areas that have excessive dust.
- Do not perform any actions (such as fabricating, twisting, stretching, bundling, forcibly bending, damaging, altering, exposing to heat sources, or placing heavy objects on the power cable and the AC adaptor) that may damage the power cable and the AC adaptor. Using the product with a damaged power cable or AC adaptor may cause electric shock, short circuits, or fire. Contact an authorised service centre for repairs.
- Do not overload the power outlet or wiring above the specified levels. Overloading by having many connections on one power outlet may cause heat generation, resulting in a fire.
- Never put metal objects inside the product. Never spill any liquid on the product (excluding the doorphone).
If metal objects enter the product or the product becomes wet, turn off a circuit breaker or unplug the product from the power outlet and contact an authorised service centre.
- Do not use a microwave oven or other devices, such as electromagnetic cookers, to speed up the drying process of any parts of the product.
- Completely insert the AC adaptor into the power outlet. Failure to do so may cause electric shock and/or excessive heat resulting in a fire. Do not use damaged AC adaptors or power outlets.
- Regularly remove any dust, etc., from the AC adaptor by unplugging it from the power outlet, then wiping it with a dry cloth. Accumulated dust may cause an insulation defect from moisture, etc., resulting in a fire.
- Turn off a circuit breaker or unplug the product from the power outlet if the product emits smoke, an abnormal smell or makes unusual noise, or if the
product has been dropped or physically damaged. These conditions can cause fire or electric shock. Confirm that smoke has stopped emitting and contact an authorised service centre.
- Hold the main body (not the metal parts) of the AC adaptor when unplugging it. Unplugging the AC adaptor while holding its cord or the cord's plugs may result in fire, electric shock, or injury.
Preventing accidents
- SD cards may become a choking hazard. Keep SD cards out of reach of children. If you suspect a child has swallowed an SD card, seek medical advice immediately.
- Do not use the product in health care facilities if any regulations posted in the area instruct you not to do so. Hospitals or health care facilities may be using equipment that could be sensitive to external RF (radio frequency) energy.
- Do not install or use this product near automatically controlled devices such as automatic doors and fire alarms. Radio waves emitted from this product may cause such devices to malfunction, resulting in an accident.
- Consult the manufacturer of any personal medical devices, such as pacemakers or hearing aids, to determine if they are adequately shielded from external RF (radio frequency) energy. (The product operates in the frequency range of 1.88 GHz to 1.90 GHz, and the RF transmission power is 250 mW (max.).)

CAUTION
Preventing accidents, injuries, and property damage
- Do not use the product in unstable areas or areas prone to strong vibrations. This may cause the product to fall, resulting in damage to the product or injury.
- Do not put your ear(s) near the speaker, as loud sounds emitted from the speaker may cause hearing impairment.
- Do not place coins or other metal objects in the charger. Metal objects may become hot, causing burns.
- Do not place magnetic cards or other devices that store data magnetically (such as credit cards) near the charger. Failure to do so may make the cards or devices unusable.
Sub monitor batteries
Preventing leakage, heat generation, rupture, or accidents
- We recommend using the batteries noted on page 4. USE ONLY rechargeable Ni-MH batteries AAA (R03) size.
- Do not mix old and new batteries.
- Do not open or mutilate the batteries. Released electrolyte from the batteries is corrosive and may
cause burns or injury to the eyes or skin. The electrolyte is toxic and may be harmful if swallowed.
- Charge the batteries provided or identified for use with the product only, in accordance with the instructions and limitations specified in this manual.
- Do not heat batteries or dispose of batteries in a fire.
- Do not touch the ends of batteries (⊕, ⊖) with metal objects.
- Handle the batteries with care. Do not allow conductive materials such as rings, bracelets or keys to touch the batteries, otherwise a short circuit may cause the batteries and/or the conductive material to overheat and cause burns.
- Only use the specified charger and AC adaptor to charge the batteries. Failure to follow these instructions may cause the batteries to swell or explode.
2.2 Important safety instructions
When using this product, basic safety precautions should always be followed to reduce the risk of fire, electric shock, or personal injury.
- Do not use this product near water. For example, near a bathtub, wash bowl, kitchen sink, or laundry tub, in a wet basement, or near a swimming pool, etc.
- Use only the power supply unit, AC adaptor, and batteries indicated in this manual.
Do not dispose of the battery(ies) in a fire.
They may explode. Check with local codes for possible special disposal instructions.
SAVE THESE INSTRUCTIONS
2.3 For best performance
Location/avoiding noise (main monitor/sub monitor)
The main monitor, sub monitor, and other compatible Panasonic units use radio waves to communicate with each other. (The product operates in the frequency range of 1.88 GHz to 1.90 GHz, and the RF transmission power is 250 mW (max.).)
- For maximum coverage (approx. 100 m) and noise-free communications, install your main monitor:
- at a convenient, high, and central location with no obstructions between the sub monitor and main monitor in an indoor environment.
- away from electronic appliances such as TVs, radios, personal computers, wireless devices, or digital cordless phones.
- facing away from radio frequency transmitters, such as external antennas of mobile phone stations. (Avoid installing the main monitor near a window.)
- Coverage and voice quality depends on the local environmental conditions.
- Do not place the charger near TVs, speakers, or other devices that emit electromagnetic waves. Failure to do so may prevent the charger from charging the product.
Environment (main monitor/sub monitor)
- Keep the unit (main monitor and sub monitor) away from electrical noise generating devices, such as fluorescent lamps and motors.
- The unit should not be exposed to direct sunlight.
- The unit should be kept away from heat sources such as radiators, cookers, etc. It should not be placed in rooms where the temperature is less than 0 °C or greater than 40 °C. Damp basements should also be avoided.
- Do not install the product in locations that are suspect to sudden changes in temperature. Failure to do so may cause condensation to form on the product causing malfunction.
- Even when the main monitor and sub monitor are used within 100 m of each other, obstructions can cause weak signals, noise, interrupted transmissions, distorted images and slow image refresh rates. Obstructions can include:
– Metal doors or metal shutters.
– Heat insulation including aluminium foil. - Concrete walls or walls made of galvanized iron sheet.
- If the sub monitor is being used in a different building, or a different part of the house, i.e. a different floor to the where the main monitor has been installed.
- Many walls.
– Double insulated glass windows. - Some types of hearing aids may receive noise from wireless communications between the main monitor, sub monitor and other compatible Panasonic units.
- Operating the unit near electrical appliances may cause interference. Move away from the electrical appliances.
- In areas surrounded by a high electrical field, disturbances may occur in the unit's image or sound.
2.4 Other important information
- The AC adaptor is used as the main disconnect device. Ensure that the power outlet is installed near the product and is easily accessible.
Caution:
- Risk of explosion if battery is replaced by incorrect types. Dispose of used batteries according to the instructions.
Tapping
This product uses digital wireless technology so that a call is rarely intercepted. However, calls may be tapped by a third party because the product also communicates using radio waves.
- "Tapping" means that the other party intercepts a radio message intentionally or accidentally by using a receiver.
Privacy and rights of portrait
When installing or using the doorphone, please take into consideration the rights of others with regard to privacy.
- It is generally said that "privacy" means the ability of an individual or group to stop information about themselves from becoming known to people other than those whom they choose to give the information. "Rights of portrait" means the right to be safe from having your own image taken and used indiscriminately without consent.
Personal information
The main monitor's internal memory and SD cards record personal information (image and audio recordings of visitors, etc.). Panasonic assumes no liability for any unforeseen damages arising from the exposure of the recorded information.
- Disclaimer
Recorded data may be altered or deleted as a result of incorrect operations, exposure to static electricity, accidents, malfunction, repairs or other operations. Panasonic assumes no liability for any direct or indirect damages resulting from the loss or alteration of recorded images.
Requesting repairs for the product
- Make sure to back up recorded data, from the main monitor's internal memory, to an SD card and then delete all recorded data from the internal memory before sending the product for repairs. After backing up the data, make sure to remove the SD card from the main monitor. - After backing up the data, initialize the settings of the main monitor and sub monitor. ^1 (All information saved to the internal memory is deleted when settings are initialized.)
- Even if the product is sent for repairs without being initialized, the memory (including recorded data and settings) for the main monitor or sub monitor may be cleared and set to factory default after repair.
- If operations cannot be performed due to the main monitor or sub monitor malfunction, consult with the place of purchase for appropriate action.
Note for product disposal, transfer, or return
- This product can store your private/confidential information.
To protect your privacy/confidentiality, we recommend that you erase the information (recorded images) from the memory before you dispose of, transfer or return the product.
All the recorded images can be erased at once by initializing the main monitor or sub monitor. ^*1
- Remove the SD card from the main monitor.
- See page 10 for information about the disposal or transfer of the SD card.
*1 Main monitor: perform [Initialize settings + Delete images] in [Initialize settings]. (→ page 37) Sub monitor: perform "Initialize". (→ page 38)
Information for Users on Collection and Disposal of Old Equipment and used Batteries


These symbols (①, ②, ③) on the products, packaging, and/or accompanying documents mean that used electrical and electronic products and batteries should not be mixed with general household waste.
For proper treatment, recovery and recycling of old products and used batteries, please take them to applicable collection points, in accordance with your national legislation and the Directives 2002/96/EC and 2006/66/EC.
By disposing of these products and batteries correctly, you will help to save valuable resources and prevent any potential negative effects on human health and the environment which could otherwise arise from inappropriate waste handling.
For more information about collection and recycling of old products and batteries, please contact your local municipality, your waste disposal service or the point of sale where you purchased the items.
Penalties may be applicable for incorrect disposal of this waste, in accordance with national legislation.
For business users in the European Union
If you wish to discard electrical and electronic equipment, please contact your dealer or supplier for further information.
Information on Disposal in other Countries outside the European Union
These symbols (①, ②, ③) are only valid in the European Union. If you wish to discard these items, please contact your local authorities or dealer and ask for the correct method of disposal.
Note for the battery symbol
This symbol (②) might be used in combination with a chemical symbol (③). In this case it complies with the requirement set by the Directive for the chemical involved.
Others
- It is prohibited to disassemble or modify this product. Contact the dealer where you purchased this product for repair.
- When power fails, this product cannot be used.
- For the recorded image:
The recorded image may be lost when:
- Mishandled
– Electric shock or radio wave interference occurs.
– The power is turned off during use.
- Panasonic may not be liable for damages due to external factors such as power failures.
- If you stop using the main monitor and the doorphone, remove the main monitor and the doorphone from the walls to prevent them from falling off. (Consult your dealer for information about removing the product.)
3.1 Using SD cards (sold separately)
SD cards can be used with the main monitor to record images and calls from the doorphone and camera. ( page 19)
When an SD card is not used, the main monitor's internal memory is used to save images. In this case, only doorphone images can be saved and the memory capacity is limited. We therefore recommend using an SD card to save images.
See page 42 for information about SD cards that can be used.
3.1.1 Cautions for SD cards
- The SD card indicator ( page 11) flashes when data is being read from or written to the SD card. Do not remove the SD card, press the RESET button ( page 11), or turn off the power to the main monitor while the SD card indicator is flashing. Failure to observe this may cause data to become corrupted.
- SD cards formatted by PCs or other devices must be formatted by the main monitor before they can be used. (→ page 41)
- When the write-protect lock switch (①) is set to "LOCK", the SD card cannot be formatted, and images and audio cannot be recorded or deleted.
- We recommend backing up important data to a PC or other device. Data on SD cards may become corrupted or be deleted if SD cards malfunction, or are exposed to electromagnetic waves or static electricity.
Disposing or transferring SD cards
- Users are solely responsible for the managing of SD card data. Formatting or deleting SD cards with the main monitor, a PC or other device, only changes the file management information and does not completely delete all data stored on the SD cards. When disposing of or transferring SD cards, we recommend physically destroying SD cards or using commercially available computer software to completely delete all data in SD cards.
3.1.2 Inserting SD cards
Important:
- Do not touch the SD card's metal contacts.
1 After confirming that the screen of the main monitor is off, insert the SD card into the SD card slot (①).

- Insert the SD card with the notched corner (②) facing upwards until it clicks into place.
- The SD card indicator flashes and the main monitor starts to confirm the recorded image information.
2 Confirm that "The SD card is ready." is displayed on the screen.
- The SD card indicator turns off and then the screen automatically turns off.
Removing SD cards
After confirming that the SD card indicator is off, push in the SD card and then remove it.
3.2 Controls
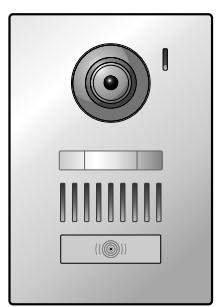
3.2.1 Doorphone
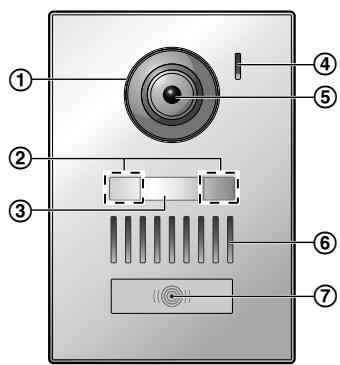
① Lens cover
② LED lights (for illumination)
③ Name plate (supplied accessory)
- Can be attached as required when installing the doorphone.
④ Microphone
⑤ Camera lens
⑥ Speaker
⑦ Call button and indicator (red)
● The indicator lights in red when the power is on.
Doorphone image quality
The quality of doorphone images may change depending on factors such as the installation environment and the time when images are viewed.
See page 44 for more information.
3.2.2 Main monitor

① Display (touch panel) ( page 12)
② Notification indicator (blue)
- Flashes when there is a notification. (→ page 13)
- When the display is touched, the top menu is displayed and the indicator stops flashing.
③ Speaker
④ Talk button and indicator (blue)
Described in this manual as TALK.
- The indicator flashes when there is an incoming call from a doorphone or sub monitor and lights when there is a call.
- When the touch button is displayed on screen, calls can also be answered by touching this button.
⑤ SD card slot (side panel) ( page 10)
⑥ Displays or hides the touch buttons and icons displayed over images.
⑦ Microphone
⑧ SD card indicator (blue)
- Flashes when data is being written to or read from an SD card. (→ page 10)
⑨ Off button
Described in this manual as OFF.
⑩ Reset button
If the main monitor cannot be correctly operated, press the RESET button with a pointed object to reset the main monitor. (Recorded images and configured settings are not affected.)
3.2.3 Sub monitor
① Display ( page 13)
② Multifunction buttons

① Soft key icons ( page 14) Displays the functions that can be operated by
② is displayed in screens such as the information screen ( page 13). The arrows displayed in indicate the direction that the button can be used in.
- In the information screen, the volume can be changed by pressing up or down.
③ (monitor) ( page 18, 24)
④ Charge indicator ( page 14)
⑤ Antenna (built-in)
- Do not cover the antenna when using the sub monitor. (This may weaken radio waves.)
⑥ Speaker
⑦ (page) (→ page 17, 18)
⑧ OFF (off)
⑨ TALK (talk) (→ page 17)
⑩ Microphone
3.3 Displays
3.3.1 Main monitor - touch panel and screen information
Important:
- Only touch the display using your fingers.
- Do not operate the display using hard and/or pointy objects (such as ball point pens), sharp objects, or finger nails.
- Do not touch or press the display with excessive force.
- Do not use commercially available LCD display protection sheets. The touch panel may not operate correctly if protection sheets are used.
- When there are sudden changes to the temperature, such as when a heater or cooler is turned on, the inside of the display may appear cloudy and it may not operate correctly. In this case, wait for 1 or 2 hours before attempting to operate the display.
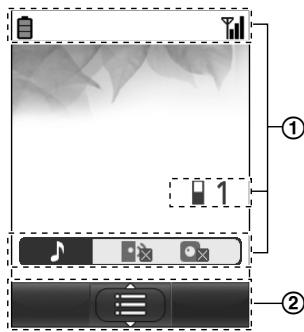
Top menu
The top menu is the screen displayed when you touch the standby (black) screen. (Only displayed after the date and time settings have been configured, see page 15.)
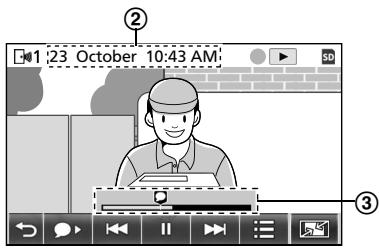
Image viewing screen
① "Have notices" is displayed when there are notifications.
Touch [Check] to view the notification's contents.
② Touch buttons (buttons displayed in dark blue on the screen)
The touch buttons change depending on the displayed screen and actions being performed.
- Touch buttons on the screen to perform operations.
- When a button is touched, a beep sounds and the button's colour changes to orange.
- The sounds made by the main monitor can be turned off in the [Touch sound] settings. (→ page 37)
- See page 12 for information about the top menu buttons.
- See page 13 for information about the main buttons displayed in the image viewing screen.
③ Status information icons ( page 13)
Top menu buttons
| Button | Action |
 | Displays the recorded image list. (→ page 20)"New" is displayed when there are messages that have not been viewed. |
 | Monitors the doorphone or camera. (→ page 18, 24) |
 | Calls/pages the sub monitor. (→ page 18) |
 | Displays the settings menu. (→ page 26, 35) |
Displays the following information menus: Touch the button of the menu that you want to check.1 Displays notifications for the main monitor and camera.2 Displays the recording information (save destination, available memory, etc.).3 Displays whether the sensors have been enabled and if the camera can be connected to. Touch the button of the menu that you want to check.1 Displays notifications for the main monitor and camera.2 Displays the recording information (save destination, available memory, etc.).3 Displays whether the sensors have been enabled and if the camera can be connected to. |
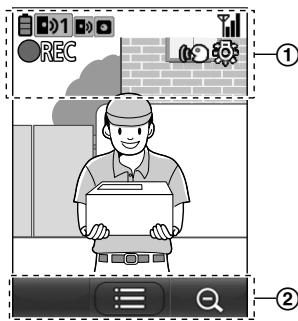
Main buttons in the image viewing screen
| Button | Action |
 | Answers or starts a call with the displayed visitor. |
 | Monitors the displayed visitor. (Sound and images can be monitored.) |
 | Displays menus. |
 | Changes the display from wide display to entire image display. (→ page 33) |
 | Records the displayed image. (→ page 20, 25) |
 | Returns to the previous screen. |
 | Unlocks the electric door lock. (→ page 29) |
 | Unlocks the electric vehicle gate lock. (→ page 29) |
 | Transfers calls from the main monitor to the sub monitor. (→ page 17) |
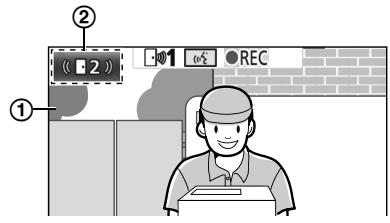
Status information icons
| Icon | Meaning |
 | Indicates which doorphone is calling, monitoring, or on a call. ("1" indicates the device number.) |
 | Indicates which camera is calling, monitoring, or on a call. ("1" indicates the device number.) |
 | Indicates that the main monitor is on a call. |
 | Indicates that the main monitor is monitoring. |
| Icon | Meaning |
| ●REC | Indicates that images are being recorded. (→ page 20) |
| [DBWD] | Indicates that the doorphone's LED lights are on. (→ page 34) |
| - | |
 | Indicates that "Press-to-talk" mode is on. (→ page 17) |
| [YTHB] | Indicates that the write-protect lock switch of this SD card is set to "LOCK", or an SD card that cannot be recorded to is inserted. (→ page 10) |
3.3.2 Sub monitor - monitor display
Information screen
The information screen is displayed when the sub
monitor is taken off the charger, or F1, F2, or OFF are pressed when the screen is off.
Talking/monitoring screen
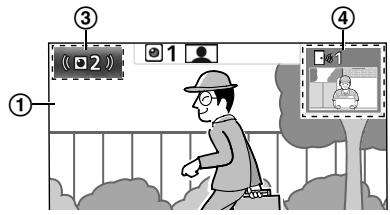
① Status information icons
| Icon | Meaning |
| twknal | Battery level. (→ page 15) |
| corzal | Range status: The more bars displayed, the stronger the signal between sub monitor and main monitor.Out of range. |
| Indicates the number of the sub monitor being used. | |
| Indicates that the doorphone's ringtone volume is muted. | |
| Indicates that the camera's ringtone volume is muted. | |
| Indicates which doorphone is calling, monitoring, or on a call. ("1" indicates the device number.) | |
| Indicates which camera is calling, monitoring, or on a call. ("1" indicates the device number.) | |
| Indicates there is a call from the doorphone when calling, monitoring, or on a call with another device. (→ page 32) | |
| Indicates there is a call from a camera when calling, monitoring, or on a call with another device. (→ page 32) | |
| Indicates that "Press-to-talk" mode is on. (→ page 17) | |
| Indicates that images are being recorded. (→ page 20) | |
| Indicates that the doorphone's LED lights are "On". (→ page 34) |
② Soft key icons
| Icon | Action |
| Displays menus. | |
| Executes the selected item or operation. | |
| Returns to the previous screen. | |
| Unlocks the electric lock. (→ page 29) | |
| Changes the display to zoom display. (→ page 33) | |
| Changes the display to wide display. (→ page 33) |
3.4 Battery installation
- USE ONLY rechargeable Ni-MH batteries AAA (R03) size.
- Do NOT use Alkaline/Manganese/Ni-Cd batteries.
- Confirm correct polarities (⊕, ⊖).
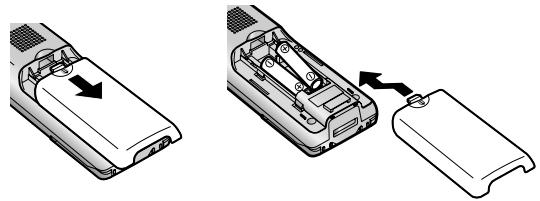
natural_image
Two-step diagram showing a device being inserted into a housing, with arrows indicating the process (no text or symbols present)Note:
- Use the supplied rechargeable batteries (Ni-MH ONLY). For replacement, we recommend using the Panasonic rechargeable batteries noted on page 4.
- Wipe the ends of batteries (⊕, ⊖) with a dry cloth.
- Avoid touching the ends of batteries (⊕, ⊖) or the unit contacts.
3.5 Charging the sub monitor
Only connect the charger with the supplied Panasonic AC adaptor ( page 3).
AC adaptor connections
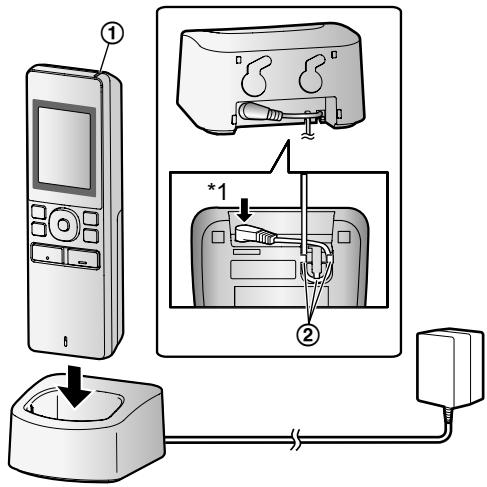
*1 Press plug firmly.
- Connect the charger to the power outlet, and then place the sub monitor in the charger to charge it. Charging usually takes about 8 hours.
① Charge indicator
- when charging: lights
– when charging is completed: off
② Hook
- Charging may take longer in the following situations.
- When the operating temperature is low. (→ page 43)
- When the sub monitor is picked up off the charger or used during charging.
- When the sub monitor's signal is out of range ( _× ). (→ page 14)
- The sub monitor does not overcharge even if it is continuously placed in the charger.
Battery level
| Icon | Battery level |
| DOWART | High |
| DESIGN | Medium |
| HEAD | Low |
| DETRNOI | Needs charging |
- See page 43 for a guide on operating times for the sub monitor.
Note:
- When the sub monitor is off the charger or the AC adaptor is disconnected for 1 week or more, remove the batteries in order to maintain battery performance and prevent the batteries from discharging.
- Recharge the batteries before using the sub monitor again.
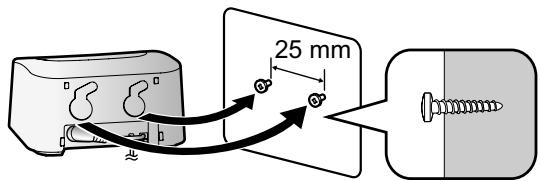
3.6 Wall mounting
Note:
- Make sure that the wall and the fixing method are strong enough to support the weight of the unit.
- Drive the screws (locally procured) into the wall.
3.7 Setting the language, date and time
- This operation can only be performed on the main monitor.
A language selection screen is displayed when the main monitor is first used. Follow the steps below to configure the language, date and time. (The notification indicator flashes when these settings have not been configured.)
1 Touch the language that you want to use and then touch [Next].
2 Configure the date and time by touching [+] and [-] .
3 Touch [OK] to complete the settings.
- A beep sounds and the screen turns off.
Changing the language, date and time
The language, date and time can be changed from the settings button in the top menu. ( page 35)
Note:
- The sub monitor's language (including the language of additionally registered sub monitors) is automatically matched to the main monitor's language setting.
- The date and time settings may be deleted when there is a power outage. In this case, reconfigure the settings.
- The time may get out of sync by about 60 seconds a month.
3.8 Wide/zoom settings and zoom position settings
- This operation can only be performed on the main monitor.
You can configure how doorphone images are initially displayed on the main monitor and sub monitor.
Wide/zoom settings
From the following 3 settings, you can select how images are initially displayed when visitors come or when monitoring.
Zoom display ^*1

natural_image
Illustration of a man standing next to a smiling child, with no visible text or symbols(images are zoomed in on 2 times more that in wide display)
Wide display ^*2 (default setting)
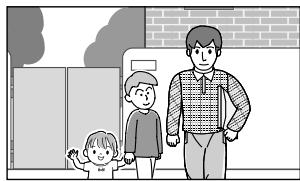
natural_image
Illustration of a family scene with an adult, two children, and a chimney (no text or symbols)Entire image display (main monitor only)
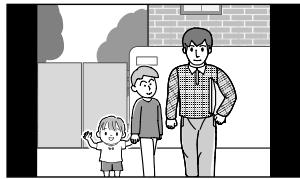
natural_image
Illustration of a family scene with an adult, two children, and a third child standing near a smartphone (no text or symbols present)*1 Because a digital zoom is used, image quality is lower when compared to images in wide display or entire image display.
*2 The top and bottom parts of wide display images on the main monitor are cut off when compared to images in entire image display.
Zoom position settings
You can configure which parts of images are zoomed in on when displaying zoomed images. Adjust the position
so that the people or objects that you want to view are displayed centrally in the screen.
Settings:
-
From the top menu, touch [Initial settings].
-
Configuring wide/zoom settings:
① Touch [Wide/Zoom settings] and then select the doorphone to be configured.
② Touch [When visitors come] or [When monitoring], and then select the display method (Zoom, Wide, or All).
- A beep sounds and the settings are changed.
③ To end the operation, press OFF.
Configuring zoom position settings:
① [Zoom position settings] → select the doorphone to be configured.
(The current doorphone image is displayed in the wide display.)
② Touch the position that you want to be zoomed in on, and then touch [OK] after confirming the selected position.
- A beep sounds, "Configured" is displayed, and then the screen automatically turns off.
Note:
- When [Zoom] is selected for [Wide/Zoom settings]:
- Adjust the zoom position so that people or objects that you want to view are displayed centrally in the screen. (→ page 15)
- When images are recorded, only the areas displayed when zooming are recorded.
- The zoom position screen automatically turns off if settings are not completed in about 90 seconds. In this case, settings are not saved and must be redone.
4.1 Answering calls
- This operation is the same for the main monitor and sub monitor.
When you receive a call from a doorphone, the main monitor and sub monitor ring and display an image from the doorphone. You can answer calls with the following operations.
1 Press TALK and talk to the visitor.
- Speak alternatively with the visitor (staying within about 50 cm from the microphone).
- If you and the visitor speak at the same time, you will not hear each other.
– Talking time: up to about 90 seconds.
2 To end the operation, press OFF.
Features available while talking or when there is an incoming call
– Monitor visitors (incoming call only)


- Adjust wide/zoom and pan/tilt settings ( page 33)
- Adjust sound and display settings (→ page 33)
- Talk using "Press-to-Talk" (→ page 17)
- Transfer calls (→ page 17)
– Unlock electric locks ( page 29)
Note:
- The display will turn off if you do not answer a call within about 30 seconds.
- Incoming call images are automatically recorded to the main monitor. (→ page 20)
4.1.1 Press-to-talk mode
If it is difficult for you or the visitor to hear each other due to noise, the "Press-to-talk" mode can be used to make conversations easier to hear. Speak with the visitor alternately by pressing («¿TALK) to switch between the talking mode and the receiving mode. (You can operate this feature in the same way by using either the main monitor or the sub monitor.)
1 Press and hold («« TALK) for about 2 seconds during a call until a beep sounds.
• (or Ⓞ) is displayed on the screen.
2 To speak to the visitor:
Speak while pressing and holding «TALK.
To hear the visitor:
Release TALK
Note:
- "Press-to-talk" mode is cancelled after the call ends.
4.2 Transferring doorphone calls
You can transfer a doorphone call between the main monitor and the sub monitor.
- When using multiple sub monitors, you can transfer a doorphone call between the sub monitors.
To transfer calls
- ☐: While talking to the visitor at the doorphone,
touch
- When there are multiple devices that can be selected, select the device. To page all devices, touch [Call all together].
☐: While talking to the visitor at the doorphone,
press
- When there are multiple devices that can be selected:

-
Page the other party.
-
When the paged party answers, ask them to receive the call from the doorphone. Perform the following to transfer the call to the paged party.
: Touch [Transfer to sub monitor].
: Press OFF.
To receive calls
- This operation is the same for the main monitor and sub monitor.
- When the intercom call is received, press to talk to the paging party.
- When the image from the doorphone is displayed, talk to the visitor.
- To end the operation, press OFF.
Note:
- The visitor cannot hear voices during paging.
- To talk to the visitor if the paged party does not answer:

Touch [Talk to visitor].

Press
TALK
4.3 Monitoring the outside with the doorphone
You can monitor the sounds and images from the doorphone.
1

From the top menu, touch

- When there are multiple devices displayed, touch the number of the doorphone that you want to monitor with (①) and then the image (②).
Example: When there are both doorphones and cameras.
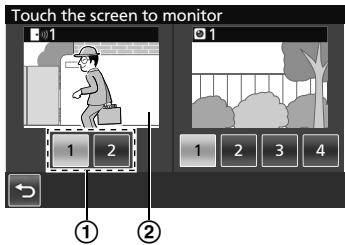

Press

- When there are multiple devices displayed:

Select the destination.

(OK)
2 The images from the doorphone are displayed.
- Press («TALK to speak to the monitored party.
3 To end the operation, press OFF.
Features available while monitoring
- Adjust wide/zoom and pan/tilt settings ( page 33)
- Adjust sound and display settings (→ page 33)
– Record monitored images ( page 20)
Note:
- The sound from your end will not be heard at the doorphone.
- Monitoring time:

About 90 seconds (can be extended up to 3
minutes by performing operations during monitoring)

About 3 minutes
4.4 Talking between the main monitor and the sub monitor
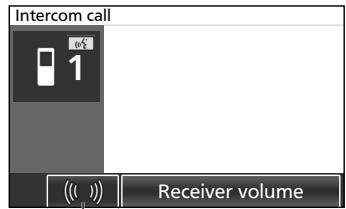
Intercom calls between the main monitor and the sub monitor can be made.
- When using multiple sub monitors, you can make intercom calls between the sub monitors.
To make calls
From the top menu, touch

- When there are multiple devices that can be selected, select the device. To call all devices, touch [Call all together].

Press

- When there are multiple devices that can be selected:

Select the device. ^*1 → (OK) (OK)
*1
To call all devices, select "Call all together".
- Page the other party.
- Talk with the paged party when they answer the call.
- To end the operation, press OFF.
To receive calls
- This operation is the same for the main monitor and sub monitor.
- When the intercom call is received, press to talk to the paging party.
Note:
- Paging automatically ends after about 30 seconds and intercom calls automatically end after about 90 seconds.
5.1 Image and audio recording
The amount of audio and image content that can be recorded depends on the where the content is being saved (internal memory or SD card).
In order to enjoy the full capabilities of the product, we recommend using an SD card for the save destination.
- When an SD card is inserted into the main monitor, it automatically becomes the default save destination. (The save destination cannot be selected.)
– See page 10 for information about supported SD cards and how they are used.
| Save destination | SD card (2 GB - 64 GB) | Internal memory (when an SD card is not inserted) | ||
| Maximum number of images | 3,000*1 | 50 | ||
| Recorded image type | Doorphone images and calls(→ page 20) | Camera images and calls(→ page 25) | Doorphone images only(→ page 20) | |
| Content of each recording | Incoming call recordings(automatic recording) | Video: max of approx. 30 seconds | Series of images recorded at 1 second intervals and audio: max of approx. 30 seconds | Still images: max of 8 |
| Monitor recordings(manual recording) | ||||
| Talk recordings | Video and audio: max of approx. 90 seconds*2 | Series of images recorded at 1 second intervals and audio: max of approx. 90 seconds*2 | Cannot record | |
*1 Differs depending on the capacity of the SD card. See page 19 for a guide to the capacity and number of images that can be recorded with SD cards.
*2 See page 36 for audio recording settings in [Record calls] for the doorphone and camera.
Note:
- Recorded images from the internal memory can be copied to SD cards. (→ page 41)
- Images recorded on SD cards can be played on a PC. (→ page 41)
Guide for SD card capacity and recording
The following table gives an approximate guide to the number of images that can be recorded, based on which device took the images and the size of the SD card used, when the default settings are used ([Record calls] is set to [Disable] ( page 36)).
Unit: number of recorded images
| Capacity | 2 GB | 4 GB | 8 GB | 16 GB | 32 GB | 48 GB | 64 GB | |
| Recorded image type | Doorphone images only | 125 | 255 | 520 | 1,040 | 2,090 | 3,000 | 3,000 |
| Camera images only | 2,300 | 3,000 | 3,000 | 3,000 | 3,000 | 3,000 | 3,000 |
Note:
- When using a camera, we recommend using an SD card with a capacity of 4 GB or more.
- The number of images that can be recorded in the table are just a guide and may differ from the actual number of images that can be recorded.
- Because SD cards contain data such as file system management information, the complete capacity cannot be used to save data. When other data is saved to an SD card, the number of images and videos that can be saved is reduced.
5.2 Recording doorphone images and conversations
5.2.1 Automatically recording incoming call images
When there is an incoming call, regardless of whether you answer the call or not, images are automatically recorded about 2 seconds after receiving the call. (See page 19 for information about the recorded contents.)
When calls are not answered:
Recorded images are saved as unchecked images, and the notification indicator of the main monitor flashes.
Note:
- When there is an incoming call from another doorphone when talking or monitoring with a doorphone ( page 30), you must end the call or monitoring in order to display and save the image from the incoming call.
- When there are multiple doorphones and there is an incoming call from another doorphone, while receiving an incoming call, the number of recorded images (8 images), and the length of recorded videos (about 30 seconds), are reduced.
When the internal memory or SD card's memory is full (auto image updating)
When the memory is full, it is not necessary to manually delete images in order to record new messages because existing images, starting with the oldest image, are automatically deleted.
– Images that have not been viewed are also deleted.
- See page 13 for information about checking the recording status of the internal memory or SD card.
5.2.2 Record images and audio until the end of calls (Record calls)
To use this function, an SD card must be in the main monitor and [Record calls] must be appropriately configured ( page 36).
In this case, when calls from a doorphone are answered, the calls can be recorded from start to finish in 1 video file that includes audio data. (The maximum length of the video is about 120 seconds.)
5.2.3 Manually recording monitored images
Monitored images can be manually recorded with the main monitor and sub monitor. (See page 19 for information about the recorded contents.)
Images monitored with the camera can also be recorded with the same operations.
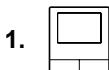
1 Perform the following operations when monitored images are displayed.
- REC is displayed on the screen when recording.
flowchart
graph LR
    A["Touch"] --> B["REC"]
    C["OK"] --> D["Record"]
    style A fill:#f9f,stroke:#333
    style B fill:#ccf,stroke:#333
    style C fill:#cfc,stroke:#333
    style D fill:#fcc,stroke:#333
Note:
- When recording images with the sub monitor, because there is a lag from when operations are performed to when recording actually starts, there may be a difference between the contents of the monitored images and the recorded images.
5.3 Playing recorded images (main monitor only)
When there are recently recorded images that have not been viewed, the notification indicator flashes and "New" is displayed.
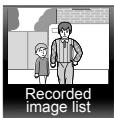
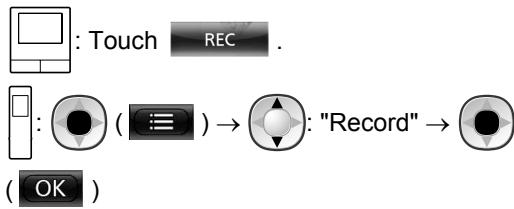
1 From the top menu, touch [Recorded image list].
- A list of recorded images for each day is displayed in a 1 week calendar.
- To view a recorded image list from another day, touch the button of the desired date. This will show all recorded images from that day.
- Touch 📄 to view a list of camera recorded images.
- See page 21 and 22 for information about how to navigate this screen and play images.
2 Touch the image that you want to view.
- Touch ▶ to view all of the images after the selected date.
3 To end the operation, press OFF.
Note:
- The notification indicator stops flashing when the top menu is displayed, and "New" in the top menu disappears from the display when the recorded image list screen is displayed.
5.3.1 Navigating the recorded image list and image playing screens
Recorded image list screen
Image playing screen
① The recording device's number
② Recording date and time
③ Time that the image has been played for
Display and other icons
| Icon | Meaning |
| Indicates that there is an image that has not been viewed, and which images have not been viewed. | |
| Displayed when images from a doorphone are displayed.When images from a camera are displayed,or1is displayed. | |
| Indicates that an image recorded on the SD card is being displayed or played. | |
| Indicates there is recorded audio (displayed at the start position of recorded calls in the playback screen). | |
| Displayed when playing images. | |
| Displayed when images being played are paused. | |
| Displayed when the audio is muted.(→ page 22) | |
| Displayed when the write-protect lock switch of the SD card is set to "LOCK". (→ page 10) |
Operation buttons in the recorded image list screen
| Button | Action |
| Go to the previous or next week. | |
| Go to the previous or next page (only displayed when there are 7 or more recorded images). | |
| Switches the memory (internal memory or SD card) that recorded images are displayed from. | |
| Goes to the doorphone's image list. | |
| Goes to the camera's image list. | |
| Plays images from the selected date and all images recorded after that date. | |
| Deletes all images from the selected day.To delete:Touch → confirm the message and then touch [Yes]. | |
| Allows you to search for images using the calendar (this is convenient for searching for an image when there are many recorded images).When touched, a calendar such as the following is displayed. Touch the date button of the images that you want to view. |
Operation buttons in the playing screen
| Button | Action |
 | Skips to the next or previous image. |
 | Pauses images. |
 | When audio is recorded with an image, audio is played from the start of recorded calls. |
 | Returns to the recorded image list screen. |
 | Allows you to delete images, and adjust the brightness and volume.(→ page 22) |
  | Switches between wide, entire image, and zoom displays. (→ page 33)● The display can also be zoomed by touching an image. |
 | Plays paused images. |
 | Skips to the next or previous frame (image). |
5.3.2 Menu button functions when playing images
The following operations can be performed by using the

button displayed when playing images.
Deleting individual images:
Images can be deleted 1 image at a time.
- Touch [Delete], check the displayed message and then touch [Yes].
Changing the screen's brightness:
- Touch [Brightness], and then adjust the brightness by touching [-] (Darker) or [+] (Brighter).
Changing the volume of played images:
The volume can be changed when playing the images.
- Touch [Volume], and then adjust the volume by touching [-] (Quieter) or [+] (Louder).
- To mute the audio, touch [-] until is displayed.
Note:
- The [Delete all images] setting can be used to delete all images in the save destination (internal memory or SD card) in a single operation. ( page 36)
6.1 Connecting with a camera
By connecting with a camera (additional accessories, → page 4), you can monitor outside images with the camera, and the main monitor and sub monitor can receive notifications with sounds and images when camera sensors are triggered.
- See the camera's manuals for detailed information about using the camera.
- An SD card is required to record camera images.
Note:
- The image quality of camera images may be lower than the image quality of doorphone images.
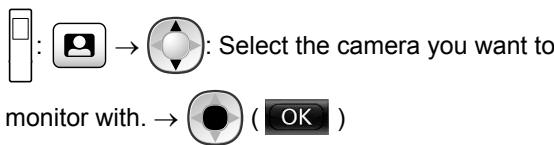
6.1.1 Registering a camera to the main monitor
Register the camera after connecting it to a power supply.
- Register 1 camera at a time. Multiple cameras cannot be registered at the same time.
- These operations are for VL-WD812EX model cameras. See the camera's manuals as required.
flowchart
graph LR
    A["User Interface"] --> B["From the top menu, touch"]
    B --> C["→"]
    D["User Interface"] --> E["→ [Register/Cancel"] → [Register] →]
[Camera] → the number of the camera to be registered.
- After this, use the camera and complete the following steps within about 5 minutes.
2 : With the power connected to the camera, press the register button on the rear side of the camera.
- The register button is located behind the register button cover (①). Peel open the register button cover and use the thin end of the sensor range cap removement tool (supplied accessory) to press and hold the register button (②) for about 3 seconds. After this make sure to firmly close the register button cover.

- The camera's indicator lamp (③) flashes in green during registration. When registration is complete, a beep sounds and the indicator lamp lights in green.
natural_image
Technical diagram of a mechanical device with numbered component (3), no visible text or symbols3 : To end the operation, press OFF.
6.1.2 Images sent from the camera
Camera image recording intervals
The camera records images (series of images) and sends them to the main monitor. The main monitor and sub monitor display the images by continuously updating still images one image at a time. (Video data is not sent from the camera.)
Images recorded due to sensor detections
The timing that the 1st image is recorded changes depending on whether [Recording before detection] ( page 27) is set to [1 second before] or [2 seconds before].
| Recording from 1 second before detection | Recording from 2 seconds before detection | |
| ↓ | ||
| 1st image | 1 second before detection | 2 seconds before detection |
| ↓ | ||
| 2nd image | Just after detection | |
| ↓ | ||
| 3rd image | 1 second after detection | |
| ↓ | ||
| 4th image | 2 seconds after detection | |
| ↓ | ||
| 5th image | Approx. 4 to 5 seconds after detection | |
- Images from the 6th image onwards are recorded in approx. 1 second intervals.
● The following issues may occur when it is dark. - The first image is dark. (The LED lights are not lit because no detections have been made yet.)
- Objects in images may appear blurred.
Images recorded when monitoring
Images are recorded in approx. 1 second intervals from when monitoring is started.
6.2 Monitoring the outside with the camera
You can monitor the sounds and images from the camera.
- The sound from your end will not be heard at the camera.
1 : From the top menu, touch and then the image.
- If the camera selection screen is displayed, touch the number of the camera that you want to monitor with and then the image.
2 The images from the camera are displayed.
- Press («TALK to speak to the monitored party.
3 To end the operation, press OFF.
Features available while monitoring
- Adjust wide/zoom and pan/tilt settings ( page 33)
- Adjust sound and display settings (→ page 33)
- Make a warning sound come out of the camera (→ page 24)
– Record monitored images ( page 20)
Note:
- Monitoring time:
- : About 90 seconds (can be extended up to 3 minutes by performing operations during monitoring) - : About 3 minutes
- In situations where it is difficult to see images, such as when it is dark or when there is backlight, change the camera's [Brightness] setting and activate the [Backlight compensation] setting as required. (→ page 27)
6.3 When camera sensors are triggered
When a camera sensor is triggered, the main monitor and sub monitor are notified in the follow manner.
1 When a sensor is triggered the ringtone sounds and camera images are displayed for about 30 seconds.
- Talking to the other party at the camera side: Press 🔊 TALK.
- Monitoring (watching and listening) the other party without talking:

: Touch

- The monitoring time is about 90 seconds (can be extended up to 3 minutes by performing operations during monitoring).

– The monitoring time is about 3 minutes.
- Making a warning sound come out of the camera:

flowchart
graph LR
    A[" "] --> B["Touch"]
    B --> C["Warning sound"]
    C --> D["Output"]
[Play sound].

flowchart
graph LR
    A["Input"] --> B{Warning}
    B -->|Yes| C["Output"]
    B -->|No| D["Warning"]
(OK)
Features available when a sensor is triggered
- Adjust wide/zoom and pan/tilt settings (→ page 33)
- Adjust brightness settings (→ page 34)
– Record monitored images (→ page 20)
Note:
- Images from when camera sensors are triggered are automatically recorded to the SD card. (→ page 25)
- Once a sensor is triggered, the next sensor detection cannot be made until about 10 seconds after the first triggered images have finished being displayed. (The time that detections are not made for can be selected. → page 26)
- In situations where it is difficult to see images, such as when it is dark or when there is backlight, change the camera's [Brightness] setting and activate the [Backlight compensation] setting as required. (→ page 27)
- The volume and the types of sounds used by the [Warning sound] setting can be changed. (→ page 28)
6.4 Turning off camera sensor detections for specified periods of time (main monitor only)
Camera sensor detections can be turned off for specified periods of times as required.
- When camera sensor detections are turned off, notifications are not sent to the main monitor and sub monitor and images are not automatically recorded.
- When there are multiple cameras, sensor detections for all of the cameras will be turned off.
1 From the top menu, touch

2 Touch the time you want to turn off sensor detection for.
- A beep sounds and "Off" is highlighted in yellow when settings are completed.
3 To end the operation, press OFF.
Turning sensor detection back on again
When sensor detection is turned off, it will automatically turn on again after the specified time has passed. You can turn on the sensor detection again at any time with the following operations.
- From the top menu, touch → On Off to turn the sensor detection on again.
- To end the operation, press OFF.
Note:
- The status of camera sensor detections can be checked in the camera information menu. (→ page 13)
6.5 Recording camera images and conversations
Camera images with audio data can be recorded to an SD card. (Including doorphone images, a maximum of 3,000 images can be saved.)
6.5.1 Automatically recording images when sensors are triggered
When a sensor is triggered, images from 1 or 2 seconds ^1 before the detection are automatically recorded ^2 to an SD card. (→ page 19)
*1 The timing when recording starts before detections depends on the [Recording before detection] setting. (→ page 27)
*2 When a call is made after a sensor is triggered, audio from the main monitor or sub monitor will also be recorded.
When calls are not answered:
Recorded images are saved as unchecked images, and the notification indicator of the main monitor flashes to indicate that there are unchecked images.
Note:
- When there are multiple cameras, multiple incoming calls may be received at the same time. In this case, the most recent incoming call is given priority and recorded.
- When there is an incoming call from another camera when talking or monitoring with a camera ( page 30, 31), you must end the call or monitoring in order to display and save the image from the incoming call.
- When there are multiple cameras, and another camera's sensor is triggered whilst receiving an incoming call, the recording time of camera images (about 30 seconds maximum) may be reduced.
6.5.2 Recording images and audio until the end of calls (Record calls)
To use this function, an SD card must be inserted in the main monitor and [Record calls] must be set to [Enable] ( page 36). With this function, calls can be recorded from start to finish in 1 video file that contains audio data (max. length of about 120 seconds).
6.5.3 Manually recording monitored images and playing recorded images
The operations are the same for doorphone images.
- Manually recording monitored images. (→ page 20)
– Playing recorded images. (→ page 20)
- Manually recording monitored images. (→ page 20) - Playing recorded images. (→ page 20)
6.6 Changing camera settings
You can change the settings to match how the camera is used.
How to change the settings (using the main monitor)
- From the top menu of the main monitor, touch → → [Connected devices] → [Camera].
- Select the number (1 - 4) of the camera to be configured.
- Touch the item name, function name, and setting contents.
● Operations may have to be repeated depending on the function.
- To end the operation, press OFF.
Note:
- The setting function screen automatically quits if an incoming call is received or if no operations are performed for about 90 seconds.
- In the following table, < > indicates the default settings.
*1 When [Day and night switch] is set to [Timer], the configured time periods are displayed above the [Night only] and [Day only] setting buttons.
Item name: Sensor settings
| Function name | Setting contents and other information |
| Sensor selection | Heat sensor only, , External sensor only, All sensors, Off (disables all sensors) |
| Heat sensor detection*1 | , AlwaysSelect the time period for heat sensor detection.- When [Night only] is selected, the heat sensor operates according to the settings of [Day and night switch] (→ page 26). |
| Motion detection*1 | Day only,Select the time period for motion detection.- When [Day only] is selected, motion detection operates according to the settings of [Day and night switch] (→ page 26). |
| Day and night switch | , TimerSelect whether to automatically set the day and night switch settings or set them manually to a preferred time.- This setting is active when the [Heat sensor detection] or [Motion detection] settings are set to [Night only] or [Day only].Auto: the camera automatically switches between night and day modes depending on the brightness of the surrounding area.Timer: allows you to configure the time for the night.(After selecting [Timer], set the time with [+] and [-], and then touch [OK].) |
| Time with no detection | <10 seconds>, 30 seconds, 60 secondsSelect the time after an image is detected by a sensor or a monitored image is displayed until the sensor can make detections again.- Select a long time period if you do not want the sensor to make frequent detections. |
| Heat sensor sensitivity | High sensitivity, , Low sensitivity, Very low sensitivity, Do not detectIf it is difficult for the sensor to make detections, select [High sensitivity]. If detections are being too frequently made, select [Low sensitivity] or [Very low sensitivity]. |
| Motion detection sensitivity | High sensitivity, , Low sensitivity, Very low sensitivityIf you want to detect small changes in motion, select [High sensitivity]. If you do not want to detect small changes in motion, select [Low sensitivity] or [Very low sensitivity]. |
| Motion detection range | Select the range (area) of motion detection.By setting the areas that you do not want motion to be detected in to X, you can narrow down the areas that motion can be detected in.Configuration1. Touch areas that you do not want motion to be detected in so that X is displayed on those areas. (Touch again to remove  X.)2. Touch [Configure]. X.)2. Touch [Configure]. |
| Recording before detection | <1 second before>, 2 seconds beforeSelect to start recording 1 or 2 seconds before a sensor detection is made.See page 23 for information about recording intervals and sensor detection recordings. |
| Check sensors | Heat sensor, Motion detection, External sensorYou can check the operations of each sensor when setting the camera, or at any other time.Select the type of sensor that you want to check, trigger it, and then confirm if detections were correctly made. (See the Installation Guide for the camera for information about how to check the sensors.) |
| Recording test | Confirm if images are correctly recorded before and after images are recorded for sensor detections. (See the Installation Guide for the camera for more information.) |
| External sensor | , Break contactWhen using commercially available external sensors, select the type of contact points used by the sensor.Select the type of contact point according to the external sensor used and its function. |
Item name: Screen settings
| Function name | Setting contents and other information |
| Brightness | -3, -2, -1, <0>, +1, +2, +3Adjust the brightness of camera images. (The higher you set the brightness, the brighter the image.)– Make adjustments when the images are very dark or bright. |
| Backlight compensation | On,<Off>When [On] is selected, backlight compensation is performed. However, depending on the background of the subject, the backlight compensation may not be effective. |
| Automatic illumination | When the sensor is triggered: Enable,<Only when dark>, DisableWhen monitoring: Enable,<Only when dark>, Disable |
| Uneven colour prevention | On,<Off>Normally use this setting set to [Off]. Only set this setting to [On] if the colour in camera images is uneven. (When set to [On], the image quality may be reduced when it is dark.) |
Item name: Sound settings
| Function name | Setting contents and other information |
| Sensor trigger sound | Sound type:, Sound b, Sound cVolume:, Normal, Quiet, MuteSelect the type and volume of the sound to be made by the camera when there is a sensor detection. |
| Warning sound | Sound type:, Sound b, Sound cVolume:, Normal, QuietBy operating the main monitor or sub monitor when monitoring or performing other actions, you can make a warning sound come out of the camera. Select the type and volume of the sound. |
| Owner's voice volume | Loud,, QuietSelect the volume of the sound from the camera when talking or calling out to visitors. |
| Camera mic sensitivity | , Normal, LowWhen too much sound is picked up, select [Normal] or [Low]. |
Item name: Other settings
| Function name | Setting contents and other information |
| Indicator lamp | , When transmitting, OffSelect how the indicator lamp lights up.- When [When transmitting] is selected, the lamp only lights up when the main monitor or sub monitor are talking or monitoring with the camera. |
| Camera detection history | Displays the sensor detection history. (Displays the latest 24 entries.) |
| Initialize settings | Yes, NoReturns the camera's settings to the factory default.- The camera remains registered to the main monitor even if the camera's settings are initialized. (Registration information is not deleted.) |
7.1 Connecting with electric locks
When a commercially available electric lock is connected to the main monitor, you can open a door or gate using the main monitor or the sub monitor. You can also select how long the door or gate remains open.
To use electric locks, they must be configured on the main monitor.
- A maximum of 4 electric locks can be connected to the main monitor.
- For detailed information about connections, see the manual included with the electric lock and the Installation Guide of this product.
7.1.1 Configuring electric locks
- This operation can only be performed on the main monitor.
1 From the top menu, touch → →
[Connected devices] → [Electric lock] → the doorphone to be configured.
- [Unlocking buzzer sound] can also be configured. (→ page 37)
2 Touch the electric lock to be configured and then touch the unlocking time.
3 To end the operation, press OFF.
7.1.2 Unlocking electric locks
1 When talking or monitoring with the doorphone:
- When there are 2 electric locks connected to the same doorphone:
: Select the electric lock to be unlocked. →

Opening another door or gate:
- After opening the door or gate, you can open another door or gate by touching 📄 (sub monitor: 📄).
Note:
- You can only open the door or gate when talking or monitoring.
- When using multiple electric locks with different doorphones:
You can only open the electric locks from the doorphone that they are linked to.
8.1 When another incoming call is received - main monitor
When another incoming call is received from a doorphone or camera while talking, monitoring, or receiving an incoming call with the main monitor, the ringtone sounds and notifications are received in the following manner.
Example: When there is an incoming call from doorphone 2 while talking with doorphone 1.
Example: When there are incoming calls from doorphone 1 and camera 2 while monitoring with camera 1.
Example: When there is an incoming call from a doorphone or camera during intercom calls.
⑤
① Main screen
② Doorphone button indicating that there is a new incoming call (the example shows an incoming call from doorphone 2)
- By touching this button, you can display the image from the incoming call in the main screen.
③ Camera button indicating that there is a new incoming call (the example shows an incoming call from camera 2)
- By touching this button, you can display the image from the incoming call in the main screen.
④ Sub screen indicating that there is a new incoming call (the example shows an incoming call from doorphone 1)
- By touching the sub screen, you can display the image from the sub screen in the main screen.
⑤ Incoming call notification button
*1 When multiple incoming camera calls are received, the most recent incoming call received is given priority and is displayed in the sub screen.
*2 When multiple incoming camera calls are received, the most recent incoming call received is given priority and is shown in the camera button.
| Current action | New incoming call from | Next action |
| Receiving an incoming call from a doorphone | Doorphone | The display changes to the new incoming call, and the previous incoming call is terminated. |
| Camera | The existing incoming call from the doorphone is displayed in the main screen and the new incoming call from the camera is displayed in the sub screen*1.By touching the sub screen, you can switch the images displayed in the main screen and sub screen. | |
| Talking or monitoring with a doorphone | Doorphone | The number of the doorphone that the incoming call is from is displayed in the touch button (2).When 2 is touched, the display changes to the new incoming call and the existing call or monitoring is terminated. |
| Camera | The incoming call from the camera is displayed in the sub screen*1.When talking with the doorphone:- By touching the sub screen, you can switch the images displayed in the main screen and sub screen. (You can continue talking with the original call when images are switched.)When monitoring with the doorphone:- When the sub screen is touched, the display changes to the new incoming call from the camera and the existing monitoring is terminated. | |
| Receiving an incoming call from a camera | Doorphone | The existing incoming call from the camera is displayed in the sub screen and the new incoming call from the doorphone is displayed in the main screen.By touching the sub screen, you can switch the images displayed in the main screen and sub screen. |
| Camera | The display changes to the new incoming call, and the previous incoming call is terminated. | |
| Talking or monitoring with a camera | Doorphone | The incoming call from the doorphone is displayed in the sub screen (4).When talking with the camera:– By touching 4, you can switch the images displayed in the main screen and sub screen. (You can continue talking with the original call when images are switched.)When monitoring with the camera:– When 4 is touched, the display changes to the new incoming call from the doorphone and the existing monitoring is terminated. |
| Camera | The incoming call can be displayed by touching the camera button (3)*2.When 3 is touched, the display changes to the new incoming call and the existing call or monitoring is terminated. | |
| Transferring doorphone calls | Doorphone | The incoming call notification button (5) is displayed.When 5 is touched, transferring is cancelled and the screen is returned to the original doorphone screen. The number of the doorphone that the incoming call is from is displayed in a touch button such as 2.When 2 is touched, the display changes to the new incoming call and the existing call or monitoring is terminated. |
| Camera | The incoming call notification button (5) is displayed.When 5 is touched, transferring is cancelled and the screen is returned to the original doorphone screen. The incoming camera call is displayed in the sub screen*1.By touching the sub screen, you can switch the images displayed in the main screen and sub screen. (You can continue talking with the original call when images are switched.) | |
| During an intercom call | Doorphone or camera | The incoming call notification button (5) is displayed.When 5 is touched, the display changes to the new incoming call and the existing intercom call is terminated. |
Note:
- The sub screen display can be turned off by touching 📷/ Pinterest.
8.2 When another incoming call is received - sub monitor
When another incoming call is received from the doorphone or camera while talking, monitoring, or receiving an incoming call with the sub monitor, notifications are received in the following manner.
| Current action | New incoming call from | Next action |
| Receiving an incoming call from a doorphone or camera | Doorphone or camera | The doorphone's or camera's ringtone sounds, and <<E TALK or  flashes. (See page 13 for information about the display.)When multiple doorphone incoming calls are received, the original incoming call is terminated, and the new incoming call is given priority and is displayed.When an incoming call from both the doorphone and camera are received, the doorphone's incoming call is given priority and is displayed.When multiple camera incoming calls are received, the original incoming call is terminated, and the new incoming call is given priority and is displayed.To talk to the visitor at the doorphone:Press <<E TALK .To monitor with the doorphone or camera: flashes. (See page 13 for information about the display.)When multiple doorphone incoming calls are received, the original incoming call is terminated, and the new incoming call is given priority and is displayed.When an incoming call from both the doorphone and camera are received, the doorphone's incoming call is given priority and is displayed.When multiple camera incoming calls are received, the original incoming call is terminated, and the new incoming call is given priority and is displayed.To talk to the visitor at the doorphone:Press <<E TALK .To monitor with the doorphone or camera: → →  Select the device. → Select the device. →  (OK) (OK) |
| Talking or monitoring with a doorphone or camera, or during an intercom call | Doorphone or camera | The doorphone's or camera's ringtone sounds and the icon of the incoming call's device is displayed.(See page 13 for information about the display.)To answer the incoming call:PressOFF.The original call or monitoring is terminated and the displayed image is changed.Press <<E TALK to talk with the visitor at the doorphone or camera. |
9.1 Changing how images are displayed (wide/zoom and pan/tilt settings)
When displaying doorphone and camera images, the display can be changed between wide and zoom displays, and the zoom position can be changed using pan and tilt operations.
| Operation |  | [travel] |
| Wide → zoom | Touch the position that you want to enlarge. |  |
| Entire image display → zoom | - | |
| Zoom → wide |  |  |
| Entire image display → wide |  | - |
| Wide → entire image display |  | - |
| Pan/tilt | Touch the position that you want to view. |  |
- See page 15 for an image of what the wide, zoom, and entire image displays look like.
Note:
- Because a digital zoom is used, the image quality of zoom display is lower than that of wide display or entire image display.
- When images are recorded in zoom display, only the areas displayed are recorded.
- When using the main monitor, pan and tilt, wide, zoom, and entire image display operations can be performed even when playing recorded images.
- Even if the display is changed, it will go back to the configured settings when the next image is displayed.
- To change how incoming doorphone calls and monitored images are initially displayed, change the [Wide/Zoom settings] or [Zoom position settings] settings. (→ page 15)
- Incoming call images, monitored images, and recorded images from the camera can only initially be displayed in the wide display.
9.2 Audio and display settings for talking and monitoring
The following audio and display settings can be configured for talking and monitoring with doorphones and cameras.
| Status | Sound settings that can be changed | Display settings that can be changed |
| Talking or monitoring with a doorphone | Receiving volume of incoming callsOwner's voice volume (output to the doorphone) ^*1 Voice changer function (makes the voice output to the doorphone sound deeper) | Doorphone LED lights' illumination (manually ON/OFF) ^*2 Doorphone backlight compensation ^*2 Brightness settings ^*2 |
| Talking or monitoring with a camera | Receiving volume of incoming calls | Brightness settings ^*3 |
*1 This is the volume that can be heard outside at the doorphone when talking with the doorphone. (This setting can only be changed by the main monitor.)
*2 Can also be changed when there is an incoming call from the doorphone.
*3 Can also be changed when there is an incoming call from the camera.
Configuration (Configure the settings as follows while talking or monitoring.)

Touch [Sound] or [Display]^*1 configure the settings that you want to change (see the following
table).
*1 [Sound] and [Display] are not displayed when talking or monitoring with a camera.


) → configure the settings that you want to change (see the following table).
| Changing the receiving volume of incoming calls |  | Touch [Receiver volume], and then adjust the volume by touching [−] (Quieter) or [+] (Louder). | |
| DYX80 |  : "Volume" → : "Volume" →   ) → ) →  : Adjust the volume. : Adjust the volume. | ||
| Changing the owner's voice volume (output to the doorphone)*1 | ### | Touch [Owner's voice volume] and then adjust the volume by touching [Quiet] or [Normal]. | |
| Using voice changer*1 | DWS80 | Touch [Voice changer] → [On]. | |
| SBS90 |  : "Voice changer" → : "Voice changer" →   | ||
| Turning the doorphone's LED lights on or off*1 | ### | Touch [Illumination], and then touch [On] or [Off]. | |
| DAB0 |  : :  → →   ) → ) →  : Select the required setting. : Select the required setting. | ||
| Using backlight compensation for doorphone images*1 | DAB0 | Touch [Backlight compensation] and then adjust the backlight compensation using either [−], [Off], or [+]. | [-]: use when faces appear too bright (makes images darker)[Off]: turns off backlight compensation[+]: use when faces appear too dark (makes images brighter) |
| SCTT |  : :  → →    : :  | ||
| Changing the screen's brightness | DAB0 | Touch [Brightness], and then adjust the brightness by touching [−] (Darker) or [+] (Brighter). | |
| DAB0 |  : :  → →   ) )  | Adjust the brightness. | |
*1 Can only be configured when talking or monitoring with a doorphone.
9.3 Ringtone settings
9.3.1 Ringtone type settings
You can change the ringtone that is heard when receiving calls from the doorphone or the camera. (The ringtone of the intercom call cannot be changed.)
- For information about how to configure settings, see page 36 for the main monitor and page 38 for the sub monitor.
9.3.2 Ringtone volume settings
The ringtone volume for doorphone calls, camera calls, and paging can be changed.

See page 36.

: Perform the following procedure.
1 When the information screen is displayed, select the item to change the volume for with (▲) and then press

(OK).

Adjust the volume.*1

To end the operation, press OFF.

To mute the sound, press and hold 📋 until 🏻 is displayed. (The paging volume cannot be turned off.)
- To activate the sound again, press 🔊.
9.4 Functions settings list - main monitor
You can change the settings to match how the main monitor is used.
How to change settings
- From the top menu, touch →
- Touch the item name, function name, and setting contents.
- Operations may have to be repeated depending on the function.
- To end the operation, press OFF.
Note:
- The setting function screen automatically quits if an incoming call is received or if no operations are performed for about 90 seconds.
- In the following table, < > indicates the default settings.
Item name: Initial settings
| Sub-menu | Settings | |||
| 1 | 2 | 3 | ||
| Time and date settings*1 | - | - | 2013-1-1 0:00 | |
| Time display format | - | - | <12h>, 24h | |
| Set day for first day of week | - | - | Sunday, | |
| Zoom position settings | Doorphone 1 - 2 | - | - | For details, see page 15. |
| Wide/Zoom settings | Doorphone 1 - 2 | When visitors come/When monitoring | Zoom, , All | |
9. Additional functions
| Sub-menu | Settings | ||
| 1 | 2 | 3 | |
| Power supply frequency | - | - | <50 Hz>, 60 Hz● To prevent mottled or uneven colour from being displayed, choose the appropriate power supply frequency for your area. |
| Select language*1 | - | - | , Français, Deutsch, Italiano, Español, Nederlands |
*1 When using the product for the first time, follow the on-screen instructions to configure this setting. (→ page 15)
Item name: Ringtone
| Sub-menu | Settings | ||
| 1 | 2 | ||
| Ring volume | Doorphone | , Normal, Quiet, Mute | |
| Camera | , Normal, Quiet, Mute | ||
| Page | , Normal, Quiet | ||
| Ringtone | Doorphone 1 | , Sound 2, Sound 3, Sound 4 | , Repeat |
| Doorphone 2 | Sound 1, , Sound 3, Sound 4 | , Repeat | |
| Camera 1 - 4 | , Sound B, Sound C, Sound D | ||
Item name: Recording/Play
| Sub-menu | Settings | |
| 1 | 2 | |
| Record calls | Doorphone 1 - 2/ Camera 1 - 4 | Enable, <Disable>If you want to record images and audio until the end of calls (→ page 20, 25) select [Enable]. |
| Delete all images | Internal memory | Yes, No |
| SD card | Yes, No | |
Item name: SD card
| Sub-menu | Settings | ||
| 1 | 2 | ||
| Format | - | Yes, No | For details, see page 41. |
| Copy to SD card | - | Yes, No | |
Item name: Connected devices
| Sub-menu | Settings | ||
| 1 | 2 | 3 | |
| Camera | - | - | For details, see page 26. |
| Doorphone connection*1 | Doorphone 1 | - | <Device connected>, Auto detection, Device not connected |
| Doorphone 2 | - | Device connected, <Auto detection>, Device not connected | |
| Sub-menu | Settings | |||
| 1 | 2 | 3 | ||
| Electric lock | Doorphone 1 - 2 | Electric door lock/Electric vehicle gate lock | , Unlock for 1 second - Unlock for 7 seconds | For details, see page 29. |
| Unlocking buzzer sound | - | , Off | ||
| Repeater connections | Repeaters are connected separately: Repeater 1 - 2 | - | , Camera | For more information about connecting repeaters, see page 39. |
| Repeaters are connected together: Repeater (connected together) | ||||
| Automatic illumination | Doorphone 1 - 2 | When visitors come/When monitoring | , Disable● With this setting, you can select whether or not to automatically turn on the LED lights when the area surrounding the doorphone is dark. | |
*1 Select [Device not connected] for doorphones that are no longer used.
Item name: Register/Cancel
| Sub-menu | Settings | |
| 1 | 2 | |
| Register | Sub monitor station/Camera/ Repeater | Registration method: Sub monitor station and Repeater → page 39 and 40, Camera → page 23 |
| Cancel | Cancellation method: Sub monitor station, Camera, and Repeater → page 40 | |
Item name: Other
| Sub-menu | Settings | |
| 1 | 2 | |
| Touch sound | - | <On>, Off |
| Initialize settings*1 | - | Initialize settings + Delete images, Only initialize settings• Select [Initialize settings + Delete images] when disposing, transferring, or returning the product. |
| Demo mode | - | Do not use this setting unless the product is being used in a sales display.On, Special SD card required, <Off> |
*1 The following settings are not initialized.
- [Power supply frequency], [Select language], [Electric lock], [Repeater connections], and [Camera] settings.
- Registration information of devices registered to the main monitor. (All devices remain registered to the main monitor even after initialization.)
9.5 Function settings list - sub monitor
You can change the settings to match how the sub monitor is used.
How to change settings
- In the information screen, press 📄 ( ≡ ).
- ☐: Select the function name. → ⬤ (OK)
- ☐: Select the setting contents. → ⬤ (OK)
- To adjust "Contrast", use ◀ and then press ⏻ ( OK ).
- To execute "Initialize", press F1 (Yes). (Initialization is completed when the screen turns off.)
- To end the operation, press OFF.
Note:
- The setting function screen automatically quits if an incoming call is received or if no operations are performed for about 60 seconds.
- In the following table, < > indicates the default settings.
| Sub-menu | Settings | ||
| 1 | 2 | ||
| Ringtone | Doorphone 1 | , Sound 2, Sound 3, Sound 4 | , Repeat |
| Doorphone 2 | Sound 1, , Sound 3, Sound 4 | , Repeat | |
| Camera 1 - 4 | , Sound B, Sound C, Sound D | ||
| Key sound | - | , Off | |
| Contrast | - | The contrast can be adjusted to 5 different levels (default setting: level 3). When it is difficult to see the monitor display, adjust the contrast as necessary. | |
| Register | - | Yes, No• Used when registering sub monitors to the main monitor.- The supplied sub monitor is pre-registered to the main monitor.- See page 39 for information about re-registering cancelled sub monitors. | |
| Initialize | - | Yes, No• The sub monitor remains registered to the main monitor even if its settings are initialized. (The registration information is not deleted.) | |
10.1 Registering sub monitors
Additional sub monitors (additional accessories, → page 4) can be registered and used with this product.
10.1.1 Registering a sub monitor to the main monitor
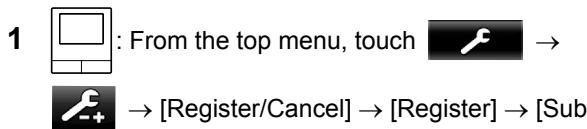
flowchart
graph LR
    A["User Interface"] --> B["From the top menu, touch"]
    B --> C["→"]
    D["User Interface"] --> E["→ [Register/Cancel"] → [Register] → [Sub]
monitor station] → select the number of the sub monitor to be registered.
- After this, use the sub monitor and complete the following steps within about 2 minutes.
- "Registering completed" is displayed.
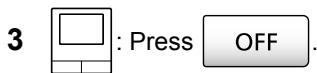
*1 To re-register cancelled sub monitors:
flowchart
graph LR
    A[" "] --> B[" "]
    B --> C["Register"]
    C --> D[" "]
    E[" "] --> F["F1"]
    F --> G["(OK)"]
    G --> H["(Yes)"]
10.2 Using repeaters
If the sub monitor or camera are used away from the main monitor, or if there are obstructions ( page 7) between the sub monitor or camera and the main monitor, the following problems may occur. In these cases, using a repeater (additional accessory, page 4) may improve transmissions between the devices.
– calls with the sub monitor cut out and images are distorted
– images from the camera are distorted or notifications from camera sensors cannot be received
- When × is displayed for the sub monitor or the camera's indicator lamp flashes in red, the main monitor cannot connect to the sub monitor or camera
Note:
- Up to 2 repeaters can be used. A single repeater can be used to send signals to multiple sub monitors or cameras. However, the same repeater cannot send signals to both sub monitors and cameras.
- Signal range differs depending on factors such as the structure of rooms or the types of walls used. After
registering devices to the main monitor ( page 40), see the repeater's Getting Started for information about appropriate installation locations.
Signal range and repeater installation example
Using each repeater connected separately
This extends signals away from the main monitor. Because signals are sent through the main monitor, different types of devices can be connected to each repeater. (For example, sub monitors can be connected to one repeater and cameras can be connected to another.) This is useful when you want to connect to different types of devices over shorter distances.
When repeaters are not used:
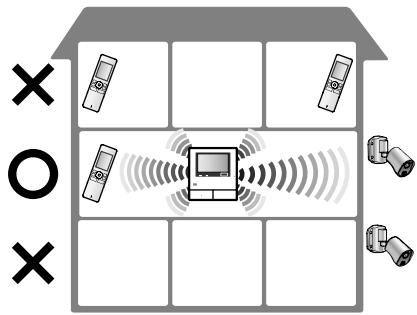
When repeaters are used:

flowchart
graph TD
    A["Room"] --> B["Device 1"]
    A --> C["Device 2"]
    A --> D["Device 3"]
    A --> E["Device 4"]
    A --> F["Device 5"]
    B --> G["Central Monitor"]
    C --> G
    D --> G
    E --> G
    F --> G
    G --> H["Output"]
    style A fill:#f9f,stroke:#333
    style B fill:#ccf,stroke:#333
    style C fill:#ccf,stroke:#333
    style D fill:#ccf,stroke:#333
    style E fill:#ccf,stroke:#333
    style F fill:#ccf,stroke:#333
Using 2 repeaters connected together
This extends the signal away from the main monitor by sending signals directly between repeaters. Because the signals are sent between repeaters, the same type of device must be connected to both repeaters (all sub monitors or all cameras). This is useful when you want to connect to the same type of devices over long distances.
When repeaters are not used:
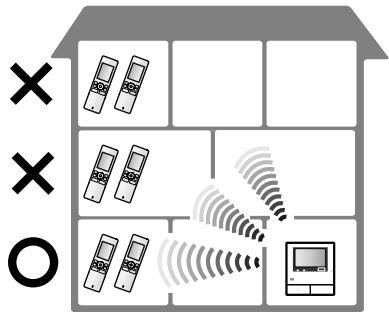
When repeaters are used:

flowchart
graph TD
    A["Zone 1"] --> B["Mobile Device"]
    C["Zone 2"] --> D["Mobile Device"]
    E["Zone 3"] --> F["Mobile Device"]
    G["Grid"] --> H["Display"]
    style A fill:#f9f,stroke:#333
    style C fill:#f9f,stroke:#333
    style E fill:#f9f,stroke:#333
    style G fill:#f9f,stroke:#333
10.2.1 Registering a repeater to the main monitor

flowchart
graph LR
    A["User Interface"] --> B["From the top menu, touch"]
    B --> C["→"]
    D["User Interface"] --> E["→ [Register/Cancel"] → [Register] →]
[Repeater] → select the number of the repeater to be registered.
2 Registering the first repeater:
Go to step 3.
Registering the second repeater:
Select the connection method according to how you want to use the repeater. ( page 39)
- If [Connected together] is selected, go to step 5.
3 Touch [Next].
4 Select the device that you want the repeater to connect to.
- After this, use the repeater and complete the following steps within about 2 minutes.
5 : Connect power to the repeater that you want to register, and then press PROGRAM (①) for about 3 seconds.
- The /ID indicator (②) flashes green.
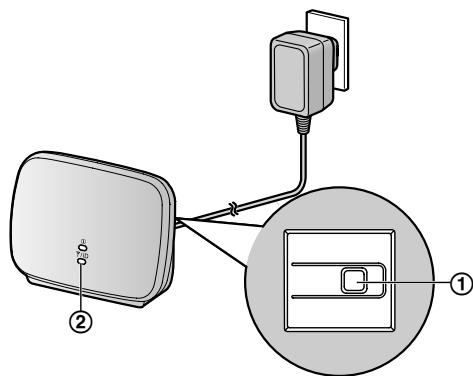
- The indicator lights when the registration is completed. (Depending on the signal status, the indicator may not light in green. In this case, see the repeater's Getting Started.)

Note:
- When using devices in separate buildings or over long distances, cut outs and image distortions may not be improved even if a repeater is used.
10.3 Cancelling sub monitors, cameras, and repeaters
- Cancelling can only be performed on the main monitor.
1 From the top menu, touch → → [Register/Cancel] → [Cancel] → select the type of device to be cancelled.
2 Select the device to cancel from the displayed list.
- Cancelling repeaters: When 2 repeaters are connected together, only the farthest from the main monitor can be cancelled.
3 Confirm the message and then touch [Yes].
- A beep sounds and "Cancel completed" is displayed.
4 To end the operation, press OFF.
Important:
- To prevent incorrect operations, remove the batteries from cancelled sub monitors.
10.4 Using SD cards (formatting/ copying data/playing images)
Formatting:
SD cards formatted by PCs or other devices must be formatted by the main monitor before they can be used.
Copying recorded images (internal memory → SD cards)
A maximum of 50 recorded images saved to the main monitor can be copied at one time.
- Copied data is saved to the "BACKUP" folder in the "PRIVATE" folder of the SD card ( page 42). If data is copied again to the same SD card, all of the recorded data already saved to the "BACKUP" folder is overwritten.
- Copied data can only be played on a PC and cannot be played on the main monitor.
Operations (main monitor only)
1 Insert the SD card that you want to format or copy recorded data to into the SD card slot. ( page 10)
2 From the top menu, touch → → [SD card].
3 When formatting:
Touch [Format], confirm the message and then touch [Yes].
When copying recorded data:
Touch [Copy to SD card], confirm the message and then touch [Yes].
Important:
- The SD card indicator flashes while formatting or copying. Do not remove the SD card or press the RESET button ( page 11) when the indicator is flashing.
4 To end the operation, press OFF.
- Remove the SD card as required.
10.4.1 Playing images on a PC
By inserting an SD card into an SD card slot on a PC or an SD card reader connected to a PC, images saved on the SD card (still images and videos) can be played on a PC.
- Still images (JPEG format) can be viewed with viewer software that supports JPEG.
- Videos (Motion JPEG format) can be played with QuickTime Player. (On PCs installed with Windows® 7 or Windows® 8, videos can also be played with Windows Media® Player.)
Supported operating systems ^*1 :
Windows® XP/Windows Vista®/Windows® 7/Windows® 8/Mac OS® X
*1 Images and videos may not be able to be played correctly depending on the compatibility between the viewer or video software and the operating system.
How to play images:
See the PC's operating instructions.
10.4.2 SD card folder structure and file formats
When an SD card is inserted into the main monitor, folders are created in the SD card. Data directly saved to the SD card and data copied from the internal memory to the SD card are saved to separate folders.
- Do not change the name of folders or delete folders with a PC. (If you do so data cannot be played with the main monitor.)
- The following 3 types of files are saved to the SD card.
– JPG: still images (JPEG format)
– MOV: videos (Motion JPEG format)
– TXT: recording data (text format)
Recorded image folder structure and file formats when saving data directly to SD cards
Folder structure
Example:
$$ \begin{array}{c} \text {DCIM / 100_D501} \ \text {①} \end{array} $$
① Folder number (100 - 129)
- When using SD cards with data saved from other devices, folder numbers 100 - 999 are available.
File format
Example:
$$ \begin{array}{c} \text {DRI_0001.JPEG} \ \boxed {①} \end{array} $$
① Name of the device the image was recorded from
- DR1 - DR2: Doorphone 1 - 2
- CM1 - CM4: Camera 1 - 4
② File number
- 1 recorded image is saved to each number.
- File numbers from 0001 to 0100 are created in each folder.
Folder structure and files types of data copied from the internal memory of the main monitor to the SD card
Folder structure
Example:
PRIVATE/PANA_GRP/DOOR/BACKUP/20141013

① Recorded date (Example: October 13, 2014)
File format
Example:
① Recorded time (Example: 13:45)
② Counter (00 - 49)
③ Recording number for each recorded file
- 00: indicates the files contain recording information
- 01 - 08: indicates the image number from among 8 images
10.5 Cleaning
Wipe the product with a soft, dry cloth.
For excessive dirt, wipe the product with a slightly damp cloth.
Important:
- Do not use any cleaning products that contain alcohol, polish powder, powder soap, benzine, thinner, wax, petroleum, or boiling water. Also do not spray the product with insecticide, glass cleaner, or hair spray. This may cause a change in colour or quality of the product.
Cleaning the charger:
For safety, disconnect the charger from the power supply before cleaning.
Cleaning the sub monitor:
To avoid mistakenly operating the sub monitor, remove its batteries before cleaning.
Cleaning the main monitor's touch panel:
From the top menu, touch →
- The "Touch panel cleaning" screen is displayed for approx. 90 seconds. You can clean the main monitor during this time. (Press OFF when you have finished.)
- Use a soft, dry cloth to clean the touch panel making sure not to scratch its surface.
10.6 Specifications
Main monitor (VL-MWD501EX)
| Power source | Power supply unit (VL-PS240)24 V DC, 0.5 A |
| Power consumption | Standby: approx. 1.4 WDuring operation: approx. 10 W |
| Dimensions (mm) (height × width × depth) | Approx. 180×165×21(excluding protruding sections) |
| Mass (weight) | Approx. 470 g |
| Operating environment | Ambient temperature: approx.0 °C to +40 °CRelative humidity(non-condensing): up to 90 % |
| Display | Approx. 5 inches, wide colour display |
| Talking method | Hands-free |
| Installation method | Wall mount (mounting bracket supplied) |
| Frequency range | 1.88 GHz to 1.90 GHz |
| Option output (A contact) | Rated load:24 V AC/DC, 0.3 A or lowerMinimum applicable load:5 V DC, 0.001 A(Output when there is a call from the doorphone (→ page 17).) |
- Compatible SD cards
The following SD cards, that comply with the SD standards, can be used (we recommend SD cards manufactured by Panasonic).
- Supported SD card types ^1 SD memory card ^2 : 2 GB SDHC memory card ^*3 : 4 GB - 32 GB SDXC memory card: 48 GB and 64 GB
- Format SD memory card: FAT16 SDHC memory card: FAT32 SDXC memory card: exFAT
*1 See page 19 for a guide to the capacity and number of recordings possible with SD cards.
*2 miniSD and microSD memory cards can also be used. However, an adaptor is required.
*3 miniSDHC and microSDHC memory cards can also be used. However, an adaptor is required.
Power supply unit (VL-PS240) (indoor use only)
| Power source | Input: 220-240 V AC, 0.2 A,50/60 HzOutput: 24 V DC, 0.6 A |
| Dimensions (mm) (height × width × depth) | Approx. 116×100×54 (excluding protruding sections) |
| Mass (weight) | Approx. 230 g |
| Operating environment | Ambient temperature: approx. 0 °C to +40 °CRelative humidity (non-condensing): up to 90 % |
| Installation method | Attach to DIN rail |
Doorphone (VL-V554EX/VL-V554UEX)
| Power source | Power supplied by the main monitor20 V DC, 0.23 A |
| Dimensions (mm) (height × width × depth) | VL-V554EX: approx. 169×118 ×30 (excluding protruding sections)VL-V554UEX: approx. 169×118 ×16.5 (excluding sections embedded into the wall) |
| Mass (weight) | VL-V554EX: approx. 405 gVL-V554UEX: approx. 345 g |
| Operating environment | Ambient temperature: approx. -10 °C to +50 °CRelative humidity (non-condensing): up to 90 % |
| Viewing angle | Horizontally: approx. 170°Vertically: approx. 115° |
| Installation method | VL-V554EX: surface mount (mounting base supplied)VL-V554UEX: flush mount (flush mounting box supplied) |
| Minimum illuminance required | 1 lx(within approx. 50 cm from the camera lens) |
| Lighting method | LED lights |
| IP rating | IP54*1 |
| IK rating | Compliant with IK07 |
*1 Water resistance is only assured if the doorphone is installed correctly according to the instructions in the Installation Guide, and appropriate water protection measures are taken.
Sub monitor (VL-WD613EX)
■ Main body
| Power source | Rechargeable Ni-MH (AAA × 2) |
| Dimensions (mm) (height × width × depth) | Approx. 173×52×30(excluding protruding sections) |
| Mass (weight) | Approx. 160 g (including the batteries) |
| Operating environment | Ambient temperature: approx. 0 °C to +40 °CRelative humidity (non-condensing): up to 90 % |
| Display | Approx. 2.2 inches, colour display |
| Frequency range | 1.88 GHz to 1.90 GHz |
| Talking method | Hands-free |
| Operating time*1 | Standby use: approx. 80 hours |
| Charging time*2 | Approx. 8 hours |
| Transmitting range | Approx. 100 m (line-of-sight distance from the main monitor) |
*1 When used fully charged in an operating temperature of 20 °C.
*2 When the operating temperature is 20 °C. The charging time may increase when the operating temperature is lower than this.
■ Charger
| Power source | AC adaptor (PNLV226CE/PNLV226E)Input: 220-240 V AC, 0.1 A,50/60 HzOutput: 5.5 V DC, 0.5 A |
| Power consumption | Standby: approx. 0.4 W(when the sub monitor is not placed in the charger)During charging: approx. 1.4 W |
| Dimensions(mm) (height × width × depth) | Approx. 43×81×76(excluding protruding sections) |
| Mass (weight) | Approx. 70 g (excluding the AC adaptor) |
| Operating environment | Ambient temperature: approx.0 °C to +40 °CRelative humidity(non-condensing): up to 90 % |
Note:
- Design and specifications are subject to change without notice.
11.1 Troubleshooting
Monitor display (doorphone images)
| Problem | Cause & Solution | Page |
| Images appear distorted. | Images may appear distorted because of the characteristics of the camera lens. This is not a malfunction. | - |
| The background appears greenish. | At night or when there is poor light in the area around the doorphone, lights or white objects near the doorphone may appear greenish. This is not a malfunction. | - |
| Images at night are dark and faces cannot be identified. | [Automatic illumination] is set to [Disable].→ Change the setting to [Enable].Even when the doorphone's LED lights are lit, because the light from the LED lights cannot illuminate the edges of the visible area (the areas directly next to the doorphone), faces of people may not be identifiable even when they are close to the doorphone.→ We recommend installing extra lights in the area around the doorphone. | 37- |
| The images of people's faces are dark. | Images of people's faces appear dark when there is strong sunlight or a backlight in the area around the doorphone.→ Use the backlight compensation function. | 34 |
| Images are dirty or unclear.Images are not in focus. | There is dirt on the surface of the doorphone's lens.Wipe the lens with a soft, dry cloth.There is water condensation on the surface of the doorphone's lens.→ Wait for the condensation to evaporate. | 42- |
| Images are white or black. | The brightness of the display is not correctly adjusted.→ Adjust the brightness when images are displayed. | 34 |
| Images are white, or white lines or circles are shown on the display. | Strong light such as sunlight is shining into the lens of the doorphone causing images to be difficult to see on the display. (This is not a malfunction.)→ Locating the doorphone away from direct sunlight or changing the angle that the doorphone is installed may help reduce this problem. | - |
| Images are flickering. | AC (alternating current) lights such as fluorescent lights are used near the doorphone.AC (alternating current) lights such as fluorescent lights may cause flickering in dark environments. (This is not a malfunction.) | - |
| Images of the area you want to view in the zoom screen are not displayed correctly. | Change the zoom position setting to a suitable position.→ Configure the [Zoom position settings] settings. | 15 |
| Images displayed on the sub monitor distort or are displayed slowly. (It takes 5 seconds or more to be displayed.) | The antenna on the sub monitor is being covered with your hand.Do not cover it.The sub monitor is too far from the main monitor, or there is an object such as a concrete wall obstructing the signal.Move the sub monitor closer to the main monitor or to an area that does not have any obstructions. | 127 |
Monitor display (camera images)
| Problem | Cause & Solution | Page |
| Even though there are people, they cannot be viewed at all or can only be partially viewed. | You may not be able to correctly view people with the camera in the following cases.When people are moving near the edge of the sensor range.When people move slowly or quickly across the front of the camera.When people move closely across the front of the camera (approx. 1 m). | - |
| Images are dirty or unclear (out of focus). | There is dirt on the surface of the camera's lens cover.Wipe the lens cover with a soft, dry cloth. | - |
| Images are not displayed with the correct brightness. | The brightness in the area where the camera is installed is changing rapidly.Wait about 1 second. The brightness will be automatically adjusted. | - |
| Images are blurry and people's faces or other objects are hard to distinguish. | When images of dark areas are viewed, due to the characteristics of the image sensor of the camera, people's faces can be hard to distinguish. (This is not a malfunction.)→ We recommend installing extra lights in the area around the camera. (The camera's LED lights cannot produce enough light to illuminate the area in this situation.) | - |
| Objects in images are blurred. | Images may blur when the subject moves. (This is a characteristic of the image sensor of the camera and is not a malfunction.)Images of objects can easily blur when images of dark areas are viewed or if the object is dark.→ We recommend installing extra lights in the area around the camera. (The camera's LED lights cannot produce enough light to illuminate the area in this situation.) | - |
| White points or coloured light points are displayed in images. | White points or coloured light points may appear in images when images of dark areas are viewed or if the object is dark. (This is a characteristic of the image sensor of the camera and is not a malfunction.)→ We recommend installing extra lights in the area around the camera. (The camera's LED lights cannot produce enough light to illuminate the area in this situation.) | - |
| Images have uneven colour. | AC (alternating current) lights such as fluorescent lights may cause uneven colouring or flickering.Setting [Uneven colour prevention] to [On] may reduce the uneven colour and flickering. (However, this may reduce the image quality of images with dark areas.) | 27 |
Ringtone
| Problem | Cause & Solution | Page |
| The ringtone for the doorphone or camera does not sound. | ● The ringtone volume is muted.→ Activate the sound for the ringtone.● The sub monitor's batteries are discharged.→ Charge the batteries. | 3514 |
Calls (doorphone, camera, and intercom calls)
| Problem | Cause & Solution | Page |
| Sound cuts in/out or fades. | The surroundings of the main monitor, the sub monitor, or the doorphone are noisy, causing the sound to cut out or fade.→ Try using the "Press-to-talk" mode.When talking with the sub monitor or camera:The antenna (→ page 12) on the sub monitor is being covered with your hand.→ Do not cover it.When talking with the sub monitor or camera:The sub monitor or camera is too far from the main monitor, or there is an object such as a concrete wall obstructing the signal.→ Move the sub monitor or camera closer to the main monitor or to an area that does not have any obstructions.If the sub monitor or camera cannot be moved to another area, installing a repeater (additional accessory) may improve the signal. | 17-739 |
| Calls cannot be heard because of noise or feedback. | Noise or feedback may occur when you are too close to the other party.→ Move away from the other party. | - |
| Your voice cannot be heard by the visitor but the visitor's voice can be heard. | You are using the "Press-to-talk" mode. (P is displayed on the main monitor and (C) is displayed on the sub monitor.)→ When using the "Press-to-talk" mode, the visitor can hear your voice only while you are pressing (TALK). | 17 |
Sub monitor (charging)
| Problem | Cause & Solution | Page |
| flashes and 2 shorteps sound. | The battery level is very low.→ Charge the batteries immediately. | 14 |
| en if you place the sub nitor on the charger,charge indicator does light up.(care) (prz) (prz) (prz) | The AC adaptor is disconnected from the power outlet.→ Plug the AC adaptor into the power outlet firmly.The sub monitor is not placed on the charger correctly.→ Replace the sub monitor securely. (The charge indicator lights in red.)The batteries are new or discharged.→ Place the sub monitor on the charger and wait for a few minutes. | |
| charge indicator does not go off after the batteries have been charged for about 8urs.(care) (prz) (prz) (prz) (prz) | If the sub monitor is picked up off the charger or used during charging, the charging time will become longer.The charging time may increase when the operating temperature is lower than 20 °C.The charging time increases when the power of the main monitor is turned off or is displayed on the sub monitor.→ Make sure the power of the main monitor is turned on, and charge the sub monitor in a location near the main monitor where is displayed for the sub monitor's signal display. | -714 |
| flashes after onlyng the sub monitor 2 or mes after charging. | Clean the ends of batteries (⊕ and ⊖) with a dry cloth and charge again.It is time to replace the batteries. | 14 |
| The sub monitor, the AC adaptor, or the charger is warm. | ● This is normal. (It may feel a little warmer in summer than in winter.) → If it feels very hot, disconnect the AC adaptor from the power outlet and contact an authorised service centre. | - |
Camera (sensor operations)
| Problem | Cause & Solution | Page |
| Monitoring can be performed with the camera but sensor notifications are not received. | The camera (sensor detection) is turned off.→ Touch  The camera's [Sensor selection] setting is set to [Off] (not make detections).→ Set [Sensor selection] to a setting other than [Off]. The camera's [Sensor selection] setting is set to [Off] (not make detections).→ Set [Sensor selection] to a setting other than [Off]. | 2426 |
| Sensors do not make detections.The motion detection and heat sensor do not work | Motion detection/heat sensorThe sensors do not operate when [Sensor selection] is set to [Off] or [External sensor only].→ Check the settings.Motion detection does not workMotion detection does not operate at night when [Motion detection] is set to [Day only].→ Check the settings.Detections may not be made when the object makes small movements.→ Change the [Motion detection sensitivity] setting to a higher sensitivity.Detections are hard to make when it is dark.→ Use the heat sensor for detections or install lights to illuminate the area around the object.Heat sensor does not workThe heat sensor does not operate at midday when [Heat sensor detection] is set to [Night only].→ Check the settings.Detections may not be made in the following situations.- when reflective objects are in front of the camera and can interfere with the heat detection, such as glass- when snow is on the surface of the heat sensor- when people move towards the front of the cameraWhen the outside temperature is close to the body temperature, it is hard to make detections. It is also hard to make detections when people wear thick clothes.→ Change the [Heat sensor sensitivity] setting to a higher sensitivity. | 262626--262626 |
| The sensors do not work correctly.Sensors are triggered each time a car passes by (separated by more than 5 m)Sensors are triggered when there are no people near the camera. | Motion detection/heat sensorIn the following situations, the sensors are triggered by detecting changes to the temperature and movement of objects.When a car enters the detection range. (When a car or light from a car's headlights enters the detection range, movement is detected. The high temperature of a car's muffler or bonnet may cause sensors to be triggered even from 5 m away, or more.)When objects that are in the detection range are moved by wind, such as tree branches or clothes hung out to dry.When small animals such as dogs or cats enter the detection range.When rain or snow falls.→ Adjust the angle of the camera so that it does not face roads.When using motion detection, adjust the detection range with the [Motion detection range] setting. To avoid mistakenly detecting light from car headlights at night, set [Motion detection] to [Day only].→ When using the heat sensor, you can use the heat sensor's lever to adjust the sensor's angle and the sensor range cap to adjust the detection range. (See the camera's manuals for more information.)Heat sensor onlyThe heat sensor may make incorrect detections in the follow locations.- where the camera can be exposed to direct sunlight- near heating and cooling devices that cause rapid temperature change-in a greasy or moist place- underneath outdoor lights or other areas that can become hot- near fire or heating devices- where the camera can be exposed to interference from magnetic devices- where reflective objects are in front of the camera and can interfere with the heat detection, such as glass- where there are strong light emitting devices such as fluorescent lights that can affect the temperature- near devices that emit radio waves, such as mobile phonesWhen the outside air temperature is cold, the detection range (approx. 5 m) becomes longer and too many detections may be made.→ Change the [Heat sensor sensitivity] setting to a lower sensitivity. | -2627-26 |
| The heat sensor has trouble making detections. | The surface of the heat sensor is dirty.→ Wipe the surface of the heat sensor with a soft, dry cloth. | - |
| People moving towards the front of the camera cannot be detected. | Because of the characteristics of the sensors, the camera may not be able to detect people moving towards the front of the camera.→ Perform the following operations.- Change the camera location so that objects pass the camera from the sides. (It is easier to detect objects moving sideways in front of the camera.)If you want to detect objects moving towards the front of the camera, use a commercially available external sensor. (See the camera's manuals for more information.) | - |
Others
| Problem | Cause & Solution | Page |
| "Demo mode" is displayed on the screen.The ringtone regularly sounds.You cannot talk or make calls. | The [Demo mode] function setting is configured on the main monitor.→ From [Other] in the function settings, set [Demo mode] to [Off]. | 37 |
| The product does not work with correct operations.The product does not work properly. | Perform the following operations.-:Press the RESET button on the bottom side of the main monitor with a pointed object. (Recorded images and configured settings are not affected.)-:Remove the battery and insert it again. (Recorded images and configured settings are not affected.) | 11- |
| The main monitor does not work properly.Nothing is displayed on the monitor.The ringtone does not sound.Voices cannot be heard. | Check the power connection.If the power is connected, there may be a problem with the electrical wiring.→ Contact an authorised service centre. | - |
| Notifications for camera detections do not come to the sub monitor. | The sub monitor is too far from the main monitor, or there is an object such as a concrete wall obstructing the signal.→ Move the sub monitor closer to the main monitor or to an area that does not have any obstructions.The sub monitor's batteries are discharged.→ Charge the batteries. | 714 |
| When you touch the touch panel of the main monitor:the touch panel does not responda button other than the one touched responds | When the touch panel does not respond.- The touch panel is dirty. Clean the touch panel.- If cleaning does not help, adjust the touch panel.When a button other than the one touched responds.- The touch panel needs to be adjusted.Adjusting the touch panelWhile pressing OFF on the main monitor, press TALK 3 times.Follow the on-screen instructions and touch the "+" marks (in 5 places) with your finger.Touch [OK]. | 42-- |
11.2 Error messages - main monitor
When using devices for the first time or registering devices
| Display | Cause & Solution | Page |
| "Cannot register" | ● Registration failed because it was not completed within the specified time.→ Check that the devices to be registered are correctly connected and receiving power, and then try again. | 233940 |
Camera connections
| Display | Cause & Solution | Page |
| "Cannot connect to camera" | ● The camera is too far from the main monitor, or there is an object such as a concrete wall obstructing the signal.→ Move the camera closer to the main monitor or to an area that does not have any obstructions. If the camera cannot be moved to another area, installing a repeater (additional accessory) may improve the signal. | 7 |
| "Cannot transmit" |
11.3 Error messages - sub monitor
| Display | Cause & Solution | Page |
| "Cannot connect to main monitor station" | ● The sub monitor or camera is too far from the main monitor, or there is an object such as a concrete wall obstructing the signal.→ Move the sub monitor or camera closer to the main monitor or to an area that does not have any obstructions.If the camera cannot be moved to another area, installing a repeater (additional accessory) may improve the signal. | 7 |
| "Cannot connect to camera 1"(When there are multiple cameras, the camera number may not be 1.) | ||
| "Registration failed" | ● Registration to the main monitor has not been completed. Bring the sub monitor closer to the main monitor and try registering again. | - |
12.1 Index
A
Accessories: 3
Adding devices (Register)
Camera: 23
Repeater: 40
Sub monitor station: 39
Antenna: 12
B
Backlight compensation (camera): 27
Backlight compensation (doorphone): 34
Batteries (charging): 14
Battery cover: 3
Battery level: 15
Battery level display: 13
Brightness settings
Camera image brightness: 27
Image brightness: 22
Screen brightness: 34
C
Call button: 10
Camera information: 13
Camera lens: 10
Camera monitoring: 23
Cancel: 40
Changing the volume
Owner's voice volume: 34
Receiver volume: 34
Ring volume: 35
Volume when playing images: 22
Charge indicator: 12
Charger: 3, 14
Charging: 14
Cleaning: 42
Contrast: 38
D
DECT repeater: 4
Delete all images: 36
Display: 11
Door station: 3, 4
Doorphone: 10
Doorphone monitoring: 18
E
Electric lock: 29
Entire image display: 15, 33
F
Function settings - camera
Automatic illumination: 27
Backlight compensation: 27
Brightness: 27
Camera detection history: 28
Camera mic sensitivity: 28
Check sensors: 27
Day and night switch: 26
External sensor: 27
Heat sensor detection: 26
Heat sensor sensitivity: 26
Indicator lamp: 28
Initialize settings: 28
Motion detection: 26
Motion detection range: 27
Motion detection sensitivity: 26
Owner's voice volume: 28
Recording before detection: 27
Recording test: 27
Sensor selection: 26
Sensor trigger sound: 27
Time with no detection: 26
Uneven colour prevention: 27
Warning sound: 28
Function settings - main monitor
Automatic illumination: 37
Camera: 36
Cancel: 37
Copy to SD card: 36, 41
Delete all images: 36
Demo mode: 37
Doorphone connection: 36
Electric lock: 29, 37
Format: 36, 41
Initialize settings: 37
Power supply frequency: 36
Record calls: 36
Register: 37
Repeater connections: 37
Ring volume: 36
Ringtone: 36
Select language: 15, 36
Set day for first day of week: 35
Time and date settings: 15, 35
Time display format: 35
Touch sound: 37
Wide/Zoom settings: 15, 35
Zoom position settings: 15, 35
Function settings - sub monitor
Contrast: 38
Initialize: 38
Key sound: 38
Register: 38, 39
Ringtone: 38
|
Illumination settings (camera): 27
Illumination settings (doorphone)
Automatic illumination: 37
Manually ON/OFF: 34
Images (recording)
Auto image updating: 20
Deleting: 21, 22
Playing: 20
Searching: 21
Information screen: 13
Initialize settings
Camera: 28
Main monitor: 37
Sub monitor: 38
Intercom calls: 18
K
Key sound: 38
L
LED lights: 10
Lens cover: 10
M
Main monitor: 11
Main monitor station: 3
Microphone: 10, 11, 12
Monitoring: 18, 23
Multifunction buttons: 11
N
Notification indicator: 11
Notification screen: 13, 15
0
Owner's voice volume: 28, 34
P
Page: 12
Intercom calls: 18
Transferring doorphone calls: 17
Pan/tilt: 33
Playing
Doorphone and camera recorded images and audio: 20
Press-to-talk: 17
R
Record calls: 20, 25, 36
Recording calls (camera calls): 25
Recording calls (doorphone calls): 20
Recording images and audio (doorphone and camera)
Automatic recording: 20, 25
Automatically updating recorded images: 20
Manually recording: 20, 25
Record calls: 20, 25
Register (adding devices)
Camera: 23
Repeater: 40
Sub monitor station: 39
Repeater: 39
Reset: 11, 49
RESET button: 11, 49
Ring volume: 35
Ringtone (changing the type): 34
s
SD card indicator: 11
SD cards: 10
Copying (internal memory → SD cards): 41
File formats: 41
Folder structure: 41
Format: 41
Inserting SD cards: 10
Number of recordings: 19
Recording information: 13
Removing SD cards: 10
Write-protect lock switch: 10
Select language: 15, 36
Sensor detections
Camera sensors: 24, 25
Speaker: 10, 11, 12
Specifications: 42
Supported models: 3
T
Talk indicator: 11
Time: 15
Time and date settings: 15
Top menu: 12
Touch panel: 11
Transferring calls (doorphone): 17
U
Using a camera: 23
Cancelling devices: 40
V
Voice changer: 34
Volume: 34
W
Wall mounting: 15
Wide display: 15, 33
Wide/zoom: 15, 33
Wireless monitor station: 3
Wireless sensor camera: 4
Z
Zoom display: 15, 33
Mode d'emploi
natural_image
Front view of a digital camera with control panel and indicator lights (no text or symbols)
natural_image
Simple diagram of a computer monitor with no text or symbols
natural_image
Illustration of a remote control device with a digital display and keypad (no text or symbols)4. Conversation/Surveillance
Conversation/Surveillance
1.2 Informations relatives aux accessoires
1.2.1 Accessoires fournis
Panasonic Testing Center
Panasonic Marketing Europe GmbH
flowchart
graph LR
    A["Target Icon"] --> B["Sonnerie"]
    B --> C["OK"]
Signification
⑥ Enceinte
⑦ (page) (→ page 17, 18)
⑧ OFF (désactivation)
⑨ TALK (conversation) (→ page 17)
⑩ Microphone
3.3 Ecrans
natural_image
Two-step diagram showing a device's internal structure before and after assembly, with no visible text or symbols.Remarques :
natural_image
Illustration of two people standing indoors, one holding a folder (no text or symbols visible)natural_image
Illustration of a family scene with an adult standing, two children, and smokestacks in the background (no text or symbols)natural_image
Illustration of a family scene with an adult, two children, and a third child standing near a smartphone (no text or symbols present)
Avec répétiteurs :
flowchart
graph TD
    A["Smart Home"] --> B["Device"]
    B --> C["Sensor 1"]
    B --> D["Sensor 2"]
    B --> E["Sensor 3"]
    B --> F["Sensor 4"]
    B --> G["Sensor 5"]
    B --> H["Sensor 6"]
    B --> I["Sensor 7"]
    B --> J["Sensor 8"]
    B --> K["Sensor 9"]
    B --> L["Sensor 10"]
    style A fill:#f9f,stroke:#333
    style B fill:#ccf,stroke:#333
    style C fill:#cfc,stroke:#333
    style D fill:#fcc,stroke:#333
    style E fill:#cff,stroke:#333
    style F fill:#ffc,stroke:#333
    style G fill:#cfc,stroke:#333
    style H fill:#fcc,stroke:#333
    style I fill:#ffc,stroke:#333
    style J fill:#fcc,stroke:#333
    style K fill:#ffc,stroke:#333
    style L fill:#fcc,stroke:#333
Avec répétiteurs :
flowchart
graph TD
    A["Zone 1"] --> B["Mobile Phone"]
    B --> C["Grid"]
    D["Zone 2"] --> E["Mobile Phone"]
    E --> F["Grid"]
    G["Zone 3"] --> H["Mobile Phone"]
    H --> I["Grid"]
    J["Grid"] --> K["Display Device"]
    style A fill:#f9f,stroke:#333
    style D fill:#f9f,stroke:#333
    style G fill:#f9f,stroke:#333
Ecran large : 15, 34
Ecran large/affichage zoom : 15, 34
Microphone : 10, 11, 12
natural_image
Front view of a digital camera module with lens, buttons, and ventilation grilles (no text or symbols)
natural_image
Simple diagram of a computer monitor with control buttons and display screen (no text or symbols)
natural_image
Illustration of a remote control device with a display and keypad (no text or symbols)natural_image
Simple line drawing of a monitor and folder (no text or symbols)VL-MWD501EX

VL-WD613EX

VL-V554EX (Aufputzmontage)/
VL-V554UEX (Bündige Montage)
Panasonic Testing Centre
Panasonic Marketing Europe GmbH
① Statusinformationssymbole
natural_image
Diagram showing two steps of a device's internal components, one with an arrow indicating direction and the other with a lock icon (no text or symbols present)Hinweis:
natural_image
Illustration of two people standing indoors, one adult holding a folder, no text or symbols presentnatural_image
Illustration of a family scene with a man standing, two children, and a fire in the background (no text or symbols)natural_image
Illustration of a family scene with an adult, two children, and a third child standing near a smartphone (no text or symbols present)→ [Registrieren/abbrechen] → [Registrieren] →

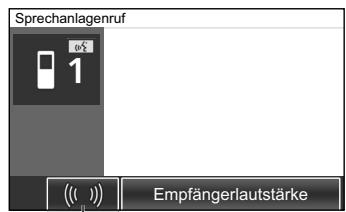
Funk-Monitorstation: 3
Submonitorstation: 39
|
Submonitorstation: 39
Reinigung: 42
Repeater: 39
Reset: 11, 49
RESET (Taste): 11, 49
Rufen: 12
Internrufe: 18
natural_image
Front view of a digital camera module with lens, buttons, and indicator lights (no text or symbols)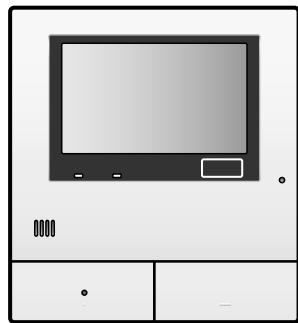
natural_image
Simple diagram of a computer monitor with no text or symbols
natural_image
Illustration of a remote control device with a display and keypad (no text or symbols)natural_image
Simple diagram of a monitor and tablet device with no text or symbolsVL-MWD501EX

VL-WD613EX
Panasonic Testing Centre
Panasonic Marketing Europe GmbH
Winsbergring 15, 22525 Hamburg, Germany
1.4 Procedure operative e icone
natural_image
Illustration of a mobile phone with a black arrow pointing to the screen (no text or symbols)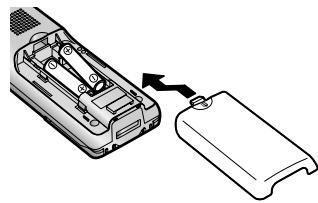
natural_image
Diagram showing a device with internal components being inserted into a housing (no text or symbols present)Nota:
natural_image
Illustration of a man and a child standing in an office setting (no text or symbols visible)natural_image
Illustration of a family scene with an adult standing, two children, and smokestacks in the background (no text or symbols)natural_image
Illustration of a family scene with an adult, two children, and a third child standing near a brick building (no text or symbols)3

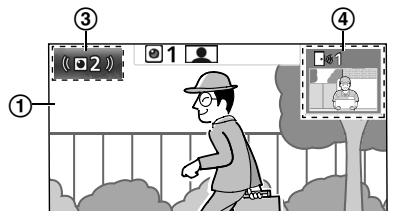
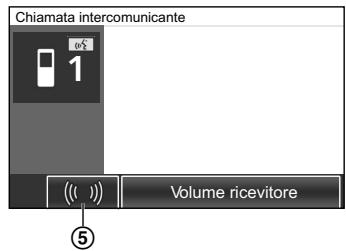
Registra chiamate: 21, 26, 37
natural_image
Front view of a digital camera module with lens, buttons, and indicator lights (no text or symbols)
natural_image
Simple diagram of a computer monitor with control buttons and display (no text or symbols)
natural_image
Illustration of a remote control device with a display and keypad (no text or symbols)natural_image
Simple line drawing of a computer monitor with no text or symbolsVL-MWD501EX

VL-WD613EX
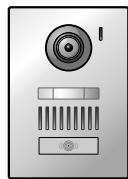
VL-V554EX (montura en superficie)/
VL-V554UEX (marco empotrado)
Panasonic Testing Centre
Panasonic Marketing Europe GmbH
Winsbergring 15, 22525 Hamburg, Germany
Para futuras consultas
natural_image
Empty dashed rectangular frame with no text, numbers, or symbolsSignificado
3.2.2 Control principal
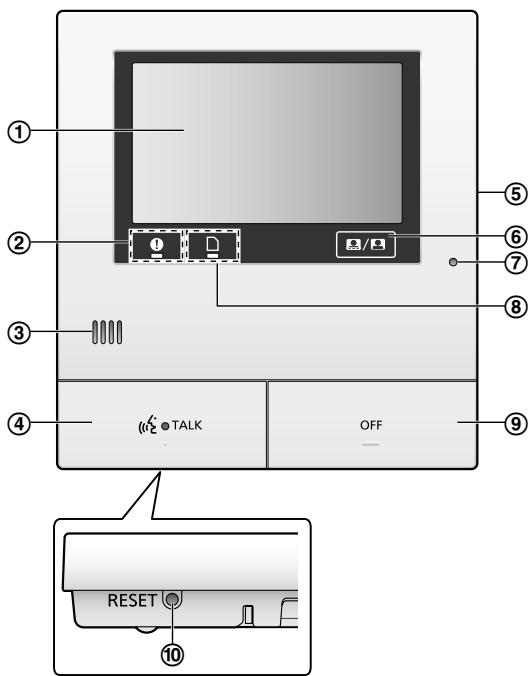
natural_image
Diagram showing two steps of a device's internal components, one with an arrow indicating direction and the other with an arrow pointing to a labeled part (no text or symbols present)Nota:
natural_image
Illustration of two people standing in front of a building, one holding a folder (no text or symbols visible)natural_image
Illustration of a family scene with an adult standing, two children, and a third child, in front of a brick wall (no text or symbols)natural_image
Illustration of a family scene with an adult, two children, and a third child standing near a smartphone (no text or symbols present)
3

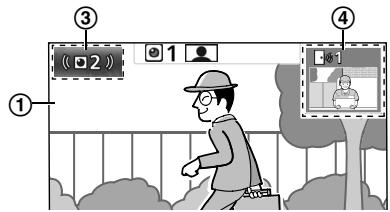

⑤
Si se utilizan repetidores:

flowchart
graph TD
    A["Mobile Device"] --> B["Central Monitor"]
    C["Camera"] --> B
    D["Mobile Device"] --> B
    E["Camera"] --> B
    F["Mobile Device"] --> B
    G["Camera"] --> B
    H["Mobile Device"] --> B
    I["Camera"] --> B
    J["Mobile Device"] --> B
    K["Camera"] --> B
    L["Mobile Device"] --> B
    M["Camera"] --> B
    N["Mobile Device"] --> B
    O["Camera"] --> B
    P["Mobile Device"] --> B
    Q["Camera"] --> B
    R["Mobile Device"] --> B
    S["Camera"] --> B
    T["Mobile Device"] --> B
    U["Camera"] --> B
    V["Mobile Device"] --> B
    W["Camera"] --> B
    X["Mobile Device"] --> B
    Y["Camera"] --> B
    Z["Mobile Device"] --> B
    AA["Camera"] --> B
    AB["Mobile Device"] --> B
    AC["Camera"] --> B
    AD["Mobile Device"] --> B
    AE["Camera"] --> B
    AF["Mobile Device"] --> B
    AG["Camera"] --> B
    AH["Mobile Device"] --> B
    AI["Camera"] --> B
    AJ["Mobile Device"] --> B
    AK["Camera"] --> B
    AL["Mobile Device"] --> B
    AM["Camera"] --> B
    AN["Mobile Device"] --> B
    AO["Camera"] --> B
    AP["Mobile Device"] --> B
    AQ["Camera"] --> B
    AR["Mobile Device"] --> B
    AS["Camera"] --> B
    AT["Mobile Device"] --> B
    AU["Camera"] --> B
    AV["Mobile Device"] --> B
    AW["Camera"] --> B
    AX["Mobile Device"] --> B
    AY["Mobile Device"] --> Y
    AZ["Mobile Device"] --> Y
    BA["Mobile Device"] --> Y
    BB["Mobile Device"] --> Y
    BC["Mobile Device"] --> Y
    BD["Mobile Device"] --> Y
    BE["Mobile Device"] --> Y
    BF["Mobile Device"] --> Y
    BG["Mobile Device"] --> Y
    BH["Mobile Device"] --> Y
    BI["Mobile Device"] --> Y
    BJ["Mobile Device"] --> Y
    BK["Mobile Device"] --> Y
Si se utilizan repetidores:

flowchart
graph TD
    A["Zone 1"] --> B["Mobile Device"]
    C["Zone 2"] --> D["Mobile Device"]
    E["Zone 3"] --> F["Mobile Device"]
    G["Grid"] --> H["Display"]
    style A fill:#f9f,stroke:#333
    style C fill:#f9f,stroke:#333
    style E fill:#f9f,stroke:#333
    style G fill:#f9f,stroke:#333
Control principal (VL-MWD501EX)
natural_image
Front view of a digital camera module with lens, buttons, and indicator lights (no text or symbols)
natural_image
Simple diagram of a computer monitor with no text or symbols
natural_image
Illustration of a remote control device with a display and keypad (no text or symbols)natural_image
Simple line drawing of a monitor and keyboard (no text or symbols)VL-MWD501EX

VL-WD613EX
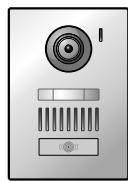
VL-V554EX (oppervlakbevestiging)/
VL-V554UEX (verzonken bevestiging)
Panasonic Testing Centre
Panasonic Marketing Europe GmbH
Winsbergring 15, 22525 Hamburg, Germany
Voor later gebruik
natural_image
Empty rectangular frame with dashed lines, no text or symbols presentflowchart
graph LR
    A["Circle"] --> B["Square"]
    B --> C["Belsignaal"]
    C --> D["Square"]
Betekenis
① Display ( pagina 13)
② Multifunctionele knoppen
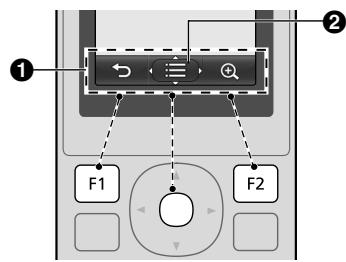
① Statusinformatiepictogrammen
natural_image
Illustration of a mobile phone with an arrow indicating left-side motion (no text or symbols present)
natural_image
Diagram showing a device with internal components being inserted into a housing (no text or symbols present)Opmerking:
natural_image
Illustration of a man and a child standing in front of a vehicle (no text or symbols visible)natural_image
Illustration of a family scene with an adult standing, two children, and smokestacks in the background (no text or symbols)natural_image
Illustration of a family scene with an adult, two children, and a third child standing near a smartphone (no text or symbols present)
3

: druk op
OFF
flowchart
graph LR
    A["User Icon"] --> B["Selecter de camera die u wilt"]
Met versterkers:
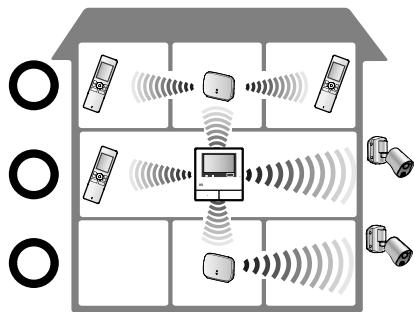
flowchart
graph TD
    A["Smart Home"] --> B["Device"]
    B --> C["Sensor 1"]
    B --> D["Sensor 2"]
    B --> E["Sensor 3"]
    B --> F["Sensor 4"]
    B --> G["Sensor 5"]
    B --> H["Sensor 6"]
    B --> I["Sensor 7"]
    B --> J["Sensor 8"]
    B --> K["Sensor 9"]
    B --> L["Sensor 10"]
    style A fill:#f9f,stroke:#333
    style B fill:#ccf,stroke:#333
    style C fill:#cfc,stroke:#333
    style D fill:#fcc,stroke:#333
    style E fill:#cff,stroke:#333
    style F fill:#ffc,stroke:#333
    style G fill:#cfc,stroke:#333
    style H fill:#fcc,stroke:#333
    style I fill:#ffc,stroke:#333
    style J fill:#fcc,stroke:#333
    style K fill:#ffc,stroke:#333
    style L fill:#fcc,stroke:#333
Met versterkers:

flowchart
graph TD
    A["Mobile Device 1"] --> B["Server"]
    C["Mobile Device 2"] --> D["Cloud"]
    E["Mobile Device 3"] --> F["Server"]
    G["Mobile Device 4"] --> H["Cloud"]
    I["Computer"] --> J["Server"]
    style A fill:#f9f,stroke:#333
    style C fill:#f9f,stroke:#333
    style E fill:#f9f,stroke:#333
    style G fill:#f9f,stroke:#333
    style I fill:#f9f,stroke:#333
    style B fill:#ccf,stroke:#333
    style D fill:#ccf,stroke:#333
    style F fill:#ccf,stroke:#333
    style H fill:#ccf,stroke:#333
    style J fill:#ccf,stroke:#333
Verbinding van camera's
1-62, 4-chome, Minoshima, Hakata-ku, Fukuoka 812-8531, Japan
http://www.panasonic.net/
© Panasonic System Networks Co., Ltd. 2013