
VL-SDM100BX - Video Intercom PANASONIC - Free user manual and instructions
Find the device manual for free VL-SDM100BX PANASONIC in PDF.


| Product Type | Wireless Video Door Intercom System |
| Model | VL-SDM100BX |
| Included Components | Wireless Camera (VL-CM850BX), Monitor (VL-DM100BX), Cradle, AC Adaptor (PNLV232BX) |
| Monitor Dimensions (H x W x D) | 47 mm × 131 mm × 78 mm (including cradle) |
| Monitor Weight | Approx. 160 g (including cradle) |
| Camera Dimensions (Wireless Unit) | 190 mm × 78 mm × 58 mm |
| Camera Dimensions (Camera Unit) | 37 mm × 87.5 mm × 40 mm |
| Camera Weight | Approx. 390 g (excluding batteries) |
| Monitor Power Supply | AC adaptor 100-240 V AC, 50/60 Hz |
| Monitor Power Consumption | Standby: approx. 1 W, Operation: approx. 2 W |
| Camera Power Supply | 4 LR6 alkaline batteries |
| Camera Battery Life | Battery save mode ON: approx. 6 months; OFF: approx. 4 months (5 uses/day, 20 sec each) |
| Display Type | 2.2" color TFT LCD monitor |
| Wireless Frequency | 1.9 GHz TDMA-WB (1881.792 MHz – 1897.344 MHz) |
| Wireless Range | Approx. 70 m (line-of-sight) |
| Monitor Operating Temperature | 0 °C to 40 °C |
| Camera Operating Temperature | Wireless unit: 0 °C to 40 °C; Camera unit: -10 °C to 50 °C |
| Operating Humidity | Up to 90% RH (non condensing) |
| Camera Viewing Angle | Horizontal: approx. 120°, Vertical: approx. 90° |
| Camera Minimum Illuminance | 3 lux |
| Camera Water Resistance | IPx3 equivalent (camera unit only) |
| Installation Method | Attached to a door (camera) |
| Cleaning Instructions | Clean with a soft dry cloth; do not use alcohol, benzine, or harsh chemicals |
| Security Features | Pairing system to prevent unauthorized access |
Frequently Asked Questions - VL-SDM100BX PANASONIC
User questions about VL-SDM100BX PANASONIC
0 question about this device. Answer the ones you know or ask your own.
Ask a new question about this device
Download the instructions for your Video Intercom in PDF format for free! Find your manual VL-SDM100BX - PANASONIC and take your electronic device back in hand. On this page are published all the documents necessary for the use of your device. VL-SDM100BX by PANASONIC.
USER MANUAL VL-SDM100BX PANASONIC
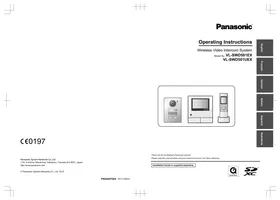
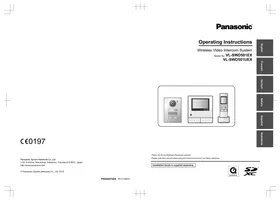
Operating Instructions
Wireless Door Camera
Model No. VL-SDM100BX
Including: VL-CM850BX
VL-DM100BX

VL-CM850BX

VL-DM100BX
Thank you for purchasing a Panasonic product.
Please read this manual before using the unit and save for future reference.
Installation Guide is supplied separately.
Introduction
Product descriptions ....3
Accessory information ....3
Important Information
For your safety ....5
Important safety instructions ....6
For best performance ....7
Other information 8
Getting Started
Location of controls 9
Monitor display 11
How to use
Monitoring the outside 13
Programming function settings ......15
Useful Information
Replacing batteries ....16
Cleaning 17
Help
Troubleshooting ....18
Error messages ....20
General Information
Specifications 21
Quick Reference Guide
Quick Reference Guide (in Chinese) ......23
Quick Reference Guide (in Arabic) ......28
Index
Index....29
Product descriptions
| Product figure |  VL-CM850BX*1 VL-CM850BX*1 |  VL-DM100BX*2 VL-DM100BX*2 |  *3 *3 |
| Description in this manual | Wireless Camera Monitor Cradle | ||
*1 The Wireless Camera is attached to the front door of a house or apartment. *2 With the Monitor you can easily check your front door with images from the Wireless Camera. *3 The Cradle is used to hold the Monitor, see page 11.
Accessory information
Supplied accessories
① AC adaptor *1 … × 1

② Cradle*1 ... × 1

③ Operating Instructions *2 … × 1

④ Installation Guide *3 … × 1

*1 Used for the Monitor. *2 Contains English Operating Instructions with Chinese and Arabic Quick Reference Guide. *3 English Installation Guide (separate document). Lists the accessories required for installation.
Note:
- Design and specifications are subject to change without notice.
- The illustrations in these instructions may vary slightly from the actual product.
License:
- Portions of this software are based in part on the work of the Independent JPEG Group.
Trademarks:
- All other trademarks identified herein are property of their respective owners.
This product is not designed to be used to prevent theft or intrusions. Panasonic assumes no liability for any accidents or damages occurring in such cases.
For your safety
To prevent severe injury and loss of life/property, read this section carefully before using the product to ensure proper and safe operation of your product.
WARNING
Power connection
- Use only the power source marked on the unit. If you are not sure of the type of power supplied to your home, consult your dealer or local power company.
- Use only the specified AC adaptor.
- Do not overload power outlets and extension cords. This can result in the risk of fire or electric shock.
- Completely insert the AC adaptor into the power outlet. Failure to do so may cause electric shock and/or excessive heat resulting in a fire.
- Regularly remove any dust, etc. from the AC adaptor by pulling it from the power outlet, then wiping with a dry cloth. Accumulated dust may cause an insulation defect from moisture, etc. resulting in a fire.
- If the unit emits smoke or an abnormal smell, or makes an unusual noise, immediately unplug the AC adaptor from the power outlet. These conditions can cause fire or electric shock. Confirm that smoke has stopped and contact an authorized service center.
- Never touch the plug with wet hands. Danger of electric shock exists.
Installation
- Do not use the unit in areas that are exposed to rain, moisture, steam, or oily smoke, or areas that have excessive dust. This may cause fire or electric shock.
- Do not install or use this product near automatically controlled devices such as automatic doors and fire alarms. Radio waves emitted from this product may cause such devices to malfunction resulting in an accident.
- Do not perform any actions (such as damaging, altering, exposing to heat sources, or placing heavy objects on the AC adaptor) that may damage the AC adaptor. Using the unit with a damaged AC adaptor may cause electric shock, short circuits, or fire. Contact an authorized service center for repairs.
Operating safeguards
- To reduce the risk of electric shock, do not disassemble this unit. Refer servicing to an authorized service center when service is required. Opening covers may expose you to dangerous voltages or other risks. Incorrect reassembly can cause electric shock when the unit is subsequently used.
- Do not touch the Monitor or the AC adaptor during an electrical storm. There may be a remote risk of electric shock from lightning.
- Never spill any liquids on the unit or get the unit wet in any way. This may cause fire, electric shock, or injury. If the unit becomes wet, immediately unplug the AC adaptor from the power outlet and refer servicing to an authorized service center.
- Never spill any liquids on the AC adaptor, or get the AC adaptor wet in any way. This may cause fire, electric shock, or injury. If the AC adaptor becomes wet, immediately unplug the AC adaptor from the power outlet and refer servicing to an authorized service center.
- Unplug this unit from power outlets and refer servicing to an authorized service center when the following conditions occur:
– If the AC adaptor is damaged or frayed.
- If the Monitor has been exposed to rain or water, or liquid has been spilled into the unit, do not use a microwave oven to speed up the drying process of any parts of the unit to avoid permanent damage. - If the unit has been dropped or physically damaged.
- Do not place the unit in a microwave oven or other devices such as electromagnetic cookers. This may cause heat or smoke to be generated, fire, or an explosion.
Medical
- Consult the manufacturer of any personal medical devices, such as pacemakers or hearing aids, to determine if they are adequately shielded from external RF (radio frequency) energy. (The unit operates in the frequency range of 1.88 GHz to 1.90 GHz, and the RF transmission power is 250 mW (max.).)
- Do not use the product in health care facilities if any regulations posted in the area instruct you not to do so. Hospitals or health care facilities may be using equipment that could be sensitive to external RF energy.
Installation and relocation
- Make sure to have sure footing when attaching or taking off the unit. Tripping over or falling down may cause injury.
Dry-cell battery
- If the batteries are leaking, do not come into contact with the electrolyte from the batteries or let it get in your eyes. This may cause loss of sight. Should the electrolyte from the batteries get into your eyes, do not rub your eyes. Immediately flush your eyes with clean water and see a doctor for medical treatment as soon as possible.
- In order to prevent the risk of heat generation, fire, an explosion, or leaking liquids, do not: – Charge, heat up, or disassemble batteries, or dispose of batteries in the fire.
- Connect metal objects to batteries' terminals.
- Carry or store the batteries together with rings, bracelets, keys, or similar objects. – Use old and new batteries or batteries of different types together.
- Do not place the batteries within reach of children. There is a risk that children may swallow batteries. If you suspect that a child has swallowed batteries immediately seek consultation with a medical practitioner.
- In order to prevent the risk of heat generation, an explosion, or leaking liquids, immediately remove batteries that cannot be used, remove batteries when not using the unit for extended periods, and do not insert batteries with incorrect polarities.
CAUTION
Installation and relocation
- The AC adaptor is used as the main disconnect device. Ensure that the power outlet is installed near the product and is easily accessible.
- In order to prevent the risk of injury from the unit falling: – Always follow the attachment procedures listed in this manual.
- Make sure that the battery case does not fall when exchanging batteries.
- Do not use excessive force when closing the door.
- Never use the unit in an unstable place or a place that is exposed to strong vibrations.
Dry-cell battery
- Only use specified batteries. Using unspecified batteries may cause leaking fluids, heat generation, or an explosion.
Important safety instructions
When using this unit, basic safety precautions should always be followed to reduce the risk of fire, electric shock, or personal injury.
- Do not use this unit near water. For example, near a bathtub, wash bowl, kitchen sink, or laundry tub, in a wet basement, or near a swimming pool, and the like.
- Use only the AC adaptor indicated in this manual.
- Do not dispose of the batteries in a fire. They may explode. Check with local waste management codes for special disposal instructions.
SAVE THESE INSTRUCTIONS
For best performance
Before using
- It is prohibited to disassemble or modify this unit. Contact the dealer where you purchased this unit for repair.
- When power fails, this unit cannot be used.
- Panasonic may not be liable for damages due to external factors such as power failures.
Location (Wireless Camera/Monitor)
The Wireless Camera (①) and Monitor (②) use radio waves to communicate with each other.
Range 70 m (with no obstructions)

②
- For maximum distance operation, we recommend the following: Placing the Monitor away from electrical appliances such as:
- TVs
- Radios – Personal computers – Air conditioners
- Coverage depends on the local environmental conditions.
Environment
- Keep the unit away from electrical noise generating devices, such as fluorescent lamps and motors.
- The unit should be kept away from excessive smoke, dust, high temperature and vibration.
- The unit should not be exposed to direct sunlight.
- The unit is not waterproof. Do not get the unit wet. Failure to do this may cause malfunction.
- Do not place heavy objects on top of the unit.
- When you leave the unit unused for a long period of time, unplug it from the power outlet. In this situation, we recommend that you turn the power for the Wireless Camera off in order to conserve the batteries' energy.
- The unit should be kept away from heat sources such as heaters, kitchen stoves, etc. It should not be placed in rooms where the temperature is less than 5 °C or greater than 40 °C. Damp basements should also be avoided.
- Even when the Monitor and Wireless Camera are within 70 m, if there are obstructions such as the ones below, problems such as signals becoming weak, distorted images, and slow image refresh rates may occur, causing the Monitor and Wireless Camera to not be able to be used together. (See page 12 for information about the signal display.)
- walls with insulation material that contains aluminum foil – walls made of concrete or galvanized iron
- when each device (Wireless Camera and Monitor) is used on a different floor
– double insulating glass or metallic shutters
- places where several walls are separated by open space
- Operating the product near electrical appliances may cause interference. Move away from the electrical appliances.
Other information
Caution
- Risk of explosion if battery is replaced by an incorrect type. Dispose of used batteries according to the instructions.
Privacy and rights of portrait
When installing or using the Wireless Camera, please take into consideration the rights of others with regard to privacy.
- It is generally said that "Privacy" means the ability of an individual or group to stop information about themselves from becoming known to people other than those whom they choose to give the information. "Rights of portrait" means the right to be safe from having your own image taken and used indiscriminately without consent.
Others
- Panasonic assumes no liability for injuries or property damage resulting from failures arising out of improper installation or operation inconsistent with the Operating Instructions.
- If you stop using the Wireless Camera, remove the Wireless Camera from the door to prevent it from falling off.
- Red color indication of LED on this product is not related to the safety.
Requesting repairs for the unit
- During repairs the unit's settings may be changed or returned to the default settings.
Note for product disposal, transfer, or return
- Perform "RESET SETTINGS" with the Monitor before you dispose of, transfer, or return the product.
Location of controls
Wireless Camera

- Bottom view

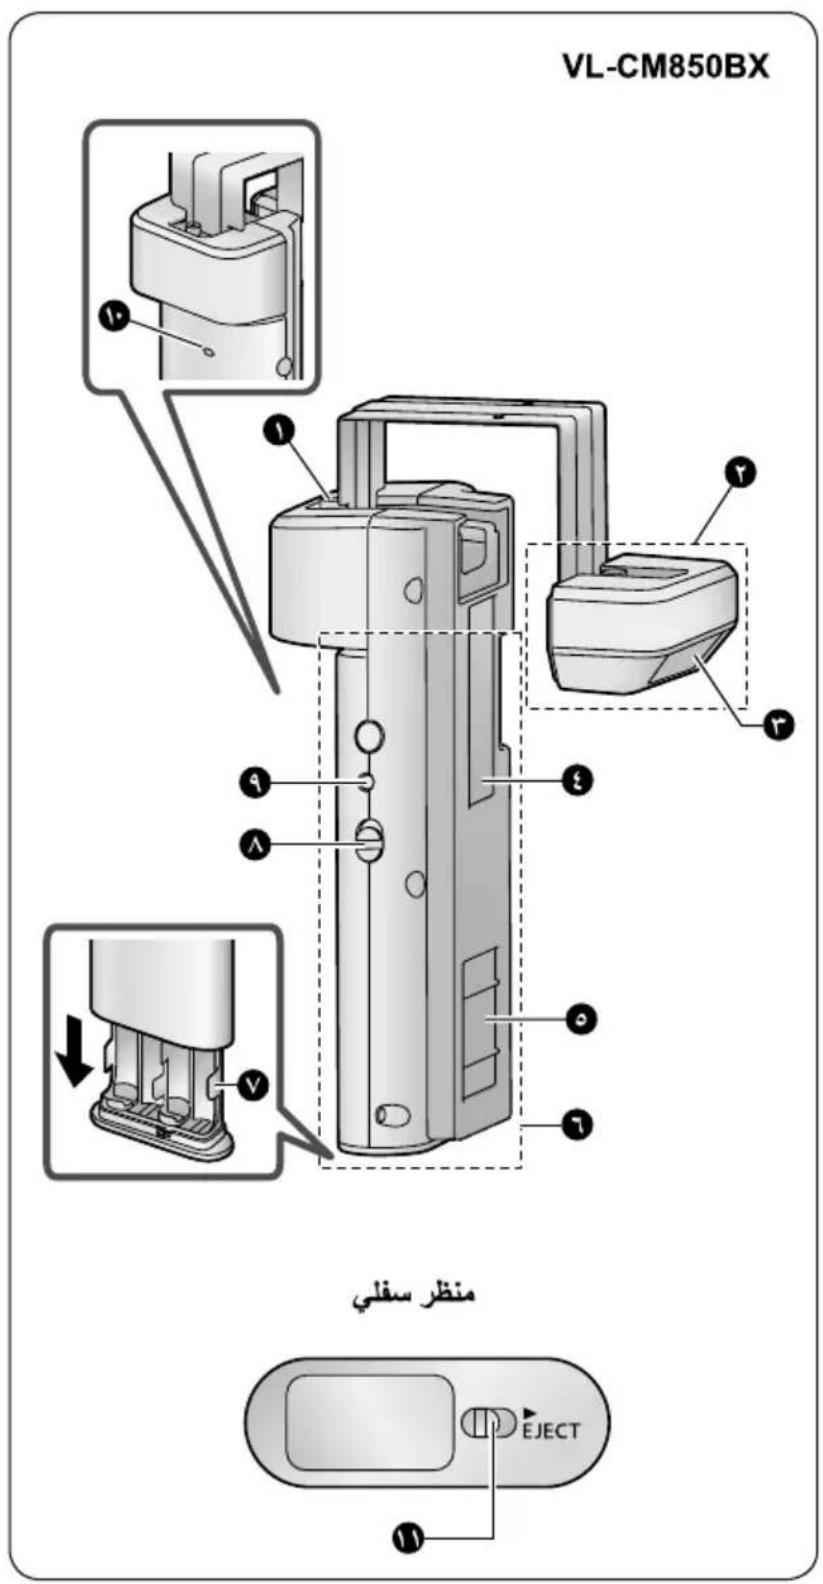
① Fixing screw ② Camera unit ③ Camera lens ④ Cable protection sheet
- Do not remove this sheet.
5 Magnet/rubber - The magnet and rubber are used to stop the Wireless Camera from moving. 6 Wireless unit ⑦ Battery case 8 Power switch (ON/OFF)
- Set the power switch to OFF to conserve battery power during the following situations: - When the Monitor is disconnected from the power source for an extended period of time. - During electrical power failures.
⑨ Pair button (Not normally used.)
- Used after the Monitor and/or Wireless Camera are replaced or serviced (page 20).
10 Pair indicator
- Flashes/lights when pairing (not normally performed).
- When you turn the Wireless Camera's power ON, you can check the pair indicator to ensure the power is on (page 16).
⑪ Slide lever
- Use the slide lever when removing the battery case.
Monitor
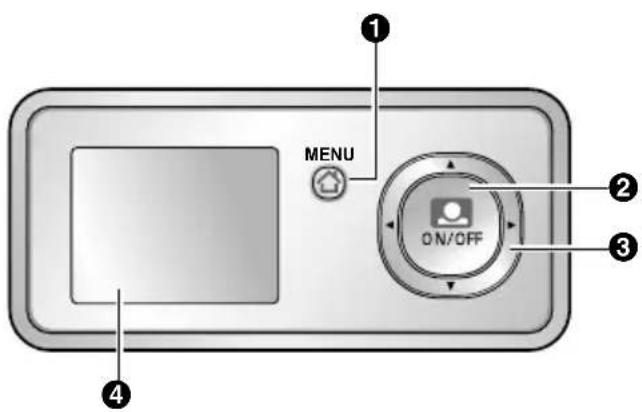
- Bottom view

① Menu button
② Monitor button
• Used to monitor the area outside the door (page 13). - Used to perform operations shown in the operation assistance.
③ Navigator key
Used to select items or perform operations shown in the operation assistance.
 | 【▲】/【▼】 | Press【▲】(up) or【▼】(down). |
 | 【◀】/【▶】 | Press【◀】(left) or【▶】(right). |
4 Monitor display
⑤ AC adaptor
6 Relay box
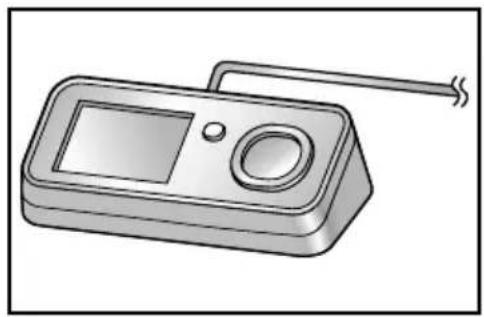
Cradle
Use the Cradle to hold the Monitor.
- Pass the cord through the groove in the Cradle.

- When the Monitor is placed on the Cradle.
Monitor display
- The following display is an example for description purposes, and it may differ from the actual display.
- To display the top menu when it is off (not displayed), press [MENU].
Top menu When displaying images
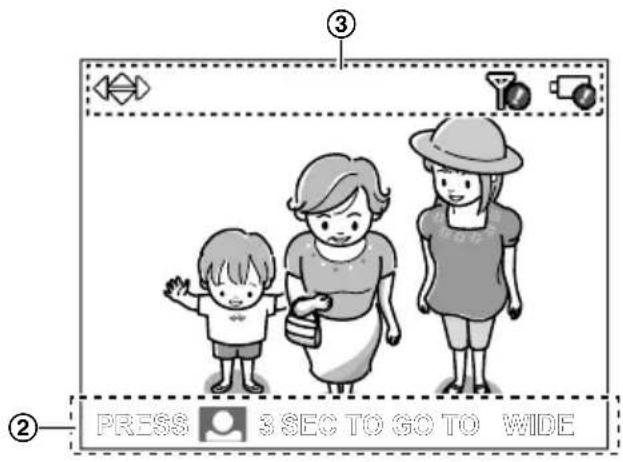
① Displays the menu names for items that can be operated.
"SIGNAL/BATT": Use this menu to display the status of the wireless signal and batteries (page 12).
"ALL SETTINGS": Use this menu to change settings (page 15).
② Operation assistance
Displays what actions the buttons can be used for and assistance for operations.
- The operation assistance can be configured not to be displayed when monitoring (page 15).
③ Displays the current status with symbols.
 | Appears during Zoom mode (page 13).The displayed arrows indicate which direction the Zoom position can be moved while in Zoom mode. |
 | Displayed when the signal between the Monitor and Wireless Camera is weak. |

Displayed when the battery life of the Wireless Camera is low.
Signal/battery status
To view the signal and remaining battery power of the Wireless Camera:
1 Press [MENU], then select "SIGNAL/BATT" by pressing [◀] or [▶]. 2 Press the Monitor button (OK). 3 Press [▶] (renew) to display the latest signal status and remaining battery power information. 4 To finish the operation, press [MENU] 2 times.
Note:
- The [MENU] button will light in red to inform you when the signal is weak or if the remaining battery power is running low. If the [MENU] button is pressed at this time, the light goes out and the signal/battery status screen is displayed. Take the appropriate action, such as exchanging the batteries, after checking the information displayed.
Signal status symbols
Strong Weak Out of range


*1 Use within this range.
Note:
- When the Wireless Camera is out of range, move the Monitor to an area with a stronger signal.
Remaining battery power symbols
Full Low Out of power


*1 Use within this range.
Note:
- When the batteries of the Wireless Camera run out of power, replace them with new batteries (page 16).
- When the Wireless Camera is out of range, the remaining battery power symbol of the Wireless Camera is not displayed on the Monitor.
Monitoring the outside
You can monitor the outside images taken by the Wireless Camera.
You can perform the following operations during monitoring:
- Switching between Wide/Zoom (page 13)
- Adjusting brightness (display) (page 13)

1 Press [icon] (Monitor button).
- The outside image will be shown on the display.
2 To end operations, press [icon] (Monitor button).
Note:
- Monitoring lasts for about 20 seconds after [icon] (Monitor button) is pressed. However, if operations are performed during monitoring, monitoring can be extended to a maximum of 3 minutes.
- At night or at other times when the area around the Wireless Camera becomes dark, the following occur:
– The image quality is reduced.
- Images are automatically brightened to make it easier to see the face of the other party. Although images may appear to be washed out, this is not a malfunction.
Adjusting brightness (display)
1 Press [MENU] while monitoring. 2 Press (◀) or (▶) to adjust the brightness.
Manipulating displayed images with Wide/Zoom and Pan/Tilt
During monitoring, the display can be temporarily switched between Wide/Zoom, and the Zoom position can be changed with Pan/Tilt operations.
Wide display (default setting)
Zoom display
1 Press and hold [icon] (Monitor button) for about 3 seconds when in the Wide display.
- The display is switched to the Zoom display.
- To switch back to the Wide display, press and hold [O] (Monitor button) for about 3 seconds again.
2 To change the Zoom position with Pan/Tilt, press arrow keys ([▲], [▼], [◀], or [▶]) when in Zoom mode.
- The Zoom position changes each time [▲], [▼], [◀], or [▶] is pressed.
- The Zoom position can be moved in the direction of the symbols shown on the screen.
- The Zoom position changes each time [▲], [▼], [◀], or [▶] is pressed. - The Zoom position can be moved in the direction of the symbols shown on the screen.

Note:
- Performing the above operations only temporarily switches between Wide/Zoom displays. Therefore, images will be displayed according to the default settings the next time images are monitored. To change the default settings, change "WIDE/ZOOM SETTINGS" (page 15).
- When the Zoom position is changed, it is retained and used the next time images are monitored.
Programming function settings
You can change the function settings to suit your needs.
How to change the function settings
1 Press [MENU], then select the "ALL SETTINGS" by pressing [◀] or [▶]. 2 Press [ ] (Monitor button) ("OK"), then select the desired item by pressing [▲] or [▼]. 3 Press [ ] (Monitor button) ("OK"). 4 Press [▲] or [▼] to select the desired function, then press [○] (Monitor button) ("OK"). - This step may not be necessary depending on the feature being programmed. 5 Press [▲] or [▼] to select the desired setting, then press [○] (Monitor button) ("OK"). 6 To finish the operation, press [MENU] 2 times.
Note:
- When no operation is performed for about 60 seconds during settings, the setting function quits.
Function list
In the following list, < > indicates the default settings.
| Item Function Setting | ||
| START-UP SETTINGS | PREVENT MOTTLED COLOR | / POWER FREQUENCY (50Hz) / POWER FREQUENCY (60Hz)To prevent mottled or uneven color from being displayed, set the power frequency to match the area in which you use the unit. |
| SELECT LANGUAGE | / FRANÇAIS / ESPAÑOL / العربية | |
| DISPLAY SETTINGS | WIDE/ZOOM SETTINGS | / ZOOM MODESelect how images are initially displayed: Wide or Zoom |
| CONTRAST | When it is difficult to see the monitor display, you can adjust the display contrast. 5 levels are available. | |
| OPERATION ASSISTANCE | / NOSelect NO if you do not want the operation assistance (page 11) to be displayed when viewing Wireless Camera images. | |
| BATTERY SAVE MODE | - | / ONSelect ON to lengthen the time that the batteries can be used for. However, by selecting ON, the time it takes to display images when monitoring may increase. |
| RESET SETTINGS | - | YES / NOIf YES is selected, the Monitor settings are reset.- A reset cannot be performed when the Wireless Camera is out of range. Only perform a reset when the Wireless Camera is within signal range. |
Replacing batteries
When the batteries of the Wireless Camera run out of power ( ), replace them with new batteries.
• ONLY USE LR6 Alkaline batteries. - Batteries have a shelf-life. Check the shelf-life listed on the batteries before using them. - Make sure to close the door and turn off the power of the Wireless Camera before replacing the batteries to prevent the Wireless Camera from falling down.
1 Move the slide lever (①) to the right and remove the battery case (②) from the wireless unit.
- Be careful not to drop the battery case.

2 Insert the batteries into the battery case.
• 4 LR6 Alkaline batteries - Do not mix new and used batteries, or different types of batteries. - Make sure that the polarity , of the batteries is correct.

3 Insert the battery case into the wireless unit.
- Firmly push the battery case upward until it locks in place.

4 Slide the power switch (③) to ON.
- You can check if the power is actually on by confirming that the pair indicator (4) changes from flashing to not lit.
Cleaning
- Clean the unit with a soft, dry cloth. For excessive dirt, wipe the unit with a slightly damp cloth.
- When cleaning the surface of the Monitor, gently wipe the screen with a soft cloth (such as one used for cleaning glasses) to prevent damaging the screen.


- Before cleaning the Monitor and its electrical contacts, make sure to unplug the AC adaptor from the power outlet.
Important:
- Do not use anything containing alcohol, polish powder, powder soap, benzine, thinner, wax, petroleum, or boiling water. Also do not spray with insecticide, glass cleaner, or hair spray. This could cause a change in color or quality.
Troubleshooting
Display issues
| Problem Cause & Solution Page | ||
| Images appear slightly distorted. | This is a characteristic of camera lenses and is not a malfunction. | - |
| The image of a person's face is dark. | When a backlight is present at the Wireless Camera location, the person's face can become dark.- Adjust the brightness of the display while monitoring. | 13 |
| The image is not clear or is blurry. | There is either dirt or water condensation on the lens surface of the camera.- Clean the dirty surface with a soft dry cloth or allow time for condensation to evaporate. | 17 |
| The image of the subject is washed out when it is dark. | Image brightness automatically adjusts to make a person's face easier to see when it is dark. This is not a malfunction. | - |
| The image is white or black. | The brightness of the display is not properly adjusted. Adjust the brightness while monitoring. | 13 |
| The image is white, or white lines or circles are shown on the display. | Strong light such as sunlight is shining into the lens of the Wireless Camera. Though this may cause the display image to become difficult to see, this is not a malfunction.- Locate the Wireless Camera away from direct sunlight. | - |
| The image is flickering. | The PREVENT MOTTLED COLOR setting does not match the power frequency for the region that you are using the unit in.- Matching the power frequency for the region that you are using the unit in can improve the quality of the colors displayed. When using the unit in a different region (after moving, etc.), match the settings to that region.AC (alternating current) lights such as fluorescent lights may cause flickering. This is not a malfunction. | 15- |
| The image displayed on the Monitor distorts or is displayed slowly. (It takes about 5 seconds or more to be displayed.) | There is either a wall or obstruction, or a large distance present between the Monitor and Wireless Camera.- Move the Monitor to a location that is either closer or without obstructions. | 7 |
Monitor
| Problem Cause & Solution Page | ||
| The Monitor is warm. ● T | his is normal.- If it feels very hot, unplug the AC adaptor from the power outlet, then contact an authorized service center. | - |
Others
| Problem Cause & Solution Page | ||
| The Wireless Camera's batteries run out of power quickly. | ● The Wireless Camera is out of range of the Monitor. - When the Wireless Camera is out of range of the Monitor, it repeatedly searches for the Monitor which causes the batteries' power to be consumed faster. Move the Monitor so that it is within range of the Wireless Camera. ● The AC adaptor is unplugged from the power outlet. - When the Monitor is disconnected from the power outlet it causes the Wireless Camera to lose its link with the Monitor. This causes the Wireless Camera to repeatedly search for the Monitor which results in the batteries' power being consumed faster. When unplugging the AC adaptor of the Monitor, turn the power switch of the Wireless Camera to OFF. ● You are using rechargeable batteries. - Depending on the capacity of the rechargeable batteries, their life span may become shorter. This is not a malfunction. | 12 - - |
| There is a power failure. ● | T he unit does not work during a power failure. - | |
| The unit does not work properly. | ● Perform the following operations.Wireless Camera:Replace the batteries.Monitor:Disconnect the Monitor from the power outlet and then reconnect it after waiting for about 10 seconds.- Program settings are not affected. | 16 - |
| The wrong language was selected by mistake. | ● To change the selected language, perform the following operations:- Press [MENU] → [▶] → [○] (Monitor button) → [○] → [▼] → [○] → select the desired language → [○]. | - |
Error messages
| Message Cause & Solution Page | ||
| CANNOT CONNECT TO CAMERA | The following may be causing the problem.The Wireless Camera is turned off.- Turn the Wireless Camera on.The batteries of the Wireless Camera have run out of power.- Replace the batteries.The Wireless Camera is turned on, but the Wireless Camera is out of range from the Monitor.- Move the Monitor to a location closer or without obstructions. (When the Wireless Camera is in range of the Monitor it can connect to the Monitor.)- Then, turn the power for the Wireless Camera off then on. (When the Wireless Camera is in range of the Monitor it can connect to the Monitor.)- When using a replacement Wireless Camera (while your original Wireless Camera is being serviced), the replacement Wireless Camera must be paired to the Monitor. Refer to the instructions below for pairing the Wireless Camera.■ How to pair Wireless CamerasPerform the following operations on the Monitor, then, perform the operations on the Wireless Camera within 2 minutes.Monitor operations:1 Press [MENU], [▲], and [○] (Monitor button) at the same time. (Enters CAMERA PAIRING MODE.)2 Press [○] (Monitor button).Wireless Camera operations:3 Insert the batteries (page 16).4 Turn the power for the Wireless Camera on while pressing the pair button with a pointed object (keep pressing the pair button until the pair indicator starts flashing).● The pair indicator starts flashing quickly.- The pair indicator changes in the following manner when pairing is successfully completed:flash quickly → light for about 10 seconds → go out-Pairing must be performed again if the pair indicator changes in the following manner:flash quickly → go out | 91679 |
Specifications
Monitor (VL-DM100BX)
■ Power supply:
AC adaptor (PNLV232BX) (100-240 V AC, 50/60 Hz)
■ Power consumption:
Standby: approx. 1 W
Operation: approx. 2 W
■ Dimensions (Height × Width × Depth):
Monitor section*1: approx. 16.5 mm × 126 mm × 59 mm (excluding protruding sections)
Relay box: approx. 46.5 mm × 46.5 mm × 25 mm (excluding protruding sections)
*1 Monitor section with the Cradle: approx. 47 mm × 131 mm × 78 mm (excluding protruding sections)
■ Weight:
Approx. 160 g (including the Cradle)
■ Operating temperature:
0 °C to 40 °C
■ Operating humidity:
Up to 90 % RH (Relative Humidity) non condensing
■ Display:
2.2" color TFT LCD monitor
■ Wireless transmission method:
1.9 GHz TDMA-WB
■ Transmission frequency:
1881.792 MHz - 1897.344 MHz
■ Transmitting range:
Approx. 70 m (line-of-sight distance)
Wireless Camera (VL-CM850BX)
■ Power supply:
LR6 Alkaline battery × 4
Battery save mode ON: approx. 6 months
Battery save mode OFF (default): approx. 4 months
*1 When used 5 times a day (displaying images for about 20 seconds each time) with a temperature of 20°C.
*2 When using Panasonic brand LR6 Alkaline batteries.
■ Dimensions (Height × Width × Depth):
Wireless unit: approx. 190 mm × 78 mm × 58 mm (excluding protruding sections)
Camera unit: approx. 37 mm × 87.5 mm × 40 mm (excluding protruding sections)
■ Weight:
Approx. 390 g (excluding batteries)
■ Operating temperature:
Wireless unit (indoor use): 0 °C to 40 °C
Camera unit (outdoor use): -10 °C to 50 °C
Operating humidity:
Up to 90% RH (Relative Humidity) non-condensing
Installation method:
Attached to a door
Wireless transmission method:
1.9 GHz TDMA-WB
Minimum illuminance:
3 lx
Water resistant properties:
IPx3 equivalent (Camera unit) 1
*1 IPx3 specifies protection against directly sprayed water from a vertical direction to 60° on both sides.
Viewing angle:
Horizontal: approx. 120°
Vertical: approx. 90°
■ Transmission frequency:
1881.792 MHz - 1897.344 MHz
■ Transmitting range:
Approx. 70 m (line-of-sight distance)
Quick Reference Guide (in Chinese)
Quick Reference Guide
Control locations
VL-CM850BX
Bottom view
Basic operations
Quick Reference Guide (in Arabic)
Quick Reference Guide
Control key locations
A A C adaptor: 10 Adjusting the display brightness: 13
B Batteries (Alkaline batteries): 16 Battery case: 9, 16
C Camera lens: 9 Camera unit: 9 Cleaning: 17 Contrast: 15 Cradle: 11
L Language: 15, 19
M Menu button: 10 When lit in red: 12 Monitor display: 10, 11 Monitoring (the outside): 13 Adjusting the display brightness: 13 Switching between Wide/Zoom view: 13 Switching Zoom position (Pan/Tilt): 14
N Navigator key: 10
Operation assistance: 11, 15
P Pair button: 9, 20 Pair indicator: 9, 16, 20 Pan/Tilt (switching Zoom position): 14 Power switch: 9, 16
Q Quick Reference Guide (in Arabic): 28 Quick Reference Guide (in Chinese): 23
R Relay box: 10 Remaining battery power (Alkaline batteries): 11, 12 Resetting function settings: 15
S Signal status display (Wireless Camera): 11, 12 Slide lever: 10, 16 Specifications: 21 Switching between Wide/Zoom view Changing the display settings: 15 Switching while monitoring: 13 Symbols: 11, 12
W Wide display: 13 Wireless unit: 9
Z Zoom display: 13
For your future reference
Date of purchase
Serial number (found on the bottom of the Monitor)
Dealer's name and address
Dealer's telephone number
Attach your sales receipt here.
Panasonic System Networks Co., Ltd.
1-62, 4-chome, Minoshima, Hakata-ku, Fukuoka 812-8531, Japan
Web site: http://www.panasonic.net/
© Panasonic System Networks Co., Ltd. 2012
- OPERATING INSTRUCTIONS
- INTRODUCTION
- IMPORTANT INFORMATION
- GETTING STARTED
- HOW TO USE
- USEFUL INFORMATION
- HELP
- GENERAL INFORMATION
- QUICK REFERENCE GUIDE
- INDEX
- PRODUCT DESCRIPTIONS
- ACCESSORY INFORMATION
- SUPPLIED ACCESSORIES
- NOTE
- LICENSE
- TRADEMARKS
- FOR YOUR SAFETY
- WARNING
- POWER CONNECTION
- INSTALLATION
- OPERATING SAFEGUARDS
- MEDICAL
- INSTALLATION AND RELOCATION
- DRY-CELL BATTERY
- CAUTION
- IMPORTANT SAFETY INSTRUCTIONS
- SAVE THESE INSTRUCTIONS
- FOR BEST PERFORMANCE
- BEFORE USING
- LOCATION (WIRELESS CAMERA/MONITOR)
- ENVIRONMENT
- OTHER INFORMATION
- PRIVACY AND RIGHTS OF PORTRAIT
- OTHERS
- REQUESTING REPAIRS FOR THE UNIT
- NOTE FOR PRODUCT DISPOSAL, TRANSFER, OR RETURN
- LOCATION OF CONTROLS
- WIRELESS CAMERA
- ⑪ SLIDE LEVER
- MONITOR
- BOTTOM VIEW
- ① MENU BUTTON
- ② MONITOR BUTTON
- ③ NAVIGATOR KEY
- MONITOR DISPLAY
- ⑤ AC ADAPTOR
- RELAY BOX
- CRADLE
- SIGNAL/BATTERY STATUS
- SIGNAL STATUS SYMBOLS
- REMAINING BATTERY POWER SYMBOLS
- MONITORING THE OUTSIDE
- ADJUSTING BRIGHTNESS (DISPLAY)
- MANIPULATING DISPLAYED IMAGES WITH WIDE/ZOOM AND PAN/TILT
- PROGRAMMING FUNCTION SETTINGS
- HOW TO CHANGE THE FUNCTION SETTINGS
- FUNCTION LIST
- REPLACING BATTERIES
- CLEANING
- IMPORTANT
- TROUBLESHOOTING
- SPECIFICATIONS
- MONITOR (VL-DM100BX)
- POWER SUPPLY
- POWER CONSUMPTION
- DIMENSIONS (HEIGHT × WIDTH × DEPTH)
- WEIGHT
- OPERATING TEMPERATURE
- OPERATING HUMIDITY
- DISPLAY
- WIRELESS TRANSMISSION METHOD
- TRANSMISSION FREQUENCY
- TRANSMITTING RANGE
- WIRELESS CAMERA (VL-CM850BX)
- QUICK REFERENCE GUIDE (IN CHINESE)
- CONTROL LOCATIONS
- BASIC OPERATIONS
- QUICK REFERENCE GUIDE (IN ARABIC)
- FOR YOUR FUTURE REFERENCE
- ATTACH YOUR SALES RECEIPT HERE
Brand : PANASONIC
Model : VL-SDM100BX
Category : Video Intercom