
ER-GP22 - Electric mower PANASONIC - Free user manual and instructions
Find the device manual for free ER-GP22 PANASONIC in PDF.
| Product Type | Professional Electric Hair Clipper |
| Brand | Panasonic |
| Model | ER-GP22 |
| Intended Use | Professional Hair Cutting |
| Power Supply | AC Adapter (RE9-77) and built-in rechargeable Ni-MH battery |
| Motor Voltage | 1.2 V --- |
| Charging Time | Approximately 8 hours |
| Operating Time | Approximately 40 minutes of continuous use |
| Blades | Standard blade and styling blade (ER-GP22) |
| Included Accessories | 3mm comb, 6mm comb, cleaning brush, oil, storage stand |
| Maintenance | Clean after each use with brush, oil before and after use |
| Safety | Do not use in wet environment, do not immerse in water, unplug before cleaning |
| Replacement Parts | Blade WER9352, styling blade WER-9P10 |
| Recommended Charging Temperature | 0 °C to 35 °C |
Frequently Asked Questions - ER-GP22 PANASONIC
User questions about ER-GP22 PANASONIC
0 question about this device. Answer the ones you know or ask your own.
Ask a new question about this device
Download the instructions for your Electric mower in PDF format for free! Find your manual ER-GP22 - PANASONIC and take your electronic device back in hand. On this page are published all the documents necessary for the use of your device. ER-GP22 by PANASONIC.
USER MANUAL ER-GP22 PANASONIC
Operating Instructions
Rechargeable Professional Hair Clipper
Model No. ER-GP21/ER-GP22
natural_image
Illustration of a hair styling tool with a clip and handle (no text or symbols)| English | 3 | Dansk | 77 | Česky | 149 |
| Deutsch | 17 | Português | 89 | Slovensky | 161 |
| Français | 29 | Norsk | 101 | Magyar | 173 |
| Italiano | 41 | Svenska | 113 | Română | 185 |
| Nederlands | 53 | Suomi | 125 | ||
| Español | 65 | Polski | 137 |
Panasonic
Operating Instructions
Rechargeable Professional Hair Clipper
Model No. ER-GP21/ER-GP22
Contents
Safety precautions......6
Intended use 9
Parts identification ......9
Charging the clipper....10
Using the clipper ...... 10
Care....11
Troubleshooting 13
Removing the built-in rechargeable battery....13
Specifications 14
Caution for AC Mains Lead......14
Warning
- This appliance can be used by children aged from 8 years and above and persons with reduced physical, sensory or mental capabilities or lack of experience and knowledge if they have been given supervision or instruction concerning use of the appliance in a safe way and understand the hazards involved. Children shall not play with the appliance. Cleaning and user maintenance shall not be made by children without supervision.
- If the supply cord is damaged, it must be replaced by the manufacturer, its service agent or similarly qualified persons in order to avoid a hazard.
- Do not use anything other than the supplied AC adaptor.
- Keep the appliance dry.
- The following symbol indicates that a specific detachable power supply unit is required for connecting the electrical appliance to the supply mains. The type reference of power supply unit is marked near the symbol.

Safety precautions
To reduce the risk of injury, loss of life, electric shock, fire, and damage to property, always observe the following safety precautions.
Explanation of symbols
The following symbols are used to classify and describe the level of hazard, injury, and property damage caused when the denotation is disregarded and improper use is performed.

DANGER
Denotes a potential hazard that will result in serious injury or death.

WARNING
Denotes a potential hazard that could result in serious injury or death.

CAUTION
Denotes a hazard that could result in minor injury or property damage.
The following symbols are used to classify and describe the type of instructions to be observed.

This symbol is used to alert users to a specific operating procedure that must not be performed.

This symbol is used to alert users to a specific operating procedure that must be followed in order to operate the unit safely.

WARNING
▶ Power supply

Do not connect or disconnect the power plug to a household outlet with a wet hand.
- Doing so may cause electric shock or injury.
Do not immerse appliance and AC adaptor in water or wash it with water.
Do not place the appliance and AC adaptor over or near water filled sink or bathtub.
Never use the appliance if the AC adaptor is

damaged or if the power plug fits loosely in a household outlet.
Do not damage or modify, or forcefully bend, pull, or twist the cord.
Also, do not place anything heavy on or pinch the cord.
- Doing so may cause electric shock or fire due to a short circuit.

Do not use in a way exceeding the rating of the household outlet or the wiring.
- Exceeding the rating by connecting too many plugs to one household outlet may cause fire due to overheating.

Always ensure the appliance is operated on an electric power source matched to the rated voltage indicated on the AC adaptor.
Fully insert the power plug.
- Failure to do so may cause fire or electric shock.

Always unplug the power plug from a household outlet when cleaning.
- Failure to do so may cause electric shock or injury.

WARNING

Regularly clean the power plug and the charging plug to prevent dust from accumulating.
- Failure to do so may cause fire due to insulation failure caused by humidity. Disconnect the power plug and wipe with a dry cloth.
▶ In case of an abnormality or malfunction
Immediately stop using and remove the power plug if there is an abnormality or malfunction.
- Failure to do so may cause fire, electric shock, or injury.
- The main unit or AC adaptor is deformed or abnormally hot.
- The main unit or AC adaptor smells of burning.
- There is abnormal sound during use or charging of the main unit or AC adaptor.
- Immediately request inspection or repair at an authorized service centre.

▶ This product

This product has a built-in rechargeable battery. Do not throw into flame or heat.
- Doing so may cause fluid leak, overheating, or explosion.

Do not modify or repair.
- Doing so may cause fire, electric shock, or injury. Contact an authorized service centre for repair (battery change, etc.).

Never disassemble except when disposing of the product.
- Doing so may cause fire, electric shock, or injury.
▶ Preventing accidents

Do not store within the reach of children or infants. Do not let them use it.
- Putting the blade, and/or oil container in the mouth may cause accidents and injury.

If the oil is consumed accidentally, do not induce vomiting, drink a large amount of water, and contact a physician.
If the oil comes into contact with eyes, immediately wash thoroughly with running water, and contact a physician.
- Failure to do so may result in physical problems.

CAUTION
▶ Protecting the skin
Do not press the blade against the skin.
Do not use the clipper for any purpose other than hair trimming.

Do not directly apply the blades on ears or rough skin (such as swellings, injuries or blemishes).
- Doing so may cause injury to ears or uneven skin.

Check that the blades are not damaged or deformed before use.
- Failure to do so may cause skin injury.

CAUTION
▶ Note the following precautions

Do not allow metal objects or trash to adhere to the power plug or the charging plug.
- Doing so may cause electric shock or fire due to a short circuit.

Do not drop or subject to shock.
- Doing so may cause injury.

Do not wrap the cord around the AC adaptor when storing.
- Doing so may cause the wire in the cord to break with the load, and may cause fire due to short circuit.

Disconnect the power plug from the household outlet when not using.
- Failure to do so may cause electric shock or fire due to electrical leakage resulting from insulation deterioration.

Disconnect the power plug by holding onto the power plug instead of the cord.
- Failure to do so may cause electric shock or injury.
▶ Disposal of the rechargeable battery

DANGER
The rechargeable battery is exclusively for use with this clipper. Do not use the battery with other products.
Do not charge the battery after it has been removed from the product.

- Do not throw into fire or apply heat.
- Do not solder, disassemble, or modify the battery.
- Do not let the positive and negative terminals of the battery get in contact with each other through metallic objects.
- Do not carry or store the battery together with metallic jewellery such as necklaces and hairpins.
- Never peel off the tube.
- Doing so may cause fluid leak, overheating, or explosion.

WARNING

After removing the rechargeable battery, do not keep it within reach of children and infants.
- The battery will harm the body if accidentally swallowed. If this happens, consult a physician immediately.

WARNING
If the battery fluid leaks out, take the following procedures. Do not touch the battery with your bare hands.

- The battery fluid may cause blindness if it comes in contact with your eyes.
Do not rub your eyes. Wash immediately with clean water and consult a physician.
- The battery fluid may cause inflammation or injury if it comes in contact with the skin or clothes.
Wash it off thoroughly with clean water and consult a physician.
Intended use
- This clipper is designed for professional use to trim hair. It can be operated on rechargeable battery.
- Before and after each use, apply oil at the marked places. (See page 12.)
Failure to apply the oil may cause the following problems.
- The clipper has become blunt.
- Shorter operating time.
- Louder sound.
- Do not use thinner, benzine, alcohol or other chemicals. Doing so may cause failure, cracking or discoloration of the main body.
Clean the main body only with a soft cloth slightly dampened with tap water or soapy tap water.
- You should not allow permanent wave lotion, hair dyeing or hair spray to come into contact with the main body or the blades.
Doing so may result in cracking or corrosion. - Before using an attachment, check that it has been installed correctly. Failure to do so may cause hair to be cut too short.
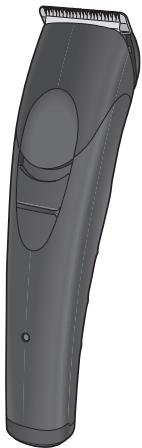
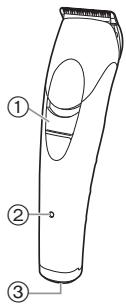
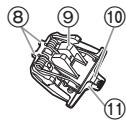
Parts identification
A
B

©
D

E

F

G

H

A Main body
① Power switch [O/I]
② Charge indicator lamp (→)
③ Appliance socket
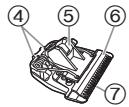
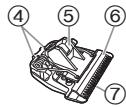
B Blade
④ Mounting hook
⑤ Cleaning lever
⑥ Moving blade
⑦ Stationary blade
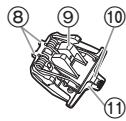
© Design blade ER-GP22
⑧ Mounting hook
⑨ Cleaning lever
⑩ Moving blade
⑪ Stationary blade
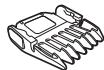
D 3 mm comb attachment
E 6 mm comb attachment
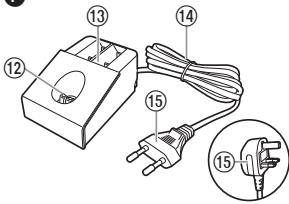
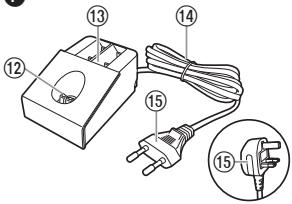
F AC adaptor (RE9-77) (The shape of the power plug differs depending on the area.)
⑫ Charging plug
⑬ Comb attachment shelves
⑭ Cord
⑮ Power plug
Accessories
G Cleaning brush
H Oil
Charging the clipper
- Make sure that the clipper is turned off.
1 Place the clipper on the AC adaptor.
2 Insert the power plug into a household outlet.
- Charging is completed after approx. 8 hours.
- Check the charge indicator lamp (→) glows.
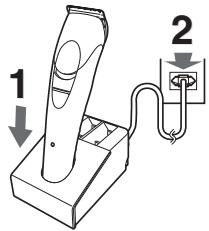
3 Disconnect the power plug after charging is completed.
(for safety and to reduce energy usage)
- The charge indicator lamp (→) continues to glow after charging is complete. There is no indication to show that “charging is complete”.
Notes
- If there is crackling noise on radios or other devices while charging, charge the clipper using a different household outlet.
- When the appliance is not used for 6 months or more, the battery will weaken (leak battery fluid, etc.). Fully charge the battery once every 6 months.
- When charging the clipper for the first time or when it has not been in use for more than 6 months, the lamp on the main body may not glow for a few minutes, or the operating time may shorten. Please charge it for more than 16 hours in such cases.
- Recommended ambient temperature for charging is 0 – 35 °C. Battery performance may decrease outside of the recommended temperature.
- 1 full charge will provide approximately 40 minutes of continuous operation.
- You can charge the battery before it is completely discharged. However, it is recommended to charge when the battery is completely discharged. The battery life depends strongly on factors such as how it is used and stored.
Using the clipper
- Make sure that the clipper is turned off.
- The appliance may not operate in an ambient temperature approximately 0 °C or lower.
1 Select the trimming heights indicated on the insides and sides of the attachments.
2 Slide the power switch on the main body to the “|” position to turn on the clipper.
Removing and mounting the comb attachments
Mounting the attachment
(Example: in the case of 3 mm) Slide the attachment until it clicks.
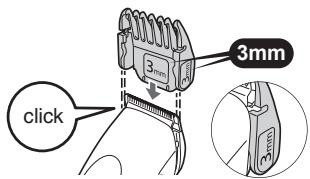
Removing the attachment
Remove the attachment by pressing with your thumb.
natural_image
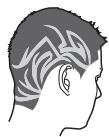
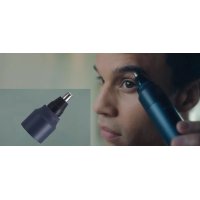
Illustration of a hand performing a finger manipulation or massage technique (no text or symbols present)▶ Using the design blade ER-GP22
The design blade enables to produce the illustrated hair design.
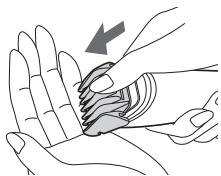
Care
Removing and mounting the blade
- Make sure that the clipper is turned off.
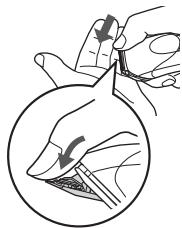
Removing the blade
Hold the clipper with the switch facing upward and push the blade with your thumb while catching the blade in your other hand.
natural_image
Illustration of a hand holding a tool with arrows indicating motion, showing a circular view of a finger and a knife (no text or symbols)Mounting the blade
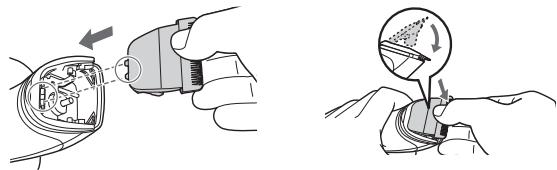
Fit the mounting hook into the blade mounting on the clipper and push in until it clicks.
natural_image
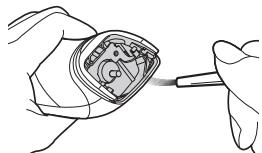
Illustration showing two hands performing a tool manipulation operation: one with a tool inserted into a device, the other with a tool moving a circular arrow (no text or symbols present)Cleaning
- Clean the clipper and the blade after each use. (If not cleaned, the motion will become poor and the sharpness will worsen.)
-
Make sure that the clipper is turned off.
-
Brush off any hairs from the clipper and from around the blade.
- Brush off the hairs from the blade edge.
- Brush the hairs out from between the stationary blade and the moving blade while pressing down on the cleaning lever (a) to raise the moving blade.
natural_image
Line drawing of hands holding a small electronic component with a tool, no text or symbols present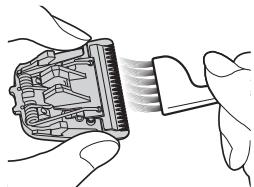
natural_image
Illustration of hands inserting a component into a device (no text or symbols visible)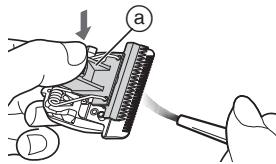
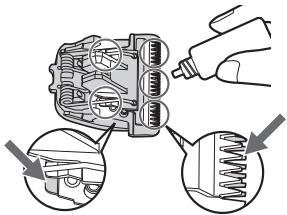
Lubrication
- Apply the oil to the clipper before and after each use.
Apply a drop of the oil to each indicated point.
Attach the blade to the main body, turn on the power and allow to run for approximately 5 seconds.
Failure to apply the oil may cause the following problems due to rust, wear or burn out.
- The clipper has become blunt.
- Shorter operating time.
- Louder sound.
Lubricating the design blade
ER-GP22
Lubricate the design blade as illustrated.

▶ Replacement parts
Replacement part is available at your dealer or Service Centre
| Replacement parts for ER-GP21/ER-GP22 | Blade | WER9352 |
| Design blade | WER-9P10 |
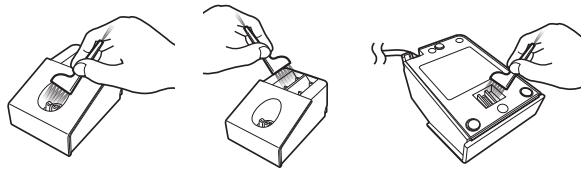
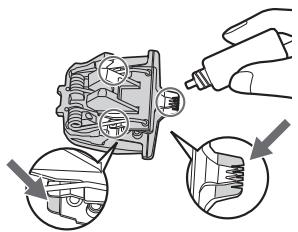
Cleaning the AC adaptor
Use the cleaning brush to clean hair trimmings and dust in the charging plug, the comb attachment shelves or in the hole on the bottom surface.
natural_image
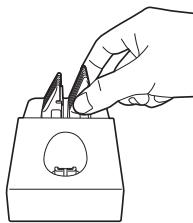
Three-step line drawings showing hands using a tool to adjust a battery and switch (no text or symbols present)Storing comb attachments
You can store your comb attachments in the comb attachment shelves.
natural_image
Line drawing of a hand using tweezers to cut a component into a container (no text or symbols)Troubleshooting
Problem
The clipper has become blunt.
Operating time is short.
Clipper stopped functioning.
The clipper cannot be charged.
Makes a loud sound.
Action
Until problems are solved, please follow each procedure as follows;
- Charge the clipper. (See page 10.)
- Clean the blade and apply oil. (See pages 11 and 12.)
- Replace the blade. (See page 11.)
- Have the battery replaced by an authorized service centre.
▶ Push the main body into the charging stand or appliance plug all the way.
Charge within the recommended
▶ charging temperature of 0 °C to 35 °C.
▶ Apply oil.
(See page 12.)
▶ Have the battery replaced by an authorized service centre.
If the problems still cannot be solved, contact the store where you purchased the appliance or a service centre authorised by Panasonic for repair.
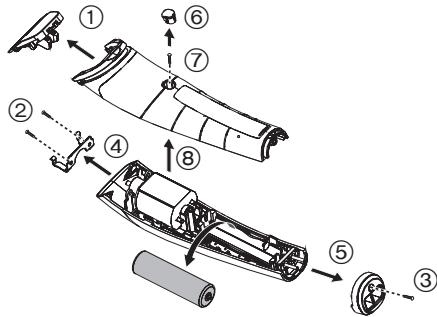
Removing the built-in rechargeable battery
Remove the built-in rechargeable battery before disposing the clipper.
Please make sure that the battery is disposed of at an officially designated location if there is one.
This figure must only be used when disposing the clipper, and must not be used to repair it. If you dismantle the clipper yourself, it may cause malfunction.
- Remove the clipper from the AC adaptor.
- Slide the power switch to turn on the power and then keep the power on until the battery is completely discharged.
- Perform steps ① to ⑧ and lift the battery, and then remove it.
- Take care not to short circuit the positive and negative terminals of the removed battery, and insulate the terminals by applying tape to them.
For environmental protection and recycling of materials
This clipper contains a Nickel-Metal Hydride battery.
Please make sure that the battery is disposed of at an officially assigned location, if there is one in your country.
Specifications
| Power source | See the name plate on the AC adaptor. |
| Motor voltage | 1.2 V--- |
| Charging time | Approx. 8 hours |
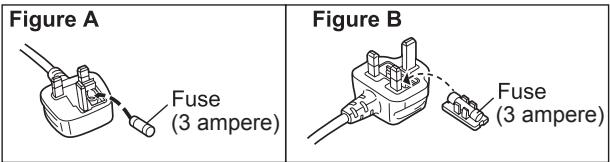
Caution for AC Mains Lead
For your safety, please read the following text carefully.
This appliance is supplied with a moulded three pin mains plug for your safety and convenience.
A 3-ampere fuse is fitted in this plug.
Should the fuse need to be replaced please ensure that the replacement fuse has a rating of 3-ampere and that it is approved by ASTA or BSI to BS1362.
Check for the ASTA mark 📍 or the BSI mark 🍼 on the body of the fuse.
If the plug contains a removable fuse cover you must ensure that it is refitted when the fuse is replaced.
If you lose the fuse cover the plug must not be used until a replacement cover is obtained.
A replacement fuse cover can be purchased from your local dealer.
CAUTION!
IF THE FITTED MOULDED PLUG IS UNSUITABLE FOR THE SOCKET OUTLET IN YOUR HOME THEN THE FUSE SHOULD BE REMOVED AND THE PLUG CUT OFF AND DISPOSED OF SAFELY.
THERE IS A DANGER OF SEVERE ELECTRICAL SHOCK IF THE CUT OFF PLUG IS INSERTED INTO ANY 13-AMPERE SOCKET.
THIS PLUG IS NOT WATERPROOF—KEEP DRY.
Before use
Remove the connector cover, if attached.
How to replace the fuse
The location of the fuse differ according to the type of AC mains plug (figures A and B). Confirm the AC mains plug fitted and follow the instructions below.
Illustrations may differ from actual AC mains plug.
- Open the fuse cover with a screwdriver.

- Replace the fuse and close or attach the fuse cover.
Disposal of Old Equipment and Batteries Only for European Union and countries with recycling systems

These symbols on the products, packaging, and/or accompanying documents mean that used electrical and electronic products and batteries must not be mixed with general household waste.
For proper treatment, recovery and recycling of old products and batteries, please take them to applicable collection points in accordance with your national legislation.
By disposing of them correctly, you will help to save valuable resources and prevent any potential negative effects on human health and the environment.
For more information about collection and recycling, please contact your local municipality.
Penalties may be applicable for incorrect disposal of this waste, in accordance with national legislation.
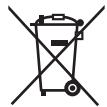
Note for the battery symbol (bottom symbol)
This symbol might be used in combination with a chemical symbol. In this case it complies with the requirement set by the Directive for the chemical involved.
Panasonic
Bedienungsanleitung
B

©

D

E

F

G

H

A Haarschneider
natural_image
Illustration of a hand performing a finger manipulation or massage technique (no text or symbols present)natural_image
Illustration of a hand holding a tool, showing a circular inset with a magnified view of the tool tip (no text or symbols)natural_image
Illustration showing a hand inserting a device into a cable with an arrow indicating direction (no text or symbols present)Reinigung
natural_image
Line drawing of hands holding a mechanical component with a tool (no text or symbols)
natural_image
Illustration of hands inserting a component into a device (no text or symbols visible)
Einfettung
▶ Ersatzteile
natural_image
Three-step line drawing showing hands using a tool to adjust a battery and switch (no text or symbols present)natural_image
Line drawing of a hand using tweezers to cut a circular object into a rectangular base (no text or symbols)Fehlersuche
Problem
▶ Prévention des accidents

B

©

D

E

F

G

H

A Corps principal
natural_image
Illustration of a hand performing a finger manipulation or massage technique (no text or symbols present)natural_image
Illustration of a hand holding a tool with arrows indicating motion, showing a circular view of the tool inside (no text or symbols)Installation de la lame
natural_image
Illustration showing a hand holding a device with a magnified view of the internal components (no text or symbols present)Nettoyage
natural_image
Line drawing of hands holding a small electronic device with a pen inserted (no text or symbols)
natural_image
Illustration of hands inserting a connector into a device (no text or symbols visible)
Lubrification
Lubrification de la lame de style ER-GP22
natural_image
Three-step line drawing showing hands using a tool to adjust a battery and switch (no text or symbols present)natural_image
Line drawing of a hand using tweezers to cut a circular object into a rectangular base (no text or symbols)Dépannage
Problème
B
©

D

E

F

G

H

A Corpo principale
© Lama design ER-GP22
natural_image
Illustration of a hand holding a finger with a magnified inset showing the finger area (no text or symbols)natural_image
Illustration of a hand holding a tool with arrows indicating motion, showing a circular view of the tool inside (no text or symbols)natural_image
Illustration showing a hand inserting a plug into a cable with a magnified view of the plug being inserted (no text or symbols present)Pulizia
natural_image
Line drawing of hands holding a small electronic component with a tool, no text or symbols present
natural_image
Illustration of hands inserting a component into a device (no text or symbols visible)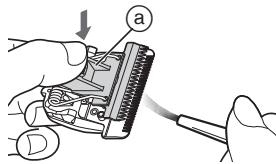
Lubrificazione
▶ Parti di ricambio
natural_image
Three-step line drawing showing hands using a tool to adjust a battery and switch (no text or symbols present)natural_image
Line drawing of a hand using tweezers to press or apply small objects into a container (no text or symbols)Specifications....64
Waarschuwing
B

©
D

E

F

G

H

A Hoofdbehuizing
① Stroomschakelaar [O/ I ]
② Laad indicator (=)
③ Stroomaansluiting
B Mesje
④ Bevestigingshaak
⑤ Reinigingshendel
⑥ Bewegend mesje
⑦ Stationair mesje
© Ontwerpmesje ER-GP22
⑧ Bevestigingshaak
⑨ Reinigingshendel
⑩ Bewegend mesje
⑪ Stationair mesje
natural_image
Illustration of a hand holding a wrist with a finger pointing to the wrist area (no text or symbols present)natural_image
Illustration of a hand holding a tool, with a magnified inset showing the tool tip and blade (no text or symbols)Het mesje monteren
natural_image
Illustration showing a hand inserting a plug into a cable with a magnified view of the plug being inserted (no text or symbols present)Reiniging
natural_image
Line drawing of a hand holding an electronic component with a tool, no text or symbols present
natural_image
Illustration of hands inserting a component into a device (no text or symbols visible)
Smering
▶ Vervangende onderdelen
natural_image
Three-step line drawing showing hands using a tool to adjust a battery and switch (no text or symbols present)natural_image
Line drawing of a hand using tweezers to apply a small object onto a base (no text or symbols)Problemen oplossen
Probleem
B

©

D

E

F

G

H

A Cuerpo principal
natural_image
Illustration of a hand holding a small object with an arrow indicating motion (no text or symbols)natural_image
Illustration of a hand holding a tool, with a magnified inset showing the tool tip and blade (no text or symbols)natural_image
Illustration showing two-step mechanical assembly: one with a tool inserted into a device, the other with a magnified view of a component (no text or symbols)Limpieza
natural_image
Line drawing of a hand holding an electronic component with a tool, no text or symbols presentnatural_image
Illustration of hands inserting a connector into a device (no text or symbols visible)Lubricación
natural_image
Three-step line drawing showing hands using a tool to adjust a battery and switch (no text or symbols present)natural_image
Line drawing of a hand using tweezers to press or adjust a component (no text or symbols present)B

©

D

E

F

G

H

A Apparatets krop
① Afbryderkontakt [O/I]
② Opladningsindikatorlampe

© Specialblad ER-GP22
natural_image
Illustration of a hand performing a finger manipulation or massage technique (no text or symbols present)▶ Brug af specialbladet ER-GP22
natural_image
Illustration of a hand holding a tool, showing a circular motion with arrows indicating movement (no text or symbols)Montering af bladet
natural_image
Illustration of a hand inserting a plug into an electrical socket (no text or symbols visible)
natural_image
Illustration of a hand holding a small object with a circular diagram above showing a gear or mechanical component (no text or symbols)Rensning
natural_image
Line drawing of a hand holding a small mechanical component with a tool, no text or symbols present
natural_image
Illustration of hands inserting a component into a device (no text or symbols visible)
Smøring
▶ Reservedele
Reservedele kan købes hos din forhandler eller servicecenter
| Reservedele til ER-GP21/ER-GP22 | Blad | WER9352 |
| Specialblad | WER-9P10 |
natural_image
Three-step line drawings showing hands using a tool to adjust a battery and switch (no text or symbols present)natural_image
Line drawing of a hand using a tool to cut or apply a component, no text or symbols presentFejlfinding
B

©

D

E

F

G

H

A Corpo principal
natural_image
Illustration of a hand holding a finger with a magnified inset showing the finger area (no text or symbols)natural_image
Illustration of a hand holding a tool, with a magnified inset showing the tool tip and blade (no text or symbols)Montagem da lâmina
natural_image
Illustration of a hand inserting a plug into an electrical socket (no text or symbols visible)
natural_image
Illustration of a hand holding a device with a circular diagram showing a gear or mechanical component (no text or symbols)Limpeza
natural_image
Line drawing of a hand holding a small mechanical component with a tool, no text or symbols present
natural_image
Illustration of hands inserting a connector into a device (no text or symbols visible)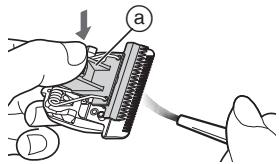
Lubrificação
natural_image
Three-step line drawing showing hands using a tool to adjust a battery and switch (no text or symbols present)natural_image
Line drawing of a hand using tweezers to cut a circular object into a rectangular base (no text or symbols)B

©

D

E

F

G

H

A Hoveddeksel
① Strømbryter [O/ I ]
② Ladelampe (→)
③ Pluggmottak
B Blad
natural_image
Illustration of a hand holding a small object with an arrow indicating motion (no text or symbols)natural_image
Illustration of a hand holding a tool, with a magnified inset showing the tool tip and blade (no text or symbols)Montere bladet
natural_image
Illustration of a hand inserting a plug into an electrical socket (no text or symbols visible)
natural_image
Illustration of a hand holding a small object with a circular diagram above showing a gear or mechanical component (no text or symbols)Rengjøring
natural_image
Line drawing of a hand holding an electronic component with a tool, no text or symbols present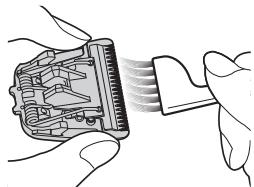
natural_image
Illustration of hands inserting a connector into a device (no text or symbols visible)
Smøring
Smøre designbladet ER-GP22
Smør designbladet som vist på tegningen.

▶ Reservedeler
Reservedeler fås hos forhandleren eller et serviceverksted
| Reservedeler for ER-GP21/ER-GP22 | Blad | WER9352 |
| Designblad | WER-9P10 |
natural_image
Three-step line drawing showing hands using a tool to adjust a battery and switch (no text or symbols present)natural_image
Line drawing of a hand using a tool to cut or apply a component, no text or symbols presentProblemløsning
B
©

D

E

F

G

H

A Huvuddel
① Strömbrytare [O/I]
② Laddningsindikeringslampa

③ Kontakt
B Skärblad
natural_image
Illustration of a hand holding a finger with a magnified inset showing the finger area (no text or symbols)natural_image
Illustration of a hand holding a tool, with a magnified inset showing the tool tip and blade (no text or symbols)Att sätta på bladet
natural_image
Illustration of a hand inserting a plug into an electrical socket (no text or symbols visible)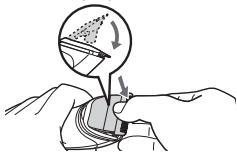
natural_image
Illustration of a hand holding a small object with a circular diagram showing a gear or mechanical component (no text or symbols)Rengöring
natural_image
Line drawing of a hand holding a small electronic component with a tool, no text or symbols present
natural_image
Illustration of hands inserting a component into a device (no text or symbols visible)
Smörjning
Smörja designskärbladet ER-GP22
▶ Utbytbara delar
natural_image
Three-step line drawing showing hands using a tool to adjust a battery and switch (no text or symbols present)natural_image
Line drawing of a hand using tweezers to cut or apply a component (no text or symbols)Felsökning
Problem
Klipparen är slö.
B

©

D

E
F

G

H

A Runko
natural_image
Illustration of a hand performing a finger manipulation or massage technique (no text or symbols present)natural_image
Illustration of a hand inserting a plug into a device (no text or symbols visible)
natural_image
Illustration of a hand holding a small object with a circular diagram above showing a gear or mechanical component (no text or symbols)Puhdistaminen
natural_image
Line drawing of a hand holding an electronic component with a tool, no text or symbols present
natural_image
Illustration of hands inserting a connector into a device (no text or symbols visible)
Voitelu
▶ Varaosat
natural_image
Three-step line drawing showing hands using a tool to adjust a battery and switch (no text or symbols present)natural_image
Line drawing of a hand using a tool to cut or apply a component, no text or symbols presentVianetsintä
Ongelma
B

©

D

E

F
G

H

A Korpus
natural_image
Illustration of a hand performing a finger manipulation or massage technique (no text or symbols present)natural_image
Illustration of a hand holding a tool, with a magnified inset showing a hand holding a tool (no text or symbols present)Mocowanie ostrza
natural_image
Illustration showing a hand inserting a plug into a cable with a magnified view of the plug being inserted (no text or symbols present)Czyszczenie
natural_image
Line drawing of a hand holding an electronic component with a tool, no text or symbols present
natural_image
Illustration of hands inserting a component into a device (no text or symbols visible)
Smarowanie
▶ Części zamienne
natural_image
Three-step line drawing showing hands using a tool to adjust a battery and switch (no text or symbols present)natural_image
Line drawing of a hand using tweezers to press or adjust a component (no text or symbols present)B

©

D

E

F
G

H

A Hlavní část
natural_image
Illustration of a hand performing a finger manipulation or massage technique (no text or symbols present)natural_image
Illustration of a hand holding a tool, with a magnified inset showing a hand holding a tool (no text or symbols present)Připevnění čepele
natural_image
Illustration of a hand inserting a plug into an electrical socket (no text or symbols)
natural_image
Illustration of a hand holding a small object with a circular diagram above showing a gear or mechanical component (no text or symbols)Čištění
natural_image
Line drawing of a hand holding an open mechanical component with a tool, no text or symbols present- Z okraje čepele vykartáčujte vlasy.

natural_image
Illustration of hands inserting a connector into a device (no text or symbols visible)Mazání
▶ Náhradní díly
natural_image
Three-step line drawings showing hands using a tool to adjust a battery and switch (no text or symbols present)natural_image
Line drawing of a hand using tweezers to press or adjust a component (no text or symbols present)Řešení potíží
Problém
B

©

D

E

F

G

H

A Hlavná čast'
natural_image
Illustration of a hand holding a finger with a magnified inset showing the finger area (no text or symbols)▶ Používanie tvarovacej čepele ER-GP22
natural_image
Illustration of a hand holding a tool, with a magnified inset showing the tool tip and blade (no text or symbols)Nasadzovanie čepele
natural_image
Illustration showing a hand inserting a cable into a device, and another hand adjusting a component with a circular arrow (no text or symbols)Čistenie
natural_image
Line drawing of a hand holding an open mechanical component with a tool, no text or symbols presentnatural_image
Illustration of hands inserting a connector into a device (no text or symbols visible)Mazanie
Mazanie tvarovacej čepele ER-GP22
▶ Náhradné diely
natural_image
Three-step line drawing showing hands using a tool to adjust a battery and switch (no text or symbols present)natural_image
Line drawing of a hand using tweezers to cut a component into a container (no text or symbols)Riešenie problémov
Problém
B

©

D

E

F

G

H

A Készüléktest
natural_image
Illustration of a hand holding a finger with a magnified inset showing the finger area (no text or symbols)natural_image
Illustration of a hand inserting a plug into an electrical socket (no text or symbols visible)
natural_image
Illustration of a hand holding a small object with a circular diagram showing a gear or mechanical component (no text or symbols)Tisztítás
natural_image
Line drawing of a hand holding an open mechanical component with a tool, no text or symbols presentnatural_image
Illustration of hands inserting a connector into a device (no text or symbols visible)Kenés
▶ Cserealkatrészek
natural_image
Three-step line drawings showing hands using a tool to adjust a battery and switch (no text or symbols present)natural_image
Line drawing of a hand using tweezers to cut a component into a container (no text or symbols)Hibaelhárítás
Probléma
68,5 mm × 46,0 mm × 97,0 mm
Tömeg: 260 g
B

©

D

E

F

G

H

A Corpul principal
© Lamă design ER-GP22
natural_image
Illustration of a hand holding a finger with a magnified inset showing the finger area (no text or symbols)▶ Folosirea lamei de design ER-GP22
natural_image
Illustration of a hand holding a tool with an arrow indicating force or movement, showing a circular motion view (no text or symbols)Montarea lamei
natural_image
Illustration of a hand inserting a plug into an electrical socket (no text or symbols)
natural_image
Illustration of a hand holding a small object with a circular diagram above showing a gear or mechanical component (no text or symbols)Curățare
natural_image
Line drawing of a hand holding an open mechanical component with a tool, no text or symbols presentnatural_image
Illustration of hands inserting a connector into a device (no text or symbols visible)Lubrifiere
Ungeti lama de design ER-GP22
Ungeti lama de design conform imaginii.
▶ Piese de schimb
natural_image
Three-step line drawings showing hands using a tool to adjust a battery and switch (no text or symbols present)Depozitarea pieptenilor
natural_image
Line drawing of a hand using tweezers to press or adjust a component (no text or symbols present)Depanare
Problema
© Panasonic Corporation 2015


- Panasonic
- Contents
- Safety precautions......6
- Warning
- Safety precautions
- Explanation of symbols
- DANGER
- CAUTION
- ▶ Power supply
- ▶ In case of an abnormality or malfunction
- ▶ This product
- ▶ Preventing accidents
- ▶ Protecting the skin
- ▶ Note the following precautions
- ▶ Disposal of the rechargeable battery
- Intended use
- Parts identification
- A Main body
- B Blade
- © Design blade ER-GP22
- Charging the clipper
- Notes
- Using the clipper
- Removing and mounting the comb attachments
- Mounting the attachment
- Removing the attachment
- ▶ Using the design blade ER-GP22
- Care
- Removing and mounting the blade
- Removing the blade
- Mounting the blade
- Cleaning
- Lubrication
- Lubricating the design blade
- ER-GP22
- ▶ Replacement parts
- Cleaning the AC adaptor
- Storing comb attachments
- Troubleshooting
- Problem
- Action
- Removing the built-in rechargeable battery
- For environmental protection and recycling of materials
- Specifications
- Caution for AC Mains Lead
- CAUTION!
- THIS PLUG IS NOT WATERPROOF—KEEP DRY.
- Before use
- How to replace the fuse
- Disposal of Old Equipment and Batteries Only for European Union and countries with recycling systems
- Note for the battery symbol (bottom symbol)
- A Haarschneider
- Reinigung
- Einfettung
- ▶ Ersatzteile
- Fehlersuche
- ▶ Prévention des accidents
- A Corps principal
- Installation de la lame
- Nettoyage
- Lubrification
- Lubrification de la lame de style ER-GP22
- Dépannage
- Problème
- A Corpo principale
- © Lama design ER-GP22
- Pulizia
- Lubrificazione
- ▶ Parti di ricambio
- Waarschuwing
- A Hoofdbehuizing
- B Mesje
- © Ontwerpmesje ER-GP22
- Het mesje monteren
- Reiniging
- Smering
- ▶ Vervangende onderdelen
- Problemen oplossen
- Probleem
- A Cuerpo principal
- Limpieza
- Lubricación
- A Apparatets krop
- © Specialblad ER-GP22
- ▶ Brug af specialbladet ER-GP22
- Montering af bladet
- Rensning
- Smøring
- ▶ Reservedele
- Fejlfinding
- A Corpo principal
- Montagem da lâmina
- Limpeza
- Lubrificação
- A Hoveddeksel
- B Blad
- Montere bladet
- Rengjøring
- Smøre designbladet ER-GP22
- ▶ Reservedeler
- Problemløsning
- A Huvuddel
- B Skärblad
- Att sätta på bladet
- Rengöring
- Smörjning
- Smörja designskärbladet ER-GP22
- ▶ Utbytbara delar
- Felsökning
- A Runko
- Puhdistaminen
- Voitelu
- ▶ Varaosat
- Vianetsintä
- Ongelma
- A Korpus
- Mocowanie ostrza
- Czyszczenie
- Smarowanie
- ▶ Części zamienne
- A Hlavní část
- Připevnění čepele
- Čištění
- Mazání
- ▶ Náhradní díly
- Řešení potíží
- Problém
- A Hlavná čast'
- ▶ Používanie tvarovacej čepele ER-GP22
- Nasadzovanie čepele
- Čistenie
- Mazanie
- Mazanie tvarovacej čepele ER-GP22
- Riešenie problémov
- A Készüléktest
- Tisztítás
- Kenés
- ▶ Cserealkatrészek
- Hibaelhárítás
- Probléma
- A Corpul principal
- © Lamă design ER-GP22
- ▶ Folosirea lamei de design ER-GP22
- Montarea lamei
- Curățare
- Lubrifiere
- Ungeti lama de design ER-GP22
- ▶ Piese de schimb
- Depozitarea pieptenilor
- Depanare
- Problema
Brand : PANASONIC
Model : ER-GP22
Category : Electric mower