
SC-HC27 - Loudspeaker PANASONIC - Free user manual and instructions
Find the device manual for free SC-HC27 PANASONIC in PDF.
| Product type | Hi-Fi mini-system with CD player, radio and Bluetooth |
| Brand | Panasonic |
| Model | SC-HC27 |
| Dimensions (W x H x D) | 490 x 231 x 284 mm |
| Weight | 5.2 kg |
| Power supply | 230 V ~ 50 Hz |
| Power consumption | 55 W (operating), 0.5 W (standby) |
| Output power | 2 x 20 W RMS |
| Speakers | 2-way: 10 cm woofer and 2 cm tweeter |
| Disc player | CD, CD-R/RW, MP3 CD |
| Radio | FM/AM with 30 presets |
| Wireless connectivity | Bluetooth 4.2 |
| Ports | 1 x USB (MP3 playback), 1 x audio input (3.5 mm), 1 x headphone output |
| Main functions | CD playback, radio, Bluetooth, USB, timer, clock, equalizer |
| Care and cleaning | Clean with a soft, dry cloth. Do not use solvents. |
| Safety | Unplug the device before any cleaning. Do not expose to moisture. |
| Spare parts and repairability | Contact Panasonic after-sales service for spare parts. |
| Included accessories | Remote control, FM antenna, power cable |
| General information | Product intended for domestic use. Manual available in multiple languages. |
Frequently Asked Questions - SC-HC27 PANASONIC
User questions about SC-HC27 PANASONIC
0 question about this device. Answer the ones you know or ask your own.
Ask a new question about this device
Download the instructions for your Loudspeaker in PDF format for free! Find your manual SC-HC27 - PANASONIC and take your electronic device back in hand. On this page are published all the documents necessary for the use of your device. SC-HC27 by PANASONIC.
USER MANUAL SC-HC27 PANASONIC
Operating Instructions
Thank you for purchasing this product.
For optimum performance and safety, please read these instructions carefully.
Please keep this manual for future reference.
Muchismasgraciasporhaberadquiridoesteaparato.
Do the procedures with the remote control. You can also use the buttons on the main unit if they are the same.
Your system and the illustrations can look differently.
Safety precautions

Bottom of product
Produktets underside
Inside of product Produktets inside
| CAUTION - VIDEA AND INVERSE L LASER RADIATION WHEN OPEN- AND INTERLOCKS DEFADED >DO NOT STARE INTO BRAAM. FATE 241 CFR / Class : (a) |
| CAUTION - CLASS 1M VIDEA AND INVERSE LASER RADIATION WHEN OPEN AND INTERLOCKS DEFADED DO NOT VIEW DIRECTLY WITH OPTICAL INSTRUMENTS. EIG80825-1+402 Class 1M |
| ATTENTION - PAYONNEMENT L'AVIATION VIDEA ET INVERSE CLasse 1M, N.CAS DODIVERTE ET LORSIQUE LA SECURITE EST NEUTRALLEGE. NE PAS RAGIER PROPRIÉTÉD À L'AGENCE DE DINDSTRUMENTS D'OPPÔTURE. |
| VARIANCE - KASSM USYNTH OCH DYNSYNTH LASERSTRALING NAR DENDRA DEL APOPNAD OACH SPARRREN AR UROPPLOAD, BETRATIA ET AL SILENDEX INTERNEDITO GENOMY ISTRUMENT. |
| FORSGTIG - VISIONS OUS YNGSNL LASERSTRALING KLASSEN, M.NAR LAGET ET ABERT ONG SKEPEHRES AFBRYDERE ER DU FLUKURE, ANGLES ATA LE PEG A SIECTE ISTRUMENT. |
| VARIOTI - AVIETAESA J AU SOULAUUMI OTISKAE LQT EL TALINHA UOKUAN M EN KAPYKA YA J NAKYAMONTA LASERSTRALING AEA, KAAI KATOSE ISTRUMENTA LAITEELA SUORA SATESEEL. |
| VORSCHT - SICHTARE LA STRATRAH UNKAGE CLASSE 1M, WENN ABECKICE GEOFFEEIT UND SICHERSRTSVERBISELLENGINS UBEHRBUCKT. NCHT DEKET MT OPITICHEN INSTRUMENTEN BRETACRÊTEN. |
| PRECAUÇON - RADIACION VIDEA VIDEA ÉNCESS CLASE 1M, ESTAR ABRÉTI Y CON LOS INTERPRISES DE LO QIÉLUÉ DES HARMATÉLOS, NO MIRE DIRECTAMENTE CON INSTRUMENTS. |
| 注意 - 对抗及失效消除时有可见及不可见激光辐射。避免光束照射。 |
WARNING!
Unit
- To reduce the risk of fire, electric shock or product damage,
- Do not expose this unit to rain, moisture, dripping or splashing.
- Do not place objects filled with liquids, such as vases, on this unit.
- Use only the recommended accessories.
- Do not remove covers.
- Do not repair this unit by yourself. Refer servicing to qualified service personnel.
Battery
- Risk of fire, explosion and burns. Do not recharge, disassemble, heat above 60^ or incinerate.
- Keep the button-type battery out of the reach of children. Never put button-type battery in mouth. If swallowed call your doctor.
CAUTION!
Unit
- To reduce the risk of fire, electric shock or product damage,
- Do not install or place this unit in a bookcase, built-in cabinet or in another confined space. Ensure this unit is well ventilated.
- Do not obstruct this unit's ventilation openings with
newspapers, tablecloths, curtains, and similar items. - Do not place sources of naked flames, such as lighted candles, on this unit.
This unit is intended for use in moderate climates.
Install this unit so that the AC mains lead can be unplugged from the socket outlet immediately if any problem occurs. - This unit may receive radio interference caused by mobile telephones during use. If such interference occurs, please increase separation between this unit and the mobile telephone.
- This unit utilizes a laser. Use of controls or adjustments or performance of procedures other than those specified herein may result in hazardous radiation exposure.
Battery
- Danger of explosion if battery is incorrectly replaced. Replace only with the type recommended by the manufacturer.
- When disposing the batteries, please contact your local authorities or dealer and ask for the correct method of disposal.
- Do not heat or expose to flame.
- Do not leave the battery(ies) in a car exposed to direct sunlight for a long period of time with doors and windows closed.
Product Identification Marking is located on the bottom of the unit.
Maintenance
To clean this system, wipe with a soft, dry cloth.
- Never use alcohol, paint thinner or benzine to clean this system.
- Before using chemically treated cloth, read the instructions that came with the cloth carefully.
ADVARSEL!
Supplied accessories
Check and identify the supplied accessories.
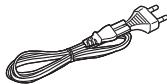
1 x AC mains lead
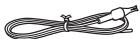
1 x FM indoor antenna
1 x Remote control (with a battery)
(N2QAYC000059)
Table of contents
Safety precautions 2
Maintenance. 2
Supplied accessories. 3
Overview of controls. 4
Getting started 5
iPod/iPhone, Disc, USB. 5
Radio. 7
Sound effects. 8
Clock and timers. 8
Troubleshooting 9
Specifications 11
Information for Users on Collection and Disposal of Old Equipment and used Batteries

These symbols on the products, packaging, and/or accompanying documents mean that used electrical and electronic products and batteries should not be mixed with general household waste.

For proper treatment, recovery and recycling of old products and used batteries, please take them to applicable collection points, in accordance with your national legislation and the Directives 2002/96/EC and 2006/66/EC.
By disposing of these products and batteries correctly, you will help to save valuable resources and prevent any potential negative effects on human health and the environment which could otherwise arise from inappropriate waste handling.
For more information about collection and recycling of old products and batteries, please contact your local municipality, your waste disposal service or the point of sale where you purchased the items.
Penalties may be applicable for incorrect disposal of this waste, in accordance with national legislation.

For business users in the European Union If you wish to discard electrical and electronic equipment, please contact your dealer or supplier for further information.
[Information on Disposal in other Countries outside the European Union]
These symbols are only valid in the European Union. If you wish to discard these items, please contact your local authorities or dealer and ask for the correct method of disposal.

Note for the battery symbol (bottom two symbol examples):
This symbol might be used in combination with a chemical symbol. In this case it complies with the requirement set by the Directive for the chemical involved.
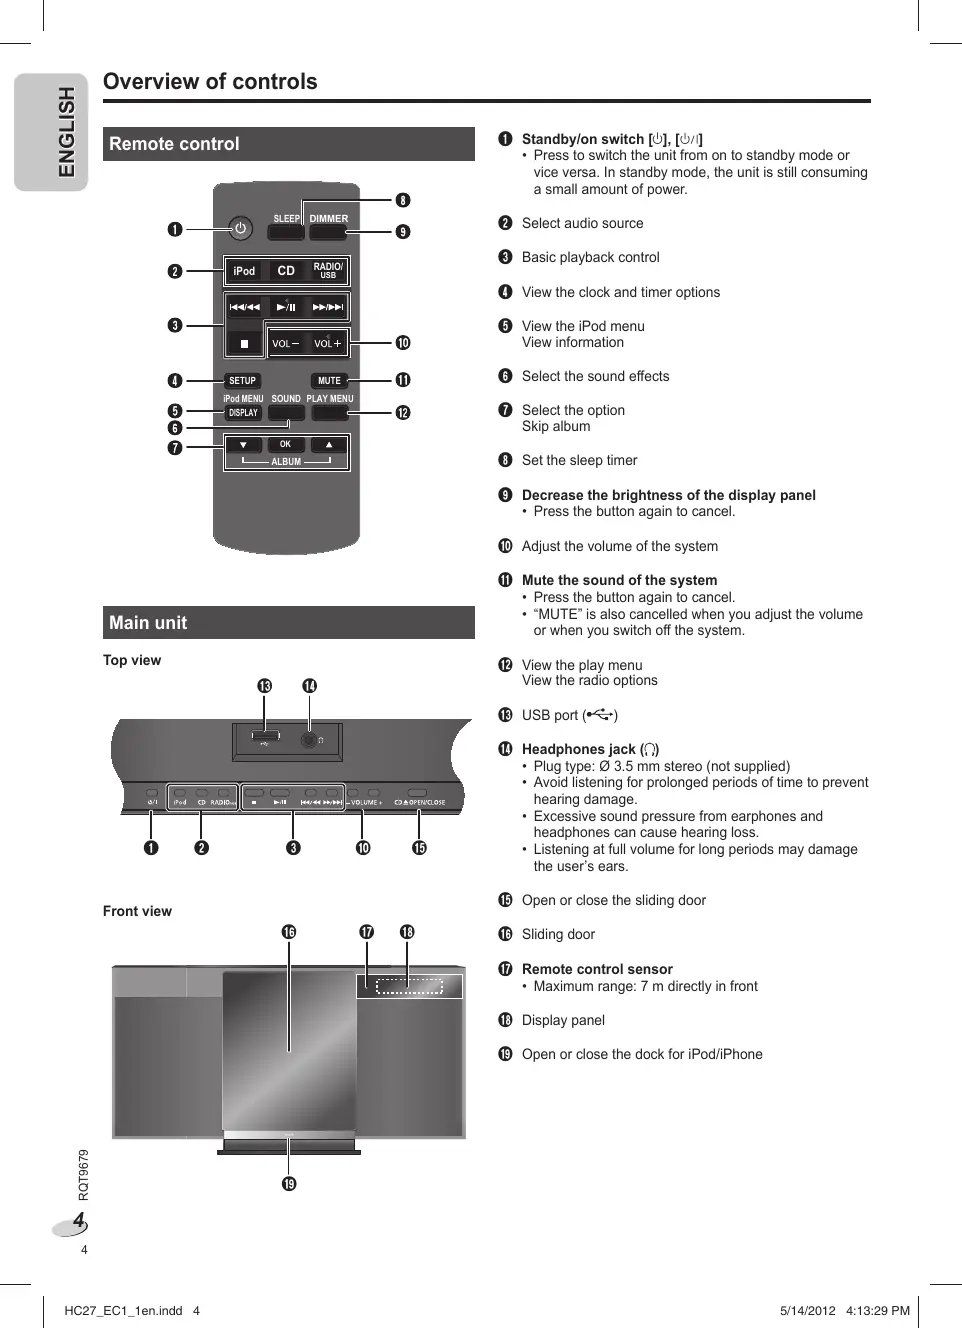
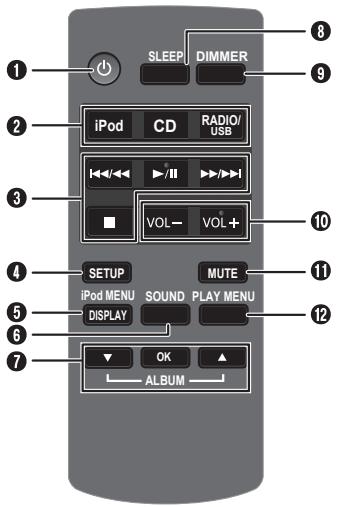
Remote control
Main unit
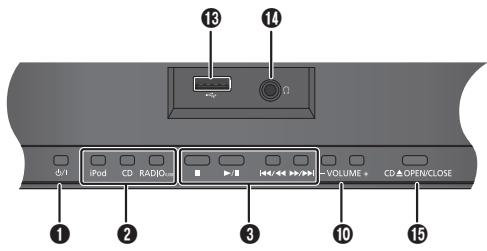
Top view

Front view
Mute the sound of the system
1 Standby/on switch [ ] , [ /]
- Press to switch the unit from on to standby mode or vice versa. In standby mode, the unit is still consuming a small amount of power.
Select audio source
3 Basic playback control
View the clock and timer options
View the iPod menu View information
6 Select the sound effects
Select the option Skip album
Set the sleep timer
Decrease the brightness of the display panel Press the button again to cancel.
10 Adjust the volume of the system
- Press the button again to cancel.
- "MUTE" is also cancelled when you adjust the volume or when you switch off the system.
View the play menu View the radio options
USB port()
1 Headphones jack (O)
Plug type: 0.35 mm stereo (not supplied)
- Avoid listening for prolonged periods of time to prevent hearing damage.
- Excessive sound pressure from earphones and headphones can cause hearing loss.
- Listening at full volume for long periods may damage the user's ears.
15 Open or close the sliding door
16 Sliding door
Remote control sensor
Maximum range: 7 m directly in front
18 Display panel
19 Open or close the dock for iPod/iPhone
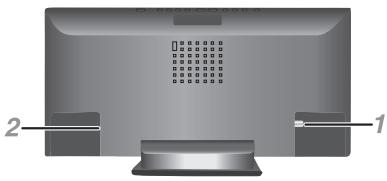
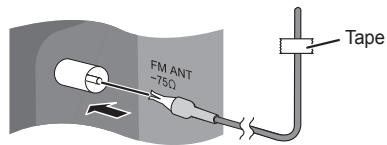
1 Connect the FM indoor antenna.
Place the antenna where reception is best.
2 Connect the AC mains lead.
Power consumption in standby mode: 0.2 W
(approximate)
Do not use an AC mains lead from other equipment.
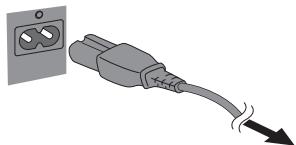
To household mains socket
Note:
- Some settings return to default when you disconnect the system.
These speakers do not have magnetic shielding. Do not put them near TVs, PCs or other equipment easily influenced by magnetism. - You cannot remove the net of the speakers.
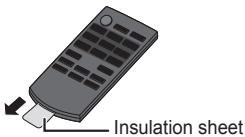
Preparing the remote control
Before using
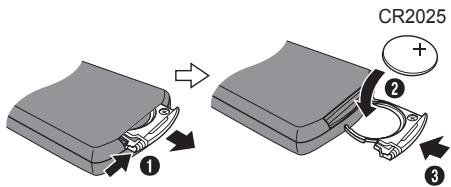
Replacing the battery
Replace with a new battery (CR2025 lithium battery).
1 While pressing the stopper, pull out the battery holder.
2 Insert a new battery with the (+) side facing up.
3 Push the battery holder back fully.
Inserting or removing media
iPod/iPhone
Push [iPod ] to open the dock tray.
![PANASONIC SC-HC27 - Push [iPod ] to open the dock tray. - 1](/content/2019/11/105407/images/b14d30a07f8710320299e8e96e15175ce9e7d3fa7dd48dfcf5002bbe356fb7db.jpg)
Note:
- Make sure to remove the iPod/iPhone from its case.
- Make sure to align your iPod/iPhone with the connector when inserting.
- Use a compatible dock adapter.
- If a dock adapter is not available, insert and remove the iPod/iPhone with care.
Disc
Press [CD OPEN/CLOSE] on the main unit to open the sliding door.
Put in a disc with the label facing towards you.
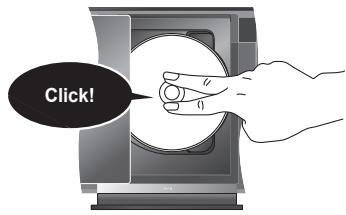
Note:
Keep fingers away from the sliding door when it is closing.
USB
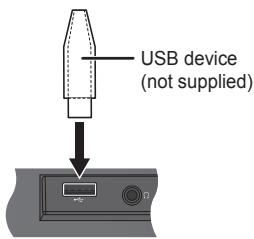
Note:
Do not use a USB extension cable. The system cannot recognise USB device connected through a cable.
Press [iPod], [CD] or [USB] to select the source.
| Play | Press [▶/II]. |
| Stop | Press [■].USB:The track is memorised.“RESUME” is shown.Press two times to stop fully. |
| Pause | Press [▶/II].Press again to continue playback. |
| Skip track | Press [↓←/←] or [▶/▶]. |
| Search through track | Press and hold [↓←/←] or [▶/▶]. |
iPod/iPhone
iPod
| View iPod menu | Press [iPod MENU]. |
| Select an item | Press [▲, ▼] and then press [OK]. |
Note:
Depending on the model, it may be necessary to remove the iPod/iPhone and select the album, artist, etc. on the iPod/iPhone.
- Operation results may vary depending on the iPod/iPhone models.
- Read the User Guide of the iPod/iPhone for the operating instructions.
Disc, USB
CD USB
| Skip album MP3 | Press [▲, ▼]. |
| View information | Press [DISPLAY]. |
Note:
Maximum characters that can be shown: approximately 32
- This system supports ver. 1.0, 1.1 and 2.3 ID3 tags.
- Text data that the system does not support can show differently.
1 Press [PLAY MENU] to select "PLAYMODE" or "REPEAT".
2 Press [, ] and then press [OK] to select the desired mode.
PLAYMODE
| OFF PLAYMODE | Play all tracks. |
| 1-TRACK 1▶ | Play one selected track. Press [▶/▶] or [▶/▶] to select the track. |
| 1-ALBUM 1■ (MP3) | Play one selected album. Press [▲,▼] to select the album. |
| RANDOM RND | Play all tracks randomly. |
| 1-ALBUM RANDOM 1■ RND (MP3) | Play all tracks in one selected album randomly. Press [▲,▼] to select the album. |
REPEAT
| ON REPEAT | Repeat playback. |
| OFF REPEAT | Cancel repeat playback. |
Note:
- During random playback, you cannot skip to tracks which have been played.
- The setting returns to default when you open the sliding door.
Compatible media
iPod/iPhone (as of January 2012)
Update your iPod/iPhone with the latest software before using this system.
iPod touch
1st, 2nd, 3rd and 4th generation
iPod nano
2nd, 3rd, 4th, 5th and 6th generation
iPod classic
iPhone 4S / iPhone 4 / iPhone 3GS / iPhone 3G / iPhone
Charging an iPod/iPhone
An iPod/iPhone is charged automatically when connected to the system (even when the system is in standby mode).
- See the iPod/iPhone display for its battery charging status.
- Disconnect the iPod/iPhone if it is not used for an extended period of time after charging is complete.
- Charging stops when the battery is fully charged. The battery will deplete naturally.
Disc
- This system can play CD-R/RW with CD-DA or MP3 format content.
- Some CD-R/RW cannot be played because of the condition of the recording.
- MP3 files are defined as tracks and folders are defined as albums.
- This system can access up to:
- CD-DA : 99 tracks
- MP3 : 999 tracks, 255 albums (including root folder) and 20 sessions
- Disc must conform to ISO9660 level 1 or 2 (except for extended formats).
- Recordings will not necessarily be played in the order you recorded them.
USB
- Compatible USB devices which are defined as mass storage class:
- USB devices that support bulk-only transfer
- USB devices that support USB 2.0 full speed
- Files are defined as tracks and folders are defined as albums.
- Track must have the extension ".mp3" or ".MP3".
- This system can access up to: -255 albums (including root folder)
- 2500 tracks
- 999 tracks in one album
- CBI (Control/Bulk/Interrupt) is not supported.
- NTFS file system is not supported (only FAT 12/16/32 file system is supported).
- Some files can fail to work because of the sector size.
Made for

iPod

iPhone
"Made for iPod" and "Made for iPhone" mean that an electronic accessory has been designed to connect specifically to iPod, or iPhone, respectively, and has been certified by the developer to meet Apple performance standards.
Apple is not responsible for the operation of this device or its compliance with safety and regulatory standards.
Please note that the use of this accessory with iPod, or iPhone may affect wireless performance.
iPhone, iPod, iPod classic, iPod nano, and iPod touch are trademarks of Apple Inc., registered in the U.S. and other countries.
MPEG Layer-3 audio coding technology licensed from Fraunhofer IIS and Thomson.
Radio
30 FM stations can be preset.
Preparation
Connect the FM indoor antenna ( page 5).
Press [RADIO] to select "FM".
Automatic presetting
1 Press [PLAY MENU] to select "A.PRESET".
2 Press [, ] to select "LOWEST" or "CURRENT" frequency.
LOWEST : To begin auto preset from the lowest frequency.
CURRENT: To begin auto preset from the current frequency*.
- To change the frequency, refer to "Manual tuning and presetting".
3 Press [OK] to start presetting.
The tuner presets all the stations it can receive into the channels in ascending order.
To cancel, press [■].
Manual tuning and presetting
1 Press [PLAY MENU] to select "TUNEMODE".
2 Press [, ] to select "MANUAL" and then press [OK].
3 Press [←/←] or [▶▶/▶] to tune in to the station.
To tune automatically, press and hold the button until the frequency starts changing quickly.
"STEREO" is shown when the system is tuned in to a stereo broadcast.
To preset the station
4 Press [OK].
Press [, ] to select a preset number.
6 Press [OK].
Do steps 3 through 6 again to preset more stations.
Note:
A station previously stored is overwritten when another station is stored in the same preset number.
Selecting a preset station
1 Press [PLAY MENU] to select "TUNEMODE".
2 Press [, ] to select "PRESET" and then press [OK].
3 Press [I<1/1] or [▶▶/▶] to select the preset station.
Improving the sound quality
1 Press [PLAY MENU] to select "FM MODE".
2 Press [▲,▼] to select "MONO" and then press [OK]. To cancel, select "STEREO".
"MONO" is also cancelled when you change the frequency.
To memorise the setting
Continue with steps 4 through 6 of "Manual tuning and presetting".
Checking the signal status
Press [PLAY MENU] to select "FM STATUS" and then press [OK].
| FM | The FM signal is in monaural. The system is not tuned in to a station. |
| FM ST | The FM signal is in stereo. |
| FM MONO | “MONO” is selected as the “FM MODE”. |
RDS broadcasting
This system can show the text data transmitted by the radio data system (RDS) available in some areas.
Press [DISPLAY].
| PS | Station name |
| PTY | Program type |
| FREQ | Frequency |
Note:
RDS may not be available if reception is poor.
Sound effects
1 Press [SOUND] to select a sound effect.
2 Press [, ] to select the desired setting.
| PRESET EQ | "HEAVY": Adds punch to rock. "SOFT": For background music. "CLEAR": Clarifies higher frequencies. "VOCAL": Adds gloss to vocal. "FLAT": Cancels the sound effect. |
| BASS | "BASS -4" to "BASS +4". |
| TREBLE | "TREBLE-4" to "TREBLE+4". |
| D.BASS | "ON D.BASS" or "OFF D.BASS". |
| SURROUND | "ON SURROUND" or "OFF SURROUND". |
Clock and timers
Setting the clock
This is a 24-hour clock.
1 Press [SETUP] to select "CLOCK".
2 Press [, ] to set the time.
3 Press [OK].
To show the clock for a few seconds
Press [SETUP] to select "CLOCK" and then press [OK].
Note:
Reset the clock regularly to maintain accuracy.
Play timer
You can set the timer to come on at a certain time to wake you up.
Preparation
Set the clock.
1 Press [SETUP] to select "TIMER ADJ".
2 Press [, ] to set the start time.
3 Press [OK].
4 Do steps 2 and 3 again to set the end time.
To start the timer
1 Prepare the audio source you want to listen to and set the volume.
2 Press [SETUP] to select "TIMER SET".
3 Press [ , ] to select "SET" and then press [OK]. is shown.
The system must be switched off for the timer to operate.
| Check the settings | 1. Press [SETUP] to select “TIMER ADJ”. 2. Press [OK]. |
| Cancel | 1. Press [SETUP] to select “TIMER SET”. 2. Press [▲,▼] to select “OFF” and then press [OK]. |
Note:
- The timer starts at a low volume and increases gradually to the preset level.
- The timer comes on at the set time every day if the timer is on.
- If you switch off the system and switch on again while a timer is in operation, the timer will not stop at the end time.
Sleep timer
The sleep timer switches off the system after the set time.
Press [SLEEP] to select the setting (in minutes).
To cancel, select "OFF".
SLEEP 30 SLEEP 60 SLEEP 90 SLEEP120 OFF
Note:
- The remaining time is always shown on the display.
The display changes temporarily when you perform other operations. - The sleep timer can be used together with the play timer.
- The sleep timer always comes first. Be sure not to set an overlap of timers.
Auto off function
iPod
CD
USB
This function switches off the system (except in radio source) if you do not use the system for approximately 30 minutes.
1 Press [SETUP] to select "AUTO OFF".
2 Press [, ] to select "ON" or "OFF" and then press [OK].
Troubleshooting
Before requesting service, make the following checks. If you are in doubt about some of the check points, or if the solutions indicated do not solve the problem, consult your dealer for instructions.
Common problems
No operations can be done with the remote control.
- Examine that the battery is installed correctly.
- The remote control and this unit are using different codes ( page 10, "REMOTE ").
Sound is distorted or no sound.
- Adjust the volume of the system.
- Examine the volume of the iPod/iPhone.
- Switch off the system, determine and correct the cause, then switch the system on again. It can be caused by straining of the speakers through excessive volume or power, and when using the system in a hot environment.
A "humming" sound can be heard during playback.
- An AC mains lead or fluorescent light is near the cable. Keep other appliances and cords away from the cable of this system.
iPod/iPhone
You cannot switch on the iPod/Phone.
- Examine that the battery of the iPod/iPhone is not depleted.
- Switch off the iPod/iPhone and the system before you connect the iPod/iPhone. Connect the iPod/iPhone and try again.
iPod/iPhone does not charge.
- Examine the connection.
Disc
Display not shown correctly.
Playback does not start.
- You did not put the disc in correctly. Put it in correctly.
Disc is dirty. Clean the disc. - Replace the disc if it is scratched, warped, or non-standard.
- There is condensation. Let the system dry for 1 to 2 hours.
USB
The USB device or the contents in it cannot be read.
- The format of the USB device or the contents in it is/are not compatible with the system.
- USB devices with storage capacity of more than 32 GB cannot work in some conditions.
Slow operation of the USB device.
Large content size or large memory USB device takes longer time to read.
The elapsed time shown is different from the actual play time.
- Transfer the data to another USB device or backup the data and reformat the USB device.
Radio
A beat sound is heard.
- Switch off the TV or move it away from the system.
- Move mobile telephones away from the unit if the interference is apparent.
Main unit displays
“-·-”
- You connected the AC mains lead for the first time or there was a power failure recently. Set the clock.
"ADJUST CLOCK"
- Clock is not set. Adjust the clock accordingly.
"ADJUST TIMER
- Play timer is not set. Adjust the play timer accordingly.
"ERROR"
- An incorrect operation was done. Read the instructions and try again.
"F61"
- There is a power supply problem.
"IPOD OVER CURRENT ERROR" or
"USB OVER CURRENT ERROR"
- The iPod/iPhone or USB device is drawing too much power. Remove the iPod/iPhone or USB device. Switch the system off and on again.
"NODEVICE"
- The iPod/iPhone or USB device is not connected.
Examine the connection.
"NO DISC"
- You have not put in a disc.
"NO PLAY"
- You have put in a disc that the system cannot play.
- You have inserted a USB device that cannot be played.
Examine the content. You can only play supported format. - If there are more than 255 albums or folders (audio and non-audio), some of the MP3 files in these albums cannot be read and played. Transfer these music albums to another USB device. Alternatively, reformat the USB device and save these music albums prior to saving the other non-audio folders.
"NOT MP3/ERROR"
- An unsupported MP3 format. The system will skip that track and play the next one.
"NOT SUPPORTED"
- You have inserted an iPod/iPhone that cannot be played.
- If the iPod/iPhone is compatible, remove the iPod/iPhone and connect it again. Examine that the battery of the iPod/iPhone is not depleted.
"REMOTE " (" " stands for a number.)
-
The remote control and this unit are using different codes. Change the code of the remote control.
-
When "REMOTE 1" is shown, press and hold [OK] and [▼] for a minimum of 4 seconds.
- When "REMOTE 2" is shown, press and hold [OK] and [▲] for a minimum of 4 seconds.
“-VBR-”
- The system cannot show the remaining play time for variable bit rate (VBR) tracks.
Memory reset (initialisation)
Reset the memory when the following situations occur:
- There is no response when buttons are pressed.
- You want to clear and reset the memory contents.
1 Disconnect the AC mains lead.
Wait 3 minutes before you continue with step 2.
2 While you press and hold [ /] on the main unit, connect the AC mains lead again.
"-- - - - - - - - " is shown.
3 Release [0 / 1]
All the settings are set back to the factory preset. It is necessary to set the memory items again.
Remote control code
When other Panasonic equipment responds to the remote control of this system, change the remote control code for this system.
To set the code to "REMOTE 2"
1 Press and hold [CD] on the main unit and [] on the remote control until "REMOTE 2" is shown.
2 Press and hold [OK] and [▲] for a minimum of 4 seconds.
To set the code to "REMOTE 1"
1 Press and hold [CD] on the main unit and [] on the remote control until "REMOTE 1" is shown.
2 Press and hold [OK] and [] for a minimum of 4 seconds.
Amplifier section
RMS output power stereo mode
Front Ch (both ch driven)
5 W per channel (6 Ω), 1 kHz, 10% THD
Total RMS stereo mode power
10 W
Tuner section
Preset station
FM 30 stations
Frequency modulation (FM)
Frequency range
87.50 MHz to 108.00 MHz (50 kHz step)
Antenna terminals
75Ω (unbalanced)
Terminals section
USB port
USB standard
USB 2.0 full speed
Media file format support
MP3 (*.mp3)
USB device file system
FAT12, FAT16, FAT32
USB port power
DC OUT 5 V, 500 mA MAX
iPod connector
DC OUT 5 V, 1.0 A MAX
Headphones jack
Terminal
Stereo, 3.5 mm jack
Disc section
Disc played (8 cm or 12 cm)
CD, CD-R/RW (CD-DA, MP3*)
Pick up
Wavelength
790 nm (CD)
Laser power
CLASS 1
NORSK
Bøgelengde
790 nm (CD)
Laserstyrike
FL = Front left channel
FR = Front right channel
^※ MPEG-1 Layer 3, MPEG-2 Layer 3
Speaker section
Type
1 way, 1 speaker system (bass reflex)
Speaker unit(s)
Full range
8 cm cone type x 1/ch
Impedance
6Ω
General
Power supply
AC 220 to 240V 50Hz
Power consumption
19 W
Dimensions (W x H x D)
400 mm x 213 mm x 110 mm
[ \mathrm{D} = 72 \, \mathrm{mm} \, (\mathrm{min}) ]
[ \mathrm{D} = 144\mathrm{mm} ] (tray open)
Mass
2 kg
Operating temperature range
0^ to +40^
Operating humidity range
35% to 80% RH (no condensation)
Power consumption in standby mode
0.2 W (approximate)
Note:
- Specifications are subject to change without notice. Mass and dimensions are approximate.
- Total harmonic distortion is measured by the digital spectrum analyzer.
CLASS 1 LASER PRODUCT
Parte interior del aparato
| CAUTION - VISIBLE AND INBIVILE E LASER RADIATION WHEN OPEN < AND INTERDCS DEFAILED >, DO NOT STARE INTO BRAEM, FATE OR CLASS 1A. FATE OR CLASS 1A. |
| CAUTION - CLASS IM VISIBLE AND INBIVILE LASER RADIATION WHEN OPEN AND INTERDCS DEFAILED, DO NOT MEAN DIRECTLY WITH OPTICAL INSTRUMENTS, EGR06825-1/420 Class 1M. |
| ATTENTION - RAYMOND TOLERANCE VISIBLE ET INBIVISE E. CLASSE 1M, ENR CASH D°VOURTELE ET LORSIQUE LA SECURETÉ ESTHELIE JUULIE, PE NASKOAD CHARGE DE L'IMPÔT DE DIRIGEMENT DE L'IMPÔT. INSTRUMENTS D'OPTIQUE. |
| VARNING - KLASM IM SYNTHES OCH OSYNLIG LASERTRADING NAR DENNADE DEL AR PONDAO CHF SPARRREN AR UHKOPPLAD, BETRACTA E L SUTRIEN GENODY SPECIUM INGENITUM, UNATTEZ LE MEDI DE OPPOH. |
| FORSGTIG - SYNUG OSYNLIG LASERTRADING KLASSE 1M, NAR ALET ET ABEND OT SGKHERODS ABRYDERTE ERE LIDE AF KUNFIKTUS, OHITE TEA LE MEDI DE OPPOH. |
| WARD - AVIAETSA JA SUQALUKNUTI, OHITE TEA SOLT E OLITTA LIUOKUAN M NAKYVAA Y NAKYAMOTANA LASERTRADING KAVLA, A KATO SATISSE POMELA LAITELLA SUOAURA SATESEEL. |
| VORSCHT - SCHINTARE LASERTRADING KLASSE 1M, VENN BEAICKING GEOFFEEF AND SICHERHUTSVERBEGILANS UBEBRIDUCT, NCTT REDEKT MER IT OPSTHENCH INSTRUMENTEN BRETACRATED. |
| PRECAUION - RADICTION LASER WIRE E VISIBLE CLASSE 1M AL ESTAR ABERTO Y CON LOS INTERRUPTIONS DE BLOQUED DES HARMADILLADOS, NO MIRE DIRECTIEMENT CON INSTRUMENTOS OPTICO. |
| 注章 - 打开及时及关闭临时有可见及不可见激光辐射。避免光束照射。 |
ADVERTENCIA!
Unidad
iPod/iPhone, disco, USB 5
Radio. 7
- Compruebe que la pila del iPod/iPhone no está agotada.
- Abyssing the system of the system of the system of the system of the system of the system of the system of the system of the system of the system of the system of the system of the system of the system of the system of the system of the system of the system of the system of the system of the system of the system of the system of the system of the system of the system of the system of the system of the system of the system of the system of the system of the system of the system of
El iPod/iPhone no searga.
"IPOD OVER CURRENT ERROR" o
"USB OVER CURRENT ERROR"
KCLASS 1 LASER APPARAT
Apparatens insida
Produktets inside
| CAUTION - VIBERLE AND INVIVBLE E LASER RADIATION WHEN OPEN- AND INTER LOCKS DEFEATED >DO NOT STARE BINO BEAM. FAO 24/CI / Class : (a) |
| CAUTION - CLASS IM VIBERLE AND INVIVBLE LASER RADIATION WHEN OPEN AND INTER LOCKS DEFEATED, DO NOT VIEW DIRECTLY WITH OPHTIC INSTRUMENTS, EFO80052-1/420 Class 1M |
| ATTENTION - RAVONEMENT VIBERLE ET INVIVBLE LE, CLASSE IM EN CAS DÉTENTEURI ET LORSQUE LA SECURTE EST NEUTRALLEESE, PE NOS REGARPER DIRÉCTIF AMD DIRENÇS INSTRUMENTS D'OPTIQUE. |
| VARNING - KCLASS IM YSGNE OCH OSYNIGL LASERTRAIANG NAR DENNALE OR APNND OCH SPARRREN AR URCRIPOLD, RETRACTA E US TILABEN INTRODE OPHTICS KISKTERIN, |
| FORSGIT - VJSGNL OSYNIGL LASERTRAIANG Klassse IM, NAR LAGET ET ABENDG OPHTICS KISKTERIN, ABBRYDEREE URE OF FUNKTIUM, UNDA GYE MEDI DE OPHTICS KISKTERINISTRUMENTER. |
| VARIOT - AVIAETSAJA BA SUQALUKNTIS CHITTEETEASS OLET ALTTINA LUKUAN IM NAKYVAA J NAKYMATONATLA LASERKATEVA, AKA LAATO OPSPITA LAITTEELA SUOAURA SATESEEL. |
| VORSCIT - SCHMETARE LASERTRAIANG Klassse IM, WENNA BECKECING GEFFENTJ AND SCDHERNTS VERSBEIGELLEN UBBREBRUCKT, NORT MEKRT DMT OPHTISCHEN INSTRUMENTEN BRETACRATID. |
| PRECAUCTION - RAOACION LASER VIBERLE E BLOQUIED Klassse IM AL ESTAR ABERTO Y CON LIERINTERRUPTIONS DE BLOQUIED DESBIVAHILLADNOS, NO MIRE DIRECTIARENTI ON INSTRUMENTOS OPTICS. |
| 注章 - 打开时及失效时段有可见及不可见激光辐射。避免光束照射。 |
WARNING!
Enhet
Välj alternatively Hoppa over album
Stall in insomningstimern
5 W per canal (6 Ω), 1 kHz, 10% THD
Total RMS-stereolägeseffekt
10W
Tunerdel
Brug统计数据 are the most common for the 2015 and 2016 seasons. The data are from the European Union, which is the largest market for the two countries.
Forindstillet station
FM 30 stationer
Frekvensmodulation (FM)
Frekvensområde
87,50 MHz til 108,00 MHz (50 kHz trin)
Antenneterinaler
75Ω (ubalanceret)
Terminal-sektion
USB-port
USB-standard
iPod/iPhone, Levy, USB 5
Radio. 7
Aänitehosteet. 8
"IPOD OVER CURRENT ERROR" tai "USB OVER CURRENT ERROR"
Pridvolby stanic 30 stanic FM
Pursuant to at the directive 2004/108/EC, article 9(2)
Panasonic Testing Centre
Panasonic Marketing Europe GmbH
Winsberging 15, 22525 Hamburg, Germany

EU
Panasonic Corporation
Web Site: http://panasonic.net
En Sp Sw Da Fi Po Cz

- Safety precautions
- WARNING!
- Unit
- Battery
- CAUTION!
- Maintenance
- ADVARSEL!
- Supplied accessories
- Table of contents
- Information for Users on Collection and Disposal of Old Equipment and used Batteries
- Remote control
- Main unit
- Connect the FM indoor antenna.
- Connect the AC mains lead.
- Note:
- Preparing the remote control
- Before using
- Replacing the battery
- Inserting or removing media
- iPod/iPhone
- Push [iPod ] to open the dock tray.
- Disc
- USB
- iPod
- Disc, USB
- CD USB
- Compatible media
- iPod/iPhone (as of January 2012)
- iPod touch
- iPod nano
- iPod classic
- Charging an iPod/iPhone
- Radio
- Preparation
- Automatic presetting
- Manual tuning and presetting
- Selecting a preset station
- Improving the sound quality
- Checking the signal status
- RDS broadcasting
- Sound effects
- Clock and timers
- Setting the clock
- Play timer
- Sleep timer
- Press [SLEEP] to select the setting (in minutes).
- Auto off function
- Troubleshooting
- Common problems
- No operations can be done with the remote control.
- Sound is distorted or no sound.
- A "humming" sound can be heard during playback.
- You cannot switch on the iPod/Phone.
- iPod/iPhone does not charge.
- Display not shown correctly.
- Playback does not start.
- The USB device or the contents in it cannot be read.
- Slow operation of the USB device.
- The elapsed time shown is different from the actual play time.
- A beat sound is heard.
- Main unit displays
- "ADJUST CLOCK"
- "ADJUST TIMER
- "ERROR"
- "F61"
- "IPOD OVER CURRENT ERROR" or
- "USB OVER CURRENT ERROR"
- "NODEVICE"
- "NO DISC"
- "NO PLAY"
- "NOT MP3/ERROR"
- "NOT SUPPORTED"
- "REMOTE " (" " stands for a number.)
- “-VBR-”
- Memory reset (initialisation)
- Disconnect the AC mains lead.
- While you press and hold [ /] on the main unit, connect the AC mains lead again.
- Release [0 / 1]
- Remote control code
- To set the code to "REMOTE 2"
- To set the code to "REMOTE 1"
- Amplifier section
- RMS output power stereo mode
- Tuner section
- Preset station
- Frequency modulation (FM)
- Terminals section
- USB port
- iPod connector
- Headphones jack
- Disc section
- Disc played (8 cm or 12 cm)
- Pick up
- NORSK
- Speaker section
- Type
- Speaker unit(s)
- General
- Power supply
- Power consumption
- Dimensions (W x H x D)
- Mass
- Operating temperature range
- Operating humidity range
- Power consumption in standby mode
- W (approximate)
- ADVERTENCIA!
- Unidad
- El iPod/iPhone no searga.
- "IPOD OVER CURRENT ERROR" o
- KCLASS 1 LASER APPARAT
- Enhet
- Tunerdel
- Forindstillet station
- Frekvensmodulation (FM)
- Terminal-sektion
- USB-port
- "IPOD OVER CURRENT ERROR" tai "USB OVER CURRENT ERROR"
- Pridvolby stanic 30 stanic FM
- Panasonic Corporation
- Web Site: http://panasonic.net
Brand : PANASONIC
Model : SC-HC27
Category : Loudspeaker