
SB-TP55 - Loudspeaker PANASONIC - Free user manual and instructions
Find the device manual for free SB-TP55 PANASONIC in PDF.


| Product Type | Speaker |
| Model Name | SB-TP55 |
| Brand | Panasonic |
| Dimensions (Approx.) | 200 mm x 100 mm x 100 mm |
| Weight (Approx.) | 1.0 kg |
| Power Source | AC 100-240V, 50/60Hz |
| Power Consumption | 15 W |
| Bluetooth Version | 4.2 |
| Supported Audio Formats | MP3, WMA, AAC |
| Controls | Power, Volume, Play/Pause, Source Select |
| Indicators | Power LED, Bluetooth LED, Status LED |
| Audio Inputs | 3.5mm AUX, USB-A |
| Speaker Type | Full-range driver |
| Frequency Response | 80 Hz – 20 kHz |
| Maximum Output Power | 10 W |
| Cleaning Instructions | Wipe with a soft, dry cloth. Do not use liquids or sprays. |
| Safety Precautions | Do not expose to rain or moisture. Keep away from heat sources. |
| Spare Parts Availability | Contact Panasonic authorized service center for replacement parts. |
| Repairability Index | Not rated (assumed moderate) |
Frequently Asked Questions - SB-TP55 PANASONIC
User questions about SB-TP55 PANASONIC
0 question about this device. Answer the ones you know or ask your own.
Ask a new question about this device
Download the instructions for your Loudspeaker in PDF format for free! Find your manual SB-TP55 - PANASONIC and take your electronic device back in hand. On this page are published all the documents necessary for the use of your device. SB-TP55 by PANASONIC.
USER MANUAL SB-TP55 PANASONIC
natural_image
Diagram of six vertical bars with varying heights and a small rectangular block, no text or symbols presentPanasonic®
Speaker System
Operating Instructions
Model No.
SB-TP55
EB
Dear customer
Thank you for purchasing this product.
For optimum performance and safety, please read these instructions carefully.
| Speaker system Speaker | |
| SB-FS50 Front, Surround SB-FS50 X 4 | |
| SB-CW55 | Center SB-PC50 X 1Active subwoofer SB-WA55 X 1 |
Supplied accessories
Please check and identify the supplied accessories.
Use numbers indicated in parentheses when asking for replacement parts.
SB-CW55
□ AC mains lead .... 1 (RJA0038-1U)

Note
The included AC mains lead is for use with this unit only. Do not use it with other equipment.
SB-FS50
□ Monaural connection cable ..... 1 (RJL1P015B50)
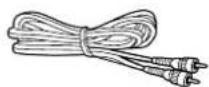
☐ Speaker cables (long: 10 m) ..... 2 (REE1203C)

☐ Speaker cables (short: 4 m) ..... 3 (REE1203A)

☐ Speaker feet ..... 1 sheet (4 feet) (RFA0631A-K)

□ Screw for base .... 4 (XSS5+12FN)

□ Nylon clamp .... 4 (RMR1503-W)

□ Screw for nylon clamp .... 4 (XTB3+8JFN)

Note:
"EB" on the packaging indicates the United Kingdom.
Before connecting, operating or adjusting this product, please read these instructions completely.
Please keep this manual for future reference.
CAUTION!
- DO NOT INSTALL OR PLACE THIS UNIT IN A BOOKCASE, BUILT-IN CABINET OR IN ANOTHER CONFINED SPACE. ENSURE THE UNIT IS WELL VENTILATED. TO PREVENT RISK OF ELECTRIC SHOCK OR FIRE HAZARD DUE TO OVERHEATING, ENSURE THAT CURTAINS AND ANY OTHER MATERIALS DO NOT OBSTRUCT THE VENTILATION VENTS.
- DO NOT OBSTRUCT THE UNIT'S VENTILATION OPENINGS WITH NEWSPAPERS, TABLECLOTHS, CURTAINS, AND SIMILAR ITEMS.
- DO NOT PLACE SOURCES OF NAKED FLAMES, SUCH AS LIGHTED CANDLES, ON THE UNIT.
• DISPOSE OF BATTERIES IN AN ENVIRONMENTALLY FRIENDLY MANNER.
WARNING:
TO REDUCE THE RISK OF FIRE, ELECTRIC SHOCK OR PRODUCT DAMAGE, DO NOT EXPOSE THIS APPARATUS TO RAIN, MOISTURE, DRIPPING OR SPLASHING AND THAT NO OBJECTS FILLED WITH LIQUIDS, SUCH AS VASES, SHALL BE PLACED ON THE APPARATUS.
This product may receive radio interference caused by mobile telephones during use. If such interference is apparent, please increase separation between the product and the mobile telephone.
THIS UNIT IS INTENDED FOR USE IN MODERATE CLIMATES.
| shop@Panasonic | www.panasonic.co.uk(for UK customers only) |
| Order accessory and consumable items for your product with ease and confidence by tele-phoning our Customer Care Centre Mon-Friday 9:00am-5:30pm.(Excluding public holidays.)Or go on line through our Internet Accessory ordering application.Most major credit and debit cards accepted.All enquiries transactions and distribution facilities are provided directly by Panasonic UK Ltd.It couldn't be simpler! | |
| Customer Care CentreFor UK customers: 08705 357357For Republic of Ireland customers: 01 289 8333 | |
| Technical SupportFor UK customers: 0870 1 505610This Technical Support Hot Line number is for Panasonic PC software related products only.For Republic of Ireland, please use the Customer Care Centre number listed above for all enquiries.For all other product related enquiries, please use the Customer Care Centre numbers listed above. | |
Caution for AC mains lead
(For the United Kingdom)
("EB" area code model only)
For your safety, please read the following text carefully.
This appliance is supplied with a moulded three pin mains plug for your safety and convenience.
A 5-ampere fuse is fitted in this plug.
Should the fuse need to be replaced please ensure that the replacement fuse has a rating of 5-ampere and that it is approved by ASTA or BSI to BS1362.
Check for the ASTA mark 📄 or the BSI mark 🌐 on the body of the fuse.
If the plug contains a removable fuse cover you must ensure that it is refitted when the fuse is replaced.
If you lose the fuse cover the plug must not be used until a replacement cover is obtained.
A replacement fuse cover can be purchased from your local dealer.
CAUTION!
IF THE FITTED MOULDED PLUG IS UNSUITABLE FOR THE SOCKET OUTLET IN YOUR HOME THEN THE FUSE SHOULD BE REMOVED AND THE PLUG CUT OFF AND DISPOSED OF SAFELY.
THERE IS A DANGER OF SEVERE ELECTRICAL SHOCK IF THE CUT OFF PLUG IS INSERTED INTO ANY 13-AMPERE SOCKET.
If a new plug is to be fitted please observe the wiring code as stated below.
If in any doubt please consult a qualified electrician.
IMPORTANT
The wires in this mains lead are coloured in accordance with the following code:
Blue: Neutral, Brown: Live.
As these colours may not correspond with the coloured markings identifying the terminals in your plug, proceed as follows:
The wire which is coloured Blue must be connected to the terminal which is marked with the letter N or coloured Black or Blue.
The wire which is coloured Brown must be connected to the terminal which is marked with the letter L or coloured Brown or Red.
WARNING: DO NOT CONNECT EITHER WIRE TO THE EARTH TERMINAL WHICH IS MARKED WITH THE LETTER E, BY THE EARTH SYMBOL ⊥ OR COLOURED GREEN OR GREEN/YELLOW.
THIS PLUG IS NOT WATERPROOF—KEEP DRY.
Before use
Remove the connector cover.
How to replace the fuse
The location of the fuse differ according to the type of AC mains plug (figures A and B). Confirm the AC mains plug fitted and follow the instructions below.
Illustrations may differ from actual AC mains plug.
- Open the fuse cover with a screwdriver.

- Replace the fuse and close or attach the fuse cover.

Safety precautions
Placement
Set the unit up on an even surface away from direct sunlight, high temperatures, high humidity, and excessive vibration. These conditions can damage the cabinet and other components, thereby shortening the unit's service life.
Voltage
Do not use high voltage power sources. This can overload the unit and cause a fire.
Do not use a DC power source. Check the source carefully when setting the unit up on a ship or other place where DC is used.
AC mains lead protection
Ensure the AC mains lead is connected correctly and not damaged. Poor connection and lead damage can cause fire or electric shock. Do not pull, bend, or place heavy items on the lead.
Grasp the plug firmly when unplugging the lead. Pulling the AC mains lead can cause electric shock.
Do not handle the plug with wet hands. This can cause electric shock.
Foreign matter
Do not let metal objects fall inside the unit. This can cause electric shock or malfunction.
Do not let liquids get into the unit. This can cause electric shock or malfunction. If this occurs, immediately disconnect the unit from the power supply and contact your dealer.
Do not spray insecticides onto or into the unit. They contain flammable gases which can ignite if sprayed into the unit.
Service
Do not attempt to repair this unit by yourself. If sound is interrupted, indicators fail to light, smoke appears, or any other problem that is not covered in these operating instructions occurs, disconnect the AC mains lead and contact your dealer or an authorized service center. Electric shock or damage to the unit can occur if the unit is repaired, disassembled or reconstructed by unqualified persons.
Extend operating life by disconnecting the unit from the power source if it is not to be used for a long time.
Insertion of connector
Even when the connector is perfectly inserted, depending on the type of inlet used, the front part of the connector may jut out as shown in the drawing.
However there is no problem using the unit.



natural_image
Diagram of a rectangular container with curved arrows indicating motion or force, and a small grid-like pattern on the side (no text or symbols)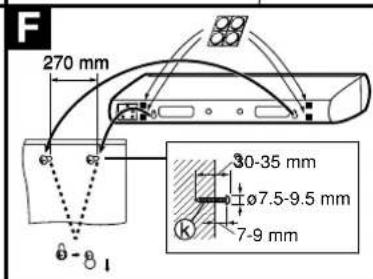
Speaker setup
Take care when handling the speakers not to apply undue pressure to the front nets. Lay the speakers on a flat surface over a soft cloth when working on them.
Tighten the screws firmly.
Front and surround speakers (SB-FS50)
The 4 speakers are the same.
Put the front speakers either side of the television. Put the surround speakers to the side of or slightly behind the seating area.
CAUTION
Do not attach these speakers to walls or ceilings.
A Attaching the base
① Screw for base
Place with the net up.
B Refitting the stabilizer
Refit the stabilizer if you place the speaker so that there are more than 20 cm between its rear and a wall.
① Unscrew the four screws.
② Turn the stabilizer around and reattach with the four screws.
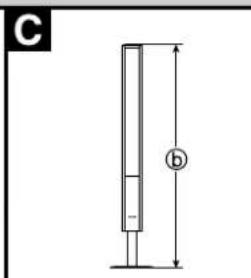
C Adjusting height
⑥ There are three heights (approx. 1108 mm, 1170 mm, and 1284 mm).
The speakers are shipped at the lowest height.
① Unscrew the screw (④ and detach the casing.
② Unscrew the four screws and detach the stand.
③ Change the position of the stand and reattach with the four screws.
d Hooks
© Do not pinch the speaker cord.
4 Reattach the casing and fix with the screw.
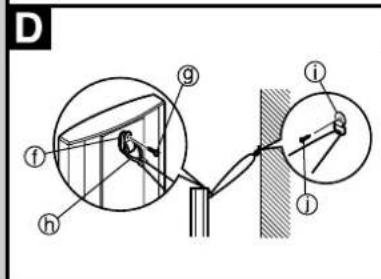
D Attaching a stabilizing wire
Example
f Nylon clamp
⑨ Screw for nylon clamp
① Wire (not included)
① Ring (not included)
① Screw (not included)
Screw the wood screw into a thick and hard part of the wall.
The surface must be able to support over 30 kg.
Center speaker (SB-PC50)
Put above or below the center of the television, on a shelf or rack or attach to the wall. Placing it directly on the television can cause the picture to be distorted.
CAUTION
Do not attach this speaker to walls or ceilings using methods other than those described here.
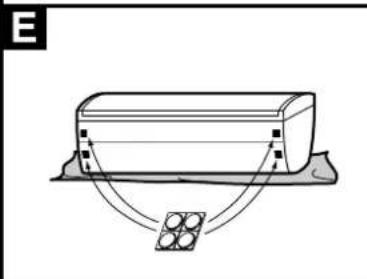
E Attaching the rubber feet when placing on a surface
Attach the rubber feet to the base of the speaker to prevent vibration from causing the speaker to move or fall over.
F Attaching to a wall
Attach four rubber feet to the rear of the speaker.
⑨ Screw (not included)
Screw the wood screw into a thick and hard part of the wall.
The surface must be able to support over 10 kg.
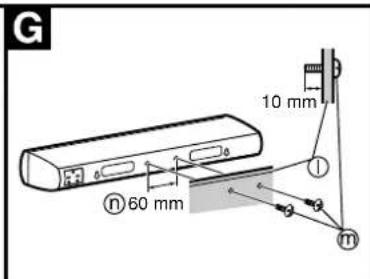
G Attaching to a television stand
Ensure the following conditions are met when purchasing or preparing your television stand.
Observe the diameter and length of the screws and the distance between the screws as shown in the diagram.
① Television stand (not included)
③ Screw (not included); diameter: 5 mm, pitch: 0.8 mm, length: thickness of board plus 10 mm.
⑨ Distance between the centers of the holes: 60 mm.
The stand must be able to support over 10 kg.
Subwoofer (SB-WA55)
Place anywhere as long as it is a reasonable distance from the television. Place it at least 5 cm from the wall as it has a bass reflex port in the rear.
CAUTION
Do not attach this speaker to walls or ceilings.


flowchart
graph TD
    A["SB-FS50"] --> B["↓"]
    B --> C["SB-PC50"]
    C --> D["No"]
    style A fill:#f9f,stroke:#333
    style B fill:#ccf,stroke:#333
    style C fill:#cfc,stroke:#333

A Location
◎ Front speaker (Left) (SB-FS50)
© Center speaker (SB-PC50)
⑨ Front speaker (Right) (SB-FS50)
® Surround speaker (Right) (SB-FS50)
⑤ Surround speaker (Left) (SB-FS50)
① Active subwoofer (SB-WA55)
The front, center, and surround speakers should be placed at approximately the same distance from the listening position. The angles in the diagram are approximate.
How you set up your speakers can affect the bass and the sound field. Note the following points.
- Place on flat, level secure bases.
Use spacers or a similar item to stop them from rocking. - Placing speakers too close to walls, and corners can result in excessive bass.
- Cover walls and windows with thick curtain.
- Do not place anything on top of the subwoofer.
Connections
Connect to a receiver or amplifier (with 6- impedance for the front, center, and surround speakers, and a pin-type output terminal for an active subwoofer.
Before connection
Turn off the other equipment.
Do not connect the AC mains lead until all other cables and cords are connected.
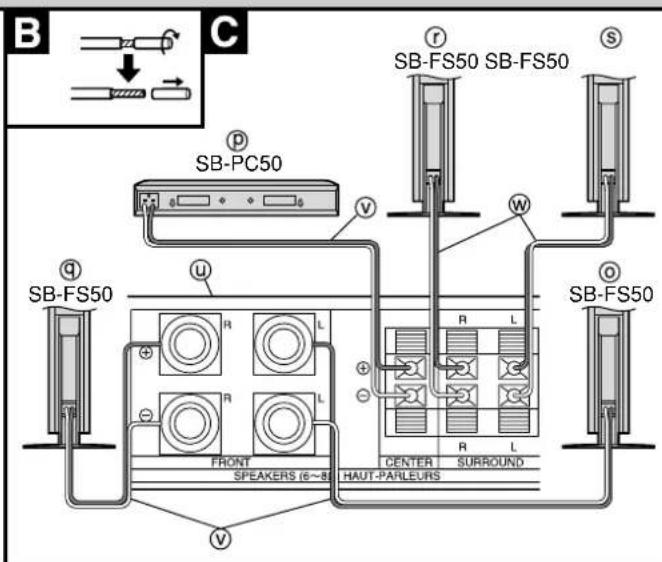
B Twist off the vinyl tip.
c Front, center, and surround speakers
Connect the front (D) and center speakers () with the 4-meter cables (Y) and the surround speakers (, ① with the 10-meter cables (W)
Be sure to connect only positive (copper) wires to positive (+) terminals and negative (silver) wires to negative (-) terminals.
CAUTION
Never short-circuit positive (+) and negative (-) speaker wires.
D Subwoofer
Connect with the included monaural connection cable (☒) to the receiver or amplifier's subwoofer output terminal.
BE SURE TO READ THE CAUTION FOR THE AC MAINS LEAD ON PAGE 2 BEFORE PROCEEDING TO STEP 2.
② Connect the AC mains lead (⑦ to the household mains socket (②).

Subwoofer operation (SB-WA55)
1 Set [POWER] to "ON".
The indicator turns green.
The unit switches to standby and the indicator turns red if it doesn't receive a signal for about 8 minutes. It switches back on when it receives a signal.
2 Output sound from the receiver or amplifier ( ① ) and adjust the volume to a suitable level.
See the operating instructions for the other equipment for details.
Do not adjust the bass as this can cause distortion.
3 Set [LOW PASS FILTER].
Set the low pass filter on your receiver or amplifier to 200 Hz if possible.
Refer to "Frequency response by LOW PASS FILTER setting". Set [LOW PASS FILTER] to 200 Hz for a full range. Reduce it if you feel the bass is too strong.
4 Adjust [VOLUME] to a suitable level.
Refer to "Frequency response by VOLUME setting".
5 Play something, then set [PHASE] to "■NORMAL" or "■REVERSE" so sound is normal.
The subwoofer and speakers cancel each other out (causing unusual, muffled sound) if phase is incorrect.
Frequency response by LOW PASS FILTER setting
![PANASONIC SB-TP55 - Play something, then set [PHASE] to "■NORMAL" or "■REVERSE" so sound is normal. - 1](/content/2026/05/969106/images/7a5a1792066289c14344fd352a38273ad0c2e377bef85d975029423779120ae9.jpg)
line
| Frequency (Hz) | Approximate Value | | -------------- | ----------------- | | 20 | 50 | | 50 | 100 | | 100 | 150 | | 200 | 200 | | 500 | 50 | | 1000 | 60 |Frequency response by VOLUME setting
![PANASONIC SB-TP55 - Play something, then set [PHASE] to "■NORMAL" or "■REVERSE" so sound is normal. - 2](/content/2026/05/969106/images/361bb7ee6aba351fc694d4221a8a3f0f3c9667b4777bb24c05575d4f2bda3a20.jpg)
line
| Frequency (Hz) | Sound pressure level (approximate values) | | -------------- | ----------------------------------------- | | 20 | 10 dB | | 50 | ~100 | | 100 | ~80 | | 200 | ~60 | | 500 | ~40 | | 1000 | ~20 |When settings are complete
The only operation you should have to perform daily is press [POWER] to turn the unit ON/OFF.
If you reposition the system and the acoustics change, reset the unit as necessary.
Note
If the volume output is too loud, this unit's amplifier can be clipped, causing output to sound unusual. Reduce the volume of the receiver or amplifier or the volume of this unit if this occurs.
Protection circuitry (SB-WA55)
This circuitry to prevents damage caused by excessive input or abnormal signals. When excess input is detected, the sound is automatically interrupted.
If sound is interrupted...
- Reduce the volume level from the receiver or amplifier.
- Press [POWER] to turn the unit off.
- Check the sound source and connections for problems.
- Press [POWER] to turn the unit on.
After the protection circuitry is reset...
Take care not to increase the receiver's or amplifier's volume level too much.
Notes
Speaker impedance and allowed input
| SB-FS50 / SB-PC50 Impedance 6 Ω | |
| Input power 100 W (DIN) | |
CAUTION
The only receivers or amplifiers you should connect to these speakers are those whose rated output does not exceed the above figures. Using a receiver or amplifier with higher ratings than listed above can cause abnormal sounds to occur because of excessive input, damage to the receiver or speakers, and fire. If equipment is damaged in any way or unexpected trouble occurs during playback, unplug the system from its outlet and call a serviceman for help.
Protection circuitry
SB-FS50 / SB-PC50
These units incorporate protection circuitry to protect them from damage caused by excessive input or abnormal signals; when excess input is detected, input is automatically interrupted.
If sound is interrupted...
- Reduce the volume of the receiver (or amplifier).
- Check the sound source and connections for any problems. If there is no problem, the protection circuitry will reset in a few minutes.
After the protection circuit is reset...
Take care not to increase the receiver's volume too high.
Excessive input
You can damage your speakers and shorten their useful life if you play sound at high levels over extended periods.
Reduce the volume in the following cases to avoid damage :
- When playing distorted sound.
- When adjusting the sound quality.
- When turning the amplifier on or off.
- When the speakers are receiving howling from a microphone or record player, noise from FM broadcasts, or continuous signals from an oscillator, test disc, or electronic instrument.
Other notes
If irregular coloring occurs on your television :
These speakers are designed to be used close to a television, but the picture may be affected with some televisions and set-up combinations.
If this occurs, turn the television off for about 30 minutes.
The television's demagnetizing function should correct the problem. If it persists, move the speakers further away from the television.
You cannot remove the speaker net.
Keep magnetized items away.
Magnetized cards, bank cards, commuter passes, etc., can be damaged if allowed too near speaker magnets. Clocks may also be affected.
Avoid locations such as described below :
• In direct sunlight
- Near heating appliances or other sources of heat
• Where the humidity is high
Maintenance
Clean these units with a soft, clean, dry cloth.
Clean regularly to maintain the polished surface.
- Never use alcohol, paint thinner, or benzine to clean these units.
- Before using chemically treated cloth, read the instructions that came with the cloth carefully.
Specifications
SB-FS50
Type 2 way 3 speaker system Closed type
Speaker (s) Woofer: 8 cm cone type x 2
Tweeter: 2.5 cm semi-dome type x 1
Impedance 6 Ω
Input power 200 W (Music), 100 W (DIN)
Sound pressure level 81 dB/W (1.0 m)
Crossover frequency 3 kHz
| Frequency range | 140 Hz – 50 kHz (at -16 dB) |
| 180 Hz – 45 kHz (at -10 dB) | |
| Dimensions (W x H x D) | 240 x 1108 x 211 mm |
| Mass | 5.5 kg |
SB-PC50
Type 3 way 5 speaker system Bass-reflex type
Speaker (s) Woofer: 5 cm cone type x 4
Tweeter: 2.5 cm semi-dome type x 1
Impedance 6 Ω
Input power 200 W (Music), 100 W (DIN)
Sound pressure level 82 dB/W (1.0 m)
| Crossover frequency | 3.5 kHz, 4.5 kHz |
| Frequency range | 130 Hz – 50 kHz (at -16 dB) |
| 150 Hz – 45 kHz (at -10 dB) | |
| Dimensions (W x H x D) | 430 x 64 x 100 mm |
| Mass | 1.8 kg |
SB-WA55
SPEAKER SECTION
| Type | 1 way 1 speaker system Bass-reflex type |
| Speaker (s) | Woofer: 17 cm cone type x 1 |
| Impedance | 6 Ω |
| Input power | 200 W (Music), 100 W (DIN) |
| Sound pressure level | 80 dB/W (1.0 m) |
| Frequency range (with amp) | 32 – 300 Hz (at -16 dB) |
| 38 – 240 Hz (at -10 dB) |
AMPLIFIER SECTION
| Output power 100 W (6 Ω) (THD 0.9%) | |
| Input sensitivity / Input Impedance | 300 mV/33 kΩ (RCA jack) |
| Phase switching | NORMAL/REVERSE |
| Low pass filter | 50 – 200 Hz Variable |
GENERAL
| Power supply AC 230 – 240 V, 50 Hz | |
| Power consumption | 168 W |
| Dimensions (W x H x D) | 162 x 457 x 420 mm |
| Mass | 10.8 kg |
Note
Specifications are subject to change without notice.
Mass and dimensions are approximate.

- Panasonic®
- Speaker System
- Operating Instructions
- Dear customer
- Supplied accessories
- SB-CW55
- Note
- SB-FS50
- Note:
- CAUTION!
- WARNING:
- THIS UNIT IS INTENDED FOR USE IN MODERATE CLIMATES.
- Caution for AC mains lead
- (For the United Kingdom)
- ("EB" area code model only)
- IMPORTANT
- WARNING: DO NOT CONNECT EITHER WIRE TO THE EARTH TERMINAL WHICH IS MARKED WITH THE LETTER E, BY THE EARTH SYMBOL ⊥ OR COLOURED GREEN OR GREEN/YELLOW.
- THIS PLUG IS NOT WATERPROOF—KEEP DRY.
- Before use
- How to replace the fuse
- Safety precautions
- Placement
- Voltage
- AC mains lead protection
- Foreign matter
- Service
- Insertion of connector
- Speaker setup
- Front and surround speakers (SB-FS50)
- CAUTION
- A Attaching the base
- B Refitting the stabilizer
- C Adjusting height
- D Attaching a stabilizing wire
- Center speaker (SB-PC50)
- E Attaching the rubber feet when placing on a surface
- F Attaching to a wall
- G Attaching to a television stand
- Subwoofer (SB-WA55)
- A Location
- Connections
- Before connection
- c Front, center, and surround speakers
- D Subwoofer
- Subwoofer operation (SB-WA55)
- Set [POWER] to "ON".
- Output sound from the receiver or amplifier ( ① ) and adjust the volume to a suitable level.
- Set [LOW PASS FILTER].
- Adjust [VOLUME] to a suitable level.
- Play something, then set [PHASE] to "■NORMAL" or "■REVERSE" so sound is normal.
- When settings are complete
- Protection circuitry (SB-WA55)
- If sound is interrupted...
- After the protection circuitry is reset...
- Notes
- Protection circuitry
- SB-FS50 / SB-PC50
- After the protection circuit is reset...
- Excessive input
- Reduce the volume in the following cases to avoid damage :
- Other notes
- If irregular coloring occurs on your television :
- If this occurs, turn the television off for about 30 minutes.
- You cannot remove the speaker net.
- Keep magnetized items away.
- Avoid locations such as described below :
- Maintenance
- Clean these units with a soft, clean, dry cloth.
- Specifications
- SB-PC50
- SB-WA55
Brand : PANASONIC
Model : SB-TP55
Category : Loudspeaker