
JMG20W - Yogurt maker GORENJE - Free user manual and instructions
Find the device manual for free JMG20W GORENJE in PDF.


| Product Type | Yogurt Maker |
| Brand | Gorenje |
| Model | JMG20W |
| Dimensions (W x D x H) | 20 x 20 x 15 cm |
| Weight | 1.5 kg |
| Power Supply | 220-240 V, 50/60 Hz |
| Power Consumption | 15 W |
| Capacity | 7 jars of 150 ml each |
| Material | Plastic housing, glass jars |
| Timer | Yes, up to 12 hours |
| Automatic Shut-Off | Yes |
| Temperature Control | Fixed fermentation temperature (approx. 42°C) |
| Indicator Light | Yes, power on and fermentation active |
| Cleaning | Glass jars and lids are dishwasher safe; wipe base with damp cloth |
| Safety Features | Automatic shut-off, overheat protection |
| Spare Parts Available | Replacement jars, lids |
| Repairability | Authorized service centers for repairs |
| Included Accessories | 7 glass jars, 7 lids, measuring spoon, user manual |
| Warranty | 2 years |
Frequently Asked Questions - JMG20W GORENJE
User questions about JMG20W GORENJE
0 question about this device. Answer the ones you know or ask your own.
Ask a new question about this device
Download the instructions for your Yogurt maker in PDF format for free! Find your manual JMG20W - GORENJE and take your electronic device back in hand. On this page are published all the documents necessary for the use of your device. JMG20W by GORENJE.
USER MANUAL JMG20W GORENJE
natural_image
White rice cooker with lid and control knob (no visible text or symbols)JMG20W
natural_image
Diagram showing a container being added to another, then to an open lid (no text or symbols present)natural_image
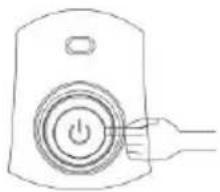
Diagram showing a cooking process with a can being added to a container, followed by adding a lid (no text or symbols present)Aparat priključite na električno omrežje in pritisnite gumb na upravljalni pološči (7).
natural_image
Line drawing of a device with a power button and handle (no text or symbols)Aparat pustite delovati od 5 do 10 ur. Aparata med delovanjem ne premikajte.
natural_image
Diagram showing three stages of a container being filled, with an arrow indicating the process (no text or symbols present)Posodo zaprite s pokrovom in premestite v hladilnik, da se ohladi.
- Pokrov
- Pokrov posude
- Cjediljka
- Mala posuda
- Velika posuda
- Uređaj
- Ploča za upravljanje
Važno:
Prije početka uporabe uređaja detaljno se upoznajte s korisničkim priručnikom i sačuvajte ga za možebitno kasnije korištenje.
Opasnost
natural_image
Diagram showing a container being added to another, then to an open lid (no text or symbols present)natural_image
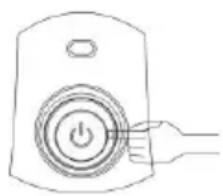
Diagram showing a container being added to another, with no text or symbols presentAparat priključite na električnu instalaciju i pritisnite gumb na ploči za upravljanje (7).
natural_image
Line drawing of a hand holding a power button inside a device (no text or symbols)natural_image
Diagram showing a container being inserted into a larger jar, with an arrow indicating the process (no text or symbols present)Posudu zatvorite pokrovom i premjestite je u hladnjak da se ohladi.
- Poklopac
- Poklopac posude
- Cediljka
- Mala posuda
- Velika posuda
- Aparat
- Kontrolna tabla
Važno:
natural_image
Diagram showing a cooking pot with lid and side view, plus an addition of a lid (no text or symbols)natural_image
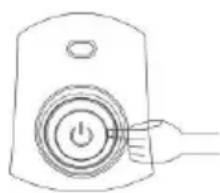
Diagram showing a container being added to a lid, with no text or symbols presentAparat priključite na električnu instalaciju i pritisnite dugme na kontrolnoj tabli (7).
natural_image
Line drawing of a hand holding a speaker with a power button (no text or symbols)Ostavite da aparat radi od 5 do 10 časova. Tokom rada aparat nemojte pomerati.
Temperatura prostorije može da utiče na vreme izrade jogurta. U slučaju niže temperature prostorije, vreme izrade jogurta se produžuje, ali ne više od ukupno 14 sati.
Kada je jogurt pripremljen, isključite napravu i izvucite priključni kabl iz utičnice električne instalacije.
Čaše s jogurtom premestite u frižider i ostavite da se jogurt ohladi.
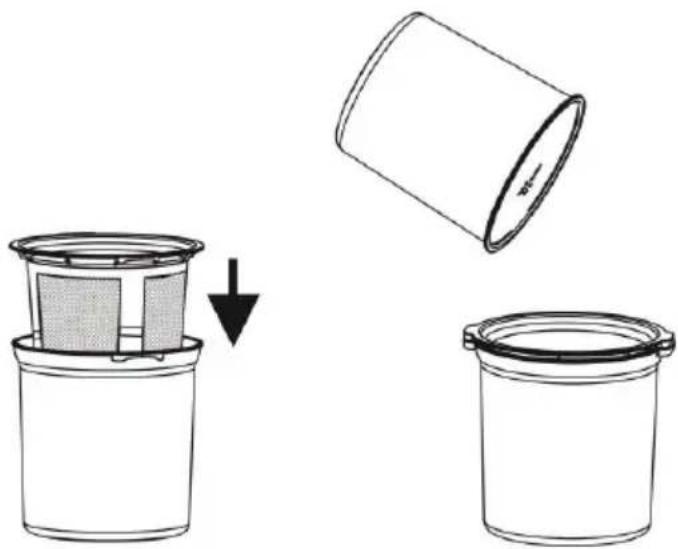
Ukoliko želite grčki jogurt, sipajte napravljeni jogurt u malu posudu (4), u koju ste stavili cediljku (3).
natural_image
Diagram showing a container being inserted into a lid, with an arrow indicating the process (no text or symbols present)Posudu zatvorite poklopcem i premestite u frižider da se ohladi.
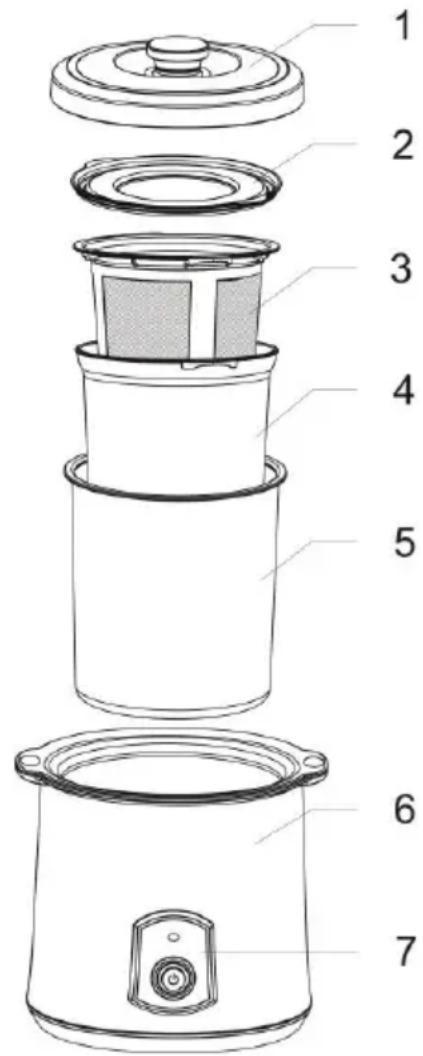
General description:
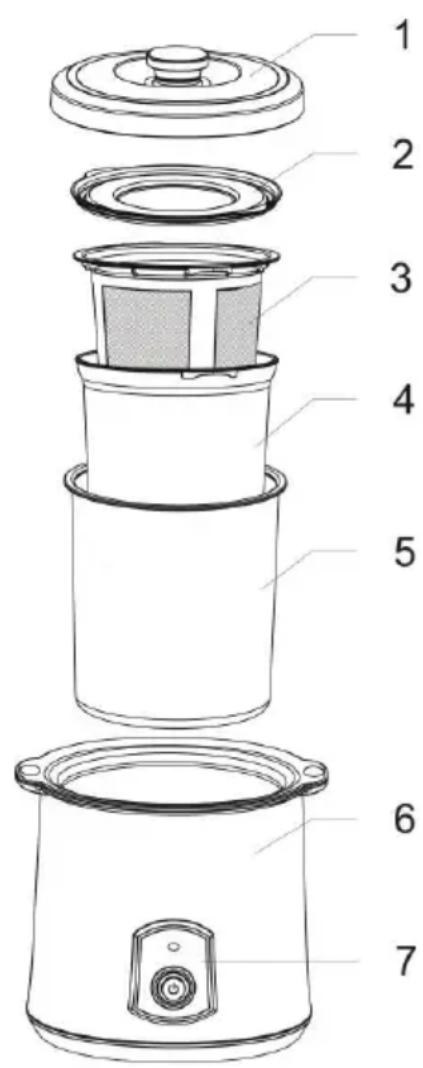
- Lid
- Jar cover
- Sieve
- Small jar
- Large jar
- The appliance
- Control panel
Important:
Before using the appliance for the first time, carefully read this instruction manual and save it for future reference.
Danger
Do not immerse the appliance in water or any other liquid, and do not rinse it under running water, e.g. under a tap.
Warning
Before connecting the appliance to the power mains, make sure the voltage indicated on the appliance matches the power mains voltage in your home. Do not use the appliances, of the plug, power cord, or any other component is damaged. If the power cord is damaged, it may only be replaced by Gorenje, Gorenje's authorized service and repair centre, or an adequately trained professional. The appliance should not be used by children or persons with impaired physical or psychological skills, or persons with lacking experience and knowledge, unless such persons are supervised or advised by a person responsible for their safety.
Do not let the children play with the appliance.
Do not leave the appliance to operate unattended. If you notice any sign of damage on any part of the appliance, discontinue its use and contact the nearest Gorenje authorized service and repair centre.
Do not clean with water hotter than 80^ C.
Attention: When in use, the appliance becomes hot!
Do not use attachments or spare parts by other manufacturers unless they are expressly recommended by Gorenje. In case of use of such attachments or accessories, the
warranty shall be void. Before switching on the appliance, make sure all components are correctly installed. Only use the appliance if the lid is correctly in place. When making yoghurt, do not use ingredients past their expiration date or yoghurt with added flavouring. Make sure the appliance is dry during operation. After use, in case of any faults, and before cleaning, always unplug the appliance from the power mains. The appliance is intended exclusively for personal (household) use and should not be used for commercial purposes. Do not use the appliance outdoors.
This equipment is labelled in compliance with the European Directive 2012/19/EC on waste electric and electronic equipment – WEEE. The Directive specifies the requirements for collection and management of waste electric and electronic equipment effective in the entire European Union.
Preparing the appliance for use:
Remove the packaging. Wash all appliance parts with lukewarm water and some liquid detergent. Then, dry them thoroughly (see chapter "Cleaning").
Making yoghurt:
You only need two ingredients to make yoghurt: milk and natural yoghurt (without added sugar or fruit).
In the large jar (5), prepare a mixture of milk and add 5 to 10 percent of plain yoghurt.
Example: 1 litre of milk + 0.5 to 1 dl of yoghurt
Thoroughly mix the milk and yoghurt to make a smooth mixture without curdles.
Close the large jar containing the mixture with the jar cover (2), place it into the appliance, and cover with the lid (1).
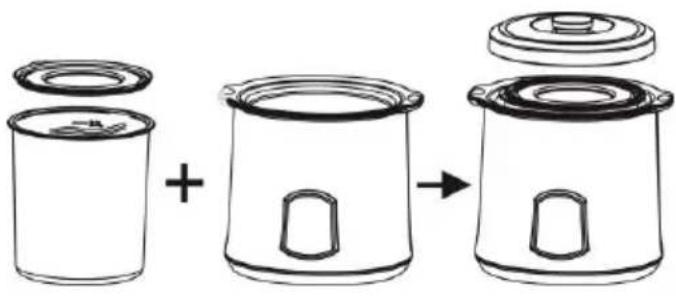
natural_image
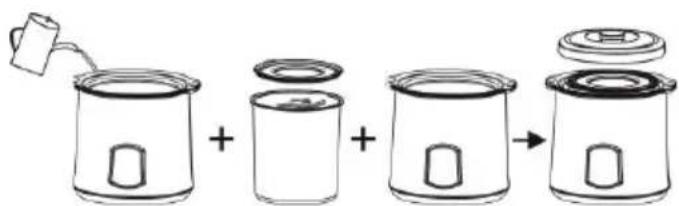
Diagram showing a container being added to another, then to an open lid (no text or symbols present)For better heat transfer, shorter yoghurt preparation time, and better quality, add some water into the appliance before inserting the large jar with the milk and yoghurt mixture.
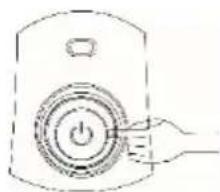
Connect the appliance to the power mains and press the button on the control panel (7).
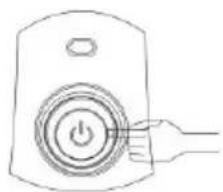
natural_image
Line drawing of a hand holding a button with a power symbol (no text or labels)Let the appliance operate for 5 to 10 hours.
Do not move the appliance during operation.
Room temperature can affect the yoghurt preparation time. If the environment temperature is lower, preparation time can be extended, but it cannot be longer than 14 hours.
When your yoghurt is ready, switch off the appliance and unplug the power cord.
Transfer the yoghurt into a closed container and place it in the refrigerator. Leave it to cool.
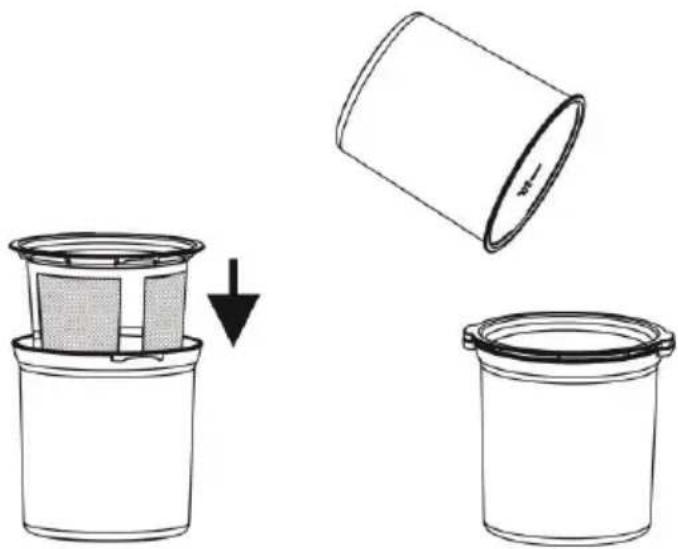
For Greek yoghurt, transfer the yoghurt, when done, to the small jar (4) with the sieve (3) in place.
natural_image
Diagram showing a container being inserted into a lid, with an arrow indicating the process (no text or symbols present)Close the jar with the cover and put in the refrigerator to cool.
The longer the yoghurt is on the sieve, the denser the yoghurt will be.
Tips:
For best results, first heat the milk to 85 °C, then leave it to cool to 35 °C before adding yoghurt and preparing the mixture.
Dry cultures can also be used in place of yoghurt. In such case, observe the instructions of the product's manufacturer.
When making new yoghurt, you may also use the yoghurt that you have made. However, your yoghurt can be "recycled" in this way only three to four times. After that, the yoghurt will be too watery. Then, it is time to start the process with fresh yoghurt.
When making Greek yoghurt, taking Greek yoghurt as the base is not necessary, but will lead to better results.
Cleaning:
Before cleaning the appliance, make sure it has been disconnected from the power mains and that it has cooled down completely.
Do not clean the appliance with scouring pads, caustic or corrosive cleaners or aggressive liquids like alcohol, gasoline, or acetone.
Appliance is easier to clean if it is cleaned immediately after use.
Clean the appliance with lukewarm water and some liquid detergent.
Clean the exterior of the appliance with a clean damp cloth. Do not clean the appliance exterior with water and never immerse the appliance in water.
Do not use metal cleaning accessories as they can damage the appliance.
Do not wash the appliance or parts thereof in the dishwasher.
Environment:
After the expiry of its useful life, do not discard the appliance with common household waste. Take is to an authorized recycling centre. This will help preserve the environment.
Warranty and repair:
For more information or in case of problems, please visit Gorenje website at www.gorenje.com or contact Gorenje customer service in your country (phone numbers are listed in the International Warranty Sheet). If there is no such centre in your country, please contact the local Gorenje dealer or Gorenje's small domestic appliance and personal care appliance department.
GORENJE WISHES YOU A LOT OF PLEASURE IN USING YOUR APPLIANCE.
We reserve the right to modifications.
Opis ogólny:
natural_image
Diagram showing the process of adding a lid to a container, with no text or symbols present.natural_image
Line drawing of a hand holding a power button inside a device (no text or symbols)natural_image
Diagram showing three stages of a container being filled with a lid, with an arrow indicating the process (no text or symbols present)natural_image
Diagram showing a container being added to another, then to an open lid (no text or symbols present)natural_image
Line drawing of a device with a power button and a hand holding it (no text or symbols)natural_image
Diagram showing a container being inserted into a lid, with an arrow indicating the process (no text or symbols present)- Veko
- Kryt misky
- Sitko
- Malá miska
- Vel'ká miska
- Spotrebič
- Ovládací panel
Dôležité:
natural_image
Diagram showing a container being added to another, with no text or symbols presentZapojte spotrebič do elektrickej siete a stlačte tlačidlo na ovládacom paneli (7).
natural_image
Simple line drawing of a device with a hand pointing to the button (no text or symbols)natural_image
Diagram showing a container being inserted into a larger storage unit, with an arrow indicating the process (no text or symbols present)Na misku položte kryt a vložte ju do chladničky, aby sa jogurt vychladil.
natural_image
Diagram showing a cooking pot with three parts: one open, one filled with liquid, and one closed with lid (no text or symbols)natural_image
Line drawing of a handheld device with a power button and handle (no text or symbols)natural_image
Diagram showing a container being filled with a lid, with an arrow indicating the process (no text or symbols present)natural_image
Diagram showing a container being removed from a lid, with an arrow indicating the process (no text or symbols present)natural_image
Illustration of a cooking process showing a can being added to a lid, with no text or symbols present.natural_image
Simple line drawing of a hand holding a button with a power symbol (no text or labels)natural_image
Diagram showing a container being filled with a lid, then being placed into a larger container (no text or symbols present)natural_image
Diagram showing a container being added to another, then to an open lid (no text or symbols present)natural_image
Diagram showing a cooking process with a ladle pouring liquid into a container, followed by adding and finally adding a lid (no text or symbols present)natural_image
Line drawing of a hand holding a power button inside a device (no text or symbols)natural_image
Diagram showing three stages of a container being filled with a lid, with an arrow indicating the process (no text or symbols present)natural_image
Diagram showing a cooking pot with three parts, one being added to another, and the other being added to a larger pot (no text or symbols present)natural_image
Line drawing of a hand holding a speaker with a power button (no text or symbols)natural_image
Diagram showing a container being inserted into a larger storage unit, with an arrow indicating the process (no text or symbols present)natural_image
Diagram showing a cooking pot with three parts: one open, one filled with contents, and one closed with a lid (no text or symbols)natural_image
Line drawing of a hand holding a button with a power symbol (no text or labels)natural_image
Diagram showing three stages of a container being filled with liquid, with an arrow indicating the process (no text or symbols present)natural_image
Diagram showing a cooking pot with three parts, one being added to another, and the other being added to the final container (no text or symbols present)natural_image
Line drawing of a hand pressing a button on a device (no text or symbols)natural_image
Diagram showing a container being inserted into a larger jar, with an arrow indicating the process (no text or symbols present)Brand : GORENJE
Model : JMG20W
Category : Yogurt maker