FSR-24OD - Fridge Orien - Free user manual and instructions
Find the device manual for free FSR-24OD Orien in PDF.

User questions about FSR-24OD Orien
0 question about this device. Answer the ones you know or ask your own.
Ask a new question about this device
Download the instructions for your Fridge in PDF format for free! Find your manual FSR-24OD - Orien and take your electronic device back in hand. On this page are published all the documents necessary for the use of your device. FSR-24OD by Orien.
USER MANUAL FSR-24OD Orien
natural_image
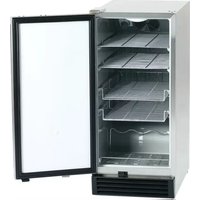
Line drawing of a simple rectangular kitchen refrigerator with wheels and a side door (no text or symbols)Model/Modelo FSR-24OD
CAUTION:
BEFORE USE, PLEASE READ AND FOLLOW ALL SAFETY RULES AND OPERATING INSTRUCTIONS. THIS APPLIANCE IS NOT DESIGNED FOR THE STORAGE OF MEDICINE OR OTHER MEDICAL PRODUCTS.
PRECAUCIÓN:
921 General Hill Drive
Virginia Beach, VA23454
Tel.: 1-757-486-2099
Website/Sitio de Internet: ORIENUSA@COX.NET
Table of Contents
Important Safeguards ....3
Location of Parts 4
Technical Specifications ....4
Energy-Saving Tips.... 5
Installation....5 - 6
Operating Your Refrigerator....7 - 8
Care and Cleaning 9
Troubleshooting 10
Limited Warranty....11 - 12
IMPORTANT SAFEGUARDS
Read all instructions before using this appliance. When using this appliance, always exercise basic safety precautions, including the following:
- Use this appliance only for its intended purpose as described in this instruction manual.
- This refrigerator/beverage cooler must be properly grounded in accordance with the installation instructions before it is used. See grounding instructions in the Installation section. Do not use an extension cord.
- This model can either be built-in or free-standing. Built-in units vent at the bottom front, and airflow at the front of this vent must be unimpeded to make the air flow freely and promote low power consumption.
- If the unit is placed on a countertop or stand, the front surface of the door must be 3" or more back from the edge of the countertop or stand in order to avoid accidental tipping of the appliance during normal usage.
- Never unplug the unit by pulling on the power cord. Always grip the plug firmly and pull straight out from the outlet.
- Repair or replace immediately all electric service cords that have become frayed or otherwise damaged. Do not use a cord that shows cracks or abrasion damage along its length or at either the plug or connector end.
- Do not use any electric device or any sharp instrument in defrosting your refrigerator.
- Unplug your unit before cleaning or before making any repairs.
NOTE: We strongly recommended that any servicing be performed by a qualified individual.
SAVE THESE INSTRUCTIONS!
DANGER!
Risk of child entrapment! Before discarding your old refrigerator:
• Take off the doors
- Leave the shelves in place so that children may not easily climb inside.
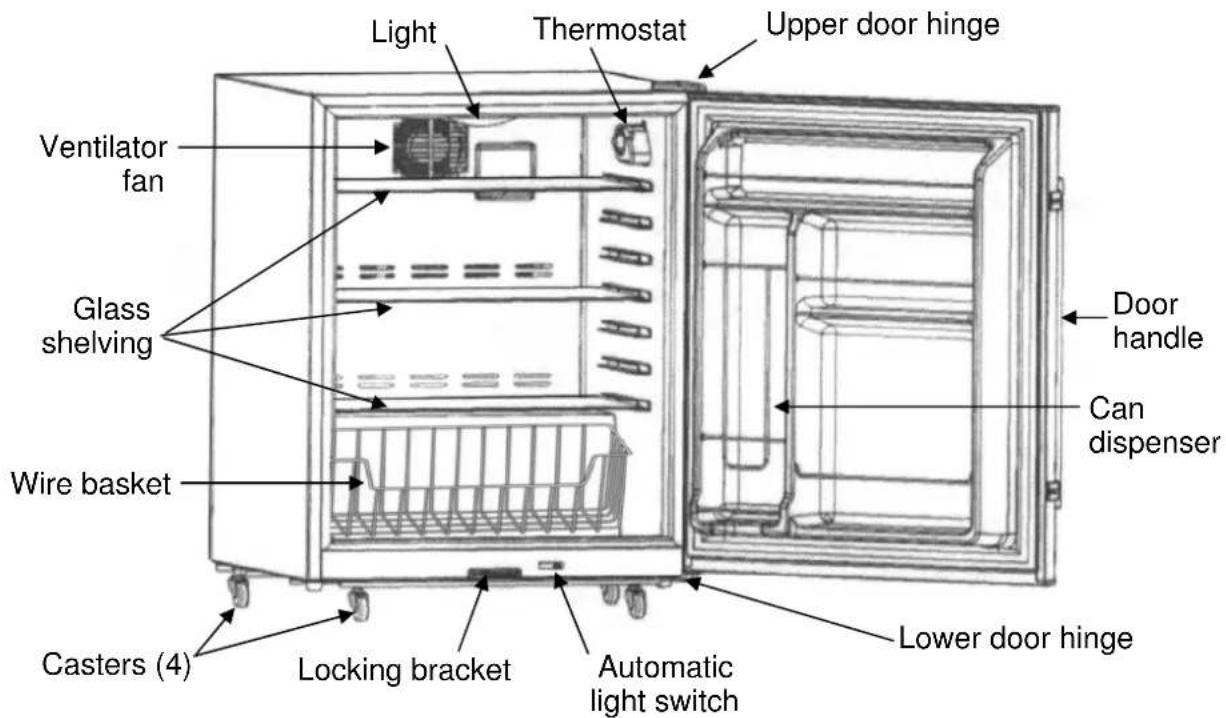
Locations of Parts
Technical Specifications
| Model FSR-24OD | |
| Capacity 4.77 ft | ^3 (135 liters) |
| Ambient Temperature Range | 25°F - 109°F |
| Electrical Rating 115V ~ | 60Hz |
| Rated Current 1.3A | |
| Refrigerant R134a | 2.7 oz. |
| Housing | Stainless steel,suitable for outdoor use |
Energy-Saving Tips
- Do not place your refrigerator next to a heating vent, a range or in direct sunlight.
- Keep the door closed as much as possible, especially in hot, humid weather.
• Cover foods to reduce moisture buildup inside the appliance.
Installation
This refrigerator is designed to be either free-standing or built-in. It has a fan at the bottom of the unit to direct compressor-generated heat away from the compressor and through vents in the back of the unit. The airflow from the vents at the back of the system must be unimpeded. Allow a minimum clearance of 4" at the back of the unit to ensure proper air circulation. The adjacent cabinets and counter top can be built around the unit as long as no top trim or counter top is installed lower than the top of the upper door hinge. For built-in operation, once the unit is positioned, the leveling legs should be turned to level the refrigerator. Installation should be such that the cabinet can be moved for servicing if necessary.
If you wish the unit to be mobile, the four supplied rolling casters can be attached to the bottom of the unit. These casters can be locked into place when the refrigerator is in the desired location.
Note: The unit can be free-standing with either the leveling legs or the rolling casters.
The door handle is connected to the left edge of the door with four screws.
To reverse the door opening, use a Phillips-head screwdriver to remove the handle from the left edge of the door, and then screw it onto the right. It will be necessary to switch the locations of the upper and lower door hinges. To do this, follow these steps:
- Remove the screw on top of the refrigerator that holds the triangular hinge cover, using a Phillips screwdriver.
- Remove the two hex nuts holding the upper hinge bracket to the top of the refrigerator, using an adjustable wrench or a 5/16" hex socket driver. Lift off the bracket, being careful not to lose the small black gasket on the hinge pin.
-
Lift the door off the lower hinge bracket and tilt the refrigerator backwards.
-
Unscrew the lower hinge bracket using the 5/16" hex socket driver. Screw it firmly into the corresponding screw holes on the opposite corner of the unit.
- Set the refrigerator back on its feet and remove two black rubber plugs from the corner of the upper surface. These plugs should be placed into the holes left after removing the upper hinge plate.
- Set the door onto the bottom hinge bracket and fix it in place by inserting the upper hinge (with its gasket) and screwing the upper hinge bracket into position. Test that the door opens and shuts properly and is correctly aligned before fully tightening the screws.
- Screw the hinge cover into place.
Electrical Connection
IMPORTANT! For your personal safety, this appliance must be properly grounded. In the event of an electrical short circuit, grounding reduces the risk of shock by providing an escape route for the electric current. This appliance is equipped with a cord having a grounding wire with a grounding plug. The plug must be inserted into an outlet that is properly grounded and installed. Consult a qualified electrician or service center if you do not completely understand the grounding instructions. If doubt exists as to whether the appliance is properly grounded, have a qualified electrician check the circuit to make sure the outlet is properly grounded.
DO NOT UNDER ANY CIRCUMSTANCES CUT OR REMOVE THE THIRD (GROUND) PRONG FROM THE POWER CORD.
Use of Extension Cords
Avoid the use of an extension cord because of potential safety hazards under certain conditions
Operating Your Refrigerator
IMPORTANT: Do not plug in the unit for at least 24 hours after unit is set in place.
Failure to do so may result in the unit working improperly.
This refrigerator/beverage cooler has a rotary temperature control knob (thermostat) marked with the settings COLD, 2, 3, 4, 5, 6, COLDEST in order of increasing coldness. In addition, this model employs a heater inside the cabinet, and is designed for outdoor use. When the temperature is colder than the temperature setting, the heater works automatically to maintain the temperature setting.
Note: To prevent excessive strain on the compressor, do not leave the unit at the COLDEST setting for more than an hour at a time.
OPERATING INSTRUCTIONS
Turning on the Unit
The refrigerator turns on automatically when it is plugged in.
Note: If you unplug the refrigerator or the power is cut off accidentally, allow 8 minutes before restarting it or plugging it back in. It will not operate properly in less than 8 minutes.
Temperature Setting
Initially set the thermostat to setting 4. The compressor will run continuously for a few hours and only after the temperature inside the appliance becomes stable will the compressor run normally (i.e., turn on and off periodically).
When the unit is operated for the first time, it is suggested that you not put foods in until the compressor is running normally.
Adjusting the thermostat counter-clockwise will make the compressor run for a longer time with a shorter compressor stop time, and the temperature inside the appliance will be colder. The setting should be regulated according to ambient conditions and the desired temperature. The compressor will run for a while after each regulation before reaching a steady temperature.
Please note: Cold air falls and warmer air rises, and there will be a small temperature variation from the bottom of the unit to the top. The temperature at the bottom of the unit will always be slightly colder.
Operating the Internal Light
This appliance has an internal light to make it easier for you to see the foods you have stored. When the door is open, the light will be on and when it is closed, the light will be off.
Defrosting Cycle
The defrosting cycle is 12 hours. After running for 12 hours, the compressor stops for 40 minutes, but the inner fan motor runs for 40 minutes to remove frost at the same time. The defrosting water will flow into the tray on the compressor. Although the water will be evaporated by the heat of the compressor, you should check the tray regularly to avoid the water overflowing to the floor.
ALARM Mode
The unit will make a beeping sound when the thermostatic sensor has malfunctioned. When this happens, the unit works and stops regularly. Contact your authorized service facility for sensor replacement.
Shelving and Wire Basket
The shelves in your unit can be moved to different levels to suit your food storage needs. There is a can dispenser in the door, and the door shelves provide storage for small and large items and a bottle storage area for tall bottles.
The removable wire basket is convenient for storing and transporting a wide variety of foods and beverages.
Replacement of the lamp
Warning: To avoid an electric shock, unplug the unit when replacing the lamp bulb.
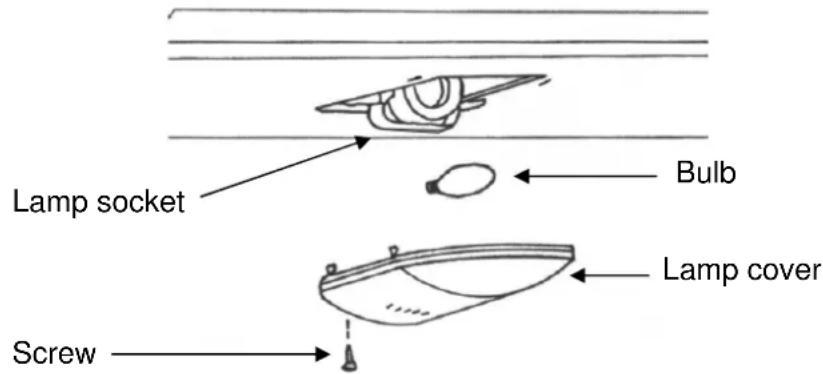
The lamp base is E26; rated power of the lamp is 15W. Use a bulb of the same rating when replacing. When replacing the light bulb, remove the screws on the lamp shield to release the shield. Then replace with the same size and type bulb and fix the shield back into place.
WARNING! Do not open the electrical control box on the upper rear panel of this appliance since this will break the waterproof seal around the control box. When this box is serviced by a professional, a waterproof sealant must be applied to the box after maintenance.
Care and Cleaning
IMPORTANT! Unplug the refrigerator before performing any maintenance operation.
Cleaning the Outside
Clean the outside of your unit with mild soapy water. Dry thoroughly with a soft cloth. To clean the door gasket, use only mild soapy water. Never use harsh detergents or scouring pads to clean any part of your refrigerator.
Cleaning the Inside
Remove all foods, plus shelves and basket. Wash inside with plain water and baking soda solution (about two tablespoons of baking soda to a quart of water). Then rinse and dry. Do not use cleansers such as soaps, detergents, scouring power or spray cleaners which can cause odors inside the refrigerator.
Wash the shelves and basket in mild detergent solution and dry with a soft cloth. To help prevent odors, leave an open box of baking soda in the refrigerator. Change the box every three months.
Do not wash any plastic parts from your refrigerator in the dishwasher. NEVER USE ACIDS, GASOLINE OR PAINT THINNER FOR CLEANING ANY PART OF THE REFRIGERATOR. Never use boiling water which can deform plastic parts.
Troubleshooting
Refrigerator does not turn on
Not plugged in.
Fuse blown or circuit breaker tripped.
Noise or vibration
Check that unit is level. If not, adjust leveling legs.
Turns on and off frequently
This is normal. Small refrigerators cycle more frequently than larger ones.
Seems to run too long
Check for proper clearances.
Frequent door openings let cold air escape.
Refrigerator too warm
Check if door is fully closed.
Check setting of regulator.
Have you put large amounts of warm food into the refrigerator recently?
Are the shelves overcrowded?
Odor in cabinet
Foods with strong odors should be tightly covered.
Check for spoiled food.
Interior may need cleaning.
Keep an open box of baking soda in refrigerator. (Replace every 3 months.)
Limited Warranty
Orien USA, L.L.C., warrants this product to be free from defects in materials and workmanship for a period of one year from the date of the original purchase. Orien also warrants the compressor for 5 years with a Parts-only warranty from the date of purchase. Any parts that are determined to be defective will be replaced or repaired, at its sole discretion, by Orien at no charge as long as it has been determined that the unit was operated in accordance with the instructions attached or furnished with the product. If the unit proves to be defective, your first course of action should be to follow the retailer's return policy.
This warranty covers units only in the continental United States and does not cover the following:
Damage from improper voltage or installation
Damage in shipping
Defects other than manufacturing defects
Glass, trim or light bulb
Any installation expenses that may be incurred
Labor or repairs after the initial 12-month period
Damage from abuse, misuse, accident, alteration or lack of proper care or maintenance
Improper or incorrectly performed maintenance or repairs
Use of parts not recommended by Orien USA, L.L.C.
Damage due to acts of God.
This limited warranty is given in lieu of all other warranties expressed or implied. This warranty does not cover incidental or consequential damages. Some States do not allow the exclusion or limitation of incidental or consequential damages, so the above limitation or exclusion may not apply to you.
This warranty provides you with specific legal rights and you may have other rights which vary from State to State. Consult the written materials accompanying your product for safe and proper operation.
This warranty may not be assigned.
For warranty service, contact
Orien USA, L.L.C.
921 General Hill Drive
Virginia Beach, VA23454
Tel.: 1-757-486-2099
Website: ORIENUSA@COX.NET
When service is required, have on hand the Model and Serial numbers found on the rating label on the back of the unit, as well as proof of purchase such as a sales or gift receipt.
If you have a service issue or wish to talk to a technical representative please call:
1 - 877 - 316 - 1725
Índice
921 General Hill Drive
Virginia Beach, VA23454
Tel.: 1-757-486-2099
Sitio en Internet:
ORIENUSA@COX.NET