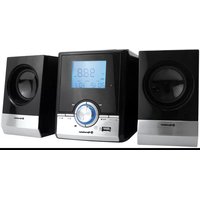
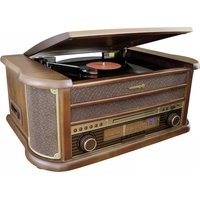
HIF-3650UMP - Hi-Fi System ROADSTAR - Free user manual and instructions
Find the device manual for free HIF-3650UMP ROADSTAR in PDF.


| Product Type | Hi-Fi System |
| Brand | Roadstar |
| Model | HIF-3650UMP |
| Dimensions (Main Unit) | Approx. 160 x 250 x 300 mm (W x H x D) |
| Weight (Main Unit) | Approx. 4.5 kg |
| Power Supply | AC 230V ~ 50Hz |
| Power Consumption | 60W (max) |
| Supported Media | CD, CD-R/RW, USB, FM/AM tuner |
| Audio Output Power | 50W RMS (2 x 25W) |
| Speaker Impedance | 4-8 ohms |
| Frequency Range | FM: 87.5-108 MHz; AM: 522-1620 kHz |
| Connectivity | USB, 3.5mm aux input, antenna |
| Bluetooth | Yes, version 4.0 |
| Remote Control | Included |
| Display | LCD with backlight |
| Supported Audio Formats | MP3, WMA, WAV |
| Maintenance | Clean with dry cloth; avoid liquids |
| Safety Features | Overload protection, ventilation slots |
| Spare Parts Availability | Contact Roadstar service center |
| Reparability | Repairs by qualified technician only |
Frequently Asked Questions - HIF-3650UMP ROADSTAR
User questions about HIF-3650UMP ROADSTAR
0 question about this device. Answer the ones you know or ask your own.
Ask a new question about this device
Download the instructions for your Hi-Fi System in PDF format for free! Find your manual HIF-3650UMP - ROADSTAR and take your electronic device back in hand. On this page are published all the documents necessary for the use of your device. HIF-3650UMP by ROADSTAR.
USER MANUAL HIF-3650UMP ROADSTAR
Roadstar management SA, via Passegglata 7 CH 6883 Novazzano (Switzerland)
WARNINGS


The exclamation point within the triangle is a warning sign alerting the user of important instructions accompanying the product.
The lightening flash with arrowhead symbol within the triangle is a warning sign alerting the user of "dangerous voltage" inside the unit.
To reduce the risk of electric shock, do not remove the cover. No user serviceable parts inside the unit. Refer all servicing to qualified personnel.
This unit employs a laser. Only a qualified service person should remove the cover or attempt to service this device, due to possible eye injury.
Invisible laser radiation when the unit is opened or interlocks defeated. Avoid exposure to laser beam. Use of controls, adjustments or procedures other than those specified herein may result in hazardous radiation exposure.
This unit operates on 230V \~ 50Hz. If the unit is not used for a long period of time, remove the plug from the AC mains.
This unit must not be exposed to moisture or rain.
The power switch in this unit is mounted on the secondary circuit and does not disconnect the whole unit from the mains in OFF position.
Ensure all connections are properly made before operating the unit. This unit should be positioned so that it is properly ventilated. Avoid placing it, for example, close to curtains, on the carpet or in a built-in installation such as a bookcase.
Do not expose this unit to direct sunlight or heat radiating sources.
Correct Disposal of This Product
(Waste Electrical & Electronic Equipment)

This marking shown on the product or its literature, indicates that it should not be disposed with other household wastes at the end of its working life. To prevent possible harm to the environment or human health from uncontrolled waste disposal, please separate this from other types of wastes and recycle it responsibly to promote the sustainable reuse of material resources.
Household users should contact either the retailer where they purchased this product, or their local government office, for details of where and how they can take this item for environmentally safe recycling.
Business users should contact their supplier and check the terms and conditions of the purchase contract. This product should not be mixed with other commercial wastes for disposal.
1
2
EnglishEng
HIF-3650UMP
Micro Hifi System with Compact Disc / MP3 Player, USB, MW/FM-stereo radio and Remote Control.
INSTRUCTION MANUAL
Please read this instruction manual carefully and familiarize yourself with your new HiFi system before using it for the first time. Please retain this manual for future reference.
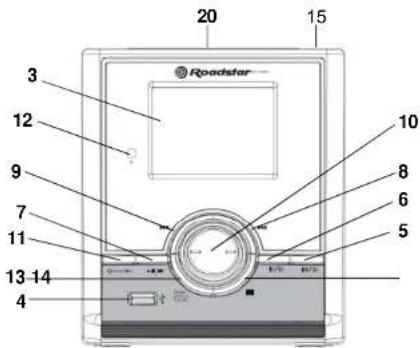
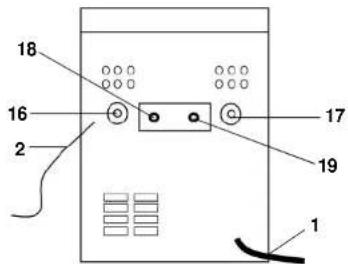
LOCATION OF CONTROLS
-
Power cord
-
Antenna FM
-
LCD Display
-
USB Port input
-
volume up /Alarm 1
-
volume down / Alarm 2
-
CD/USB Play/Pause-Button (▶ II)
-
CD/USB Forward Skip/Search Button
-
CD/USB skip button
-
Tuning Control
-
Function Selector (RADIO/USB/CD/AUX)
-
Remote sensor
-
Mode Display / Clock / Repeat / Program Button
-
Album button
-
CD Open corner
-
Left Speaker (L)
-
Right Speaker (R)
-
AUX-IN
-
Eadphone output
-
Snooze button
CONNECTING TO POWER
Before switching on make sure that the voltage of your electricity supply is the same as that indicated on the rating plate.
For your own safety read the following instructions carefully before attempting to connect this unit to the mains.
This unit is designed to operate on AC 230V 50Hz current only. Connecting it to other power sources may damage the unit.
CAUTION
To prevent electric shock disconnect from the mains before removing cover. No user serviceable parts inside. Refer servicing to qualified service personnel.
SAFETY PRECAUTION
Do not allow this unit to be exposed to rain or moisture.
Mains Supply: 230V 50Hz - AC only

This symbol means that this unit is double insulated. An earth connection is not required.
3
4
EnglishEng
POWER SUPPLY
Remove the stereo carefully from the box, retaining the packaging for future use.
AC POWER OPERATION
Connect the plug to a mains power inlet 230V AC \~ 50 Hz.
CONNECTIONS
SPEAKER CONNECTION
Connect each speaker to the corresponding speaker terminals (16 / 17) on the back of the system.
Ensure that the left speaker is connected to the leftterminals, and the right speaker to the right term
MW/FM TUNER
OPERATION
- Press the Function Selector sequentially (11) until the RADIO AM or FM compare in the display.
- Tune to the desired radio station by turning the Tuning control (10).
- To POWER OFF press the Function Selector (11) three seconds.
ANTENNA
- For FM reception there is a built-in FM antenna wire at the rear of the unit (2). Move the wire around to obtain the best reception.
- For MW reception the signals are picked up through a built-in ferrite antenna. Your may have to orient the unit to obtain the best reception.
FM-STEREO RECEPTION
- Stereo reception is possible when the tuned FM station is broadcasting in stereo.
- When in FM mode and the station is broadcasting in Stereo, the STEREO indicator compare in the display.
CLOCK SETTING
- Make sure the unit is in standbymode.
- Press and hold "CLOCK SET" (13) button until the unit entered the year setting.
- Press "SKIP +" (8) or "SKIP -" (9) to select the desired year.
- Press "Clock Set" (13) button once to confirm

5
- Repeat step 3 & 4 for setting Month, Date, 12/24Hr, Hour and Minute
ALARM SETTING
ALARM setting must be after completed clocksetting. Unit must be in "STANDBY" mode.
Below is using "AL 1" alarm setting for example:
1. Press and hold the "AL 1" button for 2 seconds to entry alarm set mode.
2. Adjust hour by pressing the "SKIP+" (8) or "SKIP-" (9) button, press the "AL 1" button to confirm.
3. Adjust minute bypassing the "SKIP+"or"SKIP-"button, pressthe "AL 1"button to confirm.
4. Pressthe "SKIP+" (8) or "SKIP-" (9) button to select below 1, 2 .3 or 4 for wake-up function:
1 - FM
2 - MP3 (DISC)
3 - USB
4 - BUZZ
5. Press the "AL1" button to confirm. The display will show "AL1", ALARM set is complete.
6. Press the "AL1" button to activate alarm ON/OFF function.
7. When "AL1" is OFF, "AL1" will disappear from the display.
SNOOZE FUNCTION
SNOOZE must be after completed ALARM setting. When the timer is triggered. You may press the "SNOOZE" button to delay the alarm fr another 10 minute
AUX-IN FUNCTION
- Usea3.5mm Male-to-Male Stereocableto connect anyexternalaudiodevice with a3.5mm Headphone or Line-Out jackto the AUX IN jack on the front panel of the stereo.
- Start playback on the external audiodevice. Adjust the volume on the audio device (do not set the volume too high to avoid distortion). You may also adjust the volume on the appliance.
- To control playback function, usethe controls provided by the external audio device.
ATTENTION!
THIS PRODUCT IS ALSO ABLE TO REPRODUCE CD-RW DISCS, HOWEVER IT COULD HAPPEN THAT DURING PLAYBACK SOME TYPE OF DISCS CANNOT BE PLAYED PROPERLY. THEREFORE, FULL PLAYABILITY WITH ALL CD-RW DISCS IS NOT GUARANTEED.
HANDLING COMPACT DISC
- To remove a disc from its storage case, press down on the centre of the case and lift the disc out, holding it carefully by the edges.
Fingerprints and dust should be carefully wiped off the disc's recorded surface with a soft

EnglishEng
cloth. Unlike conventional records, compact discs have no grooves to collect dust and microscopic debris so gently wiping with a soft cloth should remove most particles. Wipe in a straight line from the inside to the outside of the disc. Small dust particles and light stains will have absolutely no effect on reproduction quality.

natural_image
Two hand diagrams showing a mechanical or electrical component with an upward arrow and a circular component, no text or symbols present.- Never use chemicals such as record sprays, antistatic sprays, benzine, or thinners to clean compact discs. These chemicals can irreparably damage the disc's surface.
- Discs should be returned to their cases after use. This avoids serious scratches that could cause the Laser pickup to skip.
- Do not expose discs to direct sunlight, high humidity, or high temperatures for extended periods. Long exposure to high temperatures can warp the disc.
- Do not stick paper or write anything with a ballpoint pen on the label side of the disc.
LOADING AND UNLOADING COMPACT DISCS
- Set the Function Selector (11) to the CD /USB/SD Position.
- Open the disc compartment by pressing on the CD OPEN right corner.
- When the disc compartment has opened, remove a disc from its case and place it carefully in the compartment with the label side facing up. Locate smaller, 3" discs, in the centre depression of the compartment.
- Close the disc compartment. When the compartment is fully closed, the disc will start turning automatically. The total number of tracks of the CD will appear on the LCD display (3).
CAUTION
- Do not put anything except a compact disc into the compartment. Foreign objects can damage the mechanism.
- Keep the disc compartment closed when not in use to prevent dirt and dust from entering the mechanism.
• Never place more than one disc into the disc compartment at any time.
• If the disc is correctly loaded, the following information will be displayed: Total number of tracks on the disc
Notes: After the disc compartment is fully closed, the disc information may not appear on the display. This means that the disc is improperly loaded (most likely it is upside down). To check, open the disc compartment again and reload the disc.
7
NORMAL DISC PLAY
- Open the disc compartment by lift on the CD OPEN right corner and load a CD.
- Close the disc compartment.
- Press the PLAY / PAUSE button (7). The disc play will begin from the start of the first track of the disc.
- A particular track can be selected using either the CD Skip buttons (8,24). If this is done before pressing the PLAY / PAUSE (7) button, disc play will start with the selected track when the PLAY / PAUSE button is pressed.
- At the end of the disc, the unit will switch to stop mode.
Notes: If the disc is deeply scratched, or too dirty, disc play may not start. If on improperly centred disc is played, noise can be heard in the mechanism. The use of such discs should be avoided.
IMPORTANT INFORMATION
This compact disc player has built-in error compensation circuits to correct for minor defects in a disc.
There are limits, however, to the amount of correction available.
In some cases, the CD / MP3 player may skip some tracks on a disc during disc play. This problem may be cause by defects (such as scratches) in the disc being played, which are too large for the error compensation circuits to handle. If you encounter this problem, check the CD player's operation as follows, before having the unit serviced:
Play a new disc. If the CD player operates normally, the skipping problem is probably due to a defective disc.
TO STOP A CD PART WAY THROUGH
- Press the Stop button (7). Disc play will stop and the display will show the total number of tracks for the CD.
- To temporarily stop disc play (pause mode), press the Play / Pause button. Disc play will pause at the current play position. The Play/Pause indicator will flash.
- To resume disc play, press the Play/Pause (7) button again.
TRACK SKIP (CD / USB)
STARTING DISC PLAY FROM THE BEGINNING OFA PARTICULAR TRACK
- Press the Forward or Reverse Skip / Search Track button (8,9) to select the desired track. The number of the selected track will be shown on the display. Press the Play/Pause button to start play.
TO SKIP TO THE NEXT TRACK
- Press the Forward Skip / Search Track button (8) once. Play will resume at the beginning of the next track.
8
EnglishEng
The player will skip ahead to the next track each time the Forward Skip / Search Track button is pressed. Continuously pressing the Forward Skip / Search Track button makes the player skip ahead through the track by track. Once the beginning of the last track is reached the player will not advance any further.
TO SKIP BACK TO THE PREVIOUS TRACK (CD / USB)
- Press the Reverse Skip / Search Track button (8/9). If this button is pressed in the middle of a track, the player will skip back to the beginning of that track. To make it skip back to the previous track press the Reverse Skip / Search Track button (9) twice. Continuously pressing the Reverse Skip / Search Track button makes the player skip back through the disc track by track. Once the beginning of the first track is reached, the player will not go back any further.
Notes: Tracks can be selected even when the Compact Disc compartment is open. However if a track number is selected that is not present on the CD, disc play will start from the beginning of the last track.
PROGRAMMED PLAYBACK (CD / USB)
It is not possible to enter programs during CD/USB play. Press the Stop button (7) first, then follow the instructions below.
Press the PROGRAM button (13). "P01" and the PROGRAM indicator will light up.
Press the Forward and Reverse Skip Track buttons (8/9) to select the track to be stored in position1.
Press the PROGRAM button (13). The first program selection is now stored in the program memory 1.
Select the next track to be programmed using the Forward and Reverse Skip Track (8/9) buttons.
Press the PROGRAM button (13) to store this track.
Continue entering tracks in this way until all the desired tracks are stored (up to a limit of 20). When the PROGRAM button (13) is pressed to store the 20th track, the display will return to the 1st program location. Press the PROGRAM button (13) to step through the program locations.
Listening to Programmed Tracks (CD / USB)
Press the Play Pause button (7). Disc play will start at the beginning of the first programmed track.
To Clear The Program Memory (CD / USB)
If the disc is playing, press the Stop button (25) to stop the disc.
Switch the Function (11) selector to a different position (RADIO/AUX) to clear the Program.

9
REPEAT PLAY (CD / USB)
Use the MODE button (13) to listen to an entire disc, Album or one track repetitively.
For repeat play of one track
Press the Play/Pause button (7), then press the MODE button once.
The REPEAT indicator will light up.
Select the desired track by pressing the Forward or Reverse Skip Track buttons (8,9). The selected track will be shown on the CD display.
The selected track will then begin playing through to its end. At which point it will automatically
return to the beginning of that track. This will continue until the Stop button (25) is pressed.
If the MODE button (13) is pressed three times more, the Repeat indicator will go off, Repeat play will end, and normal disc play will resume from that point.
When the selected track has finished playing, the CD play will Stop.
For repeat play of Album or all the tracks on the CD / USB
Press the Play/Pause button (7), then press the MODE button (13) twice.
The REPEAT ALBUM indicator will light up.
The player will then begin playing through to the end of the last track. At which point it will automatically return to the beginning of the first track. This will continue until the Stop button (7) is pressed.
If the MODE button (13) is pressed twice more, the Repeat indicator will be cancelled, repeat play will end, and normal disc play will resume from that point.
When the last track has finished playing, the CD player will then Stop.
Random Function
Press the "MODE" button 4 times to select the RANDOM function.
EQUALIZER
Press and hold the "ALBUM" button (14), each press switch the EQ function as follows:
-
C = CLASSIC
-
r = ROCK
-
P = POP
-
J = JAZZ
-
F = FLAT (NORMAL)
IMPORTANT
Since movement of the CD mechanism and the sensitive circuitry may cause interference to a radio tuner nearby switch this unit off while operating other radio devices. This product utilizes a laser
Danger - Invisible laser radiation when opened and interlock failed or defeated. Avoid direct exposure to the beam.
Caution - Use of controls, adjustments, or procedures not listed in this manual may result in hazardous radiation exposure.

EnglishEng
Concerning Compact Discs
Only compact discs identified with this mark can be used with this player.

REMOTE CONTROL UNIT
- Remove the battery film from the battery compartment
REMOTE CONTROL:
- POWER ON/OFF BUTTON
- STOP BUTTON
- SKIP I<<
- ALARM 1
- ALBUM
- MODE BUTTON
- FUNCTION BUTTON
- PLAY/PAUSE BUTTON
- SKIP >>
- ALARM 2
- ALBUM
- PROGRAM BUTTON

BATTERY REPLACEMENT
When the remote control operation becomes unstable or the distance from which remote control is possible becomes shorter, replace the batteries with new ones.
SPECIFICATIONS
Power Supply
AC:
230V \~ 50Hz, 11W
Radio Frequency Coverage
FM:
87.5 - 108MHz
MW
520 - 1620 kHz
CD Player
Pick Up:
3-Beam. Semiconductor Laser
Encoding:
16-Bit Linear, 2 x oversampling
Design and specifications are subject to change without notice.
SICHERHEITSHINWEISE


230v\~


WIEDERHOLTE CD/USB-WIEDERGABE
AC: 230V - 50Hz, 11W

- WARNINGS
- Correct Disposal of This Product
- (Waste Electrical & Electronic Equipment)
- HIF-3650UMP
- INSTRUCTION MANUAL
- LOCATION OF CONTROLS
- CONNECTING TO POWER
- CAUTION
- SAFETY PRECAUTION
- POWER SUPPLY
- AC POWER OPERATION
- CONNECTIONS
- SPEAKER CONNECTION
- MW/FM TUNER
- OPERATION
- ANTENNA
- FM-STEREO RECEPTION
- CLOCK SETTING
- ALARM SETTING
- SNOOZE FUNCTION
- AUX-IN FUNCTION
- ATTENTION!
- HANDLING COMPACT DISC
- EnglishEng
- LOADING AND UNLOADING COMPACT DISCS
- 7
- NORMAL DISC PLAY
- IMPORTANT INFORMATION
- TO STOP A CD PART WAY THROUGH
- TRACK SKIP (CD / USB)
- STARTING DISC PLAY FROM THE BEGINNING OFA PARTICULAR TRACK
- TO SKIP TO THE NEXT TRACK
- 8
- TO SKIP BACK TO THE PREVIOUS TRACK (CD / USB)
- PROGRAMMED PLAYBACK (CD / USB)
- Listening to Programmed Tracks (CD / USB)
- REPEAT PLAY (CD / USB)
- For repeat play of one track
- For repeat play of Album or all the tracks on the CD / USB
- Random Function
- EQUALIZER
- IMPORTANT
- Concerning Compact Discs
- REMOTE CONTROL UNIT
- REMOTE CONTROL:
- BATTERY REPLACEMENT
- SPECIFICATIONS
- Radio Frequency Coverage
- CD Player
- SICHERHEITSHINWEISE
- WIEDERHOLTE CD/USB-WIEDERGABE
Brand : ROADSTAR
Model : HIF-3650UMP
Category : Hi-Fi System