
NVD-U03R - Gps SONY - Free user manual and instructions
Find the device manual for free NVD-U03R SONY in PDF.
| Product Type | Portable GPS navigator |
| Brand | SONY |
| Model | NVD-U03R |
| Required Operating System | Windows XP / Windows Vista |
| Required Hard Disk Space | 512 MB minimum |
| Required Drive | CD-ROM drive |
| Connection Port | USB |
| Power Supply | AC adapter included |
| Map Update | Via USB cable and PC connection software |
| Favorites Management | Saving and deleting personal addresses |
| Free Up Space | Deleting unnecessary languages |
| Map Transfer | Selecting and transferring maps via the software |
| Recommendation Before Update | Back up favorites and note addresses |
| Maintenance | Avoid shocks and humidity |
| Safety | Do not unplug the cable during transfer |
| General Information | Manual available in multiple languages |
Frequently Asked Questions - NVD-U03R SONY
User questions about NVD-U03R SONY
0 question about this device. Answer the ones you know or ask your own.
Ask a new question about this device
Download the instructions for your Gps in PDF format for free! Find your manual NVD-U03R - SONY and take your electronic device back in hand. On this page are published all the documents necessary for the use of your device. NVD-U03R by SONY.
USER MANUAL NVD-U03R SONY
The map and POI data may contain copyrighted material.
Do not violate the provisions of the copyright law.
On trademarks
- Microsoft, Windows, Windows Vista and ActiveSync are either registered trademarks or trademarks of Microsoft Corporation in the United States and/or other countries.
- "nav-u" and Nav-U are trademarks of Sony Corporation.
- All other trademarks are trademarks of their respective owners.

V-Trafic Information in France is provided by Mediamobile company.
Traffic Information in the UK is provided by ITIS Holdings Plc.

© 1993 - 2008 NAVTEQ. All Rights Reserved.
Austria
Croatia, Estonia, Latvia,
Lithuania, Poland, Slovenia
© EuroGeographics
France
source: @ IGN2009-BD TOPO®
Germany
Based upon Crown Copyright material.
Greece
Copyright Geomatics Ltd.
Hungary
Copyright © 2003; Top-Map Ltd.
Italy
Copyright © 2000; Norwegian
Mapping Authority
Portugal
Source: IgeoE - Portugal
Spain
Based upon electronic data
National Land Survey Sweden.
Switzerland
Customer Support Portal
If you have any questions or for the latest support information on navigation, visit the website below:
For customers in U.S.A.
http://www.sony.com/nav-u/support
For customers in Canada
http://www.sony.ca/nav-u
For customers in Mexico
For customers in Europe
http://www.navu.sony-europe.com/support
http://www.sony.net/
Sony Corporation Printed in Japan
SONY®
4-156-954-11 (1)
Map Update Disc
©2009 Sony Corporation Printed in Japan
Operating Instructions
GB
DE
Bedienungsanleitung
FR
Mode d'emploi
NL
Gebruiksanawijzing
IT
- OS: Windows® XP/Windows Vista®
- Hard Disk space: 1 GB or more (NVD-U03E, NVD-U03N)
512 MB or more (NVD-U03R, NVD-U03M)
DVD-ROM drive (CD-ROM drive for NVD-U03M) - USB port
Monitor: 1,024 × 768 dots - Internet connection for access to the support website
Before you update/add the maps on the navigation unit
Install the PC connection software on your computer
For Windows XP users:
If "ActiveSync" is not installed in your computer, install by either of the following methods:
- Insert the disc supplied with the navigation unit into your computer, select your language, then click "Install PC connection software" to install the software.
For Windows Vista users:
Download "Windows Mobile Device Center 6.1" or later from the Microsoft support site, if not already installed.
Notes
- If you update the maps on the navigation unit using this disc, data other than on this disc cannot be restored.
- Sony cannot be responsible for any loss of personal content, such as "Favorites" during the update process as certain aspects may not be compatible with the updated content. Please take a few moments to write down your "Favorites" for safekeeping, in case they are lost as a result of the update.
- Set your computer to not enter sleep mode while transferring the map data.
Connecting the navigation unit to your computer
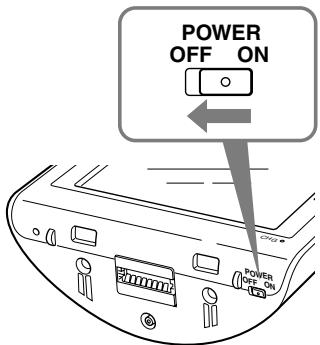
1 Switch off the main power by sliding the POWER switch of the navigation unit to the OFF position.
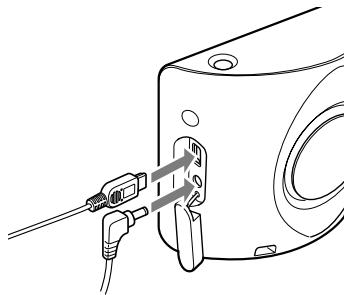
2 Connect the navigation unit to the power supply with the supplied AC adapter.
3 Connect the navigation unit to your computer using the supplied USB cable.
4 Switch on the main power by sliding the POWER switch of the navigation unit to the ON position.
Wait until your computer has detected the navigation unit.
Setting up the PC connection software on your computer
For Windows XP users:
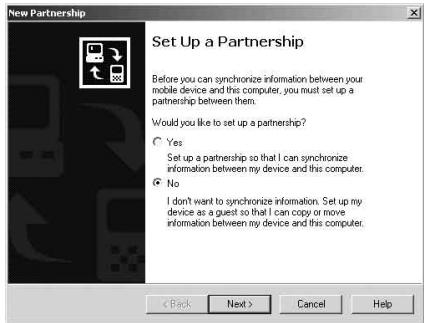
"Connecting" appears on the navigation unit display, and "Set Up a Partnership" appears on your computer display.
1 Select "No."
2 Click "Next."
For Windows Vista users:
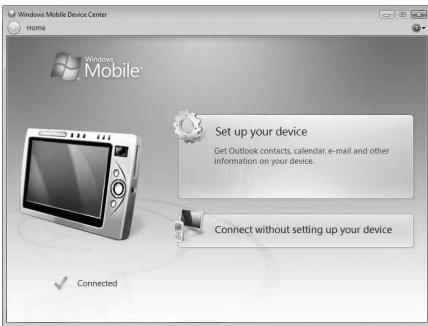
"Connecting" appears on the navigation unit display, and the setup screen of the "Device" display appears on your computer.
1 Select "Connect without setting up your device."
Note
The language on the displays in this step differs depending on your computer.
1 Insert the disc into your computer, then select your language.
Freeing up free space on the navigation unit
As map data volume increases, free space on the navigation unit is necessary. Before installing the map, delete unnecessary language data from the navigation unit.
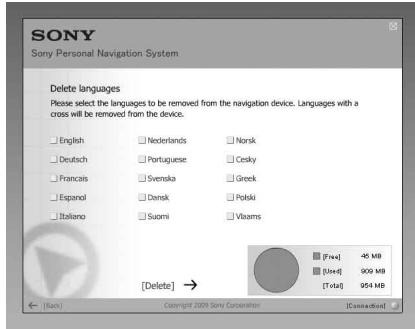
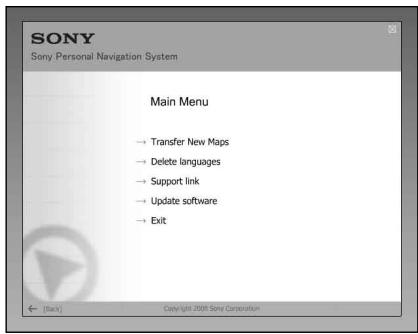
1 Select "Delete languages" from the Main Menu.
2 Select an unused language, and then click "Delete ".
1 Select "Transfer New Maps" from the Main Menu.
If an update is necessary, the following display appears, and follow the procedure of the display.
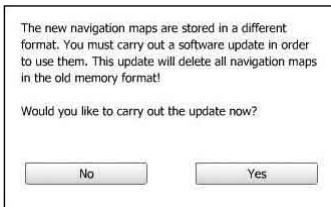
Loading new software to your navigation unit will delete all pre-existing maps. In some cases your "Favorites" will no longer be compatible. (See "Important notice" on page 9.) Update the software, and the user setting will be reset. Set the data again after updating. If you agree to these terms, select "Yes."

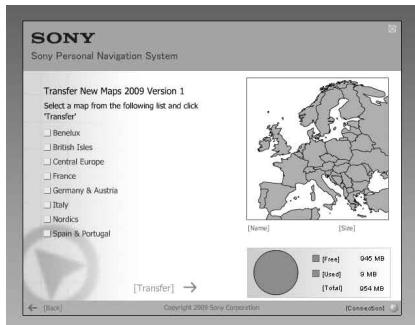
2 Check the map(s) that you want to add, and uncheck any map(s) you want to remove.
3 Click "Transfer
The confirmation display appears.
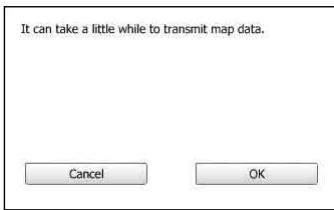
4 Click "OK."
Addition or removal of the map starts.
Notes
- The display differs depending on the map data, model, etc.
- Addition/removal time differs depending on the computer performance or map type.
- Due to the nature of the updated, highly-detailed map content, the area may be different from the map data used now.
- If you cannot select the map, refer to "Freeing up free space on the navigation unit" (page 5).
Completing the map addition/removal
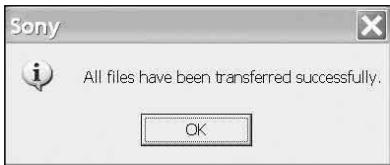
The addition/removal of the map is completed when the above message is displayed.
1 Click "OK."
2 Click "Exit" to quit the application.
Turn off the navigation unit by the POWER switch on its bottom, and disconnect the cables. Turn on the navigation unit again.
1 Does your "Favorites" and "Home" data remain after the update?
In many cases this data will remain, however, some data may generate an error message as a result of the updated map data. In this case, you will need to delete the particular "Favorites" and re-register it with the revised map data installed. Prior to updating your navigation unit, please make a note of all "Favorites" for safekeeping.
2 Can previous map data be restored after updating the navigation unit?
Cannot be restored to the factory default map of the navigation unit.
3 Are any functions updated during the update process?
No functions are updated.
4 What should be done if a route number is not displayed correctly?
Turn the unit OFF using the power switch located on the bottom of the unit and then turn it back ON. The map data will be re-read and the route number should appear correctly, unless it has recently changed.
5 I cannot set the destination registered in "Favorites." What should I do?
You may have selected a destination out of the range of the selected map. Confirm whether the selected destination is within the range of the selected map data.
The destination may not be set even within the range of the selected map, since the map data was updated. If the selected destination is within the range of the selected map, register the destination point again.
6 I cannot use a saved route. What should I do?
You may have selected a route out of the range of the selected map. Confirm whether the selected route is within the range of the selected map data.
The route may no longer be set within the range of the selected map, since the map data was updated. If the selected route is within the range of the selected map, register the route again.
7 What should be done if a cable gets disconnected during the update process?
Cancel the process, reconnect the cable and start over.
About the data on "Favorites"
- Before installation, we recommend that you write down the addresses of important data on "Favorites."
The addresses can be checked by the following procedure.
1 From the top menu, touch "New Destination" "Route planning."
2 Touch → "Favorites."
3 Select the desired item.
4 Touch
The address appears.
- After installing the new map data, the message below may appear when you select the destinations on "Favorites," "Home," or "Recent destinations" which are registered prior to the installation.
"The selected destination is not within the range of the selected map. Please select another map or another destination."
This is due to the map data format being renewed, and the area being divided as a result of an increase in data capacity.
Check if the selected destination point is within the range of the selected map.
If so, delete the destination once, then register again to use.
,The selected destination is not within the range of the selected map. Please select another map or another destination."
1 Selecteer "Connect without setting up your device".
Opmerking
"The selected destination is not within the range of the selected map. Please select another map or another destination."


- On trademarks
- Austria
- Croatia, Estonia, Latvia,
- Lithuania, Poland, Slovenia
- France
- Germany
- Greece
- Hungary
- Italy
- Portugal
- Spain
- Switzerland
- Customer Support Portal
- SONY®
- Map Update Disc
- Before you update/add the maps on the navigation unit
- Install the PC connection software on your computer
- For Windows XP users:
- For Windows Vista users:
- Notes
- Connecting the navigation unit to your computer
- Setting up the PC connection software on your computer
- Select "Connect without setting up your device."
- Note
- Freeing up free space on the navigation unit
- Select "Transfer New Maps" from the Main Menu.
- Completing the map addition/removal
- About the data on "Favorites"
- Selecteer "Connect without setting up your device".
- Opmerking
Brand : SONY
Model : NVD-U03R
Category : Gps