RHD 18 - Drill Cotech - Free user manual and instructions
Find the device manual for free RHD 18 Cotech in PDF.


| Product Type | Cordless Drill |
| Brand | Cotech |
| Model | RHD 18 |
| Voltage | 18 V |
| Battery Type | Lithium-ion |
| Chuck Type | Keyless |
| Chuck Capacity | 13 mm |
| Maximum Speed | 2000 rpm |
| Variable Speed | Yes, 0-2000 rpm |
| Torque | 50 Nm |
| Hammer Function | Yes, for masonry drilling |
| Dimensions (approx.) | 200 x 70 x 250 mm |
| Weight | 1.5 kg (with battery) |
| Power Source | Rechargeable battery |
| Charging Time | Approx. 1 hour |
| Bluetooth | No |
| LED Light | Yes, for illumination |
| Belt Clip | Yes |
| Maintenance | Clean with dry cloth; keep ventilation slots clear |
| Safety Precautions | Wear safety goggles; use correct bits; avoid moisture |
| Spare Parts Available | Battery, charger, chuck, brushes |
| Application | DIY and light professional work |
Frequently Asked Questions - RHD 18 Cotech
User questions about RHD 18 Cotech
0 question about this device. Answer the ones you know or ask your own.
Ask a new question about this device
Download the instructions for your Drill in PDF format for free! Find your manual RHD 18 - Cotech and take your electronic device back in hand. On this page are published all the documents necessary for the use of your device. RHD 18 by Cotech.
USER MANUAL RHD 18 Cotech
Read the entire instruction manual carefully and make sure that you fully understand it before you use the equipment. Keep the manual for future reference.
Viktig information:
natural_image
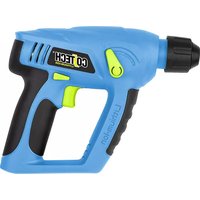
Blue CO TECH LXC Lithium 1.5 AH power drill with drill bit, displayed on a wooden surface (no text or symbols on the device body)Art.no
40-8698
Model
DZC-003
Ver. 20130513
Original instructions
Bruksanvisning i original
Postal 10 – 13 Market Place
Kingston Upon Thames
Surrey
KT1 1JZ
DEUTSCH
Kundeservice
Please read the entire instruction manual before using the product and then save it for future reference. We reserve the right for any errors in text or images and any necessary changes made to technical data. If you have any questions regarding technical problems please contact our Customer Services.
Safety
General safety instructions for cordless power tools
Warning! Read all the instructions. Failure to adhere to the following instructions may lead to electric shocks, fires and/or serious injury. The term “power tools” in the warning text below refers to your handheld mains operated or battery operated tool.
SAVE THESE INSTRUCTIONS!
1) Work area
a) Keep the work area clean and well illuminated. Cluttered and poorly lit areas invite accidents.
b) Do not use power tools in explosive environments, e.g. near flammable liquids, gases or dust. Power tools generate sparks that can easily ignite dust or fumes.
c) Keep children and other bystanders a safe distance away from the area where you intend to use the power tool. Distractions can cause you to lose your concentration and control.
2) Electrical safety
a) The power tool's plug must fit correctly into the wall socket. Never modify the plug in any way. Never use an adaptor together with earthed power tools. Unmodified plugs and suitable wall sockets minimize the risk of electric shocks.
b) Avoid physical contact with earthed objects, such as pipes, radiators, ovens or refrigerators. There is an increased risk of receiving an electrical shock if your body is earthed.
c) Do not expose the power tool to rain or other wet conditions. If water gets inside it increases the risk of electric shock.
d) Do not abuse the mains lead. Never use the lead to carry the tool or pull the plug from a wall socket. Keep the lead away from heat, oil, sharp edges and moving parts. Damaged or tangled leads increase the risk of electric shock.
e) When using power tools outdoors, use an extension lead that is suitable for the purpose. The use of an extension lead designed for outdoor use decreases the risk of electric shocks.
f) If for some reason you must use a power tool in a wet environment, always connect it to the mains via an earth-fault circuit breaker such as an RCD (residual current device). Using an RCD significantly reduces the chances of you receiving an electric shock.
3) Personal safety
a) Pay attention to what you are doing and use common sense when using power tools. Never use power tools if you are tired or under the influence of drugs, alcohol or medication. One moment of inattention while using a power tool may result in serious injury.
b) Wear protective clothing. Always wear safety glasses. Using protective clothing such as dust masks, non-slip safety shoes, helmets and ear defenders when needed decreases the risk of injury.
c) Avoid accidental starts. Make sure that the power switch is set to OFF before plugging the tool into a wall socket. Never carry a power tool with your finger on the trigger and never connect the power tool to a wall socket when the switch is set to ON, since it may result in injury.
d) Remove all service tools/spanners before switching the power tool on. A service tool left on any moving part of the power tool may result in injury.
e) Do not overreach. Make sure you stand steady and well balanced at all times. This will allow you to have more control in unexpected situations.
f) Wear suitable clothing. Do not wear loose-fitting clothing or jewellery.
Keep hair, clothes and gloves away from moving parts. Loose-fitting clothes, jewellery or long hair could become caught in moving parts.
g) If equipment for dust extraction or collecting is available, make sure that it is connected and used properly. Using technical aids may decrease dust related hazards.
4) Use and maintenance of power tools
a) Do not force the power tool. Use a power tool suitable for the work you are about to perform. The proper power tool will perform the task better and safer if used at the correct feed rate.
b) Never use the power tool if the power switch does not switch the tool on and off properly. All power tools that cannot be controlled by the power switch are dangerous and must be repaired.
c) Unplug the lead from the wall socket before making any adjustments, changing accessories or storing the power tool. These precautions reduce the risk of the power tool starting unexpectedly.
d) Store power tools that are not being used out of children's reach. Do not allow people who are unfamiliar with the tool or its functions to operate it. Power tools can be dangerous if they fall into the hands of inexperienced users.
e) Maintaining power tools. Check for any incorrect settings, parts that catch, broken parts or anything else which may cause the power tool to malfunction. If something is damaged it must be repaired before use. Many accidents are caused by poorly maintained power tools.
f) Keep tools sharp and clean. Properly maintained cutting tools with sharp blades are less likely to jam and are easier to control.
g) Use the power tool, accessories and similar according to instructions and in an appropriate manner suitable for the type of power tool used. Also, take into consideration your work environment and the type of work to be done.
h) Using the power tool for a purpose other than that for which it is intended could result in a dangerous situation.
5) Use and maintenance of cordless power tools
a) Make sure that the power switch is set to OFF before fitting the battery. Attaching a battery to a power tool when the power switch set to ON is inviting an accident.
b) Only charge the battery using a charger approved by the manufacturer. A charger suitable for one type of battery can constitute a fire hazard if used for another type of battery.
c) Only use rechargeable batteries that are strictly compatible for those particular machines. The use of other types of batteries might cause damage or fire.
d) When not in use, the battery should be stored away from metal objects such as paper clips, coins, keys, nails, screws or any other small objects that could bridge the gap between the battery terminals. Short circuiting the battery terminals can cause burn injuries or fires.
e) If batteries are abused there is a risk of them leaking acid. Avoid contact with any acid. Rinse your skin with water if you accidentally come into contact with the acid. If the acid comes into contact with your eyes, consult a doctor. Battery acid can cause irritation and burns.
6) Service
a) Repairs and service should only be performed by qualified tradesmen, and only with original spare parts. This guarantees that the safety of the power tool is maintained.
Specific safety instructions for hammer drilling
a) Wear ear protection. Exposure to excessive noise can cause hearing loss.
b) Always use an auxiliary handle if one is supplied. Loss of control over the power tool can cause personal injury.
c) Hold the power tool by its insulated gripping surfaces when performing an operation where the cutting accessory may contact hidden wiring or the power tool's own mains lead. Cutting accessories which contact "live" wires may make exposed metal parts of the power tool "live" and could give the operator an electric shock.
Product safety symbols

natural_image
Icon of a person reading a book inside a circle (no text or symbols)Read the entire instruction manual.

natural_image
Simple line drawing of a person wearing glasses and a face mask, enclosed in a circle (no text or symbols)Always use safety glasses or a visor and wear a dust mask.

natural_image
Simple line drawing of a human head inside a circle (no text or symbols)Always use hearing protection.
Buttons and functions

- Auxiliary handle with depth stop
- Battery connection
- Dust cover
-
Accessory lock
-
Rotary hammer/drill selector switch
- Forward/Reverse and trigger lock selector
- Power trigger (variable speed)
Operating instructions
NOTE: Use respiratory protection when working with material which produces lots of dust. Important: Always remove the battery from the rotary hammer drill before adjusting, servicing or repairing it.
Attaching an accessory
- The SDS-plus tool holder enables accessories to be changed simply and quickly. The SDS-plus tool holder allows the drill bit to slide back and forth, which means that it wobbles when it is not under load. This does not affect the accuracy of the drill since the drill bit centres automatically when it is pressed against the workpiece.
-
The dust cover protects the SDS-plus mechanism; take care not to damage the dust cover when changing accessories.
-
Make sure that both the shank of the accessory and the SDS-plus tool holder are free from contaminants. The shank of the accessory should be lightly greased.
-
Pull back the accessory lock, push the shank of the accessory into the SDS-plus tool holder and turn it slightly until it fits into the slots.
-
Release the accessory lock and check that the accessory is locked in place (the hammer function requires the accessory to be able to slide back and forth).

natural_image
Illustration of a hand holding a tool with arrows indicating motion or force (no text or symbols)Attaching the auxiliary handle
- Fit the auxiliary handle over the end of the drill and lock it in place by twisting the grip.
- Adjust the depth stop to the desired depth.
Removing an accessory from the SDS-plus tool holder
Pull back the accessory lock and then pull the accessory out of the tool holder.

natural_image
Illustration of a hand holding a tool with directional arrows indicating movement or force (no text or symbols)Function selection
Press in the function selector lock and select the desired function.

natural_image
Technical line drawing of a mechanical component with no visible text or symbols
natural_image
Technical line drawing of a mechanical component with no visible text or symbolsRotary hammer mode Drill mode
Forward /reverse
Select forward or reverse using the rotation direction selector. The rotating parts of the rotary hammer drill must be completely stationary before you change the direction of rotation.
- Forward rotation (drilling, rotary hammer drilling and screwdriving): Press the selector in on the left-hand side.
• Reverse rotation (for unscrewing): Press the selector in on the right-hand side. - Setting the rotation selector to the middle position will lock the power trigger.
Variable speed power trigger
- The rotary hammer drill is started and stopped by holding or releasing the power trigger (7).
- The rotary hammer drill is equipped with a variable speed control, which makes it extremely practical for screw driving. The more the power trigger is pressed, the greater the speed of the tool.
Drilling tips and advice
- When using the hammer only mode, you should only apply light pressure to the drill. The application of too much pressure can reduce the hammer effect. Try applying different amounts of pressure until you find the most effective one.
- Check the condition of the drill bit regularly. Replace any worn drill bits/tools.
- Hold the rotary hammer drill perpendicular to the workpiece before starting to drill (look from several angles). Make sure that you keep the drill straight, do not force the drill out of line when drilling.
-
If you are drilling into thin materials it is important that you place a small piece of waste material behind the hole to be drilled, otherwise there is a risk of burring on the back.
-
When drilling into metal you should first use a centre punch to make a small indentation at the spot where you wish to drill. The indentation will prevent the point of the drill bit from wandering.
- Let the drill bit spin whilst lifting it out after drilling through, it allows the motor to cool down and the drill bit is freed of dust and debris.
Overload protection and other safety features
The rotary hammer drill/battery has a number of safety features that prevent damage to the machine and battery during use.
- During short high-load situations the overload protection may turn the rotary hammer drill off. This protection resets automatically. Release the trigger, wait a few seconds, ensure that there is no load and restart the rotary hammer drill. The rotary hammer drill should now function normally again.
- During high-load for extended periods the overheating protection may turn the rotary hammer drill off. This feature is self-resetting but the rotary hammer drill cannot be restarted until it has returned to normal operating temperature. Let the rotary hammer drill cool properly before trying to restart it. Adverse temperatures can occur in direct sunlight and should therefore be avoided.
- The battery has low-voltage protection which operates when the battery becomes discharged. The low-voltage protection turns off the rotary hammer drill automatically and the battery then needs to be recharged.
Care and maintenance
Important: Always remove the battery from the rotary hammer drill before performing any adjustment, service or maintenance.
- Keep the motor ventilation openings free from contaminants.
- Clean the rotary hammer drill using a lightly moistened cloth. Only use mild cleaning agents, never solvents or corrosive chemicals.
- Do not allow the battery to completely discharge unless the rotary hammer drill is not to be used for a long time. Fully charge the battery regularly.
Troubleshooting guide
| Problem Possible cause Action | ||
| The rotary hammer drill will not start. | Battery discharged. Recharge the battery. | |
| The battery is overheated. Let the battery cool down. | ||
| Worn brushes. Contact our Customer Services. | ||
| Faulty power trigger. Contact our Customer Services. | ||
| The rotary hammer drill is sluggish and/or shuts off. | Blunt or damaged drill bit. Replace the drill bit. | |
| Too much pressure applied. Decrease applied pressure. | ||
| Battery discharged. Recharge the battery. | ||
| The battery is overheated. Let the battery cool down. | ||
| The motor is overheated. Let the rotary hammer drill cool down. | ||
| Sparks in the motor. | Faulty brushes. Contact our Customer Services. | |
| Winding short circuited. | ||
| Dirty commutator. | ||
Disposal
This product should be disposed of in accordance with local regulations. If you are unsure how to proceed, contact your local authority.
Specifications
Tool holder SDS-plus
Impact energy 1.2 J
Impact rate 0–5000 bpm
No-load speed 0–1050 rpm
Drill capacity in concrete ∅ 12 mm
Drill capacity in steel ∅ 8 mm
Drill capacity in wood ∅ 12 mm
Sound pressure (LpA) 84,6 dB (A), (Uncertainty KpA: 3 dB)
Sound power (LwA) 95,6 dB (A), (Uncertainty KwA: 3 dB)
Vibration value 4,753 m/s ^2 (Uncertainty K: 1.5 m/s ^2 )
Battery 18 V lithium-ion LXC (sold separately)
Weight 2.0 kg with a 1.5 Ah battery or 2.2 kg with a 3 Ah battery
Borrhammare
natural_image
Icon of a person reading a book inside a circle (no text or symbols)natural_image
Simple line icon of a person wearing glasses and a phone receiver, enclosed in a circle (no text or symbols)natural_image
Simple black-and-white icon of a human head inside a circle (no text or symbols)natural_image
Illustration of a hand holding a tool with arrows indicating motion or force (no text or symbols)natural_image
Illustration of a hand holding a tool with directional arrows indicating movement or force (no text or symbols)natural_image
Technical line drawing of a mechanical component with no visible text or symbolsnatural_image
Technical line drawing of a mechanical component with no visible text or symbolsHöger-/vänstergång
natural_image
Icon of a person reading a book inside a circle (no text or symbols)Les hele bruksanvisningen.

natural_image
Simple line icon of a person wearing glasses and a face mask, enclosed in a circle (no text or symbols)natural_image
Simple black-and-white line drawing of a human head inside a circle (no text or symbols)natural_image
Illustration of a hand holding a tool with arrows indicating motion or rotation (no text or symbols)natural_image
Illustration of a hand holding a tool with directional arrows indicating movement or force (no text or symbols)natural_image
Technical line drawing of a mechanical component with circular and rectangular features (no text or symbols)Hammerbormodus Boremodus

natural_image
Technical line drawing of a mechanical component with no visible text or symbolsnatural_image
Icon of a person reading a book inside a circle (no text or symbols)natural_image
Simple line drawing of a person wearing glasses and holding a phone, enclosed in a circle (no text or symbols)natural_image
Simple black-and-white icon of a human head inside a circle (no text or symbols)natural_image
Illustration of a hand holding a tool with arrows indicating motion or force (no text or symbols)natural_image
Illustration of a hand holding a tool with directional arrows indicating movement or force (no text or symbols)Toimintoasetukset
natural_image
Technical line drawing of a mechanical device with no visible text or symbolsVasaraporaustila Poraustila

natural_image
Technical line drawing of a mechanical component with circular features and directional arrows (no text or symbols)Suunnanvaihto
natural_image
Icon of a person reading a book inside a circle (no text or symbols)natural_image
Simple line icon of a person wearing sunglasses inside a circle (no text or symbols)natural_image
Simple black-and-white icon of a human head inside a circle (no text or symbols)natural_image
Illustration of a hand holding a tool with arrows indicating motion or force (no text or symbols)natural_image
Illustration of a hand holding a tool with arrows indicating movement or force (no text or symbols)natural_image
Technical line drawing of a mechanical component with no visible text or symbolsBohrhammer-Modus Bohrmodus

natural_image
Technical line drawing of a mechanical component with no visible text or symbolsLinks-/Rechtslauf
Declaration of Conformity
Declares that this product complies with the requirements of the following directives and standards
Machinery directive 2006/42/EC
EN 60745-1:2009
+A11:2010
EN 60745-2-6:2010
EMC directive
2004/108/EC
EN 55014-1:2006
+A1:2009 +A2:2011
EN 55014-2:1997
+A1:2001 +A2:2008

Klas Balkow
President
Insjön, Sweden, 2013-02-20
CO TECH®
LXC
LITHIUM XROSS CONNECT

18V LITHIUM SERIES
- Viktig information:
- DEUTSCH
- Safety
- General safety instructions for cordless power tools
- 1) Work area
- 2) Electrical safety
- 3) Personal safety
- 4) Use and maintenance of power tools
- Specific safety instructions for hammer drilling
- Product safety symbols
- Buttons and functions
- Operating instructions
- Attaching an accessory
- Attaching the auxiliary handle
- Removing an accessory from the SDS-plus tool holder
- Function selection
- Forward /reverse
- Variable speed power trigger
- Drilling tips and advice
- Overload protection and other safety features
- Care and maintenance
- Troubleshooting guide
- Disposal
- Specifications
- Borrhammare
- Höger-/vänstergång
- Toimintoasetukset
- Suunnanvaihto
- Links-/Rechtslauf
- Declaration of Conformity
- CO TECH®
- LXC
- LITHIUM XROSS CONNECT
- 18V LITHIUM SERIES
Brand : Cotech
Model : RHD 18
Category : Drill