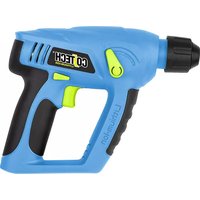
KPLCT0301 - Drill Cotech - Free user manual and instructions
Find the device manual for free KPLCT0301 Cotech in PDF.


| Product Type | Corded Drill |
| Model | KPLCT0301 |
| Brand | Cotech |
| Power Input | 600 W |
| Voltage | 220-240 V ~ 50/60 Hz |
| No-Load Speed | 0-2800 rpm (variable) |
| Chuck Type | Keyless, 13 mm |
| Max Drilling Capacity (Steel) | 13 mm |
| Max Drilling Capacity (Wood) | 30 mm |
| Max Drilling Capacity (Concrete) | 13 mm (with masonry bit) |
| Dimensions (L x W x H) | 250 x 70 x 200 mm |
| Weight | 1.5 kg |
| Cable Length | 2 m |
| Forward/Reverse | Yes |
| Variable Speed Trigger | Yes |
| Lock-On Button | Yes |
| Auxiliary Handle | No (optional accessory) |
| Depth Stop | No |
| Safety Features | Double insulated, lock-off switch |
| Maintenance | Clean vents regularly; check carbon brushes after 50 hours |
| Spare Parts Available | Chuck, brushes, switch, cord (via service center) |
| Warranty | 2 years |
Frequently Asked Questions - KPLCT0301 Cotech
User questions about KPLCT0301 Cotech
0 question about this device. Answer the ones you know or ask your own.
Ask a new question about this device
Download the instructions for your Drill in PDF format for free! Find your manual KPLCT0301 - Cotech and take your electronic device back in hand. On this page are published all the documents necessary for the use of your device. KPLCT0301 by Cotech.
USER MANUAL KPLCT0301 Cotech
Rotary hammer/ power drill/ power screwdriver
Borrhammare/borrmaskin/skruvdragare Slagboremaskin/boremaskin/skrutrekker Poravasara/porakone/ruuvinväännin

Important!
Read the entire instruction manual carefully and make sure that you fully understand it before you use the equipment. Keep the manual for future reference.
Viktig information:
natural_image
Illustration of a lithium-ion electric drill with a metal drill bit (no text or symbols on the device itself)ART.NO MODEL
18-3199 KPLCT0301-UK
40-7994 KPLCT0301
Ver. 201110
Original instructions
Bruksanvisning i original
Rotary hammer/power drill/power screwdriver, 14.4 V
ART. NO 18-3199 MODEL KPLCT0301-UK 40-7994 KPLCT0301
Please read the entire instruction manual before using the product and save it for future reference. We reserve the right for any errors in text or images and any necessary changes made to technical data. If you have any questions concerning technical problems please contact our Customer Services.
1. Safety
1. General safety instructions for rechargeable handheld power tools
Warning! Read all the instructions. Failure to adhere to the following instructions may lead to electric shocks, fires and/or serious injury. The term “handheld power tools” in the warning text below is referring to your mains operated or battery operated hand tool. SAVE THE INSTRUCTIONS.
1) The work area
a. Keep the work area clean and well illuminated. Cluttered and poorly lit areas invite accidents.
b. Do not use handheld power tools in explosive environments, i.e. nearby flammable liquids, gas or dust. Handheld power tools generate sparks that could easily ignite dust or fumes.
c. Keep away from children and other spectators while using the handheld power tool. Distractions can make you lose your concentration and control.
2. Electrical safety
a. The handheld power tool's plug must fit correctly in the wall socket. Never modify the plug in any way. Never use an adaptor together with earthed handheld power tools. Unmodified plugs and suitable wall sockets decrease the risk of electric shock.
b. Avoid body contact with earthed objects, such as pipes, radiators, ovens or refrigerators. There is an increased risk of electrical shock if your body is earthed.
c. Do not expose the handheld power tool to rain or other wet conditions. If water gets inside a handheld power tool it increases the risk of electrical shock.
d. Do not misuse the lead. Never use the lead to carry, drag or pull the plug out of the wall socket. Keep the lead away from heat, oil, sharp edges and movable parts. Damaged or tangled leads increase the risk of electrical shock.
e. When you use a handheld power tool outdoors; use an extension cord suitable for this purpose. Use of an extension cord for outdoor use decreases the risk of electrical shock.
3) Personal safety
a. Pay attention to what you do and use common sense when using handheld power tools. Never use a handheld power tool if you are tired or under the influence of drugs, alcohol or medication. One moment of inattention while using a handheld power tool may result in serious injury.
b. Use protective equipment. Always use safety glasses. Using protective equipment such as a face mask, slip resistant protective shoes, a helmet and ear defenders when needed decreases the risk of injury.
c. Avoid unexpected starts. Make sure that the switch is set to OFF before you connect the device to the wall socket. Never carry a handheld power tool with one finger on the trigger or never connect the hand tool to a wall socket when the switch is set to ON, since it may result in injury.
d. Remove all service tools/keys before switching on the hand tool. A forgotten service tool on a rotating part of the handheld power tool may result in injury.
e. Do not overreach. Make sure you stand steady and well balanced at all times. This provides better control in unexpected situations.
f. Wear suitable clothing. Do not wear loose fitting clothes or jewellery. Keep hair, clothes and gloves away from moving parts. Loose fitting clothes, jewellery or long hair could get caught in moving parts.
g. If the equipment for suctioning or collecting dust is available make sure it is connected and used properly. Using technical aids can reduce dust related hazards.
4) Use and maintenance of the handheld power tool
a. Do not overdrive the hand tool. Use a hand tool suitable for the work you are to perform. At the correct rate of feed, the correct tool will carry out the work better and more safely.
b. Never use the handheld power tool if the switch does not work properly to turn on and shut off the tool. All handheld power tools that can not be operated by the switch are dangerous and must be repaired.
c. Unplug the lead from the wall socket before making any adjustments, changes of accessories or storing the handheld power tool away. These precautions reduce the risk of unexpected start of the handheld power tool.
d. Store handheld power tools that are not being used out of reach from children. Do not let people use the handheld power tool if they are unfamiliar with it or have not read the instructions. Handheld power tools can be dangerous if they get into the hands of inexperienced users.
e. Inspect handheld power tools regularly. Check that all settings are correct, that no moving parts are getting jammed, that no parts are broken and for anything else that might cause the handheld power tool to malfunction. If something is damaged it must be repaired before use. Many accidents are caused by poorly maintained handheld power tools.
f. Keep the tools sharp and clean. Properly maintained cutting tools with sharp blades are less likely to jam and are easier to control.
g. Use the handheld power tool, accessories and such according to the instructions and in a way suitable for the type of handheld power tool used. Using the handheld power tool for work other than that for which it is intended could result in a dangerous situation.
5) Use and maintenance of the rechargeable handheld power tool
a) Make sure that the power switch is set to OFF before the battery is inserted. Inserting a battery into a handheld power tool with the power switch set to ON is inviting an accident.
b) Only charge the battery using a charger approved by the manufacturer. A charger suitable for one type of battery can constitute a fire hazard if used for another type of battery.
c) Only use the rechargeable power tool with the correct batteries. The use of another type of battery can create the risk of damage or fire.
d) When not in use, the battery should be stored away from other metal objects such as paper clips, coins, keys, nails, screws or any small object that could bridge the gap between the battery terminals. A short circuit of the battery terminals can cause burns or fires.
e) If the battery is abused it can leak acid; avoid contact with this acid. If you accidentally come into contact with the acid, rinse with water. If the acid comes into contact with your eyes, consult a doctor. Battery acid can cause irritation and burns.
6) Service
a. Repairs and service should only be performed by qualified persons, and only with original spare parts. This guarantees the safety of the handheld power tool.
2. Safety instructions for batteries and chargers
- Never attempt to open a battery.
- Never store batteries in direct sunlight or at temperatures exceeding 40 °C.
- Only charge the battery in temperatures between 4 and 40^ .
- Never expose the battery or charger to water.
- Never short-circuit the battery. Risk for explosion!
- Only use the charger supplied.
- Check that the charger, cable and battery are not damaged in any way before charging is commenced.
- Do not use the product if any component is damaged.
3. Product labelling with safety symbols



ne entire user instructions.
use ear protectors.
use safety glasses.
2. Product description
- Rotary hammer, power drill and power screwdriver functions combined in a single tool.
- Rotary hammer function with pneumatic hammer mechanism.
- SDS-Plus shank and 10 mm chuck with SDS adapter.
- Hammer force of 1.0 joules, 0-4800 blows per minute. Continuously variable speed of 0–900 RPM.
- Clockwise/anticlockwise rotation.
- Drill bit capacity: wood ∅ 10 mm, steel ∅ 8 mm and concrete ∅ 10 mm.
• 14.4 V/1.3 A lithium ion (Li-ion) battery. - Supplied with chargers (three). SDS-Plus drill bits, 6 drill bits, 20 long drill bits, 4 drill bits with SDS-Plus shank and case.
- Weight: 1.3 kg.

- SDS shank
- Dust shield
- Tool lock
- Selector switch for switching between rotary hammering and ordinary drilling
- Battery indicator
- Indicator for clockwise rotation
-
Indicator for anticlockwise rotation
-
Changeover switch for clockwise/anticlockwise rotation
- Power switch (continuously variable)
- Keyless chuck with SDS-Plus shank
- Drill bit
- Drill with SDS shank
- Screwdriver with SDS shank
- Charging socket
- DC plug
3. Charging
- The battery is supplied only partially charged and must therefore be charged for between 5 and 7 hours prior to first use. The battery need not be fully discharged before recharging. The battery will not be damaged by being charged regardless of its charge level, and charging can be switched off at any time.
- Automatic shutoff. The battery is protected against excessive discharge; when the battery voltage falls, the rotary hammer will be automatically switched off via a safety circuit.*
- Temperature protection. The battery has been fitted with a temperature sensor, which only allows charging when the battery temperature is between 0 and 45 °C.
- If only one of the LEDs on the battery indicator (5) illuminates for around five seconds when the power switch (9) is pressed in halfway (or fully), the battery has less than 30 % of its charge remaining and must be recharged.
- If the rotary hammer is not going to be used for a long period of time, the battery must be fully charged before being put away for storage.
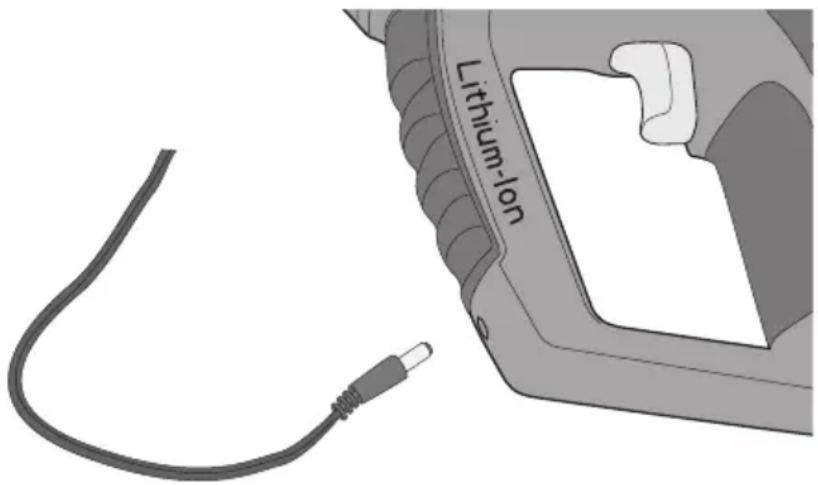
- Connect the charger to an electrical power socket and then connect the DC plug (15) to the charging socket (14).
- The battery indicator will indicate the progress of the charging. When all four LEDs are illuminated, the charging is complete. The charging time will be around 5–7 hours for normal usage. It is normal for the handle of the rotary hammer to become warm during charging.
- Remove the charger from the electrical power socket and then remove the DC plug. Protect the charger against water and humidity.
Important! The rotary hammer cannot be used when the DC plug is connected.
*WARNING! Release the power switch (9) immediately if the rotary hammer switches off automatically. Failure to do this may result in damage to the battery.
4. Use
Use respiratory protection when working with dust-generating materials.
A. Switching tools
The SDS-Plus tool shank allows the fast and simple changing of tools.
The operation of the SDS-Plus shank (1) means that the fitted tool can be freely rotated. This causes the tool to be out of true when unloaded. This does not affect the accuracy of the hole drilled as the drill bit is centred automatically during drilling.
Tools with a cylindrical shank can be used with the keyless chuck supplied (10).
The dust shield (2) protects the SDS-Plus mechanism. Make sure that the dust shield is not damaged when you are changing tools.
Insert a tool with an SDS-Plus shank as follows:
-
Clean the shank of the tool and lubricate it with a little thin oil.
-
Pull back the lock and press in (and rotate) the tool in the SDS-Plus shank.
-
Release the lock and check that the tool is firmly in position.

Remove a tool with an SDS-Plus shank as follows:
- Pull back the lock and remove the tool.

B. Function settings
Select the required application using the selector switch (4).

natural_image
Simple line drawing of a mechanical component or lever (no text or symbols)- Rotate the switch away from you in order to use the hand tool as a rotary hammer when drilling concrete or stone.

natural_image
Simple line drawing of a curved object with a circular element inside, no text or symbols present.- Rotate the selector switch towards you in order to use the hand tool as a power drill or power screwdriver.
C. Clockwise/anticlockwise rotation
- Clockwise/anticlockwise rotation can be selected using the changeover switch (8). The power switch will be locked if the changeover switch is set to the mid-position. The chuck must be completely stationary when you are changing the rotation direction.
- The rotation direction is indicated by indicator lights 6 or 7.
Clockwise (drilling and screwdriver functions):
Press in the selector switch (8) on the right-hand side as far as it will go and check that indicator (6) illuminates when you press in the power switch.
Anticlockwise (removing screws):
Press in the selector switch (8) on the left-hand side as far as it will go and check that the indicator (7) illuminates when you press in the power switch.
D. Starting, stopping and adjusting the RPM
- The tool can be started and stopped by pressing in and releasing the power switch (9).
- The machine is equipped with continuously variable RPM adjustment, which is a particularly useful feature when using the tool as a power screwdriver. The further in that the trigger is pressed, the higher the RPM will be.
E. Advice and tips for drilling
- When drilling smooth materials such as clinker concrete, you should apply a piece of heavy duty tape across the area where you intend to drill so that the drill bit does not slide when you are drilling.
- When drilling metal, you should first use a centre punch and make a small hole where you intend to drill. This small hole will then hold the drill bit in the correct position so that it does not slide when you are drilling.
- When drilling metal, you should also use thread/cutting oil in order to protect the tool.
E. Checking the battery charge level
The battery indicator (5) indicates the charge level when the power switch is pressed in.
All four LEDs are illuminated: >90%
Three LEDs are illuminated: >70 %
Two LEDs are illuminated: >30%
One LED is illuminated: <30%
Important!
The battery must be recharged when only one LED is illuminated.
G. Temperature protection
If the battery is subject to excessive load or becomes warmer than 70 °C , the motor will switch off until the battery temperature falls. If you press in the power switch when the motor has switched off, the battery indicator light will flash until you release the power switch.
5. Care and maintenance
- Ensure that the ventilation openings for the motor are always free from filings and waste.
- Clean the machine regularly using detergent and a damp cloth. Avoid strong detergents.
- The battery should be fully charged when the machine is to be stored for a long period of time.
6. Waste disposal
The product should be disposed of in accordance with local regulations. Contact your local municipal authority if you are unsure how to go about this.
7. Specifications
Model KPLCT0301, KPLCT0301-UK
Operating voltage 14.4 V
RPM, continuously variable (unloaded): 0–900 RPM
Hammer 0–4800 blows per minute
Keyless chuck ∅ 10 mm
Drill bit capacity Steel ∅ 8 mm, wood ∅ 10 mm, concrete ∅ 10 mm
Noise level LpA: 80.5 dB(A) (Inaccuracy KpA: 3 dB)
LwA: 91,5 dB(A) (Inaccuracy KwA: 3 dB)
Vibration value 5.915 m/s² (Inaccuracy K: 1.5 m/s²)
Weight 1.3 kg
Accumulator Lithium ion (Li-ion)
Voltage 14.4 V
Capacity 1.3 Ah
Chargers
Primary 230 V AC, 50 Hz, 17 W
Secondary 18 V DC, 400 mA (+ in centre)
Charging time 5–7 hours
Borrhammare/borrmaskin/skruvdragare 14,4 V
ART. NR 18-3199 MODELL KPLCT0301-UK 40-7994 KPLCT0301
natural_image
Simple line drawing of a triangular device with a circular button and two square buttons (no text or symbols)natural_image
Simple line drawing of a curved object with a circular button and directional arrows, no text or symbols present.natural_image
Simple line drawing of a triangular device with a circular button and two labeled ports (no text or symbols)natural_image
Simple line drawing of a curved object with a circular element inside, no text or symbols present.natural_image
Simple line drawing of a triangular device with a circular button and two square buttons (no text or symbols)natural_image
Simple line drawing of a triangular device with a circular button and control buttons (no text or symbols)Declaration of Conformity
KPLCTo301 / KPLCTo301-UK
Machinery directive 2006/42/EC
EN 60745-1:2009
EN 60745-2-6:2003
+A1+A11+A2+A12
EMC directive 2004/108/EC
EN 55014-1:2006
EN 55014-2:1997+A1
EN 61000-3-2:2006
EN 61000-3-
3:1995+A1+A2

Klas Balkow
President
Insjön, Sweden, 2011-09-30
CO TECH®
SVERIGE
KUNDTJÄNST Tel: 0247/445 00
Fax: 0247/445 09
E-post: kundtjanst@clasohlson.se
INTERNET www.clasohlson.se
BREV Clas Ohlson AB, 793 85 INSJÖN
NORGE
KUNDESENTER Tlf.: 23 21 40 00
Faks: 23 21 40 80
E-post: kundesenter@clasohlson.no
INTERNETT www.clasohlson.no
POST Clas Ohlson AS, Postboks 485 Sentrum, 0105 OSLO
SUOMI
ASIAKASPALVELU Puh.: 020 111 2222
For consumer contact, please visit www.clasohlson.co.uk and click on customer service.
INTERNET www.clasohlson.co.uk
- Rotary hammer/ power drill/ power screwdriver
- Important!
- Viktig information:
- Rotary hammer/power drill/power screwdriver, 14.4 V
- Safety
- General safety instructions for rechargeable handheld power tools
- 1) The work area
- Electrical safety
- 3) Personal safety
- 4) Use and maintenance of the handheld power tool
- 5) Use and maintenance of the rechargeable handheld power tool
- 6) Service
- Safety instructions for batteries and chargers
- Product labelling with safety symbols
- Product description
- Charging
- Use
- Switching tools
- Insert a tool with an SDS-Plus shank as follows:
- Remove a tool with an SDS-Plus shank as follows:
- Function settings
- Clockwise/anticlockwise rotation
- Clockwise (drilling and screwdriver functions):
- Anticlockwise (removing screws):
- Starting, stopping and adjusting the RPM
- Advice and tips for drilling
- Checking the battery charge level
- Temperature protection
- Care and maintenance
- Waste disposal
- Specifications
- Chargers
- Borrhammare/borrmaskin/skruvdragare 14,4 V
- Declaration of Conformity
- CO TECH®
- SVERIGE
- NORGE
- SUOMI
Brand : Cotech
Model : KPLCT0301
Category : Drill