IPT-DS1 - Dictaphone SONY - Free user manual and instructions
Find the device manual for free IPT-DS1 SONY in PDF.

User questions about IPT-DS1 SONY
0 question about this device. Answer the ones you know or ask your own.
Ask a new question about this device
Download the instructions for your Dictaphone in PDF format for free! Find your manual IPT-DS1 - SONY and take your electronic device back in hand. On this page are published all the documents necessary for the use of your device. IPT-DS1 by SONY.
USER MANUAL IPT-DS1 SONY
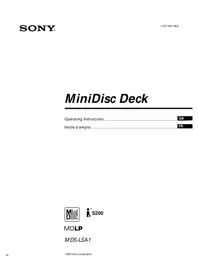
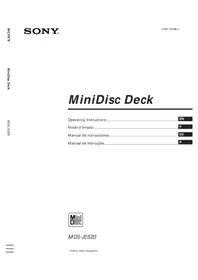
Operating Instructions
Mode d'emploi
使用说明书
JP
GB
FR
CS
Printed on 70% or more recycled paper using VOC (Volatile Organic Compound)-free vegetable oil based ink.
Before operating the product, please read this manual thoroughly and retain it for future reference.
WARNING
To reduce fire or shock hazard, do not expose the unit to rain or moisture.
CAUTION
RISK OF EXPLOSION IF BATTERY IS REPLACED BY AN INCORRECT TYPE.
DISPOSE OF USED BATTERIES ACCORDING TO THE INSTRUCTIONS.
For Customers in the U.S.A.
CAUTION
You are cautioned that any changes or modifications not expressly approved in this manual could void your authority to operate this equipment.
Note:
This equipment has been tested and found to comply with the limits for a Class B digital device, pursuant to Part 15 of the FCC Rules. These limits are designed to provide reasonable protection against harmful interference in a residential installation. This equipment generates, uses, and can radiate radio frequency energy and, if not installed and used in accordance with the instructions, may cause harmful interference to radio communications. However, there is no guarantee that interference will not occur in a particular installation. If this equipment does cause harmful interference to radio or television reception, which can be determined by turning the equipment off and on, the user is encouraged to try to correct the interference by one or more of the following measures:
- Reorient or relocate the receiving antenna.
- Increase the separation between the equipment and receiver.
- Connect the equipment into an outlet on a circuit different from that to which the receiver is connected.
- Consult the dealer or an experienced radio/TV technician for help.
For Customers in Europe
Notice for the customers in the countries applying EU Directives
The manufacturer of this product is Sony Corporation, 1-7-1 Konan Minato-ku Tokyo, 108-0075 Japan.
The Authorized Representative for EMC and product safety is Sony Deutschland GmbH, Hedelfinger Strasse 61, 70327 Stuttgart, Germany. For any service or guarantee matters please refer to the addresses given in separate service or guarantee documents.
Attention
The electromagnetic field at the specific frequencies may influence the picture and sound of this unit.
Disposal of Old Electrical & Electronic Equipment (Applicable in the European Union and other European countries with separate collection systems)


This symbol on the product or on its packaging indicates that this product shall not be treated as household waste. Instead it shall be handed over to the applicable collection point for the recycling of electrical and electronic equipment. By ensuring this product is disposed of correctly, you will help prevent potential negative consequences for the environment and human health, which could otherwise be caused by inappropriate waste handling of this product. The recycling of materials will help to conserve natural resources. For more detailed information about recycling of this product, please contact your local Civic Office, your household waste disposal service or the shop where you purchased the product.
Table of contents
Notes on using the Intelligent Pantfilter. 5
Features 6
This unit lets you 7
Automatic shooting composition. 8
Identifying parts 9
Main unit 9
Base. 10
Plate 10
Preparing the intelligent pantfilter 11
Mounting the base. 11
Attaching the plate. 12
Inserting batteries. 15
Attaching your camera to this unit 18
Automatic shooting 20
About automatic shooting 22
About MENU mode. 23
Using this unit with other accessories 26
Troubleshooting 30
Specifications 32
Trademarks 33
Notes on using the Intelligent Pantfilter
Refer to the operating instructions for your camera as well as this manual.
This unit is not a dust-proofed, moist-proofed, or water proofed product.
The IPT-DS1 can be used with the DSC-TX1/WX1 digital still cameras.
Not all of those models are available in all countries and regions.
About the base and plates
- Always use a suitable base and plate for your camera. For details on how to install them, see pages 11 and 12. Using an unsuitable base or plate may damage this unit or your camera.
- Most of the illustrations in this manual show the base and plate for the DSC-TX1 attached to this unit.
Precautions on use and strage locations
Do not use or keep this unit in locations subject to the following conditions. Otherwise, this unit could malfunction.
- Locations subject to extreme high temperature
- Temperatures in a hot sun or closed automobiles during summer may be extremely high, causing deformation or malfunction of this unit.
- Locations under direct sunlight or near heaters
- This may cause deformation or a malfunction of this unit.
- Locations subject to vibration
- Locations subject to strong magnetism
- Locations subject to dust particles in a sandy place or the beach
Precautions on recorded data:
Please note that Sony will not be liable for recorded data such as images and audio data if you cannot record or play back due to a malfunction of the camera, "Memory Stick Duo" media, or this unit.
Features
This unit lets your camera do the following:
- Automatically pans (sideways) and tilts (vertically) to follow a face and zooms in or out to frame the face.
- Automatically shoots pictures at the optimal composition and timing.
This unit lets you shoot natural, smiling faces more easily than before.
The automatic shooting function captures even happier memories since no-one has to be the photographer and everyone can be the subject.

This unit lets you …
All become a subject of pictures.
Snap a natural shot of the scene with its automatic shooting function.
Enjoy taking pictures for different scenes.

At parties!

With your family!

Automatic shooting composition
Your camera detects perfect shot timing in automatic shooting mode. It determines the perfect shot timing when it has detected:

A "Good composition" for the first time

B Big changes in composition

C A smiling face in "good composition"
Identifying parts
Main unit
Front
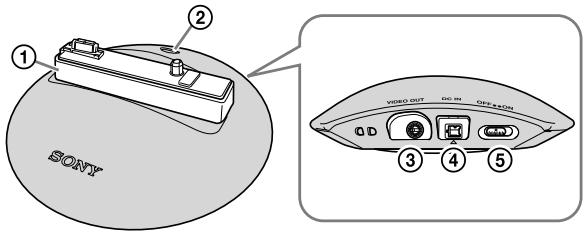
Bottom
① Tiltarm
② MENU button
③VIDEO OUT jack
④ DCINjack
⑤ ON/OFF (power) switch
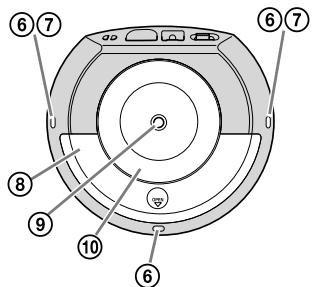
Indicator A (white/three points) (page 17)
Indicator B (red/two points) (page 17)
⑧ Battery cover
⑨ Tripod receptacle
10 Stand
This product includes one kind of base (A) to be mounted in the tilt arm of this unit. Always mount the correct base in the arm before using this unit. (Base A is pre-mounted in the tilt arm).
For details, see page 11.
Plate
This product includes two kinds of plates (a1 and a2) for covering the tilt arm of the main unit.
Make sure the base is properly mounted in the tilt arm and then attach the correct plate before using this unit.
For details, see page 12.
Preparing the intelligent pantfilter
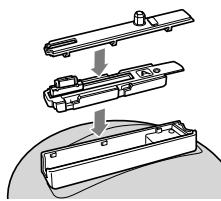
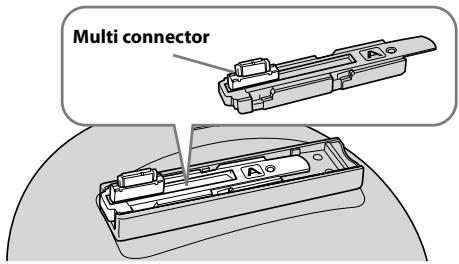
Mounting the base
The base A is pre-mounted in the tilt arm of this unit. Make sure it is mounted properly.
If the base is loose:
Mount the base in the right direction, as described below.
Notes
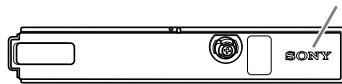
- Hold the base so that the base name reads in the same direction as the Sony logo on the main unit, and mount it straight down onto the main unit.
- Make sure that it is securely fitted all the way down.
- Do not touch the multi connector.
Attaching the plate
1 Select the proper plate.
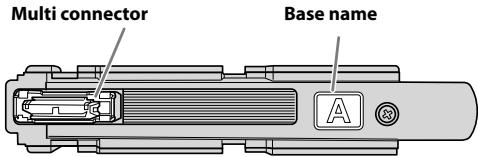
The plate has front and back faces.
Choose the proper plate for your camera.
Front
Sony logo
Back
Plate name
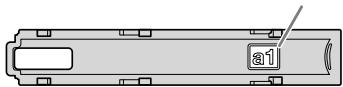
| Camera | Base | Plate |
| DSC-TX1 | A | a1 |
| DSC-WX1 | a2 |
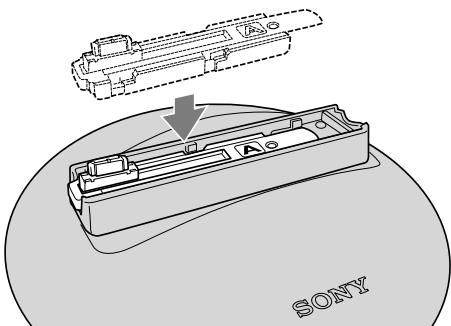
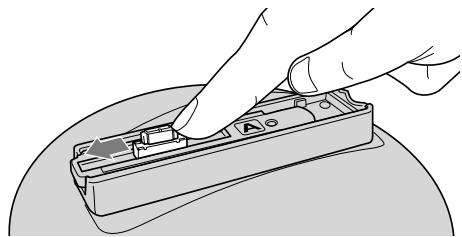
2 Attach the plate.
① Slide the multi connector until it is aligned with the hole of the plate.
Note
Do not touch the contact of the multi connector.
② Place the plate on the base with the multi connector through the hole.
- The Sony logos on the main unit and plate should read in the same direction when the plate is attached to the main body.
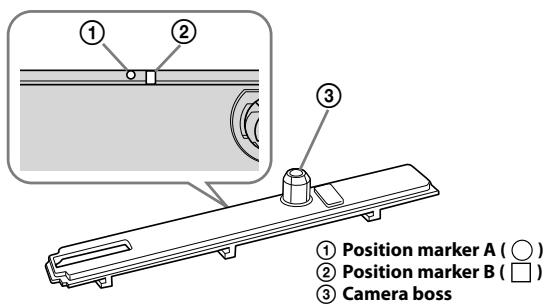
- The plate and tilt arm have guide markers which should be aligned when attaching.
On the plate:
Position marker A () , position marker B ()
On the tilt arm:
Position marker C
- When placing the plate on the tilt arm, align the marker A (O) on the plate with the marker C (O) on the tilt arm.
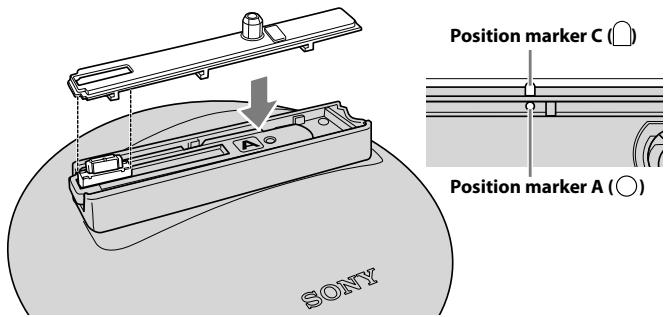
③ Slide the plate until the marker B (□) on it is aligned with the marker C (□) on the tilt arm.
- Make sure that the plate is properly seated.
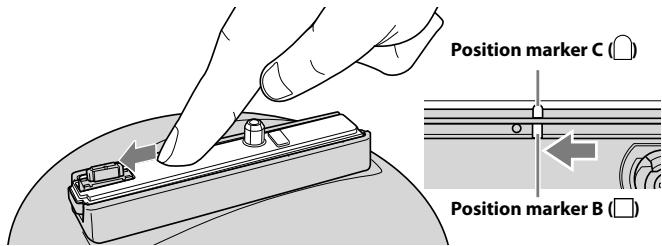
The plate clicks into place when inserted to the correct position.
- If it is slightly raised, remove it and repeat the above steps to attach it.
Removing the plate
Hang your finger on the right side of the tilt arm and lift up the plate while sliding it to the right.

Inserting batteries
You can use the following batteries.
- Two AA alkaline batteries
- Two AA Nickel-Metal Hydride batteries
Notes
- Be careful not to touch the multi connector when holding this unit.
- You cannot use manganese batteries.

Tips
If you use an AC adaptor (sold separately), you do not need batteries (page 27).
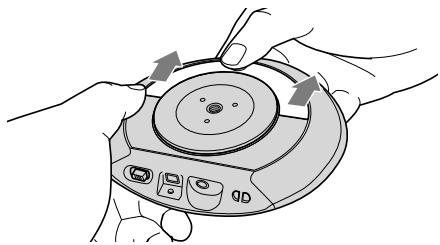
1 Slide the ON/OFF (power) switch of this unit to OFF and then open the battery cover.
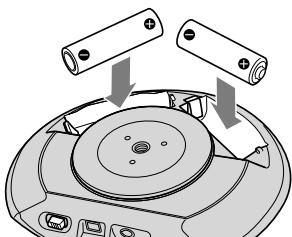
2 Insert the batteries into the battery compartment according to the marks inside the compartment.
3 Close the battery cover.
To remove batteries
Slide the ON/OFF (power) switch of this unit to OFF and then remove the batteries.
Notes
Be careful not to let the batteries fall when removing them.
Notes
- Always use the same kind of batteries together.
- Check the polarities of the batteries when inserting them into this unit. If you insert the batteries in the wrong direction, this unit does not work.
- Do not use a charged AA Nickel-Metal Hydride battery with a dead AA Nickel-Metal Hydride battery.
Battery level
If the battery level is low, indicator B flashes slowly.
If the battery level gets lower, indicator B flashes more rapidly and this unit automatically enters standby mode.
Indicators
Indicators light up or flash depending on the status of this unit.
Indicator A (white) (front and sides)
| Indicator status | This unit status |
| On | Automatic shooting |
| Flashes once | When a shot is taken |
| Flashes slowly | Initializing End-processing MENU mode |
| Flashes rapidly | Battery level is low Lens cover is closed |
Indicator B (red) (sides)
| Indicator status | This unit status |
| On | Standby mode (only when separately-sold AC adaptor is connected) |
| Flashes slowly | Battery level is low |
| Flashes rapidly | Abnormal conditionBattery level is low |
Attaching your camera to this unit
Before attaching your camera
Check the following.
- The internal memory and "Memory Stick Duo" media have sufficient free space.
- The batteries are installed.
Make sure the batteries are charged.
- Make sure that the date/time setting of your camera is set correctly.
For details, refer to the operating instructions of your camera.
Notes
For DSC-WX1 users
Before attaching your camera to this unit, check the flash settings of your camera.
You cannot change the settings after it is attached to this unit.
How to attach your camera to this unit
This manual describes how to use this unit with the DSC-TX1. The illustrations may look different from your current settings if your camera is not the DSC-TX1.
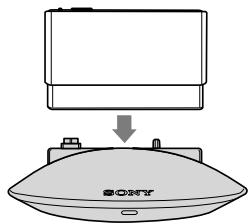
- Align the camera boss with the tripod receptacle, and the multi connector with the multi connector at the bottom of your camera.
- Set your camera perpendicular to the plate.

Tips
Make sure that the camera boss and the multi connector of this unit are fully engaged with the tripod receptacle and the multi connector of your camera.
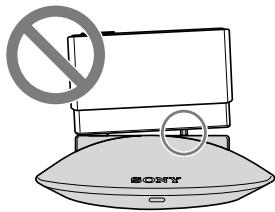
To remove your camera
Hold the tilt arm of this unit and lift up your camera.
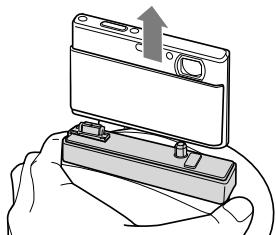
Notes
When removing your camera, always lift it perpendicular to the tilt arm. Forcibly removing your camera at an angle or sliding it sideways may damage it.

Tips
If your camera is tilted so far that it is difficult to remove, turn the camera off and set the ON/OFF (power) switch of this unit to ON.
The tilt arm of this unit returns to the initial position so you can easily remove the camera.
Automatic shooting
1 Set the ON/OFF (power) switch of this unit to ON.
The tilt arm moves to the initial position and this unit enters standby mode.
Notes
Set the ON/OFF (power) switch to OFF when you want to stop operation immediately or do not intend to use this unit for a long time.

Tips
This unit automatically enters standby mode if automatic shooting is not performed. You can leave the ON/OFF (power) switch of this unit to ON for regular use.
2 Set the power switch of your camera to ON.
The camera enters shooting mode.
For details, refer to the operating instructions of your camera.
3 Attach your camera to this unit (page 18).
This unit starts automatic shooting. For details, see page 22.
Status of this unit
| ON/OFF (power) switch of this unit | Camera | Power switch of your camera | Status of this unit |
| ON | Not attached | - | Standby*1 |
| Attached | OFF | ||
| ON | Automatic shooting*2 |
1 Indicator B lights up in red when an AC adaptor is connected to this unit.
2 When the MENU button is pressed, this unit enters MENU mode.
- When the ON/OFF (power) switch of this unit is set to OFF, it does not turn on even when you attach your camera to this unit.
About installation
Use this unit where:
- it is stable and flat.
- the camera has a clear view of people's faces.
- there are no objects nearby that may fall over.
To finish automatic shooting
Finish automatic shooting of this unit at following procedure:
① Turn your camera off.
② Detach your camera from this unit.
The tilt arm of this unit returns to the initial position and this unit enters standby mode.
Notes
We do not recommend turning the ON/OFF (power) switch to off before finishing automatic shooting because it shut the power of the unit forcibly.
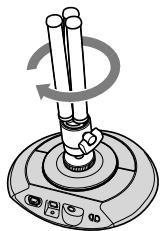
About automatic shooting
Shooting with this unit uses the face detection or smile shutter function of your camera.
When your camera is attached to this unit, it automatically pans (sideways) and tilts (vertically) to follow a face and zooms in or out to frame the face.
It also automatically shoots pictures at the optimal composition and timing.
- If you lift this unit up during automatic shooting, the motor of this unit stops and automatic shooting temporarily stops. Automatic shooting is resumed when you set this unit back in place.
- Indicator A lights up during automatic shooting.
- Indicator A flashes once when a shot is taken.

Tips
To pause automatic shooting, press the MENU button.
To resume automatic shooting, press the MENU button again.
Notes
Indicator B flashes rapidly in red if you forcibly stop the rotation or an external force is applied to this unit during automatic shooting. In this case, resolve the problem and then turn this unit off and back on by sliding the ON/OFF (power) switch from ON to OFF and back to ON.
- When using this unit in public, consider the surrounding conditions.
- Faces may not be detected or things other than faces may be detected depending on the face detection capability of your camera.
- You cannot shoot movies or panoramic pictures.
- You cannot change your camera to play mode during automatic shooting.
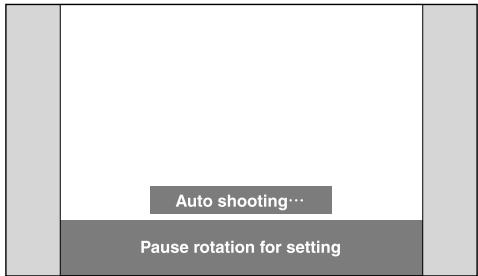
About MENU mode
If you press the MENU button during automatic shooting, rotation stops temporarily and this unit enters MENU mode.
In MENU mode, you can change the rotation angle, shooting frequency and flash settings of automatic shooting.

Tips
This section describes how to use this unit with the DSC-TX1. The illustrations show DSC-TX1 screens.
1 Press the MENU button on this unit.
It tilts forward and enters MENU mode.

Tips
To return to automatic shooting mode
Press the MENU button again or the × mark at the top right of the LCD of your camera.
If you change the settings, this unit automatically returns to automatic shooting mode.
2 Select a MENU item on the camera.
Operation differs depending on your camera.
DSC-TX1: Touch icons on the screen.
DSC-WX1: Select items with the control buttons on your camera.
- For details, refer to the operating instructions of your camera.
| MENU item | Description |
| ∞ | Selects rotation angle (page 24). |
| Selects shooting frequency (page 25). | |
| AUTO | Selects flash setting (page 25). |
Notes
- Your camera automatically turns off to save the batteries when the camera is not operated for more than 2 minutes during MENU mode.
- For DSC-WX1 users
Before attaching your camera to this unit, check the flash settings of your camera. You cannot change the settings after it is attached to this unit.
Rotation angle setting
You can set the rotation angle as follows.
When the AC adaptor or AV cable is not connected:
| ✓ | No Limit | ∞ | This unit can rotate unlimited to follow a subject during automatic shooting. |
| 180° | 180° | This unit rotates 180 degrees in front (90 degrees each from the center to the right and left). | |
| 90° | 90° | This unit rotates 90 degrees in front (45 degrees each from the center to the right and left). |
- indicates the default setting.
-
This unit sets/resets the turning center (front position) under the following condition:
-
When the power is turned on
- When the rotation angle is changed
- When this unit is lifted up and relocated

Tips
If you change the default setting, a setting value icon is displayed on the automatic shooting mode screen.
When the AC adaptor or AV cable is connected:
| 180° | 180° | This unit rotates 180 degrees in front (90 degrees each from the center to the right and left) during automatic shooting. | |
| ✓ | 90° | 90° | This unit rotates 90 degrees in front (45 degrees each from the center to the right and left). |
- indicates the default setting.
Notes
- You cannot select [No Limit] for the rotation angle.
- Route the cable so that this unit turns smoothly.
- The AC adaptor and video cable are sold separately. For details, see page 27.

Tips
If you change the default setting, a setting value icon is displayed on the automatic shooting mode screen.
Shooting frequency setting
You can select the following shooting frequencies.
| High | High shooting frequency. A large number of pictures will be taken. | ||
| ✓ | Standard | Standard shooting frequency. An average number of pictures will be taken. | |
| Low | Low shooting frequency. A small number of pictures will be taken. |
- indicates the default setting.

Tips
If you change the default setting, a setting value icon is displayed on the automatic shooting mode screen.
Flash setting
You can set the flash as follows.
| ✓ | Auto | \(✔\)AUTO | Automatically flashes according to shooting conditions. |
| Off | \(✔\) | Does not flash in any conditions. |
- indicates the default setting.
Notes
For DSC-WX1 users
Before attaching your camera to this unit, check the flash settings of your camera. You cannot change the settings after it is attached to this unit.
Using this unit with other accessories
You can use this unit in combination with other accessories. This section describes what you can do with this unit using those accessories.
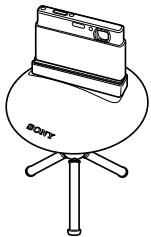
Using a tripod for shooting
Using a tripod greatly increases flexibility of shooting since it lets you adjust the shooting angle or select a location of use more freely.
Notes
- Adjust the tripod to make this unit level.
- Be careful not to subject your camera to an impact. Even when this unit is fixed to the tripod, your camera is not.
- Position the tripod securely so that it does not fall over.
- Depending on the camera platform of your tripod, you cannot use it with this unit. (When the camera platform of a tripod is larger than the stand of this unit, etc.)
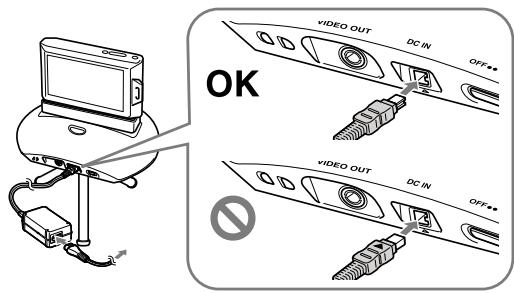
Using an external power source
You can use an external power source by connecting it to this unit with an AC adaptor AC-LS5K/AC-LS5.
Because power is supplied to your camera by the AC adaptor via this unit, you can enjoy longer automatic shooting.
- For details, refer to the operating instructions of the AC adaptor.
- We recommend that you use this unit with a tripod.
Notes
- Batteries in this unit or your camera are not charged with the AC adaptor.
- The power is supplied to your camera from this unit not the batteries in your camera.
- You cannot select [No Limit] for the rotation angle.
- Route the cable so that it does not hinder the rotation of this unit.
- If you turn your camera off before turning this unit off, the shooting frequency, rotation angle and other settings you have changed on your camera may not be stored.
-
When the power is supplied by the AC adaptor, always turn your camera off before the following:
-
Removing your camera from this unit
- Turning this unit off
- Disconnecting the AC adaptor
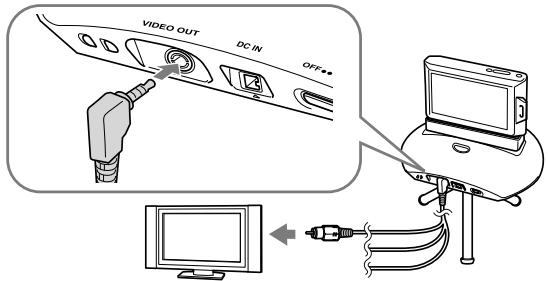
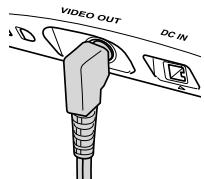
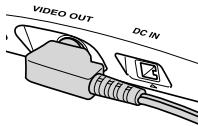
Monitoring camera images on your TV
You can connect this unit to your TV using an AV cable VMC-20FR. This lets you enjoy pictures automatically shot by this unit on your TV.
- We recommend that you use this unit with a tripod.
Notes
- Connect only the video plug of an AV cable to your TV. Connection between this unit and a TV does not support to transmit audio signal and your shooting images.
- You cannot select [No Limit] for the rotation angle.
- Route the cable so that it does not hinder the rotation of this unit.
- Hold the L-shaped plug with its cord end pointing left and connect it. When using a tripod, you can also connect it with its cord end pointing down.
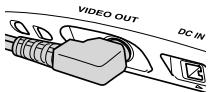
OK
OK

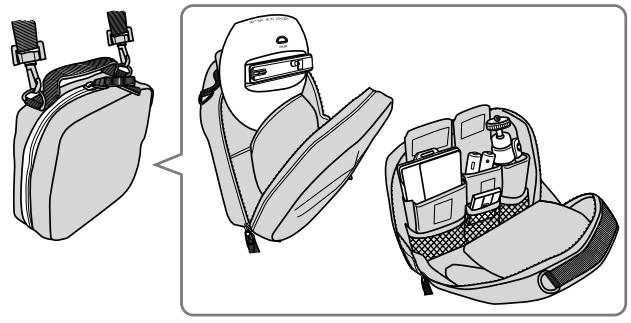
Carrying in a soft carrying case
A compact soft carrying case LCS-PSA is specially designed for storing this unit together with your camera and other accessories.
Troubleshooting
If any problems occur with your products, refer to the following solutions.
If the problem persists, contact your Sony dealer.
| Symptom | Cause/Solution |
| Indicator A flashes rapidly in white. | ·Your camera has exceeded the number of recordable images. →Remove your camera from this unit and delete some images. ·The lens cover of your camera is closed. →Open the lens cover. |
| Indicator B slowly flashes in red. | ·The batteries are low. →Prepare new batteries. |
| Indicator B continues to flash rapidly in red. | ·Some force is being applied to this unit or your camera to stop the rotation (e.g. your hand is pressing against this unit or holding the tilt arm of this unit, or something is caught in this unit). →Turn this unit off, resolve the problem, and turn this unit back on. |
| This unit does not turn on. | ·The batteries are low. →Replace the batteries (page 15). ·The AC adaptor is loose. →Connect the AC adaptor (sold separately) properly. |
| Your camera does not turn on. | ·Your camera is not properly attached to this unit. →Attach your camera properly to this unit (page 18). ·The AC adaptor is disconnected. →Connect the AC adapter (sold separately) properly. ·The battery level is low. →Install charged batteries. |
| Batteries in your camera cannot be charged. | ·You cannot charge batteries with the AC adaptor (sold separately). →Charge the batteries with the battery charger supplied with your camera. |
| Your camera cannot be attached properly to this unit or is unstable. | ·The base or plate is not mounted properly. →Mount the correct base and plate for your camera properly (page 11). |
| No images are shot. | ·Your camera is set too far from or too close to the subject. →Set your camera within the face detection range of your camera. →If there is only a small change in facial expression or composition, a shot may not be taken right away even when a face is detected. |
| This unit stops moving during use. | ·If this unit does not detect any faces, it may automatically stop looking for faces to save power. →The stoppage time varies depending on the shooting frequency setting. Shooting frequency High: does not turn off Standard: about 3 minutes Low: about 5 minutes *Times are approximate →The unit automatically turns back on when it detects a face again or if you press the MENU button or lift this unit up, etc. |
Specifications
Intelligent Pantfilter
Input/Output connectors
VIDEO OUT jack
DC IN jack
- Multi connector
General
Dimensions (approx.):
$$ 1 2 8 \times 3 4 \times 1 1 8 \mathrm {m m} (\mathrm {w / h / d}) (5 1 / 8 \times 1 3 / 8 \times 4 3 / 4 \text {i n .}) $$
(excluding projecting parts)
Mass (approx.):
175g (6.2 oz) (without arm base, arm plate and batteries)
Batteries in continuous use (at 25^ )
Approx. 11 hours with Sony AA alkaline batteries
Approx. 12 hours with Sony AA Nickel-Metal Hydride batteries
- Using this unit in a cold place may shorten the life of the alkaline batteries. In
that case, we recommend using nickel-metal hydride batteries.
Operating temperature:
5^ to 40^ (41^ to 104^)
Storage temperature:
$$ - 2 0 ^ {\circ} \mathrm {C} \text {t o} + 6 0 ^ {\circ} \mathrm {C} (- 4 ^ {\circ} \mathrm {F} \text {t o} + 1 4 0 ^ {\circ} \mathrm {F}) $$
Power supply:
Two AA alkaline batteries or two AA Nickel-Metal Hydride batteries (sold separately)
AC adaptor AC-LS5K/AC-LS5 (sold separately)
Included items
- Intelligent pantfilter (IPT-DS1) (1)
Plates (2) - Base (1)^*
-
Set of printed documentation
-
The base is mounted to the main unit upon shipping.
Design and specifications are subject to change without notice.
Trademarks
- "Party-shot" are trademarks of Sony Corporation.
- In addition, system and product names used in this manual are, in general, trademarks or registered trademarks of their respective developers or manufacturers. However, the ^ or ^® marks are not used in all cases in this manual.
Français
| Appareil photo | Base | Plaque |
| DSC-TX1 | A | a1 |
| DSC-WX1 | a2 |