MDSLSA1 - Dictaphone SONY - Free user manual and instructions
Find the device manual for free MDSLSA1 SONY in PDF.
| Product Type | MiniDisc Deck |
| Brand | Sony |
| Model | MDS-LSA1 |
| Category | Dictaphone |
| Dimensions (W x H x D) | 430 x 70 x 315 mm |
| Weight | 4.4 kg |
| Power Supply | 230 V AC, 50/60 Hz |
| Power Consumption | 18 W |
| Frequency Response | 5 Hz to 20 kHz ±0.3 dB |
| Signal-to-Noise Ratio | Greater than 100 dB during playback |
| Wow and Flutter | Below the measurement limit |
| Recording Functions | Smart Space, Auto Cut, Time Machine Recording, Music Synchro-recording, CD Synchro-recording (normal and high speed) |
| Recording Modes | Stereo, Mono, LP2, LP4 |
| Playback Functions | Repeat (All, 1, A-B), Random Play, Program Play, Auto Space, Auto Pause |
| Editing | Erase (track, portion, all), Divide, Combine, Move, S.F Edit (level change), Undo |
| Display | 4 brightness levels (Dimmer 1-4) |
| Inputs/Outputs | i.LINK S200 (4-pin) |
| Laser | Semiconductor GaAlAs, Class 1 |
| Care and Cleaning | Clean the cabinet with a soft cloth slightly dampened. Do not use solvents. |
| Safety | Do not expose to rain or moisture. Unplug if not used for extended periods. |
| Supplied Accessories | Remote control with CR2025 lithium battery, i.LINK connection cable |
Frequently Asked Questions - MDSLSA1 SONY
User questions about MDSLSA1 SONY
0 question about this device. Answer the ones you know or ask your own.
Ask a new question about this device
Download the instructions for your Dictaphone in PDF format for free! Find your manual MDSLSA1 - SONY and take your electronic device back in hand. On this page are published all the documents necessary for the use of your device. MDSLSA1 by SONY.
USER MANUAL MDSLSA1 SONY
Operating Instructions GB
This appliance is classified as a CLASS 1 LASER product.
The CLASS 1 LASER PRODUCT
MARKING is located on the rear exterior.

The following caution label is located inside the unit.

АЯ46
IN NO EVENT SHALL SELLER BE LIABLE FOR ANY DIRECT, INCIDENTAL OR CONSEQUENTIAL DAMAGES OF ANY NATURE, OR LOSSES OR EXPENSES RESULTING FROM ANY DEFECTIVE PRODUCT OR THE USE OF ANY PRODUCT.

Don't throw a battery, dispose it as the injurious wastes.
Welcome!
Thank you for purchasing the Sony MiniDisc Deck. Before operating the deck, please read this manual thoroughly and retain it for future reference.
About This Manual
Conventions
- Controls in these instructions are those on the deck; these may, however, be substituted by controls on the supplied remote that are similarly named, or, when different, appear in the instructions within parentheses.
Example: Press ▷■ (or ■).
- The following icons are used in this manual:
Indicates a procedure that requires use of the remote.
Indicates hints and tips for making the task easier.
TABLE OF CONTENTS
Location and Function of Parts 4
Front Panel Parts Descriptions 4
Remote Parts Descriptions 6
Display Window Descriptions 8
Getting Started 10
Before You Start the Hookup 10
Hooking Up the i.LINK Components 11
Recording on MDs 12
Recording on an MD 12
Notes on Recording 14
Recording for Long Times 15
Adjusting the Recording Level 16
Recording Tips 16
Marking Track Numbers While Recording (Track Marking) 17
Starting Recording With 6 Seconds of Prestored Audio Data (Time Machine Recording) 18
Synchro-recording With the Audio Component of Your Choice (Music Synchro-recording) 19
Synchro-recording With a Sony CD Player (Normal/High-Speed CD Synchro-recording) 19
Playing MDs 21
Playing an MD 21
Playing a Specific Track 22
Locating a Particular Point in a Track 22
Playing Tracks Repeatedly 23
Playing Tracks in Random Order (Shuffle Play) 24
Creating Your Own Programme (Programme Play) 24
Tips for Recording From MDs to Tape 25
Editing Recorded MDs 27
Before You Start Editing 27
Erasing Tracks 28
Dividing Tracks 30
Combining Tracks 31
Moving Tracks 31
Naming Tracks or MDs 32
Undoing the Last Edit 34
Changing the Track Level After Recording (S.F Edit) 35
Other Functions 36
Fade In and Fade Out 36
Adjusting the Brightness of the Display 37
Other Settings Using the Setup Menu 37
About i.LINK 38
Additional Information 40
Precautions 40
Handling MDs 41
System Limitations 41
Troubleshooting 42
Specifications 42
Display Messages 43
Edit Menu Table 44
Setup Menu Table 45
Self-Diagnosis Function 46
Index 47
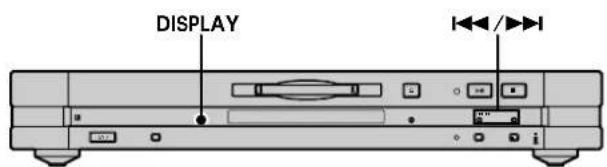
Location and Function of Parts
This chapter tells you about the location and function of the various buttons and controls on the front panel and the supplied remote. Further details are provided on the pages indicated in the parentheses. It also tells you about the information that appears in the display window.
Front Panel Parts Descriptions
1I/ (power) switch (12, 21)
Press to turn on the deck. When you turn on the deck, the STANDBY indicator turns off. When you press the switch again, the deck turns off and the indicator lights up.
2 Remote sensor
Point the remote towards this sensor ( ) for remote operations.
3LP indicator (15)
Lights up when LP2 or LP4 mode is selected, or when a track recorded in LP2 or LP4 mode is being played.
4 H.A.T.S. indicator
Lights up when the H.A.T.S. function is activated on the receiver.

What is the H.A.T.S. function?
The H.A.T.S. (High-quality digital Audio Transmission System) function on the receiver causes digital audio signals output from an MD deck or the recording source (e.g., a CD player) to be momentarily stored in a buffer in the receiver prior to output. This reduces jitter that sometimes occurs during digital audio transmission.
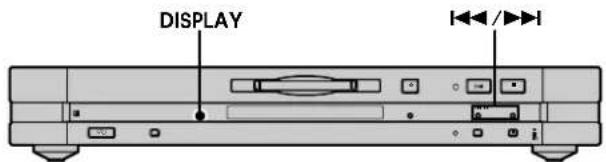
5 DISPLAY button (9, 13, 16, 20, 21)
- Press when the deck is stopped to display disc information.
- Press during recording to display information on the track being recorded or recordable time on the MD.
- Press during play to display information on the current track.
- Press during Programme Play to display the number of the track currently being played in the programme.
- Press during recording or recording pause to adjust the recording level.

6 Display window (8, 16, 32, 35)
Shows various information. For details, see "Display Window Descriptions" on page 8.
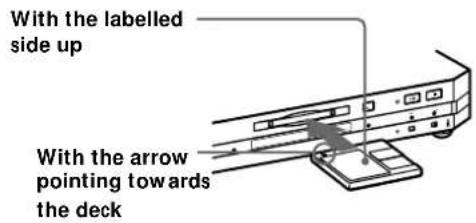
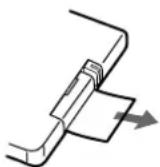
7 MD insertion slot (12, 21)
Insert the MD as illustrated below.
8 ≜ button (12, 21)
Press to eject the MD.
9 ▷■ button (12, 19, 21, 22)
- Press when the deck is stopped to start play.
- Press during playback to pause play.
- Press during recording to pause recording.
- Press during playback pause or recording pause to resume play or recording.
10 ■ button (12, 20, 21)
Press to stop play or recording, or cancel the selected operation.
11 ◀◀/▶▶I buttons (12, 15, 16, 19, 21, 22)
Press to locate tracks or select a menu item and a setting value.
12 REC ● button (12, 17)
Press to record on the MD or mark track numbers.
13 CD SYNCHRO button (19)
Press to start CD Synchro-recording.
14 HIGH SPEED indicator (20)
Lights up when the deck is in High-speed CD Synchro-recording mode.
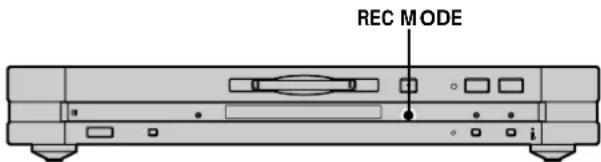
15 REC MODE button (15)
Press to select one of the following four recording modes: MONO mode (monaural recording), stereo mode (stereo recording), LP2 mode (2 times long recording), and LP4 mode (4 times long recording).
16 INPUT button (12)
Press once to display the selected programme source. If the programme source is either the STR-LSA1 or the CDP-LSA1, "▶ ▶ ◀ ◀" appears momentarily in the display window of the component. Press the button again to switch to another programme source.
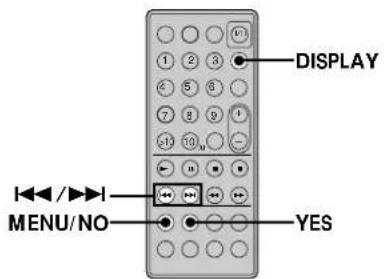
Remote Parts Descriptions

1I/ (power) switch (12, 21)
Press to turn on the deck. When you turn on the deck, the STANDBY indicator on the deck turns off. When you press the switch again, the deck turns off and the indicator lights up.
② DISPLAY button (9, 13, 16, 20, 21, 24)
Press to select the information to be displayed in the window.
③ SCROLL button (21)
Press to scroll the name of a track or MD.
4 LEVEL +/- buttons (16)
Press to adjust the recording level.
5 INPUT button (12)
Use to select the programme source to be recorded.
6● button (12, 17, 19)
Press to record on the MD or mark track numbers.
7■ button (12, 20, 21)
Press to stop play or recording, or cancel the selected operation.
8 ◀◀/▶▶ buttons (22, 23, 29, 30, 32)
Press to locate a portion within a track, change the contents of a programme, or shift the cursor to the right.
9REC MODE button (15)
Press to select one kf the following four recording modes: MONO mode (monaural recording), stereo mode (stereo recording), LP2 mode (2 times long recording), and LP4 mode (4 times long recording).
10 FADER button (36)
Press to perform Fade-in Recording or Fade-out Recording.
11T.REC button (18)
Press to start Time Machine Recording.
12 MUSIC SYNC button (19)
Press to start Music Synchro-recording.
13 CLEAR button (24, 33)
Press to erase a track in the programme or erase a character.
14 NAME EDIT/SELECT button (32, 33)
Press to add the name or change the name of a track or an MD, or to select the type of characters to be input.
15 MENU/NO button (15-19, 25, 26, 28-38)
Press to display "Edit Menu" or "Setup Menu."
YES button (15-17, 19, 24-26, 28-38)
Press to carry out the selected operation.
16 ◀◀◀ /▶▶▶I buttons (12, 15-19, 21, 22, 24-26, 28-38)
Press to locate tracks, select a menu item and a setting value, or select the character to be input.
17■ button (12, 20, 21)
Press to pause play or recording. Press again to resume play or recording.
18▶ button (12, 19, 21, 22, 24)
Press to start play.
19 Letter/number buttons (22, 24, 32)
Press to input letters or numbers.
20 PLAY MODE button (24)
Press to select Shuffle Play or Programme Play.
21REPEAT CLEAR button (23)
- Press to play tracks repeatedly.
- When Repeat All Play or Repeat 1 Play is selected, press to resume normal play.
22A↔B button (23)
Press to select Repeat A-B Play.
Display Window Descriptions
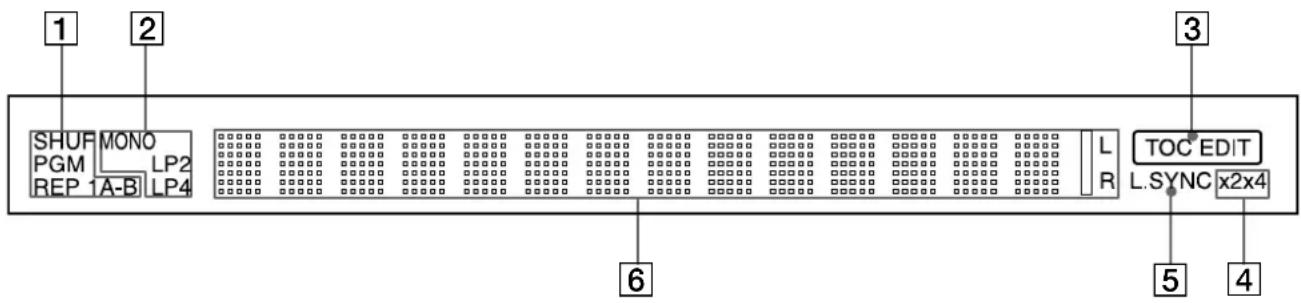
1 Play mode indicators
SHUF indicator (24)
Lights up when Shuffle Play is selected.
PGM indicator (24)
Lights up when Programme Play is selected.
REP indicators (23)
- "REP" lights up when Repeat All Play is selected.
- "REP 1" lights up when Repeat 1 Play is selected.
- "REP A-B" lights up when Repeat A-B Play is selected.
② Recording mode indicators (15)
- No indicator lights up when stereo recording is selected.
- "MONO" lights up when monaural recording is selected.
- "LP2" lights up when 2 times long recording is selected.
- "LP4" lights up when 4 times long recording is selected.
Whenever a track is played back, the corresponding recording mode indicator lights up in the display.
3 TOC EDIT indicator (14, 28, 38)
- "TOC" lights up to indicate the presence of TOC data that has not been written to the disc. "TOC" flashes when the data is being written to the disc.
- "TOC EDIT" lights up during an editing operation.
4 High-Speed CD Synchro-Recording indicators (20)
- “· 2” lights up when 2· High-speed CD Synchro-recording (recording is done in LP2 or LP4 mode) is selected.
- “. 4” lights up when 4. High-speed CD Synchro-recording (recording is done in stereo or MONO mode) is selected.
5 L.SYNC indicator (18)
Lights up during recording when the deck is in automatic track marking mode.
6 Information and menu display area (8, 9, 16, 32, 35)
- Displays parameters during editing or menu operations.
- Displays the input level during recording or recording pause.
- Displays MD or track data (name and playing time, etc.), depending on the deck status (play, recording, etc.).
Notes
- The display format that you've selected in each of the deck statuses will appear whenever the deck enters that status and you press DISPLAY until you change the format to another (see below for details). If you disconnect the mains lead, however, all the displays will revert to their default (i.e., the factory set display) the next time you turn on the deck.
- Time information to be displayed may vary according to the recording mode.
When you insert an MD
The following information appears automatically.
Disc name
Total number of tracks and total recorded time
While the deck is stopped
Press DISPLAY repeatedly to change the display. Each press of the button changes the display as follows:
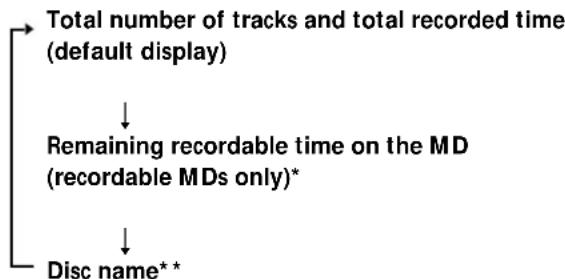
flowchart
graph TD
    A["Total number of tracks and total recorded time (default display)"] --> B["↓ Remaining recordable time on the MD (recordable MDs only)*"]
    B --> C["↓ Disc name**"]
* Not shown for the premastered discs.
**Disc name does not appear when the MD has not been named.
While the deck is recording
Press DISPLAY repeatedly to change the display. Each press of the button changes the display as follows:
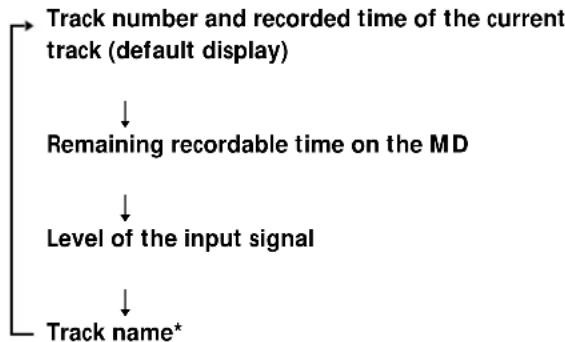
flowchart
graph TD
    A["Track number and recorded time of the current track (default display)"] --> B["Remaining recordable time on the MD"]
    B --> C["Level of the input signal"]
    C --> D["Track name*"]
* Track name does not appear when the track has not been named.
While the deck is playing
Press DISPLAY repeatedly to change the display. Each press of the button changes the display as follows:
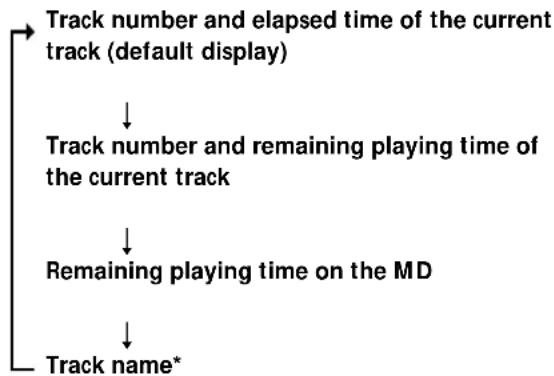
flowchart
graph TD
    A["Track number and elapsed time of the current track (default display)"] --> B["↓ Track number and remaining playing time of the current track"]
    B --> C["↓ Remaining playing time on the MD"]
    C --> D["↓ Track name*"]
* Track name does not appear when the track has not been named.
Getting Started
This chapter provides information on the supplied accessories, things you should keep in mind while hooking up the system, and how to connect i.LINK components to the MD deck. Be sure to read this chapter thoroughly before you actually connect anything to the deck.
Before You Start the Hookup
Checking the supplied accessories
This MD deck comes with the following items:
• i.LINK connecting cable (1)
- Remote commander (remote) (1)
Before using the supplied remote
The supplied remote already contains a battery. Before using the remote, pull out the insulating sheet to allow the power to flow from the battery.
To avoid battery leakage
If you don't use the remote for an extended period of time, remove the battery to avoid possible damage from battery leakage and corrosion.

When to replace the battery
Under normal conditions, the battery should last for about six months. When the remote no longer operates the deck, replace the battery with new kne.
Notes on lithium battery
- Keep the lithium battery out of the reach of the children.
Should the battery be swallowed, immediately consult a doctor. - Wipe the battery with a dry cloth to assure a good contact.
- Be sure to observe the correct polarity when inserting the battery.
- Do not hold the battery with metallic tweezers, otherwise a short-circuit may occur.
WARNING
Battery may explode if mistreated.
Do not recharge, disassemble, or dispose of in fire.
Hooking Up the i.LINK Components
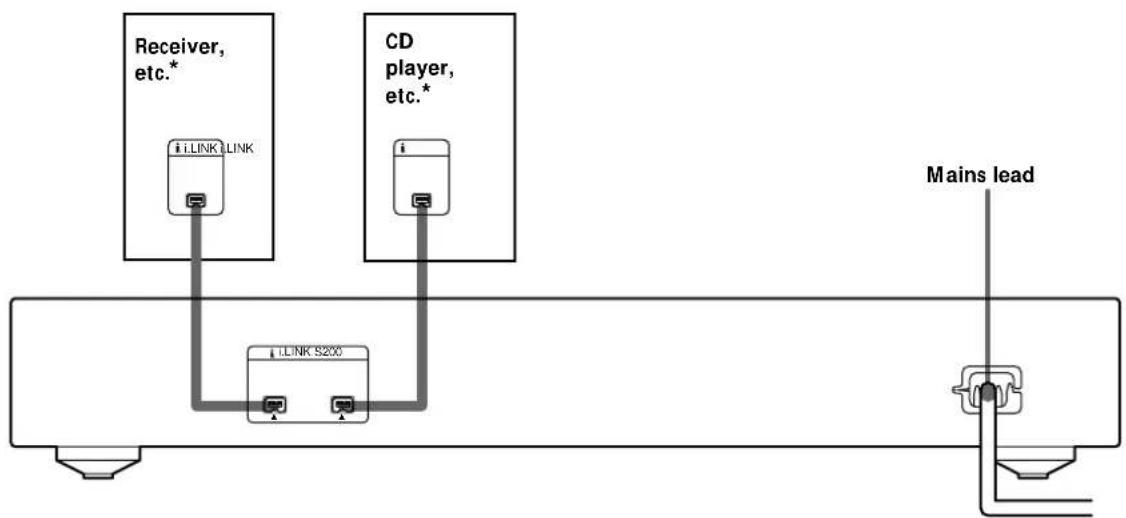
flowchart
graph TD
    A["Receiver, etc.*"] --> B["Link"]
    C["CD player, etc.*"] --> D["Link"]
    B --> E["Link S200"]
    D --> E
    E --> F["Mains lead"]
* You can connect the i.LINK components to either i.LINK S200 connector.
Required cords
i.LINK connecting cables (2) (only one supplied)

Things you should keep in mind while hooking up the system
- Turn off the power to all components before making any connections.
- Do not connect any mains lead until all the connections are completed.
- Be sure the connections are firm to prevent hum and noise.
Jacks for connecting i.LINK components
Connect an To the
Receiver or CD player, etc. i.LINK S200 connector
Note on i.LINK component hookups
If a metal object should fall into the i.LINK S200 connector, short-circuiting may occur and damage the components.
About optional i.LINK connecting cables
Be sure to use the Sony i.LINK S200 connecting cables (4 pins-4 pins).
About i.LINK components to be used in combination with the MD deck
The following i.LINK components can be used with the MD deck:
• STR-LSA1 receiver
- CDP-LSA1 CD Player

For general information about I.LINK
See "About i.LINK" on page 38.
Connecting the mains lead
Connect the mains lead of the deck to a wall outlet.
Note
If you use a timer, connect the mains lead to the outlet of the timer.
Recording on MDs
This chapter explains the various ways to record on an MD, as well as how to mark track numbers and perform synchro-recording with other components. See also “System Limitations” on page 41 before recording.
Recording on an MD
The operations for normal recording are explained below. If the MD has recorded material on it, the deck will automatically start recording from the end of the recorded portion.

1 Press I/⏻ to turn on the deck.
The STANDBY indicator turns off.
2 If the receiver is not turned off, turn it on and turn on the programme source, and then select the source kn the receiver.
3 Insert a recordable MD.
4 Press INPUT repeatedly until the name of the programme source that you want to record from appears.
If the programme source you want does not appear, see page 13.
5 If necessary, select the recording mode.
For details, see "Recording for Long Times" on page 15.
6 If necessary, locate the point on the MD to start recording from.
If you want to record on a new MD or start recording from the end of the recorded portion, go to step 7.
To record over from the beginning of an existing MD track
Press ◀◀/▶▶ repeatedly until the number of the track to be recorded over appears.
To record over from the middle of an MD track Press ◀◀◀/▶▶▶ repeatedly until the number of the track to be recorded over appears, then press ▷▶▶▶ (or ▶▶) to start playback. Press ▷▶▶▶ again (or press ▶▶) at the point you want to start recording from.
7 Press REC ●.
The deck changes to recording pause.
8 If necessary, adjust the recording level.
For details, see “Adjusting the Recording Level” on page 16.
9 Press ▷II (or press ▶ or II).
Recording starts.
10Start playing the programme source.
Operations you may want to do during recording
| To Press | |
| Stop recording ■ | |
| Pause recording | ▷II (or II) |
| Resume recording after pausing | ▷II (or press ▶ or II) |
| Change the display information DISPLAY (page 9) | |
| Eject the MD ≜ after stopping recording | |
When you pause recording
The track number increases by one. For example, if you paused recording while recording track 4, the track number will be 5 when you resume recording.
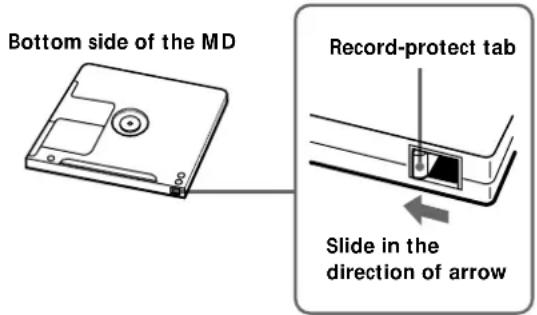
To prevent accidental erasure of the recorded material
To make it impossible to record on an MD, slide the record-protect tab in the direction of the arrow (see illustration below) to open the slot. To enable recording, close the slot.
If the programme source does not appear in step 4
An error may have occurred while the MD deck was reading information about the programme source. Or, the MD deck may be incapable of receiving information from certain components. The indications in the following table may appear at this time:
Indication Meaning
| “Disc”, “Tuner”, etc. The MD deck has read in only general information about the component. |
| “Unknown” The MD deck cannot receive any information about the component. The connection, however, remains operative. |
| “No Device” No component is connected to the MD deck. |
| “CANNOT LINC” You cannot record from the selected component. |

To play the tracks you just recorded
Press ▷▶▶ (or ▶) immediately after stopping recording. The deck starts to play from the first track of the material just recorded.

To play from the first track of the MD after recording
1 Press ■ again after stopping recording.
2 Press ▷■ (or ▶).
The deck starts to play from the first track of the MD.
Note
While recording, do not disconnect any mains leads or i.LINK connecting cables within the i.LINK configuration. If you do so, recording may not be done properly.
Notes on Recording
About indications which appear while recording
When "Protected" and "C11" alternate in the display
The record-protect slot is open and the MD is record-protected. To record on the MD, slide the tab to close the slot. For details, see "To prevent accidental erasure of the recorded material" on page 13.
When "Cannot Select" and programme source name alternate in the display
The selected programme source is not an audio component. Select the audio component.
When "Cannot Copy" and "C12" alternate in the display
The MD deck uses the Serial Copy Management System. MDs recorded through the digital input connector can't be copied on other MDs or DAT tapes through the digital output connector. For details, see "Guide to the Serial Copy Management System" on this page.
When "Impossible" appears in the display
You tried to record over existing track(s) (see "Recording on an MD" on page 12) while Shuffle Play (page 24) or Programme Play (page 24) is selected. You can record over existing material only when the normal play (page 21) or Repeat Play (page 23) is selected.
When "NO SIGNAL" appears in the display
No signal is input to the MD deck and recording cannot be done.
When "Tr" flashes in the display
The MD deck is recording over existing track(s). The indication stops flashing when the deck reaches the end of the recorded portion.
About indications which appear after recording
When "TOC" lights up in the display
Recording has finished but the TOC (Table of Contents) on the MD has not been updated to reflect the recording results. The recording will be lost if you disconnect the mains lead while the indication is on. The TOC will be updated only when you eject the MD or turn off the MD deck.
When "TOC Writing" flashes in the display
The deck is updating the TOC. Do not disconnect the mains lead or move the deck while the indication flashes.
Guide to the Serial Copy Management System
Digital audio programme, such as CDs, MDs, and DATs make it easy to produce high-quality copies of music by processing music as a digital signal.
To protect copyrighted music sources, this deck uses the Serial Copy Management System which allows you to make only a single copy of a digitally recorded source through digital-to-digital connections.
You can make only a first-generation copy\* through a digital-to-digital connection.
Examples are given as follows:
- You can make a copy of a commercially available digital sound programme (for example, a CD or MD), but you can't make a second copy from the first-generation copy.
- You can make a copy of a digital signal from a digitally recorded analog sound programme (for example, an analog record or a music cassette tape) or from a digital satellite broadcast programme, but you can't make a second copy from the first-generation copy.
* A first-generation copy means the first recording of a digital audio source through the deck's digital input connector. For example, if you record from a CD player connected to the i.LINK S200 connector, that copy is a first-generation copy.
Note
The restrictions of the Serial Copy Management System don't apply when you make a recording through the analog-to-analog connections.
Recording for Long Times
In addition to normal stereo recording, this deck has two recording modes: LP2 and LP4. When recording in LP2 mode, you can record 2 times the normal recordable time, and in LP4 mode, you can record 4 times the normal recordable time. In addition, the recordable time for monaural recording is approximately double the stereo recording time.
Note
MDs recorded in LP2 or LP4 mode can be played back only on decks that support the MD LP format. Conventional MD decks cannot play MDs recorded in LP2 or LP4 mode.
1 Do steps 1 to 4 of "Recording on an MD" on page 12.
2 Press REC MODE repeatedly to select the recording mode.
| To record in Select to light up |
| Monaural MONO |
| Stereo (factory setting) no indicator |
| LP2 stereo LP2 |
| LP4 stereo LP4 |
3 Do steps 6 to 10 of "Recording on an MD" on page 12.

When you record on an MD in LP2 or LP4 mode
The LP indicator on the front panel lights up.
Notes
- Even if you press REC MODE during recording or recording pause, you cannot change the recording mode.
- You cannot perform S.F Edit for the tracks recorded in LP2 or LP4 mode.

LP Stamp function works during recording in LP2 or LP4
mode
A track recorded in LP2 or LP4 mode is given an identification code which is displayed only when you attempt to play that track on an MD deck which does not support LP modes. "LP:" appears in the display at this time. To turn off this function, do the procedure below.
1 While the deck is stopped or playing, press MENU/NO twice. "Setup Menu" appears in the display.
2 Press ◀◀◀/▶▶▶I repeatedly until "LP Stamp On" appears, then press YES.
3 Press ◀◀◀/▶▶▶I repeatedly to select "LP Stamp Off," then press YES.
4 Press MENU/NO.
To turn on the LP Stamp function again, select "LP Stamp On" in step 3 above.
Notes
- "LP:" does not appear when the track is played back on the MD deck that supports the MD LP format.
- When the LP Stamp function is on, the maximum number of characters which can be input in the MD decreases.
- When you divide the track recorded with the LP Stamp function activated, "LP:" code is copied to the newly created track.
Adjusting the Recording Level
Do the procedure below to adjust the recording level.
1 Do steps 1 to 7 of "Recording on an MD" on page 12.
2 Play the portion of the programme source with the strongest output.
3 Press DISPLAY repeatedly until the level of the input signal appears.
4 While monitoring the sound, press I◄◄/►►I repeatedly (or press LEVEL +/- repeatedly) to raise the recording level to its highest level without turning kn the rightmost indicator on the peak level meters.

Avoid turning on this indicator
5 Stop playing the programme source.
6 To start recording, continue from step 9 of "Recording on an MD" on page 12.
The Peak Hold function freezes the peak level meters at the highest level reached by the input signal
1 Press MENU/NO twice.
"Setup Menu" appears in the display.
2 Press ◀◀/▶▶I repeatedly until "P.Hold Off" (factory setting) appears, then press YES.
3 Press ◀◀◀/▶▶▶ repeatedly to select "P.Hold On," then press YES.
4 Press MENU/NO.
To turn off the Peak Hold Function, select "P.Hold Off" in step 3 above.
Note
The volume can only be increased up to +18.0 dB. Therefore, if the output level of the connected component is low, it may not be possible to set the recording level to maximum.
Recording Tips