RP500DP - Radio LEXIBOOK - Free user manual and instructions
Find the device manual for free RP500DP LEXIBOOK in PDF.

| Product type | Projection alarm clock radio |
| Brand | LEXIBOOK |
| Model | RP500DP |
| FM frequency range | 87.5 – 108 MHz |
| Power supply | 4 AA 1.5V batteries (not included) |
| Dimensions (H x W x D) | 64 x 191 x 135 mm |
| Weight (approx.) | 300 g |
| Display | LCD screen |
| Speaker | Built-in speaker |
| Projector | Projects time and a Disney Princess icon onto the ceiling |
| Night light | Activation by pressing the base, automatic shut-off after 1 hour |
| Alarm | With 5-minute snooze function |
| Hourly chime | Enable/disable |
| Timer | Built-in |
| Pre-recorded melodies | 4 melodies (Cinderella button) |
| Radio station search | Automatic (SCAN button) and reset (RESET) |
| Antenna | Telescopic antenna for optimal reception |
| Operating temperature | Not specified |
| Warranty | 1 year |
| Maintenance | Clean with a soft, slightly damp cloth (non-soapy warm water) |
| Environmental protection | Do not dispose of with household waste, recycle |
Frequently Asked Questions - RP500DP LEXIBOOK
User questions about RP500DP LEXIBOOK
0 question about this device. Answer the ones you know or ask your own.
Ask a new question about this device
Download the instructions for your Radio in PDF format for free! Find your manual RP500DP - LEXIBOOK and take your electronic device back in hand. On this page are published all the documents necessary for the use of your device. RP500DP by LEXIBOOK.
USER MANUAL RP500DP LEXIBOOK
- MODE button: Selects the setting mode.
- SCAN button: Search the radio frequency to find radio channels.
- RADIO OFF / ON / VOLUME knob: Roll the knob to turn the radio on or off and increase or decrease the volume.
- RESET button: Resets the radio frequency so you can start scanning for channels from the beginning.
- LCD screen
- Battery compartment (at the bottom of the unit)
- Night-light rubber feet
- SET button: Selects a setting.
- ADJUST button: Changes the number and activates the snooze function.
- Cinderella button
- Speaker
- Projector
- PROJECT button: Projects the time and a Disney Princess icon onto the ceiling.
Battery information
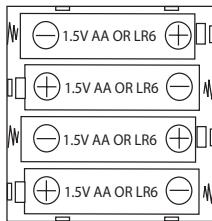
Your Disney Princess Radio Alarm Clock Projector works with 4 × 1.5V = - AA / LR6 type batteries (not included).
When you use the RP500DP for the first time:
- Using a screwdriver, open the battery compartment cover located at the bottom of the unit.
- Install the 4 × AA 1.5 ~V = = batteries (not included) observing the polarity markings inside the battery compartment.
- Close the battery compartment and tighten the screw.
IMPORTANT NOTE: For better performance, it is recommended to use alkaline batteries with this product.
Non-rechargeable batteries are not to be recharged. Rechargeable batteries are to be removed from the product before being charged. Rechargeable batteries are only to be charged under adult supervision. Different types of batteries or new and used batteries are not to be mixed. Only batteries of the same or equivalent type as recommended are to be used. Batteries are to be inserted with the correct polarity. Exhausted batteries are to be removed from the product. The supply terminals are not to be short circuited. Do not throw batteries into a fire. Remove the batteries if you are not going to use the product for a long period of time.
WARNING: Malfunction or loss of memory may be caused by strong frequency interference or electrostatic discharge. Should any abnormal function occur, press the RESET button or remove the batteries and insert them again.
Installation
Unpacking the device
When unpacking, ensure that the following elements are included:
1 x Disney Princess Radio Alarm Clock Projector
1 x instruction manual
WARNING: All packaging materials, such as tape, plastic sheets, wire ties and tags are not part of this product and should be discarded.
Settings
CLOCK
- To set the clock, press MODE 3 times.
- Press SET once: the minute digit starts flashing.
- Press ADJUST to change the setting value. Then press SET to move to the next setting.
The setting sequence is displayed in the following order:
Minutes Hours Date Month Day of the week.
- Press and hold ADJUST to quickly scroll through the values.
To view the date and alarm time:
In clock mode, press and hold ADJUST to check the date or press and hold SET to check the alarm time.
ALARM
- To set the alarm, press MODE twice.
- Press ADJUST to change the hour value. Then press SET to move to the next setting.
- Press ADJUST to change the minute value. Then press MODE to confirm.
- When the alarm sounds, press ADJUST to snooze the alarm for 5 minutes or press SET to turn it off. The alarm will ring at the same time the next day.
To activate or deactivate the alarm:
In clock mode, press SET and ADJUST at the same time. 們 appears when the alarm is activated.
HOURLY CHIME
To turn the hourly chime on or off, press and hold SET and then press MODE. When you see the days of the week at the top of the screen the hourly chime is on.
STOPWATCH
- Press MODE once.
- Press ADJUST to start or stop the stopwatch.
- Press SET to restart the stopwatch from zero.
- Press MODE to go back to the clock mode.
RADIO
- Roll the RADIO OFF / ON / VOLUME knob to the right to turn it on and increase the volume.
- Press SCAN to search for radio channels.
- Press RESET if you want to search for channels from the start of the frequency range.
- To get the best reception, fully extend the radio antenna and move it about to find where the reception is clearest.
- Roll the RADIO OFF / ON / VOLUME knob to the left to decrease the volume and turn it off.
MELODIES
Press Cinderella to play one of the 4 preloaded melodies.
NIGHTLIGHT
Press once on the base of the clock to switch on the nightlight. Press again to stop it.
Note: when activated, the nightlight will stay on for 1 hour.
PROJECTOR
Press PROJECT to project the time and a Disney Princess icon onto the ceiling. The projection will gradually fade out after a few seconds.
Specifications
| FM tuner | 87.5 – 108MHZ |
| Dimensions | H64 x W191 x 135mm |
| Batteries | 4 x AA 1.5V |
Maintenance
To prevent fire or shock hazard, disconnect your unit from the AC power source when cleaning. The finish on your unit may be cleaned with a dust cloth and cared for as other furniture. Use a soft, clean cloth moistened with plain, lukewarm water to clean the exterior of the unit. Use caution when cleaning and wiping the plastic parts. Mild soap and a damp cloth may be used on the front panel.
Warranty
This product is covered by our 1-year warranty.
For any claim under the warranty or after sale service, please contact your distributor and present a valid proof of purchase. Our warranty covers any manufacturing material and workmanship defect, with the exception of any deterioration arising from the non-observation of the instruction manual or from any careless action implemented on this item (such as dismantling, exposition to heat and humidity, etc.). It is recommended to keep the packaging for any further reference.
In a bid to keep improving our services, we could implement modification on the colours and the details of the product shown on the packaging.
NOTE: Please keep this instruction manual, it contains important information.
Reference: RP500DP
Designed and developed in Europe - Made in China
© 2010 Lexibook®
© Disney
United Kingdom & Ireland
For any further information, please call Helpline: 0808 1003015

This product is not a toy.

Environmental Protection
Unwanted electrical appliances can be recycled and should not be discarded along with regular household waste! Please actively support the conservation of resources and help protect the environment by returning this appliance to a collection centre (if available).

V --- AA / LR6 (non fornite).

IM code: RP500DPIM1280