
RL010DP - Alarm Clock LEXIBOOK - Free user manual and instructions
Find the device manual for free RL010DP LEXIBOOK in PDF.

| Product type | Star projector radio alarm clock |
| Brand | Lexibook |
| Model | RL010DP |
| Mains power | 230 V ~ 50 Hz, mains adapter AD-0970-VDS (output 9 V - 1 A) |
| Backup batteries | 2 AAA / LR03 1.5 V batteries (not supplied, alkaline recommended) |
| Radio | AM (medium wave) and FM (frequency modulation) |
| FM frequency ranges | 87.5 – 108 MHz |
| AM frequency ranges | 522 – 1629 kHz |
| Star projector | Yes, illuminated tower light |
| Alarm melody | Disney melody or radio (depending on FUNCTION position) |
| Snooze function | Yes, 8-minute interruption |
| Sleep function | Yes, adjustable auto-off timer |
| Display | Digital with constant backlight (mains) |
| Time setting | TIME SET button + HOUR/MIN keys |
| Alarm setting | ALARM SET button + HOUR/MIN keys |
| Adjustable volume | VOLUME rotary knob |
| FM antenna | Wire antenna (unfold for better reception) |
| Safety | Not suitable for children under 3 years; keep batteries out of reach |
| Cleaning | Soft damp cloth, no detergent, unplug before |
| Dimensions | Not specified |
| Weight | Not specified |
Frequently Asked Questions - RL010DP LEXIBOOK
User questions about RL010DP LEXIBOOK
0 question about this device. Answer the ones you know or ask your own.
Ask a new question about this device
Download the instructions for your Alarm Clock in PDF format for free! Find your manual RL010DP - LEXIBOOK and take your electronic device back in hand. On this page are published all the documents necessary for the use of your device. RL010DP by LEXIBOOK.
USER MANUAL RL010DP LEXIBOOK
Radiofrequency UKW 87,5-108 MHZ
Radiofrequency Mittelwelle 522-1629kHz
- Star Light
- Tuning Control
- ALARM SET: Set the alarm time
- TIME SET: Set the clock
- SLEEP: Set automatic turn off
- VOLUME Control: Set the volume
- Display
- AC cord (rear of unit)
- Battery compartment (bottom of unit)
- FUNCTION switch: Set the modes
- Band switch AM/FM
- HOUR: Set the hours
- MIN: Set the minutes
- Star Light button: Turn the Star Light on/off
- SNOOZE: Turn off the alarm
- FM Antenna wire (rear of unit)
DISPLAY
A SLEEP indicator
B SNOOZE indicator
C Radio alarm indicator
D Time
E Disney-Sound indicator
F Clock setting
G Radio
H AM/FM indicator
SAFETY PRECAUTIONS
ABOUT THIS MANUAL

Please observe the following safety instructions carefully before putting the unit into Operation. Take note of the warnings on the unit and in this manual.
Always keep the instruction manual near at hand. If you seal or pass on the product, make sure to include this manual together with the unit.

DO NOT LET YOUNG CHILDREN USE ELECTRICAL DEVICES UNATTENDED.
Swallowing batteries may be fatal. Therefore always keep batteries inaccessible to young children. If a battery has been swallowed, consult a doctor immediately.
Also keep the plastic packaging away from children. There is danger of suffocation!
MAKE SURE THAT THE UNIT IS NOT EXPOSED TO:
- humidity or moisture;
- direct sunlight or other direct heat (e. g. from radiators or other Stereo equipment);
- constant Vibration;
- strong dust or places without Ventilation.
ENSURE THAT THE POWER UNIT IS ACCESSIBLE
Connect the mains adapter to a power socket (230 V ~ 50 Hz) that is near to the device.
The mains adapter must be easily accessible in case the device has to be disconnected from the mains power supply quickly. To avoid tripping hazards, please avoid using an extension cable.
DO NOT REPAIR THE UNIT YOURSELF.
In case the power supply cord or the unit is damaged, pull out the AC mains plug immediately. Under no circumstances attempt to open or repair the unit yourself. There is danger of electric shock! Refer all servicing to our Service Center or to another qualified workshop.
BATTERY DISPOSAL

Empty alkaline and NiCd batteries do not belong in the household refuse. The batteries must be disposed of at a designated disposal/recycle point.
- The toy is not designed for children under three years of age.
- The toy may only be operated using the recommended transformer.
- The transformer is not a toy.
- Toys that are usually cleaned using liquids must be separated from the transformer before cleaning.

INSTALLATION
CONNECTING THE UNIT TO THE MAINS

Only connect the mains adapter supplied to an easily accessible 230V 50Hz power socket. Batteries will disconnect automatical, if the AC cord is plugged in. Now in the display the digits "00:00" are flashing and the background illumination is on.
BACKUP-BATTERY
If the mains adapter is pulled from the power socket or there is a power failure this clock runs on two batteries (AAA size).
TO INSTALL THE BATTERIES
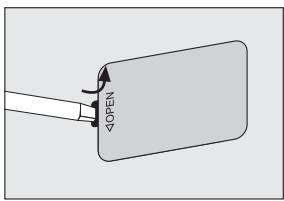
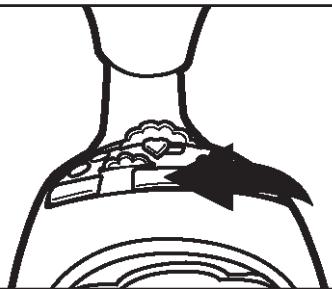
Remove the battery compartment door by inserting a small screwdriver, paper clip or similar item into the tab while gently pushing to remove.
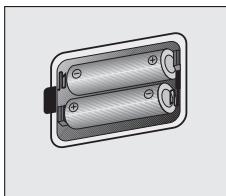
Insert two batteries (size AAA/1,5 V) into the battery compartment. Be sure to observe the polarity markings which are engraved inside the battery compartment. If the batteries are inserted incorrectly, the unit will not operate. Replace the battery compartment door.
CAUTION!
- Use only the size and type of batteries specified.
- Do not mix different types of batteries together.
- If the device is not to be used for a long period of time, remove the batteries to prevent damage or injury from possible battery leakage.
1
2

OPERATION
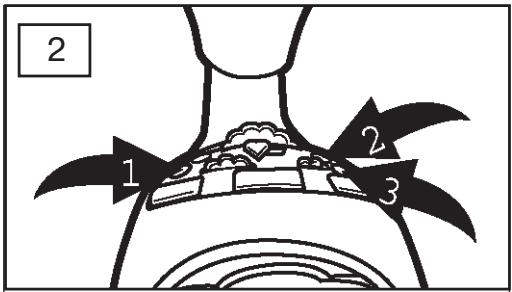
TO LISTEN TO THE RADIO
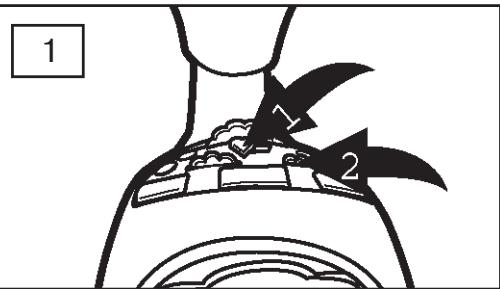
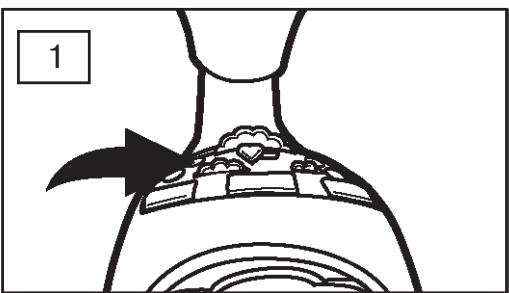
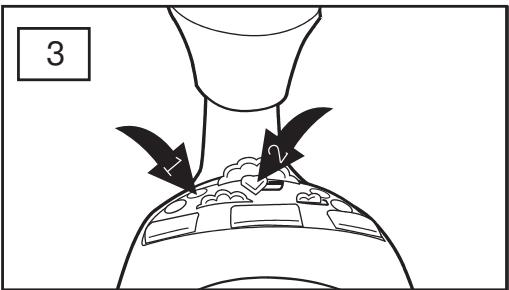
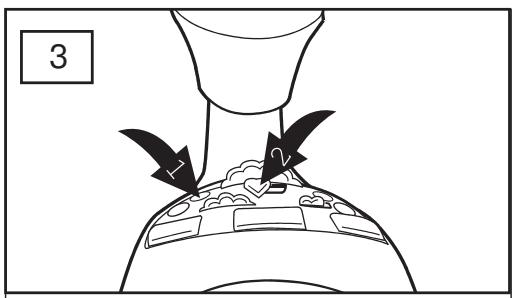
Slide the function switch 1 to the ON position to turn the unit on; the AM or FM indicator will light. Slide the Band switch 2 to select AM or FM.
Tune a station by rotating the Tuning control until the desired frequency is shown at the top of the dial.
6

Adjust the volume using the volume control. Slide the function switch to the OFF position to turn the unit off.
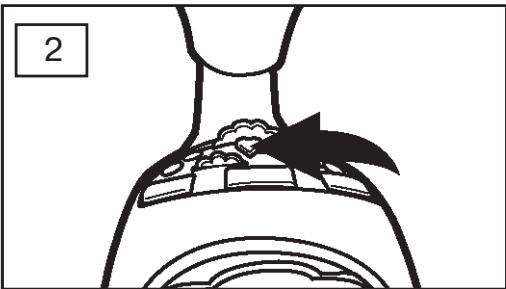
To turn the star light on, press the star light button; the star light will then light from dim to bright repeatedly on the castle top. To turn the star light off, press the star light button again.
ANTENNAS:
FM: Extend the FM antenna wire for best reception.
AM: Turn the unit for better AM reception.
Backlight:
The display's blacklight will always be on when the unit is plugged in.


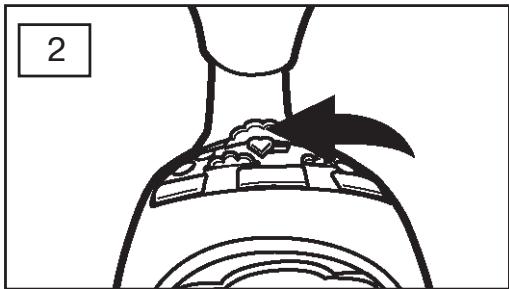
TO SET OR RESET THE ACTUAL TIME

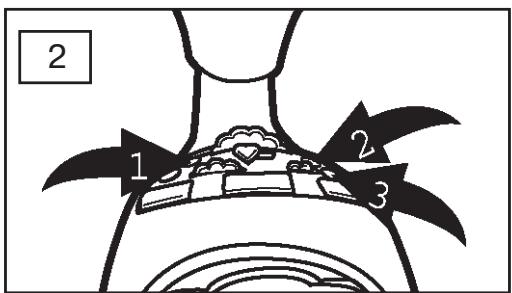
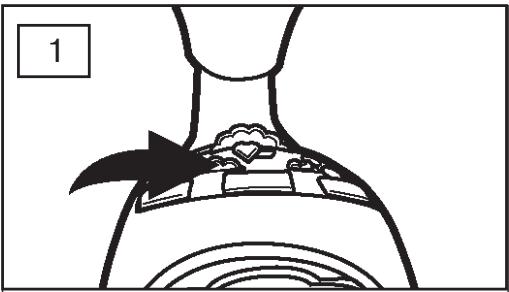
Press and hold the TIME SET button; the time indicator(⑦) and the display will blink.
While holding the TIME SET button 1, press the HOUR button 2, to set the hour and/or MIN button 3, to set the minute of the time. Make sure the appropriate AM/PM indicator is lit. Release the TIME SET button 1; after 4 seconds, the alarm time will be set and the display will show the actual time again.
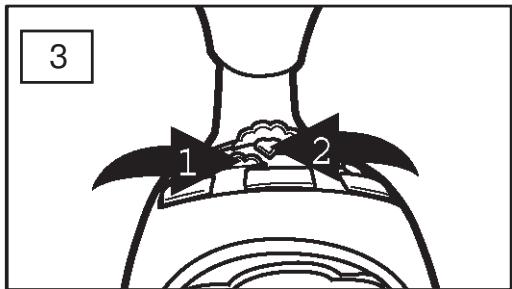
TO SET OR RESET THE ALARM TIME
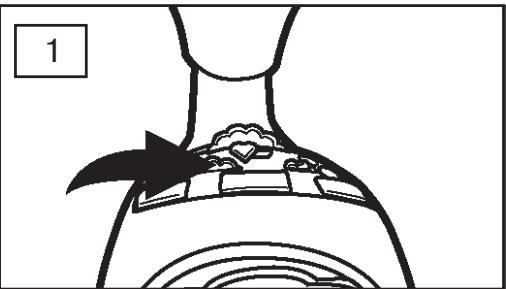
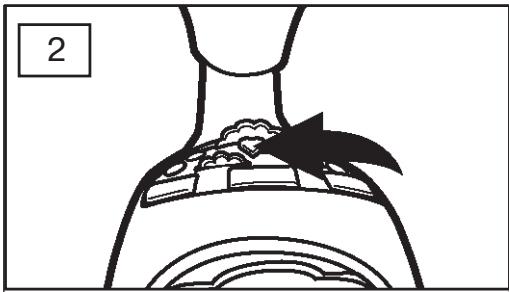
With the function switch in the ON, AUTO or BUZZ position, press and hold the ALARM SET button; the display will blink.
NOTE: You cannot set the alarm time when the function switch is set to the OFF position.
While holding the ALARM SET button 1, press the HOUR button 2, to set the hour and/or MIN button 3, to set the minute of the alarm time.
Release the ALARM SET button ①;after 4 seconds, the alarm time will be set and the display will show the actual time again.

OPERATION (CONTINUED)
TO SET THE ALARM TIME TO WAKE TO RADIO

Set the alarm time as previously instructed.
Select a radio station as described on page 19 and make sure the VOLUME control is set as desired.
NOTE: If the volume is set to Minimum, there will be no sound when the alarm time is reached.
Slide the function switch to the AUTO position and the radio alarm indicator (h) will light. When the actual time matches the selected preset alarm time, the radio will automatically turn on for nearly one hour then turn off again.
Press the ALARM SET button 1 to turn off the alarm and set it again for the next day.
Slide the function switch ② to the OFF position to turn off the alarm and not set for the next day.
See page 23 for the Snooze feature.
OPERATION (CONTINUED)
TO SET THE ALARM TIME TO WAKE TO DISNEY SOUND

Set the alarm time as previously instructed.
Slide the function switch to the BUZZ position and the Buzzer alarm indicator (J) I will light. When the actual time matches the selected preset alarm time, the buzzer will automatically turn on for nearly one hour then turn off again.
Press the ALARM SET button 1 to turn off the alarm and set it again for the next day.
Slide the function switch ② to the OFF position to turn off the alarm and not set for the next day.
See page 23 for the Snooze feature.

OPERATION (CONTINUED)
SNOOZE
1
The alarm can be temporarily turnde off manually by pressing the Snooze button; the alarm will turn backl on automatically eight minutes later. The snooze indicator(=I) will light when Snooze is activated.
B
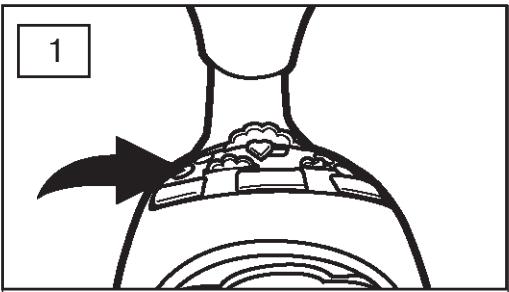
TO ACTIVATE THE SLEEP FUNCTION
1

Select a radio station as desired on page 18. With the function switch set to the AUTO position, press and hold the Sleep button ("0:00" will blink on the clock display).
2

While holding the sleep button 1, press the HOUR button 2, to set the hour and/or MIN button 3, to set minute of the desired sleep time. Release the sleep function 1 and the time will be set. The unit will then turn on for the selected amount of time. The sleep indicator will appear in the display and the actual time will appear in the display again..
NOTE: To cancel sleep timer, slide the function switch to the off position.
CLEANING

Disconnect the mains adapter before cleaning!
To clean the unit, only use a moistened, soft cloth. Do not apply chemical solvents or cleaning agents, as they may damage the surface and/or labelling of the unit.
DISPOSAL

At the end of its life, the appliance must not be disposed of in household rubbish. Enquire about the options for environmentally-friendly disposal.
SPECIFICATIONS
POWER REQUIREMENTS
Mains adapter:

Secondary: 230V-240V ~ 50Hz 12W
Primary: 9 V---1 A
Batteries (not supplied): 2 × 1,5 ~V, LR03/R03 (Alkaline recommended), Size AAA
RADIO
Radiofrequency FM 87,5-108 MHZ
Radiofrequency AM 522 -1629kHz
Subject to technical changes!


BEDIENELEMENTE
L
MANTENGAL ENCHUFE ACCESIBLE.
Radiofrequency FM 87,5-108 MHZ
Radiofrequency AM 522-1629kHz
- DISPLAY
- SAFETY PRECAUTIONS
- ABOUT THIS MANUAL
- DO NOT LET YOUNG CHILDREN USE ELECTRICAL DEVICES UNATTENDED.
- MAKE SURE THAT THE UNIT IS NOT EXPOSED TO:
- ENSURE THAT THE POWER UNIT IS ACCESSIBLE
- DO NOT REPAIR THE UNIT YOURSELF.
- BATTERY DISPOSAL
- INSTALLATION
- CONNECTING THE UNIT TO THE MAINS
- BACKUP-BATTERY
- TO INSTALL THE BATTERIES
- CAUTION!
- OPERATION
- TO LISTEN TO THE RADIO
- ANTENNAS:
- Backlight:
- TO SET OR RESET THE ACTUAL TIME
- TO SET OR RESET THE ALARM TIME
- OPERATION (CONTINUED)
- TO SET THE ALARM TIME TO WAKE TO RADIO
- TO SET THE ALARM TIME TO WAKE TO DISNEY SOUND
- SNOOZE
- TO ACTIVATE THE SLEEP FUNCTION
- CLEANING
- DISPOSAL
- SPECIFICATIONS
- POWER REQUIREMENTS
- RADIO
- BEDIENELEMENTE
- MANTENGAL ENCHUFE ACCESIBLE.
Brand : LEXIBOOK
Model : RL010DP
Category : Alarm Clock