
WB100 - Alarm Clock LEXIBOOK - Free user manual and instructions
Find the device manual for free WB100 LEXIBOOK in PDF.

| Product Type | Alarm Clock |
| Brand | LEXIBOOK |
| Model | WB100 |
| Dimensions (approx.) | 10 x 10 x 5 cm |
| Weight (approx.) | 150 g |
| Power Supply | 2 LR03/AAA 1.5 V batteries (not included) |
| Display Type | LCD screen |
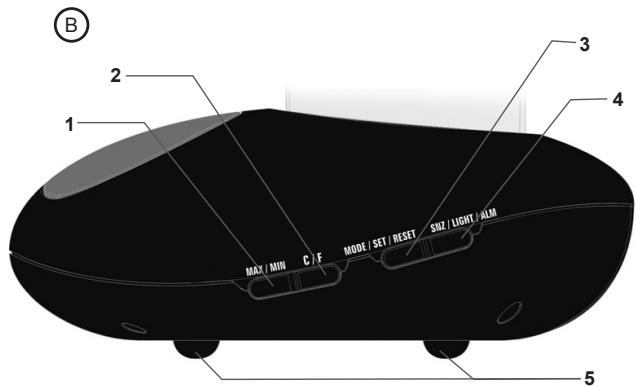
| Functions | Time display (12/24h), alarm, snooze, indoor temperature (max/min), backlight, detachable candle |
| Time Setting | Using MODE/SET/RESET and MAX/MIN buttons |
| Backlight | Yes, temporary (3 seconds) |
| Detachable Candle | Yes, with on/off button |
| Maintenance | Damp cloth, no solvents |
| Safety | Do not expose to humidity, shocks or extreme temperatures |
| Warranty | 2 years |
| Repairability | Do not attempt to repair yourself, contact customer service |
| Batteries | Do not mix types, do not recharge, respect polarity |
| Reference | WB100 |
| Manufacturer | LEXIBOOK S.A. |
| Country of Manufacture | China |
Frequently Asked Questions - WB100 LEXIBOOK
User questions about WB100 LEXIBOOK
0 question about this device. Answer the ones you know or ask your own.
Ask a new question about this device
Download the instructions for your Alarm Clock in PDF format for free! Find your manual WB100 - LEXIBOOK and take your electronic device back in hand. On this page are published all the documents necessary for the use of your device. WB100 by LEXIBOOK.
USER MANUAL WB100 LEXIBOOK
Copyright © Lexibook 2009
Copyright © Lexibook 2009
Garantie
When you use the clock for the first time:
- Open the battery door located under the unit.
- Insert 2 × 1,5V = LR03/AAA type batteries (not included) observing the polarity indicated at the bottom of the battery compartment, and as per the diagram shown opposite.
- Close back the battery compartment. The hour and the temperature will be displayed on the LCD screen.
Electronic candle
- Using a screwdriver, open the battery compartment located under the electronic candle.
- Insert 2 × 1,5V = - LR03/AAA type batteries (not included) observing the polarity indicated at the bottom of the battery compartment, and as per the diagram shown opposite.
- Close the battery compartment and tighten the screw.

1.5V SIZE AAA LR03

1.5V SIZE AAA LR03

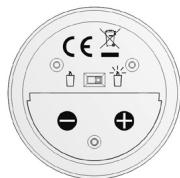
Non-rechargeable batteries are not to be charged. Rechargeable batteries are to be removed from the product before being charged. Rechargeable batteries are only to be charged under adult supervision. Different types of batteries or new and used batteries are not to be mixed. Only batteries of the same or equivalent type as recommended are to be used. Batteries are to be inserted with the correct polarity. Exhausted batteries are to be removed from the product. The supply terminals are not to be short circuited. Do not throw batteries into a fire. Remove the batteries if you are not going to use the product for a long period of time.
WARNING: Mal-function or loss of memory may be caused by strong frequency interference or electrostatic discharge. Should any abnormal function occur, remove the batteries and insert them again.
Time setting
- In time display mode (default mode), press and hold the "MODE/SET/RESET" key until "24hr" or "12hr" starts flashing.
- Press the "MAX/MIN" key to toggle between the 12 hours or 24 hours mode, then press "MODE/SET/RESET" to confirm and set the hour.
- Press the "MAX/MIN" key to increase the values and adjust the hour. Then press "MODE/SET/RESET" to confirm and set the minutes.
- Press the "MAX/MIN" key to increase the values and adjust the minutes. Then press "MODE/SET/RESET" to confirm the setting and go back to the time display mode.
Note:
- The "MAX/MIN" key can only increase the values.
- During the setting process, if there is no input within 15 seconds, the unit will automatically go back to the time display mode.
Alarm setting
Setting the alarm time
- In time display mode, press the "MODE/SET/RESET" key once to enter the "alarm" mode (the alarm icon is displayed on screen).
- To set the alarm, press and hold "MODE/SET/RESET" until the hour's digits start flashing.
- Press the "MAX/MIN" key to increase the values and adjust the hour. Then press "MODE/SET/RESET" to confirm and set the minutes.
- Press the "MAX/MIN" key to increase the values and adjust the minutes. Then press "MODE/SET/RESET" to confirm the setting and exit the alarm time setting mode.
- Press and hold the "SNZ/LIGHT/ALM" key to turn on or turn off the alarm. When the alarm is turned on, the snoozie icon is displayed.
Note:
- The "MAX/MIN" key can only increase the values.
- The alarm must be turned on ( 2 icon) or it will not ring at the specified hour.
- When the alarm is turned on, the snooze icon ±b is displayed in time display mode.
- The alarm will ring at the time set every day unless it is turned off.
- During the alarm setting process, if there is no input within 30 seconds, the unit will automatically go back to the time display mode.
Snoopze function
When the alarm is ringing, press on the base of the clock ("SNZ/LIGHT/ALM" rubber feet) or on the "SNZ/LIGHT/ALM" key to temporarily turn off the alarm and use the snooze function. The alarm will be repeated every 8 minutes until you turn it off.
Turning off the alarm
When the alarm is ringing, press any key other than the "SNZ/LIGHT/ALM" key and the rubber feet to turn it off (whether the snooze function is turned on or off). It will ring again the next day at the set time.
Note: The alarm stops ringing automatically after 1 minute.
Temperature
Celsius/Fahrenheit display
In time display or "alarm" modes, press the "C/F" key to toggle between temperature display in Celsius (^) or Fahrenheit (^) .
Maximum/minimum temperature
- In time display or "alarm" modes, press the "MAX/MIN" key once to display the maximum recorded temperature
- Press the same key again to display the minimum recorded temperature.
- Press the key a third time to go back to the current temperature.
- To clear the temperature records, use the "MAX/MIN" key to display the maximum temperature or the minimum temperature, then press the "MODE/SET/RESET" key.
Note: The temperature records are cleared automatically everyday at midnight.
Backlight
Press once on the base of the clock or on the "SNZ/LIGHT/ALM" key to switch on the backlight for 3 seconds.
Detachable candle
Use the button located under the base of the detachable candle provided with your clock to turn it on ( ) or off ( ).
Maintenance
Don't clean any part of your WB100 with benzene, thinners or other solvent chemicals—this may cause permanent damage which is not covered by the guarantee. When necessary, clean it with a damp cloth. Keep your WB100 away from extreme temperature, water or severe shock. When the LCD screen turns unclear, replace the batteries. Avoid using in the presence of magnetic fields such as in airports. Every effort has been made to ensure high standards of reliability for your WB100. However, if something does go wrong, please do not try to repair it yourself – consult your supplier or the LEXIBOOK® help line.
Warranty
This product is covered by our two-year guarantee*. For all matters relating to the guarantee or our after-sales service, please contact your retailer and have your receipt on hand. Our guarantee covers manufacturing or assembly defects with the exception of all damage resulting from a failure to respect the instructions, or any inappropriate handling of the article (such as taking it apart, exposing it to heat or humidity, etc).
- excluding the deterioration of the LCD screen.
NOTE: It is recommended that all packaging be kept for future reference.
Keep this instruction manual in a safe place as it contains important information. In our constant concern for improvement, the colours and details of the product may differ slightly from those shown on the packaging.
Reference: WB100
©2009 LEXIBOOK®
Designed and developed in Europe - Made in China
Lexibook UK Ltd,
Unit 10 Petersfield Industrial Estate,
Bedford Road, Petersfield,
Hampshire, GU32 3QA,
United Kingdom.
Helpline: 0808 1003015,
www.lexibook.com

Environmental Protection
Unwanted electrical appliances can be recycled and should not be discarded along with regular household waste! Please actively support the conservation of resources and help protect the environment by returning this appliance to a collection centre (if available).
Lexibook Ibérica S.L.
Praceta Jose Domingos dos Santos, 6B-8A, 2003-014, Brazil
2835-343 Lavradio-Barreiro, Portugal.
Apoio和技术:21 206 13 48
www.lexibook.com

Proteção Ambiental
Address/Adresse: _ City/Ville: _
Zip code/Code Postal: Country/Pays:
Phone/Téléphone: Email:
Average/Moyen Disappointing/Decevant