
CSS-HD2 - Photo Accessories SONY - Free user manual and instructions
Find the device manual for free CSS-HD2 SONY in PDF.
| Product type | Cyber-shot digital camera docking station |
| Model | CSS-HD2 |
| Brand | Sony |
| Dimensions (approx) | 124 × 48 × 78 mm (w/h/d) |
| Weight (approx) | 110 g (with one plate) |
| Power supply | AC power adaptor AC-LS5 (input 100-240 V AC, 50/60 Hz; output 4.2 V DC) |
| Operating temperature | 0°C to 40°C |
| Storage temperature | -20°C to +60°C |
| Compatible devices | DSC-T300, T75, T70, T2, W300, W170, W150, W130, W125, W120, W115, W110 |
| Main functions | Quick battery charging, HD (1080i) viewing via component cable, wireless remote control, slideshow, zoom, face search |
| Connectors | A/V OUT jack (component, video, audio), DC IN jack, device I/O |
| Included accessories | Remote control RMT-CSS6 with CR2025 battery, 5 station plates, audio/video cable, component audio/video cable, AC power adaptor AC-LS5, power cord, protective cap |
| Care and cleaning | Clean with a soft cloth slightly moistened (water or lukewarm water); do not use solvents |
| Safety | Do not expose to moisture, extreme temperatures, strong magnetic fields; unplug if a problem occurs |
| Remote control battery | CR2025 lithium coin battery (non-rechargeable) |
| Battery charging time (approximately) | About 160 min (DSC-T300/T75/T70/T2); about 230 min (other models) |
Frequently Asked Questions - CSS-HD2 SONY
User questions about CSS-HD2 SONY
0 question about this device. Answer the ones you know or ask your own.
Ask a new question about this device
Download the instructions for your Photo Accessories in PDF format for free! Find your manual CSS-HD2 - SONY and take your electronic device back in hand. On this page are published all the documents necessary for the use of your device. CSS-HD2 by SONY.
USER MANUAL CSS-HD2 SONY
Operating Instructions ____ GB
Before operating the product, please read this manual thoroughly and retain it for future reference.
WARNING
To reduce fire or shock hazard, do not expose the unit to rain or moisture.

CAUTION
RISK OF ELECTRIC SHOCK DO NOT OPEN

CAUTION: TO REDUCE THE RISK OF ELECTRIC SHOCK,
DO NOT REMOVE COVER (OR BACK).
NO USER-SERVICEABLE PARTS INSIDE.
REFER SERVICING TO QUALIFIED SERVICE PERSONNEL.

natural_image
Warning symbol of a lightning bolt inside a triangle (no text or numbers)This symbol is intended to alert the user to the presence of uninsulated “dangerous voltage” within the product’s enclosure that may be of sufficient magnitude to constitute a risk of electric shock to persons.

This symbol is intended to alert the user to the presence of important operating and maintenance (servicing) instructions in the literature accompanying the appliance.
IMPORTANT SAFEGUARDS
For your protection, please read these safety instructions completely before operating the appliance, and keep this manual for future reference. Carefully observe all warnings, precautions and instructions on the appliance, or the one described in the operating instructions and adhere to them.
Use
Power Sources
This set should be operated only from the type of power source indicated on the marking label. If you are not sure of the type of electrical power supplied to your home, consult your dealer or local power company. For those sets designed to operate from battery power, or other sources, refer to the operating instructions.
Polarization
This set may be equipped with a polarized ac power cord plug (a plug having one blade wider than the other). This plug will fit into the power outlet only one way. This is a safety feature. If you are unable to insert the plug fully into the outlet, try reversing the plug. If the plug should still fail to fit, contact your electrician to have a suitable outlet installed.
Do not defeat the safety purpose of the polarized plug by forcing it in.
Overloading
Do not overload wall outlets, extension cords or convenience receptacles beyond their capacity, since this can result in fire or electric shock.
Object and Liquid Entry
Never push objects of any kind into the set through openings as they may touch dangerous voltage points or short out parts that could result in a fire or electric shock. Never spill liquid of any kind on the set.
Attachments
Do not use attachments not recommended by the manufacturer, as they may cause hazards.
Cleaning
Unplug the set from the wall outlet before cleaning or polishing it. Do not use liquid cleaners or aerosol cleaners. Use a cloth lightly dampened with water for cleaning the exterior of the set.
Installation
Water and Moisture
Do not use power-line operated sets near water – for example, near a bathtub, washbowl, kitchen sink, or laundry tub, in a wet basement, or near a swimming pool, etc.
Power-Cord Protection
Route the power cord so that it is not likely to be walked on or pinched by items placed upon or against them, paying particular attention to the plugs, receptacles, and the point where the cord exits from the appliance.
Accessories
Do not place the set on an unstable cart, stand, tripod, bracket, or table. The set may fall, causing serious injury to a child or an adult, and serious damage to the set. Use only a cart, stand, tripod, bracket, or table recommended by the manufacturer.
Ventilation
The slots and openings in the cabinet are provided for necessary ventilation. To ensure reliable operation of the set, and to protect it from overheating, these slots and openings must never be blocked or covered.
- Never cover the slots and openings with a cloth or other materials.
- Never block the slots and openings by placing the set on a bed, sofa, rug, or other similar surface.
- Never place the set in a confined space, such as a bookcase, or built-in cabinet, unless proper ventilation is provided.
- Do not place the set near or over a radiator or heat register, or where it is exposed to direct sunlight.
Lightning
For added protection for this set during a lightning storm, or when it is left unattended and unused for long periods of time, unplug it from the wall outlet and disconnect the antenna or cable system. This will prevent damage to the set due to lightning and power-line surges.
Service
Damage Requiring Service
Unplug the set from the wall outlet and refer servicing to qualified service personnel under the following conditions:
- When the power cord or plug is damaged or frayed.
- If liquid has been spilled or objects have fallen into the set.
- If the set has been exposed to rain or water.
- If the set has been subject to excessive shock by being dropped, or the cabinet has been damaged.
- If the set does not operate normally when following the operating instructions. Adjust only those controls that are specified in the operating instructions. Improper adjustment of other controls may result in damage and will often require extensive work by a qualified technician to restore the set to normal operation.
- When the set exhibits a distinct change in performance – this indicates a need for service.
Servicing
Do not attempt to service the set yourself as opening or removing covers may expose you to dangerous voltage or other hazards.
Refer all servicing to qualified service personnel.
Replacement parts
When replacement parts are required, be sure the service technician has used replacement parts specified by the manufacturer that have the same characteristics as the original parts.
Unauthorized substitutions may result in fire, electric shock, or other hazards.
Safety Check
Upon completion of any service or repairs to the set, as the service technician to perform routine safety checks (as specified by the manufacturer) to determine that the set is in safe operating condition.
For Customers in the U.S.A.
CAUTION
You are cautioned that any changes or modifications not expressly approved in this manual could void your authority to operate this equipment.
Note:
This equipment has been tested and found to comply with the limits for a Class B digital device, pursuant to Part 15 of the FCC Rules. These limits are designed to provide reasonable protection against harmful interference in a residential installation. This equipment generates, uses, and can radiate radio frequency energy and, if not installed and used in accordance with the instructions, may cause harmful interference to radio communications. However, there is no guarantee that interference will not occur in a particular installation. If this equipment does cause harmful interference to radio or television reception, which can be determined by turning the equipment off and on, the user is encouraged to try to correct the interference by one or more of the following measures:
- Reorient or relocate the receiving antenna.
- Increase the separation between the equipment and receiver.
- Connect the equipment into an outlet on a circuit different from that to which the receiver is connected.
- Consult the dealer or an experienced radio/TV technician for help.
The supplied interface cable must be used with the equipment in order to comply with the limits for a digital device pursuant to Subpart B of Part 15 of FCC Rules.
Notice on the supplied AC Adaptor for customers in the United Kingdom
A moulded plug complying with BS1363 is fitted to this equipment for your safety and convenience.
Should the fuse in the plug supplied need to be replaced, a fuse of the same rating as the supplied one and approved by ASTA or BSI to BS1362, (i.e., marked with or mark) must be used.
If the plug supplied with this equipment has a detachable fuse cover, be sure to attach the fuse cover after you change the fuse. Never use the plug without the fuse cover. If you should lose the fuse cover, please contact your nearest Sony service station.
For Customers in Europe
This product has been tested and found compliant with the limits sets out in the EMC Directive for using connection cables shorter than 3 meters (9.8 feet).
Attention
The electromagnetic field at the specific frequencies may influence the picture and sound of this unit.
Notice for the customers in the countries applying EU Directives
The manufacturer of this product is Sony Corporation, 1-7-1 Konan Minato-ku Tokyo, 108-0075 Japan. The Authorized Representative for EMC and product safety is Sony Deutschland GmbH, Hedelfinger Strasse 61, 70327 Stuttgart, Germany. For any service or guarantee matters please refer to the addresses given in separate service or guarantee documents.
Disposal of Old Electrical & Electronic Equipment (Applicable in the European Union and other European countries with separate collection systems)

natural_image
Symbol of a trash bin crossed out by two diagonal lines (no text or numbers present)This symbol on the product or on its packaging indicates that this product shall not be treated as household waste. Instead it shall be handed over to the applicable collection point for the recycling of electrical and electronic equipment. By ensuring this product is disposed of correctly, you will help prevent potential negative consequences for the environment and human health, which could otherwise be caused by inappropriate waste handling of this product. The recycling of materials will help to conserve natural resources. For more detailed information about recycling of this product, please contact your local Civic Office, your household waste disposal service or the shop where you purchased the product.
Disposal of waste batteries (applicable in the European Union and other European countries with separate collection systems)
This symbol on the battery or on the packaging indicates that the battery provided with this product shall not be treated as household waste.
By ensuring these batteries are disposed of correctly, you will help prevent potentially negative consequences for the environment and human health which could otherwise be caused by inappropriate waste handling of the battery. The recycling of the materials will help to conserve natural resources.
In case of products that for safety, performance or data integrity reasons require a permanent connection with an incorporated battery, this battery should be replaced by qualified service staff only. To ensure that the battery will be treated properly, hand over the product at end-of-life to the applicable collection point for the recycling of electrical and electronic equipment.
For all other batteries, please view the section on how to remove the battery from the product safely.
Hand the battery over to the applicable collection point for the recycling of waste batteries. For more detailed information about recycling of this product or battery, please contact your local Civic Office, your household waste disposal service or the shop where you purchased the product.
Table of contents
Notes on using the Cyber-shot Station....8
Features....9
Trademarks....9
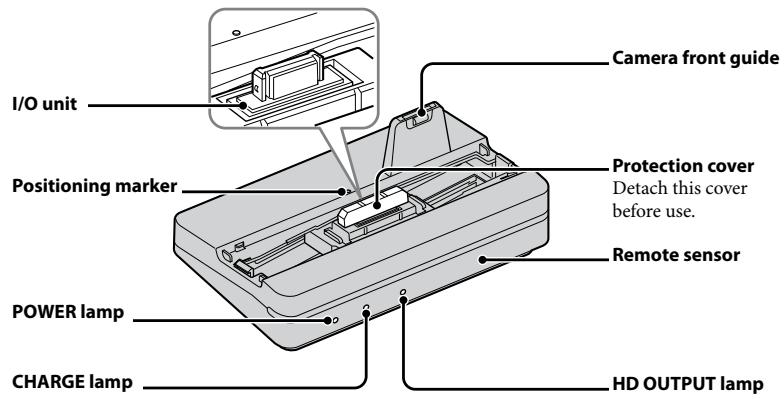
Identifying the parts....10
Set up....12
Placing the camera on the Cyber-shot Station 14
Removing the camera from the Cyber-shot Station 14
Charging the battery pack ....14
Viewing images on a TV screen 15
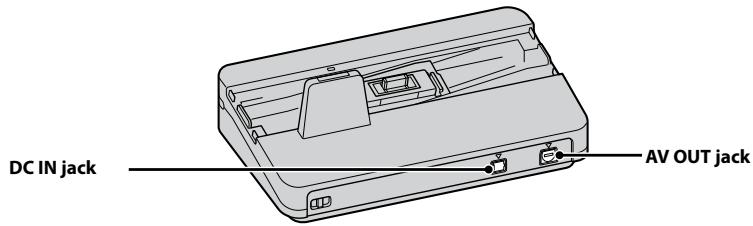
Remote Commander functions....16
Care and maintenance....17
Changing the battery of the Remote Commander....17
Troubleshooting....18
Specifications 19
Notes on using the Cyber-shot Station
Refer to the operating instructions for your camera as well as this manual.
The Cyber-shot Station is not a dust-proofed, moist-proofed, or water proofed product.
The CSS-HD2 can be used with the DSC-T300/T75/T70/T2/W300/W170/W150/W130/W125/W120/W115/W110 digital still cameras. Not all of the above models are available in all countries and regions.
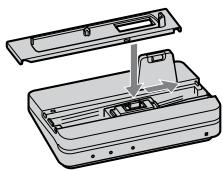
About the station plates
- The Cyber-shot Station is supplied with 5 station plates that are compatible with various digital cameras (hereinafter referred to as the “camera”). See page 12 for further details.
- Be sure to set the correct station plate that is compatible with your camera before using. If you set the wrong station plate, the I/O unit could be damaged.
- The illustration in this manual shows the combination of DSC-T300 and station plate for DSC-T300.
natural_image
Diagram of a device's internal structure showing a tray and casing with an arrow indicating assembly (no text or symbols present)Precautions on use and storage locations:
Do not use or keep the Cyber-shot Station in locations subject to the following conditions. Otherwise, the Cyber-shot Station could malfunction.
- Locations subject to extreme high temperature
Temperatures in a hot sun or closed automobiles during summer may be extremely high, causing deformation or malfunction of the Cyber-shot Station. - Locations under direct sunlight or near heaters
This may cause deformation or a malfunction of the Cyber-shot Station. - Locations subject to vibration
- Locations subject to strong magnetism
- Locations subject to dust particles in a sandy place or the beach
Precautions on use:
- Even if the CHARGE lamp is not lit, the unit is not disconnected from the AC power source (mains) as long as it is connected to the wall outlet (wall socket). If some trouble occurs while using the unit, immediately shut off the power by disconnecting the plug from the wall outlet (wall socket).
- Use the nearest wall outlet to get the AC Adaptor plugged in. If any malfunctions occur using the product, unplug the AC Adaptor to cut off the power source.
- The set is not disconnected from the AC power source (mains) as long as it is connected to the wall outlet, even if the set itself has been turned off.
- Do not use the AC Adaptor placed in a narrow space, such as between a wall and furniture.
- Do not use the Cyber-shot Station in locations that are subject to strong radio waves or radiation. Images may not be played back properly.
- Avoid other metallic objects from coming in contact with the connecting parts of the Cyber-shot Station and the power cord. It may cause a short circuit.
Precautions on recorded data:
- Please note that Sony will not be liable for recorded data such as images and audio data if you cannot record or play back due to a malfunction of the camera, recording media, or the Cyber-shot Station.
Features
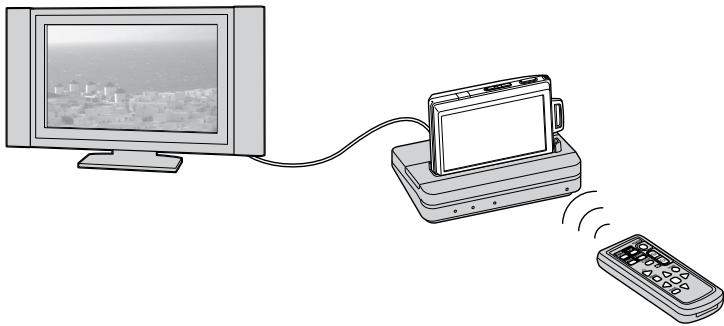
When you place a camera on the Cyber-shot Station, you can use the Cyber-shot Station in the following way.
- You can view the images of the camera in high definition by connecting the Cyber-shot Station to a high definition TV. Images can be viewed in standard definition on a normal TV.
-
You can easily view images on a TV screen with the wireless Remote Commander. Using the Remote Commander, you can operate the followings:
-
Viewing images
- Slide Show
- Playback zoom
- Display the images in index display and switch the way to display images to “Folder,” “Date View,” or “Favorites” (except for DSC-T75/T70/T2/W130/W125/W120/W115/W110).
- Display the images in index display and search for the image by “All people,” “Children,” “Smiles,” or “Infants” (except for DSC-T75/T70/T2/W130/W125/W120/W115/W110).
- The Cyber-shot Station can charge the battery pack inside the camera faster than the battery charger supplied with the camera when you simply place the camera on it.
natural_image
Illustration of a remote control device connected to a monitor and a remote, with no visible text or symbols.Trademarks
- Cyber-shot and “Cyber-shot Station” are trademarks of Sony Corporation.
- In addition, system and product names used in this manual are, in general, trademarks or registered trademarks of their respective developers or manufacturers. However, the ^TM or ^® marks are not used in all cases in this manual.
Cyber-shot Station
Station plate
- The Cyber-shot Station is supplied with 5 station plates. Be sure to attach the correct station plate before use.
See page 12 for further details.
Remote Commander
The functions of the Remote Commander differ depending on the camera you use.
When using DSC-T75/T70/T2, the Remote Commander of the Cyber-shot Station functions the same as the Remote Commander of CSS-HD1, except for the functions of the 🎧 (Slide Show) button and the control buttons.
Also, some buttons do not function at all. For further information on the functions of the control buttons, refer to the operating instructions supplied with the camera.
*1 These functions are not supported for DSC-T75/T70/T2/W130/W125/W120/W115/W110.
*2 These functions are not supported for DSC-T75/T70/T2.
Set up
Preparing the Cyber-shot Station
1 Select a station plate.
The station plates have a front side and bottom side.
Front side
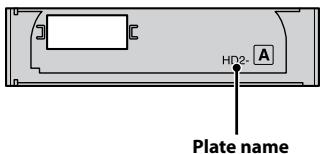
Bottom side
Select the station plate corresponding with your camera.
| Model name | Plate name | Sliding direction |
| DSC-T300 | HD2-A | Right |
| DSC-W110 | HD2-B | Left |
| DSC-W115 | ||
| DSC-W120 | ||
| DSC-W125 | ||
| DSC-W130 | ||
| DSC-W150 | HD2-C | Left |
| DSC-W170 | ||
| DSC-W300 | HD2-D | Left |
| DSC-T2 | HD2-E | Right |
| DSC-T70 | ||
| DSC-T75 |
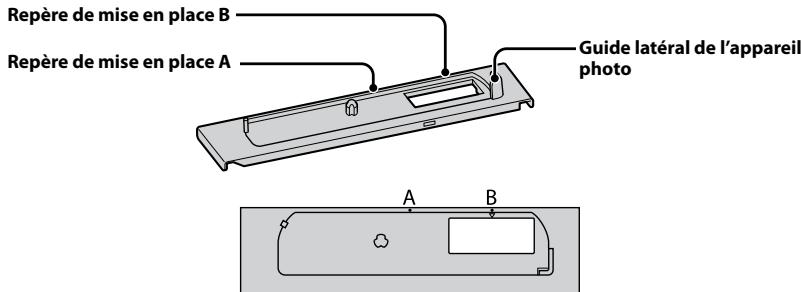
2 Attach the station plate.
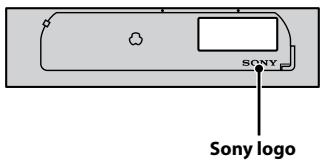
① Hold the station plate on the front side (the side with the Sony logo) facing you, and place it on the I/O unit of the Cyber-shot Station as if you place it over the protection cover attached on the I/O unit.
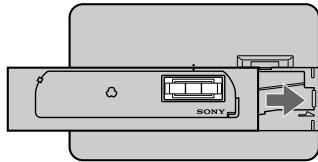
Using a right-sliding station plate (such as HD2-A)
natural_image
Top-down schematic of a vehicle or device layout with no visible text, numbers, or symbolsUsing a left-sliding station plate (such as HD2-B)
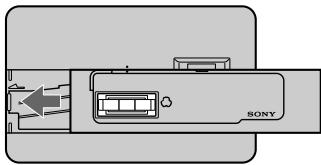
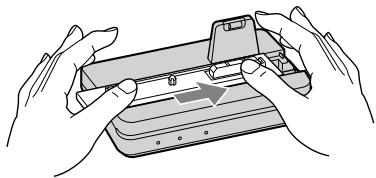
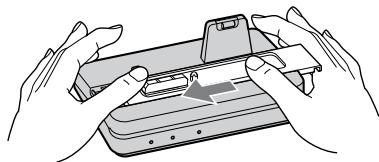
② Hold the Cyber-shot Station with one hand. Hold the camera side guide of the station plate with the other hand and slide the station plate until it is pushed in all the way.
• See the table in step 1 for the sliding direction.
Sliding to the right
natural_image
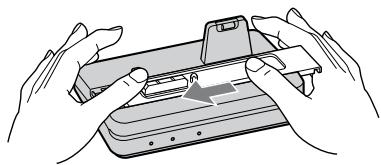
Illustration of hands assembling a small electronic device with a handle (no text or symbols visible)Sliding to the left

natural_image
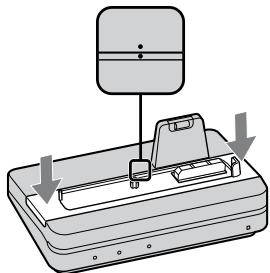
Illustration of two hands holding a device with a small object inside, no text or symbols present③ The station plate will sink in when it is slid all the way to the correct position. You will hear a click when the plate is attached properly. If the station plate does not sink in properly, evenly push down on its left/right sides.
- The positioning marker A on the station plate and positioning marker on the Cyber-shot Station will be aligned.
natural_image
Diagram of a mechanical device with a vertical scale and downward arrows indicating motion or assembly (no text or symbols)④ Detach the protection cover of the I/O unit.
- Before you place a camera on the Cyber-shot Station, be sure to detach the protection cover.
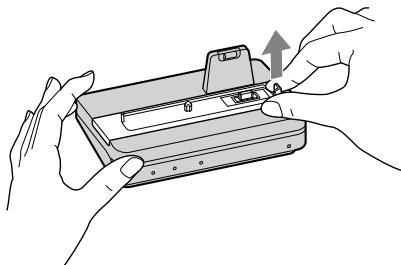
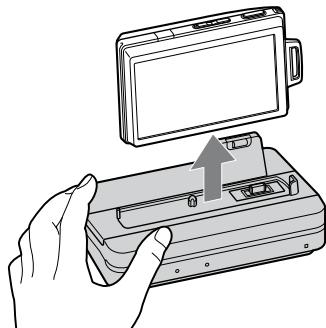
Detaching the station plate
Hold the Cyber-shot Station with one hand. Hold the camera side guide of the station plate with the other hand and pull the station plate upward.
natural_image
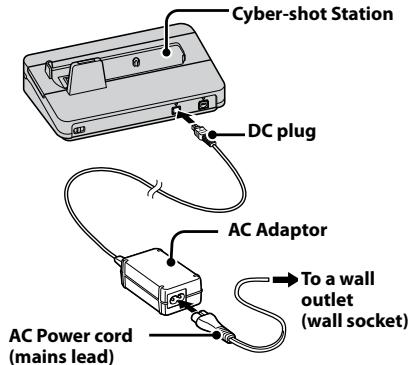
Illustration of hands installing or adjusting a mechanical component with an upward arrow (no text or symbols)3 Connect the supplied AC Adaptor to the DC IN jack of the Cyber-shot Station.
The POWER lamp of the Cyber-shot Station lights up.
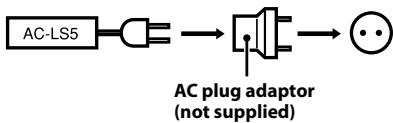
To use your Cyber-shot Station abroad – Power sources
You can use the Cyber-shot Station and the AC Adaptor (supplied) in any country or region where the power supply is within 100 V to 240 V AC 50/60 Hz.
Use a commercially available AC plug adaptor, if necessary, depending on the design of the wall outlet (wall socket).
flowchart
graph LR
    A["AC-LS5"] --> B["Capacitor"]
    B --> C["Plug with Diode"]
    C --> D["Power plug"]
    note["AC plug adaptor (not supplied)"]
Do not use an electronic transformer (travel converter), as this may cause a malfunction.
Preparing the Remote Commander
Notes on the Remote Commander
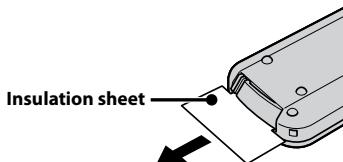
- The Remote Commander is powered by a button type lithium battery (CR2025) installed at the factory. An insulation sheet is inserted to avoid the battery exhaustion. Remove the insulation sheet before using the Remote Commander for the first time.
- Point the remote sensor of the Cyber-shot Station away from strong light sources such as direct sunlight or overhead lightings. Otherwise, the Remote Commander may not function properly.
- The Remote Commander range is less than five meters (for indoor use). Point the Remote Commander at the remote sensor of the Cyber-shot Station. Try adjusting the angle of the Remote Commander if you cannot operate the Cyber-shot Station.
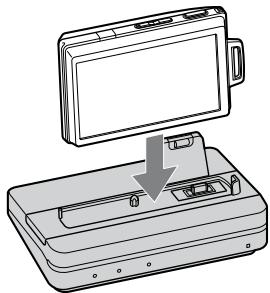
Placing the camera on the Cyber-shot Station
Remove the Adaptor ring, the Conversion lens, etc. from the camera.
Attach the camera as shown below.
- Be sure to turn off the camera before placing it on the Cyber-shot Station.
natural_image
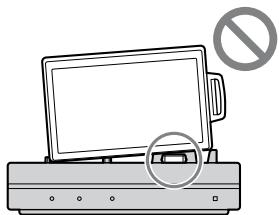
Line drawing of a device with an open lid and internal components, showing a downward arrow indicating a process (no text or symbols present)- When attaching the camera, make sure to insert the camera straight down.

- Make sure that the camera is securely attached to the Cyber-shot Station.
natural_image
Illustration of a computer monitor with a prohibition symbol above it, no text or symbols presentRemoving the camera from the Cyber-shot Station
natural_image
Illustration of a hand holding a device with an open lid and arrow indicating assembly (no text or symbols)- Hold the Cyber-shot Station down when you remove the camera from the Cyber-shot Station.
Notes
- When removing the camera, make sure to lift the camera straight up. It may damage the camera or the Cyber-shot Station when some extra force is added to the front or the sides.
Charging the battery pack
Place the camera with the battery pack inserted on the Cyber-shot Station.
Charging starts automatically. The CHARGE lamp of the Cyber-shot Station lights up.
- When the camera is turned on, the Cyber-shot Station cannot charge the battery pack.
- When the charging reaches to Normal charge*, the CHARGE lamp goes off.
* Recording and playback time with Normal charge is approximately 90% of Full charge.
- For the time of the full charge for a completely discharged battery at the temperature of 25 °C (77 °F), see the table below.
| DSC-T300/T75/T70/T2 | Approx.160 minutes |
| DSC-W300/W170/W150//W130/W125/W120/W115/W110 | Approx.230 minutes |
- It may take longer to charge, depending on the charging condition and environment.
Notes
- After attaching the camera to the Cyber-shot Station, the CHARGE lamp may blink slowly for 3 to 10 seconds. This indicates communication between the camera and the Cyber-shot Station, and it is not a malfunction.
- If CHARGE lamp does not light or blinks for more than 10 seconds, refer to “Troubleshooting”.
Charging temperature
The temperature range for charging is 0 °C to 40 °C (32 °F to 104 °F). However, to provide maximum battery efficiency, the recommended temperature range when charging is 10 °C to 30 °C (50 °F to 86 °F).
On battery life
- The battery life is limited. Battery capacity decreases little by little as you use it more and more, and as time passes. If the battery operating time seems shortened considerably, a probable cause is that the battery pack has reached the end of its life. Buy a new battery pack.
- The battery life varies according to how it is stored and the operating conditions and environment in which each battery pack is used.
Viewing images on a TV screen
You can playback images by connecting the Cyber-shot Station to the TV with the A/V connecting cable (supplied) or the Component A/V Cable (supplied).
Refer to the operating instructions supplied with the TV for connection.
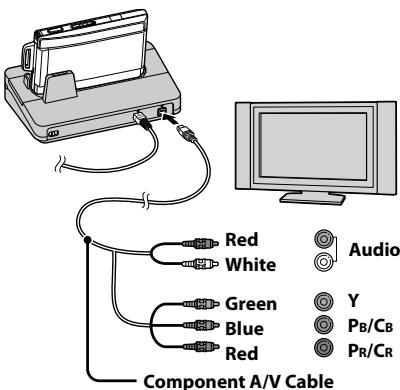
1 Viewing images on a high-definition TV
Connect the A/V OUT jack of the Cyber-shot Station and the Component AV jacks of the TV.
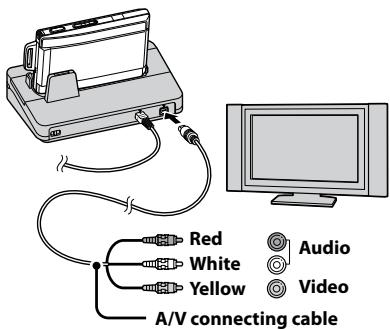
Viewing images on TVs other than high-definition TV
Connect the A/V OUT jack of the Cyber-shot Station and the audio/video input jacks of the TV.
- Turn off the TV before connecting the Cyber-shot Station and TV with the Component A/V Cable.
- The signal format to be output from the A/V OUT jack depends on the camera setting.
- To view the 1080i format images, you need a TV compatible with 1080i format.
- The audio to be output from the Cyber-shot Station via the A/V OUT jack is monaural.
- The Cyber-shot Station is not compatible with the S-VIDEO connecting cable.
2 Turn on the power by pressing the ▶ ( playback) button of the camera or the POWER button on the Remote Commander.
Tips
- The buttons on the camera or the Remote Commander may not function immediately after the camera is attached to the Cyber-shot Station. This occurs when the camera is booting up and is not a malfunction. Wait for about 10 seconds.
3 Turn on the TV and set the input switch to the input connected in step 1.
4 Press ◀/▶ on the Control buttons of the Remote Commander to select the image.
You can also select the image by pressing ◀/▶ on the Control buttons of the camera.
- The Cyber-shot Station is compatible with both NTSC and PAL TV systems. For further details, see the operating instructions supplied with the camera.
Remote Commander functions
The functions of the Remote Commander differ depending on the camera you use.
For further information, refer to the operating instructions supplied with the camera.

Slide show
You can play back a series of still images recorded with your camera by only pressing the 📂 (Slide Show) button on the Remote Commander.
1 Turn on the power of the camera by pressing the ▶ ( playback) button of the camera or the POWER button on the Remote Commander.
2 Press the 📂 (Slide Show) button on the Remote Commander.
The Slide Show settings screen appears.
- The Slide Show settings screen may not be displayed on some models even if you press the 📌 (Slide Show) button. The Slide Show will start in the preset conditions. For further details about the setting method, refer to the operating instructions supplied with the camera.
3 Use the control buttons on the Remote Commander to change the settings of the Slide Show.
4 Use the control buttons on the Remote Commander to select [OK] and press the center button or press the (Slide Show) button on the Remote Commander.
To cancel Slide Show
Press the 📌 (Slide Show) button on the Remote Commander again.
- For further information, refer to the operating instructions supplied with the camera.
Switching the view mode
You can change the index display by pressing the VIEW MODE button on the Remote Commander.
- Except for DSC-T75/T70/T2/W130/W125/W120/W115/W110.
1 Turn on the power of the camera by pressing the ▶ ( playback) button of the camera or the POWER button on the Remote Commander.
2 Press the VIEW MODE button on the Remote Commander.
The view mode screen appears.
3 Use the control buttons on the Remote Commander to select the desired view mode and press the center ■ button.
The images are displayed in index mode using the view mode you just selected.
- When you press the V UP button and V DOWN button on the Remote Commander, you can perform the following functions in each view mode.
- Date View mode:
Display the previous date and next date. - Folder mode:
Display the previous folder and next folder. - Favorites mode:
Display the previous page and next page.
Filter by Faces
You can search the images recorded with various faces by pressing the FACE button on the Remote Commander.
- Except for DSC-T75/T70/T2/W130/W125/W120/W115/W110.
1 Turn on the power of the camera by pressing the ▶ ( playback) button of the camera or the POWER button on the Remote Commander.
2 Press the FACE button on the Remote Commander.
The Search images menu appears.
3 Use the control buttons on the Remote Commander to select the search condition and press the center ● button.
The images are displayed in index mode in accordance with the search condition.
- For further information, refer to the operating instructions supplied with the camera.
Switching between HD and SD
You can switch the TV display between high-definition video (HD) and other than high-definition video (SD) by pressing the HD/SD button on the Remote Commander.
- Except for DSC-T75/T70/T2.
1 Turn on the power of the camera by pressing the ▶ ( playback) button of the camera or the POWER button on the Remote Commander.
2 Press the HD/SD button on the Remote Commander.
- Every time you press the HD/SD button, the setting will change alternately between HD and SD.
- The HD-OUTPUT lamp (blue) of the Cyber-shot Station lights up while the HD video is viewed on a TV.
- For further information, refer to the operating instructions supplied with the camera.
Wide Zoom Display
You can display a still image with an angle of view of 4:3 or 3:2 to those of 16:9 by pressing the W ZOOM button on the Remote Commander, which is the same as the wide zoom function of the camera.
- For DSC-T75/T70, the Wide Zoom functions when you press the ▼ button on the Remote Commander.
- Except for DSC-T2.
1 Turn on the power of the camera by pressing the ▶ (playback) button of the camera or the POWER button on the Remote Commander.
2 Press the W ZOOM button on the Remote Commander.
- Every time you press the W ZOOM button, the setting will change alternately between Wide Zoom and Normal modes.
- The Wide Zoom mode is canceled when you turn off the camera or the shooting mode is switched.
- Some functions of the Remote Commander will be unavailable when you are using the Wide Zoom function.
- For further information, refer to the operating instructions supplied with the camera.
Care and maintenance
Clean the Cyber-shot Station with a soft cloth slightly moistened with water or tepid water, and wipe the surface with a dry cloth. Do not use any type of solvent such as thinner, alcohol or benzine as this may damage the surface.
Changing the battery of the Remote Commander
WARNING
Battery may explode if mistreated. Do not recharge, disassemble, or dispose of in fire.
- When the lithium battery becomes weak, the operating distance of the Remote Commander may shorten, or the Remote Commander may not function properly. In this case, replace the battery with a Sony CR2025 lithium battery. Use of another battery may present a risk of fire or explosion.
For the State of California, USA only
Perchlorate Material - special handling may apply, See www.dtsc.ca.gov/hazardouswaste/perchlorate Perchlorate Material: Lithium battery contains perchlorate.
CAUTION
Replace the battery with the specified type only. Otherwise, fire or injury may result.
Replacing the button type lithium battery
* Do not use any batteries other than CR2025.
① Pull out the battery holder while pushing the tab on the holder.
② Put a new battery into the holder with its + side facing upward.
③ Insert the holder into the Remote Commander until it clicks.

Troubleshooting
If any problems occur with your products, refer to the following solutions.
If the problem persists, contact your Sony dealer.
| Symptom | Cause/Solution |
| Unable to charge the battery pack or the CHARGE lamp fails to light. | The camera is turned on.Turn the camera off.The AC Adaptor is disconnected.Connect the AC Adaptor properly.The camera is not placed on the Cyber-shot Station correctly.Place the camera correctly.The battery pack is not installed correctly.Install the battery pack correctly.The battery pack is completely charged.The battery pack installed into the camera is inapplicable.Install the battery pack compatible with your camera. |
| The CHARGE lamp blinks fast, or blinks for more than 10 seconds. | The battery pack installed into the camera is inapplicable.Install the battery pack compatible with your camera.The connection is not correct. The camera is not placed correctly on the Cyber-shot Station.Remove the camera from the Cyber-shot Station and reconnect the AC Adaptor. After the CHARGE lamp goes off, place the camera on the Cyber-shot Station. |
| Unable to turn on the camera, or it suddenly gets turned off. | The camera is not placed on the Cyber-shot Station correctly.Place the camera correctly.The AC Adaptor is disconnected.Connect the AC Adaptor properly. |
| The images cannot be played back on a TV. | The HD output setting is incorrect.Refer to the operating instructions supplied with the camera, and set the HD output setting correctly.The Component A/V Cable or A/V connecting cable from the Cyber-shot Station is not connected properly to the TV.Connect the cable properly or correct the setting. |
| Buttons on the Remote Commander do not work, and no operations can be performed. | The camera is not placed correctly on the Cyber-shot Station.Place the camera correctly.The AC Adaptor is disconnected.Connect the AC Adaptor properly.The battery in the Remote Commander is dead.Replace the battery with a new one. |
| Unable to attach the camera on the Cyber-shot Station or the camera is unstable. | The station plate is not attached properly.Confirm that the station plate is compatible with your camera and attach it properly. |
Specifications
Cyber-shot Station
Input/Output connectors
- A/V OUT jack:
Component, Video/audio output connector
- DC IN jack
- I/O unit
General
Dimensions (Approx.):
$$ 1 2 4 \times 4 8 \times 7 8 \mathrm{mm} $$
$$ (5 \times 1 1 5 / 1 6 \times 3 1 / 8 \text { in. }) $$
$$ (w / h / d) $$
Mass (Approx.): 110 g (3.9 oz.)
(including a station plate)
Operating temperature:
$$ 0 ^ {\circ} \mathrm{C} \text { to } 4 0 ^ {\circ} \mathrm{C} $$
$$ (3 2 ^ {\circ} \mathrm{F} \text { to } 1 0 4 ^ {\circ} \mathrm{F}) $$
Storage temperature:
$$ - 2 0 ^ {\circ} \mathrm{C} \text { to } + 6 0 ^ {\circ} \mathrm{C} $$
$$ (- 4 ^ {\circ} \mathrm{Fto} + 1 4 0 ^ {\circ} \mathrm{F}) $$
AC Adaptor
Input rating: 100 V to 240 V, AC 50/60 Hz, 11 W
Output rating: 4.2 V DC
See the label on the AC Adaptor for other specifications.
Dimensions (Approx.):
$$ 4 8 \times 2 9 \times 8 1 \mathrm{mm} $$
$$ (1 1 5 / 1 6 \times 1 3 / 1 6 \times 3 1 / 4 \text { inches }) $$
(w/h/d, excluding projecting parts)
Mass (Approx.): 130 g (5 oz)
(excluding AC Power cord)
Operating temperature:
$$ 0 ^ {\circ} \mathrm{C} \text { to } 4 0 ^ {\circ} \mathrm{C} $$
$$ (3 2 ^ {\circ} \mathrm{F} \text { to } 1 0 4 ^ {\circ} \mathrm{F}) $$
Storage temperature:
$$ - 2 0 ^ {\circ} \mathrm{C} \text { to } + 6 0 ^ {\circ} \mathrm{C} $$
$$ (- 4 ^ {\circ} \mathrm{Fto} + 1 4 0 ^ {\circ} \mathrm{F}) $$
Included items
• Cyber-shot Station (CSS-HD2) (1)
- Wireless Remote Commander (RMT-CSS6) (A button type lithium battery installed) (1)
- Station plate (5)
• A/V connecting cable (1)
- Component A/V Cable (1)
• AC Adaptor (AC-LS5) (1)
• AC Power cord (mains lead) (1)
- Protection cover (1)
- Set of printed documentation
Design and specifications are subject to change without notice.
Français
natural_image
Symbol of a trash bin crossed out by two diagonal lines (no text or numbers present)natural_image
Diagram of a device with an open lid and internal components, showing no text or symbolsnatural_image
Illustration of a vintage remote control device connected to a monitor and a remote, with no visible text or symbols.Marques commerciales
Plaque de la station
natural_image
Top-down schematic of a vehicle or device layout with no visible text, numbers, or symbolsnatural_image
Top-down schematic of a device layout with labeled components (no text or symbols beyond 'SONY' label)natural_image
Illustration of hands assembling a small electronic device with a handle (no text or symbols visible)natural_image
Illustration of two hands holding a device with a magnified view of the screen (no text or symbols)natural_image
Diagram of a mechanical device with a vertical load and downward arrows indicating motion (no text or symbols)natural_image
Illustration of hands installing or adjusting a device component with an upward arrow (no text or symbols)natural_image
Diagram of a device being inserted into a tray, showing the lid and base (no text or symbols)natural_image
Illustration of a computer monitor with a prohibition symbol (no text or labels)natural_image
Illustration of a hand holding a device with an open lid and arrow indicating assembly (no text or symbols)(l/h/p, parties saillantes non comprises)
natural_image
Symbol of a trash bin crossed out by two diagonal lines (no text or numbers present)
natural_image
Diagram of a device with an open lid and internal components, showing no text or symbolsnatural_image
Illustration of a vintage remote control device connected to a monitor and a remote, with no visible text or symbols.Marcas comerciales
natural_image
Illustration of hands assembling a small electronic device with a handle (no text or symbols visible)natural_image
Illustration of two hands holding a device with a small object inside, no text or symbols presentnatural_image
Diagram of a mechanical device with a hanging component and directional arrows indicating motion (no text or symbols)natural_image
Illustration of hands installing or adjusting a device component with an upward arrow (no text or symbols)natural_image
Diagram of a device with an open lid and a downward arrow indicating a process or operation (no text or symbols present)natural_image
Illustration of a computer monitor with a prohibition symbol (no text or labels)natural_image
Illustration of a hand holding a device with an open lid and arrow indicating assembly (no text or symbols)將相機裝入 Cyber-shot Station 10
從 Cyber-shot Station 中取出相機.... 10
給電池組充電.... 10
在電視機螢幕上查看影像.... 11
遥控器功能.... 12
維護及保養.... 13
更換遙控器電池....13
故障檢修....14
規格....15
natural_image
Diagram of a device casing with internal components and an open lid (no text or symbols)關於使用及存放地點的注意事項:
natural_image
Illustration of a vintage remote control device connected to a monitor and a remote, with no visible text or symbols.商標
natural_image
Illustration of hands assembling a small electronic device with a handle (no text or symbols visible)向左滑動
natural_image
Illustration of two hands holding a device with a small object inside, no text or symbols presentnatural_image
Diagram of a mechanical device with a vertical load and downward arrows indicating motion or force (no text or symbols)④取下 I/0 裝置上的保護蓋。
natural_image
Illustration of hands installing or adjusting a device into a tray (no text or symbols visible)natural_image
Diagram of a device being placed into a rectangular box, showing a screen and internal components (no text or symbols)natural_image
Illustration of a computer monitor with a prohibition symbol overlay (no text or symbols on the device itself)natural_image
Illustration of a hand holding a device with an open lid and arrow indicating the process (no text or symbols present)• Cyber-shot Station (CSS-HD2) (1)
- 無線遙控器 (RMT-CSS6)
(已裝有紐扣型鋰電池) (1)
natural_image
Diagram of a device casing with internal components and an open lid (no text or symbols)关于使用及存放地点的注意事项:
natural_image
Illustration of a remote control device connected to a monitor and a remote, with no visible text or symbols.商标
natural_image
Illustration of two hands assembling a small electronic device with a scroll wheel (no text or symbols)向左滑动
natural_image
Illustration of two hands assembling a device with a handle (no text or symbols visible)natural_image
Diagram of a mechanical device with a vertical scale and downward arrows indicating motion or force (no text or symbols)④取下 I/O 装置上的保护盖。
natural_image
Illustration of hands installing or adjusting a device into a tray (no text or symbols visible)natural_image
Line drawing of a device with an open lid and a button, showing a downward arrow indicating a process or operation (no text or symbols present)natural_image
Illustration of a computer monitor with a prohibition symbol overlay (no text or symbols on the device itself)natural_image
Illustration of a hand holding a device with an open lid and arrow indicating assembly (no text or symbols)natural_image
Diagram of a device's internal structure showing a tray and casing with an arrow indicating assembly (no text or symbols present)사용 및 보관 장소에 관한 주의
natural_image
Illustration of a vintage television connected via a cable to a remote control unit (no text or symbols present)상표
Cyber-shot Station 준비하기
1 스테이션 플레이트를 선택합니다.
natural_image
Illustration of hands assembling a device into a tray (no text or symbols visible)왼쪽으로 민다

natural_image
Illustration of hands holding a device with a clip, no text or symbols presentnatural_image
Diagram of a mechanical device with a vertical scale and downward arrows indicating motion or force (no text or symbols)natural_image
Illustration of hands installing or adjusting a device component with an upward arrow (no text or symbols)natural_image
Diagram of a device being placed into a rectangular box, showing internal components and a downward arrow indicating motion (no text or symbols present)natural_image
Illustration of a computer monitor with a prohibition symbol above it, no text or symbols presentnatural_image
Illustration of a hand holding a device with an open lid and arrow indicating rotation (no text or symbols)Printed on 70% or more recycled paper using VOC (Volatile Organic Compound)-free vegetable oil based ink.
