
Levante 30 - Fan PAX - Free user manual and instructions
Find the device manual for free Levante 30 PAX in PDF.


| Brand | PAX |
| Model | Levante 30 |
| Product Type | Tower Fan |
| Dimensions (H x W x D) | Approx. 76 x 30 x 30 cm |
| Weight | Approx. 4.5 kg |
| Power Supply | 220-240 V, 50 Hz |
| Power Consumption | 45 W |
| Airflow Speed | Up to 2.5 m/s |
| Number of Speed Settings | 3 (Low, Medium, High) |
| Oscillation | 90° horizontal oscillation |
| Timer | Up to 7.5 hours |
| Remote Control | Included |
| Noise Level | Approx. 40-55 dB |
| Safety Features | Overheat protection, tip-over switch |
| Cleaning | Wipe with damp cloth; do not immerse |
| Spare Parts | Remote control, power cord available |
| Repairability | Designed for easy disassembly; contact service center |
| Warranty | 2 years |
Frequently Asked Questions - Levante 30 PAX
User questions about Levante 30 PAX
0 question about this device. Answer the ones you know or ask your own.
Ask a new question about this device
Download the instructions for your Fan in PDF format for free! Find your manual Levante 30 - PAX and take your electronic device back in hand. On this page are published all the documents necessary for the use of your device. Levante 30 by PAX.
USER MANUAL Levante 30 PAX
EN User and installation guide 16-25
natural_image
Close-up of a white industrial fan or turbine component with a square indicator and 'PAX' label (no additional text or symbols)Read these instructions carefully before use. The fan is designed for fixed installation.
Electrical installation must be carried out by a registered electrical installation company.
Standard EN 60335 provides the following guidance:
This appliance can be used by children aged from 8 years and above and persons with reduced physical, sensory or mental capabilities or lack of experience and knowledge if they have been given supervision or instruction concerning use of the appliance in a safe way and understand the hazards involved.
Children shall not play with the appliance. Cleaning and user maintenance shall not be made by children without supervision.
VIKTIG!
natural_image
3D rendered image of a plain white cylindrical object with no text or symbols1.
natural_image
Simple white circular shape centered within a square frame, no text or symbols present.2.
Tillbehör
for duct dimensions ∅140-160
Tilbehør
natural_image
Technical line drawings of mechanical components labeled B and C, showing assembly or assembly details (no text or symbols present)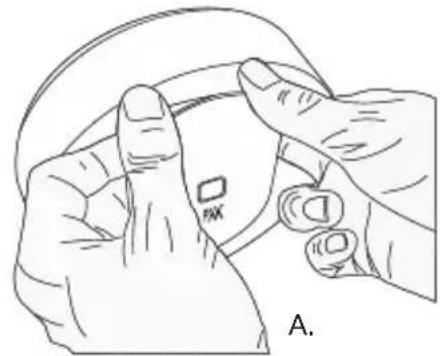
natural_image
Line drawing of two hands adjusting a device with a labeled component (no text or symbols present)natural_image
Technical line drawing of a cylindrical mechanical component with flanged ends and a central hub (no text or symbols)E.
natural_image
Cross-sectional diagram of a circular mechanical component with internal wiring and mounting brackets (no text or symbols)H.

natural_image
Technical diagram of a circular mechanical component with mounting flanges and internal wiring (no text or symbols)1.
Radio Equipment Directive (RED)
natural_image
Circular mechanical component with a central cross mark and surrounding components (no text or symbols)natural_image
Line drawing of a tool interacting with concentric circular components (no text or symbols)R.
natural_image
Technical line drawing of a mechanical component with no visible text or symbolsnatural_image
Technical diagram of a mechanical component with labeled parts and an inset circular view showing dimension (no text or symbols present)Pax Levante®
Funktioner / Automatiska funktioner
Pax Levante 00:
Rengöring
natural_image
Technical line drawing of a mechanical component with concentric rings and a central square cutout (no text or symbols)natural_image
Line drawing of two hands adjusting a device with a labeled component (PAX), no text or symbols presentSäker Vatten- installation
natural_image
Illustration of a hand using a drill pen to lift a surface with a screwdriver, no text or symbols presentThank you for choosing a Pax fan – the original!
The Pax Levante fan is designed to boost the basic ventilation of your home* or provide forced ventilation of humidity and odours from wet rooms (WC/bathroom/shower room/laundry room) or to function as a heat distributor.
The fan can be fitted in ducts with natural draught ventilation (ceiling, Figure 1) and/or without natural draught ventilation (wall, Figure 2)**.
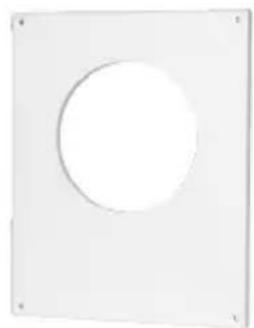
Levante fits ducts with a diameter of 100 – 140 mm. For larger ducts (up to 160 mm diameter), the Pax cover plate (accessory) must be used.
To ensure that it neither disturbs nor is disturbed by other ventilation, the fan must always be installed in its own duct. Make sure that the duct is clear of obstructions. Avoid insect mesh, filters and other objects that may obstruct the flow of air. To prevent condensation in natural draught ducts (in the winter), the ducts must be insulated where they pass through unheated areas such as cold attics.
The fan is designed for use in a temperature range of 5 to 50 °C. If the fan is installed in a cold area or if it has been stored in a cold place before installation, it may run slowly when started for the first time. The fan will work normally when it reaches its working temperature.
Make sure that air can enter the room, for example through a large gap under the door or by using the Pax transfer air unit (accessory). We recommend the use of genuine Pax accessories to ensure that the fan works properly and delivers the correct capacity.

* Primarily detached houses and holiday homes, but can also be used in multi-dwelling buildings with separate, airtight, well-insulated ventilation ducts.
** With natural draught ventilation, air is carried upwards through ventilation ducts and out of the building (see Figure 1). For natural draught ventilation to work, the air inside the building must be warmer (and therefore lighter) than the air outside. Natural draught ventilation therefore works best during the winter. Natural draught ventilation will be reduced or absent if the temperature differential (inside/outside) is small or non-existent in the summer. For this reason, buildings are often poorly ventilated when the weather is warm. This can be remedied with a Pax fan that works continuously at low speed
Installation
Installation preparation
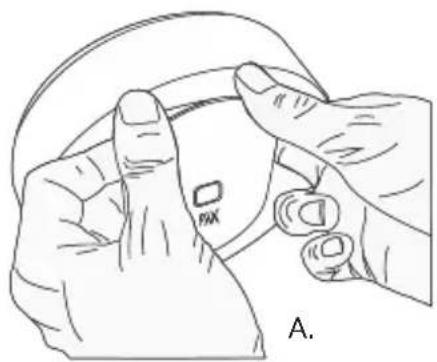
Detach the motor unit by grasping it as shown in Figure (A). Pry off the motor unit by leveraging against the cover with your knuckles. Ensure that you have the motor unit in a secure grip so you do not drop it when it is detached.
Then detach the wall frame by using a screwdriver to press the lock button as shown in Figure (B). Then remove the top of the cover from the wall frame as shown in Figure (C)

natural_image
Line drawing of two hands holding a device with a small square mark and a circular button, labeled A.Fit the enclosed wall gasket as shown in the figure (C_1).

New Installations
New installations require holes using a ∅110 mm hole saw (Figure D).

Pax wall pipes and external louvres are available as accessories (Figure E). The fan's wall seal has a short spigot which fits inside the ∅100 mm pipe. Make sure when mounting to adapt the length of the wall pipe so it does not push back the wall seal so the fan impeller cannot rotate. Always customise a wall pipe, existing or new, so it ends about 5 mm inside the wall surface where Levante is to be installed. The wall frame with its seal is prepared with 5 cable entry points (Figure F)

natural_image
Technical line drawing of a cylindrical mechanical component with flanged ends and a central housing (no text or symbols)E.
for concealed electrical connection or surface-mounted cable using the dimension shown in Figure G.

G.
geing-resistant sealant I around cables that are rough the wall seal.

Make sure that the seal is properly installed on the wall frame; place it in the appropriate place and centre it in the wall pipe. The wall frame can be levelled horizontally by placing a spirit level on its support points (Figures H and I).

natural_image
Cross-sectional diagram of a circular mechanical component with internal channels and mounting brackets (no text or symbols)H.

natural_image
Technical diagram of a mechanical component with concentric rings and mounting holes (no text or symbols)1.
Mark the three attachment points for the appropriate screws to the substrate (Figure J).
Pax follows industry regulations for Safe Water installation, drilling and sealing with silicone according to the instructions for wooden walls and concrete.
These must be followed. (See page 25).
Tighten the screws so that the seal forms a seal against the wall.

Always use a qualified electrician
All 100-240 V electrical connections must be performed by a qualified electrician. The power must be cut during all electrical work on the product.
The wall frame contains an electronics component with terminal blocks for 100-240 V AC and 12 V DC.
Electrical connection can be made according to the wiring diagram on page 20-21.
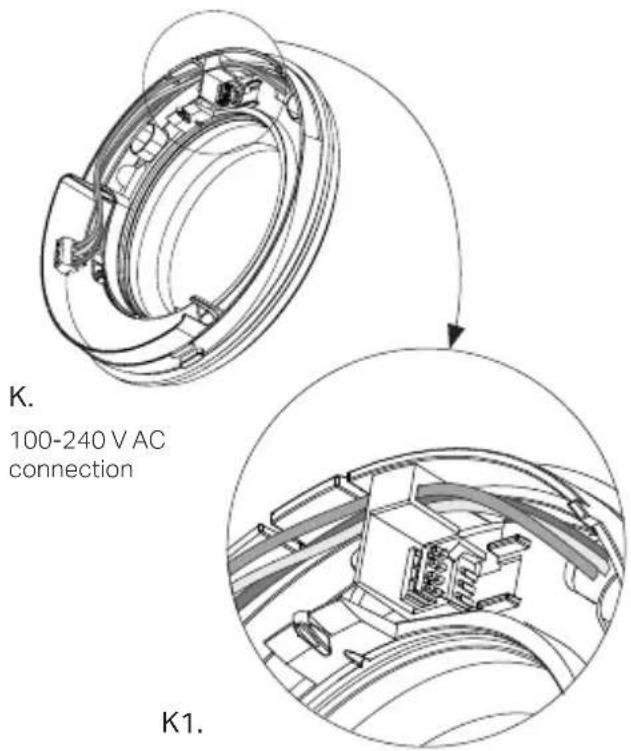
NB: As the two legs of the motor unit protrude into the wall frame, and one leg is in contact with the switching contact, cables must be laid in the wall frame as shown in Figures K/K1 (100-240 V AC connection) and L (12 V DC connection), so that no cables block the path of the leg.

12 V DC connection
ELECTRICAL CONNECTION 100-240VAC
NB! Wiring of 100-240VAC must be performed by a qualified electrician.

NB! The integrated all-pole switch S only functions at 100-240VAC wiring.
The fan is double insulated and should not be earthed.
Levante 00:
100-240VAC 50 / 60Hz
- Start / stop via manual switch L.
- (When the fan is mounted against the outer wall, can the fan be combined with a back draught shutter, accessories).
Levante 30:
100-240VAC 50/60 Hz
- Automatic forced ventilation at high humidity levels and under the influence of changes in light.
- Possibility to start / stop via manual switch T. (start = max. RPM, stop = 15 minutes run-on time)
- (When the fan is mounted against the outer wall, can the fan be combined with a back draught shutter, accessories).
Levante 40:
100-240 VAC 50/60 Hz
- Continuous basic ventilation.
- Automatic forced ventilation at high humidity levels and when triggered by light changes.
- Ability to disable basic ventilation via manual switch T or jumper B.
(If the basic ventilation is disabled and the fan is mounted on an outer wall, the fan must be combined with a back draught shutter, accessory)

Levante 50:
100-240 VAC 50/60 Hz
Supplied set for continuous basic ventilation, and automatic forced ventilation at high humidity levels and when triggered by light changes.
Option of forced air flow rate with 30 minutes' run-on using manual switch T.
Levante 50 Heat distributor:
100-240 V AC 50/60Hz
Must be selected via Pax App.
Basic settings, starts at 25^ C, stops at 22^ C.
Bluetooth LE: -12dBm EIRP (63μW), nominellt 2450MHz.
Radio Equipment Directive (RED)
Pax hereby declares that this type of Bluetooth radio equipment complies with the RED Directive 2014/53/EU.
The full text of the EU Declaration of Conformity can be found at the following URL: www.pax.se
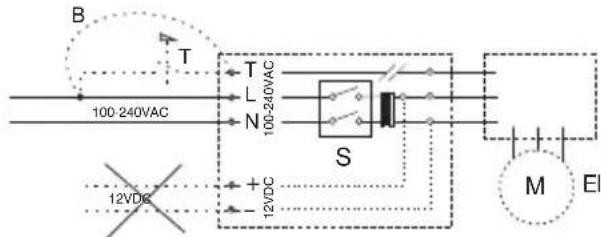
Electrical diagram Levante 30, 40 and 50.
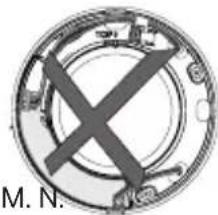
Connection of 100-240VAC and 12 V DC must not be done simultaneously (Figure M).
natural_image
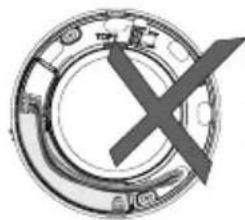
Circular mechanical component with a central X mark and surrounding components (no text or symbols)No 100-240 V cables may be laid over the electronics component (Figure N).
ELECTRICAL CONNECTION 12VDC
NOTE: Pax recommends that the electrical connection of 12 VDC be carried out by a registered electrical installation company.

NB. Maximum variation for 12VDC voltage of 10 - 13.6 VDC.
Levante 00:
12VDC
- Start / stop via manual switch C.
- (When the fan is mounted against the outer wall, can the fan be combined with a back draught shutter, accessories).
Levante 30:
12VDC (switch C always on)
- Automatic forced ventilation at high humidity levels and under the influence of changes in light.
- (When the fan is mounted against the outer wall, can the fan be combined with a back draught shutter, accessories).
Levante 40:
12 VDC (switch C always on)
- Continuous basic ventilation.
- Automatic forced ventilation at high humidity levels and when triggered by light changes.
Levante 50:
12 VDC (switch C always on)
Supplied set for continuous basic ventilation, and automatic forced ventilation at high humidity levels and when triggered by light changes.

NB! The integrated all-pole switch S only functions at 100-240VAC wiring.

NB. For 12VDC always use switches intended for direct current, C.

Levante 50 heat distributor:
12 V DC (switch C always on)
Must be selected via Pax App.
Basic setting, starts at 25 °C, stops at 22 °C.
Bluetooth LE: -12dBm EIRP (63μW), nominellt 2450MHz. Radio Equipment Directive (RED)
Pax hereby declares that this type of Bluetooth radio equipment complies with the RED Directive 2014/53/EU.
The full text of the EU Declaration of Conformity can be found at the following URL: www.pax.se
Mounting the cover on the wall frame
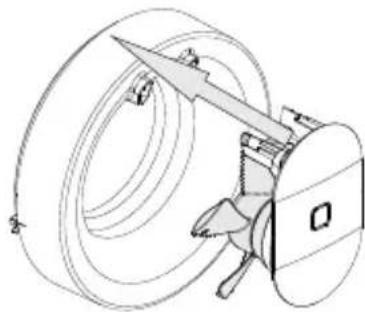
When the electrical connection has been completed, place the cover back over the wall frame by fitting the hook in the wall frame in the hole in the cover (Figure O).

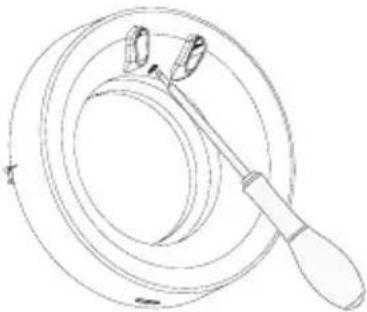
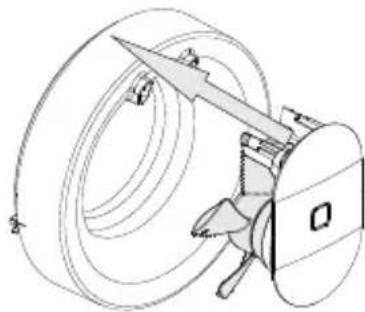
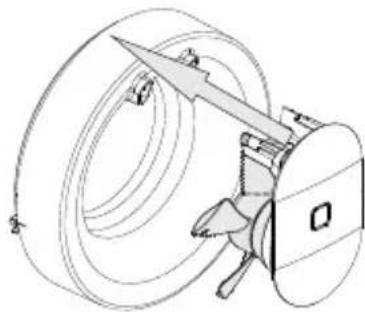
Next, close the cover over the wall frame (Figure P). Ensure the catch the screwdriver is pointing to (Figure Q) engages properly.
Make sure that the cover is firmly seated in the hook on the wall frame and latch by gently pulling the cover.
Q.
natural_image
Line drawing of a tool with a circular base and two curved handles (no text or symbols)R.
natural_image
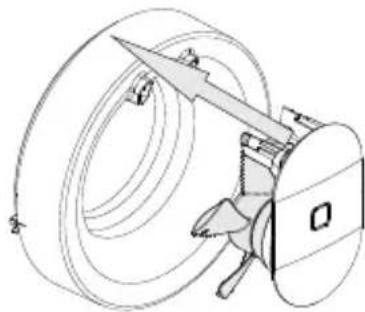
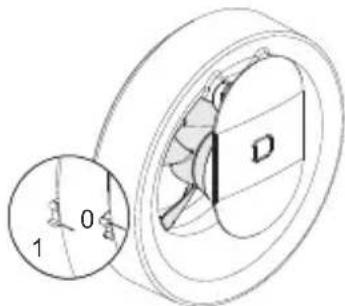
Technical line drawing of a mechanical component with no visible text or symbolsFinally, put the motor unit in place (Figure R). Be careful when putting the motor unit in place. The legs and the impeller can be damaged if the unit is forced in at an angle. A distinct 'click' sound confirms that the unit is in place. Check that the impeller rotates freely before switching on (Figure S).
S.
natural_image
Technical diagram of a mechanical component with labeled parts and an inset circular view showing dimension (no text or symbols present)Pax Levante®
Functions / Automatic functions
Pax Levante 00:
The fan is designed for start and stop with switch (230VAC), but can also be controlled with Pax thermostat for heat transfer.
Pax Levante 30:
The fan should be constantly energized, in normal mode the fan is always stationary.
- When the light changes, when a light is switched on or when shadows change when someone moves in the room, the flow increases to approximately 60 m³/h for 15 minutes. The fan then stops.
- If the humidity rises rapidly, for example when the shower is on, the fan goes up to maximum flow at approximately 110 m^3/h . When the moisture is vented away, the fan stops.
- Possibility to start / stop via manual switch T. start = maximum speed, stop = 15 minutes of lag time.
Pax Levante 40:
The fan operates continuously with a basic flow of approx. 30 m^3/h .
- When triggered by a light change, such as a lamp being switched on or shadows changing when someone moves in the room, the flow increases to approx. 60 m³/h for 15 minutes. The fan then reverts to basic flow.
- If the humidity rises rapidly, for example when the shower is on, the fan speed increases to a maximum flow of approx. 110m^3/h .
When the humidity has been vented away, the fan reverts to the basic flow of approx. 30 m^3/h .
Pax Levante 50:
The fan is programmed as default to handle the vast majority of installations.
The fan operates continuously with a basic flow of approx. 30 m^3/h .
- When triggered by a light change, such as a lamp being switched on or shadows changing when someone moves in the room, the flow increases to approx. 60 m³/h for 30 minutes. The fan then reverts to basic flow.
- If the humidity rises rapidly, for example when the shower is on, the fan speed increases to a maximum flow of approx. 110 m^3/h . When the humidity has been vented away, the fan reverts to the basic flow of approx. 30 m^3/h .
Pax Levante 50 Heat distributor:
Must be selected via Pax App.
Basic settings, starts at 25^ C, stops at 22^ C.
At start-up or after a power failure, the blue LED flashes blue for 30 seconds. The app can be activated using a phone (Bluetooth) during this time. If other settings or features are desired, the Pax app must be downloaded. This is available from
the App Store and Google Play.
Requirements for operation via the app:
Operating system versions are updated on an ongoing basis.
See the information in the
App Store and Google Play.



Cleaning
Strong solvents must not be used on the fan.
The fan must not be dipped in or sprayed with water.
For the fan to continue to function and maintain its capacity, it must be cleaned at least twice a year, more often if necessary.
- Before cleaning, switch off the power to the fan. For a 100-240 V connection, use the all-pole switch in Figure U by switching it off (0). For a 12 V connection, turn off the power at the appropriate external switch.
- Detach the motor unit by grasping it as shown in (Figure V). Pry off the motor unit by leveraging against the cover with your knuckles. Ensure that

natural_image
Technical line drawing of a mechanical component with circular cross-section and labeled parts (no text or symbols)you have the motor unit in a secure grip so you do not drop it when it is detached.
– Clean the opening, the duct and the motor unit with a damp cloth (if necessary, use a mild detergent).
- The impeller is cleaned directly on the motor (NB the impeller cannot be detached).
- If the fan has an external backdraught shutter, the shutter blades should be cleaned gently. The backdraught shutter must be located in the duct between the fan and the outer wall.
- Replace the motor unit in the frame member
Recycling
Discarded fans should be submitted as electronic waste to a recycling centre.

natural_image
Line drawing of two hands adjusting a device with a labeled component (PAX), no text or symbols presentSafe Water Installation
This product conforms to industry regulations for Safe Water Installation.
The supplier guarantees that the product will function correctly if industry regulations and the product's instructions are complied with.
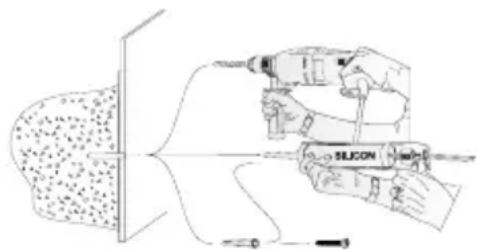
All holes for screws must be made as shown in Figures X and Y.
X.
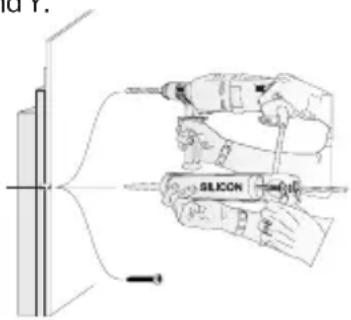
For wooden wet room walls (Figure X), drill only through the coating and waterproofing.
NB: Never drill through any plywood.
Fill the entire hole with age-resistant sealing compound. Use plumbing screws. Screw through the plywood or into the studwork.
Y.
natural_image
Illustration of a hand using a power tool to lift a granular material from a surface, with no text or symbols present.For concrete wet room walls (Figure Y), drill the appropriate hole depth for the plug.
Fill the hole with age-resistant sealing compound.
Push the plug into the hole.
Fill the entire plug with age-resistant sealing compound.
Use plumbing screws and screw the product in place.
Warranty conditions
The Pax Levante has a five-year warranty for defects in manufacturing and materials. The warranty is subject to the following conditions:
- The fan must have been assembled and installed in accordance with the advice and instructions in this user and installation guide.
- The fan must be cleaned regularly in accordance with the advice and instructions in this user and installation guide.
- The fan must be installed and used indoors.
- The fan must not be used in exposed environments (for example in industrial or other environments where there is a risk of the fan being exposed to solvents, a high dust density, gases, etc.).
natural_image
Line drawing of hands holding a device with a FAX tag, labeled A (no text or symbols on the diagram itself)
natural_image
Technical line drawings of mechanical components labeled B and C, showing assembly or assembly steps (no text or symbols present)Monter den vedlagte veggpakningen som vist på figuren (C_1).

natural_image
Technical line drawing of a cylindrical mechanical component with flanged ends and a central housing (no text or symbols)E.
natural_image
Technical diagram showing two views (H and I) of a circular mechanical component with internal components, no text or symbols present.EL TILKOBLING 100-240VAC
natural_image
Circular mechanical component with a central X mark and surrounding components (no text or symbols)natural_image
Line drawing of a tool interacting with concentric circular components (no text or symbols)R.
natural_image
Technical line drawing of a mechanical component with no visible text or symbolsPax Levante®
natural_image
Technical line drawing of a mechanical component with circular cross-section and labeled parts (no text or symbols)natural_image
Line drawing of two hands holding a device with a labeled component (PAX), no text or symbols presentSäker Vatten- installation
natural_image
Illustration of hands using a dropper to apply liquid onto a surface, with no visible text or symbolsnatural_image
Illustration of hands using a drill pen to apply material to a surface, with no visible text or symbols.natural_image
Line drawing of a hand holding a device with a small 'FAX' label, no text or symbols presentnatural_image
Technical line drawing of a cylindrical mechanical component with flanged ends and a central housing (no text or symbols)E.
natural_image
Technical diagram of a mechanical component with two views (H and I), showing internal components and fasteners (no text or symbols)natural_image
Circular diagram with a central 'X' and intersecting diagonal lines, no text or symbols present.natural_image
Circular mechanical component with a central X mark and surrounding components (no text or symbols)natural_image
Line drawing of a tool interacting with concentric circular components (no text or symbols)R.

natural_image
Technical line drawing of a mechanical device with no visible text or symbolsRengøring
natural_image
Technical line drawing of a mechanical component with circular cross-section and inset detail (no text or symbols)natural_image
Line drawing of two hands adjusting a device with a labeled sensor (no text or symbols present)Sikker Vand- installation
natural_image
Illustration of hands using a drill pen to apply a glue to a surface, with no visible text or symbols.natural_image
Illustration of hands using a power tool to apply material to a surface, with no visible text or symbols.natural_image
Technical line drawings of mechanical components, including a cylindrical component with a handle and two views (B and C), no visible text or symbols.
natural_image
Line drawing of two hands holding a device with a labeled 'PAX' (no text or symbols beyond label)natural_image
Technical line drawing of a cylindrical mechanical component with flanged ends and a central housing (no text or symbols)E.
natural_image
Technical line drawing of a circular mechanical component with internal components and mounting brackets (no text or symbols)H.

natural_image
Technical diagram of a circular mechanical component with mounting flanges and internal channels (no text or symbols)1.
natural_image
Circular diagram with a central 'X' and surrounding geometric shapes, no readable text or symbols.natural_image
Circular mechanical component with a central X mark and internal components (no text or symbols)natural_image
Line drawing of a mechanical component with a circular base and a handle, no text or symbols presentR.
natural_image
Technical line drawing of a mechanical component with no visible text or symbolsnatural_image
Technical line drawing of a mechanical component with a circular inset showing dimension 1 and center point O (no text or symbols)Pax Levante®
natural_image
Technical line drawing of a mechanical component with circular cross-section and labeled parts (no text or symbols)natural_image
Line drawing of two hands holding a small object with a label 'PAX' (no text or symbols on the object itself)natural_image
Illustration of a hand using a drill pen to lift a silicon on a surface, with no text or symbols present.Copyright © Volution Sweden AB
009-500037-C_221011
We accept no liability for printing errors and reserve the right to make changes to materials and designs.
PAX®
pax.se


- VIKTIG!
- Tillbehör
- Tilbehør
- Pax Levante®
- Funktioner / Automatiska funktioner
- Pax Levante 00:
- Rengöring
- Säker Vatten- installation
- Thank you for choosing a Pax fan – the original!
- Installation
- Installation preparation
- New Installations
- Always use a qualified electrician
- ELECTRICAL CONNECTION 100-240VAC
- Levante 00:
- Levante 30:
- Levante 40:
- Levante 50:
- Levante 50 Heat distributor:
- ELECTRICAL CONNECTION 12VDC
- Mounting the cover on the wall frame
- Functions / Automatic functions
- Pax Levante 30:
- Pax Levante 40:
- Pax Levante 50:
- Pax Levante 50 Heat distributor:
- Requirements for operation via the app:
- Cleaning
- Recycling
- Safe Water Installation
- Warranty conditions
- EL TILKOBLING 100-240VAC
- Rengøring
- Sikker Vand- installation
Brand : PAX
Model : Levante 30
Category : Fan