
Eos 100H - Fan PAX - Free user manual and instructions
Find the device manual for free Eos 100H PAX in PDF.


| Product Type | Heat Recovery Ventilation Unit |
| Model Number | 1110-2 |
| Voltage / Frequency | 230V AC, 50Hz |
| Power Consumption (without heater) | 3.5 – 25 W (depending on airflow) |
| Power Consumption (with heater) | 375 W |
| Airflow Capacities (free blowing) | 20, 40, 60 m³/h (plus 80 m³/h exhaust only) |
| Noise Pressure Level at 3 m | 19 – 35 dB(A) (depending on airflow) |
| Heat Recovery Efficiency | 80% (20 m³/h), 78% (40 m³/h), 75% (60 m³/h) |
| Motor Type | DC motor |
| Enclosure Class | IP24 |
| Insulation Class | Class II (double insulated) |
| Weight | 9.5 kg |
| Filter Types | Outdoor Air (OA) G4, Return Air (RA) G4 |
| Operating Modes | Normal, Summer, Eco, Comfort |
| Humidity Control | 9 steps, range 40% – 88% relative humidity |
| Filter Maintenance Interval | Adjustable: 90, 180, 270, or 365 days |
| Auto-Balancing | Yes, automatic adjustment of airflow balance (takes approx. 75 min) |
| Remote Control | Included |
| Warranty | 5 years (conditions apply) |
Frequently Asked Questions - Eos 100H PAX
User questions about Eos 100H PAX
0 question about this device. Answer the ones you know or ask your own.
Ask a new question about this device
Download the instructions for your Fan in PDF format for free! Find your manual Eos 100H - PAX and take your electronic device back in hand. On this page are published all the documents necessary for the use of your device. Eos 100H by PAX.
USER MANUAL Eos 100H PAX
Model No. : Pax Eos 100H
Art No. : 1110-2

Monteringsanvisning

Installation guide

PAX

tig information:
Important information:
- According to the standard EN 60335, the following shall be considered.
This appliance can be used by children aged from 8 years, and persons with reduced physical, sensory or mental capabilities, or lack of experience and knowledge if they have been given supervision or instruction concerning use of the appliance in a safety way and understand the hazards involved.
Children shall not play with the appliance.
Cleaning and user maintenance shall not be made by children without supervision.
- Prohibit to install this product where it could be directly exposed to water.
- Prohibit to install this fan near cooking equipment.
- Do not install this product in places with excessive oil fume.
- The ventilation fan must be installed in such a manner that it will not fall down from the ceiling/wall the unit are screwed in.
- The product must be installed on a wall or ceiling that is strong enough to keep the unit, otherwise the wall or ceiling reinforced.
- Be sure to provide an appropriate opening for air intake and exhaust.
- Consider the location of the intake air so do not risk that gas or other fuel gases can follow the supply air into the home.
- Use this product at the rated voltage and frequency indicated on plate.
- The appliance is equipped with an isolator switch for disconnecting from the mains. With this switch separates all poles that provide full disconnection under overvoltage category III.
This switch must be included in the fixed wiring in accordance with the cabling rules.
Environment
Packaging waste
- Please recycle packaging waste in the nearest recycling center.
Contact your local recycling center for local guidelines and more information.
Keep waste out of reach of infants and children to avoid injury or suffocation.


Innehåll
Thank you for purchasing Pax Eos. Please read this manual carefully to understand how to use this product correctly and thus achieve the best possible effect.
After you've read it, keep it well so that you can easily find it if necessary.
For more information, see www.pax.se.
- Important information Page 3
- Environment 5
- Safety instructions for users 7
- Name of each parts 9 and 11
- Howe to use 13
- Maintenance 23
- Safety instructions for the installer 25
- Dimension and Installation 27
- Assembling of Return air adapter. 37
- Specifications 39
- Frequently asked questions 39
- Warranty conditions 41
Feature:
- House heated air is drawn into the Eos. But before it is sent out, it is used to heat the incoming fresh air, so that it largely is heated as soon as it enters the house.
- As the temperature and humidity can be recovered with Eos in-built heat exchanger, it is also possible to save air conditioning costs.
- Eos is designed to be installed indoors, temperature range from 5 to 35°C.
- Recommended ambient temperature in operation is approximal 20° C.
- Eos is automatically stopped when the outside temperature is below -30°C.
Environment:
Information about electronic waste and equipment for households
This marking indicates that this product should not be disposed with other household wastes throughout the EU. To prevent possible harm to the environment or human health from uncontrolled waste disposal, recycle it responsibly to promote the sustainable reuse of material resources. To return your used device, please use the retow and collection systems or contact the retailer where the product was purchased. They can take this product for environmental safe recycling.
Information on waste electrical and equipment outside the European Union
This symbol is only valid in the European Union. If you wish to discard this product, please contact your local distributor for proper disposal.
Before disposing of your old Pax Eos
Please follow the instructions from the manufacturer of your old device or local regulations from local authorities.
If none of these options is available, please follow two-step instructions below:
-
Disconnect main power and discard the waste carefully, let the wall socket remain in the unit.
-
Keep the device out of reach of children before it is discarded.

Safety instructions for users.
PAX
UK
Safety instructions for the installer.
The symbols mean:

be

ke sure that you do this

not disassemble

Indicates fatal risks or risks of serious injury.
- According to the standard EN 60335, the following shall be considered.
This appliance can be used by children aged from 8 years, and persons with reduced physical, sensory or mental capabilities, or lack of experience and knowledge if they have been given supervision or instruction concerning use of the appliance in a safety way and understand the hazards involved. Children shall not play with the appliance.
Cleaning and user maintenance shall not be made by children without supervision. - Use this product at the rated voltage and frequency indicated on the name plate.
- Do not disassemble the unit, it may cause fire or electric shock.
- Do not turn on or off this product in case of gas leakage, there is a risk of electric spark occurs in the switch, which can result in an explosion.
- When cleaning, do not spray water or other cleaning liquids directly on the product, shop circuit and electric shock may occur.

CAUTION
Indicates a risk of personal injury or property damage.
- Routine maintenance is required every year. Disconnect the power source before you conduct any maintenance.
- Do not use gasoline, benzene, thinner or similar chemicals for cleaning of the unit.
- Do not wash in hot water over 60 °C.
SE
Viktiga delar:
1: Värmeåtervinningsaggregat
2: Filter uteluft
3: Frånluftfilter
4: Frontlucka
5: Fjärrkontroll
Name of each parts
PAX

The figure below shows Pax Eos 100H, for example.
![SA (Supply air) [1] OA (Outside air) EA (Exhaust air) [2] RA (Return air) [3] PAX [5] [4]](/content/2026/05/1016323/images/9f8ff5e8370169bc029754bd4334cd02f8cc63f8cb3972606ee38ac18b4fa4d5.jpg)
Important parts:
1: Heat recovery ventilation unit
2: Outdoor air Filter (OA filter)
3: Return air Filter (RA filter)
4: Front panel
5: Remote Control
 [3]([12])](/content/2026/05/1016323/images/6a429040b850a72734b27139536da716c16917071580ce011d20ffdaa52cd442.jpg)
Pax Eos 100H
![graph TD A["6"] --> B["♣"] C["7"] --> D["滴"] E["8"] --> F["MODE"] G["5"] --> H["Filter"] I["12"] --> J["Check"] K["4"] --> L["Power Symbol"] M["13"] --> N["Button Icon"] O["9"] --> P["Cross"] Q["10"] --> R["Light Bar"] S["11"] --> T["Comfort"] U["4"] --> V["Energy Grid"]](/content/2026/05/1016323/images/86b8f6ac3ef05ce4225951544be17fcec1a926e2bb6ab73a1f01c50ca6f7eafc.jpg)


Control panel & Remote Controll

 [3]([12])](/content/2026/05/1016323/images/aad5889b1777f5f5388cf05849717766559c97153612ee05dc927f4660604379.jpg)
Pax Eos 100H
![graph TD A["Filter"] --> B["Check"] C["MODE"] --> D["Normal"] C --> E["Summer"] C --> F["Eco"] C --> G["Comfort"] H["Mode"] --> I["Check"] J["Filter"] --> K["Check"] L["Mode"] --> M["Check"] N["Mode"] --> O["Check"] P["Mode"] --> Q["Check"] R["Mode"] --> S["Check"] T["Mode"] --> U["Check"] V["Mode"]…](/content/2026/05/1016323/images/6b29ebccf0fc603aa77ae37498af8d928b0192c0413a4e536d1da3658a7eca96.jpg)

- When the unit is in standby, you can not perform any settings.
- Settings with remote control and control panel can be performed after the unit is started with button 4.
- If no settings are done, disappears the indicating lights after 10 seconds.
(Display lights up only when manually setting on the control panel.)
[1] Main power switch (on/off)
[2] Indication, start and standby (green)
[3] Indication, filter maintenance (orange)
[4] Start and Stand by button.
[5] Filte Maintenance (reset button)
[6] Button, setting air flow (3 step)
[7] Button, setting moisture sensitivity (9 step)
[8] Button, choice of Mode location
[9] Indication, preset airflow
[10] Indication, selected moisture sensitivity
[11] Indication, selected mode.
[12] Indication, filter cleaning (orange light)
[13] Indication, operation (green light)

![[2] [6]](/content/2026/05/1016323/images/c49e17f5b89d1177b486b56b46ca686bdcd681ec677e4ca3a0968990c165480c.jpg)
![[4] [3] [5]](/content/2026/05/1016323/images/f7d590685874aff4c79b197f9e925cf3a704c306ce6a830545b96b621fd7d800.jpg)
UK
How to use Pax Eos100H.
Turn on/off the main power switch.
[1] Press up on the edge of the grille to open.
[2] Pull the lever sideways to unlock the front panel
[3] Remove the front panel down to release it.
[4] Turn on the main switch.
[5] Replace the front panel by pressing the lid in their strongholds.
[6] Flip the lever back into its locked position [2].
Note: Turn on / off the main power switch [4].
Use this button when doing maintenance or leaving home for a long time.
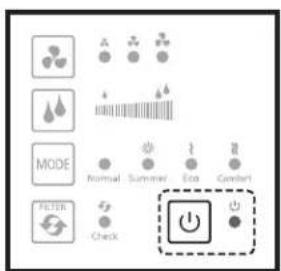
Turn on/off the aggregate.
Start the unit by pressing the button on the control panel or remote control.

Wait, the unit opens the dampers for outdoor air and exhaust air, which will take about 1 minute.
Now, moisture adjustment, operating mode and fan speed can be selected.

![[2] [6]](/content/2026/05/1016323/images/11b9e2dbdcc4acb2a7129e21787e9dfa0fa232483b2eb8fab4dcc8f6224749ee.jpg)

[3] [5]

Varvtalsreglering

- Huvudenhet
Tryck

- Main unit
Push

to change the flow into 20, 40 eller 60m3/h
![graph LR A["Low"] --> B["Mid"] B --> C["High"]](/content/2026/05/1016323/images/6ca858cffd58f78e4b513522eafc9dddf996e7fb0dd94792d3dd5aaea0dc1c36.jpg)
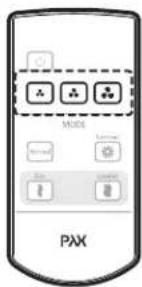
- Remot Control


Select, Low
Mid
High
Humidity control

- Main unit
Push

to change the moisture sensitivity (9 steps, 40-88%)
Settings
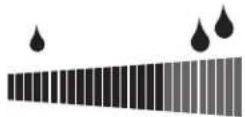
NOTE:
- Eos is factory set to start at a moisture level of 88%.
Possibility to change the starting point is by adjusting the levels of key in 9 levels between 40-88%.

- Moisture level is indicated by three LEDs, each LED indicates where the third level (3, 6 and 9 th level, each step change sensitivity by 6%)
- When the set humidity level is reached Eos goes to work only in forced extraction mode. When the humidity later falls below the set level, the unit will continue at forced in 20 minutes for the moisture level to stabilize.
Then returns to its normal Eos heat exchange operation.
(Important to think about the starting point for forced exhaust air is adjusted to a lower value than 88%. During summer, when the relative humidity is high, it may be necessary to adjust the starting point to a higher level to prevent Eos from being forced into exhaust air mode only.)
SE
Driftläge
- Fjärrkontroll
Pax Eos 100H
- Huvudenhet
- Main unit
Puch

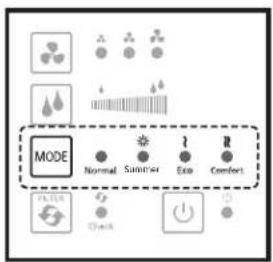
choice of Mode location.
![graph LR A["Normal"] --> B["Summer"] B --> C["Eco"] C --> D["Comfort"]](/content/2026/05/1016323/images/fb6813ab425be419eb3f54e2bd93def7efb622d11dfc64f90fa0e3648c8e4f86.jpg)
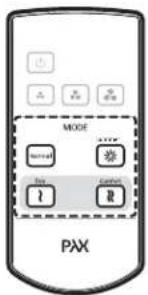
The following descriptions apply, provided that the extract air is taken from a space where the temperature is not below about 21° C.
| Normal - | Continuous operation with heat exchange:The Eos has normal heat exchange down to -15°C. From -15°C and down to -30°C, the Eos only working with exhaust air. Between -20 to -30°C provided automatically 20m3/h extraction.At -30 °C stops Eos and dampers are closed. |
| Summer - | Increased comfort in summer.If Mode Summer is on and the outdoor air is >4°C colder than the exhaust air, the supply air stops and the unit only work with exhaust air, apply at outdoor temperature down to 10°C.(Otherwise similar mode Normal) |
| Eco -only PaxEos 100H | Continuous operation with heat exchange and limited supplementary heat.The preheater heats as much as necessary to avoid icing / condensation in the heat exchanger.The unit switches the air down to -20°C outdoor temperature, from -20 to -30°C provided automatically 20m3/h extraction. At -30 °C stops Eos and dampers are closed. |
| Comfort -only PaxEos 100H | Increased comfort in winter, continuous operation with heat exchange and supplementary heat.The preheater heats as much as needed to keep supply air above +18 °C.The unit switches the air down to -20°C outdoor temperature, from -20 to -30°C provided automatically 20m3/h extraction. At -30°C stops Eos and dampers are closed. |
SE
Filterunderhåll

The light for filter maintenance lights when selected period listed, (default 180 days).
Change the air filter according to the instructions page 23.
After change, reset signal for filter control by pressing the filter button. FILTER
Push

Depending on how quickly the filters clogging of air pollutants are able to choose 4 different service intervals. The interval between filter cleaning are set as follows.
Put the unit in standby mode by pressing the button



for 3 seconds to access the mode
and
- Simultaneously press buttons choice of period.
- When two short buzzer sounds, you are into fashion for choice of period.
- Then you can step forward with the button
- Short buzzer sounds at each step as below.

to select the appropriate period.
![graph LR A["→ 90"] --> B["→ 180"] B --> C["→ 270"] C --> D["→ 365"]](/content/2026/05/1016323/images/dfcc7088ea602a4f2fb794ce3f816c5e2b8756e5e75a50d946852ec8b2c055ac.jpg)
The four service intervals shown with flashing lights according to the following combinations.
| Period | Lamp Indication | ||||
| Low | Mid | High | [8] | [7] | |
| 90 days | |||||
| 180 days | |||||
| 270 days | |||||
| 365 days | |||||
Low Mid High
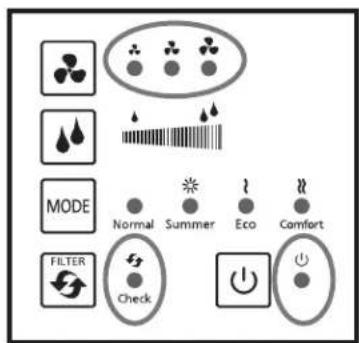
[7]
[8]
[3] After changing the period, press buttons

and

for 3 seconds again.
SE
Balancing the airflow.
Auto-Balancing is performed after the installation of Eos is complete.
Starting the auto-balancing:
- Automatic adjustment of airflow balance of flows Low, Medium and High is made by fan motor adjusts its speed and the air dampers are regulated in a specific order.
- Press 3 seconds to start automatic balancing.
- When the automatic balancing begins stopped possible preheater and blower motor runs on high flow for 1 hour to stabilize any temperature.
- During balancing flashing signal light Do not break the power or touch any buttons at Eos/remote control while automatic balancing is going on.
- When auto-balancing is complete the settings are saved automatically, and the unit return to the previous operating mode.
- During the auto-balancing is only the start button accessible.
- The auto-balance takes approximately 75 minutes to complete.
Resetting to factory defaults:
- Press at the same time 10 seconds on and when the unit is in Standby mode. This will delete the saved values from auto-balancing and restores to factory settings. One half long buzzer sound confirms the setting.


SE
Rengöring frontpanel
[1]

dra den nedåt.
[3]

[4]
[7]
Öppna
kassetten
[6]

Maintenance.
PAX
UK
Cleaning front panel
Wipe the front panel and the frame with a damp cloth. NOTE: Do not use solvents.

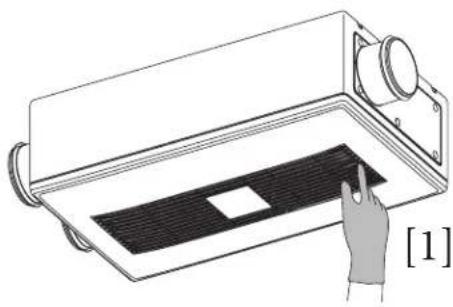
Replacement air filter.
Proceed as follows to replace the two air filters: Out side air filter OA and Return air filter RA. Start by turning off the main switch.
[1] Press up on the edge of the grille to open.
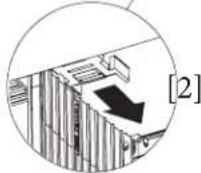
[2] Pull the lever sideways to to unlock the front panel.
[3] Remove the front by pulling it down. The front panel is

[1]


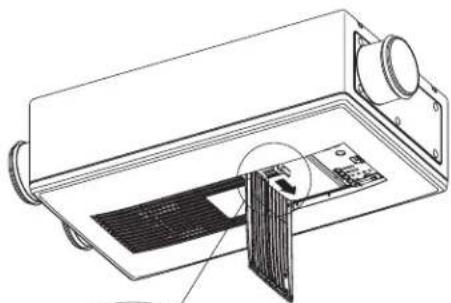
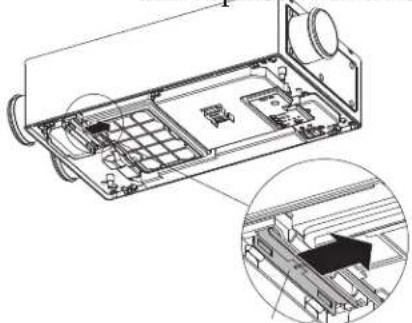
[4] Pull the locking plate for OA aside. and replace with a new one.
[5] Pull out the OA filter from the unit
[4]


[7] Open cartridge and replace the Return
[6] Pull extraction cartridge down to release it.
filter (RA) with a new filter.

[6]

[7]
Safety instructions for the installer.
PAX

Safety instructions for the installer.
The following instructions should be strictly observed in order to prevent injury to the users and other people, or damage to property.
The symbols mean:


sure that you do this

ot disassemble

WARNINGWARNING
- Use this product at the rated voltage and frequency indicated on plate.

- Prohibit to install this product where it could be directly exposed to water.
- Prohibit to install this fan near cooking equipment.
- Do not install this product in places with excessive oil fume.
- The ventilation fan must be installed in such a manner that it will not fall down from the ceiling/wall the unit are screwed in.
- The product must be installed on a wall or ceiling that is strong enough to keep the unit, otherwise the wall or ceiling reinforced.
- Be sure to provide an appropriate opening for air intake and exhaust. - Consider the location of the intake air so do not risk that gas or other fuel gases can follow the supply air into the home.
- The appliance is equipped with an isolator switch for disconnecting from the mains. With this switch separates all poles that provide full disconnection under overvoltage category III. This switch must be included in the fixed wiring in accordance with the cabling rules.
- That precaution must be taken to avoid the back-flow of gases into the room from the open flue of gas or other fuel-burning appliances.

Mått: Pax Eos 100H
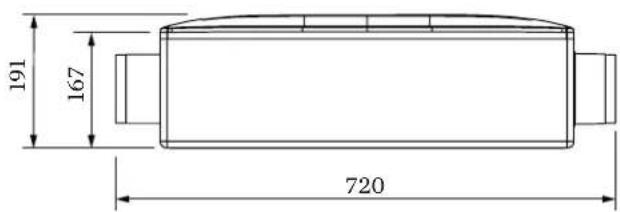


Dimension: Pax Eos 100H


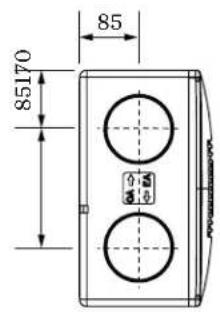
Parts included in delivery:
Screws for mounting the main unit 4pcs
Screws for mounting plate 6
Screws for the SA adapters 6
Screw cap, SA adapters 6
Screw SA duct 2
Mounting plate 1
Wall Seal A 1
Wall Seal B 1
Drilling Template 1
Remote control 1
Long bit 200mm PH2 1
[1] Fixing the drilling template on the ceiling or wall with adhesive tape.
Mark the position of the mounting plate 4 corner and 6-holes with a pen.
Ensure that the screws pulls the stable surface, wood stud or similar.
![[1] For the mounting plate is at corner](/content/2026/05/1016323/images/7ee011e9e55a81999ee8f436659dd9d779b7c08f85bc222df4c43c0b114c070f.jpg)
Marking place on the template for the mounting plate four corners.
[2] Mark the center position for pipes.
These holes guide for marking the center of the pipes.
![Drilling templates [2]](/content/2026/05/1016323/images/e751262604f8d9c1b271c1d6f147a579ed5f0aae566afaabc30ca00210802908.jpg)
Installation.
PAX
SE
![[7] Utomhus](/content/2026/05/1016323/images/adca36f6ed22956c0eec28852f9c9b1f53e64564156f494e824a8fab02179c0c.jpg)

Installation.
PAX
UK
[3] Fix the mounting plate under ceiling by 6 screws.
![S. [3]](/content/2026/05/1016323/images/e34d602efe0f81564c6c53777941df9ff864526441e7cc721b190718700929db.jpg)
[4] Drill two small holes in the inner wall marked by drilling template.
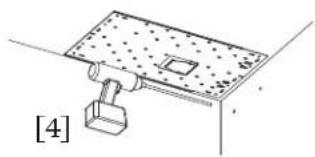
[5] Drill a hole through the wall with a long narrow drill. (be sure to drill straight in both wave and vertically)
![Technical diagram of a mechanical assembly with a bracket and mounting bracket, labeled [5] (no text or symbols beyond label)](/content/2026/05/1016323/images/7aced09cb5623066cec3d9223eba92695032b15415140135f5b6a5893d17ec28.jpg)
[6] Then use the template holes on the outside of the wall to mark the second hole position. Use a water pass so the holes get in horizontal. This will make you a safer positioning of markers to use hole saw. Next make up the larger holes D = 110 mm (adapted for channels D=100mm) by sawing through the wall from both inside and outside.
![170 [6] [6]](/content/2026/05/1016323/images/a3324ec89d44cf1b902a88523132810bfc1409a2b24b802e6972383610949a78.jpg)
Plastic channels described below is an accessory for Pax Eos.
[7] Cut the plastic channels according to the wall thickness of the housing, place the channels in the holes for outdoor air and exhaust air. Seal the space between wall and channel through joint sealing.
![[7] Outdoor Indoor](/content/2026/05/1016323/images/943563bcf57cef6198417a9f7e9493ac6d117fe72589fa0fe5e7d9a232be7725.jpg)
Installation.
PAX
SE
[8] Insert included wall seal A and wall seal B on OA/EA side of the fan to prevent air leakage.
![A [8] B](/content/2026/05/1016323/images/e71b157e8cd65c1691b802e188292231c1b17deb7382e2268461df33eb8f96da.jpg)
External wall grille described below is an accessory for Pax Eos.
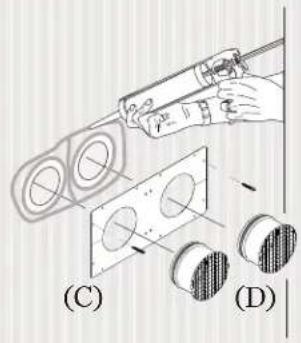
[9] Seal between the frame (C) and the outside of the wall so no ventilation air can enter between the wall and the frame.
[10] Put frame (C) and connectors (D) in place, align frame horizontally and fasten with two screws. (Take advantage of holes in the frame that will not be used later.)
[11] Screw the louvers (E) so they will always be facing away from each other and that they also protect against rain. When the entire external wall grille is bolted, seal around the frame edges so no rainwater can penetrate between the frame and outer wall.
[9]
[10]

[11]


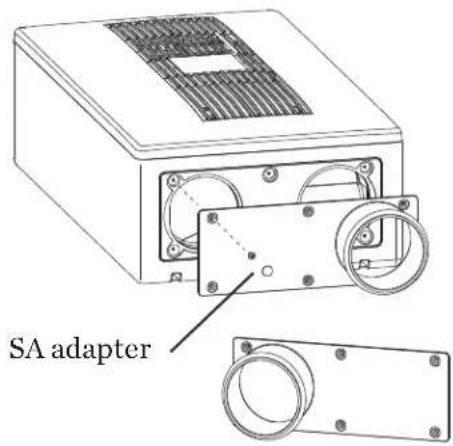
[12] Select the direction of SA adapter to correspond to the psition of duct.
Fix SA adapter with supplied screws. Following that, cover the screws with supplied screw caps.

[13] If Eos has no connection cable, must it pre-installed before Eos is put into place.
A: Pull the lever sideways to unlock the front panel
B: Remove the front panel to release it.
C: Remove the two screws holding the terminal box cover.

[13]

[14] The back of the unit is prepared with cable channels for cable.
There are three possible ways to assemble the connecting cable.
Place the unit on the side and through a sufficient length of cable, then fix the cable with tape pieces so it stays in place in the channel when the unit is mounted.
![Seal the entrance with seal [4]](/content/2026/05/1016323/images/2ab844a60e251997cc3cbc9f18a96830f9fb578c92dad296c1dfe16727aa8ba5.jpg)
[15] When the unit is lifted into place:
Press the assembly against the ceiling mounting plate while as the unit moved against SA / EA air ducts.
The mounting plate has a hook arrangement (A) matches in a corresponding part of the unit.
The hook is an aid that unit temporary can hang out in while the screws pulled, see Figure [16].
Unit
![[15] (A)](/content/2026/05/1016323/images/7fab32e827b7b20f416241b9737c82ebba64b81eda40b31268f2619b904ae4f4.jpg)
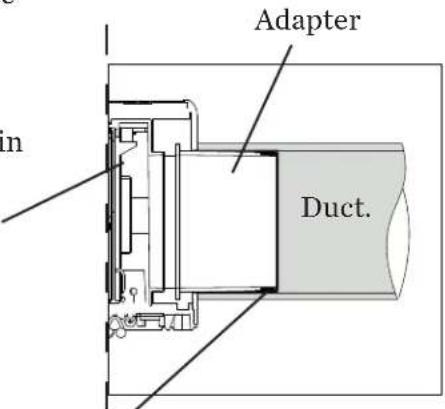
Sealing rings are pre-installed around the adapter to seal the between adapter and duct.
Installation.
PAX

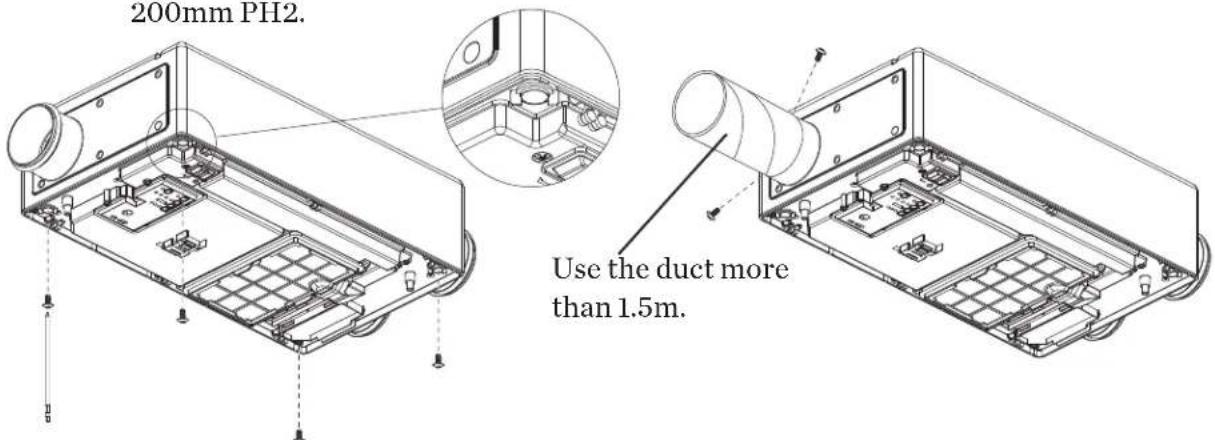
[16] Fix the unit with 4 screws in the mounting plate.
Use the attached long bit 200mm PH2.
[17] Install the duct to the SA adapter and fix the duct and adapter with supplied screw.
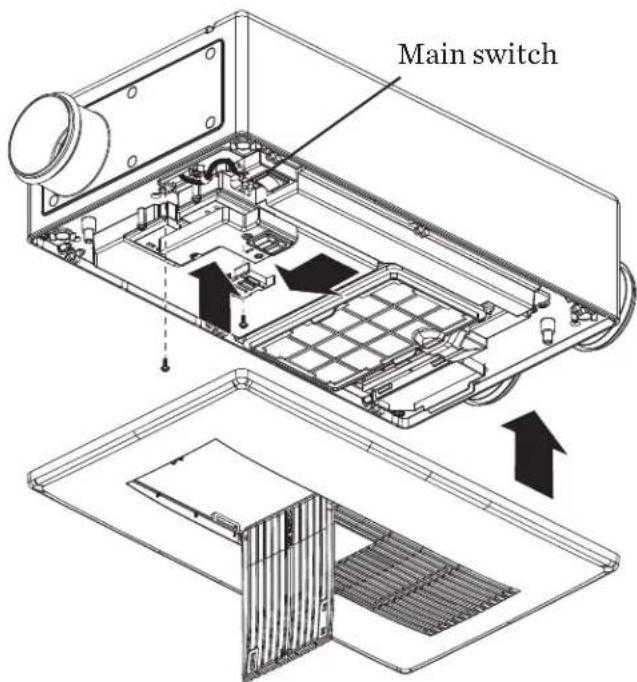
[18] Cut and strip the cable to length, connect the cable to the N and L in the terminal and fit the strain relief.

[19] Replace the terminal box cover. Turn on the main switch. Then push the front panel on place and lock the panel with lever.
Installation.
PAX

Pax Eos 100H
Monteringsanvisning
frånluftsstos
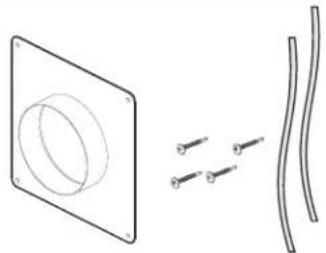
Monteringskit.
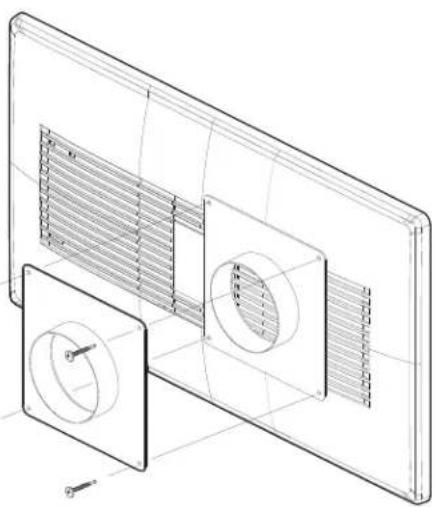
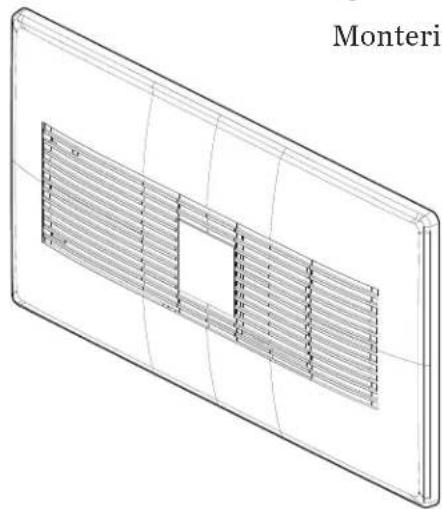

Instruction, assembling of Return air adapter.

Mounting kit.
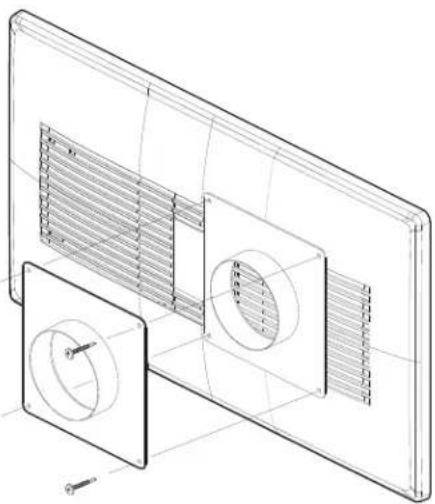


[20] Important: Relieve the weight of the pipes so that the front cover cannot come loose from its brackets, which results in leakage.
[22] When using exhaust air adapter, access to service and filter replacement must be provided. Exhaust air duct must be easy to disconnect.
Teknisk specifikation.
PAX
SE
Technical specification.
PAX
UK
| Model Name | Pax Eos 100H | |||
| Model Number 1110-2 | ||||
| Model type Standard with pre heater | ||||
| Voltage / Frequency [V] [Hz] | 230VAC 50Hz | |||
| Free blowing capacity [m3/h] | 20 | 40 | 60 | *80 |
| Power consumption [W] | 3,5 | 8,0 | 18 | 25 |
| When the heater is on [W] | 375 | |||
| Noise pressure level [dB(A)] 3m | 19 | 22 | 29 | 35 |
| Noise power level [db(A)] | #43 | |||
| Heat recovery efficiency [%] | 80 | 78 | 75 | |
| Leakage [%] | 5 | |||
| Motor type DC motor | ||||
| Encloser class IP24 | ||||
| Insulation class (class II) | ☐ | |||
| Certified Intertek | S | |||
| Other labels | CE | |||
| Filter OA: G4 / RA: G4 | ||||
| Unit wight [kg] | 9,5 | |||
| Installation Qualified installer | ||||
Energy label noise
* Only exhaust blowing
FAQs
PAX®
If you feel that the ventilation fan is not working properly, check out the following points first. If the truble persists, turn of the power switch and contact your dealer or an authorized service centre.
General:
If you hear unusual sounds from the ventilation fan.
- Are ventilation- unit been installed on a sturdy and level ceiling/wall?
- It's normal to hear some noises when the ventilation starts or stops.
The LED light does not come on.
- Is the power to the ventilation on?
-Check your home's internal fuses.
Filter maintenance lamp blinks.

- Check the filters and replace with new filters.
The unit can not be operated by remote control.
- Are the batteries exhausted?
Garantivillkor
PAX
SE
The Pax Eos has a five-year warranty for defects in manufacturing and materials.
The warranty is subject to the following conditions:
- The fan must have been installed by a qualified electrician.
- The fan must have been assembled and installed in accordance with the advice and instructions in this user and installation guide.
- The fan must be cleaned regularly in accordance with the advice and instructions in this user and installation guide.
- The fan must be installed and used indoors.
- The fan must not be used in exposed environments (for example in industrial or other environments where there is a risk of the fan being exposed to solvents, a high dust density, gases, etc.).
PAX
Copyright © Volution Sweden AB
009-905033-C 21-11-11
We accept no liability for printing errors and reserve the right to make changes to materials and designs.
pax.se



- MODEL NO. : PAX EOS 100H
- ART NO. : 1110-2
- PAX
- TIG INFORMATION
- IMPORTANT INFORMATION
- ENVIRONMENT
- PACKAGING WASTE
- INNEHÅLL
- FEATURE
- INFORMATION ABOUT ELECTRONIC WASTE AND EQUIPMENT FOR HOUSEHOLDS
- INFORMATION ON WASTE ELECTRICAL AND EQUIPMENT OUTSIDE THE EUROPEAN UNION
- BEFORE DISPOSING OF YOUR OLD PAX EOS
- SAFETY INSTRUCTIONS FOR USERS
- UK
- SAFETY INSTRUCTIONS FOR THE INSTALLER
- INDICATES FATAL RISKS OR RISKS OF SERIOUS INJURY
- CAUTION
- INDICATES A RISK OF PERSONAL INJURY OR PROPERTY DAMAGE
- SE
- VIKTIGA DELAR
- NAME OF EACH PARTS
- VARVTALSREGLERING
- HUMIDITY CONTROL
- NOTE
- DRIFTLÄGE
- FILTERUNDERHÅLL
- BALANCING THE AIRFLOW
- RENGÖRING FRONTPANEL
- MAINTENANCE
- CLEANING FRONT PANEL
- REPLACEMENT AIR FILTER
- WARNINGWARNING
- INSTALLATION
- PLASTIC CHANNELS DESCRIBED BELOW IS AN ACCESSORY FOR PAX EOS
- EXTERNAL WALL GRILLE DESCRIBED BELOW IS AN ACCESSORY FOR PAX EOS
- TEKNISK SPECIFIKATION
- TECHNICAL SPECIFICATION
- ENERGY LABEL NOISE
- FAQS
- PAX®
- GENERAL
- GARANTIVILLKOR
- THE PAX EOS HAS A FIVE-YEAR WARRANTY FOR DEFECTS IN MANUFACTURING AND MATERIALS
Brand : PAX
Model : Eos 100H
Category : Fan