805-774 - Toy Nordic Play - Free user manual and instructions
Find the device manual for free 805-774 Nordic Play in PDF.

| Product Type | Toy |
| Brand | Nordic Play |
| Model | 805-774 |
| Recommended Age | 3+ years |
| Dimensions (L x W x H) | 25 x 15 x 10 cm |
| Weight | 0.4 kg |
| Power Source | 2 x AA batteries (not included) |
| Material | ABS plastic, non-toxic |
| Color | Multicolor |
| Functions | Sound effects, lights, movement |
| Operation | On/Off switch, automatic shut-off |
| Safety Certification | CE, EN71 |
| Cleaning Instructions | Wipe with damp cloth, do not immerse |
| Maintenance | Remove batteries when not in use |
| Spare Parts Availability | Contact Nordic Play support |
| Repairability | User-serviceable battery compartment; internal repairs by qualified personnel |
| Language of Manual | EN (English) and other languages available |
| Manual Format | PDF, 32 pages |
Frequently Asked Questions - 805-774 Nordic Play
User questions about 805-774 Nordic Play
0 question about this device. Answer the ones you know or ask your own.
Ask a new question about this device
Download the instructions for your Toy in PDF format for free! Find your manual 805-774 - Nordic Play and take your electronic device back in hand. On this page are published all the documents necessary for the use of your device. 805-774 by Nordic Play.
USER MANUAL 805-774 Nordic Play
natural_image
Yellow and black sports car with a long-handled metal tool, no visible text or symbols

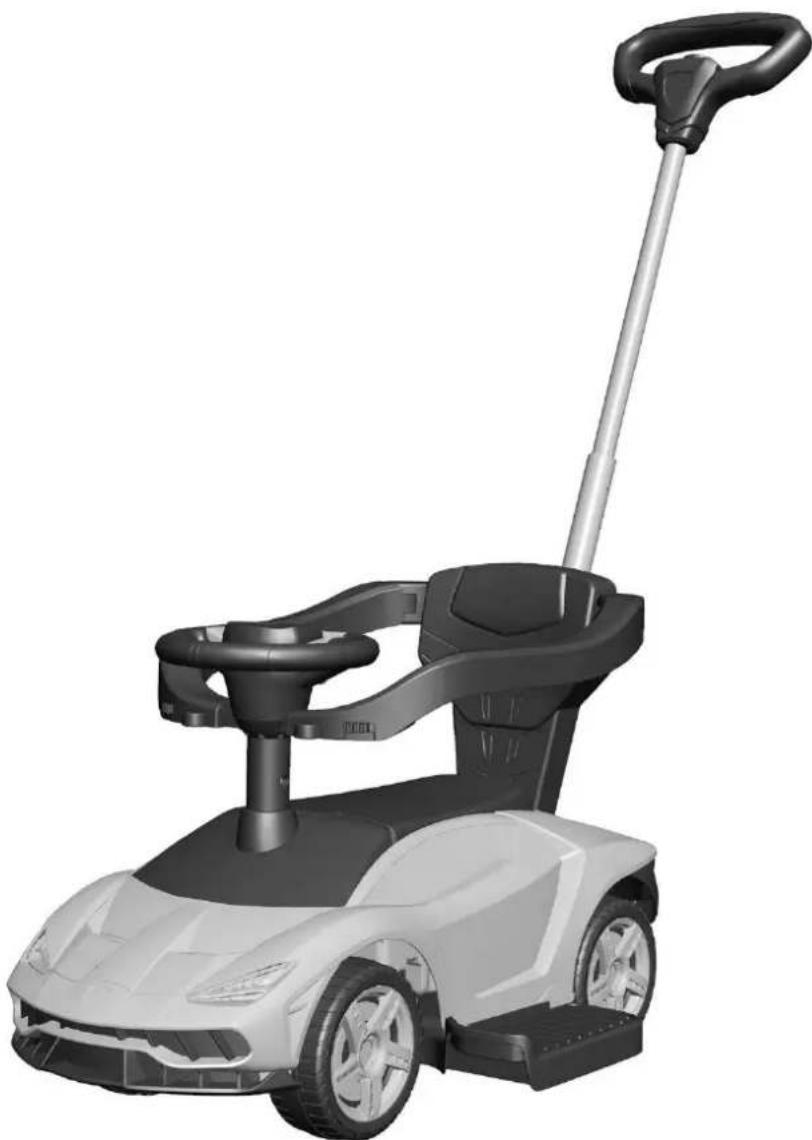
Size 71,8 x 46 x 100,7 cm
Art. no. 805-774
EAN 5705858711683
Imported by / Importeret af
NSH NORDIC A/S
Virkefeltet 4
DK-8740 Braedstrup
Made in China / produceret i Kina
General safety rules for NORDIC PLAY products
Warning:
- The vehicle may not be used on roads, sidewalks, in hills or sand.
- The vehicle should only be used on flat surfaces.
- Do not overload the vehicle. Pay attention to the maximum weight limits. Typical maximum total weight is 20 - 30 kg. Please check for your specific model.
- Children using the vehicle should always be supervised by a responsible adult.
- Push/foot-to-floor vehicles without a battery can be used from 1 year of age.
• Declaration of conformity: This product is in accordance with EU directive 2009/48/EC on the safety of toys
Warning:
For your child's safety, pay attention to the following:
- Only adults may assemble the product.
• Small parts and plastic parts should be kept away from the child to avoid risk of suffocation.
• Adult supervision is required. - Push/foot-to-floor vehicles without battery can be used from 1 year of age.
- Use the vehicle with caution, since driving skills are required to avoid falls or crashes that can result in injuries to the user or third party.
- Instructions on how the vehicle is used should be given to the child before use – especially for the braking system.
- May not be used in traffic. Only use the vehicle on private property.
- Only drive on flat surfaces away from other vehicles and obstacles.
- Avoid sharp bumps and sudden changes of the surface.
- Avoid roads and surfaces with water, sand, gravel, dirt, leaves and other debris.
- Wet weather can reduce the traction, brake effect and visibility.
- Do not drive when it is dark.
- Avoid excessive speed in conjunction with downhill driving.
- Watch out for pedestrians.
- Check and tighten all screws before every drive. Do not allow two or more children to use the vehicle at once.
- Do not use the vehicle if it has damages.
- Change damaged parts immediately.

To protect the environment, batteries and electrical equipment must be disposed separately from household waste. Contact the municipality for the nearest collection point.
Installation and Operating Instructions
natural_image
3D rendering of a white sports car with a black handle and control panel (no text or symbols visible)Please read the installation instructions carefully before use
The “Lamborghini” and “Lamborghini Bull and Shield” trademarks, copyrights, designs and models are used under license from Automobili Lamborghini S.p.A, Italy.
Our products are suitable for ASTM F963; GB6675; EN71 and EN62115 standard.
CAR DIMENSIONS
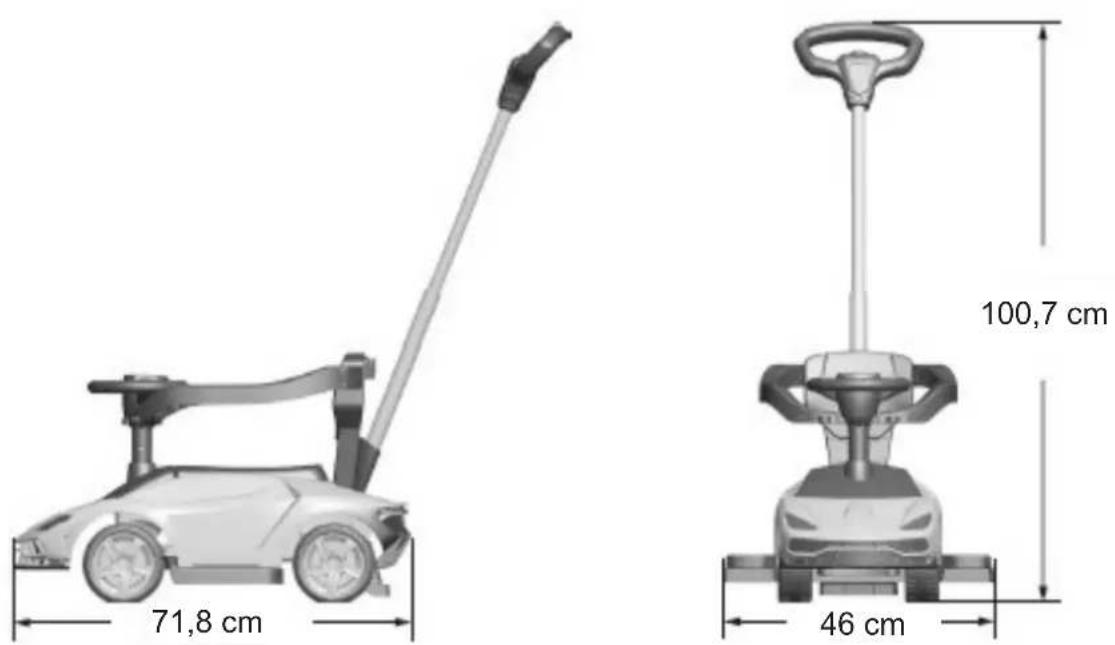
text_image
71,8 cm 100,7 cm 46 cm| Model: Including: | |
| Push handle: YES | |
| Covering cloth: NO | |
| IC music: YES | |
| PVC wheel sleeve NO |
Contents
• Product Specifications and Parameters
- Components List
- Assembly Diagram
• Installation and replacement of the batteries for steering wheel
• Function and Operation
Product specifications and parameters
- This product is suitable for the children of 2-6 years old, and shall be used under adult supervision!
- Product dimensions: 71.8 × 46 × 100.7 cm
- Product maximum load weight: 23 kg
- Product operating ambient temperature: 0-40°
- Steering wheel power supply: 2 × 1.5V AA battery (excluded in this product)
Components list
1. Car body 7. J-shaped stick | 13. Push handle |  |
2. Steering wheel 8. Foot treadle  | 14. Wheel 2 x pcs | 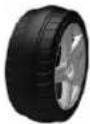 |
3.Accessories for the steering wheel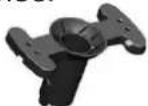 | 9. Handrails and protective railing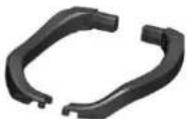 | |
4. Backrest 10. Steering wheel screw | 5 × 23PM | |
5. Front wheel assembly 11. Steering wheel locknut (5MM)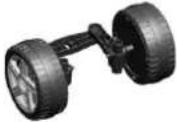 |  | |
6. “I”-shaped frame 12. Screw 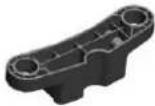 | 4 × 20BAB 2 pcs |
Assembly Diagram
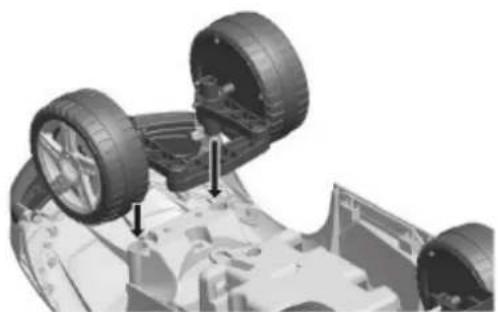
- Mount the front wheel components
natural_image
Mechanical assembly showing three tires mounted on a vehicle chassis (no text or symbols visible)Turn over the cart body, and insert the front wheel assembly into
- Mount the flange-mount.
natural_image
Mechanical assembly diagram showing a car chassis with exposed tires and mounting brackets (no text or symbols)Insert the flange-mount into the designated position on the front wheel along the arrow direction and tighten it with screws (part 12).
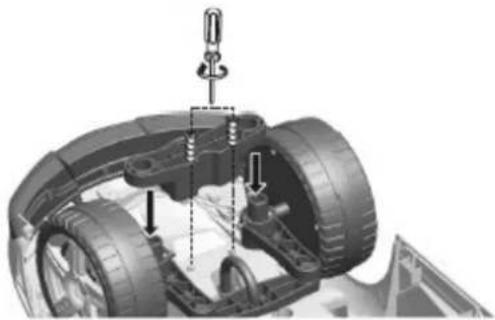
- Installation of J-shaped stick

natural_image
Undercarriage view of a vehicle chassis showing front wheel, suspension components, and chassis frame (no text or symbols visible)Install the J-shaped stick at the assigned location.
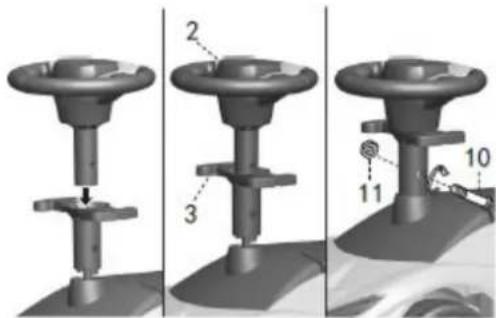
- Installation of steering wheel
text_image
Technical diagram showing three stages of a mechanical assembly with numbered components and a worker on the base.Insert the J-shaped hooks to steering wheel (part 2) and accessories of the steering wheel (part 3) in sequence and tighten them with the screws (part 10) and the lock screw cap (part 11).
- Mount the foot treadle

natural_image
3D rendering of a car chassis frame with visible wheels and chassis structure (no text or symbols)Align the snap lock of the pedal with the designated position on the bottom of the cart, push in along the arrow direction and lock.
- Install backrest

natural_image
Close-up of a mechanical device with a knob and lever mechanism (no visible text or symbols)Insert the back rest (part 4) to the designated position on the rear-upper end of the cart.
- Install left and right handrails and protective railing
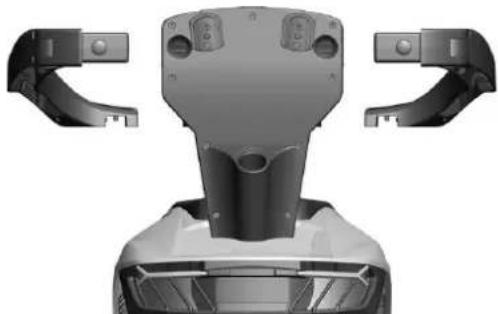
natural_image
3D rendered mechanical component with two side brackets and a central cylindrical feature (no text or symbols visible)
text_image
SwitchPush the button on handrails and protective railing, fixing left and right handrails and protective railing (part 9) into the designated position at the two ends of the backrest, and lift the other end of the handrails to the designated position of the steering wheel.
- Install pull grip

text_image
setting button Push down the push rod 13 Remove the set ring of the push handlePress height setting button
The installation personnel should stand at the rear of the children's cart, align with the direction of the bumps on the bottom of the push handle, as shown in the figure. Hold the lower end of the pipe of the push handle with left hand and hold the push handle head with right hand. A. Press the handle button; B. Push it hardly with right hand; C. Now the two bumps on the bottom of the push handle are completed retracted and insert the push handle into the bottom of the installation hold at the rear of the cart. When hearing the sound "crack", turn the handle to control the turning direction of the front wheel.
Installation and replacement of steering wheel batteries

text_image
The fixing glue meson on the screw can prevent the screw from dropping out Battery Compartment Battery cover 2 x 1.5V AA batteryThe battery box is on the bottom of the steering wheel. Put the steering wheel upside down, open the battery cover on the steering wheel, replace the batteries, and take out the used batteries. Install 2 AA batteries by aligning with the positive and negative poles of the batteries, close the battery cover and tighten the screws.
Function and Operation
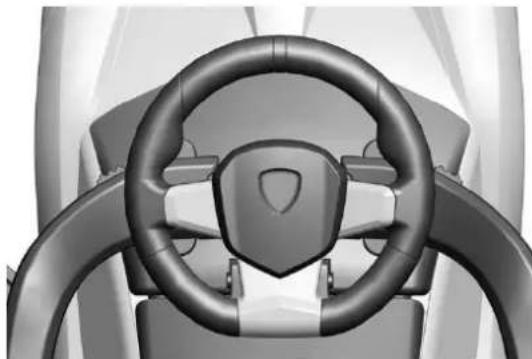
natural_image
Top-down view of a car steering wheel and dashboard (no text or symbols visible)Press the music button on the steering wheel to play six pieces of music, press it once to play a piece of music and the six pieces of music can be played in sequence.
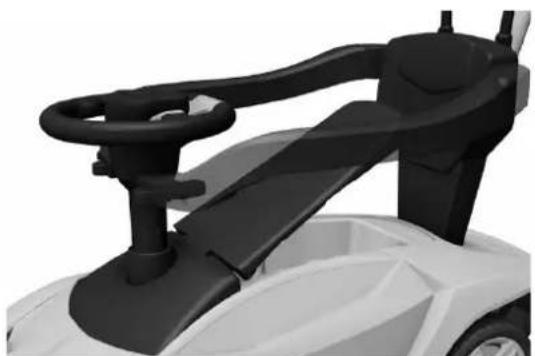
natural_image
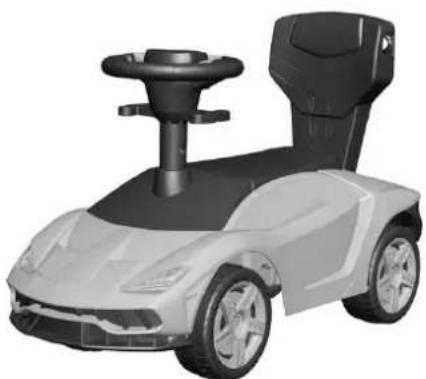
3D rendering of a white and black electric vehicle with a handle and steering wheel (no text or symbols visible)There is a large space under the seat and some items can be placed inside. The kids can excersie their abilities of sorting and storing.
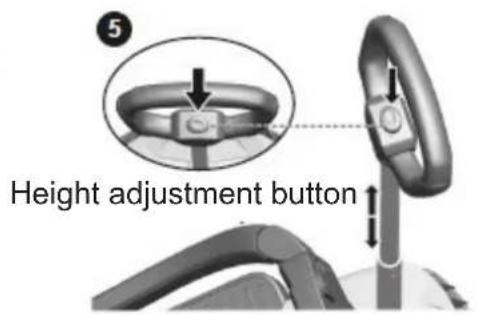
text_image
Height adjustment buttonPush the button on the top of the push handle to unlock, and shorten or stretch out the push handle. When you hear the sound "crack", the handle is locked in a new height.

text_image
Press height setting button 6 B Push down the push rod 13 A CRemove the push handle and shorten it to the lower end of the pipe of the push handle with left hand and hold the handle head with right hand. A. Press the handle button; B. Push hardly with right hand (now the two bumps on the bottom of the push handle are retracted and the handle is unlocked); C. Pull out the handle with left hand.
natural_image
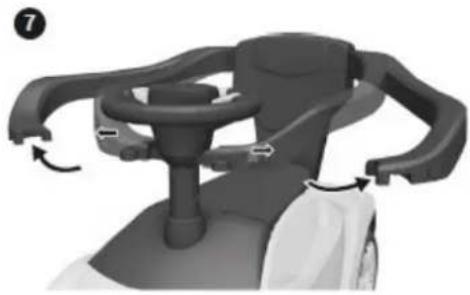
Close-up of a car steering wheel with adjustable arms and buttons (no visible text or symbols)Push the button on the handrail guard to lift it and then open.
text_image
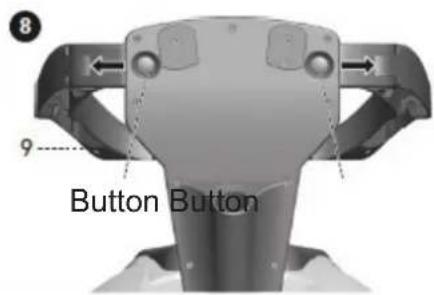
8 9 Button ButtonPress the button on the handrails and pull out, the handrails can be removed.

natural_image
Top-down schematic of a vehicle chassis with labeled parts and directional arrows (no readable text or symbols)Push up the snap hook and push back the pedal to remove.
natural_image
3D rendered model of a futuristic sports car with a black handle and gray body (no text or symbols visible)
text_image
Control nose wheel steeringOptional A, Optional B) Walker: Disassemble the push handle (part 13) and handrail guard (part 9) and pedal (part 8) according to the steps 5, 6, 7, 8, 9 change it to a walker, as shown in the figure. Children may move forward with his feet. (Optional C, Optional D) Walker: As shown in Figure . Disassemble the ceiling, and then disassemble the push handle (part 13) and handrail guard (part 9) and pedal (part 8) according to the steps 5, 6, 7, 8, 9, to change it to a walker, as shown in the figure. Children may move forward with his feet.
natural_image
3D rendering of a white sports car with a long-handled tool, no visible text or symbolsnatural_image
Mechanical assembly showing two tires mounted on a vehicle chassis (no text or symbols visible)natural_image
Mechanical assembly diagram showing a car chassis with tire, suspension components, and mechanical parts (no text or labels)natural_image
Undercarriage view of a vehicle chassis showing front wheel, suspension components, and chassis frame (no text or symbols visible)text_image
Technical diagram showing three stages of a mechanical assembly with numbered components and a worker on the base.Saml ratstammen med styret (del 2) og tilbehøret tit rattet (del 3) se tegning. Delene fastgøres med skrue (del 10) og låsemøtrik (del 11).
natural_image
3D rendering of a car chassis frame with visible wheels and chassis structure (no text or symbols)natural_image
Close-up of a mechanical device with a knob and lever mechanism (no visible text or symbols)natural_image
3D rendered mechanical component with two side brackets and a central hub (no visible text or symbols)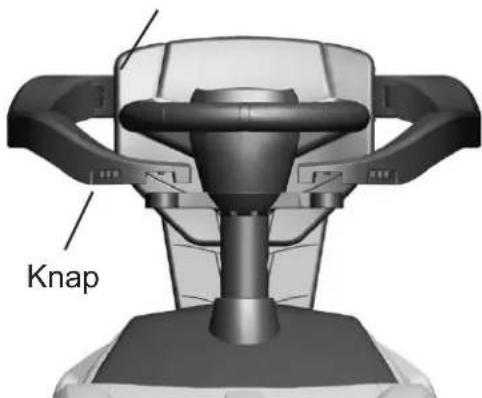
text_image
Knapnatural_image
Interior view of a car steering wheel and dashboard (no text or symbols visible)natural_image
Close-up of a white and black electric vehicle with a black handle and steering wheel (no visible text or symbols)natural_image
Mechanical device with black handle and white base, showing mechanical components and directional arrows (no text or symbols)natural_image
Top-down schematic of a vehicle's internal structure with labeled parts (no readable text or symbols)natural_image
3D rendered model of a futuristic sports car with steering wheel and dashboard (no text or symbols visible)natural_image
3D rendering of a small electric mobility device with a canopy and control panel (no text or symbols visible)natural_image
3D rendering of a white sports car with a black handle and control panel (no text or symbols visible)natural_image
Mechanical assembly showing two tires mounted on a vehicle chassis (no text or symbols visible)natural_image
Mechanical assembly diagram showing a car chassis with exposed tires and mounting brackets (no text or symbols)natural_image
Undercarriage view of a vehicle chassis showing exposed tires and structural components (no text or symbols)text_image
Technical diagram showing three stages of a mechanical assembly with numbered components and a worker on the base.natural_image
3D rendering of a car chassis frame with visible wheels and chassis structure (no text or symbols)natural_image
3D rendered mechanical device with lever and handle (no visible text or symbols)natural_image
3D rendering of a robotic device with two articulated arms and a central hub (no text or symbols visible)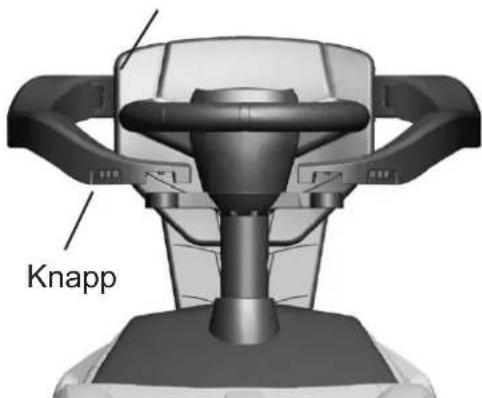
text_image
Knappnatural_image
Top-down view of a car steering wheel and dashboard (no text or symbols visible)natural_image
3D rendering of a white and black electric vehicle with a handle and steering wheel (no text or symbols visible)natural_image
Mechanical device with black handle and white base, showing mechanical components and directional arrows (no text or symbols)text_image
8 9 Knapp Knappnatural_image
Top-down schematic of a vehicle's internal structure with labeled parts (no readable text or symbols)natural_image
3D rendered model of a futuristic sports car with steering wheel and dashboard (no text or symbols visible)natural_image
3D rendering of a small electric mobility device with a canopy and control panel (no text or symbols visible)natural_image
3D rendering of a white sports car with a black handle and control panel (no text or symbols visible)natural_image
Mechanical assembly showing two tires mounted on a vehicle chassis (no text or symbols visible)natural_image
Mechanical assembly diagram showing a car chassis with exposed tires and mounting fixtures (no text or symbols)natural_image
Undercarriage view of a vehicle chassis showing exposed tires and structural components (no text or symbols)text_image
Technical diagram showing three stages of a mechanical assembly with numbered components and a close-up view of the final step.natural_image
3D rendering of a car chassis frame with visible wheels and chassis structure (no text or symbols)natural_image
3D rendered mechanical device with a lever and handle (no visible text or symbols)natural_image
3D rendering of a robotic device with two articulated arms and a central hub (no text or symbols visible)
text_image
painikenatural_image
Interior view of a car steering wheel and dashboard (no text or symbols visible)natural_image
Close-up of a white electric vehicle with black handle and wheels (no visible text or symbols)natural_image
Mechanical device with handle and control knob, no visible text or symbolsnatural_image
Top-down schematic of a vehicle chassis with labeled parts and directional arrows (no readable text or symbols)natural_image
3D rendered model of a futuristic sports car with a black handle and gray body (no text or symbols visible)natural_image
3D rendering of a toy car with a canopy and steering wheel (no text or symbols visible)NORDIC
PLAY Speed
