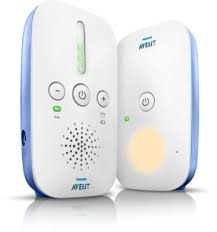
SCD491 - Baby monitor PHILIPS - Free user manual and instructions
Find the device manual for free SCD491 PHILIPS in PDF.

| Product Type | Baby monitor video (babyphone) |
| Brand | Philips |
| Model | SCD491 |
| Camera power supply | 7.5 V DC, 300 mA (mains adapter) or 4 LR6 (AA) 1.5 V alkaline batteries |
| Parent unit power supply | 8.0 V DC, 700 mA (mains adapter) or 5 supplied HR6 (AA) 1.2 V rechargeable batteries |
| Battery life (parent unit) | At least 3.5 hours |
| Radio frequency | 2.4 - 2.465 GHz |
| Maximum outdoor range | Up to 100 meters in open air |
| Typical indoor range | About 30 meters (depending on obstacles) |
| Display (parent unit) | 1.5 inch color LCD screen, 490 × 240 pixels |
| Night vision | Yes, automatic infrared LEDs (B&W image) |
| Operating modes | AV (continuous audio+video), Audio only, Auto (sound-activated) |
| Channel selection | 3 channels available |
| Nightlight | Integrated in camera unit, can be turned on/off |
| Image flip function | Yes, 180° rotation via switch on parent unit |
| Audio/video output | AV jack (RCA) and Scart adapter provided for TV connection |
| Sound level indicator | Yes, on parent unit (LEDs) |
| Out of range alert | Yes, emits a beep |
| Cleaning | With a damp cloth |
| Disposal | Do not dispose with household waste, follow local regulations |
| Warranty | Check philips.com or customer service |
Frequently Asked Questions - SCD491 PHILIPS
User questions about SCD491 PHILIPS
0 question about this device. Answer the ones you know or ask your own.
Ask a new question about this device
Download the instructions for your Baby monitor in PDF format for free! Find your manual SCD491 - PHILIPS and take your electronic device back in hand. On this page are published all the documents necessary for the use of your device. SCD491 by PHILIPS.
USER MANUAL SCD491 PHILIPS
A-1 IR LEDs
A-2 Camera lens/focus ring
A-3 Antenna
A-4 OFF/ON/ switch
A-5 Battery compartment cover
A-6 Wall mount recess
A-7 CHANNEL selection switch
A-8 Nightlight
A-9 Microphone
A-10 POWER light
A-11 DC 7.5V - + power supply jack
A-12 AC power adapter
A-13 Mounting clip
B. Monitor unit
B-1 POWER light
B-2 Display
B-3 Sound level lights
B-4 Loudspeaker
B-5 CHANNEL selection switch
B-6 Mode selection switch (AV AUDIO AUTO)
B-7 Battery compartment cover
B-8 ON/OFF switch/VOLUME control
B-9 Antenna
B-10 AC power adapter
B-11 Rotate image switch
B-12 DC 8.0V - + power supply jack
B-13 AV OUT jack
B-14 BRIGHTNESS control
B-15 Belt clip/support
B-16 SCART/RCA adapter
B-17 Audio/Video cable
C.What else you'll need
- 4 × 1.5 VAA batteries for baby unit. Not supplied.
- 5 × 1.2 VAA rechargeable batteries for monitor unit. Supplied.
Contents
3 Illustrations
4 Legend of functions
4 Camera unit (baby unit)
4 Monitor unit (parent unit)
4 What else you need
5 Contents
6 Welcome
6 Safety information
7 Getting your baby monitor ready
7 Camera unit (baby unit)
9 Monitor unit (parent unit)
10 Channel selection
Using your baby monitor
Switching on the units
I I Mode selection (monitor unit)
12 Adjusting the image
12 General remarks
13 Other features
13 Connecting the monitor to your TV
13 Switching the night-light on and off
Rotating the displayed image
14 Monitoring your baby silently
15 Troubleshooting
17 Technical specifications
18 Important information
18 Transmission range
19 Environmental information
19 Maintenance
19 Guarantee & service
Philips is dedicated to produce caring, reliable products to give parents the reassurance they need. Your baby cam consists of a monitor unit (parent unit) and a camera unit (baby unit). With the units properly connected the baby cam provides round-the-clock support by ensuring you can always see and hear your baby clearly. When the baby cam is used as a regular baby monitor, it enables you to hear your baby anywhere in the house at all times.
Philips Baby Care, taking care together
Safety information
Please read this user manual carefully before using your baby cam and keep it for future reference. This baby cam is intended as an aid. It is not a substitute for responsible and proper adult supervision and should not be used as such.
- Read and observe all warnings on the product and in this user manual.
- Make sure the camera unit and adapter cable are always out of reach of the baby (at least 1 meter/3 feet away).
- Never cover the baby cam (with a towel, blanket, etc.).
- Never use the baby cam in moist places or close to water.
- Do not expose the baby cam to extreme cold, heat or light (e.g. direct sunlight).
- Check to ensure that the voltage indicated on the type plate of the adapters (A-12, B-10) corresponds to the local power voltage before connecting to the AC power supply.
- To prevent electric shock, do not open the inside of the camera unit and monitor unit (except for the battery compartments)
- The monitor unit antenna (B-9) is fixed; do not try to extend or bend it.
- The camera unit antenna (A-3) can only be bent down (and up again). It cannot be extended.
- Always unplug the AC adapters when not using the baby cam for long periods of time.
- The adapters and battery compartment covers may be slightly warm during operation. This is normal.
- Position the AC adapter cords so that they are not walked on or pinched by items placed upon or against them, paying particular attention to cords at AC adapter plugs, wall plugs, and the point at which the cords attach to the system.

- Use only the AC adapters provided. Use of any other adapters may damage the system. Plug the AC adapters into standard household current only! To prevent entanglement and overheating, do not use extension cords.
- Keep in mind that you are using public airwaves when you use the baby cam. Sound and video may be broadcast to other receiving devices. Conversations, even from rooms near the camera unit, may be broadcast as well.
- To protect your privacy, always switch off the camera unit when not in use.
- Danger of explosion if batteries are incorrectly replaced. Replace only with the same or an equivalent type.
- Do not mix battery types (alkaline batteries with other batteries).
- Remove batteries when the baby cam will not be used for a long period of time.
- Do not mix old and new batteries.
- Do not recharge non-rechargeable batteries. This may cause a fire.
- If the batteries are left in the units when they are powered from the mains, check them for leakage every six months.


Getting your baby cam ready
Camera unit (baby unit)
Tips for positioning the camera unit
- Never place the camera unit inside the baby's bed or playpen.
- Position the unit at least 1 meter (3 feet) away from your baby.
- The unit can be mounted on a wall, or placed on a stable, flat surface, such as a dresser or table top.
IMPORTANT!
Once you have selected a location for mounting the unit, test reception before mounting the unit to the wall. If interference or other problems occur, refer to chapter 'Troubleshooting'.
- To prevent entanglement, mount the unit only at locations where its AC adapter cord is out of children's reach!
- To prevent entanglement and overheating, mount the unit only in locations where the AC adapter cord can reach a standard wall outlet.
- Mount the unit at a location where the camera lens is not obstructed. Use the horizontal and vertical angle adjustment options to aim the camera properly.


- Allow adequate ventilation of the unit when mounted on the wall. Do not mount it directly above heating vents, other heat-generating sources or in direct sunlight.
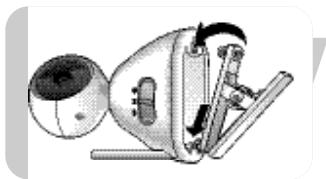
Mounting the camera unit
Before mounting, first select the best possible location for the unit. See 'Tips for positioning the camera unit'.
If you wish to operate the unit on battery power, first insert the batteries into the unit. See 'Setting up for battery-operated use'.
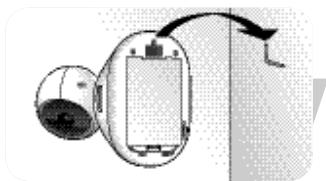
Mounting to a wall
- Attach the unit wall mount recess (A-6) to a screw or hook.

Using the mounting clip
- Insert the mounting clip feet into the recess at the bottom of the unit.
Gently push the two front feet forward until they click into position. Then gently push down the rear foot until it clicks into position.
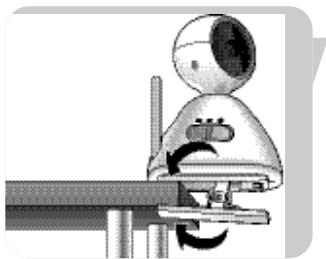
- Clip the mounting clip (A-13) to the edge of a table or cupboard.
Setting up for mains-operated use
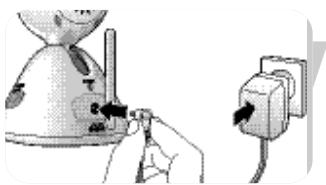
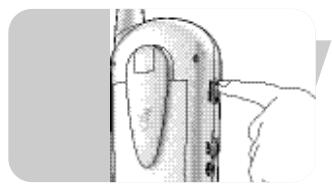
1 Connect the power adapter cord to the unit power supply jack (DC 7.5V - + A-11).
2 Connect the AC power adapter (A-12) to a wall outlet. Unwrap and fully extend the AC adapter cord.
< The camera unit is now ready for mains-operated use.
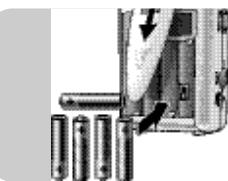
Setting up for battery-operated use
When batteries are installed, you have an automatic back-up in case of mains failure.
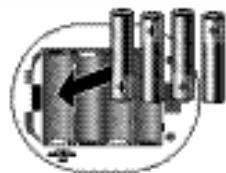
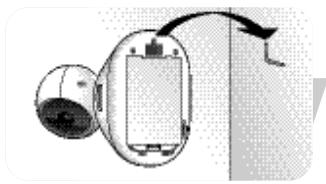
Remove the battery compartment cover (A-5).
2 Insert four 1.5V AA batteries, noting the + and - configuration inside the battery compartment. Batteries are not supplied, we recommend Philips alkaline batteries.
3 Close the battery compartment cover (A-5).
< The camera unit is now ready for battery-operated use.
Monitor unit (parent unit)
The monitor unit can be mains- or battery-operated. When batteries are installed, you have an automatic back-up in case of mains failure.
Setting up for mains-operated use
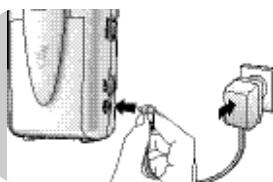
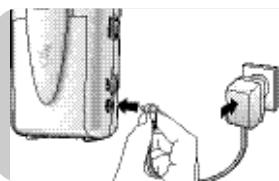
1 Connect the power adapter cord to the unit power supply jack (DC 8.0V - + B-12).
2 Connect the AC power adapter (B-10) to a wall outlet. Unwrap and fully extend the AC adapter cord.
< The camera unit is now ready for mains-operated use.
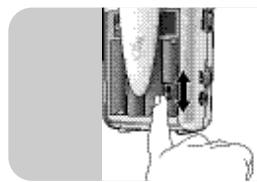
Setting up for battery-operated use
I Slide down the belt clip/support (B-15) and lift it up.
2 Remove the battery compartment cover (B-7) by sliding it downwards.
3 Insert the five I.2V AA rechargeable batteries supplied, noting the + and - configuration inside the battery compartment.

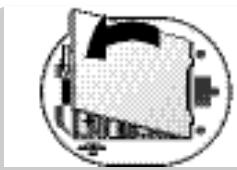
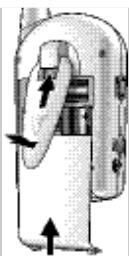
4 Slide the battery compartment cover (B-7) back in place. Push gently until it clicks into position.
5 Pull down the belt clip/support (B-15) slide it upwards until it clicks into position.
6 Connect the power adapter cord to the unit power supply jack (DC 8.0V - -B-12).
7 Connect the AC power adapter (B-10) to a wall outlet. Unwrap and fully extend the AC adapter cord.
8 Leave the monitor unit connected to the mains supply until the batteries are fully charged (at least 10 hours).
During recharging the POWER light (B-1) blinks red.
When batteries are fully charged the POWER light (B-1) lights continuously green. The monitor unit can now be used cordlessly for at least 3.5 hours.
< The monitor unit is now ready for battery-operated use.
Positioning the monitor unit
- The unit can be placed on a stable, flat surface such as a table top.
- The belt clip can be used to support the unit in an inclined position. For this, slide down the belt clip (B-15) and lift it up.
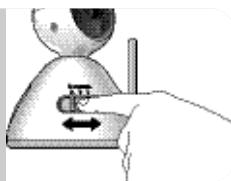
Channel selection
I Use the CHANNEL selection switch (A-7) on the camera unit to select the desired channel (1, 2 or 3).
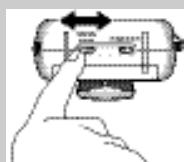
2 Set the CHANNEL selection switch (B-5) on the monitor unit to the corresponding channel.
- Make sure that both units are always set to the same channel.
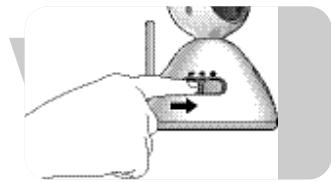
Switching on the units
I Set the camera unit OFF/ON/ switch (A-4) to the ON position.
The POWER light (A-10) lights up green.
The IR LEDs (A-1) are automatically activated so the camera can also be used in low light conditions. Images are then displayed in black and white.
2 Set the monitor unit ON/OFF switch (B-8) to the ON position.
The POWER light (B-1) lights up green.
You will now hear sound from the loudspeaker (B-4) and see picture on the display (B-2).
The sound level lights (B-3) light up when sound is picked up by the camera unit. The more sound is picked up, the more lights light up.
- Adjust the volume with the VOLUME control (B-8)
- If there is interference or if sound reception is poor, try repositioning the units (camera unit first) or set both units to another channel. See 'Channel selection'.
Make sure that both units are always set to the same channel.
Mode selection (Monitor unit)
The various modes are selected with the mode selection switch (B-6) at the bottom of the monitor unit.
AV (Audio Video) mode
Sound and picture are transmitted together continuously.
Audio mode
Only sound is transmitted. No picture is shown on the display (B-2). The baby cam is now used as a regular baby monitor.
This saves battery power.
Auto mode
Only when sound is detected by the camera unit, sound and picture are transmitted together and picture is shown on the display (B-2).
When no sound is detected, no picture is shown. This saves battery power.
Adjusting the image

Adjusting the focus of the image (camera unit)
- Use the focus ring (A-2) to adjust the focus of the image.

Adjusting the horizontal and vertical angle of the image (camera unit)
- Turn the camera head left or right to adjust the horizontal angle of the image.
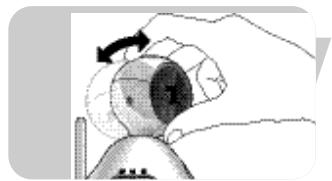
- Slide the camera head up or down the slot to adjust the vertical angle of the image.
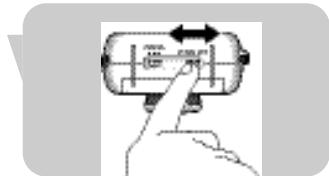
Adjusting the brightness of the display (monitor unit)
- Use the BRIGHTNESS control (B-14) to adjust the brightness of the display (B-2).
General remarks
Low power indication
- When the camera unit POWER light (A-10) goes out, battery power is low. Switch over to mains power or replace batteries.
- When the monitor unit POWER light (B-1) starts blinking green (when in use) or lights up red (after switching on), battery power is low. Switch over to mains power or recharge batteries. The batteries should recharge for 10 hours. When the unit is in use, recharging time will increase. During recharging the POWER light (B-1) blinks red. When batteries are fully charged the POWER light (B-1) lights continuously green.
When batteries do not fully recharge or not at all, battery life is at an end. Replace batteries.
Out-of-range alert
When there is no connection between the units (e.g. one of the units is switched off, units are set to different channels or batteries are low), the out-of-range alert is activated and a beeping sound is heard.
Infrared LEDs
When the camera unit is switched on, the infrared LEDs (A-I) are automatically activated so the camera can also be used in low light conditions. Images are displayed in black and white.
Other features
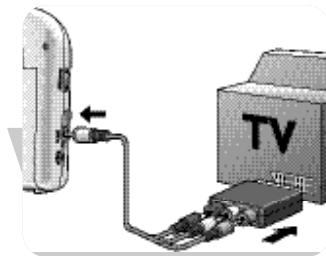
Connecting the monitor unit to your TV
SCART connection
Plug the Audio/Video connection cable supplied (B-17) into both the AV OUT jack (B-13) of the monitor unit and the SCART/RCA adapter(B-13) supplied.
2 Connect the adapter to the SCART connector of the TV.
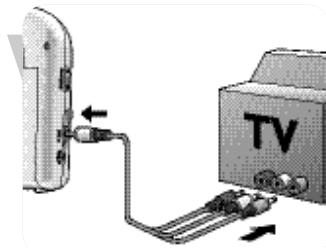
RCA connection
- Connect the single end of the Audio/Video RCA connection cable supplied (B-17) to the AV OUT jack (B-13) of the monitor.
2 Connect the audio/video plugs at the other end of the cable to the appropriate audio/video inputs on your TV. Make sure you insert the yellow plug into the Video input and the white and red audio plugs into the L(eft) and R(ight) Audio inputs.
Note: If your TV is equipped with PIP (Picture In Picture) or Full Dual Screen, you can continuously watch your baby while watching TV.
Switching the night-light on and off
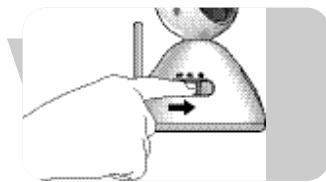
- Set the camera unit OFF/ON/ switch (A-4) to the position to switch on the nightlight.
- Set the camera unit OFF/ON/ switch (A-4) to the OFF or ON position to switch off the nightlight.
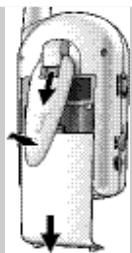
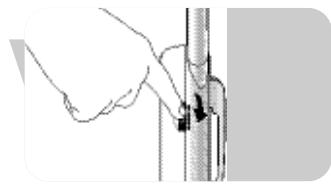
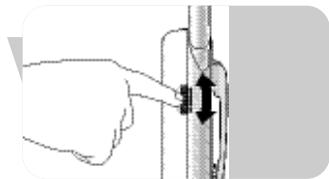
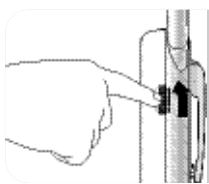
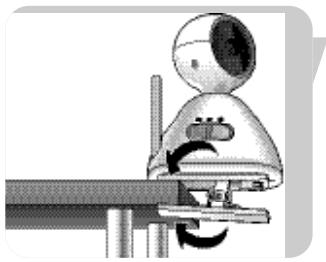
Rotating the displayed image
The Rotate image feature enables you to rotate the image 180^ for use of the camera in various positions e.g. when clipped to the edge of a table or cupboard.
The Rotate image switch is located inside the monitor unit battery compartment.
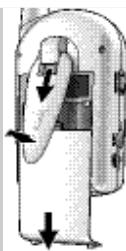
I Slide down the belt clip/support (B-15) and lift it up.
2 Remove the battery compartment cover (B-7) by sliding it downwards.
3 Set the Rotate image switch (B-11) to ON.
The image is now vertically rotatated (180^) on the display.
- Set the Rotate image switch (B-11) back to return the image back to its original setting.
Note: When the camera unit is connected to the TV, rotating the image is not possible.
Monitoring your baby silently
- Use the ON/OFF switch/VOLUME control (B-8) on the monitor unit to set the volume to the lowest level.
Do not switch off the monitor unit completely!
The sound level lights (B-3) on the monitor unit visually alert you to your baby's sounds. The more sounds your baby makes, the more lights you will see.
When no sound is detected all sound level lights (B-3) will be off.
Troubleshooting
| Problem | Possible cause | Solution |
| Camera unit's POWER light does not light up. | Unit not switched on. | Set OFF/ON/switch (A-4) to ON (day) or night). |
| Batteries are empty. | Replace batteries. | |
| AC power adapter (A-12) not plugged in. | Connect AC power adapter (A-12) to camera unit. Connect AC power adapter (A-12) to wall outlet. | |
| Monitor unit's POWER light does not light up. | Unit not switched on. | Set ON/OFF switch (B-8) to ON. |
| Batteries are low. | Recharge batteries. | |
| Battery life is at an end. | Replace batteries. | |
| AC power adapter (B-10) not plugged in. | Connect power adapter (B-10) to monitor unit. Connect power adapter (B-10) to wall outlet. | |
| Monitor unit's display does not light up. | Unit not switched on. | Set ON/OFF switch (B-8) to ON. |
| AUDIO mode selected. | Select AV or AUTO mode (B-6). | |
| No sound/no picture. | Units set to different channels. | Set both units to the same channel (A-7, B-5). |
| Camera unit not switched on. | Set OFF/ON/switch (A-4) to ON (day) or night). | |
| Interference from e.g. household appliances, cordless or cellular telephones. | Set both units to another (same) channel (A-7, B-5). | |
| Dark picture at night. | Batteries are low. | Replace/recharge batteries. |
| Brightness set too low. | Adjust brightness level (B-14). | |
| Sound but no picture. | One or both units close to metal objects. | Move unit(s) to different location(s). |
| Brightness set too low. | Adjust brightness level (B-14). | |
| Units set to different channels. | Set both units to the same channel (A-7, B-5). | |
| Interference from e.g. household appliances, cordless or cellular telephones. | Set both units to another (same) channel (A-7, B-5). | |
| Picture but no sound. | Volume level set too low. | Increase volume level (B-8). |
| Flickering picture. | Object too close to camera unit. | Remove object from camera unit or relocate camera unit. |
| One or both units close to metal objects. | Move unit(s) to different location(s). | |
| Interference from e.g. household appliances, cordless or cellular telephones. | Set both units to another (same) channel (A-7, B-5). | |
| Audio feedback (squealing). | Units too close to each other. | Increase distance between units. |
| Volume set too high. | Decrease volume (B-8). | |
| Image is displayed upside down on TV screen and cannot be rotated. | Rotating the image is not possible when the camera unit is connected to the TV. | Place camera unit straight up or disconnect monitor unit from TV. |
Monitor Unit
Hand held operation voltage: .DC8V 700mA or I.2 V AA rechargeable batteries (5x)
Low-voltage indication: 5.6 V
Temperature range: 0^ 50^
Power consumption: 5.0 W
Operation frequency: 2.4GHz 2.465 GHz
Max range (clear line of sight): up to 100 meters in open air/up to 30 meters indoors
Video system: PAL
Resolution: 490 x 240 pixels
Display: 1.5" Color LCD
Camera Unit
Operation voltage: .DC 7.5V 300mA or 1.5 V AA alkaline batteries (4x)
Power output: 10 dBm
Temperature range: 0^ 50^
Power consumption: 2.2W
Operation frequency: 2.4GHz 2.465 GHz
Sub-carrier frequency: 6.5 MHz
Microphone sensitivity: 1 to 2 meters
Important information
- Picture and sound quality is influenced by the use of microwave ovens. Other wireless systems (Bluetooth, wireless LANs, etc.) can also adversely influence the quality of picture and sound, and vice versa.
- The baby cam is a Radio Frequency (RF) based product. As such its performance can suffer the same kinds of interference as GSMs, portable radios and other RF-based products.
- The baby cam is not limited to just one room. You can use it anywhere in the house. Consequently, anybody in the vicinity of your house (up to the maximum operating range) who also owns a baby cam set to the same channel can watch and hear your baby.
- Radio wave safety: when switched on, the baby cam transmits and receives radio waves. The baby cam complies with the standards that are defined for it.
- The baby cam has an operating range of up to 100 meters, approximately in open air. Walls, ceilings and other large objects may limit the useable operating range to about 30 meters in the house, depending on what material the walls are made off.
Transmission range
What is the transmission range of a baby monitor in connection with the environment?
The range specified is the open field range of a specific monitor.
This range may be reduced, depending on the surroundings and other interference factors.
| Dry materials | Material thickness | Permeability |
| Wood, plaster, plasterboard, glass (without metal or wires, no lead) | < 30 cm | 90 - 100% |
| Brick, plywood | < 30 cm | 65 - 95% |
| Reinforced concrete | < 30 cm | 5 - 40% |
| Metal grids, bars | < 1 cm | 0 - 10% |
| Metal, aluminium sheets | < 1 cm | 0% |
For wet and moist materials reduction can be up to 100% .
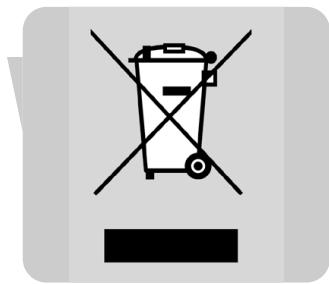
Environmental information
Disposal of your old product
Your product is designed and manufactured with high quality materials and components, which can be recycled and reused.
When this crossed-out wheeled bin symbol is attached to a product it means the product is covered by the European Directive 2002/96/EC.
Please inform yourself about the local separate collection system for electrical and electronic products.
Please act according to your local rules and do not dispose of your old products with your normal household waste. The correct disposal of your old product will help prevent potential negative consequences for the environment and human health.
Maintenance
- Clean the baby cam with a damp cloth.
- Dispose of used batteries in an environmentally friendly manner.
Guarantee & Service
If you need information or if you have a problem, please visit the Philips Web site at www.philips.com or contact the Philips Customer Care Center in your country (you will find its phone number in the worldwide guarantee leaflet). If there is no Customer Care Center in your country, turn to your local Philips dealer or contact the Service Department of Philips Domestic Appliances and Personal Care BV.
A. Unitéamera
Consumo de energia: 5,0 W
Philips Baby Care, taking care together
Philips Baby Care, taking care together
ToTOnTeTmnsMoVadacKaepa
Piv ano tyn totoeTno, th npetneipwta va etiAeEeTe Tny kalutepn duvatn heo yia tn movada. AvatpeTe oTnv evotnta yia tn totoeTno ts movadac kaepaç.
Eav oKoTneEte va TpofoobotnoeTe n movada aTo mntapiec, ToTOBETnOe npwTa tC mntapiec cTo n movda. AvatpeTe OTNV EvOTnA Puroon yia xpion e mntapiec
ToonOeTmOn oE toixo
- PpOoapuOoTe TnV UToDoxN OTepeewOns Oe Toixo (A-6) Oe μia βiδa n EvaykIoTpo.
Xpion Tou klin otepeowns
ToTOnoTeNTo TnEa Tou KIn OTepeWOns Otnv UTOOxN Tou Bpioketai Otny Katw PLeupa Tns Movadac. ZnPoXe ELaOpa Tnpoc Ta EumPoc Ta duo EumPoc nElaMata μexpi va aphiaiioouv Otn ΘeON Touc KI akouotei o Nxoc 'KIAK'. STN OUVExia, TiOE TLaOpa Tnpoc Ta KATW TO Niow TnEaMa μexpi va aphiaiosei Otn ΘeON Tou KI akouotei o Nxoc 'KIAK'.
I PuboiTe Tov diaKoTTn aeToupyiAs OFF/ON (A-4) nC kapepaO tN theon ON.
H φωτεινή ενδειξη POWER (A-10) ανάβει με πράσινο χρώμα.
OI luxviec LED utepuopwv (A-1) evpyoiouvta autouata, wote n kapeva aeitoupye iakopa kal uno suvthetake x aunlou ooiou. Me autov tov tponto oi Eikovec nou npobalovtai eivai aoipouapec.
Mny anevepyonoiote TELiOg T movada oθoVng!
OI wTeivcE vDeiEic oTaOmC nXou (B-3) nou unapxouv oTn movada oOvns, aC npoeiDtoiouv ontikya yia touc hXouc nou kavei to uWpo oac. Ooo TepiooTePouc hXouc kavei to uWpo oac tOe c TepiooTepec wTeivcE vDeiEic oAvaobv.
Otav dev avixveuetai kantoioc nxcos, oaes oI wteivcs evdeieicstarOuB-5napaevouv osnoeves.
Eπιλυση προβλημάτων
Philips Baby Care, taking care together
Sakerhetsinformation
Philips Baby Care, taking care together
Guc tuketimi: .5,0 W
Isletme Frekansi: 2,4GHz 2,465 GHz
Maks Sinir
Specifications are subject to change without notice.
Trademarks are the property of Koninklijke Philips Electronics N.V. or their respective owners.
2005 © Koninklijke Philips Electronics N.V. All rights reserved.
www.philips.com