
SPV3000 - DVD player PHILIPS - Free user manual and instructions
Find the device manual for free SPV3000 PHILIPS in PDF.

| Product type | Digital photo viewer (PhotoViewer) |
| Brand | Philips |
| Model | SPV3000 |
| Dimensions (L x D x H) | 198.8 x 119.3 x 29.8 mm |
| Dimensions of the stand (L x D x H) | 53.8 x 90 x 130 mm |
| Net weight (cabinet) | 300 g |
| Net weight (stand) | 100 g |
| Power supply | 100-240 V ~, 50/60 Hz |
| Power consumption | 7.2 W (operation), 408 mW (standby) |
| Supported image formats | JPEG/JPG |
| Supported audio format | MP3 (without copy protection) |
| TV systems | PAL, NTSC |
| Video output resolutions | SD, HD (480, 576, 720p, 1080i) |
| Front connections | 1 USB 2.0 port (storage devices), memory card slots (CF I/II, Microdrive, xD, MMC, SD, MS, etc.) |
| Rear connections | 1 USB 2.0 port (printer), stereo audio outputs (RCA), composite video output (yellow), S-Video output, component video outputs (RGB) |
| Remote control battery | CR2025 (3V) |
| Main functions | Slideshow, image display, rotation, zoom, direct printing (compatible Epson printers) |
| Maintenance | Clean with a soft cloth and mild detergent. Do not use solvents. |
| Safety | Do not expose to water, do not place open flame sources, leave a ventilation space of at least 10 cm at the back and top, 5 cm on the sides. |
| Repairability | Remote control battery replacement by user only. For any other repairs, contact Philips customer service. |
| Included accessories | PhotoViewer, remote control (battery included), stand, power adapter, user manual, quick start guide, product sticker |
Frequently Asked Questions - SPV3000 PHILIPS
User questions about SPV3000 PHILIPS
0 question about this device. Answer the ones you know or ask your own.
Ask a new question about this device
Download the instructions for your DVD player in PDF format for free! Find your manual SPV3000 - PHILIPS and take your electronic device back in hand. On this page are published all the documents necessary for the use of your device. SPV3000 by PHILIPS.
USER MANUAL SPV3000 PHILIPS
1 Important 4
2 Your PhotoViewer 5
2.1 What's in the box 5
2.2 What you also need 6
2.3 Optional components 6
2.4 Overview PhotoViewer 6
2.5 How to read this manual 7
2.5.1 Icons 7
3 Getting started 7
3.1 Prepare 7
3.2 Connect 7
3.2.1 The video signal to a TV 7
3.2.2 The audio signal to a TV or audio system 7
3.2.3 To the power outlet 8
3.3 Stand 8
3.4 Set up 8
4 Using your PhotoViewer 9
4.1 Start a slideshow 9
4.2 View a picture 9
4.3 Play a slideshow with music 10
5 Use more of your PhotoViewer 11
5.1 Full overview user interface 11
5.1.1 Overview home menu 11
5.1.2 Simple overview 11
5.1.3 Advanced overview 12
5.2 Change the set up 12
5.3 Change the slideshow settings 12
5.4 Rotate thumbnails and pictures 12
5.4.1 In the thumbnail view 13
5.4.2 In the full-screen view 13
5.4.3 In the slideshow view 13
5.5 Zoom and pan 13
5.5.1 In the thumbnail view 13
5.5.2 In the full-screen view 13
5.5.3 In the slideshow view 13
5.6 Make a slideshow from selected pictures 14
5.7 View file information 14
5.7.1 In the thumbnail view 14
5.7.2 In the full-screen view 14
5.7.3 In the slideshow view 14
5.8 Reset the factory setting 14
5.9 View the firmware version 14
5.10 Upgrade the firmware 15
6 Use a printer 15
6.1 Connect to a printer 15
6.2 Print pictures 15
6.2.1 From the thumbnail view 15
6.2.2 From the full-screen view 16
6.2.3 From the slideshow view 16
6.3 Control the print list 16
6.3.1 Manage the print list 16
6.3.2 Printer errors 16
7 Maintenance 17
7.1 Cleaning 17
7.2 Replacement 17
7.2.1 Replace the battery 17
7.3 Storage 17
7.4 Disposal 17
8 Guarantee and service 18
9 Technical data 18
10 Additional information 19
10.1 Power light 19
11 Frequently asked questions 19
12 Glossary of terms 20
Contact information 20
Warranty 20
Limitations of damages 20
Important
Take time to read this user manual before you use your PhotoViewer. It contains important information and notes regarding operating your PhotoViewer.

Be responsible Respect copyrights
The making of unauthorised copies of copy-protected material, including computer programmes, files, broadcasts and sound recordings, may be an infringement of copyrights and constitute a criminal offence. This equipment should not be used for such purposes.
The Philips guarantee applies provided the product is handled properly for its intended use in accordance with its operating instructions and upon presentation of the original invoice or cash receipt, indicating the date of purchase, dealer's name and model and production number of the product.
The Philips guarantee may not apply if:
- The documents have been altered in any way or made illegible.
- The model or production number has been altered, deleted, removed or made illegible.
- Repairs or product modifications and alterations have been executed by unauthorised service organisations or persons.
- Damage is caused by accidents including, but not limited to, lightning, water or fire, misuse or neglect.
Philips will not assume any liability for damage or loss of stored data.
Refer also to the Cautions in the chapters and subchapter sections.
- Place the product on a flat, firm and stable surface.
- Keep the product and the batteries away from excessive moisture, rain, sand or any heat sources, such as heating equipment or direct sunlight.
- Place the product in a location with adequate ventilation to prevent internal heat build-up in your product. Allow at least 10cm (4 inches) clearance from the rear and the top of the unit and 5cm (2 inches) from each side.
- Never expose the set to water dripping or splashing.
- Never place objects filled with liquids, such as vases, on the product.
- Never place sources of naked flame, such as lighted candles on the product.
- Handle the product with care to avoid scratches on the cover.
- Dispose old batteries safely.
Take the packaging to your local recycling centre.


Your product is designed and manufactured with high quality material and components, which can be recycled and reused. When this crossed-out wheeled bin symbol is attached to a product, it means the product is covered by the European Directive 2002/96/EC. Please inform yourself about the local separate collection system for electrical and electronic products. Please act according to your local rules and do not dispose of your old products with your normal household waste. The correct disposal of your old product will help prevent potential negative consequences for the environment and human health.
Caution
Danger of explosion if battery is incorrectly replaced. Replace only with the same or equivalent type.
2 Your PhotoViewer
Congratulations on your purchase and welcome to Philips!
To fully benefit from the support that Philips offers, register your product at www.philips.com/welcome.
This Photographer has been designed to make watching your digital pictures more enjoyable.
See, share and relive your memories with the Philips PhotoViewer. An easy way to view your digital photos in HD quality on your TV and make quality prints - without a PC. Relax on the couch and look at your holiday photos with the whole family or friends.
After installation, the new PhotoViewer can be used for all sorts of applications, such as customize slideshows. The following sections in this manual give a step-by-step description of the installation process and explain how to use the Philips SPV3000 PhotoViewer.
Club Philips
Club Philips is the place to be for a variety of news, services and product information.
Come to www.club.philips.com to register new purchases, find downloads, and win prizes or test the upcoming products!
All for free. Join the Club!
2.1 What's in the box
SPV3000 PhotoViewer

Remote Control (battery included)
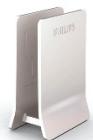
Stand
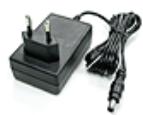
Power adapter
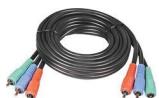

Component video cable Audio & composite video cable

User Manual
Quick Start Guide
Product sticker (1x)
2.2 What you also need
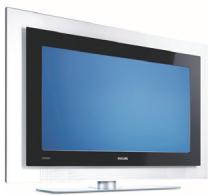
TV (LCD or other)
2.3 Optional components
- Photo printer
USB flash drive
USB hard disk drive
Memory card adapter
S-Video cable
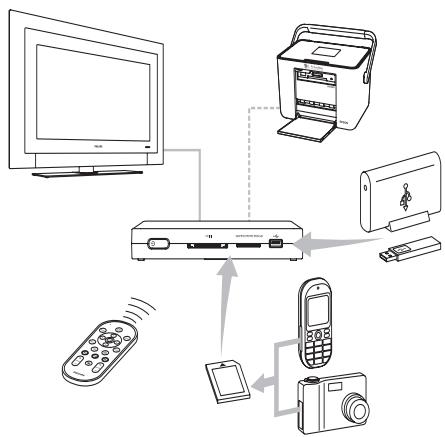
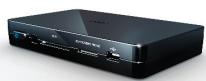
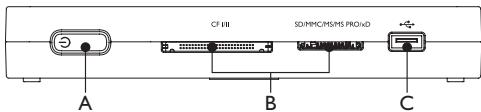
2.4 Overview PhotoViewer
Main unit
A. Power switch, switches the PhotoViewer off or to standby
B.Card slots
C. USB port (for USB storage devices)
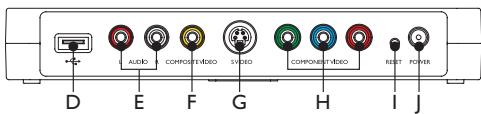
Main unit back
D. USB port, for photo printers
E. Audio outputs
F. Composite video output (SD)
G. S-Video output (SD)
H. Component video outputs (HD)
I. Reset button
J. Power socket
Remote control
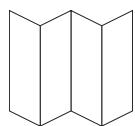
The fold-out reference page at the back gives an overview of the remote control.
- Standby-On button, switches the PhotoViewer on or to standby
- Option button, shows the available options
- OK button, confirms a selection
- Mark button, marks pictures or thumbnails for viewing or printing
- Print button
- Next button
- Rotate control, turns pictures 90 degrees clockwise (+) or counter-clockwise (-)
- Mute button, mutes or restores the volume
- Zoom control, controls the zoom factor (100 > 200 > 300 > 400%)
- Play-Pause button, plays or pauses the slideshow
- Previous button
- Resolution button, toggles between the available resolutions
- Back button
- Up, down, left, right buttons
- Menu button, opens the home menu
2.5 How to read this manual
2.5.1 Icons

Caution
Describes the actions required to avoid dangerous or illegal situations.

Note
Additional information.

Tip
Information that is useful to know but not essential to the task. For example, information about alternative use.
3 Getting started
In this chapter, the basic steps to get you started are described.
3.1 Prepare
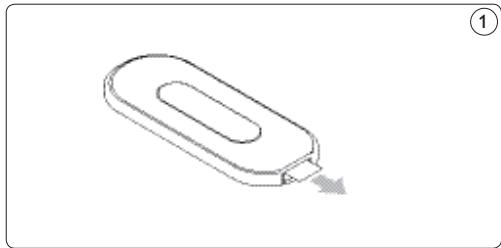
1 Remove the protective foil from the bottom of the remote control. ①
3.2 Connect
3.2.1 The video cable to a TV
The PhotoViewer has three video outputs:
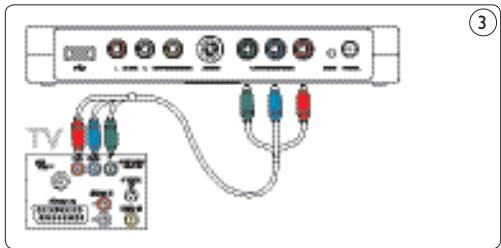
Composite video for standard definition TVs (yellow connector).
- Component video for high-definition TVs (red, green and blue connectors).
S-Video for standard definition TVs (cable not included).

Note
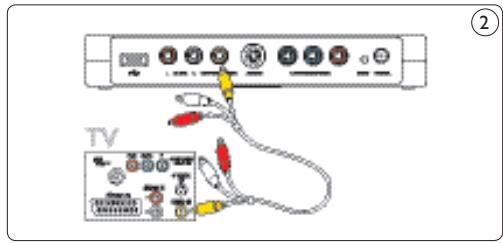
See the documentation that came with your TV for information about the video inputs on your TV. Check the connectors on your TV to determine whether you need the composite video cable (yellow connector) or the component video cable (red, green and blue connectors). The connectors have the same color as the plugs on the cables. To connect the video cable to a TV:

Caution
Switch off the TV and disconnect it from the power outlet.
1 Connect the correct by-packed video cable to the video output on the PhotoViewer.
2 Connect the other end of the video cable to your TV. ② ③
3.2.2 The audio cable to a TV or audio system
The PhotoViewer has one audio output:
- Left and right audio signal (red and white connectors).

Note
See the documentation that came with your TV or audio system for information about the audio inputs on your TV or audio system.

Caution
Switch off the TV or audio system and disconnect it from the power outlet.
1 Connect the by-packed audio cable to the audio outputs of the PhotoViewer.
2 Connect the other end of the audio cable to your TV or audio system. ④

3.2.3. To the power outlet
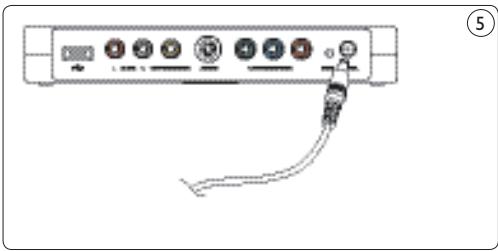
1 Connect the by-packed power adapter to the power socket (J) on the PhotoViewer.⑤
1 Connect the power adapter of the PhotoViewer to a power outlet.
2 Connect the TV and audio system to a power outlet.
3.3 Stand
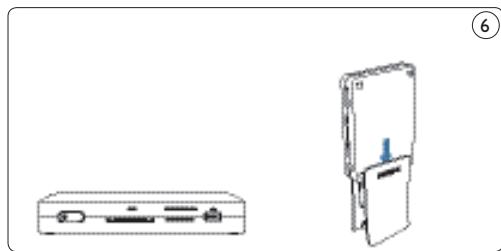
You can put the PhotoViewer flat on a surface, or you can put it in the by-packed stand. To put the PhotoViewer in the stand, attach the rubber product sticker around the label on the bottom of the PhotoViewer. ⑥

Caution
Handle the product with care to avoid scratches on the cover.

Set up
Switch on the TV.

Note
Make sure that you made all connections and set the TV to the correct external input (for example, EXT, 0, AV).
On the PhotoViewer:
Press the power switch (A).
The PhotoViewer switches to stand-by.
On the remote control:
3 Press the standby-on button (1).
After approximately 10 seconds, the home menu shows.

4 Press the OK button (3). The Setup menu shows.
Press the up/down buttons (14) to select Language. The available languages show.
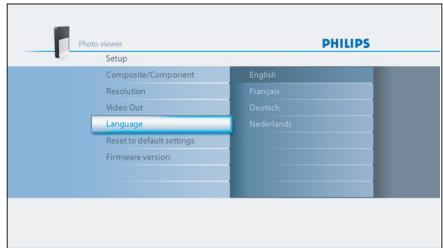
6 Press the right button (14) to go to the list of available languages.
7 Press the up/down buttons (14) to select your preferred language and press OK. The Setup menu shows in the preferred language.

Tip
Set up the PhotoViewer in the highest possible resolution supported by your TV. You can set the resolution in the Setup menu.
Enjoy using your PhotoViewer
4 Using your PhotoViewer
In this chapter, the basic tasks of how to use your PhotoViewer are described. Additional possibilities are described in the next chapter.
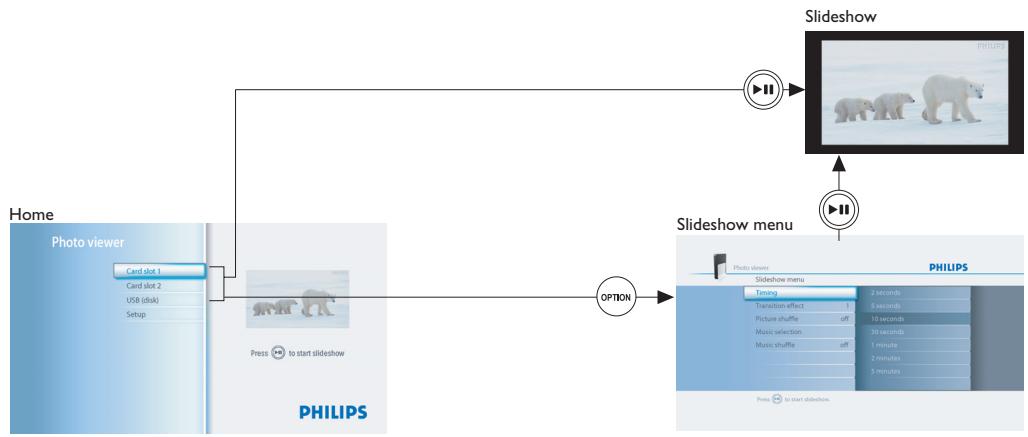
4.1 Start a slideshow
Caution
You need an adapter to insert these memory cards: RS-MMC, mobile MMC, micro MMC, mini SD, micro SD (T-Flash), MS Duo, MS PRO Duo, MS micro (M2).
1 Connect the USB disk to the USB port (C) OR insert the memory card in the applicable card slot (B). The slideshow starts automatically.

4.2 View a picture
Caution
You need an adapter to insert these memory cards: RS-MMC, mobile MMC, micro MMC, mini SD, micro SD (T-Flash), MS Duo, MS PRO Duo, MS micro (M2).
1 Connect the USB disk to the USB port (C) OR insert the memory card in the applicable card slot (B).
On the remote control:
Press the menu button (15). The home menu shows.
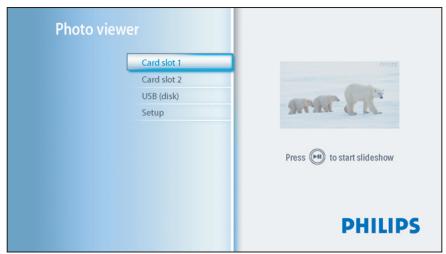
3 Press the up/down buttons (14) to select the USB disk or the memory card that contains the pictures.
4 Press the OK button (3). The thumbnail view shows.
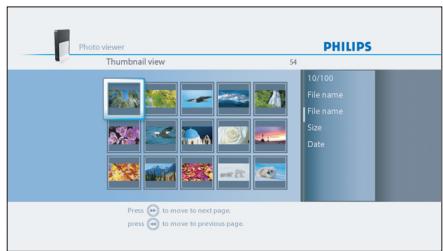
Press the up/down/left/right buttons (14) to select the picture that you want to view.
Press the OK button (3). The picture shows.

Tip
To start a slideshow, press the play/pause button (8).
4.3 Play a slideshow with music

Note
The music and the pictures can be on different memory cards or USB disks.
1 Start the slideshow.
On the remote control:
Press the option button (2).
The slideshow stops and the Slideshow menu shows.
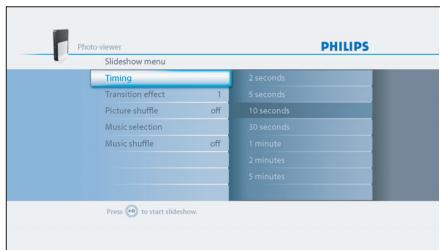
3 Press the up/down buttons (14) to select Music selection.
The available music files show.
4 Select the music files that you want to play.
Press the play-pause button (8).
The slideshow is resumed and the music starts.

Tip
You can select Music shuffle in the Slideshow menu to play the list of music files in a random order.
5 Use more of your PhotoViewer
5.1 Full overview user interface
5.1.1 Overview home menu

A. Memory cards (if inserted)
B. USB disk (if connected)
C. Compatible printer (if connected)
D. Setup
5.1.2 Simple overview
5.1.3 Advanced overview
5.2 Change the setup
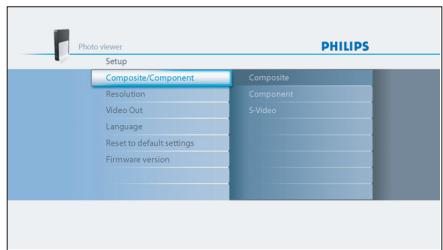
With the Setup menu, you can change the setup of your PhotoViewer. For example, you can change the resolution of the video output and the language of the user interface.

Note
In Europe, always set TV system to PAL.
To change a setting:
1 Go to the Setup menu.
2 Select the setting.
3 Select the preferred value.
4 Press the OK button (3).
5.3 Change the slideshow settings
With the Slideshow menu, you can change the settings of the slideshows. For example, you can change the viewing time of the pictures and the transition effect between the pictures.
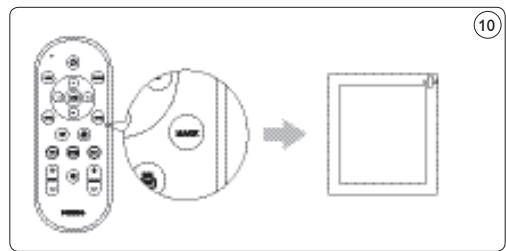
5.4 Rotate thumbnails and pictures
You can rotate thumbnails and pictures with the rotate control on the by-packed remote control. ⑦
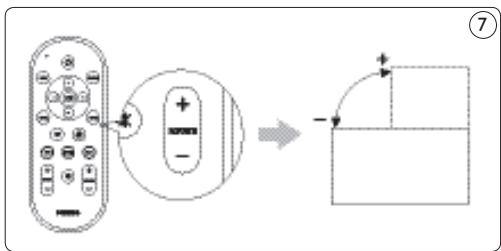
5.4.1 In the thumbnail view

Note
The PhotoViewer remembers the rotation setting in the thumbnail view when you start a slideshow. So, you do not have to rotate the pictures again during the slideshow. The PhotoViewer remembers the rotation settings until you switch off the PhotoViewer, remove the memory card or disconnect the USB disk. The PhotoViewer does not store settings on your memory card or USB disk.
1 Select the thumbnail.
Press the rotate control (7). The thumbnail rotates a quarter of a turn.
5.4.2 In the full-screen view
Press the rotate control (7). The picture rotates a quarter of a turn.
5.4.3 In the slideshow view
Press the rotate control (7). The full-screen view shows and the picture rotates a quarter of a turn.

Tip
To resume the slideshow, press the play-pause button (10).
5.5 Zoom and pan
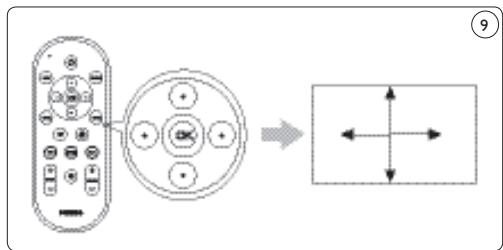
You can zoom in on pictures with the zoom controls on the by-packed remote control. ⑧
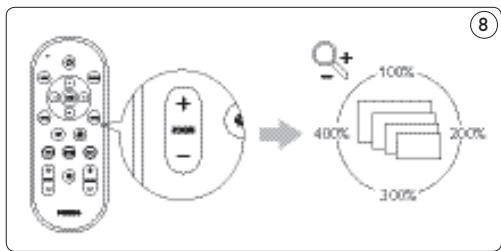
Once you zoomed in on a picture, you can pan through it with the up/down/left/right buttons on the by-packed remote control. ⑨
5.5.1 In the thumbnail view
You cannot zoom in on pictures in the thumbnail view.
5.5.2 In the full-screen view
Press the zoom control (9). The full-screen view zooms in.
2 Use the up/down/left/right buttons (14) to pan through the picture.
5.5.3 In the slideshow view
Press the zoom control (9). The full-screen view shows.
Press the zoom control again. The full-screen view zooms in.
3 Use the up/down/left/right buttons (14) to pan through the picture.

Tip
To restore the original size, press the OK button.

Tip
To resume the slideshow, press the play-pause button (10).
5.6 Make a slideshow from selected pictures
In the thumbnail view, all the pictures on the inserted memory card or the connected USB disk show. The PhotoViewer also shows the pictures that you stored in folders, but the folders themselves do not show. If the inserted memory card or the connected USB disk contains more pictures than you want to view in your slideshow, you can mark the thumbnails before you start the slideshow. If you do, the PhotoViewer makes a slideshow of the marked pictures.
1 Go to the thumbnail view.
2 Select the picture that you want to view.
Press the mark button (4). The picture is marked.
4 Select the next picture.
Press the mark button. The picture is marked.
6 Repeat the steps above for all other pictures that you want to view.
Press the play-pause button (10). The slideshow starts.

Tip
With Select all and Deselect all in the Options menu, you can select and deselect all pictures in the thumbnail view.
5.7 View file information
5.7.1 In the thumbnail view
1 Select the thumbnail.
The file information shows in the right panel.
5.7.2 In the full-screen view
2 Go to the Options menu.
3 Select Info and press the OK button (3). The file information shows.

The file information remains on the screen for the next pictures.
5.7.3 In the slideshow view
1 Go to the Options menu.
2 Select Info and press the OK button (3). The full-screen view and the file information show.

Tip
To resume the slideshow, press the play button (10).
5.8 Reset the factory settings
1 Go to the Setup menu.
2 Select Reset to default settings.
Press the OK button (3). The factory settings are restored.
OR
1 With a paperclip, press-and-hold the reset button (I) on the back of the PhotoViewer for 10 seconds. The factory settings are restored.
5.9 View the firmware version
1 Go to the Setup menu.
2 Select Firmware version. The firmware version shows.
5.10 Upgrade the firmware
1 Download the latest software from www. philips.com/support.

Note
If necessary, unpack the downloaded firmware.
2 Copy the file to the root of a USB disk.

Note
Do not rename the file or put it in a folder.
3 Switch the PhotoViewer off.
4 Switch the PhotoViewer back on.
5 Connect the USB disk to the front of the PhotoViewer.
Caution
Do not touch the buttons on the PhotoViewer or its remote control until the Firmware update message shows.
6 Select OK on the screen and press the OK button (3).
7 Follow the on-screen instructions.
6 Use a printer
6.1 Connect to a printer
You can connect your PhotoViewer to an Epson printer*. If you do so, you can print the pictures without a PC!

Note
See the documentation that came with your printer for more information about your printer.
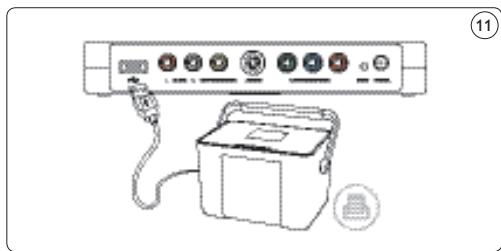
- Connect the printer cable to the USB port (D) on the PhotoViewer.
- Connect the other end of the printer cable to the printer. ⑪
HSIN3
- Connect the power adapter of the PhotoViewer to an power outlet.
- Connect the printer to an power outlet.
6.2 Print pictures
6.2.1 From the thumbnail view
To print a single picture from the thumbnail view:
1 Select the picture that you want to print.
Press the print button (5).
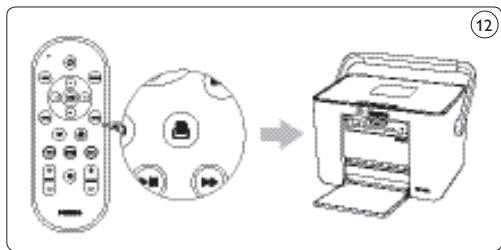
The printer starts.
To print multiple pictures from the thumbnail view:
1 Select the picture that you want to print.
Press the mark button (4). The picture is marked.
3 Select the next picture.
4 Press the mark button (4). The picture is marked.
5 Repeat the steps above for all other pictures that you want to print.
6 Press the print button (5). The printer starts.

Tip
With Select all and Deselect all in the Options menu, you can select and deselect all pictures in the thumbnail view.
6.2.2 From the full-screen view
Press the print button (5). The printer starts.
6.2.3 From the slideshow view
Press the print button (5). The full-screen view shows and the printer starts.

Tip
To resume the slideshow, press the play-pause button (10).
6.3 Control the print list
6.3.1 Manage the print list
1 Open the print list The print list shows.
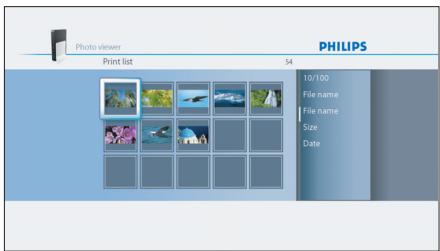
Press the option button (2). The Options menu shows.
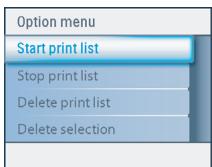
3 Choose one of the following menu items and press the OK button (3).
| Menu item | Description |
| Start print list | All photos in the print list are printed. Each photo that is printed is removed from the print list. |
| Stop print list | - The current photo is printed. - The current photo is removed from the print list. - Printing the remaining photos in the print list is stopped. |
Delete print list The current photo is printed. All photos are removed from the print list.
Delete selection - The current photo is printed.
- The current photo is removed from the print list.
- The selected photos are removed from the print list.
6.3.2 Printer errors
If the printer cannot print, an error message shows.
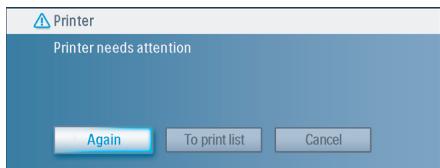
To continue, do these steps:
Make sure the printer is switched on and connected correctly.
2 Select one of the following options and press the OK button (5).
The full-screen view, the slideshow view or the thumbnail view shows.

| Option | Description |
| Again | - If the printer works correctly, the photo is printed. - If the printer does not work correctly, the error message shows again. |
| To print list | - If the printer works correctly, the photo is printed. - If the printer does not work correctly, the photo is added to the print list. |
Cancel The photo is not printed.
7 Maintenance
7.1 Cleaning
Caution
Do not use any solutions that contain alcohol, spirits, ammonia or abrasives. Otherwise, you can cause damage to the outside of the product (for example, make scratches or stains).
You can clean the outside of the product with a soft cloth slightly moistened with a mild detergent solution.
7.2 Replacement
7.2.1 Replace the battery
1 Open the battery compartment of the remote control. ⑬
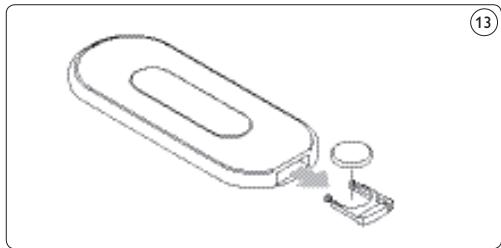
HSIN3
2 Remove the old battery and dispose it.
3 Insert the new battery (CR2025, 3V) correctly.
4 Close the battery compartment.
7.3 Storage
Before you store the PhotoViewer, make sure that:
- The card slots are empty.
- The battery is removed from the remote control.
- The cover of the PhotoViewer is protected to scratches and dust.
The room in which you store the PhotoViewer must meet these requirements:
- Temperature: between -40^ to 70^ C.
- Relative humidity: between 5 and 95% (non-condensing).
7.4 Disposal
Before you dispose the PhotoViewer, make sure that:
The card slots are empty.
- The battery is removed from the remote control.
8 Guarantee and service
If you need service or information or if you have a problem, please consult the worldwide guarantee leaflet or our website at www.philips.com. You can also contact the Philips Customer Care Centre in your country; they will be happy to help you.
You will find the telephone numbers in the worldwide guarantee leaflet. If there is no Customer Care Centre in your country, turn to your local Philips dealer or contact the Service Department of Phillips Consumer Electronics B.V.You will find their address and fax number in the worldwide guarantee leaflet.
9 Technical data
Supported memory cards
- Left card slot: CF Type I, CF Type II
- Right card slot: Microdrive, xD-Picture, MMC, RS-MMC, MMCmobile, MMCmicro, MMCplus, SD, miniSD, SDHC (SD-2.0), T-Flash (microSD), MS, MS Duo, MS ROM, MS PRO ,MS PRO Duo, MS Micro (M2)
Supported codecs
Note
The supported codecs are subject to change. Future upgrades for the PhotoViewer might support more codecs than below.
Pictures: JPEG/JPG
Audio: MP3 (without copy protection)
Transmission
- TV system: PAL, NTSC
- Resolutions: SD quality, HD quality (480,576,720p, 1080i)
Connectivity
- Front connections: USB 2.0 for USB disks
- Rear connections: USB 2.0 for Epson printers* Audio outputs (stereo) Composite video output S-Video output Component video outputs
Power
Power supply: 100 - 240 V~, 50/60 Hz
Power consumption: 7.2 W
- Standby power consumption: 408 mW
Cabinet
- Dimensions
- case: 198.8 × 119.3 × 29.8 mm ( W × D × H )
- stand: 53.8 × 90 × 130 mm ( W × D × H )
Net weight: case: 300 gr stand: 100 gr
10 Additional information
10.1 Power light
The blue power light inside the power button of the PhotoViewer shows the status of the PhotoViewer.
If the power light is on:
- The PhotoViewer is on (and connected to a power outlet)
- A memory card is inserted and/or a USB disk is connected.
If the power light flashes slowly (once every 2 seconds):
- The PhotoViewer is reading the inserted memory card and/or connected USB disk.
If the power light flashes fast (twice every second):
- A software upgrade is in progress.
If the power light pulses ('heartbeat' every six seconds):
- The PhotoViewer is in the standby mode.
If the power light is off:
- The PhotoViewer is off (or disconnected from the power outlet).
I frequently asked questions
Set up
I do not see the user interface of the PhotoViewer on the TV.
- Set the TV to the correct programme number (for example, EXT, 0, AV). See the documentation that came with your TV.
There is no sound signal from the TV or audio system.
- Check if the audio cables are connected correctly.
- Check if the volume of your TV or audio system is turned on.
Make sure that the file format of your audio files is MP3 and that the files do not have copy protection.
Use (more of) your PhotoViewer The PhotoViewer does not react when I press a button on the remote control.
- When you press a button on the remote control, point the remote control in the direction of the power switch of the PhotoViewer.
- Replace the battery of the remote control
The picture seems to be transformed.
- Change the resolution with the resolution button on the remote control.
- Change the settings of the connected TV. See the documentation that came with your TV.
The connected printer does not react.
Make sure that the printer is switched on.
Make sure that the printer is connected to the USB port at the back of the PhotoViewer.
- Change the settings of the connected printer. See the documentation that came with your printer.
Make sure that the printer is an Epson printer*.
See the website www.philips.com/support for more questions and answers.
- Compatible with any Epson PictureMate plus other models, please see www.philips.com/welcome for more information.
12 Glossary of terms
For a glossary of terms, see the website www.philips.com/support.
Contact information
Belgie/Belgique/Belgium
Twee Stationssstraat 80/
Philips CE, The Philips Centre,
Surrey
Phone: 0906 1010 016
Warranty
Philips makes no warranty of any kind with regard to this material including, but not limited to, the implied warranties of merchantability and fitness for a particular purpose. Philips assumes no responsibility for any error that may appear in this document. Philips makes no commitment to update nor to keep current the information in this document.
Limitations of damages
The vendor will not be liable for any indirect, special, incidental or consequential damages (including damages for loss of business, loss of profits or the like), whether based on breach of contract, tort (including negligence), product liability or otherwise, even if the vendor or its representatives have been advised of the possibilities of such damages and even if a remedy set forth herein is found to have failed its essential purpose.
Inhaltsverzeichnis
Be responsible Respect copyrights
- A software upgrade is in progress.
Philips CE, The Philips Centre,
Surrey
Phone: 0906 1010 016
Garantie
Be responsible Respect copyrights
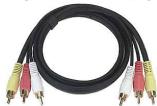
Cable composante video Cable audio & video
Philips CE, The Philips Centre,
Surrey
Phone: 0906 1010 016
Garantie
Be responsible Respect copyrights
Televisie (LCD of anders)
5.10 De firmwareversie upgraden
1 Download de新模式 software van www.philips.com/support.

Opmerking
Pak, indien nodig, de gedownloade firmware UIT.
Philips CE, The Philips Centre,
Surrey
Phone: 0906 1010 016