
DVP3388 - DVD player PHILIPS - Free user manual and instructions
Find the device manual for free DVP3388 PHILIPS in PDF.


| Product Type | DVD Player |
| Brand | Philips |
| Model | DVP3388 |
| Dimensions (W x D x H) | 430 x 260 x 40 mm |
| Weight | 1.5 kg |
| Power Supply | 110-240 V, 50/60 Hz |
| Power Consumption | 10 W (typical) |
| Playback Formats | DVD, DVD±R/RW, CD, CD-R/RW, MP3, JPEG, DivX, MPEG4 |
| Video Output | Composite, Component, HDMI (1080p upscaling) |
| Audio Output | Stereo RCA, Coaxial digital |
| USB Port | Yes, front USB for multimedia playback |
| Remote Control | Included |
| Progressive Scan | Yes |
| Parental Control | Yes |
| Maintenance | Clean with a soft, dry cloth. Do not use liquids. |
| Safety | Class 1 laser product. Avoid exposure to moisture. |
| Spare Parts Availability | Remote control available from Philips service centers. |
Frequently Asked Questions - DVP3388 PHILIPS
User questions about DVP3388 PHILIPS
0 question about this device. Answer the ones you know or ask your own.
Ask a new question about this device
Download the instructions for your DVD player in PDF format for free! Find your manual DVP3388 - PHILIPS and take your electronic device back in hand. On this page are published all the documents necessary for the use of your device. DVP3388 by PHILIPS.
USER MANUAL DVP3388 PHILIPS
Register your product and get support at www.philips.com/welcome
DVP3388

User manual
PHILIPS
Contents
1 Important 4
Safety and important notice 4
Trademark Notice 5
2 Your DVD player 6
Features highlight 6
Product overview 7
3 Connect 9
Connect video cables 9
Connect audio cables 10
Route audio to other devices 11
Connect USB device 12
Connect to power outlet 12
4 Get started 13
Prepare the remote control 13
Find the correct viewing channel 14
Select menu display language 14
Turn on Progressive Scan 15
Use Philips EasyLink 16
5 Play 17
Play from disc 17
Play video 18
Play music 21
Play photo 23
Play from USB device 24
6 Advanced features 25
Media copy 25
Create MP3 files 25
7 Adjust settings 27
General setup 27
Audio setup 28
Video setup 31
Preferences 33
8 Additional information 36
Update software 36
Care 36
9 Specification 37
10 Troubleshooting 39
11 Glossary 41
1 Important
Safety and important notice

Warning
- Risk of overheating! Never install the DVD player in a confined space. Always leave a space of at least four inches around the DVD player for ventilation. Ensure that curtains or other objects never cover the ventilation slots on the DVD player.
- Never place the DVD player, remote control, or batteries near naked flames or other heat sources, including direct sunlight.
- Only use this DVD player indoors. Keep this DVD player away from water, moisture, and liquid-filled objects.
- Never place this DVD player on other electrical equipment.
- Keep away from this DVD player during lightning storms.
- Where the mains plug or an appliance coupler is used as the disconnect device, the disconnect device shall remain readily operable.
- Visible and invisible laser radiation when open. Avoid exposure to beam.
About Progressive Scan
Consumers should note that not all high definition television sets are fully compatible with this product and may cause artifacts to be displayed in the picture. In case of 525 or 625 progressive scan picture problems, it is recommended that the user switch the connection to the 'standard definition' output. If there are questions regarding our TV set compatibility with this model 525p and 625p DVD player, please contact our customer service center.
Recycle notice

This electronic equipment contains a large number of materials that can be recycled or reused if disassembled by a specialized company. If you are disposing of an old machine, please take it to a recycling center. Please observe the local regulations regarding disposal of packaging materials, exhausted batteries, and old equipment.
Copyright notice

Be responsible. Respect copyrights.
This product incorporates copyright protection technology that is protected by method claims of certain U.S. patents and other intellectual property rights owned by Macrovision Corporation and other rights owners. Use of this copyright protection technology must be authorized by Macrovision Corporation, and is intended for home and other limited viewing uses only unless otherwise authorized by Macrovision Corporation. Reverse engineering or disassembly is prohibited.
Trademark Notice
DOLBY
DIGITAL
Manufactured under license from Dolby Laboratories. Dolby and the double-D symbol are trademarks of Dolby Laboratories.
Windows Media and the Windows logo are trademarks, or registered trademarks of Microsoft Corporation in the United States and/or other countries.

DivX, DivX Ultra Certified, and associated logos are trademarks of DivX, Inc. and are used under license.
Official DivX® Ultra Certified product.
Plays all versions of DivX® video (including DivX® 6) with enhanced playback of DivX® media files and the DivX® Media Format.
Plays DivX® video with menus, subtitles and audio tracks.

The USB-IF Logos are trademarks of Universal Serial Bus Implementers Forum, Inc.

HDMI, and HDMI logo and High-Definition Multimedia Interface are trademarks or registered trademarks of HDMI licensing LLC.
2 Your DVD player
Congratulations on your purchase, and welcome to Philips! To fully benefit from the support that Philips offers, register your product at www.philips.com/welcome.
This DVD player offers higher picture quality video play for an amazing viewing experience.
Features highlight
Video upscaling to 1080p
You can now watch the DVDs in the highest picture quality available for your HDTV. This DVD player offers full high-definition video play up to 1080p resolution for an amazing viewing experience. A highly detailed picture and increased sharpness delivers a more true-to-life picture.
EasyLink
EasyLink uses the HDMI CEC (Consumer Electronics Control) industry standard protocol to share functionality with all HDMI CEC compliant devices over HDMI. It enables the connected devices to control each other with a single remote control.

Note
EasyLink (HDMI CEC) is only applicable with certain criteria. Terms and conditions may vary by product. Consult your product dealer for information. - Philips does not guarantee 100% interoperability with all HDMI CEC devices.
Screen fit
View the movie in full screen on any TV with this DVD player.
Hi speed USB 2.0 link
Simply plug your USB flash drive into the USB jack to play your MP3/WMA/JPEG/DivX/WMV files to enjoy the music play in superb sound quality.
Media copy
You can transfer data files such as MP3, WMA and JPEG from disc to USB flash drive.
Create MP3 files
Convert your favourite audio tracks from an audio CD into MP3 format. The created MP3 files are saved in your USB device.
Region codes
Your DVD player plays discs with the following region codes.
DVD region code Countries


India
Product overview
Main unit
① ⏻ (Standby-on)
Turn on the DVD player or switch to standby mode.
② Disc compartment
③ Display panel
④ ▲ (Open/Close)
Open or close the disc compartment.
⑤ ▶ (Play/Pause)
Start, pause or resume disc play.
⑥ (USB) jack
Connect a USB flash drive.
Remote control
Your DVD player
① Ⓧ (Standby-On)
Turn on the DVD player or switch to standby mode.
② ▲ (Open/Close)
Open or close the disc compartment.
③ DISC MENU
Access or exit the disc menu.
Switch to disc mode.
For VCD/SVCD, turn PBC (Playback Control) on or off in PBC mode.
For VCD/SVCD, turn PBC (Playback Control) on or off in PBC mode.
④ ▲▼◀▶ (Navigation buttons)
Navigate through the menus.
Search fast-forward (▶) or fast-backward (◀). Press repeatedly to change the search speed.
Search slow-forward (▲) or slow-backward (▼). Press repeatedly to change the search speed.
⑤ ↩ BACK
Return to the previous display menu. For DVD, navigate to the title menu. For VCD version 2.0 or SVCD with PBC turned on, return to the menu.
⑥ ◀/▶ (Previous/Next)
Skip to the previous or next title, chapter, or track.
Press and hold for fast-backward or fast-forward search.
⑦ (USB)
Switch to USB mode and display the content.
⑧ Numeric buttons
Select an item to play.
⑨ SUBTITLE
- Select DVD or DivX subtitle language.
- Access the menu to USB copy or USB delete.
⑩ ZOOM
Fit the picture format to the TV screen. Zoom in or out of the picture.
⑪ VOLUME
- Display the current volume level and use (◀) or (▶) navigation buttons to set the volume level between 0 \~ 20.
⑫ REPEAT/REPEAT A-B
- Toggle between various repeat modes.
- Mark the section for repeat play, or turn off repeat mode.
⑬ AUDIO/CREATE MP3
- Select an audio language/channel.
- Access the menu to create MP3.
⑭ ■ (Stop)
- Stop disc play.
⑮ ▶ (Play/Pause)
• Start, pause or resume disc play.
⑯ i INFO
- For disc, display the current status or disc information.
- For slideshows, display a thumbnail view of photo files.
⑰ OK
- Confirm an entry or selection.
⑱ SETUP
- Access or exit the setup menu.
3 Connect
Make the following basic connections to use the DVD player.
Basic connections:
Video cables•
Audio cables•
Optional connections:
Audio to other devices:•
Multi channel receiver•
Digital amplifier/receiver•
Analog stereo system•

Note
Refer to the type plate at the rear or bottom of the product for identification and supply ratings.
- Before you make or change any connections, ensure that all the devices are disconnected from the power outlet.

Tip
Different types of connectors may be used to connect this product to your TV, depending on availability and your needs. A comprehensive interactive guide to help you connect your product is available at www.connectivityguide.philips.com.
Connect video cables
Connect this DVD player to the TV to view disc play.
Select the best video connection that the TV can support.
Option 1: Connect to HDMI jack (for a HDMI, DVI or HDCP-compliant TV).
Option 2: Connect to component video jacks (for a standard TV or Progressive Scan TV).
Option 3: Connect to video (CVB) jack (for a standard TV).

Note
- You must connect this DVD player directly to a TV.
Option 1: Connect to HDMI jack
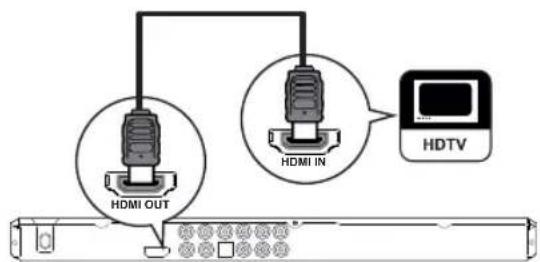
1 Connect a HDMI cable (not supplied) to the HDMI OUT jack on this DVD player and the HDMI input jack on the TV.
- Use a HDMI-DVI adaptor in case the TV has only a DVI connection.

Note
If the device supports HDMI CEC, you can control compliant devices with a single remote control (see chapter 'Use Philips EasyLink').

Tip
• This type of connection provides the best picture quality.
Option 2: Connect to component video jacks
1 Connect the component video cables (not supplied) to the Y Pb Pr jacks on this DVD player and the component video input jacks on the TV.
- If a progressive scan TV is used, you may turn on the progressive scan mode (see chapter 'Turn on Progressive Scan' for details).

Tip
The component video input jacks on the TV may be labeled as Y Pb/Cb Pr/Cr or YUV.
- This type of connection provides good picture quality.
Option 3: Connect to video (CVBS) jack
1 Connect a composite video cable (supplied) to the TV OUT jack on this DVD player and the video input jack on the TV.

Tip
The video input jack on the TV may be labeled as A/V IN, VIDEO IN, COMPOSITE or BASEBAND.
- This type of connection provides standard picture quality.
Connect audio cables
Connect the audio from this DVD player to the TV to allow sound output through the TV.

1 Connect the audio cables (supplied) to the AUDIO OUT FRONT L/R jacks on this DVD player and the audio input jacks on the TV.
Route audio to other devices
Route the sound from this DVD player to other devices to enhance audio play.
Connect to multi channel receiver
1 Connect the audio cables (not supplied) to the AUDIO OUT (FRONT L/R, REAR L/R, CENTER and SUBWOOFER) jacks on this DVD player and the audio input jacks on the device.

Tip
You can optimize the audio output (see chapter 'Adjust settings' - [Audio Setup] > [Analog Output]) for details.
Connect to digital amplifier/receiver![graph TD A["OPTICAL"] --> B["DIGITAL AUDIO INPUT"] B --> C["COAXIAL"] C --> D["OPTICAL"] D --> E["Coaxial"] E --> F["Optical"] style A fill:#f9f,stroke:#333 style B fill:#ccf,stroke:#333 style C fill:#cfc,stroke:#333 style D fill:#fcc,stroke:#333 style E fill:#cff,stroke:#333 style F fill:#ffc,strok…](/content/2026/06/1362082/images/a775561214699f243bb0e86bbb81bfde54976f3e0d86780c102644acbbcd046d.jpg)
Connect
1 Connect a coaxial cable (not supplied) to the COAXIAL jack on this DVD player and the DIGITAL IN (COAXIAL) jack on the device.
or
1 Connect an optical cable (not supplied) to the OPTICAL jack on this DVD player and the DIGITAL IN (OPTICAL) jack on the device.

Tip
You can optimize the audio output (see chapter 'Adjust settings' - [Audio Setup] > [Digital Audio]) for details.
Connect to analog stereo system

1 Connect the audio cables (supplied) to the AUDIO OUT FRONT L/R jacks on this DVD player and the audio input jacks on the device.

Tip
You can optimize the audio output (see chapter 'Adjust settings' - [Audio Setup] > [Analog Output]) for details.
Connect USB device

1 Connect the USB flash drive to the (USB) jack on this DVD player.

Note
This DVD player can only play/view MP3, WMA, DivX, JPEG or WMV files that are stored on such devices. - Press ✉ to access the content and play the files.
Connect to power outlet

Warning
Risk of product damage! Ensure that the power supply voltage corresponds to the voltage printed on the back or the underside of the DVD player.
1 Connect the power cord to the power outlet.
The DVD player is ready to be set up for use.
4 Get started
Prepare the remote control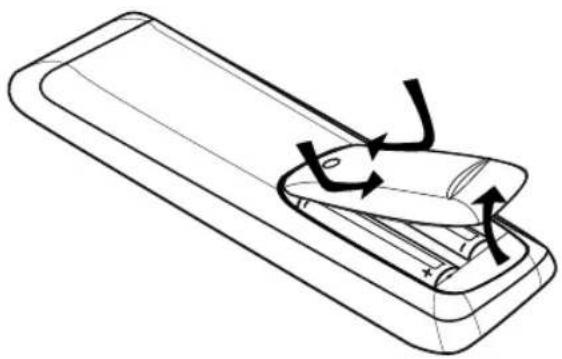
1 Push to open the battery compartment cover. 2 Insert two R03 or AAA batteries with correct polarity (+/-) as indicated. 3 Close the battery compartment.

Caution
Remove batteries if they are exhausted or if the remote control is not to be used for a long time.
- Do not mix batteries (old and new or carbon and alkaline, etc.).
- Batteries contain chemical substances, they should be disposed of properly.
Navigate through the menu
1 Point the remote control directly at the remote sensor on this DVD player and select the desired function.

2 Use the following buttons on the remote control to navigate through the on-screen menus.
| Button Action | |
| ▲▼ | Move up or down. |
| Move left or right. | |
| OK | Confirm a selection. |
| Enter numbers. | |
Find the correct viewing channel
1 Press ⏻ to turn on the DVD player. 2 Turn on the TV and switch to the correct video-in channel.
You may go to the lowest channel on the TV, then press the Channel Down button on the TV remote control until you see the Video In channel.
You may press the button repeatedly on the TV remote control.
Usually this channel is between the lowest and highest channels and may be called FRONT, A/V IN, VIDEO, etc.

Tip
See the TV user manual on how to select the correct input on the TV.
- If the audio output of this DVD player is routed to another audio device (such as an audio system or receiver), turn on the audio device and select the appropriate audio input channel. Refer to the device's user manual for details.
Select menu display language

Note
You can skip this setting if this DVD player is connected to a HDMI CEC compliant TV. It will automatically switch to the same OSD menu language as your TV setting.
1 Press SETUP.
The [General Setup] menu is displayed.
2 Select [OSD Language], then press ▶.
General Setup
Disc Lock
OSD Language
Sleep Timer
Auto Standby
DivX(R) VOD Code
Auto (Eng)
○ English
Hindi
The language options vary depending on your country or region. They may not match the illustration shown here.
3 Press ▲▼ to select a language, then press OK.

Tip
You can set the default language for DVD audio and disc menu. See chapter 'Adjust settings' - [Preferences] for details.
Turn on Progressive Scan
Connect a progressive scan TV with component video jacks (see chapter 'Connect video cables - Option 2: Connect to component video jacks' for details).
1 Turn on the TV to the correct viewing channel for this DVD player. 2 Press SETUP. 3 Press ▼ to select [ Video Setup ]. 4 Select [ Progressive ] > [ On ], then press OK.
A warning message is displayed.
| Video Setup | |
| TV System | On |
| TV Display | |
| Progressive | Off |
| Picture Setting | |
| HD JPEG | |
| HDMI Setup | |
5 To proceed, select [OK] and press OK.
→ The progressive setup is complete.

Note
If a blank/distorted screen is displayed, wait for 15 seconds for the auto recover.
- If no picture is displayed, turn off the progressive scan mode as follows:
1) Press ▲ to open the disc compartment. 2) Press the numeric button '1'.
6 To exit the menu, press SETUP.
7 You can now turn on the progressive scan mode on the TV (see the TV user manual).

Note
The progressive scan setting will not be available • when the HDMI video signal is detected.
- During play, when progressive scan mode is on for both this DVD player and the TV, distorted picture may display. Turn off the progressive scan feature on both this DVD player and the TV.
Use Philips EasyLink
The DVD player supports Philips EasyLink, which uses the HDMI CEC (Consumer Electronics Control) protocol. EasyLink-compliant devices that are connected through HDMI connectors can be controlled by a single remote control.
Philips does not guarantee 100% interoperability with all HDMI CEC devices.
1 Turn on the HDMI CEC operations on the TV and other connected devices. See TVs/ devices manual for details. 2 You can now enjoy the following Philips EasyLink controls.
One-touch play
When you press the STANDBY button, it turns on the TV and this DVD player, then video disc play starts.
To enable One-touch play, a video disc must be placed in the disc compartment before operation.
One-touch standby
When you press and hold the STANDBY button, all connected HDMI CEC devices switch to standby mode simultaneously.

Tip
The default setting for EasyLink features is on. You can change the default setting, see chapter 'Adjust settings' - [Video Setup] > [HDMI Setup] > [EasyLink Setup] for details.
5 Play
Play from disc

Note
DVDs and DVD players are designed with regional restrictions. Ensure that the DVD video you play is for the same region zone as the player (indicated on its back).
- This DVD player can support play of the following file formats: MP3/WMA/JPEG/DivX/WMV.
- About WMV 9 - this DVD player only supports Main Profile (low level) and Simple Profile. Advanced Profile and DRM-protected video files are not supported.
- To play DVD-R, DVD+R or DVD-RW, the disc must be finalized.
Play a disc

Caution
Never place any objects other than discs into the disc compartment.
1 Press ▲ to open the disc compartment. 2 Insert a disc with its label facing up. For double-sided disc, load the side to play faces up. 3 Press ▲ to close the disc compartment and start disc play.
To view disc play, turn on the TV to the correct viewing channel for this DVD player.
4 To stop disc play, press ■.

Tip
If the password entry menu is displayed, you have to enter the password before it can be played.
- If you pause or stop a disc for about 5 minutes, the screen saver activates. To deactivate the screen saver, press DISC MENU. • After you pause or stop a disc, if no buttons are pressed within 15 minutes, this DVD player automatically switches to standby mode.
Play video

Note
For video disc, play always resumes from the point where it was last stopped. To start play from the beginning, press ◀ while the message is displayed.
Control a title
1 Play a title. 2 Use the remote control to control the title.
Button Action
| ▶II | Start, pause or resume disc play. |
| ■ | Stop disc play. |
| ▶| | Skip to the next title or chapter. |
| |◀ | Skip to the beginning of the current title or chapter.Press twice to jump to the•previous title or chapter. |
| ◀◀, ▶▶ Searches fast-forward (▶▶)or fast-backward (◀◀).Press repeatedly to change•the search speed. | |
| ▲, ▼ Searches slow-forward (▲) or slow-backward (▼).Press repeatedly to change•the search speed.For VCD/SVCD, slow-•backward search is not possible. | |
Change video play
1 Play a title. 2 Use the remote control to change the video play.
Button Action
| AUDIO/CREATE MP3 | Change audio language.Only applicable to discs • with multiple audio language or channel. |
| SUBTITLE | Change subtitle language.Only applicable to discs • with multiple subtitle language. |
| REPEAT/REPEAT A-B | Selects or turns off repeat mode.To select a repeat play mode, press ◀▶ ,Repeat options vary depending on the disc type.For VCD/SVCD, repeat • play is only possible if the PBC mode is turned off. |
| ZOOM(Screen Fit) | Fit the picture format to the TV screen.Press repeatedly until the image is scaled to fit to the TV screen. |
| ZOOM | Toggle between screen aspect ratio and different zoom factor.To pan through the zoomed image, press the navigation buttons. |
| INFO | Display the current status or disc information.You can change the video play options here without interrupting disc play. |

Note
- Some operations may not work with some discs. See the information accompanying the disc for details.
Access DVD menu

1 Press DISC MENU to access disc main menu. 2 Select a play option, then press OK.
In some menus, press the numeric buttons to input your selection.
To return to the title menu during play, press BACK.
Access VCD menu
The PBC (Playback Control) for VCD/SVCD is turned on by default in the factory. When you load in a VCD/SVCD, the contents menu is displayed.
1 Press numeric buttons to select a play option, then press OK to start play.
If PBC is off, it skips the menu and starts play from the first track.
During play, you can press BACK to return to the menu (if the PBC mode is on).

Tip
The default setting for PBC is on. You can change the default setting, see chapter 'Adjust settings' - [ Preferences ] > [ PBC ] for details.
Preview disc contents

Play
1 During play, press INFO. → The disc status menu is displayed. 2 Select [Preview], then press ▶.
DVD
Select Digest Type:
Title Digest Chapter Digest Title Interval Chapter Interval
VCD/SVCD
Select Digest Type:
Track Digest Disc Interval Track Interval
3 Select a preview option, then press OK.
A six thumbnails preview screen is displayed.
To go to the next/previous preview screen, press ◀/▶.
To start play, press the thumbnail picture.
OK at the s
Quick skip play to a specific time
1 During play, press INFO. → The disc status menu is displayed.
2 Select the current elapsed playing time, then press ▶. [ TT Time ] • (title time) [ CH Time ] • (chapter time) [ Disc Time ] • (disc time) [ Track Time ] • (track time)
3 Press the numeric buttons to change the time where you want to skip to.
Display play time
1 During play, press INFO. → The disc status menu is displayed.
2 Select [ Time Disp ], then press ▶. → The display options are different depending on the disc type.
| Option Action | |
| [ Title Elapsed ] / [ Chapter Elapsed ] | Display DVD title or chapter elapsed play time. |
| [ Title Remain ] / [Chapter Remain ] | Display DVD title or chapter remaining play time |
| [ Total Elapsed ] / [Single Elapsed ] | Display VCD/SVCD disc or track elapsed play time. |
| [ Total Remain ] / [Single Remain ] | Display VCD/SVCD disc or track remaining play time. |
3 Select an option, then press OK.
View DVD play from different angles
1 During play, press INFO. → The disc status menu is displayed.
2 Select [ Angle ], then press ▶.
3 Press the numeric buttons to change the angle. Time changes to the selected angle.

Note
Only applicable to discs containing sequences recorded from different camera angles.
Set repeat play for a specific section
1 During play, press REPEAT/REPEAT A-B repeatedly until [ ➞ A ] appears at where you want to set the starting point. 2 Press REPEAT/REPEAT A-B repeatedly again until [ ➞ AB ] appears to set the ending point. → Repeat play starts.
3 To cancel repeat play, press REPEAT/REPEAT A-B repeatedly until [Off] appears.

Note
- The marked section for repeat play is only possible within a track/title.
Play DivX® video
DivX video is a digital media format that retains high quality despite a high rate of compression. This DVD player is DivX® Certified so that you can enjoy DivX video.
1 Insert a disc or USB that contains the DivX videos.
For USB, press
A contents menu is displayed.
2 Select a title to play, then press OK. 3 Use the remote control to control the title.
Button Action
| SUBTITLE | Change subtitle language. |
| AUDIO/CREATE MP3 | Change audio language/channel. |
| ■ | Stop disc play.For DivX, the contents • menu is displayed.For DivX Ultra video, • press this button again to display the contents menu. |
 | Display title elapsed play • time or title remaining play time.Display DivX Ultra video • information. |

Note
You can only play DivX videos that were rented or purchased with the DivX registration code of this DVD player (see chapter 'Adjust settings' - [General Setup] > [DivX(R) VOD Code] for details).
- If the subtitle does not appear correctly, change the subtitle language (see chapter 'Adjust settings' - [ Preferences ] > [ DivX Subtitle ] for details).
Play music

Note
For some commercial audio discs, play may resume from the point where it was last stopped. To start play from the first track, press ◀.
Control a track
1 Play a track. 2 Use the remote control to control the track.
| Button Action | |
| ▶II | Start, pause or resume disc play. |
| ■ | Stop disc play. |
| ▶I | Skip to the next track. |
| |◀ | Skip to the beginning of the current track. Press twice to jump to the previous track. |
| Select an item to play. | |
| ◀◀, ▶▶ | Searches fast-forward (▶▶)or fast-backward (◀◀).Press repeatedly to change the search speed. |
| REPEAT/ REPEAT A-B | Toggle through various repeat play mode; or turn off repeat mode.Repeat options vary depending on the disc type. |
Quick skip play
1 During play, press INFO until one of the following options is selected.
| Display Action | |
| [ Disc Go To ] | Skip play to a specifi c time within the disc. |
| [ Track Go To ] | Skip play to a specifi c time within a track |
| [ Select Track ] | Skip play to a specifi c track number. |
2 Press the numeric buttons to change the time/number where you want to skip to.
Play MP3/WMA music
MP3/WMA is a type of highly compressed audio file (files with .mp3, .wma extensions).
1 Insert a disc or USB that contains the MP3/WMA music.
For USB, press
A contents menu is displayed.
→ Play starts.
2 Select a track to play if play does not start automatically.
To select another track/folder, press • ▲▼, then press OK.
3 To return to the main menu, press ▲ until the root menu is selected, then press OK.

Note
- For CDs recorded in multiple sessions, only the first session is played.
- This DVD player does not support MP3PRO audio format.
- If any special characters are present in the MP3 track name (ID3) or album name, it may not display correctly on the screen because these characters are not supported.
- Some WMA is protected by Digital Rights Management (DRM), it cannot be played on this DVD player.
- Folders/files exceed the supported limit of this DVD player are not displayed or played.

Tip
You can display the data disc contents without folders, see chapter 'Adjust settings' - [ Preferences ] > [ Mp3/Jpeg Nav ] for details.
Play photo
Play photos as slideshow
This DVD player can play JPEG photos (files with .jpeg or .jpg extensions).
1 Insert a disc or USB that contains the JPEG photos.
For USB, press
For a Kodak disc, the slideshow begins automatically.
For a JPEG disc, the photo menu is displayed.
2 Select the folder/album you want to play.
To preview the photos in the folder/album, press ⓘ INFO.

To go to previous or next screen display, press ◀/▶.
To select a photo, press the navigation buttons.
To display the selected photo only, press OK.
3 Press OK to start slideshow play. To return to the menu, press ↩ BACK.

Note
You may require longer time to display the disc content on the TV due to the large number of songs/photos compiled onto one disc.
- If the JPEG photo is not recorded with an 'exif' type file, the actual thumbnail picture is not shown on the display. It is replaced by a 'blue mountain' thumbnail picture.
- This DVD player can only display digital camera pictures according to the JPEG-EXIF format, typically used by almost all digital cameras. It cannot display Motion JPEG and pictures in formats other than JPEG, or sound clips associated with pictures.
- Folders/files exceeding the supported limit of this DVD player are not displayed or played.
Control photo play
1. Play photo slideshow. 2. Use the remote control to control the photo.
| Button | Action |
| Rotate the photo anti-clockwise. | |
| Rotate the photo clockwise. | |
| Flip the photo vertically. | |
| Flip the photo horizontally. | |
| ZOOM | Zoom in/ out.• Play pause in zoom mode. |
| Stop disc play. |
Play musical slideshow
Play MP3/WMA music files and JPEG photo files simultaneously to create musical slideshow. The MP3/WMA and JPEG files must be stored on the same disc.
1. Play MP3/WMA music. 2. Navigate to the photo folder/album and press OK to start slideshow play.
Slideshow begins and continues till the end of the photo folder or album.
Audio continues to play till the end of the disc.
To return to the menu, press ↩ BACK.
3. To stop slideshow play, press ■. 4. To stop music play, press ■ again.
Play from USB device
This DVD player plays/views MP3, WMA, DivX, JPEG or WMV files that are stored on USB device.
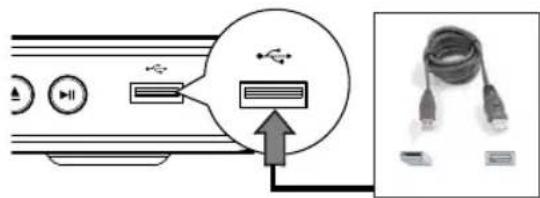
1 Connect a USB flash drive to the (USB) jack on this DVD player. 2 Press A contents menu is displayed. Play starts. 3 Select a file to play if play does not start automatically.
For more information, see chapters • 'Play music, Play photo, Play video' for details.
4 To stop play, press ■ or remove the USB device.
To switch to the disc mode, press or DISC MENU.

Tip
- If the device does not fit into the USB jack, connect it through a USB extension cable.
- Digital cameras that require additional programme installation when connected to a PC are not supported.
6 Advanced features
Media copy
You can transfer data files such as MP3, WMA or JPEG from disc to the USB device.
1 Insert a disc contains the MP3/WMA/JPEG files. 2 Press ■ to stop disc play. 3 Connect the USB flash drive to the (USB) jack on this DVD player. 4 Select the file to copy, then press SUBTITLE. 5 Select [Yes] in the menu to start to copy, then press OK.

Once complete, a new folder is created automatically in the USB device to store all the new data files.
6 To stop copy progress, press ■, then press OK.

Note
While you copy, never press any buttons.
Copy-protected media cannot be copied.
Create MP3 files
You can convert audio CDs into MP3 audio files with this DVD player. The created MP3 audio files are saved in the USB device.
1 Insert an audio CD. 2 Connect the USB flash drive to the (USB) jack on this DVD player. 3 During disc play, press AUDIO/CREATE MP3. 4 Select [Yes] in the menu and press OK.
| Create MP3 | |||
| OPTIONS | TRACK | ||
| Speed | Normal | Track01 | 04:14 |
| Bitrate | 128kbps | Track02 | 04:17 |
| CRT ID3 | Yes | Track03 | 03:58 |
| Device | USB 1 | Track04 | 04:51 |
| Summary | Track05 | 03:53 | |
| Press [OK] button to change speed. | Track06 | 04:09 | |
| Track07 | 04:38 | ||
| Start Exit | Select all | Deselect all | |
5 Select the conversion options in the [OPTIONS] panel and press OK.
| Option Description | |
| [ Speed ] | Select the write-to-fi le speed.If • [ Normal ] speed is selected, music play can be heard while creating the MP3 fi le. |
| [ Bitrate ] | Select the quality level.Higher bitrate for better sound quality and bigger fi le size.Default setting is • [ 128 kbps ]. |
| [ CRT ID3 ] | Copy track information into the MP3 fi le.Default setting is • [ Yes ]. |
| [ Device ] | The created MP3 fi les can only be saved in USB device. |
6 Press ▶ to access the [TRACK] panel. 7 Select the audio track, then press OK.
To select another track, repeat step 7.
To select all tracks, select • [Select all] in the menu and press OK.
To deselect all tracks, select • [ Deselect all ] in the menu and press OK.
8 Select [Start] in the menu to start to convert, then press OK.
Once complete, a new folder is created automatically in the USB device to store all the new MP3 files.
To exit the menu, select • press OK.
[Exit] and

Note
While you convert, never press any buttons. • DTS CDs and copy-protected CDs cannot be converted. - Write-protected or password-protected USB devices cannot be used to store MP3 files.
7 Adjust settings
This section describes the various setting options of this DVD player.
| Symbol Option | |
| [ General Setup ] | |
| [ Audio Setup ] | |
| [ Video Setup ] | |
| [ Preferences ] | |

Note
If the setup option is grayed out, it means the setting cannot be changed at the current state.
General setup
1 Press SETUP. → [ General Setup ] menu is displayed. 2 Press ▶. 3 Select an option, then press OK.
| General Setup | |
| Disc Lock | |
| OSD Language | |
| Sleep Timer | |
| Auto Standby | |
| DivX(R) VOD Code | |
4 Select a setting, then press OK.
To return to the previous menu, press •

To exit the menu, press • SETUP.

Note
See the explanations of the above options in the following pages.
[Disc Lock]
Set play restriction for a specific discs. Before you start, place the disc in the disc compartment (maximum 20 discs can be locked).
[Lock] • – restrict access to the current disc. The next time you want to play this disc or unlock it, you need to enter the password.
[Unlock]• – play all discs.
![PHILIPS DVP3388 - [Disc Lock] - 1](/content/2026/06/1362082/images/17332cf505acc6f06180200c1010b741724fac16bd9bedf6093c7e92e318214b.jpg)
Tip
- You can set or change the password, go to [Preferences] > [Password].
[ OSD Language ]
Select the default on-screen menu language.
[ Sleep Timer ]
Switch to standby automatically after the preset time.
• [Off] – disable sleep mode. - [15 Mins], [30 Mins], [45 Mins], [60 Mins] – select the count down time before the DVD player switches to standby.
[ Auto Standby ]
Turn off or on automatic standby switching mode. It is an energy saving feature.
[ On ]• – switch to standby after 15 minutes of inactivity (for example, in pause or stop mode).
[Off]• – disable auto standby mode.
[ DivX(R) VOD Code ]
Display the DivX® registration code.
![PHILIPS DVP3388 - [ DivX(R) VOD Code ] - 1](/content/2026/06/1362082/images/ba373dcab311d309892d6f73bf4edde1d06c063b199b9ece8e29ec9f5866d248.jpg)
Tip
Enter this DVD player's DivX registration code when you rent or purchase video from www.divx.com/vod. The DivX videos rented or purchased through the DivX® VOD (Video On Demand) service can be played only on the device to which it is registered.
Audio setup
1 Press SETUP. → [ General Setup ] menu is displayed. 2 Press ▼ to select [Audio Setup], then press ▶. 3 Select an option, then press OK.
| Audio Setup | |
| Analog Output | |
| Digital Audio | |
| HDMI Audio | |
| Audio Sync | |
| Volume | |
| Sound Mode | |
| Speaker Setup | |
| CD Upsampling | |
4 Select a setting, then press OK.
To return to the previous menu, press •
◀
To exit the menu, press • SETUP.

Note
See the explanations of the above options in the following pages.
[ Analog Output ]
Select the analog audio setting based on the audio device that is connected through the analog audio jack.
[ Stereo ]• – for stereo output.
[ LT/RT ]• – for surround sound output through two speakers.
[ Multi Channel ]• – for multi channel output.
[ Digital Audio ]
Select the setting based on the digital amplifier/receiver that is connected through the digital jack.
[ Digital Output ] - select the type of digital output.
Option Description
| [ Off ] Disable digital output. |
| [All] The device supports multi-channel audio formats. |
| [ PCM Only ] The device is not capable of decoding multi-channel audio. Audio is downmixed to two-channel sound: see [ LPCM Output ] setting. |
[ LPCM Output ]
(Linear Pulse Code Modulation) output sampling rate.
| Option | Description |
| [ 48kHz ] | For discs recorded at sampling rate of 48 kHz. |
| [ 96kHz ] | For discs recorded at the sampling rate of 96 kHz. |
![PHILIPS DVP3388 - [ LPCM Output ] - 1](/content/2026/06/1362082/images/0b350b9ab8df09bd606dbe1b75ea3446b6abfa97065a82fcc5700bac1565317b.jpg)
Note
- [Digital Audio] setting is only available if the [HDMI Audio] is set to [Off].
- [LPCM Output] setting is only available if the [Digital Output] is set to [PCM only].
- The higher the sampling rate, the better the sound quality.
[ HDMI Audio ]
Select the audio output setting when you connect this DVD player and the TV with a HDMI cable.
[On] - audio output through the TV. [Off] - disable audio output from the TV.
[ Audio Sync ]
Set the default delay time for audio output when you play a video disc.
- Press OK.
- Press ◀▶ to set the delay time.
- Press OK to confirm and exit.
[Volume]
Set the default volume level when you play a disc.
- Press OK.
- Press ◀▶ to set the volume.
- Press OK to confirm and exit.
- select the LPCM
[ Sound Mode ]
Select a preset sound effect to enhance the audio output.
[3D]• – select a virtual surround sound effect that is produced from the left and right audio channels.
[Movie Mode]• – select a sound effect for movies.
[ Music Mode ]• — select a sound effect for music.
[ Speaker Setup ]
When you connect a speaker system, you can optimize surround output for the connected speakers.
[ Front Speaker ]•
| Option Description |
| [ Large ] Produce low frequency signal below 120 Hz. |
| [ Small ] Cannot produce low frequency signal below 120 Hz. |
[ Center Speaker ] / [ Rear Speaker ]•
| Option Description |
| [ Large ] Produce low frequency signal below 120 Hz. |
| [ Small ] Cannot produce low frequency signal below 120 Hz. |
| [ Off ] No speaker is connected. |
[ Subwoofer ]•
| Option Description |
| [ On ] A subwoofer is connected. |
| [ Off ] No subwoofer is connected. |
- [Speakers Volume] – Set the volume level of each speaker to get the ideal audio balance.
- Press OK.
- Select a speaker, then press ◀▶ to adjust the volume.
- Press OK to confirm and exit.
- [Speakers Delay] – Set the delay time for the center, subwoofer and rear speakers if they are placed closer to the listening position, so that the sound output from all speakers reach the listening position at the same time.
- Press OK.
- Select a speaker, then press ◀▶ to set the delay time.
- Press OK to confirm and exit.
![PHILIPS DVP3388 - [ Speaker Setup ] - 1](/content/2026/06/1362082/images/ed026a39bb7ba07b3ffc75fe1374d8db407f69a5c31298517c404f3c6f0ef24a.jpg)
Note
- [Speaker Setup] setting is only available if you have set the [Analog Output] setting to [Multi Channel].
[ CD Upsampling ]
For better sound quality in stereo mode, convert the music CD to a higher sampling rate.
• [Off] – turn off CD-upsampling. • [88.2kHz] – convert to twice the original sampling rate. • [176.4kHz] – convert to four times the original sampling rate.
[Night Mode]
You can play DVDs with Dolby Digital mode at a low volume, without disturbing others. High volume output is decreased and low volume output is increased to an audible level.
• [On] – turn on night mode. • [Off] – enjoy surround sound with its full dynamic range.
Video setup
1 Press SETUP. → [ General Setup ] menu is displayed. 2 Press ▼ to select [ Video Setup ], then press ▶. 3 Select an option, then press OK.
| Video Setup | |
| TV System | |
| TV Display | |
| Progressive | |
| Picture Setting | |
| HD JPEG | |
| HDMI Setup | |
4 Select a setting, then press OK.
To return to the previous menu, press •

To exit the menu, press • SETUP.

Note
See the explanations of the above options in the following pages.
[ TV System ]
If the video does not appear correctly, change the setting. By default, this setting matches the most common setting for TVs in your country.
[NTSC]• – for NTSC-system TV.
[ Multi ]• – for TV that is compatible with both PAL and NTSC.
[PAL] – for PAL-system TV.
[TV Display]
Select the screen format according to how you want the picture to appear on the TV.
4:3 Pan Scan (PS)![PHILIPS DVP3388 - [TV Display] - 1](/content/2026/06/1362082/images/405acbc0f1c3cd1b02e85f3154822d4a5ee37b258e8be433acdc29f3d3a3b4c6.jpg)
4:3 Letter Box (LB)![PHILIPS DVP3388 - [TV Display] - 2](/content/2026/06/1362082/images/2d9897c1b56ccbb5038c66a3179b1b0fec3872d33a8cd8f111959807b7f3646b.jpg)
16:9 (Wide Screen)![PHILIPS DVP3388 - [TV Display] - 3](/content/2026/06/1362082/images/9d6f1621e00c5ca83ff13f02b3a1f7c1288f88a2d458417de1a2d3ef54526e3a.jpg)
[4:3 Pan Scan] – for standard TV, a full-height screen display with the sides trimmed.
- [4:3 Letter Box] – for standard TV, a 'wide-screen' display with black bars on the top and bottom. [16:9] – for wide-screen TV (frame ratio 16:9).
[Progressive]
If a progressive scan TV is not connected through HDMI cable, turn on progressive scan mode.
[On] – turn on progressive scan mode. [Off] – disable progressive scan mode.
![PHILIPS DVP3388 - [Progressive] - 1](/content/2026/06/1362082/images/a92fde5166564e96f8f189a212934ab419192b9c666583e7ece024e500bdae24.jpg)
Tip
There is more detailed description available. See chapter 'Get Started - Turn on Progressive Scan' for details.
[Picture Setting]
Select a predefined set of picture color settings or customize the personal setting.
[Standard] – original color setting.
[Bright] – vibrant color setting.
[Soft] – warm color setting.
[Personal] – customize the color setting. Set the level of brightness, contrast, sharpness and color saturation, then press OK.
[HD JPEG]
Enjoy untouched and uncompressed JPEG pictures at their original resolution when you connect this DVD video player and the TV with a HDMI cable.
[On] – display high definition picture.
[Off] – display standard picture.
![PHILIPS DVP3388 - [HD JPEG] - 1](/content/2026/06/1362082/images/b15c79b4bd4441aac07cc6de52e55de7465340ed53667f1c98f424f97f97a405.jpg)
Note
This DVD video player supports the resolution display of 720p and above.
[HDMI Setup]
When you connect this DVD player and the TV with a HDMI cable, select the best HDMI setup that the TV can support.
[Resolution] – select a video resolution that is compatible with the TV display capability.
Option Description
| [ Auto ] It detect and select the best supported video resolution automatically. | |
| [ 480i ], [ 480p ], [ 576i ], [ 576p ], [ 720p ], [ 1080i ], [ 1080p ] | Select a video resolution that best supported by the TV. See the TVs manual for details. |
![PHILIPS DVP3388 - [HDMI Setup] - 1](/content/2026/06/1362082/images/8f20acb8ff3ab9df0b8a4ec2133e4cab913c8304c9bf825d16655c25a4ef5c38.jpg)
Note
- If the setting is not compatible with the TV, a blank screen appears. Wait for 15 seconds for auto recovery or switch to its default mode as follows: 1) Press ▲ to open the disc compartment. 2) Press numeric button '1'.
- [Wide Screen Format] – define the wide screen format for disc play.
| Option | Description |
| [ Superwide ] | Center position of the screen is stretched less than the side. This setting is only applicable if the video resolution is set to 720p or 1080i/p. |
| [ 4:3 Pillar Box ] | No stretching of the picture. Black bars are displayed on both sides of the screen. This setting is only applicable if the video resolution is set to 720p or 1080i/p. |
| [ Off ] | Picture will be displayed according to the format of the disc. |

Note
- This setting is only available if you have set the [TV Display] setting to [16:9].
[ EasyLink Setup ] • – if this DVD player is connected to HDMI CEC compliant TV/devices, all connected devices can respond to the following commands simultaneously:
Option Description
| [ EasyLink ] Tum off or turn on all EasyLink features.To disable this feature,select [ Off ]. | |
| [ One Touch Play] | When you press the STANDBY button, it turns on the TV and this DVD player, then video disc play starts (if a video disc is found in the disc compartment).To disable this feature,select [ Off ]. |
| [ One Touch Standby ] | When you press and hold the STANDBY button, all connected HDMI CEC devices switch to standby mode simultaneously.To disable this feature,select [ Off ]. |

Note
Philips does not guarantee 100% interoperability with all HDMI CEC compliant devices.
- You must turn on the HDMI CEC operations on the TV/devices before you can enjoy the EasyLink controls. See the TVs/devices manual for details.
Preferences
1 Press SETUP. → [ General Setup ] menu is displayed. 2 Press ▼ to select [ Preferences ], then press ▶. 3 Select an option, then press OK.
| Preferences | |
| Audio | |
| Subtitle | |
| Disc Menu | |
| Parental Control | |
| PBC | |
| Mp3/Jpeg Nav | |
| Password | |
| DivX Subtitle | |
4 Select a setting, then press OK. To return to the previous menu, press • ◀. To exit the menu, press • SETUP.

Note
- Stop disc play before you can access to [ Preferences ]. • See the explanations of the above options in the following pages.
[ Audio ]
Select the default audio language for DVDs.
[ Subtitle ]
Select the default subtitle language for DVDs.
[ Disc Menu ]
Select the menu language for DVDs.
![PHILIPS DVP3388 - [ Disc Menu ] - 1](/content/2026/06/1362082/images/7344d5a085e50072b2fdc31451f53318f6df71b85aa9d147b5fe7e34a5a6443a.jpg)
Note
If the language you have set is not available on the disc, the disc uses its own default language.
- For some DVDs, the subtitle/audio language can only change from the disc menu.
- To select the languages that are not listed in the menu, select [Others]. Then check the Language Code list at the back of this user manual and enter the respective language code.
[ Parental Control ]
Restrict access to DVDs that are unsuitable for children. These types of DVDs must be recorded with ratings.
Press 1. OK.
Select a rating level, then press 2.
Press the 3. numeric the password.
![PHILIPS DVP3388 - [ Parental Control ] - 1](/content/2026/06/1362082/images/a27a2feed9fe9352ee444485bb0d7c2396002538da47f94ea2b93c43a33441b4.jpg)
Note
Rated DVDs above the level you set in • [ Parental Control ] require a password to be played.
- The ratings are country-dependent. To allow all discs to play, select '8'.
- Some DVDs have ratings printed on them but are not recorded with ratings. This function has no effect on such DVDs.

Tip
You can set or change the password, go to • [ Preferences ] > [ Password ].
[PBC]
For VCDs/SVCDs recorded with PBC (playback control), you can access the disc content through an interactive menu.
[ On ]• – an index menu is displayed when you load a disc for play.
[Off]• – skip the menu and start play from the first track.
[ Mp3/Jpeg Nav ]
Select to display the folders or display all the files.
• [View Files] – display all the files. - [View Folders] – display the folders of MP3/WMA files.
[Password]
Follow the instructions on the TV to set or change the password for locked discs and play restricted DVDs.

- Press the numeric buttons to enter '136900' or the last set password at [Old Password] field.
- Enter the new password at [New Password] field.
- Enter the new password again at [Confirm PWD] field. Press 4. OK to exit the menu.
![PHILIPS DVP3388 - [Password] - 2](/content/2026/06/1362082/images/89bbcc330b1e16982f5640013d052e0b79d8223139328b3c241b11066e63f967.jpg)
Note
If you forget the password, enter '136900' before you set a new password.
[ DivX Subtitle ]
Select a character set that supports the DivX subtitle.
[Standard] Albanian, Danish, Dutch,
English, Finnish, French,
Gaelic, German, Italian,
Kurdish (Latin),
Norwegian, Portuguese,
Spanish, Swedish, Turkish
![PHILIPS DVP3388 - [ DivX Subtitle ] - 1](/content/2026/06/1362082/images/0cab11490179a3b25a6c2ba0fb757631363c1bd105c88ebb5e1335b2c96298c9.jpg)
Note
- Ensure that the subtitle file has the exact same file name as the movie file. If for example the file name of the movie is 'Movie.avi', then you will need to name the text file 'Movie.sub' or 'Movie.srt'.
[Version Info]
Display the software version of this DVD player.
This information is required when you want to find out if a newest software version is available at the Philips website that you may download and install on this DVD player.
[Default]
Reset all the settings of this DVD player to factory default, except for [Disc Lock],
[ Parental Control ] and [ Password ] settings.
8 Additional information
Update software
To check for updates, compare the current software version of this DVD player with the latest software version (if available) at the Philips website.

Caution
Power supply must not be interrupted during • software upgrade.
1 Press SETUP.
| Preferences | |
| Disc Menu | |
| Parental Control | |
| PBC | |
| Mp3/Jpeg Nav | |
| Password | |
| DivX Subtitle | |
| Version Info | |
| Default | |
2 Select [ Preferences ] > [ Version Info ], then press OK. 3 Write down the file name, then press SETUP to exit the menu.
4 Visit www.philips.com/support to check for the latest software version, using the fi le name for this DVD player. 5 Refer to the upgrade instructions for more information.

Note
Disconnect the power cord for a few seconds and • connect again to reboot the system.
Care

Caution
Never use solvents such as benzene, thinner, commercially available cleaners, or anti-static sprays intended for discs.
Clean discs
Wipe the disc with a microfiber cleaning cloth from the center to the edge in a straight line movement.
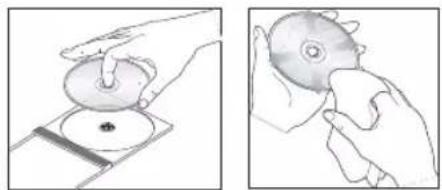
9 Specification

Note
- Specification and design are subject to change without notice.
Accessories supplied
Quick Start Guide
Remote control and batteries
Audio/video cables
Playback media
DVD-Video, Video CD/SVCD, Audio CD, CD-R/CD-RW, DVD+R/+RW, DVD-R/-RW, DivX-CD, Picture CD, MP3-CD, WMA-CD, WMV-CD, USB flash drive
USB
Compatibility: Hi-Speed USB (2.0)
Class support: UMS (USB Mass Storage Class)
TV standard
Number of lines: •
625 (PAL/50Hz); 525 (NTSC/60Hz)
Playback: Multi-standard (PAL/NTSC)
Video performance
Video DAC: 12 bits, 108 MHz•
Y Pb Pr: 0.7 Vpp \~ 75 ohm•
• Video output: 1 Vpp \~ 75 ohm
Video format
• Digital compression:
- MPEG 2: DVD/SVCD
- MPEG 1: VCD/DivX
• Horizontal resolution:
• DVD: 720/1920 pixels (50 Hz); 720/1920 pixels (60 Hz)
• VCD: 352 pixels (50 Hz); 352 pixels (60 Hz)
• Vertical resolution:
• DVD: 576/1080 lines (50 Hz); 480/1080 lines (60 Hz)
• VCD: 288 lines (50 Hz); 240 lines (60 Hz)
Audio performance
• DA converter: 24 bits, 192 kHz • Frequency response: • DVD: 4 Hz - 22 kHz (48 kHz); 4 Hz - 44 kHz (96 kHz) • SVCD: 4 Hz - 20 kHz (44.1 kHz); 4 Hz - 22 kHz (48 kHz) • CD/VCD: 4 Hz - 20 kHz (44.1 kHz) • Signal-Noise (1 kHz): > 90 dB (A-weighted) • Dynamic range (1 kHz): > 85 dB (A-weighted) • Crosstalk (1 kHz): > 85 dB • Distortion/noise (1 kHz): > 70 dB • MPEG MP3: MPEG Audio L3
Audio format
- Digital:
- MPEG/AC-3/PCM: Compressed digital (16, 20, 24 bits fs, 44.1, 48, 96 kHz) • MP3 (ISO 9660): 96, 112, 128, 256 kbps & variable bit rate fs, 32, 44.1, 48 kHz
- Analog sound stereo
- Dolby surround compatible downmix from Dolby Digital multi-channel sound
Connections
• Y Pb Pr output: Cinch 3x • Video output: Cinch (yellow)
Audio output (Front L+R): Cinch (white/red)•
- Digital output:
• 1 coaxial: IEC60958 for CDDA/LPCM; IEC61937 for MPEG 1/2, Dolby Digital • 1 optical
- HDMI output
• 5.1 channel analog output
• Audio Front L+R: Cinch (white/red) • Audio Rear L+R: Cinch (white/red) • Audio Center: Cinch (blue) • Audio Subwoofer: Cinch (black)
Main unit
Dimensions (w × h × d): 360 × 37 × 209 (mm) •
Net Weight: approximately 1.3 kg•
Power
Power supply rating: 110 V - 240 V; 50/60 Hz
Power consumption: < 12 W•
Power consumption in standby mode: < 0.3 W•
Laser Specification
Type: Semiconductor laser InGaAlP (DVD), AlGaAs (CD)
Wave length: 658 nm (DVD), 790 nm (CD)
Output Power: 7.0 mW (DVD), 10.0 mW (VCD/CD)
Beam divergence: 60 degrees
10 Troubleshooting

Warning
Risk of electric shock. Never remove the casing of this unit.
To keep the warranty valid, never try to repair the system yourself.
If you encounter problems when using this DVD player, check the following points before requesting service. If the problem remains unsolved, register your product and get support at www.philips.com/welcome.
If you contact Philips, you will be asked for the model and serial number of your DVD player. The model number and serial number are on the back or bottom of your DVD player. Write the numbers here:
Model No. ____
Serial No. ____
Main unit
The buttons on this DVD player do not work.
Disconnect this DVD player from the power outlet for a few minutes, then connect again.
Picture
No picture.
See TV manual for correct video input and channel selection. Change the TV channel until you see the DVD screen.
If this happens when you turn on the progressive scan setting or change the TV system setting, you have to switch to its default mode:
Press 1. ▲ to open the disc compartment.
Press the 2. numeric button '1' (for progressive scan) or the numeric button '3' (for TV System).
No picture on HDMI connection.
Check if the HDMI cable is faulty. Replace a new HDMI cable.
If this happens when you change the HDMI video resolution, you have to switch to its default mode:
Press 1. ▲ to open the disc compartment.
Press 2. numeric button '1'.
Sound
No sound.
Ensure that the audio cables are connected and the connected device is turned on to the correct input source.
No sound on HDMI connection.
You may not hear any sound from the HDMI output if the connected device is non-HDCP compliant or only DVI-compatible.
- Ensure that the [ HDMI Audio ] setting is turned on.
No sound during DivX movies play.
- The audio codec may not be supported by this DVD player.
Play
DivX video files cannot be played.
Ensure that the DivX video file is complete. • Ensure that the file name extension is correct.
The aspect ratio of the screen is not aligned with the TV display setting.
The aspect ratio is fixed on the DVD.
DivX subtitles are not displayed correctly.
Ensure that the subtitle file name is the same as the movie file name. Select the correct character set.
Press 1. SETUP.
Select 2. [Preferences] > [DivX Subtitle] in the menu.
Select the character set that supports 3. the subtitle.
Select the character set that supports the subtitle.
The contents of the USB flash drive cannot be read.
The USB flash drive format is not compatible with this DVD player.
- Drive is formatted with different file system which is not supported by this DVD player (e.g. NTFS).
12 Glossary
A
Aspect ratio
Aspect ratio refers to the length to height ratio of TV screens. The ratio of a standard TV is 4:3, while the ratio of a high-definition or wide TV is 16:9. The letter box allows you to enjoy a picture with a wider perspective on a standard 4:3 screen.
D
DivX®
The DivX code is a patent-pending, MPEG-4 based video compression technology, developed by DivX Networks, Inc., that can shrink digital video to sizes small enough to be transported over the internet, while maintaining high visual quality.
H
HDMI
High-Definition Multimedia Interface (HDMI) is a high-speed digital interface that can transmit uncompressed high definition video and digital multichannel audio. It delivers high quality picture and sound quality, completely free from noise. HDMI is fully backward-compatible with DVI.
As required by the HDMI standard, connecting to HDMI or DVI products without HDCP (High-bandwidth Digital Content Protection) will result in no Video or Audio output.
J
JPEG
A very common digital still picture format. A still-picture data compression system proposed by the Joint Photographic Expert Group, which features small decrease in image quality in spite of its high compression ratio. Files are recognised by their file extension 'JPG or JPEG'.
M
MP3
A file format with a sound data compression system. 'MP3' is the abbreviation of Motion Picture Experts Group 1 (or MPEG-1) Audio Layer3. By using the MP3 format, one CD-R or CD-RW can contain about 10 times more data than a regular CD. Files are recognized by their file extension '.MP3'.
O
One-touch play
When you connect the DVD player to devices that support one-touch play, you can control the DVD player and the devices with one remote control. For example, when you press Play on the DVD remote control, the TV automatically switches to the correct channel to show the DVD content.
One-touch standby
When you connect the DVD player to devices that support standby, you can use DVD player remote control to put the DVD player and all connected HDMI devices in standby mode. You can perform one-touch standby using the remote control from any of the connected HDMI devices.
P
PBC
Playback Control. A system of navigating a Video CD/Super VCD through on-screen menus recorded onto the disc. You can enjoy interactive play and searching.
Progressive Scan
The progressive scan displays twice the number of frames per second than ordinary TV system. It offers higher picture resolution and quality.
W
WMA
Windows Media™ Audio. Refers to an audio compression technology developed by Microsoft Corporation. WMA data can be encoded by using Windows Media Player version 9 or Windows Media Player for Windows XP. Files are recognized by their file extension 'WMA'.
WMV
A video file or stream in Windows Media format. It is a compression format of motion picture based on MPEG-4 developed by Microsoft.
Language Code
| Abkhazian 6566 | |
| Afar 6565 | |
| Afrikaans 6570 | |
| Amharic 6577 | |
| Arabic 6582 | |
| Armenian 7289 | |
| Assamese 6583 | |
| Avestan 6569 | |
| Aymara 6589 | |
| Azerhaijani 6590 | |
| Bahasa Melayu 7783 | |
| Bashkir 6665 | |
| Belarusian 6669 | |
| Bengali 6678 | |
| Bihari 6672 | |
| Bislama 6673 | |
| Bokmål, Norwegian 7866 | |
| Bosanski 6683 | |
| Brezhoneg 6682 | |
| Bulgarian 6671 | |
| Burmese 7789 | |
| Castellano, Español 6983 | |
| Catalán 6765 | |
| Chamorro 6772 | |
| Chechen 6769 | |
| Chewa; Chichewa; Nyanja 7889 | |
| 中文 9072 | |
| Chuang; Zhuang 9065 | |
| Church Slavic; Slavonic 6785 | |
| Chuvash 6786 | |
| Corsican 6779 | |
| Česky 6783 | |
| Dansk 6865 | |
| Deutsch 6869 | |
| Dzongkha 6890 | |
| English 6978 | |
| Esperanto 6979 | |
| Estonian 6984 | |
| Euskara 6985 | |
| Ελληνικά 6976 | |
| Faroese 7079 | |
| Français 7082 | |
| Frysk 7089 | |
| Fijian 7074 | |
| Gaelic; Scottish Gaelic 7168 | |
| Gallegan 7176 | |
| Georgian 7565 | |
| Gikuyu; Kikuyu 7573 | |
| Guarani 7178 | |
| Gujarati 7185 | |
| Hausa 7265 | |
| Herero 7290 | |
| Hindi 7273 | |
| Hiri Motu 7279 | |
| Hrwatski 6779 | |
| Ido 7379 | |
| Interlingua (International)7365 | |
| Interlingue 7365 | |
| Inuktitut 7385 |
| Inupiaq | 7375 |
| Irish | 7165 |
| Íslenska | 7383 |
| Italiano | 7384 |
| Ivrit | 7269 |
| Japanese | 7465 |
| Javanese | 7486 |
| Kalaallisut | 7576 |
| Kannada | 7578 |
| Kashmiri | 7583 |
| Kazakh | 7575 |
| Kernewek | 7587 |
| Khmer | 7577 |
| Kinyarwanda | 8287 |
| Kirghiz | 7589 |
| Komi | 7586 |
| Korean | 7579 |
| Kuanyama; Kwanyama | 7574 |
| Kurdish | 7585 |
| Lao | 7679 |
| Latina | 7665 |
| Latvian | 7686 |
| Letzeburgesch; | 7666 |
| Limburgan; Limburger | 7673 |
| Lingala | 7678 |
| Lithuanian | 7684 |
| Luxembourgish; | 7666 |
| Macedonian | 7775 |
| Malagasy | 7771 |
| Magyar | 7285 |
| Malayalam | 7776 |
| Maltese | 7784 |
| Manx | 7186 |
| Maori | 7773 |
| Marathi | 7782 |
| Marshallese | 7772 |
| Moldavian | 7779 |
| Mongolian | 7778 |
| Nauru | 7865 |
| Navaho; Navajo | 7886 |
| Ndebele, North | 7868 |
| Ndebele, South | 7882 |
| Ndonga | 7871 |
| Nederlands | 7876 |
| Nepali | 7869 |
| Norsk | 7879 |
| Northern Sami | 8369 |
| North Ndebele | 7868 |
| Norwegian Nynorsk; | 7878 |
| Occitan; Provencal | 7967 |
| Old Bulgarian; Old Slavonic | 6785 |
| Oriya | 7982 |
| Oromo | 7977 |
| Ossetian; Ossetic | 7983 |
| Pali | 8073 |
| Panjabi | 8065 |
| Persian | 7065 |
| Polski | 8076 |
| Português | 8084 |
| Pushto | 8083 |
| Russian | 8285 |
| Quechua | 8185 |
| Raeto-Romance | 8277 |
| Romanian | 8279 |
| Rundi | 8278 |
| Samoan | 8377 |
| Sango | 8371 |
| Sanskrit | 8365 |
| Sardinian | 8367 |
| Serbian | 8382 |
| Shona | 8378 |
| Shqip | 8381 |
| Sindhi | 8368 |
| Sinhalese | 8373 |
| Slovensky | 8373 |
| Slovenian | 8376 |
| Somali | 8379 |
| Sotho; Southern | 8384 |
| South Ndebele | 7882 |
| Sundanese | 8385 |
| Suomi | 7073 |
| Swahili | 8387 |
| Swati | 8383 |
| Svenska | 8386 |
| Tagalog | 8476 |
| Tahitian | 8489 |
| Tajik | 8471 |
| Tamil | 8465 |
| Tatar | 8484 |
| Telugu | 8469 |
| Thai | 8472 |
| Tibetan | 6679 |
| Tigrinya | 8473 |
| Tonga (Tonga Islands) | 8479 |
| Tsonga | 8483 |
| Tswana | 8478 |
| Türkçe | 8482 |
| Turkmen | 8475 |
| Twi | 8487 |
| Uighur | 8571 |
| Ukrainian | 8575 |
| Urdu | 8582 |
| Uzbek | 8590 |
| Vietnamese | 8673 |
| Volapuk | 8679 |
| Walloon | 8765 |
| Welsh | 6789 |
| Wolof | 8779 |
| Xhosa | 8872 |
| Yiddish | 8973 |
| Yoruba | 8979 |
| Zulu | 9085 |
WARRANTY
This APPARATUS IS covered under warranty against any defect arising out of faulty or defective material or workmanship for a period of 6 months from date of purchase.
Should a defect develop during the period of warranty, Philips Electronics India Limited undertakes to repair the apparatus free of charge through an Authorised Philips service Center. If the purchaser shifts his residence to other town, the warranty will be valid at the nearest Authorised Philips service Center.
This warranty is not valid in case:
I. The apparatus is not used according to this manual; 2. Defects are caused by improper or reckless use; 3. Any repair work are done by person other than Authorised Philips Service Center; 4. Any modification or alteration of any nature are made in the apparatus; 5. The serial number is tampered 6. This warranty form is not completed immediately after purchase.
Serial No.:
Bill No & Date of Purchase:
Purchaser's Name:
Location & Tel No:
Dealer's Name:
Location & Tel No:
Dealer's Stamp & Sign:
Maintenance Tips for your DVD Player:
• Always keep a Disc loaded in your DVD Player tray. - Keep the player away from dusty areas. Keep it covered with a dust cover. - Clean your DVD Player Lens after every 20 discs played. - Use the 2 brush Philips DVD Lens Cleaner SVC2520 for best results. - Clean the CDs / VCD / DVD / MP3 CD before inserting in your DVD Player.
"For unlimited listening pleasure use Philips earphones / headphones". Over 20 models to choose from
Philips Electronics India Limited
For any sales or service related queries:
Visit us on web at www.philips.com/support or
Call us on Tel. No.: 1860-180-1111 (BSNL / MTNL)*
011-6600-1111 (GSM / WLL)*
* "standard call rates apply"

- CONTENTS
- IMPORTANT
- YOUR DVD PLAYER
- CONNECT
- GET STARTED
- PLAY
- ADVANCED FEATURES
- ADJUST SETTINGS
- ADDITIONAL INFORMATION
- SPECIFICATION
- TROUBLESHOOTING
- GLOSSARY
- SAFETY AND IMPORTANT NOTICE
- WARNING
- ABOUT PROGRESSIVE SCAN
- RECYCLE NOTICE
- COPYRIGHT NOTICE
- BE RESPONSIBLE. RESPECT COPYRIGHTS
- TRADEMARK NOTICE
- DOLBY
- DIGITAL
- FEATURES HIGHLIGHT
- VIDEO UPSCALING TO 1080P
- EASYLINK
- NOTE
- SCREEN FIT
- HI SPEED USB 2.0 LINK
- MEDIA COPY
- CREATE MP3 FILES
- REGION CODES
- DVD REGION CODE COUNTRIES
- PRODUCT OVERVIEW
- BASIC CONNECTIONS
- OPTIONAL CONNECTIONS
- TIP
- CONNECT VIDEO CABLES
- OPTION 1: CONNECT TO HDMI JACK
- CONNECT AUDIO CABLES
- ROUTE AUDIO TO OTHER DEVICES
- CONNECT TO ANALOG STEREO SYSTEM
- CONNECT USB DEVICE
- CONNECT TO POWER OUTLET
- CAUTION
- NAVIGATE THROUGH THE MENU
- FIND THE CORRECT VIEWING CHANNEL
- SELECT MENU DISPLAY LANGUAGE
- GENERAL SETUP
- TURN ON PROGRESSIVE SCAN
- USE PHILIPS EASYLINK
- ONE-TOUCH PLAY
- ONE-TOUCH STANDBY
- PLAY FROM DISC
- PLAY A DISC
- PLAY VIDEO
- CONTROL A TITLE
- CHANGE VIDEO PLAY
- ACCESS DVD MENU
- ACCESS VCD MENU
- PREVIEW DISC CONTENTS
- VCD/SVCD
- QUICK SKIP PLAY TO A SPECIFIC TIME
- DISPLAY PLAY TIME
- VIEW DVD PLAY FROM DIFFERENT ANGLES
- SET REPEAT PLAY FOR A SPECIFIC SECTION
- PLAY DIVX® VIDEO
- PLAY MUSIC
- CONTROL A TRACK
- QUICK SKIP PLAY
- PLAY MP3/WMA MUSIC
- PLAY PHOTO
- PLAY PHOTOS AS SLIDESHOW
- CONTROL PHOTO PLAY
- PLAY MUSICAL SLIDESHOW
- PLAY FROM USB DEVICE
- [DISC LOCK]
- [ OSD LANGUAGE ]
- [ SLEEP TIMER ]
- [ AUTO STANDBY ]
- [ DIVX(R) VOD CODE ]
- AUDIO SETUP
- [ ANALOG OUTPUT ]
- [ DIGITAL AUDIO ]
- [ LPCM OUTPUT ]
- [ HDMI AUDIO ]
- [ AUDIO SYNC ]
- [VOLUME]
- [ SOUND MODE ]
- [ SPEAKER SETUP ]
- [ CD UPSAMPLING ]
- [NIGHT MODE]
- VIDEO SETUP
- [ TV SYSTEM ]
- [TV DISPLAY]
- [PROGRESSIVE]
- [PICTURE SETTING]
- [HD JPEG]
- [HDMI SETUP]
- PREFERENCES
- [ AUDIO ]
- [ SUBTITLE ]
- [ DISC MENU ]
- [ PARENTAL CONTROL ]
- [PBC]
- [ MP3/JPEG NAV ]
- [PASSWORD]
- [ DIVX SUBTITLE ]
- [VERSION INFO]
- [DEFAULT]
- UPDATE SOFTWARE
- PRESS SETUP
- CARE
- CLEAN DISCS
- ACCESSORIES SUPPLIED
- PLAYBACK MEDIA
- USB
- TV STANDARD
- VIDEO PERFORMANCE
- VIDEO FORMAT
- AUDIO PERFORMANCE
- AUDIO FORMAT
- CONNECTIONS
- MAIN UNIT
- POWER
- LASER SPECIFICATION
- PICTURE
- SOUND
- DIVX VIDEO FILES CANNOT BE PLAYED
- THE ASPECT RATIO OF THE SCREEN IS NOT ALIGNED WITH THE TV DISPLAY SETTING
- DIVX SUBTITLES ARE NOT DISPLAYED CORRECTLY
- THE CONTENTS OF THE USB FLASH DRIVE CANNOT BE READ
- A
- ASPECT RATIO
- D
- DIVX®
- H
- HDMI
- J
- JPEG
- M
- MP
- O
- P
- PBC
- PROGRESSIVE SCAN
- W
- WMA
- WMV
- WARRANTY
- THIS WARRANTY IS NOT VALID IN CASE
- PHILIPS ELECTRONICS INDIA LIMITED
Brand : PHILIPS
Model : DVP3388
Category : DVD player