
AJ3130 - Alarm clock radio PHILIPS - Free user manual and instructions
Find the device manual for free AJ3130 PHILIPS in PDF.

| Product type | Radio alarm clock |
| Brand | Philips |
| Model | AJ3130 |
| Power supply | Mains alternating current; 9V backup battery type 6F22 |
| Standby consumption | 3 W |
| Radio bands | FM, AM |
| Alarm functions | Progressive buzzer or radio; snooze 8-9 min; 24-hour reset |
| Sleep function | Radio auto-off timer up to 59 min |
| Display | 12-hour clock with alarm mode indicators |
| Time setting | Separate HR and MIN buttons |
| Alarm setting | Time selection, buzzer/radio choice, volume adjustment |
| Volume control | Rotary knob |
| FM antenna | Integrated into power cord |
| AM antenna | Built into the housing |
| Maintenance | Clean with a soft damp cloth; no solvents |
| Backup batteries | One 9V 6F22 battery (not included); replace once a year |
| Dimensions (approx.) | Not specified in the manual |
| Weight (approx.) | Not specified in the manual |
Frequently Asked Questions - AJ3130 PHILIPS
User questions about AJ3130 PHILIPS
0 question about this device. Answer the ones you know or ask your own.
Ask a new question about this device
Download the instructions for your Alarm clock radio in PDF format for free! Find your manual AJ3130 - PHILIPS and take your electronic device back in hand. On this page are published all the documents necessary for the use of your device. AJ3130 by PHILIPS.
USER MANUAL AJ3130 PHILIPS
natural_image
Exterior view of a Philips water heater with perforated grille and brand logo (no readable text beyond branding)Let's make things better.

PHILIPS
INDEX
N Norge
Philips Consumer Electronics
Glaslaan 2
5616 JB Eindhoven, The Netherlands
English 5
Français 11
Español 17
Deutsch 23
Nederlands 29
Italiano 35
Portugûes 41
Dansk 47
Svenska 53
Suomi 59
'Ελληνικά 65
Important notes for users in the U.K.
Mains plug
This apparatus is fitted with an approved moulded 13 Amp plug. To change a fuse in this type of plug proceed as follows:
- Remove fuse cover and fuse.
- Fix new fuse which should be a BS1362 5 Amp, A.S.T.A. or BSI approved type.
- Refit the fuse cover.
If the fitted plug is not suitable for your socket outlets, it should be cut off and an appropriate plug fitted in its place.
If the mains plug contains a fuse, this should have a value of 5 Amp. If a plug without a fuse is used, the fuse at the distribution board should not be greater than 5 Amp.
Note: The severed plug must be disposed to avoid a possible shock hazard should it be inserted into a 13 Amp socket elsewhere.
How to connect a plug
The wires in the mains lead are coloured with the following code: blue = neutral (N), brown = live (L).
As these colours may not correspond with the colour markings identifying the terminals in your plug, proceed as follows:
- Connect the blue wire to the terminal marked N or coloured black.
- Connect the brown wire to the terminal marked L or coloured red.
- Do not connect either wire to the earth terminal in the plug, marked E (or 12 ) or coloured green (or green and yellow).
Before replacing the plug cover, make certain that the cord grip is clamped over the sheath of the lead - not simply over the two wires. Copyright in the U.K.: Recording and playback of material may require consent. See Copyright Act 1956 and The Performer's Protection Acts 1958 to 1972.
NOTES
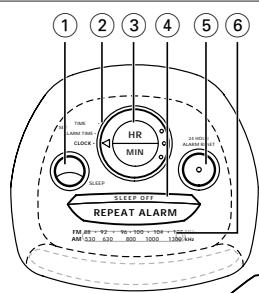
CONTROLS
①SLEEP – to activate sleep time
Clock control
② SET TIME – to set clock time
SET ALARM – to set /review the alarm time
CLOCK – to return to clock time display after setting clock/alarm time
③HR – to adjust the hours for clock and alarm times
MIN – to adjust the minutes for clock and alarm times
④SLEEP OFF /REPEAT ALARM – to switch off slumber
– to switch off the alarm for a 8-9 minute period
⑤24HOUR ALARM RESET – to stop the active alarm for 24 hours
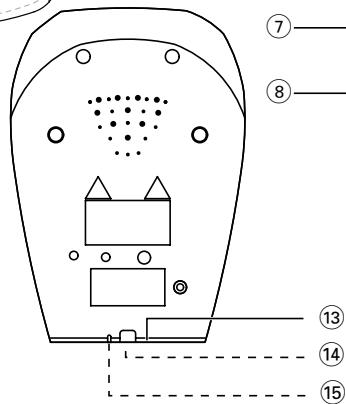
⑥Dial lens
⑦ ALARM BUZZER – to activate gentle wake buzzer for alarm setting RADIO – to activate radio for alarm setting OFF – to switch off the alarm
⑧RADIO – to switch radio mode ON/OFF
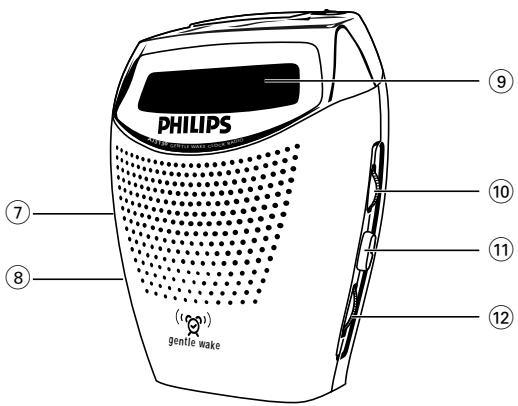
⑨ Display – with alarm indicators
⑩ VOLUME – to adjust the sound level
⑪ BAND – to select FM-MW waveband
⑫ TUNING – to tune to radio stations
⑬ Mains – for mains supply
⑭ Battery compartment – for backup battery
⑮Pigtail – aerial for FM reception
Both the model number and production number are in the battery compartment.
Environmental information
We have reduced the packaging to its minimum and made it easy to separate into three mono-materials: cardboard (box), polystyrene and plastic.
Your set consists of materials, which can be recycled if disassembled by a specialized company. Please observe the local regulations to dispose of packing materials, dead batteries and old equipment.
MAINS SUPPLY
For users in the U.K.: please follow the instructions on page 4.
- Check if the mains supply, as shown on the type plate inside the battery compartment, corresponds to your local mains supply.
- If your set is equipped with:
- a voltage selector - found on the back of the set
- a frequency selector - inside the battery compartment adjust these selectors to match with your local mains supply and frequency.
- Connect the mains plug into the wall socket. The mains supply is now switched on and the numbers on the display will start to flash. You will need to set the correct time.
- To disconnect the set from the mains supply completely, withdraw the mains plug from the wall socket.
Standby power consumption: 3W
When a power failure occurs the complete clock radio will be switched off. When the mains supply returns, the numbers on the display will start to flash and you will need to reset the correct time on the clock.
To retain the clock time and the set alarm time in the event of an AC mains failure or disconnection, insert a 9 volt battery, type 6F22 (not supplied) into the battery compartment: this will act as a mains backup. However, the time will not be illuminated on the clock display. Operation of the alarm and radio are also excluded. For clarity, the battery backup is used to retain the clock and alarm time only. As soon as the mains supply returns, the display will indicate the correct time.
- Insert the battery into the battery compartment.
- Connect the mains plug to the wall socket.
- Replace the battery once a year, or as often as necessary.
CLOCK DISPLAY
The time is displayed using the 24-hour clock system.
Important! When setting the clock or alarm time, for accurate hour and minute adjustment always make sure you press the HR and MIN keys separately and not simultaneously.
- Adjust the clock control to SET TIME.
- Press and hold down the HR or MIN key to set and adjust the hours and minutes respectively:
- With your finger held down on HR, the hour increases as a digit from 0 to 23.
- With your finger held down on MIN, the minutes increases as a digit from 00 to 59.
- Release the HR or MIN key when you have reached the correct time.
- To safeguard the clock time from being accidentally adjusted, turn the clock control to CLOCK.
RADIO
You can use the clock radio solely as a radio.
- Adjust the RADIO switch to ON.
- Select your waveband using the BAND switch.
- Use TUNING to find your radio station.
- Adjust the sound with the VOLUME control.
- To turn off the radio, adjust RADIO to OFF.
To improve radio reception:
- For FM , extend and position the pigtail to obtain optimum reception.
- For MW, the set is provided with a built-in aerial which to function best should be placed on a non-metallic surface e.g. wood, plastic. Direct the MW aerial by adjusting the position of your clock radio.
SETTING THE ALARM
GENERAL
If you wish to use the alarm, first set the alarm time.
There is a choice of two alarm modes, buzzer or radio. The display shows the alarm indicator if the alarm is set.
- Adjust the clock control to SET ALARM.
- Press and hold down the HR or MIN key to set and adjust the hours and minutes respectively:
- With your finger held down on HR, the hour increases as a digit from 0 to 23.
- With your finger held down on MIN, the minutes increases as a digit from 00 to 59.
-
-- If both the HR and MIN keys are pressed simultaneously, the alarm time display will be reset to 0:00.
-
Release the HR or MIN key when you have reached the correct time.
-
Adjust the clock control to CLOCK to return to clock time.
- To review your set alarm time, adjust the clock control to SET ALARM.
-
To select the alarm mode you wish to be awoken by, set ALARM to RADIO or BUZZER.
-
If you have selected the radio mode, make sure you have adjusted the volume loud enough to wake you up!
- The buzzer alarm begins gently and gradually increases to a fixed maximum volume.
SWITCHING OFF THE ALARM
There are three ways of switching off the alarm. Unless you choose to cancel the alarm completely, the 24HOUR ALARM RESET option will be automatically selected after 1 hour and 59 minutes from the time your alarm time first goes off.
24HR ALARM RESET
If you want the alarm mode to be stopped immediately but also wish to repeat the alarm call at the same time for the following day:
- Press 24HOUR ALARM RESET during the alarm call.
REPEAT ALARM
This will repeat your alarm call at 8-9 minute intervals.
- During the alarm call, press SLEEP OFF /REPEAT ALARM.
- Press SLEEP OFF /REPEAT ALARM again during the next call if you wish to repeat the alarm call.
- If, however, you do not press SLEEP OFF /REPEAT ALARM again, the alarm will sound for 1 hour and 59 minutes before turning itself off. Your alarm time setting will then automatically enter the 24HOUR ALARM RESET mode to sound at the same time next day.
SETTING THE ALARM
SLEEP
Canceling the Alarm Completely
- Before or during the set alarm time goes off, push the ALARM switch to OFF position.
→ Alarm indicator disappears from display.
SLEEP
About Sleep
The clock radio has a built-in timer called SLEEP, which enables the radio to be automatically switched off after 59 minutes. SLEEP allows you to lie back, listen and fall asleep.
Setting and switching off Sleep
- Check that the clock control is in the CLOCK position.
- Set RADIO to OFF position.
- Set your sleep time by pressing once on the SLEEP key.
• The display shows the sleep period 0: 59. - To cancel the sleep function before the sleep period ends, press SLEEP OFF /REPEAT ALARM.
Note: - The sleep function does not affect the alarm setting. - If during SLEEP you have turned down the volume and you have an alarm set in the radio mode, make sure you have adjusted the volume loud enough to wake you up the following day!
MAINTENANCE
- If you do not intend to use the clock radio for a long time, disconnect the set by withdrawing the plug from the wall socket. The battery should also be removed to prevent chemical leakage which will damage your set.
- To clean your set from fingerprints, dust and dirt, use a clean and soft damp cloth or chamois leather. Do not use cleaning products which contain, benzene, thinner, etc. as these may harm the housing.
TROUBLESHOOTING
If a fault occurs, first check the points listed below before taking the set for repair. If you are unable to remedy a problem by following these hints, consult your dealer or service centre.
WARNING: Under no circumstances should you try to repair the set yourself, as this will invalidate the guarantee.
PROBLEM
- POSSIBLE CAUSE
- REMEDY
No sound
– Volume not adjusted
- Adjust VOLUME
MW broadcast cannot be received properly
- Weak radio signal
- Rotate the set for better reception and make sure that the set is placed on a suitable (non-metallic) surface.
Continuous crackling and hiss noise during MW reception
- Interference from other electrical equipment e.g. TVs, computers, fluorescent lamps
- Move the clock radio away from electrical equipment
Intermittent crackling sound during FM reception
- Weak signal
- Adjust the pigtail aerial
The alarm does not function
- The alarm is not set
- Set the alarm time and the alarm switch to BUZZER or RADIO
– Volume too low for radio - Increase the volume
SLEEP does not function
– Radio still in ON position
- Switch RADIO to OFF
– Clock control in SET TIME or SET ALARM position
- Adjust clock control to CLOCK
CONTROLS
⑮ Pigtail – aerial for FM reception
- CAUSES POSSIBLES
- REMÈDE
Aucun son
- CAUSA POSIBLE
- REMEDIO
No suena
⑧ RADIO – to switch radio mode on/off (ON/OFF)
REPEAT ALARM - HERHALEN NA 8-9 MINUTEN
INDSTILLING AF VÄKKEREN
GENERELT
AFBRYDELSE AF VÆKKEREN
24HR ALARM RESET (24-TIMERS GENINDSTILLING AF VÄKKEREN)
INDSTILLING AF VÄKKEREN
SOVEFUNKTION
Printed in Hong Kong
TCtext/RM/9934