89107 - Paint gun Power Craft - Free user manual and instructions
Find the device manual for free 89107 Power Craft in PDF.


| Product Type | Paint Spray Gun |
| Brand | Power Craft |
| Model | 89107 |
| Power Source | Electric (230 V, 50 Hz) |
| Power Consumption | 600 W |
| Paint Capacity | 1000 ml |
| Max Viscosity | 50 DIN-s |
| Spray Pattern | Adjustable: horizontal, vertical, circular |
| Nozzle Size | 2.5 mm |
| Flow Rate | Adjustable, up to 500 ml/min |
| Dimensions (L x W x H) | 25 x 12 x 30 cm |
| Weight | 1.5 kg |
| Material | Plastic body, brass nozzle |
| Main Functions | Paint spraying for walls, furniture, fences |
| Cleaning | Disassemble and clean with solvent after use |
| Safety Features | Overload protection, double insulation |
| Spare Parts | Nozzle, needle, cup, filter (available) |
| Repairability | User-serviceable with common tools |
| Manual Language | English, German, French, etc. (PDF) |
Frequently Asked Questions - 89107 Power Craft
User questions about 89107 Power Craft
0 question about this device. Answer the ones you know or ask your own.
Ask a new question about this device
Download the instructions for your Paint gun in PDF format for free! Find your manual 89107 - Power Craft and take your electronic device back in hand. On this page are published all the documents necessary for the use of your device. 89107 by Power Craft.
USER MANUAL 89107 Power Craft
natural_image
Black and white power spray gun with green handle, no visible text or symbols on the main bodyEL-MALERPISTOL
Anvendte ikoner
Malerpistolens dele
natural_image
Technical line drawing of a mechanical component with no visible text or symbolsBrug
natural_image
Three identical mechanical components with pointed tips and internal channels, shown from top to bottom (no text or symbols)Forkert
natural_image
Three identical mechanical components with pointed tips and internal channels, no visible text or symbolsnatural_image
Pure electrical circuit lines without any symbolsBusiness Unit Manager
07.01.2015 - HP Schou A/S, DK-6000 Kolding
Miljøoplysninger
Fremstillet i P.R.C
6615
EU-Importør:
HP Schou A/S
6000 Kolding
Danmark
© 2015 HP Schou A/S
| Maling | Sekunder |
| Terpentinbasert maling | 18-22 |
| Vannbasert primer | 24-28 |
| Vannbasert maling | 20-25 |
| Lakk | 20-25 |
| Aluminiumsmaling | 22-25 |
| I rebeskyttelse, olje, rensemiddel, algemiddel og lignende. | Må ikke fortynnes |
natural_image
Technical line drawing of a mechanical component with no visible text or symbolsBruk
Skru beholderen (5) av malingssprøyten.
Plasser beholderen på et underlag som tåler tilsmussing, og fyll den godt omrørte malingen i beholderen. Skru beholderen godt fast på malingssprøyten.
natural_image
Three identical mechanical components with pointed tips and internal channels, shown in a schematic view (no text or symbols)Feil
natural_image
Three identical mechanical components with vertical rods, shown from different angles (no text or symbols)natural_image
Pure electrical circuit lines without any symbolsBusiness Unit Manager
07.01.2015 - HP Schou A/S, DK-6000 Kolding
Miljøinformasjon
Sprutpistolens delar:
natural_image
Technical line drawing of a mechanical component with no visible text or symbolsAnvändning
natural_image
Three identical mechanical components with pointed tips and internal channels, shown in a schematic view (no text or symbols)Fel
natural_image
Three identical mechanical components with pointed tips and internal channels, no visible text or symbolsnatural_image
Pure electrical circuit lines without any symbolsBusiness Unit Manager
07.01.2015 - HP Schou A/S, DK-6000 Kolding
Miljöinformation

natural_image
Technical line drawing of a mechanical component with no visible text or symbolsKäyttö
natural_image
Three identical mechanical components with pointed tips and internal channels, no text or symbols visibleVäärin
natural_image
Three identical mechanical components with pointed tips and internal channels, no visible text or symbolsnatural_image
Pure electrical circuit lines without any symbolsBusiness Unit Manager
07.01.2015 - HP Schou A/S, DK-6000 Kolding
Symbols are sometimes used on the packaging, on the machine or in the accompanying documentation. A key to these symbols is given below.

Instruction Manual
Read the instruction manual carefully before use and keep it for future reference

Hearing protection must be used!
Use hearing protection when operating the machine!

Protective goggles must be worn!
Use protective goggles when operating the machine!

Voltage/frequency
Indicates the required voltage and frequency of the power supply to which the machine is to be connected.

Power rating
Indicates the machine's maximum power output.

Max. l/min
Specifi es the maximum capacity in liters per minute.
Introduction
In order to get the most out of your new electric paint sprayer, please read through these instructions and the attached safety instructions before putting the paint sprayer to use. We also recommend that you save the instructions in case you need to refer to them at a later date in order to refresh your memory on the paint sprayer's functions.
Technical Data
Voltage/frequency: 230 V \~ 50 Hz
Power output: 110 W
Reservoir capacity: 800 ml
Max. viscosity: 60 din/sec
Max. quantity: 0.32 l/min
Nozzle: ∅0.8 mm
With 2-meter long cord, viscosity measuring cup, cleaning pin, 2 valves, spare nozzel and adjusting screw
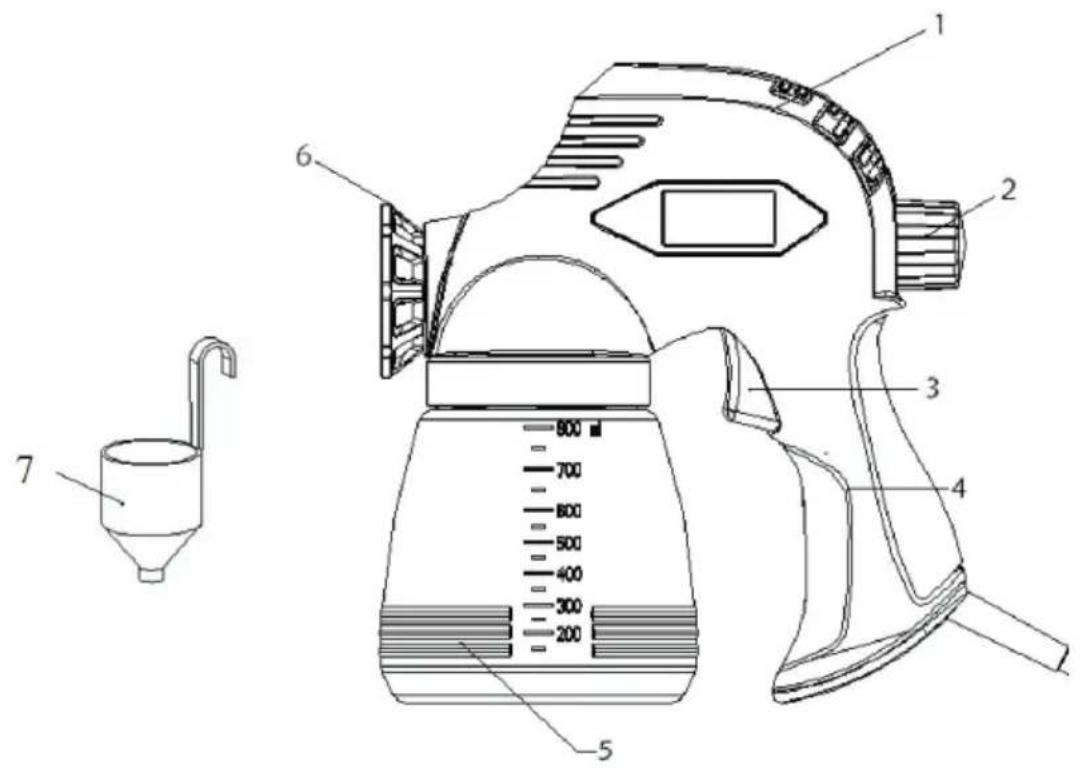
Paint sprayer parts
- Casing
- Regulator
- On/off switch
- Handle
- Reservoir
- Nozzle
- Viscosity measuring funnel
Special Safety Requirements
The paint sprayer is not for use by children under 18 years old.
Always use the appropriate protective equipment when using the paint sprayer
Never spray yourself, other people or animals.
Observe all the safety instructions presented on the paint packaging.
If working indoors, make sure that the fumes from the paint do not get sucked into the paint sprayer. Make sure there is adequate ventilation.
If working outdoors, be aware of the wind and its direction so that the paint does not land anywhere other than intended.
Be careful not to press the start/stop button when fi tting the nozzle
Disconnect the paint sprayer from the power mains before filling, attaching o removing the reservoir
The machine is not intended for use with textured paint, emulsion paint, alkaline, acidic or highly infl ammable paints and varnishes and paints with too high or low a viscosity.
Suitable Materials
Water- and turpentine-based paint, varnish and clear coat, primer, automotive paints and wood preservative, diluted to a suitable viscosity, if required.
Paint Viscosity
The paint will typically need diluting before it can be used in the paint sprayer. As the packaging seldom provides information or the level of dilution required to make paint suitable for spraying, the viscosity chart below can be used as a suitable starting point.
Measuring Viscosity
Stir the paint thoroughly before measuring the viscosity.
Dip the viscosity measuring cup fully into the paint.
Lift up the measuring cup and see how many seconds it takes for the measuring cup to empty.
For the paint to be suitable for use in the paint sprayer, the measured time must be within the interval shown in the chart.
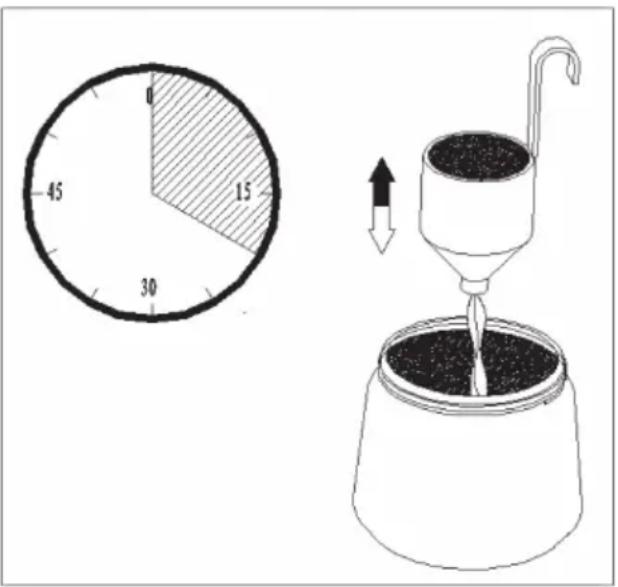
| Paint | Seconds |
| Turpentine-based paint | 18-22 |
| Water-based primer | 24-28 |
| Water-based paint | 20-25 |
| Lacquer | 20-25 |
| Aluminium paint | 22-25 |
| Wood preservative, oil, detergent, algicide, etc | Do not dilute |
If the paint takes a shorter or longer time to run out of the measuring cup, either add more paint or more thinner, respectively
Preparation Before Use
The results depend largely on the surface, condition and cleanliness of the workpiece. Therefore, make sure you prepare the workpiece thoroughly before painting, for example by sanding, degreasing or cleaning it. If necessary, ask a professional for advice.
Cover any areas that are not to be painted.
Test the paint sprayer's setting and amount of paint on a piece of cardboard or similar before you start painting the actual workpiece. This will help you find the optimal distance to the workpiece.
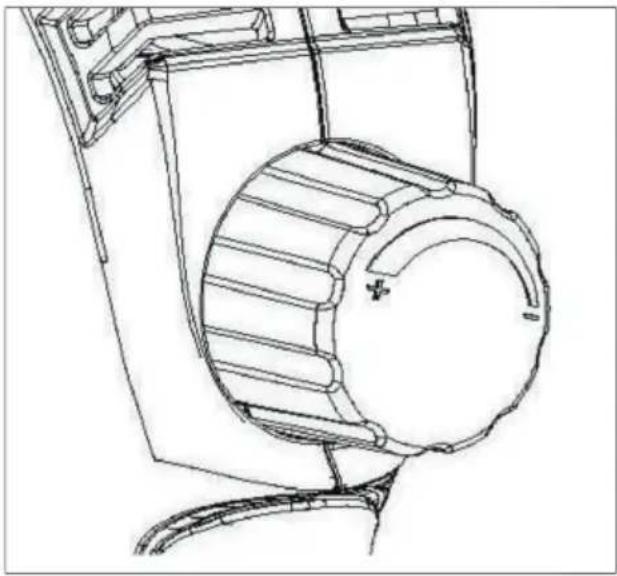
You can increase the amount of paint by turning the regulator (2) anticlockwise, and you can reduce the amount of paint by turning the regulator clockwise.
natural_image
Technical line drawing of a mechanical component with no visible text or symbolsUse
Unscrew the reservoir (5) from the paint sprayer.
Place the reservoir onto a surface that can withstand dirt and fill the reservoir with well-stirred paint. Screw the reservoir securely onto the paint sprayer.
Press the on/off button (3) to paint
If you need to stop working temporarily, you should resume working as soon as possible in order to avoid having paint dry at the nozzle.
If paint accumulates around the nozzle, wipe it off with a cloth and a little water or turpentine, if required.
Spraying Technique
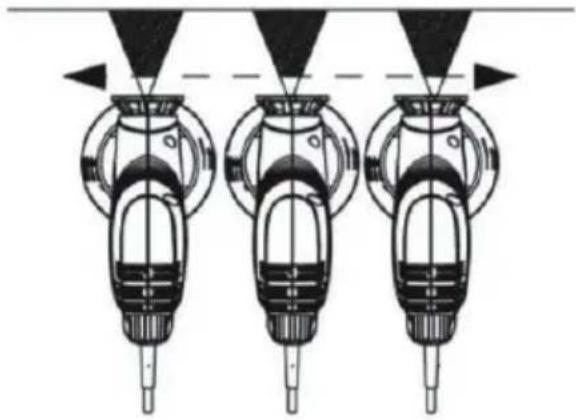
Always begin by spraying immediately to the side to the workpiece, so the starting point is not visible in the finished result
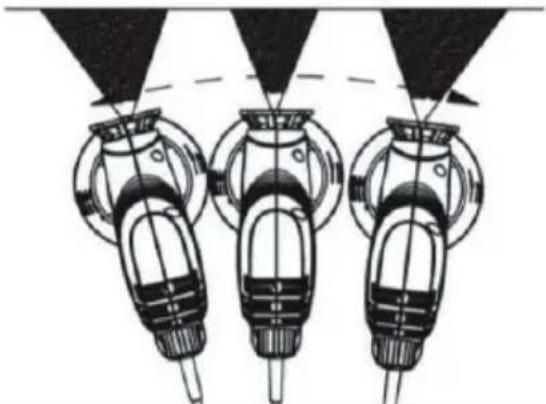
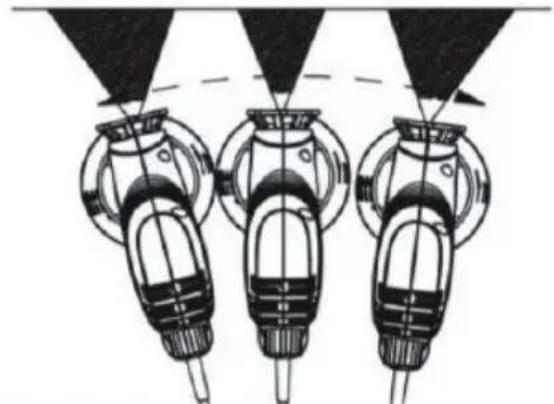
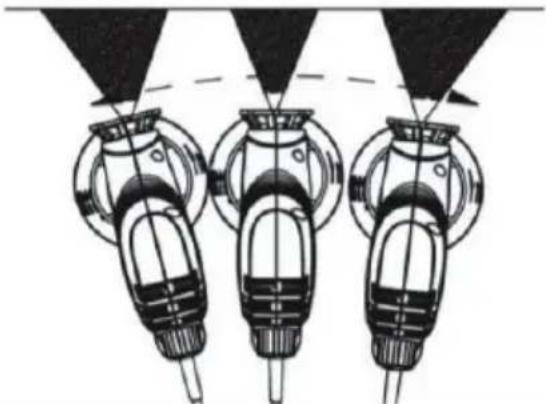
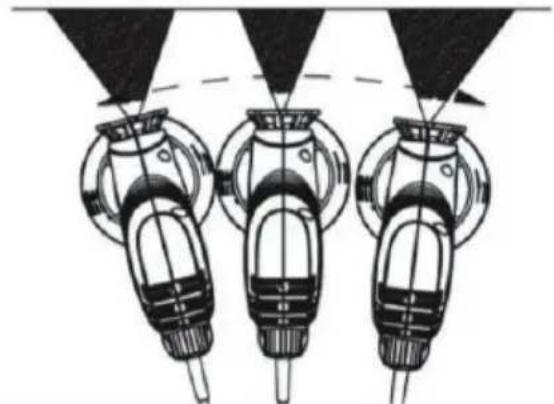
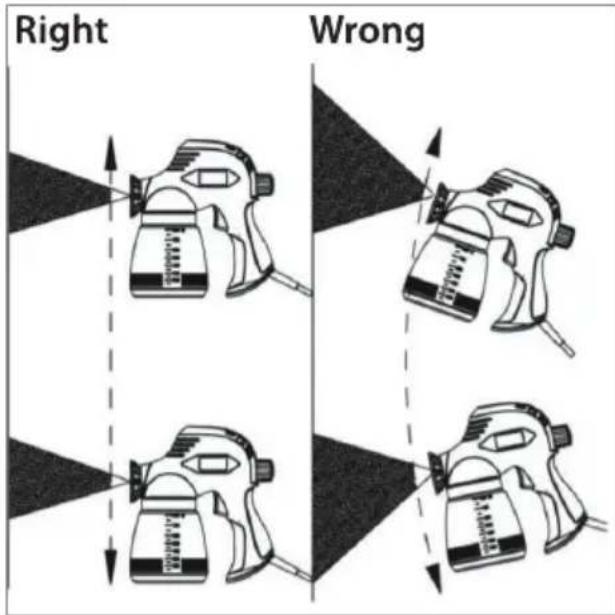
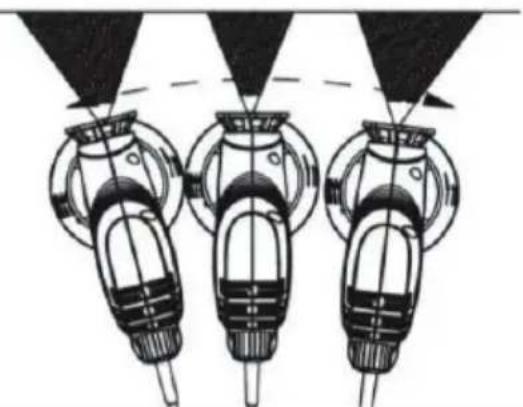
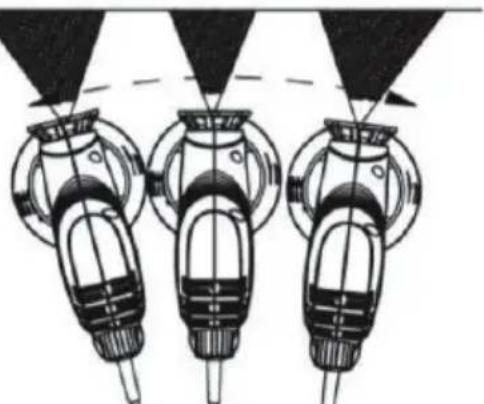
Hold the spray gun at a constant distance of 25 to 30 cm from the workpiece, and use gentle, smooth movements along the workpiece.
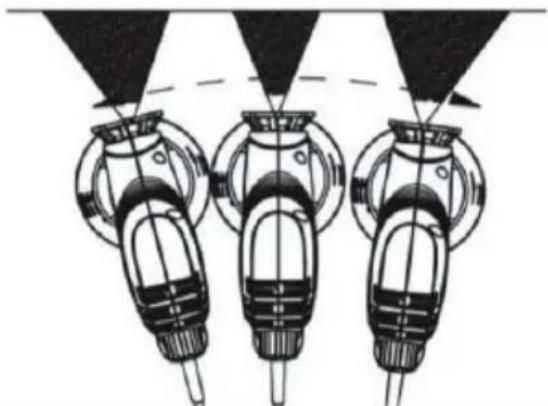
Do not spray paint from side to side as this results in an uneven cover and causes paint mist to form in front of the workpiece.
Right
natural_image
Three identical mechanical components with pointed tips and internal channels, shown in a schematic view (no text or symbols)Wrong
natural_image
Three identical mechanical components with vertical supports and diagonal lines, no text or symbols visibleDo not tilt the spray gun more than a maximum of 45 degrees
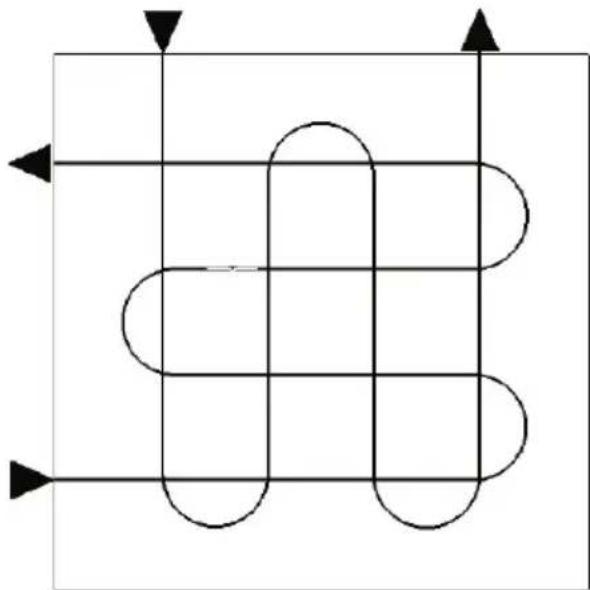
Spraying the paint in the pattern shown will result in a uniform layer of paint on workpiece.
natural_image
Pure electrical circuit lines without any symbolsCleaning and Maintenance
The paint sprayer must be cleaned immediately following each use; otherwise, the paint can dry out and block the paint sprayer so that it can never be used again!
Turn the paint sprayer off
Unscrew the reservoir from the spray gun.
Pour the rest of the paint back into its container.
Fill the reservoir with water or turpentine, depending on what is needed to dilute the paint. Keep the reservoir clean.
Fill the reservoir with clean water or turpentine, and then screw the reservoir onto the paint sprayer. Turn the pain sprayer on and spray the water or turpentine into a suitable container. Repeat until the water or turpentine comes out of the nozzle clear
Remove the suction pipe and the filter, and then clean the parts with water or thinner.
Apply a few drops of acid-free oil down into the hole to the suction pipe in order to lubricate the piston and cylinder.
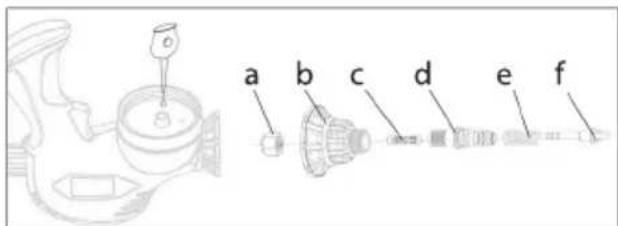
Remove the nozzle (a), nozzle guard (b), valve (c), cylinder (d), spring (e) and piston (f), and clean the parts thoroughly with a soft brush and a little water or turpentine.
Clean the holes in the nozzle with the accompanying cleaning needle.
Reassemble the parts.
Remember to dispose of paint, turpentine etc. in accordance with your local regulations
Service centre
Note: Please quote the product model number in connection with all inquiries.
The model number is shown on the front of this manual and on the product rating plate. For:
- Complaints
- Replacements parts
- Returns
- Guarantee issues
- Open weekdays from 07.00 to 17.00 (Fridays until 15.00
• E-mail: service@hpschou.com
Declaration of Compliance
We hereby declare that
ELECTRICPAINT SPRAYER
89107 (JS-981PQ)
230 V - 110 W
has been manufactured in accordance with the following standards or normative documents
EN55014-2:1997+A1+A2
EN55014-1:2006+A'
EN61000-3-2:2006+A1+A2
EN61000-3-3:2008
FN60745-1:2009+A1
EN50580:2012
in accordance with the provisions of the following directives
2006/95/EEC The Low Voltage Directive
2004/108/EEC The EMC Directive

15
Stefan Schou
Business Unit Manager
07.01.2015 - HP Schou A/S, DK-6000 Kolding
Environmental Information
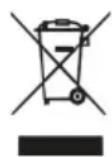
HP Schou A/S endeavours to manufacture environmentally-friendly electrical and electronic products; we also wish to contribute to the safe disposal of waste substances, which may be environmentally hazardous.
A healthy environment is important for everyone, and we have therefore set ourselves the target of complying with the requirements in the EU's initiatives in this area, which means we guarantee the environmentally sound collection, treatment, recovery and disposal of electronic equipment which might otherwise harm the environment. This also means that our products do not contain any of the following chemicals or substances
- Lead
- Mercury
- Cadmium
- Hexavalent chromium
- PBB (polybrominated biphenyls) (fl ame retardants)
- PBDE (polybrominated diphenyl ethers) (fl ame retardants
HP Schou A/S is proud to support the EU's environmental initiatives in order to play a part in a cleaner environment, and we hereby declares that our products comply with both the WEEE Directive (2012/19/EC) and the RoHS Directive (2011/65/EC).
As a consumer, you can also play a part in protecting the environment by following the applicable environmental regulations and taking old electrical and electronic equipment to your local recycling centre. If the equipment contains batteries, you must remember to remove these before you dispose of the equipment.

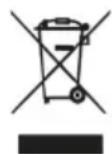
Manufactured in P.R.C
6615
EU Importer:
HP Schou A/S
6000 Kolding
Denmark
© 2015 HP Schou A/S
All rights reserved. The contents of this user guide may not be reproduced in part or whole in any way, electronically or mechanically (e.g., photocopying or scanning), translated or stored in a database and retrieval system without the prior written consent of HP Schou A/S.
ELEKTRO-MALERPISTOLE
Verwendete Symbole
natural_image
Technical line drawing of a mechanical component with no visible text or symbolsGebrauch
natural_image
Three identical mechanical components with pointed tips and shafts, shown in side profile (no text or symbols)Falsch
natural_image
Three identical mechanical components with vertical supports and diagonal beams, no visible text or symbolsnatural_image
Pure electrical circuit lines without any symbolsBusiness Unit Manager
07.01.2015 - HP Schou A/S, DK-6000 Kolding
Umwelthinweise
Värvipihusti osad
natural_image
Technical line drawing of a mechanical component with no visible text or symbolsKasutamine
natural_image
Three identical mechanical components with pointed tips and shafts, shown in side profile (no text or symbols)Vale
natural_image
Three identical mechanical components with internal shafts and mounting holes, no visible text or symbolsnatural_image
Pure electrical circuit lines without any symbolsBusiness Unit Manager
07.01.2015 - HP Schou A/S, DK-6000 Kolding
- EL-MALERPISTOL
- Anvendte ikoner
- Malerpistolens dele
- Brug
- Miljøoplysninger
- Bruk
- Miljøinformasjon
- Sprutpistolens delar:
- Användning
- Miljöinformation
- Käyttö
- Instruction Manual
- Hearing protection must be used!
- Protective goggles must be worn!
- Voltage/frequency
- Power rating
- Max. l/min
- Introduction
- Technical Data
- Paint sprayer parts
- Special Safety Requirements
- Suitable Materials
- Paint Viscosity
- Measuring Viscosity
- Preparation Before Use
- Use
- Spraying Technique
- Cleaning and Maintenance
- Service centre
- Declaration of Compliance
- ELECTRICPAINT SPRAYER
- Environmental Information
- ELEKTRO-MALERPISTOLE
- Verwendete Symbole
- Gebrauch
- Umwelthinweise
- Värvipihusti osad
- Kasutamine
Brand : Power Craft
Model : 89107
Category : Paint gun