button. The following functions can be set:
- SCAN SET: With this you can set which station should be considered for automatic storage during the station scan. The settings which are possible are "ALL" (all stations which can be received) or "STRONG" (only the strongest stations). The selection is made
- AUD SET: Setting for "Mono" or "Stereo" reception. The selection is made
Press the button on the remote control or on the main device until "BT" appears on the display. If there is no paired device in the vicinity, the icon flashes in the display.
Pairing of BLUETOOTH devices
The BLUETOOTH function allows wireless transmission of music files (audio streaming) to the system. To couple appropriate devices (e.g. smartphones) please proceed as follows:
- Open the pairing function on your BLUETOOTH device and look for "M-822DAB".
- Select "M-822DAB" for pairing and wait until "BT" stops flashing on the display and a sequence of tones is heard. Pairing is now complete.
- If your BLUETOOTH devices asks for a 4 digit PIN then please enter "0000".
- The BLUETOOTH device is now saved and in future will be automatically paired.
- To connect to another BLUETOOTH device, please repeat steps 1 - 3.
Playback via BLUETOOTH
To transmit music via audio streaming, use the music player of your choice on the BLUETOOTH device.
The following control options are available to you:
- Press the button on the remote control or on the device to pause or continue playback.
- Press the
- If you hold down the button on the remote or on the main device for 3 seconds, the BLUETOOTH connection is canceled. "BT" flashes in the display. To renew connection, briefly change to a different source and then back to BLUETOOTH.
If the BLUETOOTH connection should be disconnected because of larger distances, automatic connection takes place once the distance is reduced again.
Using Line-in
Playing external components
External devices such as MP3 players, DVD players or games consoles can be connected to the Line-In port to play music.
Press the button on the remote control or on the main device until "LINE IN" appears on the display.
Setting the time and date
When receiving a DAB+ or FM station in sufficient quality, the time is set automatically. Depending on the reception strength, this process takes some time. If no corresponding station is available, you can also set the time manually.
- Turn on the radio and press the button on the remote control.
- Then use
- When "SAVED" appears on the display, the time and date have been saved.
Setting the sleep timer
The sleep timer is used to automatically turn off the radio after a preset period of time. To set it, please proceed as follows:
- Turn on the radio and press the button on the remote control.
- Press the button repeatedly to set the power off time as follows:
"OFF, 15, 30, 45, 60, 90 minutes".
An active sleep timer is indicated by "SLEEP" on the bottom line of the display.
With "SLEEP OFF" an active timer is switched off.
- By pressing the key briefly, the remaining running time of the timer is displayed.
Setting the alarm clock
With this device, 2 different alarm times can be set. These alarm times can be programmed for the following time blocks: "Daily" / "Once" / "Weekends" / "Weekdays".
To set the alarm time, please proceed as follows:
- Turn on the radio and press button on the remote control.
- "ALARM 1" will be displayed. You can now set up the alarm time 1 or press the buttons.
- After confirming with key, please do the following steps:
- "ON TIME": setting hours and minutes, confirm the selection each time.
- "DURATION": setting the alarm duration in minutes ("15, 30, 45, 60, 90").
- "SOURCE": Then select DAB, FM, CD, USB or BUZZER as the source and confirm.
- "DEFAULT" or select another memory location and confirm. With "DEFAULT", the currently set station is used. This menu item only appears if the source DAB or FM has been selected.
- In the next menu, select and confirm the frequency with "DAILY" / "ONCE" / "WEEKENDS" / "WEEKDAYS" and confirm. If set to "ONCE", please enter the desired date.
- Then select and confirm the wakeup volume with and buttons.
- Select "ALARM ON" or "ALARM OFF" and confirm.
The alarm time is now stored and "TIMER" appears in standby at the bottom right of the display.
To set the 2nd alarm time, proceed in the same way. To delete a set alarm, select "ALARM OFF" in the last step of the setting, or press and hold the key for 2 seconds. The alarm clock will turn on at the specified time for the set duration, with "TIMER" flashing on the display.
When the alarm is active, the alarm signal can be interrupted for 9 minutes by pressing the key.
In the event of malfunctions, please check the following points:
→ Perform a factory reset: "MENU" -> "SYSTEM" -> "RESET" -> "YES".
No sound
→ Insert the mains plug in properly.
→ Adjust the volume to the correct level.
→ Make sure that the correct source is selected.
Left and right channel mixed up
→ Check the speaker connection and their locations.
→ Remove the mains plug and connect it again.
Problems with radio reception
→ Readjust the antenna.
→ Look for a more suitable location.
→ If possible use an outdoor antenna.
→ Other electrical devices are disturbing the reception.
→ Location not suitable for DAB+ reception.
CD-Player – display "NO DISC"
→ Insert the CD with the labelled side facing up.
→ Clean the CD.
→ Use only compliant CDs.
USB operation
"NO USB" → Turn the device off and then re-connect the USB device.
"NO SONG" → Please make sure that the USB device contains compatible files.
Remote control - not working properly
→ Change the battery.
→ Remove any obstructions
→ Move closer to the main device and make sure that you are pointing towards the remote control sensor on the device.
Maintenance and care
Cleaning the housing: Use a cloth which is slightly dampened with a mild cleanser. Do not use any cleanser which contains alcohol, ammonia or abrasives.
Cleaning CDs
- Clean soiled discs with a special cleaning cloth. Wipe the disc in straight lines from the middle to the edge. Do not wipe with a circular motion.
- Do not use any solution, such as white spirit, thinner, commercial detergents or anti-static spray for analogue records.
Condensation can form inside the device when there is a significant difference between the temperature of the device and the ambient temperature. If condensation should develop in the device interior, proper function can no longer be ensured. In this case, it is imperative to wait for several hours after the dampness has dried before the device can be used again.
Particular care must be taken in the following circumstances
If the device is moved from one location to another location which is significantly hotter or colder or if the humidity has increased in the installation location of the device etc.
Disposal of used electrical and electronic devices and batteries.

The (crossed-out wheeled bin) symbol on the product or its packaging indicates that this product must not be handled as normal household waste, but handed in to a collection point managed by public waste management authorities or to a collection point set up by the manufacturer or distributor, free of charge.
The owners of electrical devices should usually separate the waste batteries and waste accumulators which are not firmly enclosed in the waste devices from these waste devices before handing them over to collection points. This does not apply if the waste devices are prepared for recycling with the participation of a public waste management authority. By helping to properly dispose of this product, you are protecting the environment and the health of your fellow human beings. Improper or incorrect disposal endangers the environment and health. For more information on the recycling of these electrical devices and batteries, please contact your local authority or your municipal waste disposal companies.
The Bluetooth® word mark and logo are owned by the BLUETOOTH SIG, Inc. and any use of such marks by is under license. Other trademarks and tradenames are the property of their respective owners.
M-822DAB technical specifications
| Power supply AC ~ 100 - 240 V 50/60 Hz | |
| Power consumption 40 Watt | |
| Power consumption in standby mode < 1 Watt | |
| CD operation | |
| Signal to Noise Ratio (A-Filter) ≥ 70 dB | |
| Dynamic Range ≥ 60 dB | |
| Tuner FM/DAB+ | |
| DAB Tuning Range BAND III 174.928 MHz - 239.200 MHz | |
| FM Tuning Range 87.50 MHz - 108.00 MHz | |
| BLUETOOTH | |
| BLUETOOTH Version V5.0 | |
| Performance Class Class 2 | |
| Transmission Power max. 13 dbm | |
| Range approx. 10 metres (can vary depending on surroundings) | |
| Frequency range 2.402 GHz - 2.480 GHz | |
| BLUETOOTH Profile A2DP (Advanced Audio Distribution Profile, AVRCP (Audio/Video Remote Control Profile)) |
| USB devices Playable files: MP3 | Compatible with USB1.1 Full-Speed Compatible with FAT16, FAT32 Maximal 500 mA Bit rates: 32 kBit/s bis 320 kBit/s |
| Line-In 3.5 mm jack socket | |
| Headphone | 3.5 mm jack socket |
| Amplifier part | |
| Output Power | 2 x 50 Watt / 6 Ohm |
| Frequency response 20Hz - 20kHz (+- 3dB) | |
| |
| Dimensions and Weight | |
| Main Unit | (W x H x D) 260 x 129 x 240 mm / 2.4 kg |
| Speakers | (W x H x D) 173 x 263 x 240 mm / 2.45 kg each. |
| |
| Temperature range | 0°C to +40°C |
Subject to technical changes
Warranty
Dear Customer,
We would like to thank you for purchasing this Kenwood product. If this product is found to be defective in material or workmanship under normal operating conditions, in accordance with the provisions of the following warranty, we will rectify these faults free of charge or replace the device.
Please retain this warranty card in a safe place.
Kenwood grants a two year warranty for this device from the date of purchase according to the invoice or purchase receipt from the Kenwood dealer.
This warranty covers defects in materials or workmanship. We reserve the right to replace the product if economical repair is no longer possible. Costs for packaging and installation and risks associated with the actual repair are not included in the warranty coverage and will be invoiced.
Conditions
A. In addition to presentation of this warranty card, the following information is required to assert a claim:
(a) Your name with complete address
(b) The receipt or invoice of a retailer established in an EU state from which the original purchase date can be inferred.
(c) The complete name and address of the retailer from whom the product was purchased.
(d) The serial number and model of the product.
Kenwood reserves to right to deny warranty coverage if the above-mentioned information is missing or if changes have been made to the product after its initial purchase.
B. At the time of delivery of this product to the retailer, this product complied with all standards and safety regulations which apply in the country of destination. Modifications required to operate this device in countries outside the country of destination do not fall under the above-mentioned warranty provisions. Furthermore, we do not accept liability for work connected with this or for damage to the product which arise due to such work.
If the product is used in a country for which it is not designed and produced, then warranty work will only be carried out if the cost for converting the device to nationally valid standards and safety regulations is carried by the user.
Furthermore, if the product differs from the products distributed by the official importer and if replacement parts are not available for repairing this device, the user must carry the costs for the transport of the device to and from the land of purchase.
The same applies if no warranty coverage can be offered in the country under consideration because of other, justifiable reasons.
C. Exceptions from warranty coverage are:
(a) Changes to the product as well as normal service and adjustment work, including the regular checks mentioned in the operating manual.
(b) Damage to the product which have occurred as a result of defective or improper work if this work has been undertaken by third parties who are not authorised to carry out warranty services on behalf of the manufacturer.
(c) Damage due to negligence, accidents, modifications, incorrect mounting, defective packaging, incorrect operation or use of incorrect replacement parts during a repair.
(d) Damage due to fire, water damage, lightening, earthquake, insufficient ventilation, force majeure, connection to incorrect voltage or other causes external to Kenwood.
(e) Damage to speakers due to operation at higher outputs than those specified. Damage to records, tapes and video cassettes, CD Compact Discs and other articles which are not part of this product.
(f) Consumables and wear parts which must be replaced in the course of normal customer service, such as: Pickup systems, needles, drive belts, recording heads, slots, consoles, dry-cell batteries, rechargeable batteries, power tubes etc.
(g) All products on which the serial number(s) has/have been wholly or partially removed, changed or rendered unrecognisable.
This warranty can be invoked by anyone who has legally purchased the product.
In accordance with the above warranty provisions, the product will be either repaired or replaced free of charge. This right in now way restricts the user's other rights within the framework of the applicable legal regulations.
Repair or replacement do not effect any extension on the warranty period.
Any further claims shall be excluded, in particular any claims for order cancellation, price reduction or for compensation for any damage.
Contact address:
JVCKENWOOD U.K. Limited
First Floor, Gleneagles, the Belfry, Colonial Way, Watford, Hertfordshire WD24 4WH, UNITED KINGDOM
Email : Enquiries@uk.jvckenwood.com www.kenwood-electronics.co.uk
KENWOOD
KENWOOD
Système stéréo compact
M-822DAB
NOTICE D'EMPLOI
JVCKENWOOD Corporation
Sommaire
Avant la mise sous tension 3
Consignes de sécurité 3
Avant la mise en service 6
Branchement 6
Manipulation des CD 7
Désignations et fonctions des éléments 8
Fonctions de base 9
Mise en marche du système 9
Arrêt du système 9
Régulateur de volume 9
Réglage du son 9
Utilisation des CD et appareils USB 9
Préparation 9
Lecture d'un CD ou fichier audio (USB, CD) 10
Sélection d'un répertoire (fichiers audio uniquement) 10
Programmation de titres et fichiers 11
- Mode opératoires pour CD audio 11
- Mode opératoire pour fichiers audio 11
Lecture aléatoire et fonction de lecture en boucle 12
- Mode opératoires pour CD audio 12
- Mode opératoire pour fichiers audio 12
Utilisation de la radio DAB+ 12
Réglage des stations DAB+ 12
Sélection d'une station DAB+ 13
Enregistrement des stations dans la mémoire de stations 13
Informations DAB+ étendues 14
Fonctions du menu DAB+ 14
Utilisation de la radio FM 15
Réglage des stations FM 15
Enregistrement des stations dans la mémoire de stations 15
Fonctions du menu « FM » 15
Utilisation de BLUETOOTH 16
Appariage d'appareils BLUETOOTH 16
Lecture par BLUETOOTH 16
Utilisation de Line-In 16
Date/heure, minuteur de veille, réveil 17
Élimination des défaillances 18
Maintenance et entretien 18
Mise au rebut 19
Caractéristiques techniques 20
Garantie 21
Avant la mise sous tension
CONSIGNES DE SÉCURITÉ IMPORTANTES
Attention : Lisez attentivement cette page afin d'assurer l'utilisation sûre de l'appareil !
Lire attentivement ces consignes !
- Respectez toutes les consignes de sécurité et d'action lorsque vous mettez ce produit en service.
Conserver soigneusement ces consignes !
- Conservez les consignes de sécurité et d'action afin de pouvoir vous y reporter ultérieurement.
Respecter toutes les mises en garde !
- Respectez scrupuleusement toutes les mises en garde figurant sur le produit et dans la notice d'emploi
1. Nettoyer uniquement avec un chiffon sec !
- Débranchez la fiche d'alimentation de cet appareil de la prise secteur avant de le nettoyer. N'utilisez jamais de détergents liquides ou en aérosol. Utilisez uniquement un chiffon légèrement humide pour nettoyer l'appareil.
2. Accessoires
- Utilisez uniquement les accessoires indiqués par le fabricant.
3. N'utilisez pas cet appareil à proximité de l'eau
– L'appareil ne doit jamais être exposé à des gouttes ou projections d'eau – par exemple à proximité d'une baignoire, d'un lavabo, d'un évier, d'une machine à laver, dans un sous-sol humide ou à proximité d'une piscine, etc. Ne posez jamais des récipients contenant de l'eau sur l'appareil, par exemple un vase avec des fleurs.
4. Ventilation
- Les fentes et orifices du boîtier servent à la ventilation de l'appareil, afin d'assurer le bon fonctionnement de l'appareil et le protéger contre toute surchauffe qui pourrait occasionner une auto-ignition. N'obturez pas les orifices de ventilation. Installez l'appareil conformément aux consignes du fabricant. N'obturez pas les orifices de ventilation en posant l'appareil sur un lit, un canapé, un tapis ou un autre support mou similaire. En absence d'une ventilation suffisante telle que décrite dans la notice de montage du fabricant, l'appareil ne doit pas être encastré dans une bibliothèque ou un placard.
5. Alimentation électrique
- Cet appareil ne doit être branché qu'à la tension d'alimentation indiquée appareil. Si vous avez des doutes sur le type d'alimentation électrique de votre logement, veuillez vous adresser à votre revendeur spécialisé ou à votre fournisseur d'énergie local.
6. Câble d'alimentation
- Veillez à ce que personne ne puisse trébucher sur le câble d'alimentation. Veillez également à ce que le câble d'alimentation ne puisse pas être écrasé à proximité immédiate d'une prise secteur, y compris les prises à rallonge. Le câble d'alimentation ne doit pas non plus être écrasé à la sortie de l'appareil.
7. Orages
- Débranchez l'appareil du secteur en cas d'orage ou s'il n'est pas utilisé pendant une durée prolongée.
8. Surcharge
- N'exposez jamais les prises secteur, rallonges ou multiprises à une surcharge, puisque cela génère un risque d'incendie ou d'électrisation.
9. Pénétration de corps étrangers et de liquides
- Veillez à ce qu'aucun corps étranger ou liquide ne puisse pénétrer dans l'appareil par les orifices de ventilation. Cela pourrait conduire à un contact avec des éléments sous haute tension ou un court-circuit, qui peuvent occasionner un incendie ou une électrisation. Ne déversez jamais un liquide quelconque sur l'appareil.
10. Maintenance
- Ne tentez jamais de réaliser par vous-même la maintenance de cet appareil, puisque l'ouverture ou le retrait de caches peuvent donner accès à des éléments sous tension.
Tout contact avec ces éléments génère des risques. Confiez toutes les opérations de maintenance aux collaborateurs qualifiés du service clients.
11. Détériorations qui requièrent une réparation
- Ne faites effectuer les opérations de maintenance et de réparation que par un service clients qualifié. La maintenance/réparation est nécessaire lorsque l'appareil a été endommagé (par ex. le câble d'alimentation ou la fiche), qu'un liquide a pénétré dans l'appareil, que des objets ont pénétré dans l'appareil, que l'appareil a été exposé à la pluie ou l'humidité, lorsqu'il ne fonctionne plus correctement ou est tombé.
12. Pièces détachées
- En cas de mise en place de pièces détachées, assurez-vous que le technicien du service clients Utilise des pièces détachées prescrites par le fabricant ou présentant les mêmes caractéristiques que les pièces d'origine.
Les pièces détachées non homologuées peuvent occasionner des incendies, électrisations ou autres accidents.
13. Contrôle de sécurité
– Après la réalisation d'opérations de maintenance ou de réparation, priez le technicien du service clients d'effectuer un contrôle de sécurité afin de s'assurer du parfait état de fonctionnement de l'appareil.
14. Montage mural ou au plafond
- Cet appareil ne doit être installé sur un mur ou au plafond que conformément aux recommandations du fabricant.
15. Chaleur
– N'installez pas l'appareil à proximité de surfaces chaudes telles que par exemple des radiateurs, radiateurs soufflants, poêles ou autres appareils pouvant dégager de la chaleur (y compris les amplificateurs). Ne posez jamais des objets avec des flammes nues tels que des bougies ou des lanternes sur ou à proximité de l'appareil. Les piles installées ne doivent pas être exposés à une chaleur élevée occasionnée par ex. par la lumière directe du soleil, le feu, etc.
16. Câbles électriques
- Une antenne extérieure ne doit pas être installée à proximité d'un câble haute tension ou d'autres câbles électriques ou d'un endroit d'où il peut tomber sur de tels câbles électriques.
Lors de l'installation d'une antenne extérieure, il convient de veiller avec une circonspection extrême à ne pas toucher par mégarde des câbles électriques, puisque cela implique un danger de mort.
17. Batteries
– Lorsque l'appareil n'est pas utilisé pendant un mois ou plus, vous devez retirer la pile du compartiment à piles de la télécommande afin d'éviter toute fuite. Mettez immédiatement au rebut les piles qui fuient, en respectant l'ensemble des dispositions légales applicables.
Les piles qui fuient peuvent occasionner des blessures et endommager l'appareil.
Ne mélangez jamais des piles de différents types ou des piles usagées avec des piles neuves.
Risques liés à un volume sonore élevé
- Pour éviter les éventuels dommages auditifs, nous vous recommandons de ne pas trop prolonger l'écoute à un volume sonore élevé. Cela s'applique notamment lors de l'utilisation d'un casque audio.
Télécommande
- Si vous exposez le capteur de la télécommande à la lumière directe du soleil ou à la lumière de tubes fluorescents à haute fréquence, des dysfonctionnements sont possibles. Dans de tels cas, le système doit être installé à un autre endroit pour éviter de tels dysfonctionnements.
- Les piles fournies sont destinées au contrôle fonctionnel et peuvent présenter une durée de vie limitée. Lorsque la portée de la télécommande diminue, il convient de remplacer les piles usagées par piles neuves.
Prudence!
Risques d'explosion
- Lorsque des piles d'un type non adapté sont utilisées ; des températures élevées ou basses extrêmes auxquelles une pile peut être exposée pendant l'utilisation, le stockage ou le transport
- Lors d'une faible pression atmosphérique à grande altitude, lorsqu'une pile est jetée au feu ou placée dans un four chaud; lors de l'écrasement ou du sectionnement mécaniques d'une pile; lors de l'exposition prolongée d'une pile à un environnement à températures très élevées ou une pression atmosphérique très faible, qui peuvent conduire à l'explosion ou à la fuite de liquides ou gaz inflammables.
Afin de minimiser le risque d'une électrisation, d'un incendie, etc.
- Vous ne devez pas retirer de vis, de caches ou d'éléments du boîtier.
- Le bouton Marche/Arrêt ne coupe jamais entièrement l'alimentation électrique, quelle que soit sa position.
Comme la fiche d'alimentation est utilisée pour isoler l'appareil entièrement du secteur, elle ne doit pas être démontée du câble d'alimentation et être accessible à tout moment.
Fonction d'économie d'énergie automatique
Le modèle est équipé d'une fonction d'économie d'énergie automatique. Elle commute l'appareil en mode veille après 15 minutes lorsque le volume sonore la lecture est très faible ou que la radio est réglée sur le mode silencieux. Ce réglage ne peut pas être modifié.
Par la présente, la société JVCKENWOOD Corporation déclare que le type de dispositif radio M-822DAB satisfait aux exigences de la directive 2014/53/UE. Le texte complet de la déclaration de conformité UE est disponible via l'adresse Internet suivante :
https://www.kenwood.com/euukdoc/
Fabricant :
JVCKENWOOD Corporation
3-12. Moriyacho, Kanagawa-ku, Yokohama-shi, Kanagawa 221-0022, JAPAN
Responsible (UE) :
JVCKENWOOD Europe B.V.
Amsterdamseweg 37, 1422 AC UITHOORN, THE NETHERLANDS
IMPORTANT POUR LES PRODUITS LASER
- PRODUIT LASER DE LA CLASSE 1
- PRUDENCE: Ne pas ouvrir le boîtier. L'appareil ne contient pas d'éléments dont la maintenance peut être effectuée par l'utilisateur. Faites effectuer la maintenance uniquement par des techniciens qualifiés.
Déballage
Déballez avec précaution l'appareil en veillant à ce que tous les accessoires soient présents.
2 x enceintes / télécommande / Antenne filaire FM/DAB / 2 x piles R03/AAA 1,5 V
Branchement
- Ouvrez le compartiment à piles de la télécommande et insérez les piles en veillant à leur polarité. La polarité requise (+/-) est indiquée dans le compartiment à piles.
Branchez les baffes gauche et droite au connecteur (Speaker Out) au dos de l'appareil. Appuyez à cet effet sur les bornes à ressort et insérez les extrémités libres des câbles dans les orifices prévus à cet effet. Veillez à relier le conducteur noir à la borne à ressort noire. L'autre conducteur est branché à la borne rouge.
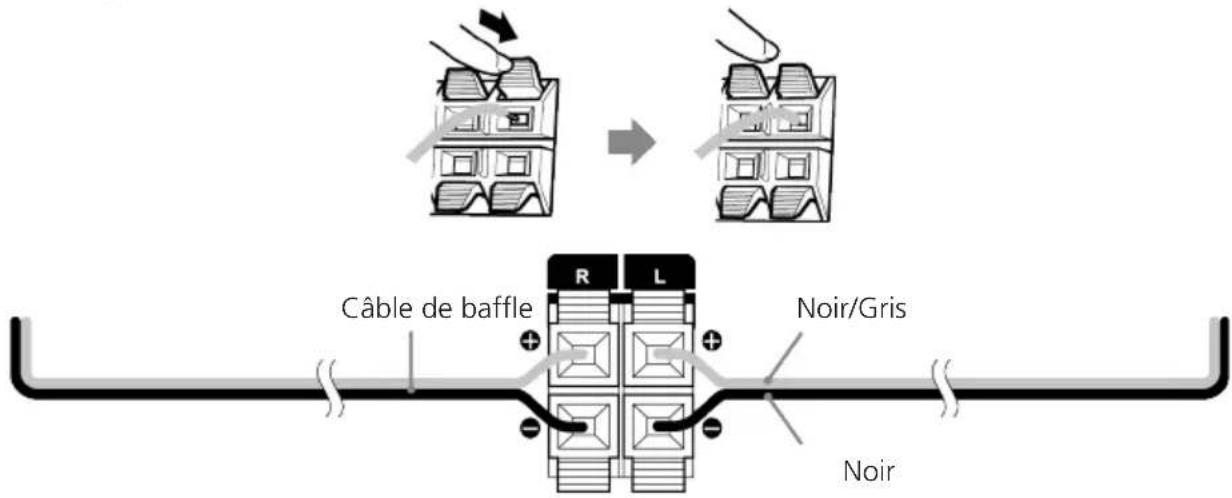
text_image
Câble de baffle
R L
Noir/Gris
Noir
- Branchez la fiche d'alimentation directement à une prise secteur à courant alternatif. Comme la fiche d'alimentation est utilisée pour isoler entièrement l'appareil du réseau électrique, la prise doit être constamment accessible.
Branchement de l'antenne DAB+ / FM
- Branchez l'antenne filaire au connecteur [ FM ANTENNA 75Ω ].
- Cherchez l'endroit qui vous offrira la meilleure réception.
- Fixez l'antenne.
L'antenne fournie est une antenne filaire simple. Pour assurer une réception stable, nous recommandons l'installation d'une antenne extérieure (disponible dans le commerce).
Pour brancher l'antenne extérieure, commencez par débrancher l'antenne intérieure. Nous ne sommes pas en mesure de garantir la bonne réception des stations radio depuis le réseau câblé.
Première utilisation
Lors de la première mise en service de l'appareil, il exécute une recherche automatique des stations DAB+. Veuillez patienter jusqu'à ce que ce processus soit entièrement terminé. Vous trouverez de plus amples informations à ce sujet dans la section « Utilisation de la radio DAB+ »
Manipulation des CD
Mesures de précaution pour la manipulation
Tenez le CD de sorte à ne pas toucher la surface numérique. (Le côté non imprimé du CD correspond au côté de lecture.)
Mesures de précaution à prendre pour les CD
Utilisez exclusivement des CD avec le marquage DISC. Un CD sans ce marquage ne pourra éventuellement pas être lu correctement.
Cet appareil est en mesure de lire les fichiers audio enregistrés sur une mémoire Flash ou un lecteur audio numérique, dès lors que ces appareils disposent d'un port USB (dans le présent document, ces appareils sont désignés par « Appareils USB »).
Les restrictions suivantes s'appliquent concernant les appareils USB utilisables :
Appareils USB utilisables
- Appareils USB appartenant à la classe des mémoires masse USB.
- Appareils USB, dont le courant absorbé maximal est de 500 mA.
- Appareils USB, de la classe des mémoires de masse USB : des appareils USB que le PC détecte comme mémoire externe, sans qu'un pilote spécial ou un logiciel d'application spécial ne soit nécessaire.
- Veuillez vous adresser à votre revendeur, si vous n'êtes pas certain que votre appareil USB correspond aux spécifications de la classe des mémoires de masse USB.
- L'utilisation d'un appareil USB qui n'est pas supporté peut conduite à une lecture ou un affichage erronés du fichier audio.
Même si vous utilisez un appareil USB qui correspond aux spécifications figurant ci-dessus, les fichiers audio peuvent ne pas être lus correctement en fonction du type ou de l'état de l'appareil USB.
Face avant
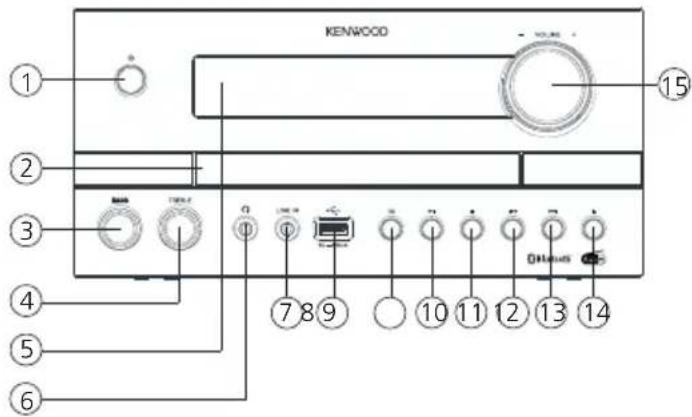
text_image
KENWOOD
15
2
3
4
5
6
7 8 9
10 11 12 13 14
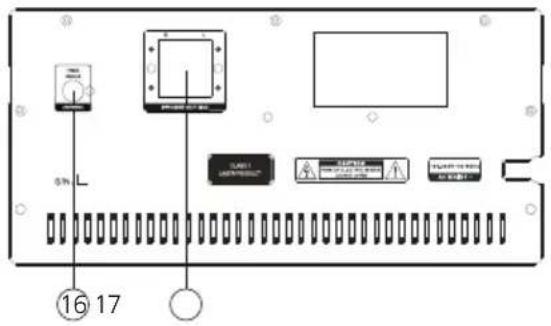
Face arrière

text_image
0%
L
16 17
1 – Veille / Marche 10 – Lecture / Pause
2 - Tiroir CD 11 - Arrêt
3 – Régulateur de basses 12 – Précédent (Titre précédent)
4 – Régulateur d'aigües 13 – Suivant (Titre suivant)
5 – Afficheur 14 – Ouvrir / Fermer (Éjecter)
6 - Connecteur de casque 15 - Volume
7 - Port Line-In
8 - Port USB 16 - Port d'antenne FM / DAB+
9 – Sélection de source (MODE) 17 – Connecteurs de baffle
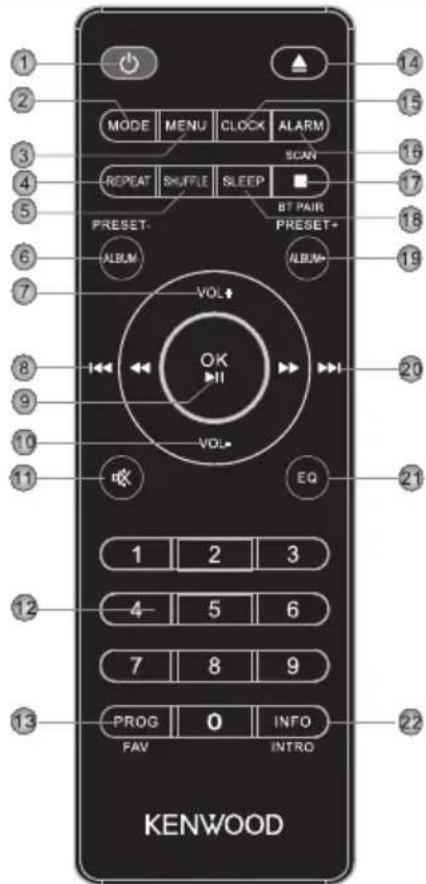
Télécommande
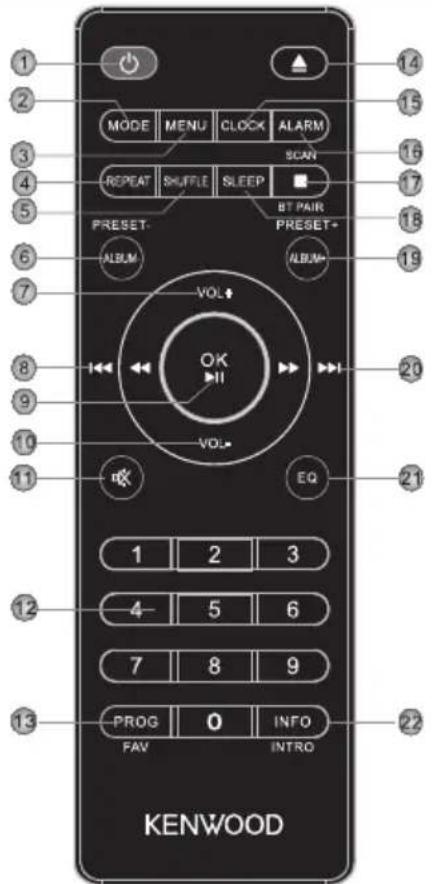
text_image
1
2
3
4
5
6
7
8
9
10
11
MODE MENU CLOCK ALARM
REPEAT SHUFFLE SLEEP
RESET-
ALBUM
VOL
OK
VOL*
BT PAIR
PRESET-
ALBUM
EQ
1 2 3
4 5 6
7 8 9
PROG 0 INFO
FAV INTRO
KENWOOD
1 Veille Marche / Arrêt
2 Sélection du mode (source)
3 Menu
4 Sélection de lecture en boucle
5 Mode aléatoire
6 Album précédent, mémoire de préréglages –
7 Augmenter le volume
8 Changement de titre / Recherche de titre parmi les titres précédents
9 Confirmer la saisie, Lecture/Pause
10 Diminuer le volume
11 Mode silencieux Marche / Arrêt (Mute)
12 Touches numériques
13 Programmation de titres, attribution un emplacement mémoire
14 Ouvrir/Fermer le tiroir de CD
15 Régler l'horloge
16 Réglage du réveil
17 Interrompre la lecture, appariage BLUETOOTH, recherche de stations
18 Réglage du minuteur de veille
19 Album prochain, mémoire de préréglages +
20 Changement de titre/Recherche de titre parmi les titres suivants
21 Sélection du préréglage d'égalisateur
22 Commutation sur les informations à l'écran, lors de la lecture 10 secondes d'introduction par titre
Fonctions de base
Pour allumer le système : Appuyez sur la touche de la télécommande ou de l'appareil principal. L'écran affiche « WELCOME ».
Arrêt du système: Appuyez sur la touche de la télécommande ou de l'appareil principal. L'écran affiche « VEILLE » et l'appareil commute en mode Veille.
Régulateur de volume
Sur la télécommande : Appuyez sur les touches pou augmenter le volume ou sur la touche pour diminuer le volume.
Sur l'appareil principal : Tournez le régulateur pour augmenter ou diminuer le volume. Lorsque le volume est réglé au minimum, l'écran affiche « VOL 00 », tandis que le volume maximal est indiqué par « VOL 32 ».
Mode silencieux temporaire : Appuyez à cet effet sur la touche de la télécommande. « MUTE » clignote sur l'afficheur. Au prochain actionnement de la touche, le volume précédent est rétabli.
Réglage du son
Vous pouvez augmenter ou diminuer les niveaux de basses et d'aigües en fonction de votre musique préférée.
Sur l'appareil principal : Tournez le régulateur BASS ou TREBLE pour régler le niveau d'amplification : Plage de réglage -6 à +6.
Égaliseur
Sur la télécommande : Appuyez sur la touche pour ouvrir les uns après les autres les réglages suivants : FLAT -> CLASSIC -> POP -> JAZZ -> ROCK
Utilisation des CD et appareils USB
Préparation
Insérer un CD
- Appuyez sur la touche de l'appareil principal ou de la télécommande pour ouvrir le compartiment à CD.
- Insérez un CD avec la face imprimée vers le haut dans le compartiment à CD.
- Appuyez sur la touche de l'appareil principal ou de la télécommande pour fermer le compartiment à CD.
Retrait d'un CD
- Appuyez sur la touche de l'appareil principal ou de la télécommande pour ouvrir le compartiment à CD.
- Retirez le CD prudemment du compartiment à CD.
- Appuyez sur la touche de l'appareil principal ou de la télécommande pour fermer le compartiment à CD.
Branchement d'appareils USB.
- Appuyez sur la touche pour sélectionner le mode Veille.
- Branchez l'appareil USB au port USB situé sur la face avant.
Retrait de l'appareil USB
- Appuyez sur la touche pour sélectionner le mode Veille.
-
Débranchez l'appareil USB du port USB.
-
Attendez toujours que l'appareil ait lu intégralement le CD / l'appareil USB avant de poursuivre.
- Si aucun CD n'est placé dans le compartiment à CD, l'afficheur indique « NO DISC ».
- Si aucun fichier exécutable ne se trouve sur l'appareil USB, l'afficheur indique « NO SONG ».
- Pour les fichiers audio, le temps de chargement peut être supérieur à 10 secondes si de nombreux titres sont enregistrés sur le CD ou l'appareil USB.
Lecture d'un CD ou d'un fichier audio (USB, CD)
Sur la télécommande : À l'aide de la touche « MODE », sélectionnez la source et appuyez sur la touche pour démarrer la lecture.
Sur l'appareil principal : À l'aide de la touche sélectionnez la source souhaitée et appuyez sur la touche pour démarrer la lecture.
Sur les appareils USB ou CD contenant des fichiers audio (par ex. MP3), le nombre de répertoires et fichiers disponibles s'affiche comme suit :
FXX XXX
Le chiffre après le « F » correspond au nombre de répertoires, et le second bloc de chiffres au nombre total de fichiers.
Pour les CD audio, les informations concernant le nombre de titres et la durée de lecture totale s'affichent comme suit :
XX XX:XX
Le premier bloc de chiffres correspond alors au nombre de titres et le second à la durée de lecture totale du CD.
Fonctions de commande de base
Interruption de la lecture : Appuyez sur la touche de l'appareil principal ou de la télécommande pour interrompre la lecture.
Interruption de la lecture : Appuyez sur la touche de l'appareil principal ou de la télécommande pour interrompre la lecture. Le témoin sur l'afficheur clignote. Un nouvel actionnement de la touche permet de poursuivre la lecture.
Recherche d'une section spécifique lors de la lecture : Appuyez pendant plus de 2 secondes sur la touche ou de l'appareil principal ou de la télécommande pour activer l'avance ou le recul rapide. Dès que la section souhaitée est atteinte, relâchez la touche correspondante.
Sélection d'un titre spécifique : Appuyez sur la touche ou de l'appareil principal ou de la télécommande en mode lecture, pause ou arrêt. Les touches numériques de la télécommande permettent de sélectionner les titres directement.
Sélection d'un répertoire spécifique (fichiers audio uniquement) : Appuyez sur les touches ou de la télécommande, pour sélectionner un répertoire.
Lecture brève des débuts de titres : Appuyez de manière prolongée sur la touche de la télécommande pour écouter brièvement (10 secondes) les débuts des titres. Un nouvel actionnement interrompt ce mode.
Programmation de titres et fichiers
À l'aide de la télécommande, vous pouvez programmer les titres d'un CD audio ou les fichiers dans l'ordre souhaité. Vous disposez à cet effet du nombre suivant d'emplacements de mémoire :
CD audio : 20 emplacements mémoire Fichiers : 99 emplacements mémoire
Mode opératoires pour CD audio
- La source « CD » doit être en mode Arrêt. Si ce n'est pas le cas, l'écran affiche « STOP FIRST ».
- Appuyez sur la touche pour démarrer le mode de programmation.
- L'écran affiche à présent « P01 001 » tandis que « 01 » clignote. Le premier bloc de chiffres correspond au titre actuel, le second à l'emplacement mémoire actuel.
- À l'aide des touches ou , sélectionnez le titre que vous souhaitez enregistrer sur l'emplacement mémoire actuel. Les titres peuvent être choisis aussi à l'aide des touches numériques de la télécommande.
- Appuyez sur la touche pour confirmer le processus.
- Ensuite, l'afficheur indique l'emplacement mémoire suivant. Répétez les étapes 4 et 5 jusqu'à avoir terminé votre sélection ou jusqu'à ce que tous les emplacements mémoire soient occupés. Dans ce cas, « Full » s'affiche sur l'afficheur.
- La touche permet de démarrer la lecture des titres programmés. Pendant la lecture, l'écran affiche en alternant le numéro du titre et celui de l'emplacement programmé.
- Pour effacer la programmation, il vous suffit d'appuyer deux fois sur la touche .
Mode opératoire pour fichiers audio
- La source « USB » doit être en mode Arrêt. Si ce n'est pas le cas, l'écran affiche « STOP FIRST ».
- Appuyez sur la touche pour démarrer le mode de programmation.
- L'écran affiche à présent « P01 001 » tandis que « 01 » clignote. Le premier bloc de chiffres correspond au titre actuel, le second à l'emplacement mémoire actuel.
- À l'aide des touches ou , sélectionnez le titre que vous souhaitez enregistrer sur l'emplacement mémoire actuel. Les titres peuvent être choisis aussi à l'aide des touches numériques de la télécommande.
- Appuyez sur la touche pour confirmer le processus.
- Ensuite, l'afficheur indique l'emplacement mémoire suivant. Répétez les étapes 4 et 5 jusqu'à avoir terminé votre sélection ou jusqu'à ce que tous les emplacements mémoire soient occupés. Dans ce cas, « FULL » s'affiche sur l'afficheur.
- La touche permet de démarrer la lecture des titres programmés. Pendant la lecture, l'écran affiche en alternant le numéro du titre et celui de l'emplacement programmé.
- Pour effacer la programmation, il vous suffit d'appuyer deux fois sur la touche .
- Si vous appuyez sur la touche pendant la programmation, le processus est annulé. Le programme existant est supprimé lorsque vous éteignez l'appareil.
Mode opératoires pour CD audio
- Appuyez sur la touche de la télécommande pour démarrer la lecture aléatoire. L'écran affiche « SHUF » et la lecture peut être démarrée. Si vous appuyez deux fois sur la touche ou une fois sur la touche, la lecture aléatoire est interrompue.
- Appuyez sur la touche de la télécommande pour démarrer la lecture en boucle. L'actionnement répété active les fonctions suivantes :
Répéter le titre actuel (affichage « RPT ONE »)
Lecture en boucle de tous les titres (affichage « RPT ALL »)
Désactivation de la lecture en boucle (l'écran affiche « RTP OFF »)
La touche permet de démarrer la lecture.
La fonction de lecture en boucle est annulée en appuyant sur la touche .
Mode opératoire pour fichiers audio
- Appuyez sur la touche de la télécommande pour démarrer la lecture aléatoire. L'écran affiche « SHUF » et la lecture peut être démarrée. Si vous appuyez deux fois sur la touche ou une fois sur la touche, la lecture aléatoire est interrompue.
- Appuyez sur la touche de la télécommande pour démarrer la lecture en boucle. L'actionnement répété active les fonctions suivantes :
Répéter le titre actuel (affichage « RPT ONE »)
Lecture en boucle de tous les titres (affichage « RPT ALL »)
Lecture en boucle de l'album actuel (« RPT ALB »)
Désactivation de la lecture en boucle (l'écran affiche « RTP OFF »)
La touche permet de démarrer la lecture.
La fonction de lecture en boucle est annulée en appuyant sur la touche .
Utilisation de la radio DAB+
Appuyez sur la touche de la télécommande ou de l'appareil principal jusqu'à ce que l'écran affiche « DAB ».
Réglage des stations DAB+
Lors de la mise en service de l'appareil, une recherche de stations a été réalisée. Les stations trouvées ainsi sont enregistrées par ordre alphabétique dans la liste des stations.
Relancement de la recherche de stations
- Appuyez sur la touche
- Pendant la recherche de stations, l'afficheur affiche le nombre de stations déjà trouvées.
- Si aucune station n'est trouvée lors de la recherche de stations, l'écran affiche pendant env. 2 secondes « NO DAB », puis commute sur l'affichage « FULL SCAN ».
Vous devez contrôler alors le branchement correct de l'antenne ou déplacer l'appareil afin d'améliorer la réception.
Réglage manuel des ensembles
- Appuyez sur la touche
- Appuyez sur la touche jusqu'à ce que « MANUAL » s'affiche à l'écran.
- La touche « OK » confirme la fonction et le canal réglé actuel s'affiche avec la fréquence correspondante sur l'afficheur.
- Appuyez sur la touche ou pour choisir manuell. un autre canal.
- Confirmez la sélection à l'aide de la touche . Le niveau du signal s'affiche alors sur l'afficheur. Un nouvel actionnement de la touche charge l'ensemble.
Sélection d'une station DAB+
Pour afficher les stations mémorisées par ordre alphabétique dans la liste des stations, procédez comme suit :
- Appuyez sur la touche ou sur la télécommande ou l'appareil pour feuilleter la liste des stations dans un sens ou dans l'autre.
- Lorsque vous avez sélectionné la station souhaitée, appuyez sur la touche de la télécommande ou attendez env. 2 secondes pour démarrer la lecture.
L'écran affiche « LOADING » suivi de « PLAYING ».
- Si le niveau de réception de la station sélectionnée est insuffisant pour une lecture fluide, le message « OFF AIR » s'affiche à l'écran. Vous devez alors sélectionner une autre station.
Enregistrement des stations dans la mémoire de stations
30 emplacements mémoire sont disponibles pour enregistrer des stations DAB afin de les trouver plus facilement. Pour affecter la mémoire, procédez comme suit :
- Sélectionnez une station pour l'enregistrer.
- Appuyez sur la touche jusqu'à ce que l'écran clignote et affiche un emplacement mémoire. Un emplacement mémoire vide est indiqué par « EMPTY », un emplacement occupé par le nom de la station. Vous pouvez aussi réaffecter un emplacement mémoire déjà attribué.
- Appuyez sur la touche ou pour choisir un emplacement mémoire.
- Confirmez la sélection à l'aide de la touche . Le message « STORED » clignote brièvement à l'écran.
- Les stations mémorisées peuvent être ouvertes comme suit :
Appuyez sur les touches numériques de la télécommande, pour saisir directement le numéro de l'emplacement mémoire. Terminez la saisie à l'aide de la touche. Vous pouvez aussi utiliser la touche suivie de ou pour la sélection.
Pour DAB+, des informations complémentaires sont transmises en plus du signal musical. Ces informations peuvent être affichées comme suit :
Appuyez sur la touche de la télécommande pour afficher les unes après les autres les informations suivantes :
- Niveau du signal : L'afficheur indique le volume à l'aide de symboles de gauche à droite.
Plus le nombre de symboles affichés est élevé, plus la qualité de la réception est élevée.
- PTY (Type de programme) : Cette option désigne la répartition des stations par styles, par ex. Pop, Actualités, Religion, Infos, Classiques, etc.
- Désignation de l'ensemble, par ex. DR Deutschland.
- Affichage du canal et de la fréquence de la station paramétrée.
- ERR XX : Cette information indique le taux d'erreurs de la réception numérique. Il dépend du niveau du signal et peut aussi servir à l'orientation optimale de l'antenne.
- XX K BPS : Affichage de la vitesse de transmission de la station, par ex. 80 kBit/s. La vitesse de transmission peut varier d'une station à l'autre.
- DABPLUS : Désigne le type de réception « DAB+ ».
- Heure actuelle.
- Date actuelle.
La touche