mémorise les stations correspondantes dans la liste.
5.3 Liste des stations
Utilisez les touches ou de l'appareil ou de la télécommande pour sélectionner une station, puis confirmez à l'aide de la touche . L'appareil lance automatiquement la lecture.
Remarque : La qualité de réception de la station dépend de facteurs tels que le temps, le lieu d'installation et de l'orientation de l'antenne. Si la réception d'une station de la liste de stations devait ne pas être possible, vous pouvez modifier l'orientation de l'antenne ou déplacer la radio.
Les stations supprimées peuvent être effacées de la liste des stations.
5.4 Supprimer les stations dont la réception n'est pas ou plus possible
Les stations dont la réception n'est plus possible peuvent être supprimées de la liste. Appuyez à cet effet sur la touche
, puis sélectionnez l'option « Ecrêter ». Sélectionnez « OUI » pour supprimer ces stations. Sélectionnez « NON » pour revenir au menu sans supprimer les stations.
5.5 Favoris (emplacements mémoire)
Vous disposez de 30 emplacements mémoire pour mémoriser des stations DAB+ (favoris). Pour ouvrir des stations mémorisées, appuyez sur la touche , puis sélectionnez l'emplacement mémoire souhaité en appuyant sur ou et confirmez par .
Les emplacements mémoire 1 à 10 peuvent être sélectionnés aussi à l'aide des touches numériques de la télécommande, la touche <0> correspondant alors à l'emplacement mémoire 10.
5.5.1 Mémorisation de stations DAB+
Pour mémoriser les stations DAB+, il convient de procéder comme suit :
- Sélectionnez la station que vous souhaitez mémoriser sur l'un des 30 emplacements mémoire.
- Appuyez sur la touche jusqu'à ce que « Mémor. prérégl. » s'affiche à l'écran.
- Sélectionnez l'emplacement mémoire souhaité, puis appuyez sur .
- L'écran affiche « Mémorisé XX Mem.sé », « XX » correspondant au numéro de l'emplacement mémoire sélectionné.
Remarque : Les emplacements mémoire ne peuvent pas être supprimés, mais ils peuvent être écrasés par d'autres stations.
Appuyez sur la touche
pour afficher le menu spécifique à la source. Les fonctions suivantes sont disponibles :
- Recherche totale : Nouvelle recherche de stations automatique.
- Réglage manuel : Il permet de régler manuellement un canal de réception spécifique.
- DRC (Dynamic Range Control) : Si cette fonction est compatible avec la station paramétrée, elle permet d'adapter la plage dynamique.
Les réglages possibles sont « DRC Désactivé », « DRC bas » et « DRC haut ».
- Ecrêter : La fonction sert à supprimer de la liste des stations les stations invalides ou celles dont la réception n'est plus possible.
- Système : Réglages pour le minuteur de veille, le réveil, l'heure, l'éclairage, la langue, les mises à jour logicielles et le paramétrage d'usine.
6. Radio FM
Pour la réception de la radio FM, sélectionnez à l'aide de la touche de la télécommande ou sur l'appareil la source « FM ».
6.1 Réglage d'une station FM
Appuyez sur la touche pour augmenter la fréquence de réception.
Appuyez sur la touche pour diminuer la fréquence de réception.
Si vous maintenez une de ces touchesappuyées, l'appareil lance une recherche de stations automatiques qui sera interrompue à la prochaine station trouvée.
- Appuyez sur la touche pour lancer une mémorisation automatique des stations. Toutes les stations détectées sont enregistrées dans la mémoire des stations.
Fonctions RDS
Les informations suivantes peuvent être affichées en appuyant de manière répétée sur la touche : PTY (Program Type) / Texte radio RDS / Fréquence / Réception stéréo / Heure / Date
En cas de conditions de réception insuffisantes, la réception de ces informations peut être perturbée ou impossible.
6.2 Enregistrement des stations dans la mémoire de stations
30 emplacements mémoire sont disponibles pour enregistrer des stations FM afin de les trouver plus facilement.
Pour les mémoriser, il convient de procédez comme suit :
Sélectionnez la station que vous souhaitez mémoriser sur l'un des 30 emplacements mémoire.
Appuyez sur la touche jusqu'à ce que « Mémor. prérégl. » s'affiche à l'écran
Sélectionnez l'emplacement mémoire souhaité, puis appuyez sur
L'écran affiche « Mémorisé XX Mem.sé », « XX » correspondant au numéro de l'emplacement mémoire sélectionné.
Remarque : Les emplacements mémoire ne peuvent pas être supprimés, mais ils peuvent être écrasés par d'autres stations.
Appuyez sur la touche
pour afficher le menu spécifique à la source. Les fonctions suivantes sont disponibles :
Régl. recherche : « Toutes chaînes » ou « Stations fortes ».
Réglage audio : « Stéréo admis » ou « Stations mono ». Sélectionnez « Stations mono » si les conditions de réception sont mauvaises.
Système : Réglages pour le minuteur de veille, le réveil, l'heure, l'éclairage, la langue, les mises à jour logicielles et le paramétrage d'usine.
7. Lecture d'un CD
La source « CD » permet la lecture de CD audio et de CD MP3. Sélectionnez à l'aide de la touche de la télécommande ou sur l'appareil la source « CD ».
Ouvrez le compartiment CD en appuyant sur la touche de l'appareil principal ou de la télécommande. Insérez le CD et fermez le compartiment en appuyant sur . La lecture débute automatiquement par le premier titre du CD. En appuyant de manière prolongée sur la touche de la télécommande, vous pouvez écouter brièvement les débuts des titres du CD.
Pour les CD audio, les informations concernant le nombre de titres et la durée de lecture totale s'affichent comme suit :
TX/XX XX:XX
Le premier bloc de chiffres correspond alors au nombre de titres et le second à la durée de lecture totale du CD. Lors de la lecture, le numéro du titre en cours et la durée écoulée actuelle s'affichent.
7.1 Lecture de fichiers MP3
Les touches ou vous permettent de vous déplacer dans les arborescences de répertoires. La touche permet d'interrompre ou de poursuivre la lecture. Tant que vous maintenez la touche appuyée, vous pouvez faire défiler les titres à une vitesse croissante vers l'avant ou l'arrière. L'actionnement bref de la touche vous ramène au début du titre ou au titre précédent.
Pour les CD contenant des fichiers MP3, le nombre de répertoires et fichiers disponibles s'affiche comme suit :
FX/XX TXX/XX
Le chiffre après le « F » correspond au nombre de répertoires, et le second bloc de chiffres au nombre total « T »de fichiers.
7.2 Lecture aléatoire et en boucle
Pour obtenir une lecture aléatoire d'un CD ou des fichiers MP3 d'un répertoire, ou une lecture en boucle des fichiers, utilisez les touches ou de la télécommande. Les fonctions sont activées comme suit par l'actionnement répété de la touche :
Lecture en boucle :
Appuyer 1 x : Lecture en boucle titre / appuyer 2 x : Lecture en boucle album (MP3 uniquement)
Appuyer 3 x : Lecture en boucle tous / appuyer 4 x : Arrêt
Lecture aléatoire :
Appuyer 1 x : Lecture aléatoire Marche / appuyer 2 x : Lecture aléatoire Arrêt
8. Lecteur USB
Cette source vous permet de lire des fichiers MP3 (16 bit/48 kHz) depuis une clé USB. Sélectionnez à l'aide de la touche de la télécommande ou sur l'appareil la source « USB ».
8.1 Lecture de fichiers MP3
Les touches ou vous permettent de vous déplacer dans les arborescences de répertoires. La touche permet d'interrompre ou de poursuivre la lecture. Tant que vous maintenez la touche appuyée, vous pouvez faire défiler les titres à une vitesse croissante vers l'avant ou l'arrière. L'actionnement bref de la touche vous ramène au début du titre ou au titre précédent.
Pour les CD contenant des fichiers MP3, le nombre de répertoires et fichiers disponibles s'affiche comme suit :
FX/XX TXX/XX
Le chiffre après le « F » correspond au nombre de répertoires, et le second bloc de chiffres au nombre total « T » de fichiers.
8.2 Lecture aléatoire et en boucle
Pour obtenir une lecture aléatoire des fichiers MP3 d'un répertoire, ou une lecture en boucle des fichiers, utilisez les touches ou de la télécommande.
Les fonctions sont activées comme suit par l'actionnement répété de la touche :
Lecture en boucle :
Appuyer 1 x : Lecture en boucle titre / appuyer 2 x : Lecture en boucle d'un album
Appuyer 3 x : Lecture en boucle tous / appuyer 4 x : Arrêt
Lecture aléatoire :
Appuyer 1 x : Lecture aléatoire Marche / appuyer 2 x : Lecture aléatoire Arrêt
9. Audio BLUETOOTH
La fonction BLUETOOTH permet la transmission sans fil des fichiers de musique (Streaming audio) à la radio. Des smartphones, tablettes ou appareils similaires peuvent être appariés à la radio. Sélectionnez à l'aide de la touche de la télécommande ou sur l'appareil la source « BT ».
9.1 Premier appariage (Pairing) d'appareils BLUETOOTH
Assurez-vous que le terminal à apparier est allumé et que sa fonction BLUETOOTH est bien activée.
L'écran affiche « Non connecté ». Ouvrez alors les réglages BLUETOOTH du terminal à apparier et lancez la recherche d'appareils BLUETOOTH disponible sur ce terminal. Sélectionnez l'option
« M-525DAB » et lancez le processus d'appariage. Lorsque l'appariage s'est terminé avec succès, l'écran affiche « Connecté ». Vous pouvez à présent gérer la diffusion de musique via le terminal.
Utilisez à cet effet l'appli de musique de votre choix.
La commande de base des fonctions Lecture/Pause et Sauts de titre Avant/Arrière est possible à l'aide des touches correspondantes de la télécommande.
Remarque : Certains terminaux requièrent un code PIN pour l'appariage. Saisissez alors les chiffres « 0000 ».
9.2 Connexion automatique après l'appariage
Lorsque la source « BT » est désélectionnée ou que la radio est éteinte, la connexion BLUETOOTH est interrompue. Si la radio est activée de nouveau ou commutée sur la source « BT »
9.3 Appariage d'un nouveau terminal
Pour apparier un terminal supplémentaire à la radio, appuyez de manière prolongée sur la touche . La connexion actuelle est interrompue. Procédez ensuite comme lors du premier appariage d'un terminal.
9.4 Interruption de la connexion BLUETOOTH
Si vous souhaitez interrompre la connexion avec un appareil apparié, il vous suffit d'appuyer de manière prolongée sur la touche (Appariage BLUETOOTH) de la télécommande. La redio commute alors en mode d'appariage.
10. Line-IN
Pour la lecture de musique, vous pouvez brancher des appareils externes tels que des lecteurs MP3, lecteurs DVD ou consoles de jeu au port Line-In. À cet effet, sélectionnez à l'aide de la touche de la télécommande ou sur l'appareil la source « Line-In ».
11. Paramétrage d'usine
Pour rétablir la config. d'origine de la radio, il suffit de sélectionner « OUI » dans le menu « Régl. en usine? ». Attention : Tous les paramétrages effectués jusqu'à cet instant sont effacés.
L'actionnement du bouton « NON » annule le processus.
12. Élimination des défaillances
En cas de dysfonctionnements, veuillez vérifier les points suivants :
Absence de son
→ Branchez correctement le bloc d'alimentation à fiches.
Le système ne réagit pas à l'actionnement des touches
→ Débranchez la fiche secteur de la prise secteur, puis branchez-la de nouveau.
Problèmes lors de la réception radio
→ Réorientez l'antenne.
13. Maintenance et entretien
Nettoyage du boîtier
Utilisez un chiffon légèrement humecté avec un détergent doux. N'utilisez pas de détergents contenant de l'alcool, de l'ammoniac ou d'abrasifs.
La condensation (rosée) peut se former à l'intérieur de l'appareil si la différence entre la température de l'appareil et la température ambiante est trop importante. Si la condensation se forme à l'intérieur de l'appareil, elle peut nuire à son bon fonctionnement. Dans ce cas, il convient d'attendre quelques heures. Une fois l'humidité disparue, l'appareil peut de nouveau être utilisé.
Des précautions particulières sont à prendre dans les cas suivants :
Si l'appareil est déplacé d'un endroit à un autre dont la température est considérablement plus élevée ou basse, si l'humidité ambiante augmente sur le lieu d'installation de l'appareil, etc.
Manipulation des CD
Tenez le CD de sorte à ne pas toucher la surface numérique. (Le côté non imprimé du CD correspond au côté de lecture.)
Utilisez exclusivement des CD avec le marquage DISC . Un CD sans ce marquage ne pourra éventuellement pas être lu correctement.
Remarques concernant l'utilisation d'un appareil USB
Cet appareil est en mesure de lire les fichiers audio enregistrés sur une mémoire Flash ou un lecteur audio numérique, dès lors que ces appareils disposent d'un port USB (dans le présent document, ces appareils sont désignés par « Appareils USB »).
Les restrictions suivantes s'appliquent concernant les appareils USB utilisables :
Appareils USB utilisables
Appareils USB appartenant à la classe des mémoires masse USB.
Appareils USB, dont le courant absorbé maximal est de 500 mA.
Appareils USB, de la classe des mémoires de masse USB : des appareils USB que le PC détecte comme mémoire externe, sans qu'un pilote spécial ou un logiciel d'application spécial ne soit nécessaire.
Veuillez vous adresser à votre revendeur, si vous n'êtes pas certain que votre appareil USB correspond aux spécifications de la classe des mémoires de masse USB.
L'utilisation d'un appareil USB qui n'est pas supporté peut conduite à une lecture ou un affichage erronés du fichier audio.
Même si vous utilisez un appareil USB qui correspond aux spécifications figurant ci-dessus, les fichiers audio peuvent ne pas être lus correctement en fonction du type ou de l'état de l'appareil USB.
14. Mise au rebut
Mise au rebut d'appareils électriques et électroniques usagés et de piles
text_image
FR
Cet appareil,
ses accessoires
et piles
se recyclent
À DÉPOSER
EN MAGASIN
OU
À DÉPOSER
EN DÉCHÉTERIE
Points de collecte sur www.quefairedemesdechets.fr
Privilégiez la réparation ou le don de votre appareil !
Le symbole (poubelle barrée) sur le produit ou son emballage indique qu'en fin de vie, ce produit ne doit pas être jeté aux ordures ménagères, mais doit être remis gratuitement à un point de collecte installé par un service public de gestion des déchets ou un distributeur.
De manière générale, les propriétaires d'appareils électriques et électroniques usagés doivent retirer de l'appareil les piles et accus usagés qui ne sont pas intégrés en fixe dans l'appareil usagé avant de remettre ce dernier au centre de traitement de déchets. Cela ne s'applique pas si les appareils usagés sont remis à la préparation de revalorisation sous la responsabilité d'un centre de traitement de déchets de droit public. Par votre contribution à l'élimination correcte de ce produit, vous protégez l'environnement et la santé de vos concitoyens. Une mise au rebut non conforme ou erronée occasionne des risques pour l'environnement et la santé. Vous pouvez obtenir des informations plus détaillées au sujet du recyclage des appareils électriques et électroniques usagés, ainsi que des piles usagées auprès de votre commune ou des entreprises de traitement de déchets communaux.
Consignes de mise au rebut à l'attention des consommateurs en Allemagne :
https://www.e-schrott-entsorgen.org/
Consignes de mise au rebut à l'attention des consommateurs en Autriche :
https://www.elektro-ade.at/
La marque et les logos Bluetooth® sont des marques déposées de la société BLUETOOTH SIG Inc. Toute utilisation de ces marques par la société JVCKENWOOD Corporation. Fait l'objet d'une licence. Les autres marques et appellations commerciales appartiennent à leurs propriétaires respectifs.
Caractéristiques techniques – M-525DAB
Alimentation électrique Tension alternative ~ 100 - 240 V Fréquence de courant alternatif d'entrée 50/60 Hz Puissance absorbée 15 Watt Puissance absorbée en mode veille < 1 Watt Antenne UKW/DAB+ Gamme d'accord DAB BANDE III 174,928 MHz – 239,200 MHz Gamme d'accord FM 87,50 MHz – 108,00 MHz Mode CD Distance de bruit de signal (filtre A) ≥ 70 dB Étendue dynamique ≥ 60 dB Appareils USB Fichiers exécutables : MP3 Compatible avec USB1.1 Full-speed, FAT16, FAT32 Max. 500 mA, vitesses de transmission : 32 kbit/s à 320 kbit/s BLUETOOTH Version BLUETOOTH V5.0 Classe de performances Classe 2 Puissance émettrice maximale max. 13 dBm Portée Env. 10 m (peut varier en fonction de l'environnement) Plage de fréquences 2,402 GHz – 2,480 GHz Profil BLUETOOTH A2DP (Advanced Audio Distribution Profile, AVRCP (Audio/Video Remote Control Profile) Line-In Douille de jack 3,5 mm Amplificateur Puissance de sortie 2 x 7 Watt / 6 Ohm Plage de fréquences 20 Hz - 20 kHz (+- 3dB) Dimensions et poids Module principal (L x H x P) 180 x 122 x 240 mm / 1,6 kg Baffles (L x H x P) 128 x 227 x 127 mm / 0,9 kg chaque unité Plage de température 0°C à +40°C
16. Garantie
Cher client,
Nous vous remercions d'avoir opté pour ce produit Kenwood. Si ce produit devait présenter des défauts de pièces ou de main d'œuvre sous des conditions d'utilisation normales, nous les éliminerons gratuitement ou remplacerons l'appareil à nos frais, conformément à nos conditions de garantie.
Veuillez conserver soigneusement la présente carte de garantie.
Kenwood accorde sur cet appareil une garantie de deux ans à partir de la date d'achat indiqués sur la facture ou le justificatif d'achat du revendeur Kenwood.
Cette garantie s'étend aux défauts de pièces et main d'œuvre. Nous nous réservons le droit de remplacer le produit si sa réparation n'est plus appropriée sur le plan économique. Les coûts d'emballage et d'installation, ainsi que les coûts et risques liés à la réparation elle-même ne sont pas inclus dans la prestation de garantie et seront facturés.
Conditions
A. Pour faire valoir un droit de garantie, les données suivantes sont nécessaire en plus de la présentation de la présente carte de garantie :
(a) Vos noms et adresse complets.
Kenwood se réserve le droit de refuser la prestation de garantie sir les informations indiquées ci-dessus ne sont pas disponibles ou si le produit a été modifié depuis son acquisition initiale.
B. À a date de la livraison au commerçant, le présent produit satisfait à toutes les normes et disposition de sécurité applicables dans le pays de destination. Les modifications nécessaires à l'utilisation de l'appareil dans les pays en dehors du pays de destination sont exclues des dispositions de garantie susnommées. De plus, nous déclinons toute responsabilité pour les interventions réalisées dans ce contexte, ni pour les détériorations du produit occasionnées par de telles interventions.
Si le produit est utilisé dans un pays pour lequel il n'est ni conçu, ni fabriqué, nos interventions de garantie ne sont réalisées que si les coûts pour la transformation de l'appareil en fonction des normes et dispositions de sécurité nationales applicables sont prises en charge par l'utilisateur.
Si de plus, le produit est différent des produits commercialisés par l'importateur officiel et si certaines pièces détachées n'étaient pas disponibles pour la réparation du produit, l'utilisateur doit prendre en charge les frais pour les transports aller et retour de l'appareil vers et depuis le pays d'acquisition.
Cela s'applique également si dans le pays concerné, les prestations de garantie ne peuvent pas être proposées pour d'autres raisons.
C. Sont exceptés des prestations de garantie :
(a) Les modifications du produit ainsi que les opérations de maintenance et de réglage normales, y compris les contrôles réguliers indiqués dans la notice d'emploi.
Cette garantie peut être exercée par toute personne ayant acquis le produit en toute légalité.
Conformément aux dispositions de garantie sus-nommées, le produit est réparé ou remplacé gratuitement. Ce droit ne nuit en aucun cas aux autres droits de l'utilisation dans le cadre des dispositions juridiques applicables.
La réparation ou le emplacement ne donnent pas lieu à une prolongation de la durée de garantie.
Les droits complémentaires sont exclus, notamment ceux relatifs à la rédhibition, la réduction du prix ou les dommages-intérêts.
Coordonnées :
JVCKENWOOD EUROPE B.V. Succursale France
7 Allee des Barbanniers,
92632 Gennevilliers CEDEX
Tel. 09-69-390-811 www.kenwood-electronics.f
KENWOOD
KENWOOD
Sistema stereo compatto
M-525DAB
MANUALE DI ISTRUZIONI
JVCKENWOOD Corporation
Indice
Contenuto Pag.
Prima della messa in funzione / istruzioni di sicurezza 3
Messa in servizio 6
Componenti e funzioni 7
Funzionamento della radio 9
4.1 Accensione/Spegnimento (Standby) 9
Radio digitale DAB+ 11
5.1 Scansione stazioni 11
Radio FM 12
6.1 Impostazione di un stazione FM 12
Riproduzione del CD 13
7.1 Riproduzione di file MP3 14
Lettore USB 14
8.1 Riproduzione di file MP3 14
Audio BLUETOOTH 15
9.1 Accoppiamento dei dispositivi BLUETOOTH per la prima volta 15
Line-In 15
Impostazioni di fabbrica 15
Risoluzione dei problemi 16
Cura e manutenzione 16
Smaltimento 17
Dati tecnici 18
Garanzia 19
1. Prima di attivare la tensione di alimentazione
IMPORTANTI ISTRUZIONI DI SICUREZZA
Attenzione: Leggere attentamente questa pagina per garantire un funzionamento sicuro dell'unità.
Leggere attentamente queste istruzioni!
- Seguire tutte le istruzioni di sicurezza e d'uso durante l'utilizzo di questo prodotto.
Conservare le note in un luogo sicuro!
- Conservare le istruzioni di sicurezza e d'uso per future consultazioni.
Osservare tutte le indicazioni di avvertenza!
- Seguire scrupolosamente tutte le avvertenze riportate sul prodotto e nelle istruzioni per l'uso.
Pulire solo con un panno asciutto!
- Prima di pulire il prodotto, scollegare l'alimentatore di rete dalla presa a muro. Non utilizzare mai detergenti liquidi o spray di pulizia. Per la pulizia utilizzare solo un panno leggermente umido.
Accessori
- Utilizzare solo gli accessori specificati dal produttore.
Non usare questo prodotto vicino all'acqua.
- Non esporre mai l'apparecchio a gocce o spruzzi d'acqua - ad esempio in prossimità di una vasca da bagno, lavabo, lavandino, lavello, lavatrice, cantina umida, piscina, ecc. Non collocare mai sopra l'apparecchio contenitori pieni di liquidi, come vasi.
Ventilazione
- Le fessure e le aperture all'interno dell'involucro sono previste per la ventilazione dell'apparecchio per garantire un funzionamento affidabile dell'apparecchio, per proteggerlo dal surriscaldamento e dall'eventuale autoaccensione. Non bloccare le aperture di ventilazione. Installare l'apparecchio secondo le istruzioni del produttore. Non bloccare mai le aperture di ventilazione collocando l'apparecchio su un letto, un divano, una moquette o una superficie morbida simile. Questa unità non deve essere installata in una libreria o un armadio a meno che non vi sia un'adeguata ventilazione.
Alimentazione della tensione
- Questo apparecchio può essere collegato esclusivamente alla tensione di rete indicata sull'apparecchio stesso. Se non siete sicuri del tipo di alimentazione elettrica della vostra casa, contattate il vostro rivenditore o l'azienda elettrica locale.
Cavo di rete
- Assicurarsi che non sia possibile inciampare sul cavo di rete e che esso non sia scollegato nelle immediate vicinanze di una presa, comprese le uscite aggiuntive. Inoltre, non schiacciare il cavo di alimentazione quando esce dall'unità.
Poiché la spina di rete viene utilizzata per lo scollegamento completo dalla rete, deve essere lasciata attaccata al cavo di rete e rimanere sempre accessibile.
Intemperie
- Scollegare l'apparecchio dalla rete elettrica durante i temporali e quando non verrà utilizzato per un lungo periodo di tempo.
Sovraccarico
- Non sovraccaricare mai le prese di alimentazione, le prolunghe o le prese multiple, in quanto sussiste il rischio di incendio o scossa elettrica.
Penetrazione di materiale estraneo e liquido
- Non permettere che materiali estranei o liquidi entrino nell'apparecchio attraverso le aperture in dotazione, poiché ciò potrebbe causare il contatto diretto dell'apparecchio con elementi soggetti a tensioni eccessive, provocare cortocircuiti, incendi o scosse elettriche. Non versare mai liquidi di alcun tipo su questo apparecchio.
Manutenzione
- Non tentare mai di riparare l'apparecchio da soli, poiché le aperture o la rimozione delle coperture possono esporre parti sotto tensione che potrebbero essere pericolose al contatto. Per tutti gli interventi di manutenzione rivolgersi a personale qualificato.
Danni che richiedono una riparazione
- I lavori di manutenzione e riparazione devono essere eseguiti esclusivamente da un centro di assistenza clienti qualificato.
L'assistenza è necessaria quando l'apparecchio è stato danneggiato (ad esempio, cavo di alimentazione o la espina), è stato versato del liquido, sono caduti oggetti all'interno dell'apparecchio, oppure l'apparecchio è stato esposto a pioggia o umidità, non funziona normalmente o è caduto.
Ricambi
- Se sono necessarie parti di ricambio, assicurarsi che il tecnico dell'assistenza utilizzi parti di ricambio prescritte dal costruttore o aventi le stesse caratteristiche delle parti originali. Ricambi non autorizzati possono causare incendi, scosse elettriche o altri incidenti.
Controllo di sicurezza
- Al termine dei lavori di manutenzione o riparazione di questo apparecchio, chiedere al tecnico dell'assistenza di eseguire un controllo di sicurezza per determinare se l'apparecchio è in perfette condizioni di funzionamento.
Calore
- Non installare l'unità in prossimità di superfici calde come radiatori, termoventilatori, stufe o altre apparecchiature (compresi gli amplificatori) che potrebbero surriscaldarsi. Non collocare mai oggetti con fiamme libere, come candele o lanterne, sopra o vicino al prodotto. Le batterie installate nel telecomando non devono essere esposte a calore eccessivo, come la luce solare diretta, il fuoco o simili.
Batterie
- Se non si utilizza l'unità per un mese o più, rimuovere le batterie dal vano batterie del telecomando per evitare perdite. Smaltire immediatamente le batterie che presentano perdite e rispettare tutte le disposizioni di legge pertinenti. La perdita delle batterie può causare lesioni e danneggiare il dispositivo. Non combinare mai batterie di tipo diverso o batterie vecchie e nuove.
Per ridurre al minimo il rischio di scosse elettriche, incendi, ecc
• non rimuovere viti, coperture o parti dell'alloggiamento.
Rischi associati a volumi elevati
- Per evitare possibili danni all'udito, non ascoltare ad alto volume per lunghi periodi di tempo.
Telecomando
- Se si espone il sensore del telecomando alla luce solare diretta o alla luce di tubi fluorescenti ad alta frequenza, possono verificarsi dei malfunzionamenti. In questi casi collocare il sistema in un altro posto per evitare tali malfunzionamenti.
- La batteria fornita in dotazione è pensata per un test funzionale e può avere una durata limitata. Quando il raggio d'azione del telecomando diminuisce, sostituire la batteria vecchia con una nuova.
Prudenza!
Pericolo di esplosione
se si utilizzano batterie del tipo sbagliato;
alte o basse temperature estreme alle quali una batteria può essere esposta durante l'uso, lo stoccaggio o il trasporto;
bassa pressione dell'aria ad alte quote;
lo smaltimento di una batteria nel fuoco o in un forno caldo;
quando si schiaccia o si taglia meccanicamente una batteria;
lasciare una batteria in un ambiente con temperature estremamente elevate o con una pressione dell'aria estremamente bassa, potrebbe causare un'esplosione o una perdita di liquidi o gas infiammabili.
Funzione automatica di risparmio energetico
Il modello è dotata di una funzione automatica di risparmio energetico. Questo commuta l'apparecchio in modalità standby entro 15 minuti se la radio è in riproduzione a volume molto basso o se la radio è silenziata. Questa impostazione non può essere modificata.
IMPORTANTE PER PRODOTTI LASER
PRODOTTO LASER DI CLASSE 1
PRUDENZA: Non aprire l'alloggiamento. L'apparecchio non contiene pezzi che possono essere sottoposti a manutenzione da parte dell'utente; fare eseguire le operazioni di manutenzione esclusivamente a personale specializzato qualificato.
JVCKENWOOD Corporation dichiara che l'apparecchiatura radio tipo M-525DAB è conforme alla Direttiva 2014/53/UE. Il testo integrale della dichiarazione di conformità UE è disponibile al seguente indirizzo Internet: http://www.kenwood.com/euukdoc/
Produttore:
JVCKENWOOD Corporation
3-12. Moriyacho, Kanagawa-ku, Yokohama-shi, Kanagawa 221-0022, JAPAN
Rappresentante autorizzato (UE):
JVCKENWOOD EUROPE B.V., Amsterdamseweg 37, 1422 AC UITHOORN, THE NETHERLANDS
2. Messa in servizio
2.1 Sconfezionamento
Sconfezionare delicatamente il dispositivo e assicurarsi che tutti gli accessori siano presenti:
• Telecomando a infrarossi
2.2 Collegamento
- Aprire il vano batterie del telecomando e inserire le batterie con la polarità corretta. La polarità specificata (+/-) è indicata nel vano batterie.
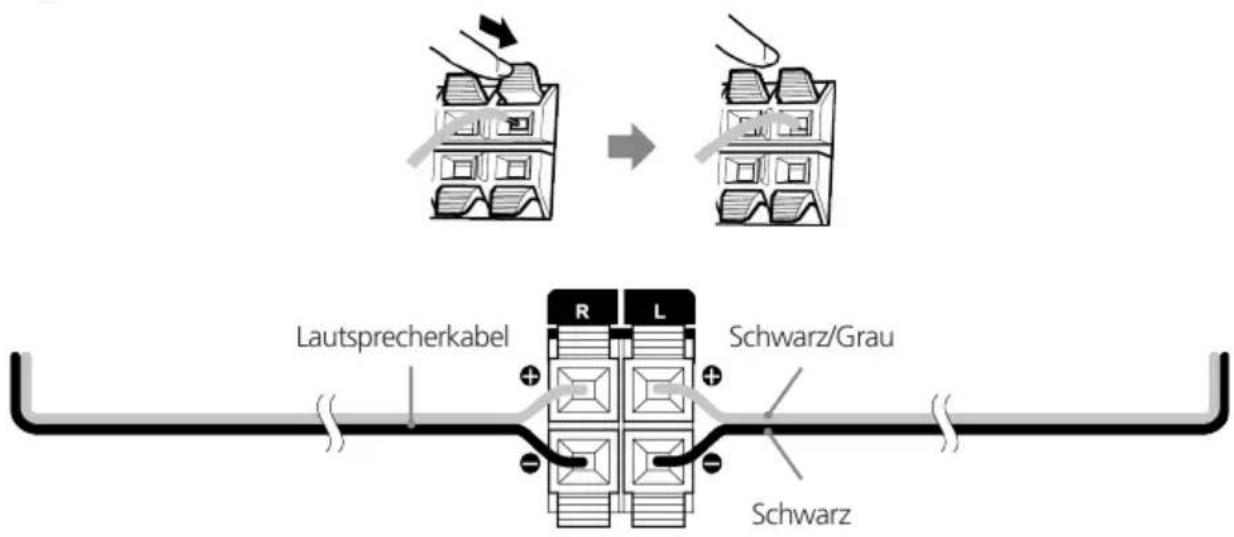
Collegare gli altoparlanti sulla presa e destra e a sinistra (all'uscita altoparlante) sul retro dell'unità. A tale scopo, premere le clip a molla e inserire le estremità dei cavi sfusi nelle aperture previste. Collegare il filo nero con il morsetto a molla nero. L'altro filo è collegato al terminale rosso nello stesso modo.
text_image
Cavo dell'altoparlante
Nero/ griglio
R L
Nero
Collegare saldamente la spina di alimentazione a una presa di corrente. Poiché la spina di rete serve per scollegarsi completamente dalla rete, la presa deve rimanere sempre accessibile.
2.3 Attacco antenna mobile DAB+ / FM
Collegare l'antenna mobile alla presa [ANTENNA 75Ω].
Trovare il luogo dove si ottiene la migliore ricezione.
Fissare l'antenna.
L'antenna fornita con il sistema è una semplice antenna mobile. Per una ricezione stabile del segnale, si raccomanda l'uso di un'antenna esterna (disponibile in commercio).
Per collegare un'antenna esterna, prima scollegare l'antenna interna.
La ricezione delle stazioni radio dalla rete via cavo non può essere garantita.
3. Componenti e funzioni
text_image
1
2
3
4
5
6
7
8
9
10
11
12
13
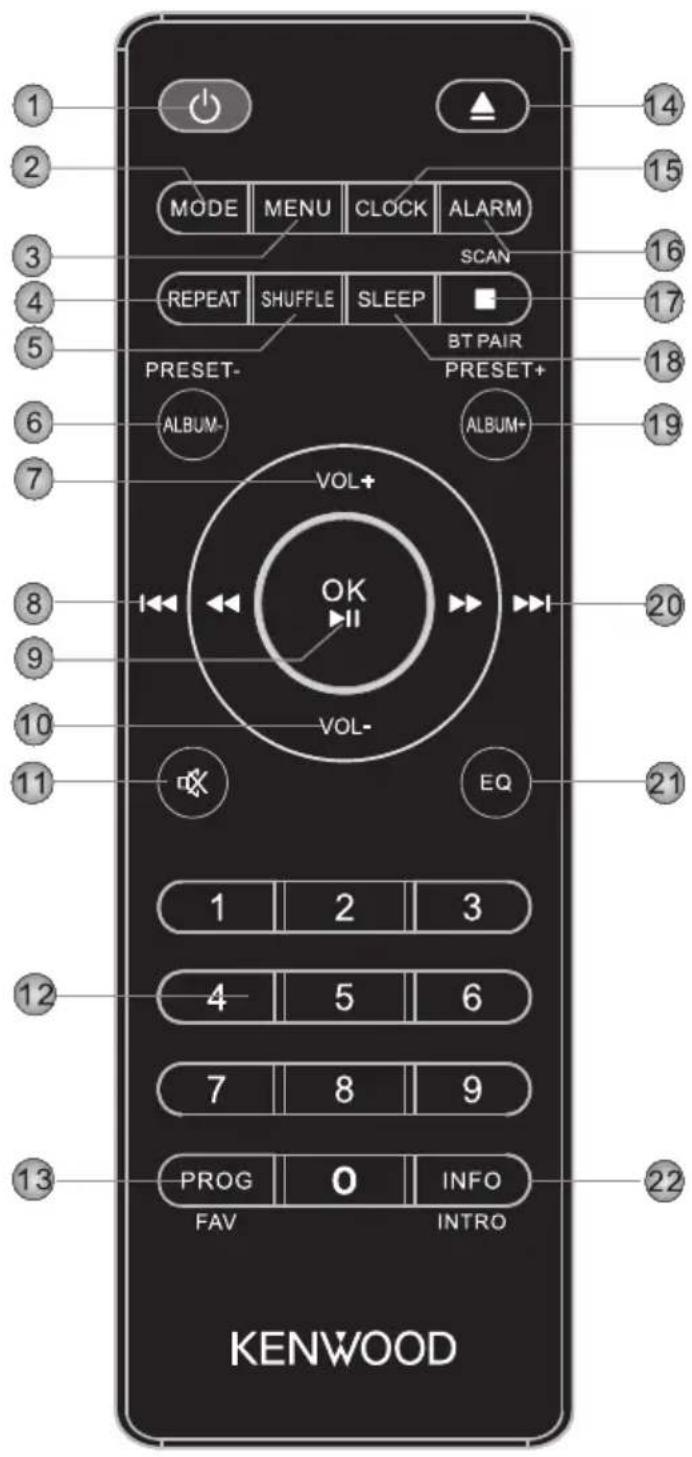
MODE MENU CLOCK ALARM
REPEAT SHUFFLE SLEEP BT PAIR
PRESET-
ALBUM-
VOL+
OK
VOL-
EQ
PROG INFO
FAV INTRO
KENWOOD
1 2 3
4 5 6
7 8 9
20
21
14
15
16
17
18
19
22
1 Standby On/Off
3. Componenti e funzioni Continuazione
Fronte
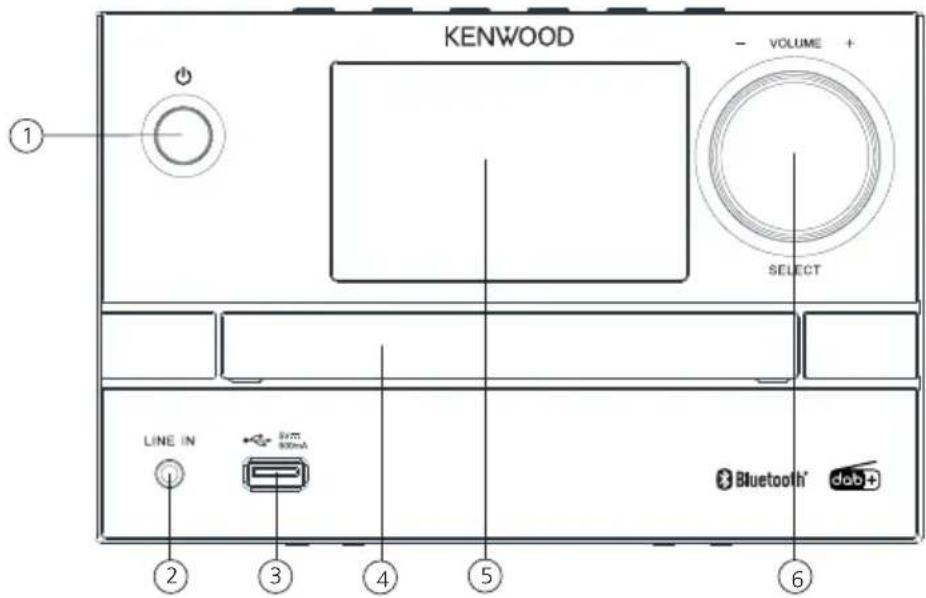
1 - Standby On/Off
text_image
KENWOOD
VOLUME +
SELECT
LINE IN
Bluetooth® dob+
①
②
③
④
⑤
⑥
Pianta
flowchart
graph TD
    A["7"] --> B["8"]
    B --> C["9"]
    C --> D["10"]
    D --> E["○"]
    E --> F["12"]
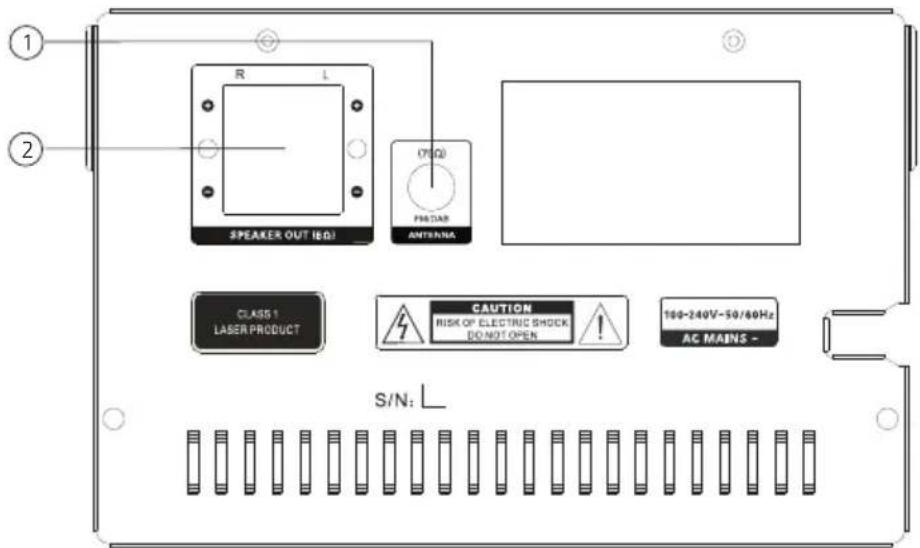
Lato posteriore
1 - Ingresso dell'antenna
text_image
1
2
R L
SPEAKER OUT (EQ)
(7)Ω
PARTAR
ANTenna
CLASS 1
LASER PRODUCT
CAUTION
RISK OF ELECTRIC SHOCK
DO NOT OPEN
100-240V-50/60Hz
AC MAINS -
S/N: L
4. Funzionamento della radio
4.1 Accensione/Spegnimento (Standby)
Premere il pulsante di standby sull'unità o sul telecomando per accendere la radio. Premere nuovamente il tasto per mettere il dispositivo in modalità standby. Per spegnerla completamente, scollegare la radio dalla rete elettrica.
Premere il tasto
del telecomando per accedere al menu relativo alla sorgente.
Premendo i tasti o sull'unità o sul telecomando per navigare nei menu. Confermare la selezione del menu con il tasto <OK sul telecomando o il tasto <SELEZIONE procedere allo stesso modo per la selezione delle impostazioni.
4.3 Regolare il volume
Ruotando il controllo del volume, è possibile regolare il volume. Sul telecomando, i tasti e l'impostazione del volume viene visualizzata graficamente sul display.
4.4 Regolazione del suono (equalizzatore)
Il sistema dispone di cinque impostazioni sonore preimpostate:
"PIATTO" / "CLASSICO" / "POP" / "JAZZ" / "ROCCIA".
Questi possono essere selezionati col tasto sul telecomando.
Premendo ripetutamente il tasto possono essere visualizzate informazioni aggiuntive, a seconda della sorgente e della stazione:
Descrizione
Nome del canale, del programma corrente, dei contenuti, degli argomenti, ecc.
Genere
Bit Rate
Accendere la radio e accedere al menu.
Selezionare il menu "System" e confermare la selezione.
Ora selezionate il menu "Language" e confermare.
Selezionare e confermare la lingua desiderata nel menu seguente.
4.7 Impostazione della data e dell'ora
Quando si riceve il segnale di una stazione DAB+ o VHF di qualità sufficiente, l'ora viene impostata automaticamente. A seconda dell'intensità di ricezione, questo processo può richiedere del tempo. Se non è disponibile una stazione corrispondente, è possibile impostare l'ora anche manualmente:
Accendere la radio e accedere al menu.
Selezionare il menu "Sistema" e confermare la selezione.
Ora aprite il menu "Ora" e confermare.
"Impost. ora/data" per selezionare e confermare l'opzione visualizzata. Quindi selezionare, impostare e confermare ore, minuti, giorno, mese e anno.
Il menu "Ora" il menu può essere richiamato anche tramite il tasto <CLOCK sul telecomando.
Si possono selezionare le seguenti funzioni nel menu "Ora":
"Aggiorn. automatico": Impostazione della fonte da cui viene richiamata automaticamente l'ora.
Possibilità di scelta: "Aggiorn. da qualsiasi" / "Aggiorn. da DAB" / "Aggiorn. da FM" / "Nessun aggiorn."
"Impost. 12/24 ore": Impostazione del formato dell'ora.
Possibilità di scelta: "Impost. 24 ore" / "Impost. 12 ore"
"Impost. formato data": Impostazione del formato della data.
Possibilità di scelta: "GG-MM-AAAA" / "MM-GG-AAAA"
4.8 Impostazione dell'illuminazione del display
L'illuminazione del display può essere programmata in 3 livelli di luminosità. Nel menu è possibile effettuare le seguenti impostazioni di "Retroilluminazione":
"Timeout": Tempo fino a quando il display è impostato sul livello di illuminazione nella schermata
"Livello affievolito" è regolamentato.
Possibilità di scelta: "On / 10 / 20 / 30 / 45 / 60 / 90 / 120 / 180 secondi"
"On" significa che la radio è sempre nel livello di luminosità del parametro "Livello attivo".
"Livello attivo": Luminosità del display quando la radio è accesa.
Possibilità di scelta: "Alto" / "Medio" / "Basso"
"Livello affievolito": Impostazione della luminosità per il funzionamento e stand-by.
Possibilità di scelta: "Alto" / "Medio" / "Basso"
4.9 Regolazione del timer di sospensione
Il timer di spegnimento viene utilizzato per spegnere automaticamente la radio dopo un periodo di tempo prestabilito. Per effettuare l'impostazione procedere come segue:
Accendere la radio e accedere al menu.
Selezionare il menu "Sistema" e confermare la selezione.
Ora aprire il menu "Sleep" e confermare.
Scegliere quindi tra le seguenti opzioni: "Off, 15, 30, 45, 60, 90 minuti"
Il menu "Sleep" il menu può essere richiamato anche tramite il tasto sul telecomando.
4.10 Impostazione della sveglia
Con questo dispositivo è possibile impostare 2 diversi tempi della sveglia. Questi tempi di risveglio possono essere programmati per i seguenti blocchi di tempo: "Ogni giorno" / "Una volta" / "Fine settimana" / "Giorni feriali"
Per effettuare l'impostazione della sveglia, procedere come segue:
Accendere la radio e accedere al menu.
Selezionare il menu "Sistema" e confermare la selezione.
Ora aprite la finestra "Sveglia" e confermare.
"Sveglia 1 impost" viene visualizzato. Ora è possibile impostare l'ora della sveglia 1 o impostarlo con i tasti o per passare alla sveglia 2 ("Sveglia 2 impost").
Dopo la conferma si prega di eseguire le seguenti operazioni:
Impostazione di ore e minuti, conferma della selezione ogni...
Impostazione della durata dell'allarme ("15, 30, 45, 60, 90 minuti")
Poi come fonte DAB, FM, CD, USB o Cicalino selezionare e confermare.
"Ultimo ascolto" o altro spazio di archiviazione e confermare.
Questa voce di menu appare solo quando si seleziona DAB o FM come sorgente.
- Nel menu successivo impostare la frequenza con "Ogni giorno" / "Una volta" / "Fine settimana" / "Giorni feriali" selezionare e confermare.
- Regolare quindi il volume di accensione con il tasto e e confermare
- Sveglia "On" oppure "Off" per selezionare e confermare l'opzione scelta.
L'ora della sveglia è ora memorizzata e il simbolo della sveglia appare in basso a sinistra del display durante la riproduzione e in standby.
Per l'impostazione della 2° sveglia procedere allo stesso modo per regolare l'ora. Per eliminare una sveglia impostata, selezionare quanto segue nell'ultimo passaggio del processo di impostazione "Sveglia Off" oppure tenere premuto il tasto per 2 secondi.
La sveglia si attiva all'ora specificata per la durata impostata, il simbolo della sveglia lampeggia sul display.
Il menu "Sveglia" può essere richiamato anche tramite il metodo sul telecomando.
5. Radio digitale DAB+
Per ricevere la radio digitale DAB+, accendere la radio con il tasto sul telecomando o sull'unità alla sorgente "DAB". Alla prima commutazione viene avviata una ricerca automatica delle stazioni. Il display mostra "Ricerca...", il numero di stazioni trovate finora e una barra di avanzamento corrispondente. L'intensità di ricezione e la ricezione stereo delle stazioni sono visualizzate sul display.
5.1 Scansione stazioni
Per cercare le stazioni ricevibili, è possibile avviare una scansione automatica. Per fare questo, richiamare il menu con il tasto
per aprire il menu e selezionare "Ricerca completa". Il display mostra "Ricerca...", il numero di stazioni trovate finora e una barra di avanzamento corrispondente. Dopodiché le stazioni vengono memorizzate in ordine alfabetico.
I canali che sono stati trovati durante una precedente ricerca ma che attualmente non sono ricevibili vengono visualizzati nella lista dei canali con un “?” davanti al nome della stazione.
5.2 Impostare manualmente
È anche possibile impostare manualmente le stazioni. Per fare questo, richiamare il menu con il tasto
per aprire il menu e selezionare "Sintonizz. manuale". Selezionare quindi il canale desiderato e confermare con . Ora vengono visualizzate le informazioni sulla stazione e sulla potenza del segnale. Premendo nuovamente il tasto si salvano le stazioni corrispondenti nella lista.
5.3 Elenco dei canali
Utilizzare i tasti o sull'unità o sul telecomando per selezionare un canale e premere per confermare. L'unità avvia automaticamente la riproduzione.
Avvertenza: La qualità di ricezione di una stazione dipende da fattori quali il tempo, la posizione e dalla ricezione dell'antenna. Se una stazione dell'elenco delle stazioni non può essere ricevuta, cambiare l'orientamento dell'antenna o la posizione della radio.
Le stazioni che non possono più essere ricevute possono essere rimosse dall'elenco delle stazioni.
5.4 Cancellare le stazioni che non sono (più) ricevibili
Le stazioni che non possono più essere ricevute possono essere cancellate dalla lista. Per fare questo, premere il tasto
e scegliere "Elimina". Selezionare "SI" e questi canali verranno eliminati. Selezionare "NO" vi riporta al menu senza cancellare i canali.
5.5 Preferiti (spazi di memoria)
Sono disponibili 30 posizioni di memoria (Preferiti) per memorizzare le vostre stazioni DAB+. Per richiamare le stazioni memorizzate, premere il tasto e selezionare la posizione di memoria desiderata premendo o e poi per selezionare.
Le posizioni di memoria da 1 a 10 possono essere selezionate anche con i tasti numerici del telecomando <0> corrisponde alla posizione di memoria 10.
5.5.1 Memorizzazione delle stazioni DAB+
Per memorizzare le stazioni DAB+, procedere come segue:
Selezionare la stazione da memorizzare in una delle 30 posizioni di memoria.
Tenere premuto il tasto fino a quando "Memor.preselez." appare sul display
Selezionare la posizione di memoria desiderata e premere
Il display visualizza "Preselez. XX In mem" dove "XX" corrisponde al numero della posizione di memoria selezionata.
Avvertenza: Le posizioni di memoria non possono essere cancellate, possono essere sovrascritte solo con altre stazioni.
Premere il tasto
per accedere al menu relativo alla sorgente. Sono disponibili le seguenti funzioni:
Ricerca completa: Nuova ricerca automatica delle stazioni.
Sintonizz. manuale: Ciò consente di impostare manualmente un canale di ricezione specifico.
DRC (Dynamic Range Control): Se supportato dalla stazione selezionata, effettuare un adattamento dell'intervallo dinamico.
- Elimina: Consente di eliminare dall'elenco delle stazioni quelle non valide o che non possono più essere ricevute.
- Sistema: Impostazioni per timer sleep, sveglia, orologio, illuminazione, lingua, Aggiornamento software e impostazioni di fabbrica.
6. Radio FM
Per ricevere le FM, commutare su FM con il tasto sul telecomando o sul dispositivo alla sorgente "FM".
6.1 Impostazione di un stazione VHF
Premere il tasto per aumentare la frequenza di ricezione.
Premere il tasto per ridurre la frequenza di ricezione.
Quando si preme il tasto o si avvia una ricerca automatica delle stazioni, che si ferma alla stazione successiva trovata.
Premere il tasto , per avviare la scansione automatica dei canali. Tutte le stazioni trovate-vengono memorizzate nella memoria delle stazioni.
Funzioni RDS
Premendo ripetutamente il tasto si possono richiamare le seguenti informazioni: PTY (Tipo di programma) / RDS Testo radiofonico / Frequenza / Ricezione stereo / Ora / Data
In caso di condizioni di ricezione insufficienti, la ricezione di queste informazioni potrebbe essere disturbata o non possibile.
6.2 Memorizzazione delle stazioni nella memoria delle stazioni
Per facilitare la ricerca a un stazione FM sono disponibili 30 posizioni di memoria.
Per salvare, procedere come segue:
Selezionare la stazione da memorizzare in una delle 30 posizioni di memoria.
Tenere premuto il tasto fino a quando "Memor.preselez." appare sul display
Selezionare la posizione di memoria desiderata e premere
Il display visualizza "Preselez. XX In mem" dove "XX" corrisponde al numero della posizione di memoria selezionata.
Avvertenza: Le posizioni di memoria non possono essere cancellate, possono essere sovrascritte solo con altre stazioni.
Premere il tasto
per accedere al menu relativo alla sorgente. Sono disponibili le seguenti funzioni:
Impostaz. di ricerca: "Tutte le stazioni" o "Solo stazioni con buona ricezi".
Impostaz. audio: "Ricezione stereo" o "Solo mono". Selezionare "Solo mono" per le condizioni di scarsa ricezione.
Sistema: Impostazioni per timer sleep, sveglia, orologio, illuminazione, lingua, Aggiornamento software e impostazioni di fabbrica.
7. Riproduzione del CD
Informazioni sulla fonte "CD" è possibile riprodurre CD audio e CD MP3. Per fare ciò, passare con il tasto sul telecomando o sul dispositivo alla sorgente "CD" fonte.
Aprire il vano CD premendo il pulsante sull'unità principale o sul Telecomando. Inserire il CD e chiudere il vassoio premendo . La riproduzione inizia automaticamente col primo titolo del CD memorizzato. Tenendo premuto il tasto sul telecomando, è possibile riprodurre brevemente i brani del CD.
Per i CD audio l'informazione relativa al numero di brani e alla durata totale del brano, viene visualizzata nel modo seguente:
TX/XX XX:XX
In questo caso il primo gruppo di numeri indica il numero dei brani e il secondo il tempo di riproduzione totale del CD. Durante la riproduzione, vengono visualizzati il numero del brano in corso di riproduzione e il tempo trascorso fino a quel momento.
7.1 Riproduzione di file MP3
Tramite i tasti o per navigare nella struttura delle cartelle. Col tasto si mette in pausa e riprende la riproduzione. Premendo in modo permanente i tasti è possibile avanzare o retrocedere all'interno del titolo a velocità crescente. Con una breve pressione del tasto si va all'inizio del titolo o al titolo precedente.
Per CD contenenti file audio (ad es. MP3), il numero delle cartelle e dei file presenti viene visualizzatonel modo seguente:
FX/XX TXX/XX
In questo caso la cifra dopo la lettera "F" indica il numero delle cartelle mentre il secondo gruppo di numeri indica la quantità totale di file "T".
7.2 Riproduzione casuale e ripetizione
Per riprodurre in ordine casuale i brani di un CD o i file MP3 di una cartella o per ripetere la riproduzione dei file, utilizzare i tasti o sul telecomando. Premendo ripetutamente, le funzioni vengono attivate come segue:
Ripetere :
Premere 1 x: Ripetizione del brano / premere 2 volte: Ripetere album (solo MP3)
Premere 3 x: Ripetere Tutti / Premere 4 volte: Da
Riproduzione random :
Premere 1 x: Riproduzione random On / premere 2 volte: Riproduzione random Off
8. Lettore USB
Con questa sorgente è possibile riprodurre file MP3 (16Bit/48kHz) da una chiavetta USB. Per fare ciò, passare con il tasto sul telecomando o sull'unità alla sorgente "USB".
8.1 Riproduzione di file MP3
Tramite i tasti o per navigare nella struttura delle cartelle. Col tasto si mette in pausa e riprende la riproduzione. Premendo in modo permanente i tasti è possibile avanzare o retrocedere all'interno del titolo a velocità crescente. Con una breve pressione del tasto si va all'inizio del titolo o al titolo precedente.
Per CD contenenti file audio (ad es. MP3), il numero delle cartelle e dei file presenti viene visualizzatonel modo seguente:
FX/XX TXX/XX
In questo caso la cifra dopo la lettera "F" indica il numero delle cartelle mentre il secondo gruppo di numeri indica la quantità totale di file "T".
8.2 Riproduzione casuale e ripetizione
Per riprodurre i file MP3 in una cartella in ordine casuale o per ripetere la riproduzione dei file, utilizzare i tasti o sul telecomando.
Premendo ripetutamente, le funzioni vengono attivate come segue:
Ripetere :
Premere 1 x: Ripetizione del brano / premere 2 volte: Album della ripetizione
Premere 3 x: Ripetere Tutti / Premere 4 volte: Da
Riproduzione random :
Premere 1 x: Riproduzione random On / premere 2 volte: Riproduzione random Off
9. Audio BLUETOOTH
La funzione BLUETOOTH permette la trasmissione senza fili di file musicali (streaming audio) alla radio. Smartphone, tablet o dispositivi simili possono essere accoppiati. Per fare ciò, passare con il tasto sul telecomando o sull'unità alla sorgente "BT".
9.1 Accoppiamento di dispositivi BLUETOOTH per la prima volta (Pairing)
Assicurarsi che il dispositivo terminale da accoppiare sia acceso e che il BLUETOOTH sia attivato. Il display visualizza "Non collegata". A questo punto aprire le impostazioni BLUETOOTH sul dispositivo da accoppiare e avviare la ricerca dei dispositivi BLUETOOTH disponibili. Selezionare "M-525DAB"
e iniziare il processo di accoppiamento. Dopo il successo dell'accoppiamento, il display mostra "Collegato". Ora la riproduzione della musica può essere controllata tramite il dispositivo terminale.
Utilizzate l'applicazione musicale di vostra scelta.
Il funzionamento di base di play/pausa e salto di traccia in avanti/indietro è possibile utilizzando i tasti corrispondenti sul telecomando.
Avvertenza: Alcuni terminali richiedono un codice PIN durante l'accoppiamento, quindi inserire "0000" uno.
9.2 Collegamento automatico dopo l'accoppiamento
Se è spenta la fonte "BT" oppure la radio, la connessione BLUETOOTH è scollegata. Se la radio viene riaccesa o commutata sulla sorgente "BT"
9.3 Accoppiamento di un ulteriore dispositivo terminale
Per associare un altro dispositivo terminale alla radio, tenere premuto il pulsante . In questo modo si scollega il collegamento di corrente. Procedere ora come per il primo accoppiamento di un dispositivo terminale.
9.4 Interruzione della connessione BLUETOOTH
Se si desidera interrompere la connessione a un dispositivo accoppiato, tenere premuto il pulsante sul telecomando. La radio torna quindi in modalità di accoppiamento.
10. Line-IN
Per riprodurre musica, è possibile collegare alla porta Line-In dispositivi esterni come lettori MP3, lettori DVD o console di gioco. Per fare ciò, passare con il tasto sul telecomando o sull'unità alla sorgente "Linea In".
11. Impostazioni di fabbrica
Per resettare la radio alle impostazioni di fabbrica, selezionare "Sì" sul menu "Ripristino valori di default". Attenzione: Tutte le impostazioni effettuate in precedenza vengono cancellate.
Selezionando "NO" il processo viene interrotto.
12. Risoluzione dei problemi
In caso di malfunzionamenti, verificare i seguenti punti:
Nessun suono
→ Inserire correttamente l'alimentatore di rete.
Il sistema non risponde alla pressione di un tasto
→ Staccare la spina dalla presa di corrente e reinserirla.
Problemi di ricezione radio
→ Riorientare l'antenna.
13. Cura e manutenzione
Pulizia dell'alloggiamento
Utilizzare un panno leggermente inumidito con un detergente delicato. Non utilizzare detergenti contenenti alcool, ammoniaca o abrasivi.
La condensa (rugiada) può formarsi all'interno dell'apparecchiatura se vi è una differenza significativa tra la temperatura dell'apparecchiatura e la temperatura ambiente. Se all'interno dell'unità si forma della condensa, non è possibile garantire il corretto funzionamento. In questo caso, l'unità deve essere sottoposta a manutenzione per alcune ore; dopo che l'umidità si sia asciugata, l'unità può essere riutilizzata.
Particolare attenzione deve essere prestata nelle seguenti circostanze
Se l'apparecchiatura viene spostata da un luogo ad un altro dove la temperatura è significativamente più alta o più bassa, o se l'umidità nel luogo in cui l'apparecchiatura è installata aumenta, ecc.
Come maneggiare i CD
Tenere il CD in modo da non toccare la superficiedel segnale. (Il lato non stampato è il lato di riproduzione.)
Utilizzare esclusivamente CD con la marcatura . Un CD privo di questa marcatura potrebbe fra l'altro non essere riprodotto correttamente.
Indicazioni per l'utilizzo di un dispositivo USB
Questo apparecchio è in grado di riprodurre file audio salvati su una memoria flash o su un audio player digitale, se questi dispositivi dispongono di una porta USB (Nel presente documento questi apparecchi vengono definiti dispositivi USB).
Per quanto concerne i dispositivi USB utilizzabili valgono le seguenti limitazioni:
Dispositivi USB utilizzabili
Dispositivi USB appartenenti alla classe dei dispositivi di memoria di massa USB.
I dispositivi USB il cui assorbimento massimo di corrente non supera i 500 mA.
Classe dei dispositivi di memoria di massa USB: Dispositivi USB che il PC riconosce come memorie esterne, senza che siano necessari un driver o un software di utilizzo speciali.
Consultare il proprio rivenditore se non si è sicuri se il proprio dispositivo USB è conforme alle specifiche per la classe dei dispositivi di memoria di massa USB.
L'utilizzo di un dispositivo USB non supportato può determinare una riproduzione o una visualizzazione errate dei fileaudio.
Anche quando si utilizza un dispositivo USB conforme alle specifiche summenzionate, è possibile che i file audio, in base al tipo o allo stato del dispositivo USB, non vengano riprodotti correttamente.
14. Smaltimento
Smaltimento delle apparecchiature elettriche ed elettroniche e delle batterie usate.
Il simbolo (pattumiera barrata) presente sul prodotto o sulla sua confezione indica che questo prodotto non deve essere trattato come un normale rifiuto domestico a fine vita, ma deve essere consegnato gratuitamente presso un punto di raccolta di un'autorità pubblica di smaltimento dei rifiuti o presso un punto di ritiro istituito dai produttori o dai distributori.
Di norma, i proprietari dei RAEE devono separare le pile e gli accumulatori esausti che non sono saldamente racchiusi nei RAEE da questi ultimi prima di consegnarli al punto di raccolta. Ciò non si applica se i RAEE sono preparati per il riutilizzo con la partecipazione di un'autorità pubblica di gestione dei rifiuti. Contribuendo al corretto smaltimento di questo prodotto, si protegge l'ambiente e la salute degli altri esseri umani. Uno smaltimento improprio o non corretto mette in pericolo l'ambiente e la salute. Per ulteriori informazioni sul riciclaggio dei vecchi apparecchi elettrici e delle batterie è possibile rivolgersi alle autorità locali o alle aziende municipalizzate che si occupano dello smaltimento dei rifiuti.
Istruzioni per lo smaltimento per i consumatori in Germania:
https://www.e-schrott-entsorgen.org/
Istruzioni per lo smaltimento per i consumatori in Austria: https://www.elektro-ade.at/
Il marchio denominativo e i loghi Bluetooth® sono marchi registrati di BLUETOOTH SIG Inc. e qualsiasi uso di questi marchi da parte di JVCKENWOOD Corporation è concesso in licenza. Gli altri marchi e nomi commerciali sono quelli dei rispettivi proprietari.
Dati tecnici M-525DAB
Alimentazione della tensione Tensione alternata ~ 100 – 240 V Frequenza di corrente alternata in ingresso 50/60 Hz Potenza assorbita 15 Watt Potenza assorbita nella modalità stand-by < 1 Watt Antenna UKW/DAB+ Intervallo di sintonizzazione DAB BAND III 174,928 MHz -239,200 MHz Gamma di sintonia UKW 87,50 MHz – 108,00 MHz Funzionamento con CD Distanza segnale/rumore (filtro A) ≥ 70 dB Intervallo dinamico ≥ 60 dB Dispositivi USB File riproducibili: MP3 Compatibile con USB1.1 Full-Speed, FAT16, FAT32 Max. 500 mA, bit rate: da 32 kBit/s a 320 kBit/s BLUETOOTH Versione BLUETOOTH V5.0 Classe di prestazione Classe 2 Massima potenza di trasmissione max. 13 dBm Autonomia Circa 10 metri (può variare a seconda dell'ambiente) Intervallo di frequenza 2,402 GHz – 2,480 GHz Profili BLUETOOTH A2DP (Profilo di distribuzione audio avanzata, AVRCP(Profilo telecomando audio/video)) Line-In Presa jack da 3,5 mm Amplificatore Potenza in uscita 2 x 7 Watt / 6 Ohm Intervallo di frequenza 20 Hz - 20 kHz (+- 3dB) Pesi e misure Unità principale (L x A x P) 180 x 122 x 240 mm / 1,6 kg Altoparlante (L x A x P) 128 x 227 x 127 mm / 0,9 kg per pezzo Intervallo di temperatura 0°C / +40°C
16. Garanzia
Gentile Cliente,
grazie per aver acquistato questo prodotto Kenwood. Se il prodotto presenta difetti di materiale o di lavorazione in normali condizioni di funzionamento, provvederemo ad eliminarli gratuitamente o a sostituire l'apparecchio secondo le seguenti disposizioni di garanzia.
Si prega di conservare questa scheda di garanzia in un luogo sicuro.
Kenwood garantisce questo prodotto per due anni dalla data di acquisto come da fattura o prova d'acquisto del rivenditore Kenwood. Questa garanzia copre i difetti dei materiali e di lavorazione. Ci riserviamo il diritto di sostituire il prodotto se una riparazione eseguita in economia non è più possibile. I costi per l'imballaggio e l'installazione, nonché i costi e i rischi connessi alla riparazione effettiva non sono inclusi nel servizio di garanzia e saranno fatturati.
Condizioni
A. Per far valere i diritti di garanzia, oltre alla presentazione della presente scheda di garanzia sono necessarie le seguenti informazioni:
(a) Nome e indirizzo completo
Kenwood si riserva il diritto di rifiutare il servizio di garanzia se le informazioni di cui sopra sono assenti o se sono state apportate modifiche al prodotto dalla data di acquisto.
B. Al momento della messa in commercio, questo prodotto è conforme a tutte le normative e le norme di sicurezza applicabili nel paese di destinazione. Eventuali modifiche necessarie per il funzionamento dell'apparecchio in paesi diversi da quello di destinazione non sono coperte dalle suddette condizioni di garanzia. Inoltre, non ci assumiamo alcuna responsabilità per lavori eseguiti in questo contesto o per danni al prodotto causati da tali lavori.
Se il prodotto viene utilizzato in un paese per il quale non è stato progettato e fabbricato, gli interventi in garanzia saranno effettuati solo se i costi per l'adeguamento dell'apparecchio alle norme nazionali e alle norme di sicurezza sono a carico dell'utente.
Inoltre, se il prodotto differisce dai prodotti venduti dall'importatore ufficiale e i pezzi di ricambio non sono disponibili per la riparazione di questo prodotto, l'utilizzatore deve sostenere le spese di trasporto del dispositivo da e verso il paese di acquisto.
Lo stesso vale se non è possibile offrire servizi di garanzia nel paese in questione per altri motivi giustificati.
C. Sono esclusi dalla garanzia:
(a) Modifiche al prodotto, nonché i normali lavori di manutenzione e di regolazione, compresi i controlli periodici menzionati nelle istruzioni per l'uso.
Questa garanzia è disponibile per tutte le persone che hanno acquistato legalmente il prodotto.
In conformità con le condizioni di garanzia di cui sopra, il prodotto sarà riparato o sostituito gratuitamente. Questo diritto non pregiudica in alcun modo gli altri diritti dell'utente nell'ambito delle disposizioni di legge applicabili.
La riparazione o la sostituzione non proroga il periodo di garanzia.
Sono escluse ulteriori rivendicazioni, in particolare le richieste di conversione, riduzione o risarcimento danni.
Indirizzo di contatto :
JVCKENWOOD ITALIA S.p.A.
Via G. Sirtori 7/9, 20129 Milano
Tel. +39(02)204821
www.kenwood.it info@it.jvckenwood.com
KENWOOD
KENWOOD
Compact stereosysteem
M-525DAB
GEBRUIKSAANWIJZING
JVCKENWOOD Corporation
Inhoudsopgave
Inhoud Pagina
Vóór de ingebruikname / veiligheidsinstructies 3
Ingebruikname 6
Componenten en functies 7
Bediening van de radio 9
4.1 In-/uitschakelen (stand-by) 9
Digitale radio DAB+ 11
5.1 Afstemming van de zenders 11
FM-radio 12
6.1 Instellen van een FM-zender 12
CD afspelen 13
7.1 Afspelen van MP3-bestanden 14
USB-speler 14
8.1 Afspelen van MP3-bestanden 14
BLUETOOTH audio 15
9.1 Voor het eerst koppelen van BLUETOOTH apparaten (Pairing) 15
Line-In 15
Fabrieksinstelling 15
Oplossing van storingen 16
Onderhoud en zorg 16
Afvalverwerwijdering 17
Technische gegevens 18
Garantie 19
1. Vóór het inschakelen van de spanningsvoorziening
BELANGRIJKE VEILIGHEIDSINSTRUCTIES
Let op: Lees deze pagina aandachtig door om de veilige werking van het apparaat te garanderen.
Opmerkingen aandachtig lezen!
- Geef gevolg aan alle veiligheids- en bedieningsinstructies wanneer u dit product in gebruik neemt.
Instructies zorgvuldig bewaren!
- U dient de veiligheids- en bedieningsinstructies te bewaren om ze later te kunnen raadplegen.
Alle waarschuwingsinstructies in acht nemen!
- U dient aan alle aan het product aangegeven en in de gebruiksaanwijzing vermelde waarschuwingen strikt gevolg te geven.
Alleen met een droge doek reinigen!
- Trek de netstekker van dit apparaat uit de wandcontactdoos voordat u dit product reinigt. Gebruik nooit vloeibare reinigingsmiddelen of reinigingssprays. Gebruik voor de reiniging alleen een lichtjes bevochtigde doek.
Accessoires
- Gebruik alleen de door de fabrikant aangegeven accessoires.
Gebruik dit apparaat niet in de nabijheid van water
- Het apparaat mag nooit aan waterdruppels of –spatten blootgesteld worden – zoals bijvoorbeeld in de nabijheid van een badkuip, een wastafel, een aanrecht in de keuken, een wasmachine, in een vochtige kelderruimte of in de nabijheid van een zwembad, enz. Zet nooit met vloeistoffen gevulde houders, zoals bv. bloemenvazen, op het apparaat.
Ventilatie
- Sleuven en openingen in de behuizing dienen voor de verluchting van het apparaat, om de betrouwbare werking van het apparaat veilig te stellen en om het apparaat tegen oververhitting en een mogelijke zelfontbranding te beschermen. Blokkeer de ventilatieopeningen niet. Installeer het apparaat in overeenstemming met de door de fabrikant verstrekte gegevens. Blokkeer nooit de ventilatieopeningen doordat u het apparaat op een bed, bank, tapijt of een al even zachte onderlaag zet. Dit apparaat mag niet in een boekenrek of inbouwkast ingebouwd worden wanneer er niet voor voldoende ventilatie gezorgd is.
Spanningsvoorziening
- Dit apparaat mag alleen aangesloten worden op de netspanning die aan het apparaat aangegeven is. Als u niet zeker bent van het type van de spanningsvoorziening in uw woning, richt u zich tot uw dealer of tot het lokale energiebedrijf.
Netsnoer
- Zorg ervoor dat men niet over het netsnoer kan struikelen en het snoer niet in de onmiddellijke nabijheid van een contactdoos, waaronder ook bijkomende contactdozen, afgekneld wordt. Ook aan de uitlaat aan het apparaat mag het netsnoer in geen geval geplet worden.
Omdat de netstekker gebruikt wordt voor het loskoppelen van het stroomnet moet de netstekker aan het netsnoer gelaten worden en permanent toegankelijk blijven.
Onweer
- Het apparaat van het stroomnet verbreken bij onweer en wanneer het langere tijd niet gebruikt wordt.
Overbelasting
- Overbelast nooit wandcontactdozen, verlengsnoeren of meervoudige contactdozen, omdat anders het gevaar voor brand of elektrische schokken bestaat.
Binnendringen van vreemd materiaal en vloeistof
- Let erop dat er nooit vreemd materiaal of vloeistof door ventilatieopeningen dit apparaat binnendringt, omdat het anders tot contact met onder hoe spanning staande componenten dan wel tot een kortsluiting met de daaruit voortvloeiende brand of elektrische schok kan komen. Mors nooit vloeistoffen van eender welke aard op dit apparaat.
Onderhoud
- Tracht nooit zelf, het onderhoud van dit apparaat uit te voeren, omdat door de openingen of door het verwijderen van afdekkingen onder spanning staande onderdelen vrij gelegd kunnen worden. De aanraking van deze onderdelen kan immers gevaren met zich meebrengen. Laat alle onderhoudswerkzaamheden over aan gekwalificeerd klantenservicepersoneel.
Beschadigingen die een reparatie vereisen
- Onderhouds- en reparatiewerkzaamheden alleen door een gekwalificeerde klantenservice laten uitvoeren.
Een onderhoud/reparatie is noodzakelijk als het apparaat beschadigd werd (bv. het netsnoer of de stekker), als er vloeistof in het apparaat gelopen is, als voorwerpen het apparaat binnengedrongen zijn, als het apparaat aan regen of vocht blootgesteld werd, als het niet meer perfect functioneert of als het neergevallen is.
Wisselstukken
- Wanneer er wisselstukken benodigd worden, overtuigt u er zich van dat de klantenservicetechnicus wisselstukken gebruikt die door de fabrikant voorgeschreven zijn of die dezelfde eigenschappen als de originele onderdelen hebben. Niet-toelaatbare wisselstukken kunnen tot brand, elektrische schokken of andere ongevallen leiden.
Veiligheidscontrole
- Verzoek de klantenservicetechnicus na de beëindiging van onderhouds- of reparatiewerkzaamheden aan dit apparaat om de uitvoering van een veiligheidscontrole om vast te stellen, of het apparaat zich in een perfecte operationele toestand bevindt.
Warmte
- Installeer het apparaat niet in de nabijheid van hete oppervlakken zoals bv. radiatoren, straalkachels, ovens of andere apparaten (versterkers inbegrepen) die heet kunnen worden. Stel nooit objecten met open vlammen, zoals kaarsen of lantaarns, op of in de buurt van het apparaat op. De in de afstandsbediening geïnstalleerde batterijen mogen niet aan felle hitte, zoals direct zonlicht, vuur of dergelijke, blootgesteld worden.
Batterijen
- Als u het apparaat een maand of langer niet gebruikt, verwijdert u de batterijen uit het batterijvak van de afstandsbediening om te verhinderen dat de batterijen zouden uitlopen. Voer uitlopende batterijen onmiddellijk vakkundig en met inachtneming van alle relevante wettelijke voorschriften af. Uitlopende batterijen kunnen letsels veroorzaken en het apparaat beschadigen. Combineer nooit batterijen van een verschillend type of oude met nieuwe batterijen.
Om het risico op een elektrische schok, brand etc. tot een minimum te herleiden
Verwijdert u geen schroeven, afdekkingen of onderdelen van de behuizing.
De inschakelknop verbreekt de stroomtoevoer in geen enkele stand volkomen.
Risico's in combinatie met hoge volumes
- Om mogelijke gehoorschade te voorkomen, luistert u niet gedurende langere perioden met een hoog volume.
Afstandsbediening
- Als u de afstandsbedieningssensor aan direct zonlicht of aan het licht van fluorescentielampen blootstelt, kan het tot functiestoringen komen. In dergelijke gevallen dient u het systeem op een andere plaatste installeren om dergelijke functiestoringen te vermijden.
- De bijgeleverde batterij is berekend op een functionele controle en kan een beperkte levensduur hebben. Wanneer de reikwijdte van de afstandsbediening afneemt, vervangt u de oude batterij door een nieuwe.
Opgepast!
Explosiegevaar
als er batterijen van het verkeerde type gebruikt worden;
hoge of lage extreme temperaturen, waaraan een batterij tijdens het gebruik, de opslag of het transport blootgesteld kan zijn;
lage luchtdruk op grote hoogte;
als er een batterij in vuur of in een hete oven gegooid worden;
bij het mechanisch pletten of snijden van een batterij;
als een batterij in een omgeving met extreem hoge temperaturen gelaten wordt of bij een extreem lage luchtdruk, hetgeen tot een ontploffing of tot het vrijkomen van brandbare vloeistoffen of gassen kan leiden.
Automatische energiebesparingsfunctie
Het model is met een automatische energiebesparingsfunctie uitgerust. Deze schakelt het apparaat binnen 15 minuten in de modus "Stand-by" wanneer de weergave met een zeer gering volume plaatsvindt resp. wanneer de radio stil afgestemd is. Deze instelling kan niet gewijzigd worden.
BELANGRIJK VOOR LASERPRODUCTEN
LASERPRODUCT VAN DE KLASSE 1
OPGEPAST: Niet de behuizing openen. Het apparaat bevat geen onderdelen die door de gebruiker onderhouden kunnen worden; onderhoudsbeurten alleen door gekwalificeerd vakpersoneel laten uitvoeren.
Hiermee verklaart de JVCKENWOOD Corporation dat de radio-installatie van het type M-525DAB aan de richtlijn 2014/53/EU voldoet. De volledige tekst van de EU-conformiteitsverklaring is op volgende website beschikbaar: http://www.kenwood.com/euukdoc/
Fabrikant:
JVCKENWOOD Corporation
3-12. Moriyacho, Kanagawa-ku, Yokohama-shi, Kanagawa 221-0022, JAPAN
Gemachtigde (EU):
JVCKENWOOD EUROPE B.V., Amsterdamseweg 37, 1422 AC UITHOORN, THE NETHERLANDS
2. Ingebruikname
2.1 Uitpakken
Pak het apparaat voorzichtig uit en let erop dat alle accessoires aanwezig zijn:
• Infrarood-afstandsbediening
2.2 Aansluiten
- Open het batterijvak van de afstandsbediening en breng de batterijen met de juiste polariteit aan.
De vooropgestelde polariteit (+/-) is in het batterijvak aangegeven.
Verbind de linkse en rechtse luidspreker met de aansluiting (Speaker Out) aan de achterzijde van het apparaat. Druk daarvoor op de veerklemmen en steek de losse kabeluiteinden in de daarvoor voorziene openingen. Daarbij de zwarte leidingdraad met de zwarte veerklem verbinden. De andere leidingdraad wordt daarvoor analoog met de rode klem verbonden.
text_image
Luidsprekerkabel
Zwart
R L
Zwart/Grijs
Sluit de netstekker vast op een wisselstroomcontactdoos aan. Omdat de netstekker gebruikt wordt voor het volledig loskoppelen van het stroomnet moet de contactdoos permanent toegankelijk blijven.
2.3 DAB+ / FM antenneaansluiting
Sluit de werpantenne op de bus [ANTENNA 75Ω] aan.
Zoek de plaats, waar de beste ontvangst bereikt wordt.
Zet de antenne vast.
Bij de met het systeem geleverde antenne gaat het om een gewone werpantenne. Voor een stabiele signaalontvangst wordt het gebruik van een (in de handel verkrijgbare) buitenantenne aanbevolen. Trek voor de aansluiting van een buitenantenne in eerste instantie de kamerantenne af. De ontvangst van radiozenders uit het kabelnetwerk kan niet gegarandeerd worden.
3. Componenten en functies
text_image
1
2
3
4
5
6
7
8
9
10
11
12
13
MODE MENU CLOCK ALARM
REPEAT SHUFFLE SLEEP BT PAIR
PRESET-
ALBUM-
VOL+
OK
VOL-
EQ
PROG INFO
FAV INTRO
KENWOOD
1 2 3
4 5 6
7 8 9
20
21
14
15
16
17
18
19
22
1 Stand-by "Aan" / "Uit"
3. Componenten en functies vervolg
Voorzijde
1 - Stand-by "Aan" / "Uit"
text_image
KENWOOD
VOLUME +
SELECT
LINE IN
Bluetooth® dob+
Bovenaanzicht
flowchart
graph TD
    A["7"] --> B["8"]
    B --> C["9"]
    C --> D["10"]
    D --> E["○"]
    E --> F["12"]
Achterzijde
1 - Antenne-ingang
text_image
1
2
R L
SPEAKER OUT (EQ)
(7)Ω
PARTAR
ANTenna
CLASS 1
LASER PRODUCT
CAUTION
RISK OF ELECTRIC SHOCK
DO NOT OPEN
100-240V-50/60Hz
AC MAINS -
S/N: L
4. Bediening van de radio
4.1 In- / uitschakelen (stand-by)
Druk op de stand-by toets aan het apparaat of op de afstandsbediening om de radio in te schakelen. Druk opnieuw op de toets om het apparaat in de stand-by modus te zetten. Om de radio uit te schakelen, koppelt u de radio van het stroomnet.
Druk op de toets
op de afstandsbediening om het aan de bron gerelateerde menu op te roepen. Door het indrukken van de toets of aan het apparaat of op de afstandsbediening kunt u in de menu's navigeren. Bevestigd wordt de menuselectie met de toets op de afstandsbediening of met de toets aan het apparaat. Ga bij de selectie van instellingen analog te werk.
4.3 Volume aanpassen
Door aan de volumeregelaar te draaien, kunt u het volume aanpassen. Op de afstandsbediening kut u daarvoor de toetsen en gebruikt worden. De volume-instelling wordt grafisch op het display aangegeven.
4.4 Klank instellen (equalizer)
Het systeem heeft vijf vooraf ingestelde klankinstellingen:
"FLAT" / "KLASSIEK" / "POP" / "JAZZ" / "ROCK".
Deze kunnen met de toets op de afstandsbediening geselecteerd worden.
Door het herhaaldelijk indrukken van de toets kan er, afhankelijk van bron en zender, bijkomende informatie weergegeven worden:
Beschrijving
Naam van de zender, van het actuele programma, inhoud, thema's etc..
Genre
Kanaalinformatie
Huidige datum en actueel tijdstip
Schakel de radio in en roep het menu op.
Selecteer het menu "System" en bevestig de selectie.
Nu het menu "Language" selecteren en vervolgens bevestigen.
In het volgende menu de gewenste taal selecteren en bevestigen.
4.7 Instellen van tijd en datum
Bij de ontvangst van een DAB+ of FM-zender in voldoende kwaliteit wordt het uur automatisch ingesteld. Afhankelijk van de ontvangststerkte neemt dit proces enige tijd in beslag. Indien er geen passende zender ter beschikking staat, kunt u het uur ook handmatig instellen:
Schakel de radio in en roep het menu op.
Selecteer het menu "System" en bevestig de selectie.
Nu het menu "Time" selecteren en vervolgens bevestigen.
"Set Time/Date" selecteren en bevestigen. Daarna uren, minuten, dag, maand en jaar selecteren, instellen en bevestigen.
Het menu "Time" kan ook via de toets op de afstandsbediening opgeroepen worden.
Volgende functies kunnen in het menu "Time" ingesteld worden:
"Auto Update": Instelling van welke bron de tijd automatisch opgevraagd wordt.
Keuzemogelijkheden: "Update from Any" / "Update from DAB" / "Update from FM" / "No update"
"Set 12/24 hour": Instelling van het tijdformaat.
Keuzemogelijkheden: "Set 24 hour" / "12 hour"
"Set date format": Instelling van het datumformaat.
Keuzemogelijkheden: "DD-MM-JJJJ" / "MM-DD-JJJJ"
4.8 Instellen van de displayverlichting
De displayverlichting kan in 3 helderheidstrappen geprogrammeerd worden. Volgende instellingen kunnen in het menu "Backlight" doorgevoerd worden:
"Timeout": Tijd, tot wanneer het display tot op de verlichtingstrap in de "Dim level" geregeld wordt.
Keuzemogelijkheden: "On / 10 / 20 / 30 / 45 / 60 / 90 / 120 / 180 seconds"
"On" betekent dat de radio altijd in de helderheidstrap van de "On level" blijft.
"On level": Helderheid van het display wanneer de radio ingeschakeld wordt.
Keuzemogelijkheden: "High" / "Medium" / "Low"
"Dim level": Helderheidsinstelling voor werking en stand-by.
Keuzemogelijkheden: "High" / "Medium" / "Low"
4.9 Instellen van de Sleeptimer
De sleeptimer wordt gebruikt om de radio na een vooraf ingestelde tijdspanne automatisch uit te schakelen. Gelieve voor de instelling als volgt te werk te gaan:
Schakel de radio in en roep het menu op.
Selecteer het menu "System" en bevestig de selectie.
Nu het menu "Sleep" selecteren en vervolgens bevestigen.
Gelieve vervolgens uit volgende mogelijkheden een keuze te maken: "Off, 15, 30, 45, 60, 90 Minutes" Daarna deze instelling bevestigen.
In de onderste regel van het display wordt de resterende tijd tot het uitschakelen aangegeven.
Wenst u de Sleepimer te deactiveren, dan selecteert u de tijdinstelling "Off".
Het menu "Sleep" kan ook via de toets op de afstandsbediening opgeroepen worden.
4.10 Instellen van de wekker
Bij dit apparaat kunnen er 2 verschillende welktijden ingesteld worden. Deze wektijden kunnen voor volgende tijdsblokken geprogrammeerd worden: "Daily" / "Once" / "Weekend" / "Weekdays"
Gelieve voor de instelling van de wektijd als volgt te werk te gaan:
Schakel de radio in en roep het menu op.
Selecteer het menu "System" en bevestig de selectie.
Nu het menu "Alarm" selecteren en vervolgens bevestigen.
"Alarm 1 setup" wordt aangegeven. U kunt nu de wektijd 1 instellen of met de toets of naar de wektijd 2 omschakelen ("Alarm 2 setup").
Gelieve na de bevestiging volgende stappen uit te voeren:
Instelling van uren en minuten, de selectie telkens bevestigen.
Instelling van de wekduur ("15, 30, 45, 60, 90 Minutes").
Vervolgens als bron DAB, FM, CD, USB of Buzzer selecteren en bevestigen.
"Last listened" of andere geheugenplaats selecteren en bevestigen.
Dit menupunt verschijnt alleen wanneer als bron DAB of FM gekozen werd.
In het volgende menu de frequentie met "Daily / "Once" / "Weekend" / "Weekdays" selecteren en bevestigen.
Daarna het inschakelvolume met de toetsen en selecteren en bevestigen.
Wekker "On" of "Off" selecteren en bevestigen.
De wektijd is nu opgeslagen en er verschijnt een wekkersymbool bij weergave en stand-by onderaan links op het display.
Voor de instelling van de 2e. wektijd gaat u analoog te werk. Om een ingestelde wekker te wissen, kiest u bij de laatste stap van de instelling "Alarm clock off", of houdt u de toets 2 seconden lang ingedrukt.
De wekker schakelt op het aangegeven tijdstip voor de ingestelde duur in, het wekkersymbool knippert daarbij op het display.
Het menu "Alarm" kan ook via de toets op de afstandsbediening opgeroepen worden.
5. Digitale radio DAB+
Om de digitale radio DAB+ te ontvangen, schakelt u met de toets op de afstandsbediening of aan het apparaat naar de bron "DAB" om. Bij de eerste omschakeling wordt er een automatische afstemming van de zenders gestart. Op het display verschijnt "Scanning", het aantal tot nu toe gevonden zenders en een overeenkomstige voortgangsbalk. Ontvangststerkte en stereo-ontvangst van de zenders worden op het display aangegeven.
5.1 Afstemming van de zenders
Om naar ontvangbare zenders te zoeken, kunt u een automatische afstemming van de zenders starten. Roep daarvoor met de toets
het menu op en kies "Full Scan". Op het display verschijnt "Scanning, het aantal tot nu toe gevonden zenders en een overeenkomstige voortgangsbalk. Daarna zijn de zenders in alfabetische volgorde opgeslagen.
Zenders die bij een vorige afstemming van de zenders gevonden worden, maar op het gegeven moment niet te ontvangen zijn, worden in de zenderlijst met een "?" vóór de zendernaam aangegeven.
5.2 Handmatig instellen
U kunt ensembles ook handmatig instellen. Roep daarvoor met de toets
het menu op en selecteer "Manual tune". Daarna het gewenste kanaal selecteren en met bevestigen. Nu wordt er informatie over het ensemble en wordt de signaalsterkte aangegeven. Door nogmaals te drukken op de toets worden de betreffende zenders in de lijst opgeslagen.
5.3 Zenderlijst
Gebruik de toets of aan het apparaat of op de afstandsbediening om een zender te selecteren en druk op ter bevestiging. Het apparaat begint automatisch met de weergave.
Opmerking: De ontvangstkwaliteit van een zender is van factoren zoals weer, opstellingsplaats en antenne-oriëntering afhankelijk. Indien een zender uit de zenderlijst niet ontvangbaar is, wijzigt u de
oriëntatie van de antenne of de plaats van opstelling van de radio.
Niet meer ontvangbare zenders kunnen uit de zenderlijst verwijderd worden.
5.4 Niet (meer) ontvangbare zenders wissen
Zenders die niet meer ontvangen kunnen worden, kunnen uit de lijst gewist worden. Druk daarvoor op de toets
en selecteer "Prune". Selecteert u "Yes", dan worden deze zenders gewist. Door het selecteren van "No" wordt u weer naar het menu geleid, zonder de zenders te wissen.
5.5 Favorieten (geheugenplaatsen)
Om DAB+ zenders op te slaan, staan er 30 geheugenplaatsen (favorieten) ter beschikking. Om opgeslagen zenders op te vragen, drukt u op de toets en selecteert u de gewenste geheugenplaats door het indrukken van of en vervolgens .
De geheugenplaatsen 1 - 10 kunnen ook via de cijfertoetsen van de afstandsbediening geselecteerd worden, waarbij de toets <0> met de geheugenplaats 10 overeenstemt.
5.5.1 Opslaan van DAB+ zenders
Om DAB+ zenders op te slaan, gaat u als volgt te werk:
Selecteer de zender die op één van de 30 geheugenplaatsen opgeslagen dient te worden.
Houd de toets zolang ingedrukt totdat "Preset store" op het display verschijnt.
Kies de gewenste geheugenplaats en druk vervolgens op .
Op het display verschijnt "Preset XX stored" waarbij "XX" met het nummer van de gekozen geheugenplaats overeenstemt.
Opmerking: De geheugenplaatsen kunnen niet gewist worden, er kan alleen met andere zenders over geschreven worden.
Druk op de toets
om het met de bron gerelateerde menu op te roepen. Volgende functies zijn beschikbaar:
• Full scan: Nieuwe automatische afstemming van zenders.
- Prune: Daardoor worden ongeldige of niet meer ontvangbare stations uit de stationslijst gewist.
- System: Instellingen voor Sleepimer, wekker, tijdstip, verlichting, taal, software-updates en fabrieksinstelling.
6. FM-radio
Om FM te ontvangen, schakelt u met de toets op de afstandsbediening of aan het apparaat naar de bron "FM" om.
6.1 Instellen van een FM-zender
Druk op de toets om de ontvangstfrequentie te verhogen.
Druk op de toets om de ontvangstfrequentie te verlagen.
Wanneer u één van deze toetseningedrukt houdt, start er een automatische zender-zoekfunctie die bij het volgende gevonden station stopt.
- Druk op de toets om een automatische zenderopslag te starten. Alle gevonden stations worden in het zendergeheugen opgeslagen.
RDS-functies
Volgende informatie kan opgevraagd worden door de toets herhaaldelijk in te drukken:
PTY (Programmatype) / RDS radiotekst / Frequentie / Stereo-ontvangst / Tijdstip / Datum
Bij ontoereikende ontvangstomstandigheden kan de ontvangst van deze informatie gestoord of niet mogelijk zijn.
6.2 Opslaan van stations in het zendergeheugen
Om FM-zenders op te slaan om ze gemakkelijker te vinden, staan er 30 geheugenplaatsen ter beschikking.
Gelieve voor de opslag als volgt te werk te gaan:
Selecteer de zender die op één van de 30 geheugenplaatsen opgeslagen dient te worden.
Houd de toets zolang ingedrukt totdat "Preset store" op het display verschijnt
Kies de gewenste geheugenplaats en druk vervolgens op .
Op het display verschijnt "Preset XX stored" waarbij "XX" met het nummer van de gekozen geheugenplaats overeenstemt.
Opmerking: De geheugenplaatsen kunnen niet gewist worden, er kan alleen met andere zenders over geschreven worden.
Druk op de toets
om het met de bron gerelateerde menu op te roepen. Volgende functies zijn beschikbaar:
Scan settings: "All stations" of "Strong stations only".
Audio setting: "Stereo allowed" of "Forced mono". Kies "Forced mono" bij slechte ontvangstomstandigheden.
System: Instellingen voor Sleepimer, wekker, tijdstip, verlichting, taal, software-updates en fabrieksinstelling.
7. CD afspelen
Via de bron "CD" kunt u audio-CD's en MP3-CD's afspelen. Schakel daarvoor met de toets op de afstandsbediening of aan het apparaat naar de bron "CD" om.
Open het CD-vak door het indrukken van de toets aan het hoofdapparaat of op de afstandsbediening. Leg de CD in en sluit het vak door het indrukken van . De weergave begint automatisch met de eerste titel van de CD. Door het indrukken en ingedrukt houden van de toets op de afstandsbediening kunt u de titels van de CD even laten afspelen.
Bij audio-CD's wordt de informatie over het aantal titels en totale speelduur als volgt aangegeven:
TX/XX XX:XX
Daarbij staat het eerste cijferblok voor het aantal titels en het tweede voor de totale speelduur van de CD. Bij de weergave wordt het nummer van de op het gegeven moment afgespeelde titel en de tot dan toe verstreken tijdspanne weergegeven.
7.1 Afspelen van MP3-bestanden
Via de toets of kunt u in de mapstructuren navigeren. Met de toets wordt de weergave gepauzeerd en voortgezet. Door het permanent indrukken van de toetsen kan er binnen de titel met toenemende snelheid vooruit en achteruit gespoeld worden. Door even te drukken op geraakt men tot het begin van de titel of tot de vorige titel.
Bij CD's die MP3-bestanden bevatten, wordt het aantal beschikbare mappen en bestanden als volgt aangegeven:
FX/XX TXX/XX
Daarbij staat het cijfer achter "F" voor het aantal mappen en het tweede cijferblok voor het totaalaantal "T" bestanden.
7.2 Willekeurige weergave en herhaling
Om titels van een CD of MP3-bestanden in een map in willekeurige reeksen (at random) weer te geven of om de weergave van de bestanden te herhalen, gebruikt de toets of op de afstandsbediening. Door het herhaaldelijk indrukken, worden de functies als volgt geactiveerd:
Herhaling :
1 x indrukken: Herhaling titel / 2 x indrukken: Herhaling album (alleen bij MP3)
3 x indrukken: Herhaling allemaal / 4 x indrukken: Uit
Willekeurige weergave :
1 x indrukken: Willekeurige weergave Aan / 2 x indrukken: Willekeurige weergave Uit
8. USB-Abspieler
Via deze bron kunt u MP3-bestanden (16Bit/48kHz) van een USB-stick afspelen. Schakel daarvoor met de toets op de afstandsbediening of aan het apparaat naar de bron "USB" om.
8.1 Afspelen van MP3-bestanden
Via de toets of kunt u in de mapstructuren navigeren. Met de toets wordt de weergave gepauzeerd en voortgezet. Door het permanent indrukken van de toetsen kan er binnen de titel met toenemende snelheid vooruit en achteruit gespoeld worden. Door even te drukken op geraakt men tot het begin van de titel of tot de vorige titel.
Bij CD's die MP3-bestanden bevatten, wordt het aantal beschikbare mappen en bestanden als volgt aangegeven:
FX/XX TXX/XX
Daarbij staat het cijfer achter "F" voor het aantal mappen en het tweede cijferblok voor het totaalaantal "T" bestanden.
8.2 Willekeurige weergave en herhaling
Om MP3-bestandeen in een map in willekeurige reeksen weer te geven of om de weergave van de bestanden te herhalen gebruikt u de toets of op de afstandsbediening.
Door het herhaaldelijk indrukken, worden de functies als volgt geactiveerd:
Herhaling :
1 x indrukken: Herhaling titel / 2 x indrukken: Herhaling album
3 x indrukken: Herhaling allemaal / 4 x indrukken: Uit
Willekeurige weergave :
1 x indrukken: Willekeurige weergave Aan / 2 x indrukken: Willekeurige weergave Uit
9. BLUETOOTH audio
De BLUETOOTH-functie laat de draadloze overdracht van muziekbestanden (Audio Streaming) aan de radio toe. Er kunnen smartphones, tablets of gelijkaardige apparaten gekoppeld worden. Schakel daarvoor met de toets op de afstandsbediening of aan het apparaat naar de bron "BT" om.
9.1 Eerste koppeling van BLUETOOTH-apparaten (Pairing)
Vergewis u ervan dat het te koppelen eindapparaat ingeschakeld en BLUETOOTH geactiveerd is. Op het display verschijnt "Not connected". Open nu de BLUETOOTH-instellingen op het te koppelen eindapparaat en start daar het zoeken naar beschikbare BLUETOOTH-apparaten. Selecteer "M-525DAB" en start het koppelingsproces. Nadat het Pairing voltooid werd, verschijnt op het display "Connectet". Nu kan de muziekweergave via het eindapparaat gestuurd worden. Gebruik daarvoor een muziek-app naar keuze.
De basisbediening van weergave/pauze en titelsprong is via de betreffende toetsen op de afstandsbediening mogelijk.
Opmerking: Sommige eindapparaten vereisen bij de koppeling een PIN-code, voer dan "0000" in.
9.2 Automatische verbinding na reeds plaatsgevonden koppeling
Wanneer er vanuit de bron "BT" omgeschakeld of de radio uitgeschakeld wordt, wordt de BLUETOOTH verbinding verbroken. Wordt de radio weer ingeschakeld of omgeschakeld naar de bron "BT".
9.3 Nog een ander eindapparaat koppelen
Om nog een ander eindapparaat met de radio te koppelen, de volgende toets indrukken en ingedrukt houden: . Daardoor wordt de actuele verbinding verbroken. Ga nu zoals bij de eerste koppeling van een eindapparaat te werk.
9.4 Onderbreken van de BLUETOOTH-verbinding
Wenst u de verbinding met een gekoppeld apparaat te onderbreken, dan de volgende toets indrukken en ingedrukt houden: op de afstandsbediening. De radio schakelt dan weer om naar de koppelingsmodus.
10. Line-In
Voor de weergave van muziek kunnen er op de Line-In aansluiting externe apparaten, zoals bv. MP3-Player, DVD-Player of spelconsoles, aangesloten worden. Schakel daarvoor met de toets op de afstandsbediening of aan het apparaat naar de bron "Line In" om.
11. Fabrieksinstelling
Gelieve, om de radio terug in de toestand bij levering te brengen, "Yes" in het menu "Factory Reset". Let op: Alle voordien doorgevoerde instellingen worden gewist.
Bij de selectie van "No" wordt het proces voortijdig beëindigd.
12. Oplossing van storingen
Gelieve bij functiestoringen de volgende punten te controleren:
Geen klank
→ Steek de stekkernetvoeding correct in.
Het systeem reageert niet op het indrukken van een toets
→ Trek de netstekker uit de wandcontactdoos en sluit de netstekker weer aan.
Problemen bij de radio-ontvangst
→ Positioneer de antenne opnieuw.
13. Onderhoud en zorg
Reiniging van de behuizing
Gebruik een met een mild reinigingsmiddel lichtjes bevochtigde doek. Gebruik geen reinigingsmiddelen die alcohol, ammoniak of schuurmiddel bevatten.
Waarschuwingsinstructies betreffende de vorming van condensatie
Condensatie (dauw) kan binnenin het apparaat tot ontwikkeling komen als er tussen de temperatuur van het apparaat en de omgevingstemperatuur een wezenlijk verschil bestaat. Indien er zich binnenin het apparaat consensatie voordoet, is een perfecte werking niet meer gegarandeerd. In dit geval moet er enkele uren lang gewacht worden; nadat de vochtigheid gedroogd is, kan het apparaat weer gebruikt worden.
In volgende omstandigheden moet men uiterst voorzichtig te werk gaan
Wanneer het apparaat verplaatst wordt van de ene naar de andere plaats, waar er een beduidend hogere of lagere temperatuur heerst, of wanneer de luchtvochtigheid op de plaats van opstelling van het apparaat toeneemt, enz.
Hantering van CD's
Houd de CD zodanig vast, dat u het signaaloppervlak niet aanraakt. (De onbedrukte zijde is de afspeelzijde.)
Gebruik uitsluitend CD's met de COMPACT DISC marking. Een CD zonder deze marking kan soms niet naar behoren weergegeven worden.
Aanwijzingen voor het gebruik van een USB-apparaat
Dit apparaat is in staat om op een flashgeheugen of digitale Audio-Player opgeslagen audiobestanden weer te geven als deze apparaten over een USB-poort beschikken (dit document worden deze apparaten als USB-apparaten bestempeld).
Met betrekking tot de bruikbare USB-apparaten gelden volgende beperkingen:
Bruikbare USB-apparaten
USB-apparaten die tot de USB-massageheugenklasse behoren.
USB-apparaten, wier maximale stroomopname hoogstens 500 mA bedraagt.
USB-massageheugenklasse: USB-apparaten die de PC als extern geheugen detecteert zonder dat er speciale driver of zonder dat er speciale toepassingssoftware noodzakelijk zou zijn.
Gelieve uw dealer te raadplegen als u er niet zeker van bent, of uw USB-apparaat met de specificaties voor de USB-massageheugenklasse overeenstemt.
Het gebruik van een USB-apparaat dat niet ondersteund wordt, kan tot een verkeerde weergave of indicatie van het audio-bestand leiden.
Zelfs als u een USB-apparaat gebruikt dat aan de hoger vermelde specificaties voldoet, kunnen audiobestanden, afhankelijk van type of toestand van het USB-apparaat soms niet perfect weergegeven worden.
14. Afvalverwerwijdering
Afvoer van gebruikte elektrische en elektronische apparaten en batterijen.
Het symbool (doorgestreepte vuilnisbak) op het product of op de verpakking daarvan wijst erop dat dit product op het einde van de levensduur daarvan niet als normaal huisvuil behandeld mag worden, maar op een inzamelpunt van een publiekrechtelijke, voor de afvalverwijdering bevoegde instantie of bij een door fabrikanten of distributeurs voorzien inzamelpunt gratis afgegeven moet worden.
Eigenaars van oude elektrische apparaten dienen oude batterijen en oude accumulatoren, die niet door het oude apparaat vast omsloten zijn, in principe vóór afgifte op het inzamelpunt van het oude apparaat los te koppelen. Dit geldt niet voor zover oude apparaten in samenwerking met een publiekrechtelijke, voor de afvalverwijdering bevoegde instantie op de recyclage voorbereid worden. Door uw bijdrage aan een correcte afvoer van dit product beschermt u het milieu en de gezondheid van uw medemens. Een onvakkundige of verkeerde afvoer brengt milieu en gezondheid in gevaar. Bijkomende informatie over de recycling van oude elektrische apparaten en batterijen krijgt u van uw gemeentebestuur of van de gemeentelijke afvalverwerkende bedrijven.
Aanwijzingen voor consumenten in Duitsland met het oog op de afvalverwijdering: https://www.e-schrott-entsorgen.org/
Aanwijzingen voor consumenten in Oostenrijk met het oog op de afvalverwijdering: https://www.elektro-ade.at/
Het Bluetooth® woordmerk en logo's zijn geregistreerde merken van BLUETOOTH SIG Inc. en elk gebruik van deze merken door de firma JVCKENWOOD Corporation Vindt plaats onder licentie. Andere merken en handelsnamen zijn die van hun betreffende houders.
Technische gegevens M-525DAB
Spanningsvoorziening Wisselspanning ~ 100 – 240 V Ingangswisselstroomfrequentie 50/60 Hz Opnamecapaciteit 15 watt Opnamecapaciteit in de stand-by modus < 1 watt Tuner UKW/DAB+ DAB-afstembereik BAND III 174,928 MHz – 239,200 MHz FM-afstembereik 87,50 MHz – 108,00 MHz CD-modus Signaal-ruisverhouding (A-filter) ≥ 70 dB Dynamiekomvang ≥ 60 dB USB-apparaten Afspeelbare bestanden: MP3 Compatibel met USB1.1 Full-Speed, FAT16, FAT32 Max. 500 mA, transmissiesnelheden: 32 kBit/s tot 320 kBit/s BLUETOOTH BLUETOOTH versie V5.0 Vermogensklasse Klasse 2 Maximaal zendvermogen max. 13 dBm Reikwijdte ca. 10 meter (kan afhankelijk van omgeving afwijken) Frequentiegebied 2,402 GHz – 2,480 GHz BLUETOOTH profiel A2DP (Advanced Audio Distribution Profile, AVRCP (Audio/Video Remote Control Profile) Line-In 3,5 mm stekkerbus Versterkergedeelte Uitgangsvermogen 2 x 7 watt / 6 ohm Frequentiegebied 20 Hz - 20 kHz (+- 3dB) Afmetingen en gewichten Hoofdeenheid (B x H x D) 180 x 122 x 240 mm / 1,6 kg Luidspreker (B x H x D) 128 x 227 x 127 mm / 0,9 kg per stuk. Temperatuurbereik 0°C tot +40°C
16. Garantie
Geachte klant,
wij danken u voor de aankoop van dit Kenwood-product. Indien dit product in normale gebruiksomstandigheden materiaal- of afwerkingsfouten vertoont, zullen wij deze in overeenstemming met de hiernavolgende garantiebepalingen kosteloos verhelpen resp. het apparaat omruilen.
Gelieve deze garantiekaart zorgvuldig te bewaren.
Kenwood verleent op dit apparaat een garantie van twee jaar, te rekenen vanaf de datum van aankoop, volgens factuur of kassabon van de Kenwood-dealer.
Deze garantie heeft betrekking op gebreken van materiaal en afwerking. Wij behouden ons het recht voor, het product om te ruilen indien een economisch verantwoorde reparatie niet meer mogelijk is. Kosten voor verpakking en installatie alsook kosten en risico's in verband met de eigenlijke reparatie zijn niet in de garantie inbegrepen en worden in rekening gebracht.
Voorwaarden
A. Om garantieclaims in te dienen, zijn aanvullend op het vertoon van deze garantiekaart volgende gegevens noodzakelijk:
(a) Uw naam met volledig adres
Kenwood behoudt zich het recht voor, garantie te verlenen als de bovenstaande informatie ontbreekt of indien er sinds het moment, waarop het product verworven werd, wijzigingen aan het product doorgevoerd werden.
B. Op het tijdstip van de levering aan de handel voldoet dit product aan alle in het land van bestemming geldende normen en veiligheidsvoorschriften. Noodzakelijke aanpassingen voor de werking van het apparaat in landen buiten het land van bestemming vallen niet onder de hoger vermelde garantievoorwaarden. Bovendien kunnen wij niet aansprakelijk gesteld worden voor werkzaamheden in dit verband of voor beschadigingen aan het product die door dergelijke werkzaamheden ontstaan.
Wordt het product gebruikt in een land, waarvoor het niet ontwikkeld en gefabriceerd werd, dan worden werkzaamheden onder garantie slechts uitgevoerd wanneer de kosten voor ombouw van het apparaat naar nationaal geldende normen en veiligheidsvoorschriften door de gebruiker gedragen worden.
Onderscheidt het product zich bovendien van de door de officiële importeur gedistribueerde producten en zijn voor de reparatie van dit product noodzakelijke wisselstukken niet beschikbaar, dan moet de gebruiker de kosten voor het transport (heen en terug) van het apparaat in het land van aankoop dragen.
Hetzelfde geldt als er in het betreffende land om andere gegronde redenen geen garantievergoedingen aangeboden kunnen worden.
C. Een uitzondering op de garantievergoedingen vormen:
(a) Wijzigingen aan het product en normale onderhouds- en afstellingswerkzaamheden met inbegrip van de in de gebruiksaanwijzing vermelde regelmatige controles.
Op deze garantie kan beroep gedaan worden door iedereen die het product rechtmatig verworven heeft.
In overeenstemming met de bovenstaande garantievoorwaarden wordt het product kosteloos gerepareerd of omgeruild. Dit recht doet op geen enkele manier afbreuk aan overige rechten van de gebruiker in het kader van de geldende wettelijke bepalingen.
Reparatie of omruiling brengen geen verlenging van de garantieperiode met zich mee.
Verder reikende rechten, in het bijzonder die op koopvernietiging, vermindering of schadevergoeding, zijn uitgesloten.
JVCKENWOOD Europe B.V.
Amsterdamseweg 37, 1422AC - Uithoorn
Tel. 0297-519 900, www.kenwood.nl
KENWOOD